Pro T-SQL 2008 Programmer's Guide (Expert's Voice in SQL Server) 143021001X, 9781430210016
Discussing new and existing features, SQL Server designer and administrator Michael Coles takes you on an expert guided
157 33 8MB
English Pages 716 [671] Year 2008
Recommend Papers
![Pro T-SQL 2008 Programmer’s Guide [1 ed.]
9781430210016, 143021001X](https://ebin.pub/img/200x200/pro-t-sql-2008-programmers-guide-1nbsped-9781430210016-143021001x.jpg)


![Pro SQL Server 2008 Replication [2nd Edition]
9781430218081](https://ebin.pub/img/200x200/pro-sql-server-2008-replication-2nd-edition-9781430218081.jpg)
![Pro Full-Text Search in SQL Server 2008 [1 ed.]
1430215941, 9781430215943](https://ebin.pub/img/200x200/pro-full-text-search-in-sql-server-2008-1nbsped-1430215941-9781430215943.jpg)
- Author / Uploaded
- Michael Coles
File loading please wait...
Citation preview
Pro T-SQL 2008 Programmer’s Guide
Michael Coles
Pro T-SQL 2008 Programmer’s Guide Copyright © 2008 by Michael Coles All rights reserved. No part of this work may be reproduced or transmitted in any form or by any means, electronic or mechanical, including photocopying, recording, or by any information storage or retrieval system, without the prior written permission of the copyright owner and the publisher. ISBN-13 (pbk): 978-1-4302-1001-6 ISBN-13 (electronic): 978-1-4302-1002-3 Printed and bound in the United States of America 9 8 7 6 5 4 3 2 1 Trademarked names may appear in this book. Rather than use a trademark symbol with every occurrence of a trademarked name, we use the names only in an editorial fashion and to the benefit of the trademark owner, with no intention of infringement of the trademark. Java™ and all Java-based marks are trademarks or registered trademarks of Sun Microsystems, Inc., in the US and other countries. Apress, Inc., is not affiliated with Sun Microsystems, Inc., and this book was written without endorsement from Sun Microsystems, Inc. Lead Editors: Jonathan Gennick, Tony Campbell Technical Reviewer: Adam Machanic Editorial Board: Clay Andres, Steve Anglin, Ewan Buckingham, Tony Campbell, Gary Cornell, Jonathan Gennick, Matthew Moodie, Joseph Ottinger, Jeffrey Pepper, Frank Pohlmann, Ben Renow-Clarke, Dominic Shakeshaft, Matt Wade, Tom Welsh Project Manager: Kylie Johnston Copy Editor: Damon Larson Associate Production Director: Kari Brooks-Copony Production Editor: Elizabeth Berry Compositor: Lynn L’Heureux Proofreaders: Linda Seifert, April Eddy Indexer: Broccoli Information Management Artist: Kinetic Publishing Services, LLC Cover Designer: Kurt Krames Manufacturing Director: Tom Debolski Distributed to the book trade worldwide by Springer-Verlag New York, Inc., 233 Spring Street, 6th Floor, New York, NY 10013. Phone 1-800-SPRINGER, fax 201-348-4505, e-mail [email protected], or visit http://www.springeronline.com. For information on translations, please contact Apress directly at 2855 Telegraph Avenue, Suite 600, Berkeley, CA 94705. Phone 510-549-5930, fax 510-549-5939, e-mail [email protected], or visit http://www.apress.com. Apress and friends of ED books may be purchased in bulk for academic, corporate, or promotional use. eBook versions and licenses are also available for most titles. For more information, reference our Special Bulk Sales–eBook Licensing web page at http://www.apress.com/info/bulksales. The information in this book is distributed on an “as is” basis, without warranty. Although every precaution has been taken in the preparation of this work, neither the author(s) nor Apress shall have any liability to any person or entity with respect to any loss or damage caused or alleged to be caused directly or indirectly by the information contained in this work. The source code for this book is available to readers at http://www.apress.com.
For Devoné and Rebecca
Contents at a Glance About the Author . . . . . . . . . . . . . . . . . . . . . . . . . . . . . . . . . . . . . . . . . . . . . . . . . . . . . . . . . . . . . . . . xvii About the Technical Reviewer . . . . . . . . . . . . . . . . . . . . . . . . . . . . . . . . . . . . . . . . . . . . . . . . . . . . . . xix Acknowledgments . . . . . . . . . . . . . . . . . . . . . . . . . . . . . . . . . . . . . . . . . . . . . . . . . . . . . . . . . . . . . . . xxi Introduction . . . . . . . . . . . . . . . . . . . . . . . . . . . . . . . . . . . . . . . . . . . . . . . . . . . . . . . . . . . . . . . . . . . . xxiii
■CHAPTER 1 ■CHAPTER 2 ■CHAPTER 3 ■CHAPTER 4 ■CHAPTER 5 ■CHAPTER 6 ■CHAPTER 7 ■CHAPTER 8 ■CHAPTER 9 ■CHAPTER 10 ■CHAPTER 11 ■CHAPTER 12 ■CHAPTER 13 ■CHAPTER 14 ■CHAPTER 15 ■CHAPTER 16 ■CHAPTER 17 ■CHAPTER 18
iv
Foundations of T-SQL . . . . . . . . . . . . . . . . . . . . . . . . . . . . . . . . . . . . . . . 1 T-SQL 2008 New Features . . . . . . . . . . . . . . . . . . . . . . . . . . . . . . . . . 23 Tools of the Trade . . . . . . . . . . . . . . . . . . . . . . . . . . . . . . . . . . . . . . . . . . 61 Procedural Code and CASE Expressions . . . . . . . . . . . . . . . . . . 81 User-Defined Functions . . . . . . . . . . . . . . . . . . . . . . . . . . . . . . . . . . . 117 Stored Procedures . . . . . . . . . . . . . . . . . . . . . . . . . . . . . . . . . . . . . . . . 151 Triggers . . . . . . . . . . . . . . . . . . . . . . . . . . . . . . . . . . . . . . . . . . . . . . . . . . . . 187 Encryption . . . . . . . . . . . . . . . . . . . . . . . . . . . . . . . . . . . . . . . . . . . . . . . . . 219 Common Table Expressions and Windowing Functions . . . . . . . . . . . . . . . . . . . . . . . . . . . . . . . . . . . . . 247 Integrated Full-Text Search . . . . . . . . . . . . . . . . . . . . . . . . . . . . . . . 273 XML . . . . . . . . . . . . . . . . . . . . . . . . . . . . . . . . . . . . . . . . . . . . . . . . . . . . . . . . . 299 XQuery and XPath . . . . . . . . . . . . . . . . . . . . . . . . . . . . . . . . . . . . . . . . . 341 Catalog Views and Dynamic Management Views . . . . . . . 387 SQL CLR Programming . . . . . . . . . . . . . . . . . . . . . . . . . . . . . . . . . . . . 407 .NET Client Programming . . . . . . . . . . . . . . . . . . . . . . . . . . . . . . . . . 451 Data Services . . . . . . . . . . . . . . . . . . . . . . . . . . . . . . . . . . . . . . . . . . . . . . 495 New T-SQL Features . . . . . . . . . . . . . . . . . . . . . . . . . . . . . . . . . . . . . . . 525 Error Handling and Dynamic SQL . . . . . . . . . . . . . . . . . . . . . . . . . 553
■CHAPTER 19 ■APPENDIX A ■APPENDIX B ■APPENDIX C ■APPENDIX D
Performance Tuning . . . . . . . . . . . . . . . . . . . . . . . . . . . . . . . . . . . . . . . 573 Exercise Answers . . . . . . . . . . . . . . . . . . . . . . . . . . . . . . . . . . . . . . . . . 603 XQuery Data Types . . . . . . . . . . . . . . . . . . . . . . . . . . . . . . . . . . . . . . . . 613 Glossary . . . . . . . . . . . . . . . . . . . . . . . . . . . . . . . . . . . . . . . . . . . . . . . . . . . . 619 SQLCMD Quick Reference . . . . . . . . . . . . . . . . . . . . . . . . . . . . . . . . . 631
■INDEX . . . . . . . . . . . . . . . . . . . . . . . . . . . . . . . . . . . . . . . . . . . . . . . . . . . . . . . . . . . . . . . . . . . . . . . 639
v
Contents About the Author . . . . . . . . . . . . . . . . . . . . . . . . . . . . . . . . . . . . . . . . . . . . . . . . . . . . . . . . . . . . . . . . xvii About the Technical Reviewer . . . . . . . . . . . . . . . . . . . . . . . . . . . . . . . . . . . . . . . . . . . . . . . . . . . . . . xix Acknowledgments . . . . . . . . . . . . . . . . . . . . . . . . . . . . . . . . . . . . . . . . . . . . . . . . . . . . . . . . . . . . . . . xxi Introduction . . . . . . . . . . . . . . . . . . . . . . . . . . . . . . . . . . . . . . . . . . . . . . . . . . . . . . . . . . . . . . . . . . . . xxiii
■CHAPTER 1
Foundations of T-SQL
.......................................1
A Short History of T-SQL . . . . . . . . . . . . . . . . . . . . . . . . . . . . . . . . . . . . . . . . . . 1 Imperative vs. Declarative Languages . . . . . . . . . . . . . . . . . . . . . . . . . . . . . . 1 SQL Basics . . . . . . . . . . . . . . . . . . . . . . . . . . . . . . . . . . . . . . . . . . . . . . . . . . . . . 3 Statements . . . . . . . . . . . . . . . . . . . . . . . . . . . . . . . . . . . . . . . . . . . . . . . . . 3 Databases . . . . . . . . . . . . . . . . . . . . . . . . . . . . . . . . . . . . . . . . . . . . . . . . . 5 Transaction Logs . . . . . . . . . . . . . . . . . . . . . . . . . . . . . . . . . . . . . . . . . . . . 6 Schemas . . . . . . . . . . . . . . . . . . . . . . . . . . . . . . . . . . . . . . . . . . . . . . . . . . . 7 Tables . . . . . . . . . . . . . . . . . . . . . . . . . . . . . . . . . . . . . . . . . . . . . . . . . . . . . 7 Views . . . . . . . . . . . . . . . . . . . . . . . . . . . . . . . . . . . . . . . . . . . . . . . . . . . . . . 9 Indexes . . . . . . . . . . . . . . . . . . . . . . . . . . . . . . . . . . . . . . . . . . . . . . . . . . . . 9 Stored Procedures . . . . . . . . . . . . . . . . . . . . . . . . . . . . . . . . . . . . . . . . . 10 User-Defined Functions . . . . . . . . . . . . . . . . . . . . . . . . . . . . . . . . . . . . . 10 SQL CLR Assemblies . . . . . . . . . . . . . . . . . . . . . . . . . . . . . . . . . . . . . . . 10 Elements of Style . . . . . . . . . . . . . . . . . . . . . . . . . . . . . . . . . . . . . . . . . . . . . . . 11 Whitespace . . . . . . . . . . . . . . . . . . . . . . . . . . . . . . . . . . . . . . . . . . . . . . . 11 Naming Conventions . . . . . . . . . . . . . . . . . . . . . . . . . . . . . . . . . . . . . . . 13 One Entry, One Exit . . . . . . . . . . . . . . . . . . . . . . . . . . . . . . . . . . . . . . . . . 15 Defensive Coding . . . . . . . . . . . . . . . . . . . . . . . . . . . . . . . . . . . . . . . . . . 18 SQL-92 Syntax Outer Joins . . . . . . . . . . . . . . . . . . . . . . . . . . . . . . . . . . 18 The SELECT * Statement . . . . . . . . . . . . . . . . . . . . . . . . . . . . . . . . . . . . 19 Variable Initialization . . . . . . . . . . . . . . . . . . . . . . . . . . . . . . . . . . . . . . . 20 Summary . . . . . . . . . . . . . . . . . . . . . . . . . . . . . . . . . . . . . . . . . . . . . . . . . . . . . . 20
■CHAPTER 2
T-SQL 2008 New Features
. . . . . . . . . . . . . . . . . . . . . . . . . . . . . . . . . 23
Productivity Enhancements . . . . . . . . . . . . . . . . . . . . . . . . . . . . . . . . . . . . . . 23 The MERGE Statement . . . . . . . . . . . . . . . . . . . . . . . . . . . . . . . . . . . . . . . . . . 26 vii
viii
■CONTENTS
New Data Types . . . . . . . . . . . . . . . . . . . . . . . . . . . . . . . . . . . . . . . . . . . . . . . . 34 Date and Time Data Types . . . . . . . . . . . . . . . . . . . . . . . . . . . . . . . . . . 34 The hierarchyid Data Type . . . . . . . . . . . . . . . . . . . . . . . . . . . . . . . . . . 38 hierarchyid Methods . . . . . . . . . . . . . . . . . . . . . . . . . . . . . . . . . . . . . . . . 45 Spatial Data Types . . . . . . . . . . . . . . . . . . . . . . . . . . . . . . . . . . . . . . . . . 47 Grouping Sets . . . . . . . . . . . . . . . . . . . . . . . . . . . . . . . . . . . . . . . . . . . . . . . . . . 55 Other New Features . . . . . . . . . . . . . . . . . . . . . . . . . . . . . . . . . . . . . . . . . . . . . 58 Summary . . . . . . . . . . . . . . . . . . . . . . . . . . . . . . . . . . . . . . . . . . . . . . . . . . . . . . 59
■CHAPTER 3
Tools of the Trade
. . . . . . . . . . . . . . . . . . . . . . . . . . . . . . . . . . . . . . . . . . 61
SQL Server Management Studio . . . . . . . . . . . . . . . . . . . . . . . . . . . . . . . . . . 61 SSMS Editing Options . . . . . . . . . . . . . . . . . . . . . . . . . . . . . . . . . . . . . . 63 Context-Sensitive Help . . . . . . . . . . . . . . . . . . . . . . . . . . . . . . . . . . . . . 64 Graphical Query Execution Plans . . . . . . . . . . . . . . . . . . . . . . . . . . . . . 66 Project Management Features . . . . . . . . . . . . . . . . . . . . . . . . . . . . . . . 66 The Object Explorer . . . . . . . . . . . . . . . . . . . . . . . . . . . . . . . . . . . . . . . . 68 The SQLCMD Utility . . . . . . . . . . . . . . . . . . . . . . . . . . . . . . . . . . . . . . . . . . . . . 69 Business Intelligence Development Studio . . . . . . . . . . . . . . . . . . . . . . . . . 71 SQL Profiler . . . . . . . . . . . . . . . . . . . . . . . . . . . . . . . . . . . . . . . . . . . . . . . . . . . . 73 SQL Server Integration Services . . . . . . . . . . . . . . . . . . . . . . . . . . . . . . . . . . 75 The Bulk Copy Program . . . . . . . . . . . . . . . . . . . . . . . . . . . . . . . . . . . . . . . . . . 76 SQL Server 2008 Books Online . . . . . . . . . . . . . . . . . . . . . . . . . . . . . . . . . . . 76 The AdventureWorks Sample Database . . . . . . . . . . . . . . . . . . . . . . . . . . . . 78 Summary . . . . . . . . . . . . . . . . . . . . . . . . . . . . . . . . . . . . . . . . . . . . . . . . . . . . . . 78
■CHAPTER 4
Procedural Code and CASE Expressions
. . . . . . . . . . . . . . . . . . 81
Three-Valued Logic . . . . . . . . . . . . . . . . . . . . . . . . . . . . . . . . . . . . . . . . . . . . . 81 Control-of-Flow Statements . . . . . . . . . . . . . . . . . . . . . . . . . . . . . . . . . . . . . . 83 The BEGIN and END Keywords . . . . . . . . . . . . . . . . . . . . . . . . . . . . . . . 83 The IF...ELSE Statement . . . . . . . . . . . . . . . . . . . . . . . . . . . . . . . . . . . . 85 The WHILE, BREAK, and CONTINUE Statements . . . . . . . . . . . . . . . . 87 The GOTO Statement . . . . . . . . . . . . . . . . . . . . . . . . . . . . . . . . . . . . . . . 88 The WAITFOR Statement . . . . . . . . . . . . . . . . . . . . . . . . . . . . . . . . . . . . 89 The RETURN Statement . . . . . . . . . . . . . . . . . . . . . . . . . . . . . . . . . . . . . 90 The TRY...CATCH Statement . . . . . . . . . . . . . . . . . . . . . . . . . . . . . . . . . 91 The CASE Expression . . . . . . . . . . . . . . . . . . . . . . . . . . . . . . . . . . . . . . . . . . . . 93 The Simple CASE Expression . . . . . . . . . . . . . . . . . . . . . . . . . . . . . . . . 94 The Searched CASE Expression . . . . . . . . . . . . . . . . . . . . . . . . . . . . . . 95 CASE and Pivot Tables . . . . . . . . . . . . . . . . . . . . . . . . . . . . . . . . . . . . . . 97 COALESCE and NULLIF . . . . . . . . . . . . . . . . . . . . . . . . . . . . . . . . . . . . 103
■CONTENTS
Cursors . . . . . . . . . . . . . . . . . . . . . . . . . . . . . . . . . . . . . . . . . . . . . . . . . . . . . . . 104 Summary . . . . . . . . . . . . . . . . . . . . . . . . . . . . . . . . . . . . . . . . . . . . . . . . . . . . . 114
■CHAPTER 5
User-Defined Functions
. . . . . . . . . . . . . . . . . . . . . . . . . . . . . . . . . . . 117
Scalar Functions . . . . . . . . . . . . . . . . . . . . . . . . . . . . . . . . . . . . . . . . . . . . . . . 117 Recursion in Scalar User-Defined Functions . . . . . . . . . . . . . . . . . . 120 Procedural Code in User-Defined Functions . . . . . . . . . . . . . . . . . . 123 Multistatement Table-Valued Functions . . . . . . . . . . . . . . . . . . . . . . . . . . . 133 Inline Table-Valued Functions . . . . . . . . . . . . . . . . . . . . . . . . . . . . . . . . . . . 143 Restrictions on User-Defined Functions . . . . . . . . . . . . . . . . . . . . . . . . . . . 147 Nondeterministic Functions . . . . . . . . . . . . . . . . . . . . . . . . . . . . . . . . 147 State of the Database . . . . . . . . . . . . . . . . . . . . . . . . . . . . . . . . . . . . . 148 Summary . . . . . . . . . . . . . . . . . . . . . . . . . . . . . . . . . . . . . . . . . . . . . . . . . . . . . 149
■CHAPTER 6
Stored Procedures
. . . . . . . . . . . . . . . . . . . . . . . . . . . . . . . . . . . . . . . . 151
Introducing Stored Procedures . . . . . . . . . . . . . . . . . . . . . . . . . . . . . . . . . . 151 Calling Stored Procedures . . . . . . . . . . . . . . . . . . . . . . . . . . . . . . . . . . . . . . 152 Managing Stored Procedures . . . . . . . . . . . . . . . . . . . . . . . . . . . . . . . . . . . . 155 Stored Procedures in Action . . . . . . . . . . . . . . . . . . . . . . . . . . . . . . . . . . . . . 156 Recursion in Stored Procedures . . . . . . . . . . . . . . . . . . . . . . . . . . . . . . . . . 163 Table-Valued Parameters . . . . . . . . . . . . . . . . . . . . . . . . . . . . . . . . . . . . . . . 173 Temporary Stored Procedures . . . . . . . . . . . . . . . . . . . . . . . . . . . . . . . . . . . 176 Recompilation and Caching . . . . . . . . . . . . . . . . . . . . . . . . . . . . . . . . . . . . . 176 Stored Procedure Statistics . . . . . . . . . . . . . . . . . . . . . . . . . . . . . . . . . 176 Parameter Sniffing . . . . . . . . . . . . . . . . . . . . . . . . . . . . . . . . . . . . . . . . 179 Recompilation . . . . . . . . . . . . . . . . . . . . . . . . . . . . . . . . . . . . . . . . . . . . 182 Summary . . . . . . . . . . . . . . . . . . . . . . . . . . . . . . . . . . . . . . . . . . . . . . . . . . . . . 184
■CHAPTER 7
Triggers
. . . . . . . . . . . . . . . . . . . . . . . . . . . . . . . . . . . . . . . . . . . . . . . . . . . . 187
DML Triggers . . . . . . . . . . . . . . . . . . . . . . . . . . . . . . . . . . . . . . . . . . . . . . . . . 187 When to Use DML Triggers . . . . . . . . . . . . . . . . . . . . . . . . . . . . . . . . . 188 Auditing with DML Triggers . . . . . . . . . . . . . . . . . . . . . . . . . . . . . . . . 192 Nested and Recursive Triggers . . . . . . . . . . . . . . . . . . . . . . . . . . . . . 199 The UPDATE and COLUMNS_UPDATED Functions . . . . . . . . . . . . . 200 Triggers on Views . . . . . . . . . . . . . . . . . . . . . . . . . . . . . . . . . . . . . . . . . 205 DDL Triggers . . . . . . . . . . . . . . . . . . . . . . . . . . . . . . . . . . . . . . . . . . . . . . . . . . 208 Logon Triggers . . . . . . . . . . . . . . . . . . . . . . . . . . . . . . . . . . . . . . . . . . . . . . . . 213 Summary . . . . . . . . . . . . . . . . . . . . . . . . . . . . . . . . . . . . . . . . . . . . . . . . . . . . . 217
ix
x
■CONTENTS
■CHAPTER 8
Encryption
. . . . . . . . . . . . . . . . . . . . . . . . . . . . . . . . . . . . . . . . . . . . . . . . . 219
The Encryption Hierarchy . . . . . . . . . . . . . . . . . . . . . . . . . . . . . . . . . . . . . . . 219 Service Master Keys . . . . . . . . . . . . . . . . . . . . . . . . . . . . . . . . . . . . . . . . . . . 220 Database Master Keys . . . . . . . . . . . . . . . . . . . . . . . . . . . . . . . . . . . . . . . . . . 221 Certificates . . . . . . . . . . . . . . . . . . . . . . . . . . . . . . . . . . . . . . . . . . . . . . . . . . . 223 Asymmetric Keys . . . . . . . . . . . . . . . . . . . . . . . . . . . . . . . . . . . . . . . . . . . . . . 229 Symmetric Keys . . . . . . . . . . . . . . . . . . . . . . . . . . . . . . . . . . . . . . . . . . . . . . . 233 Encryption Without Keys . . . . . . . . . . . . . . . . . . . . . . . . . . . . . . . . . . . . . . . . 241 Hashing Data . . . . . . . . . . . . . . . . . . . . . . . . . . . . . . . . . . . . . . . . . . . . . . . . . . 241 Extensible Key Management . . . . . . . . . . . . . . . . . . . . . . . . . . . . . . . . . . . . 243 Transparent Data Encryption . . . . . . . . . . . . . . . . . . . . . . . . . . . . . . . . . . . . 244 Summary . . . . . . . . . . . . . . . . . . . . . . . . . . . . . . . . . . . . . . . . . . . . . . . . . . . . . 246
■CHAPTER 9
Common Table Expressions and Windowing Functions . . . . . . . . . . . . . . . . . . . . . . . . . . . . . . . . . . . . . 247 Common Table Expressions . . . . . . . . . . . . . . . . . . . . . . . . . . . . . . . . . . . . . 247 Multiple Common Table Expressions . . . . . . . . . . . . . . . . . . . . . . . . 249 Recursive Common Table Expressions . . . . . . . . . . . . . . . . . . . . . . . 253 Windowing Functions . . . . . . . . . . . . . . . . . . . . . . . . . . . . . . . . . . . . . . . . . . 259 The ROW_NUMBER Function . . . . . . . . . . . . . . . . . . . . . . . . . . . . . . . 259 The RANK and DENSE_RANK Functions . . . . . . . . . . . . . . . . . . . . . . 262 The NTILE Function . . . . . . . . . . . . . . . . . . . . . . . . . . . . . . . . . . . . . . . 267 Aggregate Functions and OVER . . . . . . . . . . . . . . . . . . . . . . . . . . . . . 269 Summary . . . . . . . . . . . . . . . . . . . . . . . . . . . . . . . . . . . . . . . . . . . . . . . . . . . . . 271
■CHAPTER 10
Integrated Full-Text Search . . . . . . . . . . . . . . . . . . . . . . . . . . . . . . . 273 iFTS Architecture . . . . . . . . . . . . . . . . . . . . . . . . . . . . . . . . . . . . . . . . . . . . . . 273 Creating Full-Text Catalogs and Indexes . . . . . . . . . . . . . . . . . . . . . . . . . . 275 Creating Full-Text Catalogs . . . . . . . . . . . . . . . . . . . . . . . . . . . . . . . . . 275 Creating Full-Text Indexes . . . . . . . . . . . . . . . . . . . . . . . . . . . . . . . . . 277 Full-Text Querying . . . . . . . . . . . . . . . . . . . . . . . . . . . . . . . . . . . . . . . . . . . . . 282 The FREETEXT Predicate . . . . . . . . . . . . . . . . . . . . . . . . . . . . . . . . . . . 282 The CONTAINS Predicate . . . . . . . . . . . . . . . . . . . . . . . . . . . . . . . . . . . 285 The FREETEXTTABLE and CONTAINSTABLE Functions . . . . . . . . . 289 Thesauruses and Stoplists . . . . . . . . . . . . . . . . . . . . . . . . . . . . . . . . . . . . . . 292 Stored Procedures and Dynamic Management Views and Functions . . 296 Summary . . . . . . . . . . . . . . . . . . . . . . . . . . . . . . . . . . . . . . . . . . . . . . . . . . . . . 297
■CONTENTS
■CHAPTER 11
XML . . . . . . . . . . . . . . . . . . . . . . . . . . . . . . . . . . . . . . . . . . . . . . . . . . . . . . . . . 299 Legacy XML . . . . . . . . . . . . . . . . . . . . . . . . . . . . . . . . . . . . . . . . . . . . . . . . . . . 299 OPENXML . . . . . . . . . . . . . . . . . . . . . . . . . . . . . . . . . . . . . . . . . . . . . . . . 299 OPENXML Result Formats . . . . . . . . . . . . . . . . . . . . . . . . . . . . . . . . . . 303 FOR XML Clause . . . . . . . . . . . . . . . . . . . . . . . . . . . . . . . . . . . . . . . . . . . . . . . 307 FOR XML RAW . . . . . . . . . . . . . . . . . . . . . . . . . . . . . . . . . . . . . . . . . . . . 307 FOR XML AUTO . . . . . . . . . . . . . . . . . . . . . . . . . . . . . . . . . . . . . . . . . . . 309 FOR XML EXPLICIT . . . . . . . . . . . . . . . . . . . . . . . . . . . . . . . . . . . . . . . . 311 FOR XML PATH . . . . . . . . . . . . . . . . . . . . . . . . . . . . . . . . . . . . . . . . . . . 313 The xml Data Type . . . . . . . . . . . . . . . . . . . . . . . . . . . . . . . . . . . . . . . . . . . . . 315 Untyped xml . . . . . . . . . . . . . . . . . . . . . . . . . . . . . . . . . . . . . . . . . . . . . . 316 Typed xml . . . . . . . . . . . . . . . . . . . . . . . . . . . . . . . . . . . . . . . . . . . . . . . 317 The xml Data Type Methods . . . . . . . . . . . . . . . . . . . . . . . . . . . . . . . . . . . . . 319 The query Method . . . . . . . . . . . . . . . . . . . . . . . . . . . . . . . . . . . . . . . . . 320 The value Method . . . . . . . . . . . . . . . . . . . . . . . . . . . . . . . . . . . . . . . . . 321 The exist Method . . . . . . . . . . . . . . . . . . . . . . . . . . . . . . . . . . . . . . . . . 322 The nodes Method . . . . . . . . . . . . . . . . . . . . . . . . . . . . . . . . . . . . . . . . 323 The modify Method . . . . . . . . . . . . . . . . . . . . . . . . . . . . . . . . . . . . . . . 325 XML Indexes . . . . . . . . . . . . . . . . . . . . . . . . . . . . . . . . . . . . . . . . . . . . . . . . . . 327 XSL Transformations . . . . . . . . . . . . . . . . . . . . . . . . . . . . . . . . . . . . . . . . . . . 332 Summary . . . . . . . . . . . . . . . . . . . . . . . . . . . . . . . . . . . . . . . . . . . . . . . . . . . . . 338
■CHAPTER 12
XQuery and XPath
. . . . . . . . . . . . . . . . . . . . . . . . . . . . . . . . . . . . . . . . . 341
XPath and FOR XML PATH . . . . . . . . . . . . . . . . . . . . . . . . . . . . . . . . . . . . . . 341 XPath Attributes . . . . . . . . . . . . . . . . . . . . . . . . . . . . . . . . . . . . . . . . . . 343 Columns Without Names and Wildcards . . . . . . . . . . . . . . . . . . . . . . 344 Element Grouping . . . . . . . . . . . . . . . . . . . . . . . . . . . . . . . . . . . . . . . . . 345 The data Function . . . . . . . . . . . . . . . . . . . . . . . . . . . . . . . . . . . . . . . . . 346 XPath and NULL . . . . . . . . . . . . . . . . . . . . . . . . . . . . . . . . . . . . . . . . . . 348 The WITH XMLNAMESPACES Clause . . . . . . . . . . . . . . . . . . . . . . . . . 349 Node Tests . . . . . . . . . . . . . . . . . . . . . . . . . . . . . . . . . . . . . . . . . . . . . . . 350 XQuery and the xml Data Type . . . . . . . . . . . . . . . . . . . . . . . . . . . . . . . . . . . 351 Expressions and Sequences . . . . . . . . . . . . . . . . . . . . . . . . . . . . . . . . 352 The query Method . . . . . . . . . . . . . . . . . . . . . . . . . . . . . . . . . . . . . . . . . 354 Location Paths . . . . . . . . . . . . . . . . . . . . . . . . . . . . . . . . . . . . . . . . . . . . 355 Node Tests . . . . . . . . . . . . . . . . . . . . . . . . . . . . . . . . . . . . . . . . . . . . . . . 357 Namespaces . . . . . . . . . . . . . . . . . . . . . . . . . . . . . . . . . . . . . . . . . . . . . 359 Axis Specifiers . . . . . . . . . . . . . . . . . . . . . . . . . . . . . . . . . . . . . . . . . . . . 361
xi
xii
■CONTENTS
Dynamic XML Construction . . . . . . . . . . . . . . . . . . . . . . . . . . . . . . . . . 363 XQuery Comments . . . . . . . . . . . . . . . . . . . . . . . . . . . . . . . . . . . . . . . . 366 Data Types . . . . . . . . . . . . . . . . . . . . . . . . . . . . . . . . . . . . . . . . . . . . . . . 366 Predicates . . . . . . . . . . . . . . . . . . . . . . . . . . . . . . . . . . . . . . . . . . . . . . . 367 Conditional Expressions (if...then...else) . . . . . . . . . . . . . . . . . . . . . . 373 Arithmetic Expressions . . . . . . . . . . . . . . . . . . . . . . . . . . . . . . . . . . . . 374 XQuery Functions . . . . . . . . . . . . . . . . . . . . . . . . . . . . . . . . . . . . . . . . . 375 Constructors and Casting . . . . . . . . . . . . . . . . . . . . . . . . . . . . . . . . . . 378 FLWOR Expressions . . . . . . . . . . . . . . . . . . . . . . . . . . . . . . . . . . . . . . . 380 Summary . . . . . . . . . . . . . . . . . . . . . . . . . . . . . . . . . . . . . . . . . . . . . . . . . . . . . 385
■CHAPTER 13
Catalog Views and Dynamic Management Views
. . . . . . . 387
Catalog Views . . . . . . . . . . . . . . . . . . . . . . . . . . . . . . . . . . . . . . . . . . . . . . . . . 387 Table and Column Metadata . . . . . . . . . . . . . . . . . . . . . . . . . . . . . . . . 388 Index Metadata . . . . . . . . . . . . . . . . . . . . . . . . . . . . . . . . . . . . . . . . . . . 390 Querying Permissions . . . . . . . . . . . . . . . . . . . . . . . . . . . . . . . . . . . . . 392 Dynamic Management Views and Functions . . . . . . . . . . . . . . . . . . . . . . . 395 Session Information . . . . . . . . . . . . . . . . . . . . . . . . . . . . . . . . . . . . . . . 396 Connection Information . . . . . . . . . . . . . . . . . . . . . . . . . . . . . . . . . . . . 398 Currently Executing SQL . . . . . . . . . . . . . . . . . . . . . . . . . . . . . . . . . . . 398 Tempdb Space . . . . . . . . . . . . . . . . . . . . . . . . . . . . . . . . . . . . . . . . . . . 399 Server Resources . . . . . . . . . . . . . . . . . . . . . . . . . . . . . . . . . . . . . . . . . 400 Unused Indexes . . . . . . . . . . . . . . . . . . . . . . . . . . . . . . . . . . . . . . . . . . . 400 INFORMATION_SCHEMA Views . . . . . . . . . . . . . . . . . . . . . . . . . . . . . . . . . . 402 Summary . . . . . . . . . . . . . . . . . . . . . . . . . . . . . . . . . . . . . . . . . . . . . . . . . . . . . 404
■CHAPTER 14
SQL CLR Programming
. . . . . . . . . . . . . . . . . . . . . . . . . . . . . . . . . . . . 407
The Old Way . . . . . . . . . . . . . . . . . . . . . . . . . . . . . . . . . . . . . . . . . . . . . . . . . . 407 The SQL CLR Way . . . . . . . . . . . . . . . . . . . . . . . . . . . . . . . . . . . . . . . . . . . . . 408 SQL CLR Assemblies . . . . . . . . . . . . . . . . . . . . . . . . . . . . . . . . . . . . . . . . . . . 409 User-Defined Functions . . . . . . . . . . . . . . . . . . . . . . . . . . . . . . . . . . . . . . . . . 412 Stored Procedures . . . . . . . . . . . . . . . . . . . . . . . . . . . . . . . . . . . . . . . . . . . . . 419 User-Defined Aggregates . . . . . . . . . . . . . . . . . . . . . . . . . . . . . . . . . . . . . . . 423 Creating a Simple UDA . . . . . . . . . . . . . . . . . . . . . . . . . . . . . . . . . . . . 424 Creating an Advanced UDA . . . . . . . . . . . . . . . . . . . . . . . . . . . . . . . . . 428 SQL CLR User-Defined Types . . . . . . . . . . . . . . . . . . . . . . . . . . . . . . . . . . . . 435 Summary . . . . . . . . . . . . . . . . . . . . . . . . . . . . . . . . . . . . . . . . . . . . . . . . . . . . . 448
■CONTENTS
■CHAPTER 15
.NET Client Programming
. . . . . . . . . . . . . . . . . . . . . . . . . . . . . . . . . 451
ADO.NET . . . . . . . . . . . . . . . . . . . . . . . . . . . . . . . . . . . . . . . . . . . . . . . . . . . . . 451 The .NET SQL Client . . . . . . . . . . . . . . . . . . . . . . . . . . . . . . . . . . . . . . . . . . . . 453 Connected Data Access . . . . . . . . . . . . . . . . . . . . . . . . . . . . . . . . . . . . 453 Disconnected Datasets . . . . . . . . . . . . . . . . . . . . . . . . . . . . . . . . . . . . 458 Parameterized Queries . . . . . . . . . . . . . . . . . . . . . . . . . . . . . . . . . . . . . . . . . 460 Nonquery, Scalar, and XML Querying . . . . . . . . . . . . . . . . . . . . . . . . . . . . . 465 SqlBulkCopy . . . . . . . . . . . . . . . . . . . . . . . . . . . . . . . . . . . . . . . . . . . . . . . . . . 468 Multiple Active Result Sets . . . . . . . . . . . . . . . . . . . . . . . . . . . . . . . . . . . . . . 475 LINQ to SQL . . . . . . . . . . . . . . . . . . . . . . . . . . . . . . . . . . . . . . . . . . . . . . . . . . . 480 Using the O/RM Designer . . . . . . . . . . . . . . . . . . . . . . . . . . . . . . . . . . 480 Querying with LINQ to SQL . . . . . . . . . . . . . . . . . . . . . . . . . . . . . . . . . 482 Inspecting the O/RM Classes . . . . . . . . . . . . . . . . . . . . . . . . . . . . . . . 491 Summary . . . . . . . . . . . . . . . . . . . . . . . . . . . . . . . . . . . . . . . . . . . . . . . . . . . . . 493
■CHAPTER 16
Data Services
. . . . . . . . . . . . . . . . . . . . . . . . . . . . . . . . . . . . . . . . . . . . . . 495
Introducing HTTP Endpoints . . . . . . . . . . . . . . . . . . . . . . . . . . . . . . . . . . . . . 495 Consuming HTTP Endpoints . . . . . . . . . . . . . . . . . . . . . . . . . . . . . . . . 499 Web Services . . . . . . . . . . . . . . . . . . . . . . . . . . . . . . . . . . . . . . . . . . . . . . . . . 503 ADO.NET Data Services . . . . . . . . . . . . . . . . . . . . . . . . . . . . . . . . . . . . . . . . . 509 Creating an ADO.NET Data Service . . . . . . . . . . . . . . . . . . . . . . . . . . 510 Creating an ADO.NET Data Service Consumer . . . . . . . . . . . . . . . . 517 Summary . . . . . . . . . . . . . . . . . . . . . . . . . . . . . . . . . . . . . . . . . . . . . . . . . . . . . 522
■CHAPTER 17
New T-SQL Features . . . . . . . . . . . . . . . . . . . . . . . . . . . . . . . . . . . . . . . 525 Set Operators . . . . . . . . . . . . . . . . . . . . . . . . . . . . . . . . . . . . . . . . . . . . . . . . . 525 The OUTPUT Clause . . . . . . . . . . . . . . . . . . . . . . . . . . . . . . . . . . . . . . . . . . . . 527 The TOP Keyword . . . . . . . . . . . . . . . . . . . . . . . . . . . . . . . . . . . . . . . . . . . . . . 531 CROSS APPLY and OUTER APPLY . . . . . . . . . . . . . . . . . . . . . . . . . . . . . . . . 533 The TABLESAMPLE Clause . . . . . . . . . . . . . . . . . . . . . . . . . . . . . . . . . . . . . . 535 The NEWSEQUENTIALID Function . . . . . . . . . . . . . . . . . . . . . . . . . . . . . . . . 537 Date and Time Functions . . . . . . . . . . . . . . . . . . . . . . . . . . . . . . . . . . . . . . . 538 The max Data Types . . . . . . . . . . . . . . . . . . . . . . . . . . . . . . . . . . . . . . . . . . . 541 Synonyms . . . . . . . . . . . . . . . . . . . . . . . . . . . . . . . . . . . . . . . . . . . . . . . . . . . . 543
xiii
xiv
■CONTENTS
FILESTREAM Support . . . . . . . . . . . . . . . . . . . . . . . . . . . . . . . . . . . . . . . . . . . 544 Enabling FILESTREAM Support . . . . . . . . . . . . . . . . . . . . . . . . . . . . . . 545 Creating FILESTREAM Filegroups . . . . . . . . . . . . . . . . . . . . . . . . . . . 546 FILESTREAM-Enabling Tables . . . . . . . . . . . . . . . . . . . . . . . . . . . . . . 548 Accessing FILESTREAM Data . . . . . . . . . . . . . . . . . . . . . . . . . . . . . . . 549 Summary . . . . . . . . . . . . . . . . . . . . . . . . . . . . . . . . . . . . . . . . . . . . . . . . . . . . . 550
■CHAPTER 18
Error Handling and Dynamic SQL . . . . . . . . . . . . . . . . . . . . . . . . . 553 Error Handling . . . . . . . . . . . . . . . . . . . . . . . . . . . . . . . . . . . . . . . . . . . . . . . . . 553 Legacy Error Handling . . . . . . . . . . . . . . . . . . . . . . . . . . . . . . . . . . . . . 553 Try...Catch Exception Handling . . . . . . . . . . . . . . . . . . . . . . . . . . . . . 555 The RAISERROR Statement . . . . . . . . . . . . . . . . . . . . . . . . . . . . . . . . . 557 Debugging Tools . . . . . . . . . . . . . . . . . . . . . . . . . . . . . . . . . . . . . . . . . . . . . . . 558 PRINT Statement Debugging . . . . . . . . . . . . . . . . . . . . . . . . . . . . . . . 559 Trace Flags . . . . . . . . . . . . . . . . . . . . . . . . . . . . . . . . . . . . . . . . . . . . . . 559 SSMS Integrated Debugger . . . . . . . . . . . . . . . . . . . . . . . . . . . . . . . . . 560 Visual Studio T-SQL Debugger . . . . . . . . . . . . . . . . . . . . . . . . . . . . . . 561 Dynamic SQL . . . . . . . . . . . . . . . . . . . . . . . . . . . . . . . . . . . . . . . . . . . . . . . . . . 564 The EXECUTE Statement . . . . . . . . . . . . . . . . . . . . . . . . . . . . . . . . . . . 564 SQL Injection and Dynamic SQL . . . . . . . . . . . . . . . . . . . . . . . . . . . . . 564 Troubleshooting Dynamic SQL . . . . . . . . . . . . . . . . . . . . . . . . . . . . . . 567 The sp_executesql Stored Procedure . . . . . . . . . . . . . . . . . . . . . . . . . . . . . 568 Dynamic SQL and Scope . . . . . . . . . . . . . . . . . . . . . . . . . . . . . . . . . . . 568 Client-Side Parameterization . . . . . . . . . . . . . . . . . . . . . . . . . . . . . . . 570 Summary . . . . . . . . . . . . . . . . . . . . . . . . . . . . . . . . . . . . . . . . . . . . . . . . . . . . . 570
■CHAPTER 19
Performance Tuning . . . . . . . . . . . . . . . . . . . . . . . . . . . . . . . . . . . . . . . 573 SQL Server Storage . . . . . . . . . . . . . . . . . . . . . . . . . . . . . . . . . . . . . . . . . . . . 573 Files and Filegroups . . . . . . . . . . . . . . . . . . . . . . . . . . . . . . . . . . . . . . . 573 Space Allocation . . . . . . . . . . . . . . . . . . . . . . . . . . . . . . . . . . . . . . . . . . 574 Data Compression . . . . . . . . . . . . . . . . . . . . . . . . . . . . . . . . . . . . . . . . 579 Indexes . . . . . . . . . . . . . . . . . . . . . . . . . . . . . . . . . . . . . . . . . . . . . . . . . . . . . . . 590 Heaps . . . . . . . . . . . . . . . . . . . . . . . . . . . . . . . . . . . . . . . . . . . . . . . . . . . 590 Clustered Indexes . . . . . . . . . . . . . . . . . . . . . . . . . . . . . . . . . . . . . . . . . 591 Nonclustered Indexes . . . . . . . . . . . . . . . . . . . . . . . . . . . . . . . . . . . . . . 592 Filtered Indexes . . . . . . . . . . . . . . . . . . . . . . . . . . . . . . . . . . . . . . . . . . . 596 Optimizing Queries . . . . . . . . . . . . . . . . . . . . . . . . . . . . . . . . . . . . . . . . . . . . . 596 Reading Query Plans . . . . . . . . . . . . . . . . . . . . . . . . . . . . . . . . . . . . . . 597 Methodology . . . . . . . . . . . . . . . . . . . . . . . . . . . . . . . . . . . . . . . . . . . . . 600 Summary . . . . . . . . . . . . . . . . . . . . . . . . . . . . . . . . . . . . . . . . . . . . . . . . . . . . . 601
■CONTENTS
■APPENDIX A
Exercise Answers
. . . . . . . . . . . . . . . . . . . . . . . . . . . . . . . . . . . . . . . . . 603
Chapter 1 . . . . . . . . . . . . . . . . . . . . . . . . . . . . . . . . . . . . . . . . . . . . . . . . . . . . . 603 Chapter 2 . . . . . . . . . . . . . . . . . . . . . . . . . . . . . . . . . . . . . . . . . . . . . . . . . . . . . 603 Chapter 3 . . . . . . . . . . . . . . . . . . . . . . . . . . . . . . . . . . . . . . . . . . . . . . . . . . . . . 604 Chapter 4 . . . . . . . . . . . . . . . . . . . . . . . . . . . . . . . . . . . . . . . . . . . . . . . . . . . . . 605 Chapter 5 . . . . . . . . . . . . . . . . . . . . . . . . . . . . . . . . . . . . . . . . . . . . . . . . . . . . . 606 Chapter 6 . . . . . . . . . . . . . . . . . . . . . . . . . . . . . . . . . . . . . . . . . . . . . . . . . . . . . 607 Chapter 7 . . . . . . . . . . . . . . . . . . . . . . . . . . . . . . . . . . . . . . . . . . . . . . . . . . . . . 607 Chapter 8 . . . . . . . . . . . . . . . . . . . . . . . . . . . . . . . . . . . . . . . . . . . . . . . . . . . . . 608 Chapter 9 . . . . . . . . . . . . . . . . . . . . . . . . . . . . . . . . . . . . . . . . . . . . . . . . . . . . . 608 Chapter 10 . . . . . . . . . . . . . . . . . . . . . . . . . . . . . . . . . . . . . . . . . . . . . . . . . . . . 609 Chapter 11 . . . . . . . . . . . . . . . . . . . . . . . . . . . . . . . . . . . . . . . . . . . . . . . . . . . . 609 Chapter 12 . . . . . . . . . . . . . . . . . . . . . . . . . . . . . . . . . . . . . . . . . . . . . . . . . . . . 609 Chapter 13 . . . . . . . . . . . . . . . . . . . . . . . . . . . . . . . . . . . . . . . . . . . . . . . . . . . . 610 Chapter 14 . . . . . . . . . . . . . . . . . . . . . . . . . . . . . . . . . . . . . . . . . . . . . . . . . . . . 610 Chapter 15 . . . . . . . . . . . . . . . . . . . . . . . . . . . . . . . . . . . . . . . . . . . . . . . . . . . . 611 Chapter 16 . . . . . . . . . . . . . . . . . . . . . . . . . . . . . . . . . . . . . . . . . . . . . . . . . . . . 611 Chapter 17 . . . . . . . . . . . . . . . . . . . . . . . . . . . . . . . . . . . . . . . . . . . . . . . . . . . . 611 Chapter 18 . . . . . . . . . . . . . . . . . . . . . . . . . . . . . . . . . . . . . . . . . . . . . . . . . . . . 612 Chapter 19 . . . . . . . . . . . . . . . . . . . . . . . . . . . . . . . . . . . . . . . . . . . . . . . . . . . . 612
■APPENDIX B
XQuery Data Types
■APPENDIX C
Glossary . . . . . . . . . . . . . . . . . . . . . . . . . . . . . . . . . . . . . . . . . . . . . . . . . . . . 619
■APPENDIX D
SQLCMD Quick Reference . . . . . . . . . . . . . . . . . . . . . . . . . . . . . . . . . 631
. . . . . . . . . . . . . . . . . . . . . . . . . . . . . . . . . . . . . . . . 613
Command-Line Options . . . . . . . . . . . . . . . . . . . . . . . . . . . . . . . . . . . . . . . . 631 Scripting Variables . . . . . . . . . . . . . . . . . . . . . . . . . . . . . . . . . . . . . . . . . . . . . 635 Commands . . . . . . . . . . . . . . . . . . . . . . . . . . . . . . . . . . . . . . . . . . . . . . . . . . . 636
■INDEX . . . . . . . . . . . . . . . . . . . . . . . . . . . . . . . . . . . . . . . . . . . . . . . . . . . . . . . . . . . . . . . . . . . . . . . 639
xv
About the Author ■MICHAEL COLES is a Microsoft MVP with over a dozen years’ experience in SQL database design, T-SQL development, and client-server application programming. He has consulted in a wide range of industries, including the insurance, financial, retail, and manufacturing sectors, among others. Michael’s specialty is developing and performance-tuning high-profile SQL Server–based database solutions. He currently works as a consultant for a business intelligence consulting firm. He holds a degree in information technology and multiple Microsoft and other certifications. Michael has published dozens of technical articles online and in print magazines, including SQL Server Central, ASPToday, and SQL Server Standard. Michael is the author of the books Pro T-SQL 2005 Programmer’s Guide (Apress, 2007) and Pro SQL Server 2008 XML (Apress, 2008), and he contributed to Accelerated SQL Server 2008 (Apress, 2008). His current projects include coauthoring the book Pro SQL Server 2008 Full-Text Search.
xvii
About the Technical Reviewer ■ADAM MACHANIC is a Boston-based independent database consultant, writer, and speaker. He has been involved in dozens of SQL Server implementations for both high-availability OLTP and large-scale data warehouse applications, and has optimized data access layer performance for several data-intensive applications. Adam has written for numerous web sites and magazines, including SQLblog, Simple Talk, Search SQL Server, SQL Server Professional, CoDe, and VSJ. He has also contributed to several books on SQL Server, including Expert SQL Server 2005 Development (Apress, 2007) and Inside SQL Server 2005: Query Tuning and Optimization (Microsoft Press, 2007). Adam regularly speaks at user groups, community events, and conferences on a variety of SQL Server and .NET-related topics. He is a Microsoft Most Valuable Professional (MVP) for SQL Server and a Microsoft Certified IT Professional (MCITP).
xix
Acknowledgments I
’ve said it before, and I’ll say it again—delivering books like this into your hands takes the coordinated efforts of dozens of people working toward a common goal. There’s no way you would be reading these words right now if not for the entire team at Apress. This book is the product of the work of all my Apress teammates. With that in mind, I would like to start by thanking my editors Tony Campbell and Jonathan Gennick, who pulled this project together and oversaw it from the first page of the dedication to the last page of the index. I would also like to thank the hardest-working project manager ever, Kylie Johnston, who kept everyone on track and on schedule. I want to send a special thank you to my technical reviewer (and one of my favorite SQL authors), Adam Machanic, for keeping me honest and challenging me to “explain, explain, explain!” at every opportunity. I would also like to thank Elizabeth Berry, Damon Larson, Linda Seifert, and April Eddy, the team members who ensured that I expressed myself as clearly and cleanly as possible during the copy edit and proofreading phases. I also want to thank the numerous other team members who spent countless hours laying out pages, manipulating images, and contributing their skills in a variety of ways to bring this book to you. I would like to thank my family, including my girlfriend, Donna; my mom; Eric; Jennifer; Chris; Desmond; and Deja. I’d also like to thank my aunt Linda and her family for their support. Most important, thank you to Devoné and Rebecca—my little angels—for keeping a smile on my face. Finally, I would like to send a special thank you to Steve Jones, Microsoft MVP and entrepreneur extraordinaire of SQL Server Central fame, and Chuck Heinzelman, also an MVP and editor-in-chief of SQL Server Standard magazine, for their continued support.
xxi
Introduction I
still recall the first “database” application I ever wrote. It was a Turbo Pascal–based application for state government, designed to keep an inventory of tools and hazardous waste materials for a state institution in the late 1980s. I recall running into a lot of issues, including performance, large data storage, extensibility, and data integrity. I mention this only because these are just the types of problems that modern enterprise-class SQL DBMSs are specifically designed to handle. What’s more, they abstract away the internal workings (well, most of them anyway) so that you can concentrate more on your data and less on writing code to manipulate it. As an example, a simple sort algorithm that consumed over 100 lines of code in my custom Turbo Pascal “database” application is whittled down to a single ORDER BY clause in SQL. This abstraction allows you to spend less time worrying about how things get done and more time thinking about what you want to get done. Although I don’t use the term in everyday conversation, I can say that this change in thinking about storage represents a true “paradigm shift.” The new version of SQL Server builds on the foundation laid out by previous releases, adding new capabilities and functionality designed to meet the increasing demands of a sophisticated developer base. This book was originally scheduled to be an update of my Pro T-SQL 2005 Programmer’s Guide book. The sheer number of new features, however, demanded a nearly complete rewrite. I designed this new book with the goal of helping T-SQL developers get the absolute most out of the exciting new development features and functionality in SQL Server 2008.
Who This Book Is For This book is intended for SQL Server developers who need to port code from prior versions of SQL Server, and those who want to get the most out of T-SQL on the 2008 release. You should have a working knowledge of SQL, preferably T-SQL on SQL Server 2005 or 2000, as most of the examples in this book are written in T-SQL. In this book, I will cover some of the basics of T-SQL, including some introductory concepts like data domain and three-valued logic—but this is not a beginner’s book. I will not be discussing database design, database architecture, normalization, and the most basic of SQL constructs in any kind of detail. Instead I will be focusing most of my discussion on topics of new SQL Server 2008 functionality, which assumes a basic understanding of SQL statements like INSERT and SELECT. A working knowledge of C# and the .NET Framework is also useful (but not required), as some examples in the book will be written in C#. When C# sample code is provided, it is explained in detail, so an in-depth knowledge of the .NET Framework class library is not required.
xxiii
xxiv
■INTRODUCTION
How This Book Is Structured This book was written to address the needs of three types of readers: • SQL developers who are coming from other platforms to SQL Server 2008 • SQL developers who are moving from prior versions of SQL Server to SQL Server 2008 • DBAs and nondevelopers who need a working knowledge of T-SQL functionality to effectively support SQL Server 2008 instances For all types of readers, this book is designed to act as a tutorial that describes and demonstrates new T-SQL features with working examples, and as a reference for quickly locating details about specific features. The following sections provide a chapter-by-chapter overview.
Chapter 1 Chapter 1 starts this book off by putting SQL Server 2008’s implementation of T-SQL in context, including a short history of T-SQL, a discussion of T-SQL basics, and an overview of T-SQL coding best practices.
Chapter 2 Chapter 2 dives right into the new features of T-SQL on SQL Server 2008, with a discussion of productivity-enhancing features, the new MERGE statement, new data types like geometry and hierarchyid, and grouping sets.
Chapter 3 Chapter 3 gives an overview of the newest generation of tools available to SQL Server developers. Tools discussed include SQL Server Management Studio (SSMS), SQLCMD, Business Intelligence Development Studio (BIDS), and SQL Profiler, among others.
Chapter 4 Chapter 4 introduces T-SQL procedural code, including control-of-flow statements like IF...THEN and WHILE. In this chapter, I also discuss CASE expressions and CASE-derived functions, and provide an in-depth discussion of SQL three-valued logic.
Chapter 5 Chapter 5 discusses the various types of T-SQL user-defined functions available to encapsulate T-SQL logic on the server. I talk about all forms of T-SQL–based user-defined functions, including scalar user-defined functions, inline table-valued functions, and multistatement table-valued functions.
■INTRODUCTION
Chapter 6 Chapter 6 covers stored procedures, which allow you to create server-side T-SQL subroutines. In addition to describing how to create and execute stored procedures on SQL Server, I also address a thorny issue for some—the issue of why you might want to use stored procedures.
Chapter 7 Chapter 7 introduces all three types of SQL Server triggers: classic DML triggers, which fire in response to DML statements; DDL triggers, which fire in response to server and database DDL events; and logon triggers, which fire in response to server LOGON events.
Chapter 8 Chapter 8 discusses SQL Server encryption functionality, including the column-level encryption functionality introduced in SQL Server 2005 and the new transparent database encryption (TDE) and extensible key management (EKM) functionality, both introduced in SQL Server 2008.
Chapter 9 Chapter 9 dives into the details of common table expressions (CTEs) and windowing functions in SQL Server 2008, which feature the OVER clause.
Chapter 10 Chapter 10 discusses the advancements made to SQL Server 2008 integrated full-text search (iFTS), including greater integration with the SQL Server query engine and greater transparency by way of new iFTS-specific data management views and functions.
Chapter 11 Chapter 11 provides an in-depth discussion of SQL Server 2008 XML functionality, which carries forward the new features introduced in SQL Server 2005 and improves upon them. I cover several XML-related topics in this chapter, including the xml data type and its built-in methods, the FOR XML clause, and XML indexes.
Chapter 12 Chapter 12 discusses XQuery and XPath support in SQL Server 2008. SQL Server 2008 improves on the XQuery support introduced in SQL Server 2005, including support for the xml data type in XML DML insert statements and the let clause in FLWOR expressions.
Chapter 13 Chapter 13 introduces SQL Server 2008 catalog views, which are the preferred tools for retrieving database and database object metadata. This chapter also discusses dynamic management views and functions, which provide access to server and database state information.
xxv
xxvi
■INTRODUCTION
Chapter 14 Chapter 14 is a discussion of SQL Common Language Runtime (SQL CLR) functionality in SQL Server 2008. In this chapter, I discuss and provide examples of SQL CLR stored procedures, user-defined functions, user-defined types, and user-defined aggregates. I also talk about the restrictions that have been removed in SQL CLR support in SQL Server 2008.
Chapter 15 Chapter 15 focuses on client-side support for SQL Server, including ADO.NET-based connectivity and one of Microsoft’s newest technology offerings, LINQ to SQL.
Chapter 16 Chapter 16 discusses SQL Server connectivity using middle-tier technologies. Since native HTTP endpoints are deprecated in SQL Server 2008, I discuss them as items that may need to be supported in existing databases but should not be used for new development. I focus instead on possible replacement technologies, such as ADO.NET Data Services and IIS/.NET Web Services.
Chapter 17 Chapter 17 switches the focus back to T-SQL with a discussion of additional SQL Server 2008 features that were carried forward from their initial introduction in SQL Server 2005; features like the INTERSECT and EXCEPT operators, the DML statement OUTPUT clause, and improvements to the TOP clause. I also discuss some additional features and functionality that are new in SQL Server 2008, like new date and time functions and FILESTREAM support.
Chapter 18 Chapter 18 discusses improvements to server-side error handling made possible with the TRY...CATCH block. I also discuss various methods for debugging code, including using the Visual Studio T-SQL debugger. This chapter wraps up with a discussion of dynamic SQL and SQL injection, including the causes of SQL injection and methods you can use to protect your code against this type of attack.
Chapter 19 Chapter 19 provides an overview of performance-tuning SQL Server code. This chapter discusses SQL Server storage, indexing mechanisms, and query plans. I wrap up the chapter with a discussion of my own personal methodology for troubleshooting T-SQL performance issues.
Appendix A Appendix A provides the answers to the exercise questions that I’ve included at the end of each chapter.
■INTRODUCTION
Appendix B Appendix B is designed as a quick reference to the XQuery Data Model (XDM) type system.
Appendix C Appendix C provides a quick reference glossary to several terms, many of which may be new to those using SQL Server for the first time.
Appendix D Appendix D is a quick reference to the SQLCMD command-line tool, which allows you to execute ad hoc T-SQL statements and batches interactively, or run script files.
Conventions To help make reading this book a more enjoyable experience, and to help you get as much out of it as possible, I’ve used the following standardized formatting conventions throughout. C# code is shown in code font. Note that C# code is case sensitive. Here’s an example: while (i < 10) T-SQL source code is also shown in code font, with keywords capitalized. Note that I’ve lowercased the data types in the T-SQL code to help improve readability. Here’s an example: DECLARE @x xml; XML code is shown in code font with attribute and element content in bold for readability. Some code samples and results have been reformatted in the book for easier reading. XML ignores whitespace, so the significant content of the XML has not been altered. Here’s an example: Pro SQL Server 2008 XML:
■Note Notes, tips, and warnings are displayed like this, in a special font with solid bars placed over and under the content.
SIDEBARS Sidebars include additional information relevant to the current discussion and other interesting facts. Sidebars are shown on a gray background.
xxvii
xxviii
■INTRODUCTION
Prerequisites This book requires an installation of SQL Server 2008 to run the T-SQL sample code provided. Note that the code in this book has been specifically designed to take advantage of new SQL Server 2008 features, and most of the code samples will not run on prior versions of SQL Server. The code samples presented in the book are designed to be run against the AdventureWorks 2008 sample database, available from the CodePlex web site at www.codeplex.com/ MSFTDBProdSamples. If you are interested in compiling and deploying the .NET code samples (the client code and SQL CLR examples) presented in the book, I highly recommend an installation of Visual Studio 2008. Although you can compile and deploy .NET code from the command line, I’ve provided instructions for doing so through the Visual Studio Integrated Development Environment (IDE). I find that the IDE provides a much more enjoyable experience. Some examples, such as the ADO.NET Data Services examples in Chapter 16, require an installation of IIS as well. Other code samples presented in the book may have specific requirements, such as the LINQ samples, which require the .NET Framework 3.5. I’ve added notes to code samples that have additional requirements like these.
Downloading the Code The sample code for this book is available in a ZIP file in the Downloads section of the Apress web site at www.apress.com. The ZIP file is structured so that each subdirectory contains all the sample code for its corresponding chapter.
Contacting the Author The Apress team and I have made every effort to ensure that this book is free from errors and defects. Unfortunately, the occasional error does slip past us, despite our best efforts. In the event that you find an error in the book, please let us know! You can submit errors to Apress by visiting www.apress.com, locating the book page for this book, and clicking Submit Errata. Alternatively, feel free to drop a line directly to me at [email protected].
CHAPTER
1
Foundations of T-SQL S
QL Server 2008 is the latest release of Microsoft’s enterprise-class database management system (DBMS). As the name implies, a DBMS is a tool designed to manage, secure, and provide access to data stored in structured collections within databases. T-SQL is the language that SQL Server speaks. T-SQL provides query and data manipulation functionality, data definition and management capabilities, and security administration tools to SQL Server developers and administrators. To communicate effectively with SQL Server, you must have a solid understanding of the language. In this chapter, we will begin exploring T-SQL on SQL Server 2008.
A Short History of T-SQL The history of Structured Query Language (SQL), and its direct descendant Transact-SQL (T-SQL), begins with a man. Specifically, it all began in 1970 when Dr. E. F. Codd published his influential paper “A Relational Model of Data for Large Shared Data Banks” in the Communications of the Association for Computing Machinery (ACM). In his seminal paper, Dr. Codd introduced the definitive standard for relational databases. IBM went on to create the first relational database management system, known as System R. They subsequently introduced the Structured English Query Language (SEQUEL, as it was known at the time) to interact with this early database to store, modify, and retrieve data. The name of this early query language was later changed from SEQUEL to the now-common SQL due to a trademark issue. Fast-forward to 1986 when the American National Standards Institute (ANSI) officially approved the first SQL standard, commonly known as the ANSI SQL-86 standard. Microsoft entered the relational database management system picture a few years later through a joint venture with Sybase and Ashton-Tate (of dBase fame). The original versions of Microsoft SQL Server shared a common code base with the Sybase SQL Server product. This changed with the release of SQL Server 7.0, when Microsoft partially rewrote the code base. Microsoft has since introduced several iterations of SQL Server, including SQL Server 2000, SQL Server 2005, and now SQL Server 2008. In this book, we will focus on SQL Server 2008, which further extends the capabilities of T-SQL beyond what was possible in previous releases.
Imperative vs. Declarative Languages SQL is different from many common programming languages such as C# and Visual Basic because it is a declarative language. To contrast, languages such as C++, Visual Basic, C#, and even assembler language are imperative languages. The imperative language model requires
1
2
CHAPTER 1 ■ FOUNDATIONS OF T-SQL
the user to determine what the end result should be and also tell the computer step by step how to achieve that result. It’s analogous to asking a cab driver to drive you to the airport, and then giving him turn-by-turn directions to get there. Declarative languages, on the other hand, allow you to frame your instructions to the computer in terms of the end result. In this model, you allow the computer to determine the best route to achieve your objective, analogous to just telling the cab driver to take you to the airport and trusting him to know the best route. The declarative model makes a lot of sense when you consider that SQL Server is privy to a lot of “inside information.” Just like the cab driver who knows the shortcuts, traffic conditions, and other factors that affect your trip, SQL Server inherently knows several methods to optimize your queries and data manipulation operations. Consider Listing 1-1, which is a simple C# code snippet that reads in a flat file of names and displays them on the screen. Listing 1-1. C# Snippet to Read a Flat File StreamReader sr = new StreamReader("c:\\Person_Person.txt"); string FirstName = null; while ((FirstName = sr.ReadLine()) != null) { Console.WriteLine(s); } sr.Dispose(); The example performs the following functions in an orderly fashion: 1. The code explicitly opens the storage for input (in this example, a flat file is used as a “database”). 2. It then reads in each record (one record per line), explicitly checking for the end of the file. 3. As it reads the data, the code returns each record for display using Console.WriteLine(). 4. And finally, it closes and disposes of the connection to the data file. Consider what happens when you want to add or delete a name from the flat-file “database.” In those cases, you must extend the previous example and add custom routines to explicitly reorganize all the data in the file so that it maintains proper ordering. If you want the names to be listed and retrieved in alphabetical (or any other) order, you must write your own sort routines as well. Any type of additional processing on the data requires that you implement separate procedural routines. The SQL equivalent of the C# code in Listing 1-1 might look something like Listing 1-2. Listing 1-2. SQL Query to Retrieve Names from a Table SELECT FirstName FROM Person.Person;
CHAPTER 1 ■ FOUNDATIONS OF T-SQL
■Tip Unless otherwise specified, you can run all the T-SQL samples in this book in the AdventureWorks 2008 sample database using SQL Server Management Studio or SQLCMD.
To sort your data, you can simply add an ORDER BY clause to the SELECT query in Listing 1-2. With properly designed and indexed tables, SQL Server can automatically reorganize and index your data for efficient retrieval after you insert, update, or delete rows. T-SQL includes extensions that allow you to use procedural syntax. In fact, you could rewrite the previous example as a cursor to closely mimic the C# sample code. These extensions should be used with care, however, since trying to force the imperative model on T-SQL effectively overrides SQL Server’s built-in optimizations. More often than not, this hurts performance and makes simple projects a lot more complex than they need to be. One of the great assets of SQL Server is that you can invoke its power, in its native language, from nearly any other programming language. For example, in .NET you can connect and issue SQL queries and T-SQL statements to SQL Server via the System.Data.SqlClient namespace, which I will discuss further in Chapter 15. This gives you the opportunity to combine SQL’s declarative syntax with the strict control of an imperative language.
SQL Basics Before we discuss development in T-SQL, or on any SQL-based platform for that matter, we have to make sure we’re speaking the same language. Fortunately for us, SQL can be described accurately using well-defined and time-tested concepts and terminology. We’ll begin our discussion of the components of SQL by looking at statements.
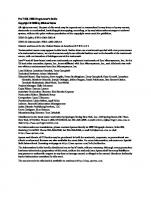
Statements To begin with, in SQL we use statements to communicate our requirements to the DBMS. A statement is composed of several parts, as shown in Figure 1-1.
Figure 1-1. Components of a SQL statement
3
4
CHAPTER 1 ■ FOUNDATIONS OF T-SQL
As you can see in the figure, SQL statements are composed of one or more clauses, some of which may be optional depending on the statement. In the SELECT statement shown, there are three clauses: the SELECT clause, which defines the columns to be returned by the query; the FROM clause, which indicates the source table for the query; and the WHERE clause, which is used to limit the results. Each clause represents a primitive operation in the relational algebra. For instance, in the example, the SELECT clause represents a relational projection operation, the FROM clause indicates the relation, and the WHERE clause performs a restriction operation.
■Note The relational model of databases is the model formulated by Dr. E. F. Codd. In the relational model, what we know in SQL as tables are referred to as relations; hence the name. Relational calculus and relational algebra define the basis of query languages for the relational model in mathematical terms.
ORDER OF EXECUTION Understanding the logical order in which SQL clauses are applied within a statement or query is important when setting your expectations about results. While vendors are free to physically perform whatever operations, in any order, that they choose to fulfill a query request, the results must be the same as if the operations were applied in a standards-defined order. The WHERE clause in the example contains a predicate, which is a logical expression that evaluates to one of SQL’s three possible logical results: true, false, or unknown. In this case, the WHERE clause and the predicate limit the results returned so that they include only rows in which the ContactId column is equal to 1. The SELECT clause includes an expression that is calculated during statement execution. In the example, the expression EmailPromotion * 10 is used. This expression is calculated for every row of the result set.
SQL THREE-VALUED LOGIC SQL institutes a logic system that might seem foreign to developers coming from other languages like C++ or Visual Basic (or most other programming languages, for that matter). Most modern computer languages use simple two-valued logic: a Boolean result is either true or false. SQL supports the concept of NULL, which is a placeholder for a missing or unknown value. This results in a more complex three-valued logic (3VL). Let me give you a quick example to demonstrate. If I asked you the question, “Is x less than 10?” your first response might be along the lines of, “How much is x?” If I refused to tell you what value x stood for, you would have no idea whether x was less than, equal to, or greater than 10; so the answer to the question is neither true nor false—it’s the third truth value, unknown. Now replace x with NULL and you have the essence of SQL 3VL. NULL in SQL is just like a variable in an equation when you don’t know the variable’s value. No matter what type of comparison you perform with a missing value, or which other values you compare the missing value to, the result is always unknown. I’ll continue the discussion of SQL 3VL in Chapter 4.
CHAPTER 1 ■ FOUNDATIONS OF T-SQL
The core of SQL is defined by statements that perform five major functions: querying data stored in tables, manipulating data stored in tables, managing the structure of tables, controlling access to tables, and managing transactions. All of these subsets of SQL are defined following: • Querying: The SELECT query statement is a complex statement. It has more optional clauses and vendor-specific tweaks than any other statement, bar none. SELECT is concerned simply with retrieving data stored in the database. • Data Manipulation Language (DML): DML is considered a sublanguage of SQL. It is concerned with manipulating data stored in the database. DML consists of four commonly used statements: INSERT, UPDATE, DELETE, and MERGE. DML also encompasses cursor-related statements. These statements allow you to manipulate the contents of tables and persist the changes to the database. • Data Definition Language (DDL): DDL is another sublanguage of SQL. The primary purpose of DDL is to create, modify, and remove tables and other objects from the database. DDL consists of variations of the CREATE, ALTER, and DROP statements. • Data Control Language (DCL): DCL is yet another SQL sublanguage. DCL’s goal is to allow you to restrict access to tables and database objects. DCL is composed of various GRANT and REVOKE statements that allow or deny users access to database objects. • Transactional Control Language (TCL): TCL is the SQL sublanguage that is concerned with initiating and committing or rolling back transactions. A transaction is basically an atomic unit of work performed by the server. The BEGIN TRANSACTION, COMMIT, and ROLLBACK statements comprise TCL.
Databases A SQL Server instance—an individual installation of SQL Server with its own ports, logins, and databases—can manage multiple system databases and user databases. SQL Server has five system databases, as follows: • resource: The resource database is a read-only system database that contains all system objects. You will not see the resource database in the SQL Server Management Studio (SSMS) Object Explorer window, but the system objects persisted in the resource database will logically appear in every database on the server. • master: The master database is a server-wide repository for configuration and status information. The master database maintains instance-wide metadata about SQL Server as well as information about all databases installed on the current instance. It is wise to avoid modifying or even accessing the master database directly in most cases. An entire server can be brought to its knees if the master database is corrupted. If you need to access the server configuration and status information, use catalog views instead. • model: The model database is used as the template from which newly created databases are essentially cloned. Normally, you won’t want to change this database in production settings, unless you have a very specific purpose in mind and are extremely knowledgeable about the potential implications of changing the model database.
5
6
CHAPTER 1 ■ FOUNDATIONS OF T-SQL
• msdb: The msdb database stores system settings and configuration information for various support services, such as SQL Agent and Database Mail. Normally, you will use the supplied stored procedures and views to modify and access this data, rather than modifying it directly. • tempdb: The tempdb database is the main working area for SQL Server. When SQL Server needs to store intermediate results of queries, for instance, they are written to tempdb. Also, when you create temporary tables, they are actually created within tempdb. The tempdb database is reconstructed from scratch every time you restart SQL Server. Microsoft recommends that you use the system-provided stored procedures and catalog views to modify system objects and system metadata, and let SQL Server manage the system databases itself. You should avoid modifying the contents and structure of the system databases directly. User databases are created by database administrators (DBAs) and developers on the server. These types of databases are so called because they contain user data. The AdventureWorks 2008 sample database is one example of a user database.
Transaction Logs Every SQL Server database has its own associated transaction log. The transaction log provides recoverability in the event of failure, and ensures the atomicity of transactions. The transaction log accumulates all changes to the database so that database integrity can be maintained in the event of an error or other problem. Because of this arrangement, all SQL Server databases consist of at least two files: a database file with an .mdf extension and a transaction log with an .ldf extension.
THE ACID TEST SQL folks, and IT professionals in general, love their acronyms. A common acronym in the SQL world is ACID, which stands for “atomicity, consistency, isolation, durability.” These four words form a set of properties that database systems should implement to guarantee reliability of data storage, processing, and manipulation. • Atomicity: All data changes should be transactional in nature. That is, data changes should follow an all-or-nothing pattern. The classic example is a double-entry bookkeeping system in which every debit has an associated credit. Recording a debit-and-credit double-entry in the database is considered one “transaction,” or a single unit of work. You cannot record a debit without recording its associated credit, and vice versa. Atomicity ensures that either the entire transaction is performed or none of it is. • Consistency: Only data that is consistent with the rules set up in the database will be stored. Data types and constraints can help enforce consistency within the database. For instance, you cannot insert the name Dolly in an int column. Consistency also applies when dealing with data updates. If two users update the same row of a table at the same time, an inconsistency could occur if one update is only partially complete when the second update begins. The concept of isolation, described following, is designed to deal with this situation.
CHAPTER 1 ■ FOUNDATIONS OF T-SQL
• Isolation: Multiple simultaneous updates to the same data should not interfere with one another. SQL Server includes several locking mechanisms and isolation levels to ensure that two users cannot modify the exact same data at the exact same time, which could put the data in an inconsistent state. Isolation also prevents you from even reading uncommitted data by default. • Durability: Data that passes all the previous tests is committed to the database. The concept of durability ensures that committed data is not lost. The transaction log and data backup and recovery features help to ensure durability. The transaction log is one of the main tools SQL Server uses to enforce the ACID concept when storing and manipulating data.
Schemas SQL Server 2008 supports database schemas, which are little more than logical groupings of database objects. The AdventureWorks 2008 sample database, for instance, contains several schemas, such as HumanResources, Person, and Production. These schemas are used to group tables, stored procedures, views, and user-defined functions (UDFs) for management and security purposes.
■Tip When you create new database objects, like tables, and don’t specify a schema, they are automatically created in the default schema. The default schema is normally dbo, but DBAs may assign different default schemas to different users. Because of this, it’s always best to specify the schema name explicitly when creating database objects.
Tables SQL Server supports several types of objects that can be created within a database. SQL stores and manages data in its primary data structures, tables. A table consists of rows and columns, with data stored at the intersections of these rows and columns. As an example, the AdventureWorks HumanResources.Department table is shown in Figure 1-2. In the table, each row is associated with columns and each column has certain restrictions placed on its content. These restrictions comprise the data domain. The data domain defines all the values a column can contain. At the lowest level, the data domain is based on the data type of the column. For instance, a smallint column can contain any integer values between –32,768 and +32,767. The data domain of a column can be further constrained through the use of check constraints, triggers, and foreign key constraints. Check constraints provide a means of automatically checking that the value of a column is within a certain range or equal to a certain value whenever a row is inserted or updated. Triggers can provide similar functionality to check constraints. Foreign key constraints allow you to declare a relationship between the columns of one table and the columns of another table. You can use foreign key constraints to restrict the data domain of a column to only include those values that appear in a designated column of another table.
7
8
CHAPTER 1 ■ FOUNDATIONS OF T-SQL
Figure 1-2. Representation of the HumanResources.Department table
RESTRICTING THE DATA DOMAIN: A COMPARISON In this section, I have given a brief overview of three methods of constraining the data domain for a column— restricting the values that can be contained in the column. Here’s a quick comparison of the three methods: • Foreign key constraints allow SQL Server to perform an automatic check against another table to ensure that the values in a given column exist in the referenced table. If the value you are trying to update or insert in a table does not exist in the referenced table, an error is raised. The foreign key constraint provides a flexible means of altering the data domain, since adding or removing values from the referenced table automatically changes the data domain for the referencing table. Also, foreign key constraints offer an additional feature known as cascading declarative referential integrity (DRI), which automatically updates or deletes rows from a referencing table if an associated row is removed from the referenced table. • Check constraints provide a simple, efficient, and effective tool for ensuring that the values being inserted or updated in a column are within a given range or a member of a given set of values. Check constraints, however, are not as flexible as foreign key constraints and triggers since the data domain is normally defined using hard-coded constant values. • Triggers are stored procedures attached to insert, update, or delete events on a table. A trigger provides a flexible solution for constraining data, but it may require more maintenance than the other options since it is essentially a specialized form of stored procedure. Unless they are extremely well designed, triggers have the potential to be much less efficient than the other methods, as well. Triggers to constrain the data domain are generally avoided in modern databases in favor of the other methods. The exception to this is when you are trying to enforce a foreign key constraint across databases, since SQL Server doesn’t support cross-database foreign key constraints. Which method you use to constrain the data domain of your column(s) needs to be determined by your project-specific requirements on a case-by-case basis.
CHAPTER 1 ■ FOUNDATIONS OF T-SQL
Views A view is like a virtual table—the data it exposes is not stored in the view object itself. Views are composed of SQL queries that reference tables and other views, but they are referenced just like tables in queries. Views serve two major purposes in SQL Server: they can be used to hide the complexity of queries, and they can be used as a security device to limit the rows and columns of a table that a user can query. Views are expanded, meaning that their logic is incorporated into the execution plan for queries when you use them in queries and DML statements. SQL Server may not be able to use indexes on the base tables when the view is expanded, resulting in less-than-optimal performance when querying views in some situations. To overcome the query performance issues with views, SQL Server also has the ability to create a special type of view known as an indexed view. An indexed view is a view that SQL Server persists to the database like a table. When you create an indexed view, SQL Server allocates storage for it and allows you to query it like any other table. There are, however, restrictions on inserting, updating, and deleting from an indexed view. For instance, you cannot perform data modifications on an indexed view if more than one of the view’s base tables will be affected. You also cannot perform data modifications on an indexed view if the view contains aggregate functions or a DISTINCT clause. You can also create indexes on an indexed view to improve query performance. The downside to an indexed view is increased overhead when you modify data in the view’s base tables, since the view must be updated as well.
Indexes Indexes are SQL Server’s mechanisms for optimizing access to data. SQL Server 2008 supports several types of indexes, including the following: • Clustered index: A clustered index is limited to one per table. This type of index defines the ordering of the rows in the table. A clustered index is physically implemented using a b-tree structure with the data stored in the leaf levels of the tree. Clustered indexes order the data in a table in much the same way that a phone book is ordered by last name. A table with a clustered index is referred to as a clustered table, while a table with no clustered index is referred to as a heap. • Nonclustered index: A nonclustered index is also a b-tree index managed by SQL Server. In a nonclustered index, index rows are included in the leaf levels of the b-tree. Because of this, nonclustered indexes have no effect on the ordering of rows in a table. The index rows in the leaf levels of a nonclustered index consist of the following: • A nonclustered key value • A row locator, which is the clustered index key on a table with a clustered index, or a SQL-generated row ID for a heap • Nonkey columns, which are added via the INCLUDE clause of the CREATE INDEX statement A nonclustered index is analogous to an index in the back of a book.
9
10
CHAPTER 1 ■ FOUNDATIONS OF T-SQL
• XML index: SQL Server supports special indexes designed to help efficiently query XML data. See Chapter 11 for more information. • Spatial index: A spatial index is an interesting new indexing structure to support efficient querying of the new geometry and geography data types. See Chapter 2 for more information. • Full-text index: A full-text index (FTI) is a special index designed to efficiently perform full-text searches of data and documents. Beginning with SQL Server 2005, you can also include nonkey columns in your nonclustered indexes with the INCLUDE clause of the CREATE INDEX statement. The included columns give you the ability to work around SQL Server’s index size limitations.
Stored Procedures SQL Server supports the installation of server-side T-SQL code modules via stored procedures (SPs). It’s very common to use SPs as a sort of intermediate layer or custom server-side application programming interface (API) that sits between user applications and tables in the database. Stored procedures that are specifically designed to perform queries and DML statements against the tables in a database are commonly referred to as CRUD (create, read, update, delete) procedures.
User-Defined Functions User-defined functions (UDFs) can perform queries and calculations, and return either scalar values or tabular result sets. UDFs have certain restrictions placed on them. For instance, they cannot utilize certain nondeterministic system functions, nor can they perform DML or DDL statements, so they cannot make modifications to the database structure or content. They cannot perform dynamic SQL queries or change the state of the database (i.e., cause side effects).
SQL CLR Assemblies SQL Server 2008 supports access to Microsoft .NET functionality via the SQL Common Language Runtime (SQL CLR). To access this functionality, you must register compiled .NET SQL CLR assemblies with the server. The assembly exposes its functionality through class methods, which can be accessed via SQL CLR functions, procedures, triggers, user-defined types, and user-defined aggregates. SQL CLR assemblies replace the deprecated SQL Server extended stored procedure (XP) functionality available in prior releases.
■Tip Avoid using XPs on SQL Server 2008. The same functionality provided by XPs can be provided by SQL CLR code. The SQL CLR model is more robust and secure than the XP model. Also keep in mind that the XP library is deprecated and XP functionality may be completely removed in a future version of SQL Server.
CHAPTER 1 ■ FOUNDATIONS OF T-SQL
Elements of Style Now that I’ve given a broad overview of the basics of SQL Server, we’ll take a look at some recommended development tips to help with code maintenance. Selecting a particular style and using it consistently helps immensely with both debugging and future maintenance. The following sections contain some general recommendations to make your T-SQL code easy to read, debug, and maintain.
Whitespace SQL Server ignores extra whitespace between keywords and identifiers in SQL queries and statements. A single statement or query may include extra spaces and tab characters, and can even extend across several lines. You can use this knowledge to great advantage. Consider Listing 1-3, which is adapted from the HumanResources.vEmployee view in the AdventureWorks database. Listing 1-3. The HumanResources.vEmployee View from the AdventureWorks Database SELECT [HumanResources].[Employee].[EmployeeID],[Person].[Contact].[Title],[➥ Person].[Contact].[FirstName],[Person].[Contact].[MiddleName],[Person].[Cont➥ act].[LastName],[Person].[Contact].[Suffix],[HumanResources].[Employee].[Tit➥ le] AS [JobTitle],[Person].[Contact].[Phone],[Person].[Contact].[EmailAddres➥ s],[Person].[Contact].[EmailPromotion],[Person].[Address].[AddressLine1],[Pe➥ rson].[Address].[AddressLine2],[Person].[Address].[City],[Person].[StateProv➥ ince].[Name] AS [StateProvinceName],[Person].[Address].[PostalCode],[Person]➥ .[CountryRegion].[Name] AS [CountryRegionName],[Person].[Contact].[Additiona➥ lContactInfo] FROM [HumanResources].[Employee] INNER JOIN [Person].[Contact]➥ ON [Person].[Contact].[ContactID] = [HumanResources].[Employee].[ContactID]➥ INNER JOIN [HumanResources].[EmployeeAddress] ON [HumanResources].[Employee➥ ].[EmployeeID] = [HumanResources].[EmployeeAddress].[EmployeeID] INNER JOIN ➥ [Person].[Address] ON [HumanResources].[EmployeeAddress].[AddressID] = [Pers➥ on].[Address].[AddressID] INNER JOIN [Person].[StateProvince] ON [Person].[S➥ tateProvince].[StateProvinceID] = [Person].[Address].[StateProvinceID] INNER➥ JOIN [Person].[CountryRegion] ON [Person].[CountryRegion].[CountryRegionCod➥ e] = [Person].[StateProvince].[CountryRegionCode] This query will run and return the correct result, but it’s very hard to read. You can use whitespace and table aliases to generate a version that is much easier on the eyes, as demonstrated in Listing 1-4.
11
12
CHAPTER 1 ■ FOUNDATIONS OF T-SQL
Listing 1-4. The HumanResources.vEmployee View Reformatted for Readability SELECT e.EmployeeID, c.Title, c.FirstName, c.MiddleName, c.LastName, c.Suffix, e.Title AS JobTitle, c.Phone, c.EmailAddress, c.EmailPromotion, a.AddressLine1, a.AddressLine2, a.City, sp.Name AS StateProvinceName, a.PostalCode, cr.Name AS CountryRegionName, c.AdditionalContactInfo FROM HumanResources.Employee e INNER JOIN Person.Contact c ON c.ContactID = e.ContactID INNER JOIN HumanResources.EmployeeAddress ea ON e.EmployeeID = ea.EmployeeID INNER JOIN Person.Address a ON ea.AddressID = a.AddressID INNER JOIN Person.StateProvince sp ON sp.StateProvinceID = a.StateProvinceID INNER JOIN Person.CountryRegion cr ON cr.CountryRegionCode = sp.CountryRegionCode; Notice that the ON keywords are indented, associating them visually with the INNER JOIN operators directly before them in the listing. The column names on the lines directly after the SELECT keyword are also indented, associating them visually with the SELECT keyword. This particular style is useful in helping visually break up a query into sections. The personal style you decide upon might differ from this one, but once you have decided on a standard indentation style, be sure to apply it consistently throughout your code. Code that is easy to read is easier to debug and maintain. The code in Listing 1-4 uses table aliases, plenty of whitespace, and the semicolon (;) terminator marking the end of the SELECT statement to make the code more readable. Although not always required, it is a good idea to get into the habit of using the terminating semicolon in your SQL queries.
CHAPTER 1 ■ FOUNDATIONS OF T-SQL
■Note Semicolons are required terminators for some statements in SQL Server 2008. Instead of trying to remember all the special cases where they are or aren’t required, it is a good idea to use the semicolon statement terminator throughout your T-SQL code. You will notice the use of semicolon terminators in all the examples in this book.
Naming Conventions SQL Server allows you to name your database objects (tables, views, procedures, and so on) using just about any combination of up to 128 characters (116 characters for local temporary table names), as long as you enclose them in double quotes (") or brackets ([ ]). Just because you can, however, doesn’t necessarily mean you should. Many of the allowed characters are hard to differentiate from other similar-looking characters, and some might not port well to other platforms. The following suggestions will help you avoid potential problems: • Use alphabetic characters (A–Z, a–z, and Unicode Standard 3.2 letters) for the first character of your identifiers. The obvious exceptions are SQL Server variable names that start with the at sign (@), temporary tables and procedures that start with the number sign (#), and global temporary tables and procedures that begin with a double number sign (##). • Many built-in T-SQL functions and system variables have names that begin with a double at sign (@@), such as @@ERROR and @@IDENTITY. To avoid confusion and possible conflicts, don’t use a leading double at sign to name your identifiers. • Restrict the remaining characters in your identifiers to alphabetic characters (A–Z, a–z, and Unicode Standard 3.2 letters), numeric digits (0–9), and the underscore character (_). The dollar sign ($) character, while allowed, is not advisable. • Avoid embedded spaces, punctuation marks (other than the underscore character), and other special characters in your identifiers. • Avoid using SQL Server 2008 reserved keywords as identifiers. • Limit the length of your identifiers. Thirty-two characters or less is a reasonable limit while not being overly restrictive. Much more than that becomes cumbersome to type and can hurt your code readability. Finally, to make your code more readable, select a capitalization style for your identifiers and code, and use it consistently. My preference is to fully capitalize T-SQL keywords and use mixed-case and underscore characters to visually “break up” identifiers into easily readable words. Using all capital characters or inconsistently applying mixed case to code and identifiers can make your code illegible and hard to maintain. Consider the example query in Listing 1-5.
13
14
CHAPTER 1 ■ FOUNDATIONS OF T-SQL
Listing 1-5. All-Capital SELECT Query SELECT I.CUSTOMERID, C.TITLE, C.FIRSTNAME, C.MIDDLENAME, C.LASTNAME, C.SUFFIX, C.PHONE, C.EMAILADDRESS, C.EMAILPROMOTION FROM SALES.INDIVIDUAL I INNER JOIN PERSON.CONTACT C ON C.CONTACTID = I.CONTACTID INNER JOIN SALES.CUSTOMERADDRESS CA ON CA.CUSTOMERID = I.CUSTOMERID; The all-capital version is difficult to read. It’s hard to tell the SQL keywords from the column and table names at a glance. Compound words for column and table names are not easily identified. Basically, your eyes have to work a lot harder to read this query than they should, which makes otherwise simple maintenance tasks more difficult. Reformatting the code and identifiers makes this query much easier on the eyes, as Listing 1-6 demonstrates. Listing 1-6. Reformatted, Easy-on-the-Eyes Query SELECT i.CustomerID, c.Title, c.FirstName, c.MiddleName, c.LastName, c.Suffix, c.Phone, c.EmailAddress, c.EmailPromotion FROM Sales.Individual i INNER JOIN Person.Contact c ON c.ContactID = i.ContactID INNER JOIN Sales.CustomerAddress ca ON ca.CustomerID = i.CustomerID; The use of all capitals for the keywords in the second version makes them stand out from the mixed-case table and column names. Likewise, the mixed-case column and table names make the compound word names easy to recognize. The net effect is that the code is easier to read, which makes it easier to debug and maintain. Consistent use of good formatting habits helps keep trivial changes trivial and makes complex changes easier.
CHAPTER 1 ■ FOUNDATIONS OF T-SQL
One Entry, One Exit When writing SPs and UDFs, it’s good programming practice to use the “one entry, one exit” rule. SPs and UDFs should have a single entry point and a single exit point (RETURN statement). The following SP retrieves the ContactTypeID number from the AdventureWorks Person. ContactType table for the ContactType name passed into it. If no ContactType exists with the name passed in, a new one is created, and the newly created ContactTypeID is passed back. Listing 1-7 demonstrates this simple procedure with one entry point and several exit points. Listing 1-7. Stored Procedure Example with One Entry and Multiple Exits CREATE PROCEDURE dbo.GetOrAdd_ContactType ( @Name NVARCHAR(50), @ContactTypeID INT OUTPUT ) AS DECLARE @Err_Code AS INT; SELECT @Err_Code = 0; SELECT @ContactTypeID = ContactTypeID FROM Person.ContactType WHERE [Name] = @Name; IF @ContactTypeID IS NOT NULL RETURN; -- Exit 1: if the ContactType exists INSERT INTO Person.ContactType ([Name], ModifiedDate) SELECT @Name, CURRENT_TIMESTAMP; SELECT @Err_Code = @@error; IF @Err_Code 0 RETURN @Err_Code; -- Exit 2: if there is an error on INSERT SELECT @ContactTypeID = SCOPE_IDENTITY(); RETURN @Err_Code;
-- Exit 3: after successful INSERT
GO This code has one entry point, but three possible exit points. Figure 1-3 shows a simple flowchart for the paths this code can take.
15
16
CHAPTER 1 ■ FOUNDATIONS OF T-SQL
Figure 1-3. Flowchart for example with one entry and multiple exits As you can imagine, maintaining code such as in Listing 1-7 becomes more difficult because the flow of the code has so many possible exit points, each of which must be accounted for when you make modifications to the SP. Listing 1-8 updates Listing 1-7 to give it a single entry point and a single exit point, making the logic easier to follow. Listing 1-8. Stored Procedure with One Entry and One Exit CREATE PROCEDURE dbo.GetOrAdd_ContactType ( @Name NVARCHAR(50), @ContactTypeID INT OUTPUT ) AS DECLARE @Err_Code AS INT; SELECT @Err_Code = 0; SELECT @ContactTypeID = ContactTypeID FROM Person.ContactType WHERE [Name] = @Name; IF @ContactTypeID IS NULL BEGIN INSERT INTO Person.ContactType ([Name], ModifiedDate) SELECT @Name, CURRENT_TIMESTAMP;
CHAPTER 1 ■ FOUNDATIONS OF T-SQL
SELECT @Err_Code = @@error; IF @Err_Code = 0 -- If there's an error, skip next SELECT @ContactTypeID = SCOPE_IDENTITY(); END RETURN @Err_Code;
-- Single exit point
GO Figure 1-4 shows the modified flowchart for this new version of the SP.
Figure 1-4. Flowchart for example with one entry and one exit The single-entry/single-exit model makes the logic easier to follow, which in turn makes the code easier to manage. This rule also applies to looping structures, which you implement via the WHILE statement in T-SQL. Avoid using the WHILE loop’s CONTINUE and BREAK statements and the GOTO statement; these statements lead to old-fashioned, difficult-to-maintain spaghetti code.
17
18
CHAPTER 1 ■ FOUNDATIONS OF T-SQL
Defensive Coding Defensive coding involves anticipating problems before they occur and mitigating them through good coding practices. The first and foremost lesson of defensive coding is to always check user input. Once you open your system up to users, expect them to do everything in their power to try to break your system. For instance, if you ask users to enter a number between 1 and 10, expect that they’ll ignore your directions and key in ; DROP TABLE dbo.syscomments; -at the first available opportunity. Defensive coding practices dictate that you should check and scrub external inputs. Don’t blindly trust anything that comes from an external source. Another aspect of defensive coding is a clear delineation between exceptions and run-ofthe-mill issues. The key is that exceptions are, well, exceptional in nature. Ideally, exceptions should be caused by errors that you can’t account for or couldn’t reasonably anticipate, like a lost network connection or physical corruption of your application or data storage. Errors that can be reasonably expected, like data entry errors, should be captured before they are raised to the level of exceptions. Keep in mind that exceptions are often resource intensive, expensive operations. If you can avoid an exception by anticipating a particular problem, your application will benefit in both performance and control.
SQL-92 Syntax Outer Joins Microsoft has been warning us for a long time, and starting with SQL 2005 they finally went and did it. SQL Server 2008, like SQL Server 2005, eliminates the old-style *= and =* outer join operators. Queries like the one in Listing 1-9 won’t work with SQL Server 2008. Listing 1-9. Query Using Old-Style Join Operators SELECT o.name FROM sys.objects o, sys.views v WHERE o.object_id *= v.object_id; SQL responds to this query with one of the most elaborate error messages ever seen in a Microsoft product: SQL2008(SQL2008\Michael): Msg 4147, Level 15, State 1, Line 4 The query uses non-ANSI outer join operators ("*=" or "=*"). To run this query without modification, please set the compatibility level for current database to 80, using the SET COMPATIBILITY_LEVEL option of ALTER DATABASE. It is strongly recommended to rewrite the query using ANSI outer join operators (LEFT OUTER JOIN, RIGHT OUTER JOIN). In the future versions of SQL Server, non-ANSI join operators will not be supported even in backward-compatibility modes. As the error message suggests, you can use the sp_dbcmptlevel SP to revert the database compatibility to 80 (SQL Server 2000) as a workaround for this problem. Best practices dictate that you should eliminate the old-style joins from your code as soon as possible. Backwardcompatibility mode should be considered a temporary workaround for the old-style join issue, not a permanent fix.
CHAPTER 1 ■ FOUNDATIONS OF T-SQL
COMPATIBILITY MODE CHANGES You can use the system SP sp_dbcmptlevel to revert various SQL Server behaviors to a version prior to SQL Server 2000. Use a compatibility level of 90 for SQL Server 2005 and 80 for SQL Server 2000. The SP call that converts the AdventureWorks sample database to SQL Server 2000 compatibility mode looks like this: EXEC sp_dbcmptlevel 'AdventureWorks', 90 To convert it back to SQL Server 2008 compatibility mode, you would use a statement like this: EXEC sp_dbcmptlevel 'AdventureWorks', 100 When you set a database to backward-compatibility mode, you can lose access to some of the new functionality, such as SQL CLR support and SSMS diagrams for that database. Note that previous compatibility levels of 70 for SQL Server 7.0, 65 for SQL Server 6.5, and 60 for SQL Server 6.0 are no longer available in SQL Server 2008. Microsoft has announced that from here on out they will only be supporting two prior versions in backward-compatibility modes, so you can expect SQL Server 2000 compatibility mode to be gone with the next SQL Server release after 2008. You should avoid using backward-compatibility mode unless you have a compelling reason.
The error message also suggests that the old-style join operators will not be supported in future versions, even in backward-compatibility mode. If you have old-style joins in your T-SQL code, the best course of action is to convert them to ISO SQL standard joins as soon as possible. Listing 1-10 updates the previous query to use the current SQL standard. Listing 1-10. ISO SQL-92 Standard Join Syntax SELECT o.name FROM sys.objects o LEFT JOIN sys.views v ON o.object_id = v.object_id; Note that you can still use the abbreviated inner join syntax without any problems. The abbreviated inner join syntax looks like Listing 1-11. Listing 1-11. Abbreviated Inner Join Syntax SELECT o.name FROM sys.objects o, sys.views v WHERE o.object_id = v.object_id; This book uses the ISO SQL-92 standard syntax joins exclusively in code examples.
The SELECT * Statement Consider the SELECT * style of querying. In a SELECT clause, the asterisk (*) is a shorthand way of specifying that all columns in a table should be returned. Although SELECT * is a handy tool
19
20
CHAPTER 1 ■ FOUNDATIONS OF T-SQL
for ad hoc querying of tables during development and debugging, you should normally not use it in a production system. One reason to avoid this method of querying is to minimize the amount of data retrieved with each call. SELECT * retrieves all columns, whether or not they are needed by the higher-level applications. For queries that return a large number of rows, even one or two extraneous columns can waste a lot of resources. Also, if the underlying table or view is altered, columns might be added to or removed from the returned result set. This can cause errors that are hard to locate and fix. By specifying the column names, your front-end application can be assured that only the required columns are returned by a query, and that errors caused by missing columns will be easier to locate. As with most things, there are always exceptions—for example, if you are using the FOR XML AUTO clause to generate XML based on the structure and content of your relational data. In this case, SELECT * can be quite useful, since you are relying on FOR XML to automatically generate the node names based on the table and column names in the source tables.
Variable Initialization When you create SPs, UDFs, or any script that uses T-SQL user variables, you should initialize those variables before the first use. Unlike other programming languages that guarantee that newly declared variables will be initialized to 0 or an empty string (depending on their data types), T-SQL guarantees only that newly declared variables will be initialized to NULL. Consider the code snippet shown in Listing 1-12. Listing 1-12. Sample Code Using an Uninitialized Variable DECLARE @i INT; SELECT @i = @i + 5; SELECT @i; The result is NULL, a shock if you were expecting 5. Expecting SQL Server to initialize numeric variables to 0 (like @i in the previous example) or an empty string will result in bugs that can be extremely difficult to locate in your T-SQL code. To avoid these problems, always explicitly initialize your variables after declaration, as demonstrated in Listing 1-13. Listing 1-13. Sample Code Using an Initialized Variable DECLARE @i INT = 0; -- Changed this statement to initialize @i to 0 SELECT @i = @i + 5; SELECT @i;
Summary This chapter has served as an introduction to T-SQL, including a brief history of SQL and a discussion of the declarative programming style. I started this chapter with a discussion of ISO SQL standard compatibility in SQL Server 2008 and the differences between imperative and declarative languages, of which SQL is the latter. I also introduced many of the basic components of SQL, including databases, tables, views, SPs, and other common database objects. Finally, I provided my personal recommendations for writing SQL code that is easy to debug
CHAPTER 1 ■ FOUNDATIONS OF T-SQL
and maintain. I subscribe to the “eat your own dog food” theory, and throughout this book I will faithfully follow the best practice recommendations that I’ve asked you to consider. The next chapter provides an overview of the new and improved tools available out of the box for developers. Specifically, Chapter 2 will discuss the SQLCMD text-based SQL client (originally a replacement for osql), SSMS, SQL Server 2008 Books Online (BOL), and some of the other tools available for making writing, editing, testing, and debugging easier and faster than ever.
EXERCISES 1. Describe the difference between an imperative language and a declarative language. 2. What does the acronym ACID stand for? 3. SQL Server 2008 supports five different types of indexes. What are they? 4. Name two of the restrictions on any type of SQL Server UDF. 5. [True/false] In SQL Server, newly declared variables are always assigned the default value 0 for numeric data types and an empty string for character data types.
21
CHAPTER
2
T-SQL 2008 New Features E
very new version of SQL Server comes with several new T-SQL features and enhancements. SQL Server 2008 is no exception. In the newest version of SQL Server, Microsoft has responded to developer requests in a big way. SQL Server 2008 supports brand new developer convenience features like single-statement variable declaration and initialization, new data types to manipulate and query date-based and spatial data, new statements like MERGE that add muchneeded functionality to T-SQL, and a whole lot more. When moving from SQL Server 2000, there will be a slight learning curve, although the basics of T-SQL will still be familiar. SQL Server 2005 developers, on the other hand, will feel right at home when developing for SQL Server 2008. If you wrote your SQL Server 2005 scripts to follow best practices, most will run with minimal, if any, changes. Because of the deprecation of some features, SQL Server 2000 scripts that followed best practices may require slight modification to run on SQL Server 2008. Converting old scripts to run on SQL Server 2008 is just a starting point, though. Once you’ve made the move to SQL Server 2008, you’ll undoubtedly want to take advantage of the new features and functionality to solve common problems. This chapter gives an overview of the exciting new features that SQL Server 2008 adds to T-SQL.
■Note You’ll find a list of deprecated features in BOL. To locate the list, search for “deprecated SQL 2008” in BOL. The list has deprecated features and their replacements, when available. Although many of these features are currently supported in SQL Server 2008, they will be removed in a future version of the product.
Productivity Enhancements Taking a cue from languages like C# and Visual Basic, SQL Server 2008 supports many new productivity-enhancing T-SQL features for developers. The first of these new features is singlestatement variable declaration and initialization. In the past, developers had to declare new variables in one or more DECLARE statements and assign values to the variables in one or more SET or SELECT statements, as shown in Listing 2-1. Listing 2-1. Separate Variable Declaration and Initialization DECLARE @x int, @y int, @z int;
23
24
CHAPTER 2 ■ T-SQL 2008 NEW FEATURES
SET @x = 1; SET @y = 2; SET @z = 3; With single-statement declaration and initialization, you can combine these two steps into a single statement, as shown in Listing 2-2. Listing 2-2. Single-Statement Variable Declaration and Initialization DECLARE @x int = 1, @y int = 2, @z int = 3; T-SQL has been further improved with the addition of several C-style assignment operators. For those unfamiliar with C-style languages, many mathematical, logical, and string concatenation operators can be combined with the equal sign (=) to create new assignment operators like += and *=. In C-style languages, these operators are often used to give the compiler optimization hints; in T-SQL, they are simply a convenience for developers. Listing 2-3 demonstrates T-SQL’s new C-style assignment operators. Listing 2-3. Calculating and Assigning Values with C-Style Assignment DECLARE @x int = 4, @y int = 25, @s1 varchar(20) = 'Sql'; SET @x *= @y; SET @s1 += ' Server'; SELECT @x, @s1; This example declares and assigns values to the int variables @x and @y, and to the varchar variable @s1. It uses the *= operator to assign the value of @x multiplied by @y back to @x. C# programmers will recognize the assignment expression in the statement SET @x *= @y as simple shorthand for SET @x = @x * @y. The += string concatenation operator is used to append the string ' Server' to the varchar @s1 variable. As before, the assignment statement SET @s1 += ' Server' is shorthand for SET @s1 = @s1 + ' Server'. The results of this simple example are shown in Figure 2-1.
Figure 2-1. The results of the C-style assignment operator example The complete list of T-SQL supported C-style assignment operators is shown in Table 2-1.
CHAPTER 2 ■ T-SQL 2008 NEW FEATURES
Table 2-1. T-SQL C-Style Assignment Operators
Operator
Description
+=
Addition with assignment, or string concatenation with assignment
-=
Subtraction with assignment
*=
Multiplication with assignment
/=
Division with assignment
%=
Modulo with assignment
^=
Bitwise exclusive-OR with assignment
|=
Bitwise OR with assignment
&=
Bitwise AND with assignment
Another convenience feature is offered by the new row constructors, which allow you to specify multiple rows in the VALUES clause of the INSERT statement. This new feature allows you to specify more than one row of data to be inserted in a single INSERT statement. This is particularly handy when initially populating tables, since you don’t have to re-create the entire INSERT statement over and over. Listing 2-4 demonstrates how row constructors can be used to insert three new work shifts into the AdventureWorks HumanResources.Shift table. Listing 2-4. Using Row Constructors to Create Three New Work Shifts INSERT INTO HumanResources.Shift ( Name, StartTime, EndTime ) VALUES ( 'Noon Part-time', '12:00:00', '16:00:00' ), ( 'Evening Part-time', '16:00:00', '20:00:00' ), ( 'Midnight Part-time', '00:00:00', '04:00:00' );
25
26
CHAPTER 2 ■ T-SQL 2008 NEW FEATURES
SELECT ShiftID, Name, StartTime, EndTime, ModifiedDate FROM HumanResources.Shift; In previous versions of SQL Server, this would have had to have been written as three separate INSERT statements, each with the columns specified completely; or as an INSERT statement with multiple SELECT queries unioned together with the UNION ALL set operator. As you can see, a row constructor simplifies the code. The result of the INSERT statement that uses a row constructor is shown in Figure 2-2.
Figure 2-2. The results of creating three new AdventureWorks work shifts
The MERGE Statement Microsoft teased us with the possibility in prerelease Beta versions of SQL Server 2005, but it yanked the MERGE statement out of T-SQL right before the SQL Server 2005 RTM was released. SQL Server 2008 fixes this situation by finally giving us a fully functional MERGE statement. The MERGE statement is a combination statement that can perform INSERT, UPDATE, and DELETE statements based on whether rows that match the selection criteria exist in the target table or not. Because it is so flexible, the MERGE statement syntax is a bit more complex than other Data Manipulation Language (DML) statements. It definitely takes some getting used to. For the most part, you will see it used as a combination UPDATE/INSERT, or “upsert,” statement. You can run the MERGE statement example in Listing 2-5 as a stand-alone sample, or you can run it after running the example in Listing 2-4, which adds three new shifts to the AdventureWorks HumanResources.Shift table. I recommend the latter option. Listing 2-5. Using MERGE to Update AdventureWorks Work Shifts CREATE TABLE #TempShifts ( Name varchar(50) NOT NULL, StartTime time NOT NULL, EndTime time NOT NULL );
CHAPTER 2 ■ T-SQL 2008 NEW FEATURES
INSERT INTO #TempShifts ( Name, StartTime, EndTime ) VALUES ( 'Morning Part-time', '08:00:00', '12:00:00' ), ( 'Evening Part-time ', '18:00:00', '22:00:00' ), ( 'Midnight Swing Shift', '00:00:00', '04:00:00' ); MERGE HumanResources.Shift AS target USING #TempShifts AS source ON (target.Name = source.Name) OR (target.StartTime = source.StartTime AND target.EndTime = source.EndTime) WHEN MATCHED THEN UPDATE SET Name = source.Name, StartTime = source.StartTime, EndTime = source.EndTime WHEN TARGET NOT MATCHED THEN INSERT ( Name, StartTime, EndTime ) VALUES ( source.Name, source.StartTime, source.EndTime );
27
28
CHAPTER 2 ■ T-SQL 2008 NEW FEATURES
SELECT ShiftID, Name, StartTime, EndTime, ModifiedDate FROM HumanResources.Shift; DROP TABLE #TempShifts; The MERGE sample begins by creating a temporary table into which you insert names and start and end times for three different work shifts: CREATE TABLE #TempShifts ( Name varchar(50) NOT NULL, StartTime time NOT NULL, EndTime time NOT NULL ); INSERT INTO #TempShifts ( Name, StartTime, EndTime ) VALUES ( 'Morning Part-time', '08:00:00', '12:00:00' ), ( 'Evening Part-time ', '18:00:00', '22:00:00' ), ( 'Midnight Swing Shift', '00:00:00', '04:00:00' ); If you’ve run the example in Listing 2-4, you’ll notice that one of the new shifts, Evening Part-time, already exists with a start time of 18:00:00 and an end time of 22:00:00. Another shift, Midnight Part-time, exists for the hours between 00:00:00 and 04:00:00. The Morning Part-time shift does not exist at all.
CHAPTER 2 ■ T-SQL 2008 NEW FEATURES
The interesting part of the code sample is the actual MERGE statement itself. This statement begins with the MERGE keyword and the target table. Notice that the table name is aliased, which will make it easier to reference later in the ON clause. MERGE HumanResources.Shift AS target The USING clause specifies the data rows to match against the target table. In this case, I’m matching the rows I created in the #TempShifts table against the target HumanResources.Shift table. The USING clause is very important to get right, since the rows returned by this clause determine the actions taken later in the MERGE statement. In this case, I’m simply using the #TempShifts table as the source, but you can also use a derived table. USING #TempShifts AS source The ON clause determines which rows between the target table and the USING clause data rows are matches. This example uses a compound predicate that flags any two rows as matches when they both have either the same Name or the same StartTime and EndTime. ON (target.Name = source.Name) OR (target.StartTime = source.StartTime AND target.EndTime = source.EndTime) The WHEN MATCHED clause performs its action whenever two rows match based on your ON clause criteria. The action is specified in the THEN clause, and can be either an UPDATE or a DELETE. This example is using the UPDATE clause, which looks like an abbreviated UPDATE statement. Notice that the UPDATE clause does not specify a target table, since the target table is already specified in the MERGE clause at the beginning of the statement. WHEN MATCHED THEN UPDATE SET Name = source.Name, StartTime = source.StartTime, EndTime = source.EndTime The MERGE statement can have only one WHEN TARGET NOT MATCHED clause. This clause can only perform an INSERT when a row is found in the USING clause source that does not match a row in the target table. WHEN TARGET NOT MATCHED THEN INSERT ( Name, StartTime, EndTime ) VALUES ( source.Name, source.StartTime, source.EndTime );
29
30
CHAPTER 2 ■ T-SQL 2008 NEW FEATURES
The results of the MERGE statement example in Listing 2-5 are shown in Figure 2-3. Notice that MERGE has updated the Evening Part-time shift so that it is now has a StartTime of 18:00:00 and an EndTime of 22:00:00. Likewise, the Name of the Midnight Part-time shift has been updated to Midnight Swing Shift. Last, a new shift called Morning Part-time has been inserted by the MERGE statement.
Figure 2-3. MERGE statement updates and inserts to HumanResources.Shifts
DELETING MATCHES AND HANDLING UNMATCHED SOURCE ROWS The new MERGE statement allows you to specify up to two WHEN MATCHED clauses in your MERGE statement. The actions you can take in a WHEN MATCHED clause are limited to UPDATE and DELETE. You can add AND with a predicate to the WHEN MATCHED clause to differentiate between WHEN MATCHED clauses. To be honest, I doubt that the DELETE functionality will gain the same widespread use that INSERT/UPDATE will receive, but it is one of those features that you’ll be glad to have when you actually need it. I will give an example of multiple WHEN MATCHED clauses and DELETE functionality later in this section. The WHEN TARGET NOT MATCHED clause, as explained previously in this section, is what the MERGE statement uses to insert new rows from the source rows (the USING clause is considered the source) that do not have a match in the target table. The WHEN MATCHED clause performs actions when rows from both the source and target tables match. This covers two of the three possible scenarios when matching source and target rows. The third scenario, which hasn’t been discussed yet, is when a row exists in the target table but does not have a match in the source rows. On occasion, you may need to handle this third possibility. Enter the WHEN SOURCE NOT MATCHED clause. This clause can perform an UPDATE or DELETE of the target table row when a row exists in the source that does not exist in the target table. Also, you can specify at most two WHEN SOURCE NOT MATCHED clauses. If you specify two of these clauses, the first must have an AND clause with a predicate.
The MERGE statement is an important new DML feature, and the second MERGE example demonstrates the MERGE statement DELETE functionality that I mentioned previously in this section. If you’ve already run the example in Listing 2-5, then your HumanResources.Shift table will contain the data shown in Figure 2-3. The example in Listing 2-6 builds on Listing 2-5. The lines that are different in this listing are displayed in bold.
CHAPTER 2 ■ T-SQL 2008 NEW FEATURES
Listing 2-6. Using MERGE to Update, Insert, or Delete Work Shifts CREATE TABLE #TempShifts ( Name varchar(50) NOT NULL, StartTime time NOT NULL, EndTime time NOT NULL, Action varchar(10) NOT NULL ); GO INSERT INTO #TempShifts ( Name, StartTime, EndTime, Action ) VALUES ( 'Morning Part-time', '08:00:00', '12:00:00', 'DELETE' ), ( 'Evening Part-time ', '18:00:00', '22:00:00', 'UPDATE' ), ( 'Midnight Swing Shift', '00:00:00', '04:00:00', 'DELETE' ); MERGE HumanResources.Shift AS target USING #TempShifts AS source ON (target.Name = source.Name) OR (target.StartTime = source.StartTime AND target.EndTime = source.EndTime) WHEN MATCHED AND (source.Action = 'Delete') THEN DELETE WHEN MATCHED THEN UPDATE SET Name = source.Name, StartTime = source.StartTime, EndTime = source.EndTime
31
32
CHAPTER 2 ■ T-SQL 2008 NEW FEATURES
WHEN TARGET NOT MATCHED THEN INSERT ( Name, StartTime, EndTime ) VALUES ( source.Name, source.StartTime, source.EndTime ); SELECT ShiftID, Name, StartTime, EndTime, ModifiedDate FROM HumanResources.Shift; GO DROP TABLE #TempShifts; This example begins like the previous example: by building a temporary table to hold the new shift information. This time, however, I’ve added an Action column that determines the action to take when a row is matched. If the Action is Delete, matched rows are deleted from the target table. If the Action is Update (or anything else for that matter), matched rows will be updated. CREATE TABLE #TempShifts ( Name varchar(50) NOT NULL, StartTime time NOT NULL, EndTime time NOT NULL, Action varchar(10) NOT NULL ); GO INSERT INTO #TempShifts (Name, StartTime, EndTime, Action) VALUES ('Morning Part-time', '08:00:00', '12:00:00', 'DELETE'), ('Evening Part-time ', '18:00:00', '22:00:00', 'UPDATE'), ('Midnight Swing Shift', '00:00:00', '04:00:00', 'DELETE'); The MERGE statement begins as before, the only difference being that the Action column is also returned by the USING source table: MERGE HumanResources.Shift AS target USING #TempShifts AS source
CHAPTER 2 ■ T-SQL 2008 NEW FEATURES
There are now two WHEN MATCHED clauses in the MERGE statement. The first performs a DELETE when the row is matched and the source row Action is Delete. Notice that the DELETE clause is like a thoroughly abbreviated DELETE statement. Unlike the DELETE statement, you don’t need to specify a table to delete from, since the target table was already specified at the beginning of the MERGE statement. You also don’t need to use a WHERE clause to restrict the rows, since it only deletes the current matched row. WHEN MATCHED AND (source.Action = 'Delete') THEN DELETE The second WHEN MATCHED clause captures every matching row that falls through the first WHEN MATCHED clause. It doesn’t need an AND clause. WHEN MATCHED THEN UPDATE SET Name = source.Name, StartTime = source.StartTime, EndTime = source.EndTime Finally, the WHEN TARGET NOT MATCHED clause captures and inserts all source rows that don’t match the target table: WHEN TARGET NOT MATCHED THEN INSERT ( Name, StartTime, EndTime ) VALUES ( source.Name, source.StartTime, source.EndTime ); The results of this MERGE statement example are that the Morning Part-time and Midnight Swing Shift work shifts are deleted. The Evening Part-time shift is updated so that its new StartTime and EndTime are 16:00:00 and 20:00:00, respectively. The results are shown in Figure 2-4.
Figure 2-4. The results of updating and deleting work shifts with MERGE
33
34
CHAPTER 2 ■ T-SQL 2008 NEW FEATURES
The MERGE statement may offer code simplification and performance benefits over other methods of performing the same type of conditional updates, inserts, and deletes. I’ve actually seen production ETL (extract, transform, load) systems and client-side solutions that resort to performing individual SELECT queries against a table for every row to be inserted, just to determine if the target table contains a match. The client-side solution then decides whether to send a single UPDATE, INSERT, or DELETE statement for each row. For 1,000,000 rows being imported, you’re suddenly looking at 2,000,000 total separate SQL statements and 2,000,000 round trips to the server! It’s a horrible solution, at best, and often the bottleneck in an otherwise decent ETL process. A proper MERGE statement solution has the potential to eliminate a lot of the pain and performance problems inherent in many custom ETL solutions. The MERGE statement is poised to figure prominently in both object/relational (O/R) systems for transactional databases and ETL solutions for data warehouses and data marts. In both cases, the MERGE statement may be able to offer both code simplification and potential performance benefits over other common methods of performing conditional row updates, inserts, and deletes.
New Data Types SQL Server 2008 provides new data types that support storage, manipulation, and querying of new forms of data. Some, like the date data type, which stores a simple date without the time component, have been requested by developers since the heady days of SQL Server 6.5. Others, like the geometry data type, which allows storage and querying of spatial data, have only recently been addressed. All of the new data types add to SQL Server’s already rich data typing capabilities. In this section, we will begin by exploring the new SQL Server 2008 data types, and continue the discussion with a review of the SQL Server 2008–supported data types that were first introduced in SQL Server 2005.
Date and Time Data Types SQL Server has long supported two basic date and time data types: datetime and smalldatetime. These data types have always allowed storage of date and time data combined in a single instance. For years developers have worked around the fact that date and time data could not be stored as separate values, and for years Microsoft has not responded to developer requests for new date and time data types. With the release of SQL Server 2008, the SQL Server team has responded to users in a big way. SQL Server 2008 supports four brand new date and time data types: date, time, datetime2, and datetimeoffset. The date data type finally allows us to store date-only data without the time component. It can also store a much larger range of dates than the datetime and smalldatetime data types. The date data type can handle dates from January 1, 1 CE (0001-01-01) to December 31, 9999 CE (9999-12-31)—a much wider range than either the datetime or smalldatetime data types. Listing 2-7 shows a simple usage of the date data type, demonstrating that the DATEDIFF function works with the date type just as it does with the datetime data type. Listing 2-7. Sample date Data Type Usage -- August 19, 14 C.E. DECLARE @d1 date = '0014-08-19';
CHAPTER 2 ■ T-SQL 2008 NEW FEATURES
-- February 26, 1983 DECLARE @d2 date = '1983-02-26'; SELECT @d1 AS Date1, @d2 AS Date2, DATEDIFF(YEAR, @d1, @d2) AS YearsDifference; The results of this simple example are shown in Figure 2-5.
Figure 2-5. The results of the date data type example In contrast to the date data type, the time data type lets you store time-only data. The range for the time data type is defined on a 24-hour clock, from 00:00:00.0000000 through 23:59:59.9999999, with a user-definable fractional second precision of up to seven digits. The default precision, if you don’t specify one, is seven digits of fractional second precision. Listing 2-8 demonstrates the time data type in action. Listing 2-8. Demonstrating time Data Type Usage -- 6:25:19.1 AM DECLARE @start_time time(1) = '06:25:19.1'; -- 1 digit fractional precision -- 6:25:19.1234567 PM DECLARE @end_time time = '18:25:19.1234567'; -- default fractional precision SELECT @start_time AS start_time, @end_time AS end_time, DATEADD(HOUR, 6, @start_time) AS StartTimePlus, DATEDIFF(HOUR, @start_time, @end_time) AS EndStartDiff; In Listing 2-8, two data type instances are created. The @start_time variable is explicitly declared with a fractional second precision of one digit. You can specify a fractional second precision of one to seven digits with 100 nanoseconds (ns) accuracy; the fixed fractional precision of the classic datetime data type is three digits with 3.33 milliseconds (ms) accuracy. The default fractional precision for the time data type, if no precision is specified, is seven digits. The @end_time variable in the listing is declared with the default precision. As with the date and datetime data types, the DATEDIFF and DATEADD functions also work with the time data type. The results of Listing 2-8 are shown in Figure 2-6.
35
36
CHAPTER 2 ■ T-SQL 2008 NEW FEATURES
Figure 2-6. The results of the time data type example The cleverly named datetime2 data type is an extension to the standard datetime data type. The datetime2 data type combines the benefits of the new date and time data types, giving you the wider date range of the date data type and the greater fractional second precision of the time data type. Listing 2-9 demonstrates simple declaration and usage of datetime2 variables. Listing 2-9. Declaring and Querying datetime2 Variables DECLARE @start_dt2 datetime2 = '1972-07-06T07:13:28.8230234', @end_dt2 datetime2 = '2009-12-14T03:14:13.2349832'; SELECT @start_dt2 AS start_dt2, @end_dt2 AS end_dt2; The results of Listing 2-9 are shown in Figure 2-7.
Figure 2-7. Declaring and selecting datetime2 data type variables The new datetimeoffset data type builds on datetime2 by adding the ability to store offsets relative to the International Telecommunication Union (ITU) standard for Coordinated Universal Time (UTC) with your date and time data. When creating a datetimeoffset instance, you can specify an offset that complies with the ISO 8601 standard, which is in turn based on UTC. Basically, the offset must be specified in the range –14:00 to +14:00. The Z offset identifier is shorthand for the offset designated “zulu,” or +00:00. Listing 2-10 shows the datetimeoffset data type in action. Listing 2-10. datetimeoffset Data Type Sample DECLARE @start_dto datetimeoffset = '1492-10-12T13:29:59.9999999-05:00'; SELECT @start_dto AS start_dto, DATEPART(YEAR, @start_dto) AS start_year; The results of Listing 2-10 are shown in Figure 2-8.
CHAPTER 2 ■ T-SQL 2008 NEW FEATURES
Figure 2-8. The results of the datetimeoffset sample A sampling of possible offsets is shown in Table 2-2. Note that this list is not exhaustive, but demonstrates some common offsets. Table 2-2. Common Standard Time Zones
Time Zone Offset
Name
Locations
–10:00
Hawaii-Aleutian Standard
Alaska (Aleutian Islands), Hawaii
–08:00
Pacific Standard
US West Coast; Los Angeles, CA
–05:00
Eastern Standard
US East Coast; New York, NY
–04:00
Atlantic Standard
Bermuda
+00:00
Coordinated Universal
Dublin, Lisbon
+01:00
Central European
Paris, Berlin, Madrid, Rome
+03:00
Baghdad
Kuwait, Riyadh
+06:00
Indian Standard
India
+09:00
Japan Standard
Japan
UTC AND MILITARY TIME Some people see the acronym UTC and think that it stands for “Universal Time Coordination” or “Universal Time Code.” Unfortunately, the world is not so simple. When the ITU standardized Coordinated Universal Time, it was decided that it should have the same acronym in every language. Of course, international agreement could not be reached, with the English-speaking countries demanding the acronym CUT and French-speaking countries demanding that TUC (temps universel coordonné) be used. In the final compromise, the nonsensical UTC was adopted as the international standard. You may notice that I use “military time,” or the 24-hour clock, when representing time in the code samples throughout this book. There’s a very good reason for that—the 24-hour clock is an ISO international standard. The ISO 8601 standard indicates that time should be represented in computers using the 24-hour clock to prevent ambiguity. The 24-hour clock begins at 00:00:00, which is midnight or 12 AM. Noon, or 12 PM, is represented as 12:00:00. One second before midnight is 23:59:59, or 11:59:59 PM. In order to convert the 24-hour clock to AM/PM time, simply look at the hours. If the hours are less than 12, then the time is AM. If the hours are equal to 12, you are in the noon hour, which is PM. If the hours are greater than 12, subtract 12 and add PM to your time.
Table 2-3 summarizes the differences between all SQL Server 2008 date and time data types.
37
38
CHAPTER 2 ■ T-SQL 2008 NEW FEATURES
Table 2-3. SQL Server 2008 Date and Time Data Type Comparison
Data Type
Components
Range
Precision
datetime
Date and time
1753-01-01 to 9999-12-31
Fixed, three fractional second digits, 3.33 ms
smalldatetime
Date and time
1900-01-01 to 2079-06-06
Fixed, 1 minute
date
Date
0001-01-01 to 9999-12-31
Fixed, 1 day
time
Time
00:00:00 to 23:59:59
User-defined, one to seven fractional second digits, 100 ns
datetime2
Date and time
0001-01-01 to 9999-12-31
User-defined, one to seven fractional second digits, 100 ns
datetimeoffset
Date, time, and offset
0001-01-01 9999-12-31
User-defined, one to seven fractional second digits, 100 ns, offset range of –14:00 to +14:00
The hierarchyid Data Type The new hierarchyid data type offers a new twist on an old model for representing hierarchical data in the database. This new data type offers built-in support for representing your hierarchical data using one of the simplest models available: materialized paths.
REPRESENTING HIERARCHICAL DATA The representation of hierarchical data in relational databases has long been an area of interest for SQL developers. The most common model of representing hierarchical data with SQL Server is the adjacency list model. In this model, each row of a table maintains a reference to its parent row. The following illustration demonstrates how the adjacency list model works in a SQL table.
The AdventureWorks sample database makes use of the adjacency list model in its HumanResources. Employee table, where each employee entry references its manager by ID number. AdventureWorks also uses the adjacency list model in the Production.BillOfMaterials table, where every component references its parent assembly.
CHAPTER 2 ■ T-SQL 2008 NEW FEATURES
The materialized path model requires that you store the actual hierarchical path from the root node to the current node. The hierarchical path is similar to a modern file system path, where each folder or directory represents a node in the path. The hierarchyid data type supports generation and indexing of materialized paths for hierarchical data modeling. The following illustration shows how the materialized path might look in SQL. It is a relatively simple matter to represent adjacency list model data using materialized paths, as you’ll see later in this section in the discussion on converting AdventureWorks adjacency list data to the materialized path model using the hierarchyid data type. Another model for representing hierarchical data is the nested sets model. In this model, every row in the table is considered a set that may contain or be contained by another set. Each row is assigned a pair of numbers defining the lower and upper bounds for the set. The following illustration shows a logical representation of the nested sets model, with the lower and upper bounds for each set shown to the set’s left and right. Notice that the sets in the figure are contained within one another logically, the structure from which this model derives its name.
In this section, I’ll use the AdventureWorks Production.BillOfMaterials table extensively to demonstrate the adjacency list model, the materialized path model, and the hierarchyid data type. Technically speaking, a bill of materials (BOM), or “parts explosion,” is a directed acyclic graph. A directed acyclic graph is essentially a generalized tree structure in which some subtrees may be shared by different parts of the tree. Think of a cake recipe, represented as a tree, in which “sugar” can be used multiple times (once in the “cake mix” subtree, once in the “frosting” subtree, and so on). This book is not about graph theory, though, so I’ll pass on the technical details and get to the BOM at hand. Although directed acyclic graph is the technical term for a true BOM, I’ll be representing the AdventureWorks BOMs as materialized path hierarchies using the hierarchyid data type, so you’ll see the term hierarchy used a lot in this section. In order to understand the AdventureWorks BOM hierarchies, it’s important to understand the relationship between product assemblies and components. Basically, a product assembly is composed of one or more components. An assembly can become a component for use in other assemblies, defining the recursive relationship. All components with a product assembly of NULL are top-level components, or “root nodes,” of each hierarchy. If a hierarchyid data type column is declared a primary key, it can contain only a single hierarchyid root node.
The hierarchyid data type stores hierarchy information as an optimized materialized path, which is a very efficient way to store hierarchical information. The first example converts the AdventureWorks BOMs to materialized path form using the hierarchyid data type. The first step, shown in Listing 2-11, is to create the table that will contain the hierarchyid BOMs. To differentiate it from the Production.BillOfMaterials table, I’ve called this table Production. HierBillOfMaterials.
39
40
CHAPTER 2 ■ T-SQL 2008 NEW FEATURES
Listing 2-11. Creating the hierarchyid Bill of Materials Table CREATE TABLE Production.HierBillOfMaterials ( BomNode hierarchyid NOT NULL PRIMARY KEY NONCLUSTERED, ProductAssemblyID int NULL, ComponentID int NULL, UnitMeasureCode nchar(3) NULL, PerAssemblyQty decimal(8, 2) NULL, BomLevel AS BomNode.GetLevel() ); GO The Production.HierBillOfMaterials table consists of the BomNode hierarchyid column, which will contain the hierarchical path information for each component. The ProductAssemblyID, ComponentID, UnitMeasureCode, and PerAssemblyQty are all pulled from the source tables. BomLevel is a calculated column that contains the current level of each BomNode. The next step is to convert the adjacency list BOMs to hierarchyid form, which will be used to populate the Production.HierBillOfMaterials table. This is demonstrated in Listing 2-12. Listing 2-12. Converting AdventureWorks BOMs to hierarchyid Form WITH BomChildren ( ProductAssemblyID, ComponentID ) AS ( SELECT b1.ProductAssemblyID, b1.ComponentID FROM Production.BillOfMaterials b1 GROUP BY b1.ProductAssemblyID, b1.ComponentID ), BomPaths ( Path, ComponentID, ProductAssemblyID ) AS ( SELECT hierarchyid::GetRoot() AS Path, NULL, NULL
CHAPTER 2 ■ T-SQL 2008 NEW FEATURES
UNION ALL SELECT CAST ( '/' + CAST ( bc.ComponentId AS varchar(30) ) + '/' AS hierarchyid ) AS Path, bc.ComponentID, bc.ProductAssemblyID FROM BomChildren AS bc WHERE bc.ProductAssemblyID IS NULL UNION ALL SELECT CAST ( bp.path.ToString() + CAST ( bc.ComponentID AS varchar(30) ) + '/' AS hierarchyid ) AS Path, bc.ComponentID, bc.ProductAssemblyID FROM BomChildren AS bc INNER JOIN BomPaths AS bp ON bc.ProductAssemblyID = bp.ComponentID ) INSERT INTO Production.HierBillOfMaterials ( BomNode, ProductAssemblyID, ComponentID, UnitMeasureCode, PerAssemblyQty ) SELECT bp.Path, bp.ProductAssemblyID, bp.ComponentID,
41
42
CHAPTER 2 ■ T-SQL 2008 NEW FEATURES
bom.UnitMeasureCode, bom.PerAssemblyQty FROM BomPaths AS bp LEFT OUTER JOIN Production.BillOfMaterials bom ON bp.ComponentID = bom.ComponentID AND COALESCE(bp.ProductAssemblyID, -1) = COALESCE(bom.ProductAssemblyID, -1) WHERE bom.EndDate IS NULL GROUP BY bp.path, bp.ProductAssemblyID, bp.ComponentID, bom.UnitMeasureCode, bom.PerAssemblyQty; GO This statement is a little more complex than the average hierarchyid data example you’ll probably run into, since most people currently out there are demonstrating conversion of the simple, single-hierarchy AdventureWorks organizational chart. The AdventureWorks Production.BillOfMaterials table actually contains several individual hierarchies. I’ll step through the code here to show you exactly what’s going on in this statement. The first part of the statement is a common table expression (CTE) called BomChildren. It returns all ProductAssemblyID’s and ComponentID’s from the Production.BillOfMaterials table. WITH BomChildren ( ProductAssemblyID, ComponentID ) AS ( SELECT b1.ProductAssemblyID, b1.ComponentID FROM Production.BillOfMaterials b1 GROUP BY b1.ProductAssemblyID, b1.ComponentID ), While the organizational chart represents a simple top-down hierarchy with a single root node, the BOM is actually composed of dozens of separate hierarchies with no single hierarchyid root node. BomPaths is a recursive CTE that returns the current hierarchyid, ComponentID, and ProductAssemblyID for each row. BomPaths ( Path, ComponentID, ProductAssemblyID )
CHAPTER 2 ■ T-SQL 2008 NEW FEATURES
The anchor query for the CTE is in two parts. The first part returns the root node for the entire hierarchy. In this case, the root just represents a logical grouping of all the BOM’s toplevel assemblies; it does not represent another product that can be created by mashing together every product in the AdventureWorks catalog. SELECT hierarchyid::GetRoot(), NULL, NULL The second part of the anchor query returns the hierarchyid path to the top-level assemblies. Each top-level assembly has its ComponentId appended to the root path, represented by a leading forward slash (/). SELECT CAST ( '/' + CAST ( bc.ComponentId AS varchar(30) ) + '/' AS hierarchyid ) AS Path, bc.ComponentID, bc.ProductAssemblyID FROM BomChildren AS bc WHERE bc.ProductAssemblyID IS NULL The recursive part of the CTE recursively appends forward slash–separated ComponentId values to the path to represent each component in any given assembly: SELECT CAST ( bp.path.ToString() + CAST ( bc.ComponentID AS varchar(30) ) + '/' AS hierarchyid ) AS Path, bc.ComponentID, bc.ProductAssemblyID FROM BomChildren AS bc INNER JOIN BomPaths AS bp ON bc.ProductAssemblyID = bp.ComponentID )
43
44
CHAPTER 2 ■ T-SQL 2008 NEW FEATURES
The next part of the statement inserts the results of the recursive BomPaths CTE into the Production.HierBillOfMaterials table. The results of the recursive CTE are joined to the Production.BillOfMaterials table for a couple of reasons: • To ensure that only components currently in use are put into the hierarchy, by making sure that the EndDate is NULL for each component • To retrieve the UnitMeasureCode and PerAssemblyQty columns for each component I use a LEFT OUTER JOIN in this statement instead of an INNER JOIN because of the inclusion of the hierarchyid root node, which has no matching row in the Production.BillOfMaterials table. If you had opted not to include the hierarchyid root node, you could turn this join back into an INNER JOIN. INSERT INTO Production.HierBillOfMaterials ( BomNode, ProductAssemblyID, ComponentID, UnitMeasureCode, PerAssemblyQty ) SELECT bp.Path, bp.ProductAssemblyID, bp.ComponentID, bom.UnitMeasureCode, bom.PerAssemblyQty FROM BomPaths AS bp LEFT OUTER JOIN Production.BillOfMaterials bom ON bp.ComponentID = bom.ComponentID AND COALESCE(bp.ProductAssemblyID, -1) = COALESCE(bom.ProductAssemblyID, -1) WHERE bom.EndDate IS NULL GROUP BY bp.path, bp.ProductAssemblyID, bp.ComponentID, bom.UnitMeasureCode, bom.PerAssemblyQty; The simple query in Listing 2-13 shows the BOM after conversion to materialized path form with the hierarchyid data type, with partial results shown in Figure 2-9. Listing 2-13. Viewing the hierarchyid BOMs SELECT BomNode, BomNode.ToString(), ProductAssemblyID,
CHAPTER 2 ■ T-SQL 2008 NEW FEATURES
ComponentID, UnitMeasureCode, PerAssemblyQty, BomLevel FROM Production.HierBillOfMaterials ORDER BY BomNode; GO
Figure 2-9. Partial results of the hierarchical BOM conversion As you can see, the hierarchyid column, BomNode, represents the hierarchy as a compact path in a variable-length binary format. Converting the BomNode column to string format with the ToString() method results in a forward slash–separated path reminiscent of a file path. The BomLevel column uses the GetLevel() method to retrieve the level of each node in the hierarchy. The hierarchyid root node has a BomLevel of 0. The top-level assemblies are on level 1, and their children are on levels 2 and below.
hierarchyid Methods The hierarchyid data type includes several methods for querying and manipulating hierarchical data. The IsDescendant() method, for instance, can be used to retrieve all descendants of a given node. The example in Listing 2-14 retrieves the descendant nodes of product assembly 749. The results are shown in Figure 2-10. Listing 2-14. Retrieving Descendant Nodes of Assembly 749 DECLARE @CurrentNode hierarchyid; SELECT @CurrentNode = BomNode FROM Production.HierBillOfMaterials WHERE ProductAssemblyID = 749;
45
46
CHAPTER 2 ■ T-SQL 2008 NEW FEATURES
SELECT BomNode, BomNode.ToString(), ProductAssemblyID, ComponentID, UnitMeasureCode, PerAssemblyQty, BomLevel FROM Production.HierBillOfMaterials WHERE @CurrentNode.IsDescendant(BomNode) = 1; GO
Figure 2-10. Descendant nodes of assembly 749 Table 2-4 is a quick summary of the hierarchyid data type methods. Table 2-4. hierarchyid Data Type Methods
Method
Description
GetAncestor(n)
Retrieves the nth ancestor of the hierarchyid node instance.
GetDescendant(n)
Retrieves the nth descendant of the hierarchyid node instance.
GetLevel()
Gets the level of the hierarchyid node instance in the hierarchy.
GetRoot()
Gets the hierarchyid instance root node; GetRoot() is a static method.
IsDescendant(node)
Returns 1 if a specified node is a descendant of the hierarchyid instance node.
Parse(string)
Converts the given canonical string, in forward slash–separated format, to a hierarchyid path.
Reparent(old_root, new_root)
Reparents a node by moving nodes from old_root to new_root.
ToString()
Converts a hierarchyid instance to a canonical forward slash–separated string representation.
CHAPTER 2 ■ T-SQL 2008 NEW FEATURES
Spatial Data Types SQL Server 2008 includes two new data types for storing, querying, and manipulating spatial data. The geometry data type is designed to represent flat-earth, or Euclidean, spatial data per the Open Geospatial Consortium (OGC) standard. The geography data type supports roundearth, or ellipsoidal, spatial data. Figure 2-11 shows a simple two-dimensional flat geometry for a small area, with a point plotted at location (2, 1).
Figure 2-11. Flat spatial representation
(X, Y) OR (LATITUDE, LONGITUDE)? Coordinates in spatial data are generally represented using (x, y) coordinate pairs, as in Figure 2-11. However, we often say “latitude-longitude” when we refer to coordinates. The problem is that latitude is the y axis, while longitude is the x axis. The Well-Known Text format we’ll discuss later in this section represents spatial data using (x, y) coordinate pair ordering for the geometry data type. The geography data type, however, uses (lat, long) ordering of coordinate pairs in Well-Known Text format. This means that the order is flipped for geometry, and coordinates are actually represented in (y, x) order. Based on community feedback, the SQL Server team has expressed that changes to the coordinate ordering are being considered.
The spatial data types store representations of spatial data using instance types. There are 12 instance types, all derived from the Geography Markup Language (GML) abstract Geometry type. Of those 12 instance types, only 7 are concrete types that can be instantiated; the other 5 serve as abstract base types from which other types derive. Figure 2-12 shows the spatial instance type hierarchy with the XML-based GML top-level elements.
47
48
CHAPTER 2 ■ T-SQL 2008 NEW FEATURES
Figure 2-12. Spatial instance type hierarchy The available spatial instance types include the following: • Point: This object represents a zero-dimensional object representing a single location. The Point requires, at a minimum, a two-dimensional (x, y) coordinate pair, but it may also have an elevation coordinate (z) and an additional user-defined measure. The Point object has no area or length. • MultiPoint: This type represents a collection of multiple points. It has no area or length. • LineString: This is a one-dimensional object representing one or more connected line segments. Each segment is defined by a start point and an endpoint, and all segments are connected in such a way that the endpoint of one line segment is the start point for the next line segment. The LineString has length, but no area. • MultiLineString: This is a one-dimensional object composed of multiple LineString objects. The LineString objects in a MultiLineString do not necessarily have to be connected to one another. The MultiLineString has no area, but it has an associated length, which is the sum of the lengths of all LineString objects in the MultiLineString. • Polygon: This is a two-dimensional object defined by a sequence of connected points. The Polygon object must have a single exterior bounding ring, which defines the interior region of the Polygon object. In addition, the Polygon may have interior bounding rings, which exclude portions of the area inside the interior bounding ring from the Polygon’s area. Polygon objects have a length, which is the length of the exterior bounding ring, and an area, which is the area defined by the exterior bounding ring minus the areas defined by any interior bounding rings.
CHAPTER 2 ■ T-SQL 2008 NEW FEATURES
• MultiPolygon: This is a collection of Polygon objects. Like the Polygon, the MultiPolygon has both length and area. • GeometryCollection: This is the base class for the “multi” types (e.g., MultiPoint, MultiLine, and MultiPolygon). This class can be instantiated and can contain a collection of any spatial objects. You can populate spatial data using Well-Known Text (WKT) strings or GML-formatted data. WKT strings are passed into the geometry and geography data types’ STGeomFromText() static method and related static methods. Spatial data types can be populated from GMLformatted data with the GeomFromGml() static method. Listing 2-15 shows how to populate a spatial data type with a Polygon instance via a WKT-formatted string. The coordinates in the WKT Polygon are the borders of the state of Wyoming, chosen for its simplicity. Listing 2-15. Representing Wyoming As a geometry Object DECLARE @Wyoming geometry; SET @Wyoming = geometry::STGeomFromText ('POLYGON ( ( -104.053108 41.698246, -104.054993 41.564247, -104.053505 41.388107, -104.051201 41.003227, -104.933968 40.994305, -105.278259 40.996365, -106.202896 41.000111, -106.328545 41.001316, -106.864838 40.998489, -107.303436 41.000168, -107.918037 41.00341, -109.047638 40.998474, -110.001457 40.997646, -110.062477 40.99794, -111.050285 40.996635, -111.050911 41.25848, -111.050323 41.578648, -111.047951 41.996265, -111.046028 42.503323, -111.048447 43.019962, -111.04673 43.284813, -111.045998 43.515606, -111.049629 43.982632, -111.050789 44.473396, -111.050842 44.664562, -111.05265 44.995766, -110.428894 44.992348, -110.392006 44.998688, -109.994789 45.002853, -109.798653 44.99958, -108.624573 44.997643, -108.258568 45.00016, -107.893715 44.999813, -106.258644 44.996174, -106.020576 44.997227, -105.084465 44.999832, -105.04126 45.001091, -104.059349 44.997349, -104.058975 44.574368, -104.060547 44.181843, -104.059242 44.145844, -104.05899 43.852928, -104.057426 43.503738, -104.05867 43.47916, -104.05571 43.003094, -104.055725 42.614704, -104.053009 41.999851, -104.053108 41.698246) )', 0); Listing 2-15 demonstrates a couple of interesting items, which I previously touched on but would like to reiterate here. The first point is that the coordinates are given in longitudelatitude order. This might be a bit counterintuitive for geospatial beginners, who are used to hearing coordinates referenced as “latitude-longitude” coordinates, but it’s easier to grasp once you understand that longitude represents the x axis and latitude represents the y axis.
49
50
CHAPTER 2 ■ T-SQL 2008 NEW FEATURES
The second point is that the final coordinate pair, (–104.053108, 41.698246), is the same as the first coordinate pair. This is a requirement for Polygon objects. You can populate a geography instance similarly using WKT or GML. Listing 2-16 populates a geography instance with the border coordinates for the state of Wyoming using GML. Listing 2-16. Using GML to Represent Wyoming As a geography Object DECLARE @Wyoming geography; SET @Wyoming = geography::GeomFromGml ('
41.698246 -104.053108 41.999851 -104.053009 43.003094 -104.05571 43.503738 -104.057426 44.145844 -104.059242 44.574368 -104.058975 45.001091 -105.04126 44.997227 -106.020576 44.999813 -107.893715 44.997643 -108.624573 45.002853 -109.994789 44.992348 -110.428894 44.664562 -111.050842 43.982632 -111.049629 43.284813 -111.04673 42.503323 -111.046028 41.578648 -111.050323 40.996635 -111.050285 40.997646 -110.001457 41.00341 -107.918037 40.998489 -106.864838 41.000111 -106.202896 40.994305 -104.933968 41.388107 -104.053505 41.698246 -104.053108
', 4269); Like the geometry data type, the geography data type has some interesting features. The first thing to notice is that the coordinates are given in latitude-longitude order, the opposite of the geometry object. This complicates matters a bit if you want to reuse the same coordinate data between geometry and geography instances. Another thing to notice is that in GML format, there are no comma separators between coordinate pairs. All coordinates are separated by whitespace characters. GML also requires you to declare the GML namespace http:// www.opengis.net/gml. The coordinate pairs in Listing 2-16 are also listed in reverse order from the geometry instance in Listing 2-15. This is required because the geography data type represents ellipsoidal spatial data. Ellipsoidal data in SQL Server has a couple of restrictions on it: an object must all fit in one hemisphere and it must be expressed with a counterclockwise orientation. These limitations do not apply to the geometry data type. These limitations are discussed further in the Hemisphere and Orientation sidebar in this section. The final thing to notice is that when you create a geometry instance, you must specify a spatial reference identifier (SRID). The SRID used here is 4269, which is the GCS North American Datum 1983 (NAD 83). A datum is an associated ellipsoid model of Earth on which the coordinate data is based. I used SRID 4269 because the coordinates used in the example are borrowed from the US Census Bureau’s TIGER/Line data, which is in turn based on NAD 83. As you can
CHAPTER 2 ■ T-SQL 2008 NEW FEATURES
see, using the geography data type is slightly more involved than using the geometry data type, but it can provide more accurate results and additional functionality for Earth-based geographic information systems (GISs).
HEMISPHERE AND ORIENTATION The geography data type requires spatial objects to be contained in a single hemisphere—they cannot cross the equator. If you create a Polygon or other object within a geography instance that crosses hemispheres, you’ll receive an error message like the following: The specified input does not represent a valid geography instance because it exceeds a single hemisphere. Each geography instance must fit inside a single hemisphere. A common reason for this error is that a polygon has the wrong ring orientation. This restriction is in place primarily to help with complex calculations. SQL Server must project geography instances onto a plane—flatten them out—to perform indexing and other operations like intersection calculations. Limiting geographic objects to a single hemisphere simplifies these calculations from a technical perspective. You might also receive this error message if you create a Polygon with the wrong ring orientation. So why is ring orientation so important, and what is the “right” ring orientation? To answer these questions, you have to ask yet another question: “What is the inside of a Polygon?” You might instinctively say that the inside of a Polygon is the smallest area enclosed by the coordinates you supply. But you could end up in a situation where your Polygon should be the larger area enclosed by your coordinates. If you created a border around the North Pole, for instance, is your Polygon the area within the border or is it the rest of the Earth minus the North Pole? Your answer to this question determines what the “inside” of the Polygon really is. The next step is to tell SQL Server where the inside of the Polygon lies. SQL Server’s geography instance makes you define your coordinates in counterclockwise order, so the inside of the Polygon is everything that falls on the left-hand side of the lines connecting the coordinates. In the following illustration, the image on the left side is an invalid orientation because the coordinates are defined in a clockwise order. The image on the right side is a valid orientation because its coordinates are defined in a counterclockwise order. If you follow the direction of the arrows on the image, you’ll notice that the area on the left-hand side of the arrows is the area “inside” the Polygon. This eliminates any ambiguity from your Polygon definitions.
Keep these restrictions in mind if you decide to use the geography data type in addition to, or instead of, the geometry data type.
51
52
CHAPTER 2 ■ T-SQL 2008 NEW FEATURES
Polygon and MultiPolygon are two of the more interesting and complex spatial objects you can create. I like to use the state of Utah as a real-world example of a Polygon object for a couple of reasons. First, the exterior bounding ring for the state is very simple, composed of relatively straight lines. Second, the Great Salt Lake within the state can be used as a highly visible example of an interior bounding ring. Figure 2-13 shows the state of Utah. The state of Michigan provides an excellent example of a MultiPolygon object. Michigan is composed of two distinct peninsulas, known as the Upper Peninsula and Lower Peninsula, respectively. The two peninsulas are separated by the Straits of Mackinac, which join Lake Michigan to Lake Huron. Figure 2-14 shows the Michigan MultiPolygon.
Figure 2-13. The state of Utah with the Great Salt Lake as an interior bounding ring
Figure 2-14. Michigan as a MultiPolygon
MICHIGAN AND THE GREAT LAKES Michigan’s two peninsulas are separated by the Straits of Mackinac, which is a five-mile-wide channel that joins two of the Great Lakes, Lake Michigan and Lake Huron. Although these two bodies of water are historically referred two as separate lakes, hydrologists consider them to be one contiguous body of water. Hydrology experts sometimes refer to the lakes as a single entity, Lake Michigan-Huron. On the other hand, it makes sense to consider the two lakes as separate from a political point of view, since Lake Michigan is wholly within the borders of the United States, while the border between the United States and Canada divides Lake Huron. For the purposes of this section, the most important fact is that the lakes separate Michigan into two peninsulas, making it a good example of a MultiPolygon.
Through the use of the spatial instance types, you can create spatial objects that cover the entire range from very simple to extremely complex. Once you’ve created spatial objects, you can use the geometry and geography data type methods on them or create spatial indexes on
CHAPTER 2 ■ T-SQL 2008 NEW FEATURES
spatial data type columns to increase calculation efficiency. Listing 2-17 uses the geography data type instance created in Listing 2-16 and the STIntersects() method to report whether the town of Laramie and the Statue of Liberty are located within the borders of Wyoming. The results are shown in Figure 2-15. Listing 2-17. Are the Statue of Liberty and Laramie in Wyoming? DECLARE @Wyoming geography, @StatueOfLiberty geography, @Laramie geography; SET @Wyoming = geography::GeomFromGml ('
41.698246 -104.053108 41.999851 -104.053009 43.003094 -104.05571 43.503738 -104.057426 44.145844 -104.059242 44.574368 -104.058975 45.001091 -105.04126 44.997227 -106.020576 44.999813 -107.893715 44.997643 -108.624573 45.002853 -109.994789 44.992348 -110.428894 44.664562 -111.050842 43.982632 -111.049629 43.284813 -111.04673 42.503323 -111.046028 41.578648 -111.050323 40.996635 -111.050285 40.997646 -110.001457 41.00341 -107.918037 40.998489 -106.864838 41.000111 -106.202896 40.994305 -104.933968 41.388107 -104.053505 41.698246 -104.053108
', 4269); SET @StatueOfLiberty = geography::GeomFromGml('
40.689124 -74.044483
', 4269); SET @Laramie = geography::GeomFromGml('
41.312928 -105.587253
', 4269);
53
54
CHAPTER 2 ■ T-SQL 2008 NEW FEATURES
SELECT 'Is the Statue of Liberty in Wyoming?', CASE @Wyoming.STIntersects(@StatueOfLiberty) WHEN 0 THEN 'No' ELSE 'Yes' END AS Answer UNION SELECT 'Is Laramie in Wyoming?', CASE @Wyoming.STIntersects(@Laramie) WHEN 0 THEN 'No' ELSE 'Yes' END;
Figure 2-15. The results of the STIntersection() method example SQL Server 2008 also allows you to create spatial indexes that optimize spatial data calculations. Spatial indexes are created by decomposing your spatial data into a b-tree–based grid hierarchy four levels deep. Each level represents a further subdivision of the cells above it in the hierarchy. Figure 2-16 shows a simple example of a decomposed spatial grid hierarchy.
Figure 2-16. Decomposing space for spatial indexing The CREATE SPATIAL INDEX statement allows you to create spatial indexes on spatial data type columns. Listing 2-18 is an example of a CREATE SPATIAL INDEX statement.
CHAPTER 2 ■ T-SQL 2008 NEW FEATURES
Listing 2-18. Creating a Spatial Index CREATE SPATIAL INDEX SIX_Location ON MyTable (SpatialColumn); Spatial indexing is one of the biggest benefits of storing spatial data inside the database. As one astute developer pointed out, “Without spatial indexing, you may as well store your spatial data in flat files.”
Grouping Sets In previous versions of SQL Server, developers were given two GROUP BY extensions to return multiple levels of aggregated data in a single result set on the server—the CUBE and ROLLUP options. Consider Listing 2-19, which demonstrates a simple use of CUBE to add additional summarization rows to the results of a sales-based query. This particular query retrieves the total sales by year and by territory. Partial results are shown in Figure 2-17. Listing 2-19. Total Sales by Year by Territory with CUBE SELECT DATEPART(year, soh.OrderDate) AS SalesYear, st.Name AS TerritoryName, SUM(soh.SubTotal) AS TotalSales FROM Sales.SalesOrderHeader soh INNER JOIN Sales.SalesTerritory st ON soh.TerritoryID = st.TerritoryID WHERE st.CountryRegionCode = 'US' GROUP BY DATEPART(year, soh.OrderDate), st.Name WITH CUBE ORDER BY DATEPART(year, soh.OrderDate), st.Name;
Figure 2-17. The results of the CUBE query
55
56
CHAPTER 2 ■ T-SQL 2008 NEW FEATURES
While some developers were able to use CUBE and ROLLUP to great effect for SQL Server–based data analysis and reporting applications, many developers created their own custom methods of generating such summaries, or turned to more powerful analytical tools like SQL Server Analysis Services (SSAS). As you can see in Figure 2-17, the GROUP BY with the CUBE option added aggregates data to the result set, returning all of the following: • The single row with NULL in both the SalesYear and TerritoryName columns contains the grand total of the TotalSales column entries. • The rows with NULL in the SalesYear and a valid TerritoryName (Northeast, Northwest, Central, etc.) contain the totals of the TotalSales column entries aggregated by TerritoryName. • The rows with a valid SalesYear (2001, 2002, etc.) and NULL in the TerritoryName contain the totals of the TotalSales column entries aggregated by SalesYear. • The rows with both a valid SalesYear and a valid TerritoryName contain the totals of the TotalSales column entries aggregated by both SalesYear and TerritoryName. SQL Server 2008 offers a much more powerful method of customizing your summarization experience through a new SQL 2008 standard feature called grouping sets. The results from Listing 2-19 can be generated with the new GROUPING SETS extension to GROUP BY, as shown in Listing 2-20. Listing 2-20. Total Sales by Year by Territory with Grouping Sets SELECT DATEPART(year, soh.OrderDate) AS SalesYear, st.Name AS TerritoryName, SUM(soh.SubTotal) AS TotalSales FROM Sales.SalesOrderHeader soh INNER JOIN Sales.SalesTerritory st ON soh.TerritoryID = st.TerritoryID WHERE st.CountryRegionCode = 'US' GROUP BY GROUPING SETS ( (DATEPART(year, soh.OrderDate), st.Name), (DATEPART(YEAR, soh.OrderDate)), (st.Name), () ) ORDER BY DATEPART(year, soh.OrderDate), st.Name; Each set you wish to group by is included in parentheses after the GROUPING SETS keywords. In this instance, I’m telling the query to group by the OrderDate year and territory name, then by each column separately, and finally by the empty set identified by () (empty parentheses). With grouping sets, you can specify groupings and summarizations that you cannot get with the CUBE or ROLLUP options.
CHAPTER 2 ■ T-SQL 2008 NEW FEATURES
Consider Listing 2-21, which modifies Listing 2-19 from a CUBE query to a ROLLUP query. This option basically eliminates the rows from the CUBE result set where NULL appears in the first column (in this case, the SalesYear column), except for the grand total where NULL appears in both the SalesYear and TerritoryName columns. Partial results of the ROLLUP query are shown in Figure 2-18. This query returns the same results as the previous CUBE query, except that the rows that returned totals by TerritoryName alone are removed. Listing 2-21. Total Sales by Year by Territory with ROLLUP SELECT DATEPART(year, soh.OrderDate) AS SalesYear, st.Name AS TerritoryName, SUM(soh.SubTotal) AS TotalSales FROM Sales.SalesOrderHeader soh INNER JOIN Sales.SalesTerritory st ON soh.TerritoryID = st.TerritoryID WHERE st.CountryRegionCode = 'US' GROUP BY DATEPART(year, soh.OrderDate), st.Name WITH ROLLUP ORDER BY DATEPART(year, soh.OrderDate), st.Name;
Figure 2-18. Partial results of the ROLLUP query But consider a situation in which, for instance, you want to summarize data, but you want to keep all summary rows where the SalesYear is NULL and eliminate all rows where the TerritoryName is NULL. This is basically the opposite of the ROLLUP option. ROLLUP and CUBE don’t provide this option, but you can easily do this with grouping sets, as shown in Listing 2-22 (partial results are shown in Figure 2-19).
57
58
CHAPTER 2 ■ T-SQL 2008 NEW FEATURES
Listing 2-22. Using Grouping Sets to Generate a Customized ROLLUP-Style Result SELECT DATEPART(year, soh.OrderDate) AS SalesYear, st.Name AS TerritoryName, SUM(soh.SubTotal) AS TotalSales FROM Sales.SalesOrderHeader soh INNER JOIN Sales.SalesTerritory st ON soh.TerritoryID = st.TerritoryID WHERE st.CountryRegionCode = 'US' GROUP BY GROUPING SETS ( (DATEPART(year, soh.OrderDate), st.Name), (st.Name) ) ORDER BY DATEPART(year, soh.OrderDate), st.Name;
Figure 2-19. Partial results of the GROUPING SETS query
Other New Features SQL Server 2008 builds upon the functionality set out in SQL Server 2005. SQL Server 2005 included several new T-SQL features, which are implemented and in many cases improved upon in SQL Server 2008. You can expect most SQL Server 2005 T-SQL scripts to run on SQL Server 2005 with little or no change, as long as they are well-written. By “well-written,” I’m referring to code that follows best practices for coding, including the following:
CHAPTER 2 ■ T-SQL 2008 NEW FEATURES
• Well-written code should avoid features that have been deprecated in prior releases of SQL Server. This includes previously deprecated features like the old-style outer join operators *= and =*, the T-SQL DUMP and RESTORE statements, and system SPs like sp_addalias and sp_dropalias. • Well-written code should also avoid undocumented SPs like sp_executeresultset. Many of the previously deprecated features have been discontinued in SQL Server 2008. You should also ensure that your code is up to current coding standards, meaning that it should not require backward-compatibility mode. SQL Server 2008 only supports backward compatibility for the prior two versions of SQL Server (2005 and 2000). Backward compatibility is not a magic bullet. While it provides access to some deprecated features, it does not support them all. Backward-compatibility mode can also restrict your access to some of SQL Server’s new features and functionality. Information useful for the upgrade process can be found in BOL under the heading “Upgrade (Database Engine)” (http://msdn2.microsoft.com/en-us/library/ bb500267(SQL.100).aspx). The SQL Server 2008 Upgrade Advisor tool is available on the SQL Server 2008 installation media, and should also be available for download from the Microsoft Download Center (www.microsoft.com/downloads), although it was not available for download at the time of this writing. The Upgrade Advisor tool is useful for identifying features and configuration settings that might affect your upgrade. In addition to the features already listed in this chapter, SQL Server 2008 includes new functionality encompassing security, server and database management, performance optimization, and several other enhancements, many of which I will cover in later chapters of this book.
Summary This chapter has provided an overview of many of SQL Server 2008’s new features for T-SQL developers. These include productivity-enhancing features like single-statement variable declaration and initialization, C-style assignment operators, and multirow VALUES clauses. In this chapter, I also discussed the flexible new T-SQL MERGE statement, which can perform conditional insert, update, and delete actions all in a single statement. SQL Server 2008 also introduces several new data types, including the date, time, datetime2, and datetimeoffset types for representing date and time values, the hierarchyid data type for representing hierarchical data, the spatial geometry and geography data types, and new grouping sets that provide flexible summarization capabilities over the old-style CUBE and ROLLUP options. Finally, I discussed some of the development issues that could affect an upgrade or migration of existing code. In Chapter 4, I will cover T-SQL control-of-flow language statements and begin to lay the groundwork for a detailed discussion of SQL Server 2008 SPs, UDFs, and triggers.
59
60
CHAPTER 2 ■ T-SQL 2008 NEW FEATURES
EXERCISES 1. [Choose all that apply] SQL Server 2008 provides which of the following new productivity enhancements in the T-SQL language: a.
Single-statement variable declaration and initialization
b.
C-style assignment operators
c.
Multitable TRUNCATE TABLE statement option
d.
Row constructors
2. [True/false] The new date data type stores time offset information. 3. What model does the hierarchyid data type use to represent hierarchical data in the database? 4. [Fill in the blank] The ___ data type stores flat-earth spatial data, while the ___ data type stores roundearth spatial data. 5. [Choose one] Which of the following is true of Polygon spatial objects when created in geography data type instances? a.
They must have a clockwise orientation.
b.
They must have a counterclockwise orientation.
c.
Orientation does not matter.
d.
They can cross up to two hemispheres.
6. [True/false] You can use grouping sets to perform the same tasks previously performed with the CUBE and ROLLUP operators. 7. [Choose one] A spatial index is which of the following: a.
A hash table
b.
An inverted keyword list
c.
An n-gram index
d.
A B-tree grid hierarchy
8. [Fill in the blank] Existing T-SQL scripts should run with minimal changes if you follow ___ ___.
CHAPTER
3
Tools of the Trade S
QL Server 2008 comes with a wide selection of tools and utilities to make development easier. In this chapter, I will introduce some of the most important tools for SQL Server developers, including SQL Server Management Studio (SSMS) and the SQLCMD utility, Business Intelligence Development Studio (BIDS), SQL Profiler, and SQL Server 2008 Books Online (BOL). I will also introduce supporting tools like SQL Server Integration Services (SSIS), the Bulk Copy Program (BCP), and the AdventureWorks 2008 sample database, which I will use in examples throughout the book. I will also cover some of the SQL Server connectivity features of Visual Studio 2005 and 2008.
SQL Server Management Studio Back in the heyday of SQL Server 2000, it was common for developers to fire up the Enterprise Manager (EM) and Query Analyzer (QA) GUI database tools in rapid succession every time they sat down to write code. Historically, developer and DBA roles in the DBMS have been highly separated, and with good reason. DBAs have historically brought hardware and software administration and tuning skills, database design optimization experience, and healthy doses of skepticism and security to the table. On the other hand, developers have focused on coding skills, problem solving, system optimization, and debugging. This separation of powers works very well in production systems, but in development environments developers are often responsible for their own database design and management. Sometimes developers are put in charge of their own development server local security! SQL Server 2000 EM was originally designed as a DBA tool, providing access to the GUI (graphical user interface) administration interface, including security administration, database object creation and management, and server management functionality. QA was designed as a developer tool, the primary GUI tool for the creation, testing, and tuning of queries. SQL Server 2008 continues the tradition begun with SQL Server 2005 by combining the functionality of both of these GUI tools into a single GUI interface known as SSMS. This makes perfect sense in supporting real-world SQL Server development, where the roles of DBA and developer are often intermingled in development environments.
61
62
CHAPTER 3 ■ TOOLS OF THE TRADE
Many SQL Server developers prefer the GUI administration and development tools to the text-based query tool SQLCMD, and on this front SQL Server 2008 doesn’t disappoint. SSMS offers several features that make development and administration work easier, including the following: • The integrated, functional Object Explorer, which provides the ability to easily view and manage the server, databases, and database objects. The Object Explorer also provides right-click scripting ability for database objects. • Color coding of scripts, making editing and debugging easier. • Intellisense, which is the long-awaited automatic suggestion feature for SQL scripts. SQL developers have been waiting for this feature that has been a mainstay of Visual Studio development for many years now. • Context-sensitive help provides F1-accessible help for keywords and code snippets. Just highlight a keyword or other text and press the F1 key—again, like Visual Studio developers have been doing for years. • Graphical query execution plans are the bread and butter of the query optimization process. They greatly simplify the process of optimizing complex queries, quickly exposing potential bottlenecks in your code. • Project management and code version control integration have been introduced, including integration with Team Foundation Server (TFS) and Visual SourceSafe version control systems. • SQLCMD mode allows you to execute SQL scripts using SQLCMD, taking advantage of SQLCMD’s additional script capabilities like scripting variables. SSMS also includes database and server management features, but I’ll limit the discussion of this section to some of the most important developer-specific features. Figure 3-1 shows the SSMS interface with an Intellisense example.
■Note Connecting to SQL Server 2008 via Enterprise Manager is not supported. SQL Server 2005 SSMS will connect, but requires SQL Server 2005 SP 2 Cumulative Update 5. You will lose some functionality if you connect to SQL Server 2008 instances with the older tools.
CHAPTER 3 ■ TOOLS OF THE TRADE
Figure 3-1. Using Intellisense in SSMS
SSMS Editing Options SSMS incorporates and improves on many of the developer features found in QA. You can change the editing options discussed in this section via the Tools ➤ Options menu. SSMS includes fully customizable script color coding. You can customize the foreground and background colors, font face, size, and style for elements of T-SQL, XML, XSLT, and MDX scripts. Likewise, you can customize just about any feedback that SSMS generates to suit your personal tastes. You can set other editing options such as word wrap, line number display, indentation, and tabs for different file types based on their associated file extensions. Like its predecessors, SSMS lets you configure your own keyboard shortcuts to execute common T-SQL statements or SPs. You can redefine Alt+F1, Ctrl+F1, and all Ctrl+ combinations. By default, SSMS displays queries using a tabbed window environment. If you prefer the classic multiple-document interface (MDI) window style, you can switch the environment layout to suit your tastes. You can also change the query results’ output style from the default grid output to text or file output.
63
64
CHAPTER 3 ■ TOOLS OF THE TRADE
Context-Sensitive Help To access the context-sensitive help, just highlight the T-SQL or other statement you want help with, and press F1. You can configure Help to use your locally installed copy of SQL Server 2008 BOL, or you can specify that Help search MSDN Online for the most up-to-date BOL information. You can add Help pages to your Help Favorites or go directly to the MSDN Community Forums to ask questions with the click of a button. Figure 3-2 shows the result of calling context-sensitive help for the CREATE CERTIFICATE statement.
Figure 3-2. Using SSMS context-sensitive help to find CREATE CERTIFICATE answers SSMS Help has several options that allow you to control help functionality and presentation. You can, for example, use the SSMS Integrated Help Viewer, which was shown in Figure 3-2, or you can use the External Help Viewer. The Help Options window is shown in Figure 3-3. Help Search rounds out the discussion of the help functionality in SSMS. The Help Search function automatically searches several online providers of SQL Server–related information for answers to your questions. Your searches are not restricted to SQL Server keywords or statements; you can search for anything at all, and the Help Search function will scour registered web sites and communities for relevant answers. Figure 3-4 shows the results of using Help Search to find XQuery content and articles.
CHAPTER 3 ■ TOOLS OF THE TRADE
Figure 3-3. Using the Help Options window to personalize SSMS Help
Figure 3-4. Using Help Search to find help on XQuery
65
66
CHAPTER 3 ■ TOOLS OF THE TRADE
Graphical Query Execution Plans SSMS offers graphical query execution plans similar to the plans available in QA. The graphical query execution plan is an excellent tool for optimizing query performance. SSMS allows you to view two types of graphical query execution plans: estimated and actual. The estimated query execution plan is SQL Server’s cost-based performance estimate of a query. The actual execution plan is virtually identical to the estimated execution plan, except that it shows additional information like actual row counts, number of rebinds, and number of rewinds when the query is run. These options are available via the Query menu. Figure 3-5 shows an estimated query execution plan in SSMS.
Figure 3-5. Estimated query execution plan for a simple query In addition, you can right-click the Execution Plan window to save the XML version of the graphical query plan to an XML file. SSMS can open these XML query plan files (with the extension .sqlplan) and automatically show you the graphical version. This is extremely useful for remotely troubleshooting performance problems with slow-running queries.
Project Management Features SSMS incorporates new project management features familiar to Visual Studio developers. SSMS supports solution-based development. It allows you to create solutions that consist of projects, which in turn contain T-SQL scripts, XML files, connection information, and other files. By default, projects and solutions are saved in your My Documents\SQL Server Management Studio\Projects directory. Solution files have the extension .ssmssln, and project files are saved in XML format with the .smssproj extension. SSMS incorporates a Solution Explorer window similar to Visual Studio’s Solution Explorer, as shown in Figure 3-6. You can access the Solution Explorer through the View menu. SSMS can take advantage of source control integration with TFS to help you manage versioning and deployments. To use SSMS’s source control integration, you have to set the appropriate source control options in the Options menu. The Options window is shown in Figure 3-7.
CHAPTER 3 ■ TOOLS OF THE TRADE
Figure 3-6. Viewing a solution in the SSMS Solution Explorer
Figure 3-7. Selecting the TFS MSSCCI provider in the source control options
■Note To use SSMS with TFS, you will need to download and install the appropriate Microsoft Source Code Control Interface (MSSCCI) provider from Microsoft. Go to www.microsoft.com/, search for “MSSCCI,” and download either the Visual Studio Team System 2005 or 2008 version of the MSSCCI provider, depending on which version you’re using.
67
68
CHAPTER 3 ■ TOOLS OF THE TRADE
After you create a solution and add projects, connections, and SQL scripts, you can add your solution to TFS by right-clicking the solution in the Solution Explorer and selecting Add Solution to Source Control (see Figure 3-8).
Figure 3-8. Adding a solution to source control To check out items from source control, open a local copy and choose Check Out for Edit. You’ll find options for checking out items from source control on the File ➤ Source Control menu. After checking out a solution from TFS, SSMS shows you the pending check-ins, letting you add comments to, or check in, individual files or projects.
The Object Explorer The SSMS Object Explorer lets you view and manage database and server objects. In the Object Explorer, you can view tables, stored procedures (SPs), user-defined functions (UDFs), HTTP endpoints, users, logins, and just about every other database-specific or server-scoped object. Figure 3-9 shows the Object Explorer in the left-hand pane and the Object Explorer Details tab on the right.
Figure 3-9. Viewing the Object Explorer and the Object Explorer Details tab
CHAPTER 3 ■ TOOLS OF THE TRADE
Most objects in the Object Explorer and the Object Explorer Details tabs have objectspecific pop-up context menus. Right-clicking any given object will bring up the menu. Figure 3-10 shows an example pop-up context menu for database tables.
Figure 3-10. Object Explorer database table pop-up context menu The SQL Server 2008 SSMS Object Explorer context menus offer several new options that weren’t available in SQL Server 2005. The table context menu, for example, has options for selecting the top 1000 rows, editing the top 200 rows, and policy administration. The additional options available in the new version of the Object Explorer can help ease development and administration.
The SQLCMD Utility The SQLCMD utility was originally introduced in SQL Server 2005 as an updated replacement for the SQL 2000 osql command-line utility. You can use SQLCMD to execute batches of T-SQL statements from script files, individual queries or batches of queries in interactive mode, or individual queries from the command line.
■Note Appendix D provides a quick reference to SQLCMD command-line options, scripting variables, and commands. The descriptions in the appendix are based on extensive testing of SQLCMD, and differ in some areas from the descriptions given in BOL.
SQLCMD offers support for a wide variety of command-line switches, making it a flexible utility for one-off batch or scheduled script execution. The following command demonstrates the use of some commonly used command-line options to connect to a SQL Server instance and execute a T-SQL script in the AdventureWorks database. The command uses some of the more common command-line options, including -S to specify the server/instance name, -E to indicate Windows authentication, -d to set the database name, and -i to specify the name of a
69
70
CHAPTER 3 ■ TOOLS OF THE TRADE
script file to execute. The command-line switches are all case sensitive, so -v is a different option from -V, for instance. sqlcmd -S SQL2008 -E -d AdventureWorks -i "c:\scripts\batch.sql" SQLCMD allows you to use scripting variables that let you use a single script in multiple scenarios. Scripting variables provide a mechanism for customizing the behavior of T-SQL scripts without modifying the scripts’ content. You can reference scripting variables that were previously set with the -v command-line switch, the SQLCMD :setvar command (discussed in the next section), or via Windows environment variables. You can also use any of the predefined SQLCMD scripting variables from within your scripts. The format to access any of these types of scripting variables from within your script is the same: $(variable_name). SQLCMD replaces your scripting variables with their respective values during script execution. Listing 3-1 shows some examples of scripting variables in action. Listing 3-1. Using Scripting Variables in a SQLCMD Script -- Windows environment variable SELECT '$(PATH)'; -- SQLCMD scripting variable SELECT '$(SQLCMDSERVER)'; -- Command-line scripting variable -v COLVAR= "Name" switch SELECT $(COLVAR) FROM Sys.Tables; Because scripting variables are replaced in a script wholesale, some organizations might consider their use a security risk because of the possibility of SQL injection–style attacks. For security reasons, some might choose to use the -x command-line option to turn this feature off. An example of a SQLCMD scripting variable is the predefined SQLCMDINI scripting variable, which specifies the SQLCMD startup script. The startup script is run every time SQLCMD is run. The startup script is useful for setting scripting variables with the :setvar command, setting initial T-SQL options such as QUOTED_IDENTIFIER or ANSI_PADDING, and performing any necessary database tasks before other scripts are run. In addition to T-SQL statements, SQLCMD recognizes several commands specific to the application. SQLCMD commands allow you to perform tasks like listing servers and scripting variables, connecting to a server, and setting scripting variables, among others. Except for the batch terminator GO, all SQLCMD commands begin with a colon (:). SQLCMD can also be run interactively. To start an interactive mode session, run SQLCMD with any of the previous options that do not exit immediately on completion.
■Note SQLCMD options such as -Q, -i, -Z, and -? exit immediately on completion. You cannot start an interactive SQLCMD session if you specify any of these command-line options.
CHAPTER 3 ■ TOOLS OF THE TRADE
During an interactive SQLCMD session, you can run T-SQL queries and commands from the SQLCMD prompt. The interactive screen looks similar to Figure 3-11.
Figure 3-11. Sample query run from the SQLCMD interactive prompt The SQLCMD prompt indicates the current line number of the batch (1>, 2>, etc.). You can enter T-SQL statements or SQLCMD commands at the prompt. T-SQL statements are stored in the statement cache as they are entered; SQLCMD commands are executed immediately. Once you have entered a complete batch of T-SQL statements, use the GO batch terminator to process all the statements in the cache.
Business Intelligence Development Studio SQL Server 2008 ships with the Visual Studio integrated development environment (IDE) and a set of business intelligence development add-on packages, known collectively as BIDS. BIDS allows you to create and manage projects for SQL Server Analysis Services (SSAS), SQL Server Reporting Services (SSRS), and SQL Server Integration Services (SSIS). Figure 3-12 shows the New Project window, which lists the different types of projects available in BIDS.
■Tip If you install Visual Studio on the same server as SQL Server, BIDS gives you additional options based on the Visual Studio components you’ve installed. With Visual Studio installed, you may see options for projects including Visual Basic, C#, C++.
71
72
CHAPTER 3 ■ TOOLS OF THE TRADE
Figure 3-12. Creating a new project in BIDS The BIDS interface makes it easy to create and edit SQL Server business intelligence projects, like the SSIS project shown in Figure 3-13.
Figure 3-13. Editing an SSIS project in BIDS
CHAPTER 3 ■ TOOLS OF THE TRADE
SQL Profiler SQL Profiler is the primary tool for analyzing SQL Server performance. If you have a performance problem but aren’t sure where the bottleneck lies, SQL Profiler can help you rapidly narrow down the suspects. SQL Profiler works by capturing events that occur on the server and logging them to a trace file. The classes of events that can be captured are exhaustive, covering a wide range of server-side events, including T-SQL and SP preparation and execution, security events, transaction activity, locks, and database resizing. When you create a new trace, SQL Profiler allows you to select all of the events you wish to audit. Normally, you will narrow this list down as much as possible for both performance and manageability reasons. Figure 3-14 is a sample trace that captures T-SQL-specific events on the server.
Figure 3-14. Preparing to capture T-SQL events in SQL Profiler Once a trace is configured and running, it captures all of the specified events on the server. A sample trace run using the T-SQL events is shown in Figure 3-15.
73
74
CHAPTER 3 ■ TOOLS OF THE TRADE
Figure 3-15. Running a trace of T-SQL events As you can see in the example, even a simple trace with a relatively small number of events captured can easily become overwhelming, particularly if run against a SQL Server instance with several simultaneous user connections. SQL Profiler offers the Column Filter option, which allows you to eliminate results from your trace. Using filters, you can narrow the results down to include only actions performed by specific applications or users, or those activities relevant only to a particular database. Figure 3-16 shows the Edit Filter window, where trace filter selections are made.
Figure 3-16. Editing filters in SQL Profiler
CHAPTER 3 ■ TOOLS OF THE TRADE
SQL Profiler offers several additional options, including trace replay and the ability to save trace results to either a file or a database table. SQL Profiler is vital to troubleshooting SQL Server performance and security issues.
SQL Server Integration Services SSIS was introduced in SQL Server 2005 as the replacement service for SQL Server 7.0 and 2000 Data Transformation Services (DTS). SSIS provides a true ETL tool that allows you to design simple or complex packages to pull data from multiple sources and integrate them into your SQL Server databases. In addition to data transformations, SSIS provides SQL Server–specific tasks that allow you to perform database administration and management functions like updating statistics and rebuilding indexes. SSIS divides the ETL process into three major parts: control flow, data flow, and event handlers. The control flow provides structure to SSIS packages and controls execution via tasks, containers, and precedence constraints. The data flow imports data from various sources, transforms it, and stores it in specified destinations. The data flow, from the perspective of the control flow, is just another task. However, the data flow is important enough to require its own detailed design surface within a package. Event handlers allow you to perform actions in response to predefined events during the ETL process. Figure 3-17 shows a simple SSIS data flow that imports data from a flat file into a table.
Figure 3-17. Data flow to import a flat file SSIS is a far more advanced ETL tool than DTS, and you will find that it provides significant improvements in features, functionality, and raw power over the old DTS tools.
75
76
CHAPTER 3 ■ TOOLS OF THE TRADE
The Bulk Copy Program If ETL tools were cars, SSIS might be considered the newest model Cadillac of SQL Server ETL. SSIS’s distant cousin, BCP, would be more like an austere 1960’s-era Jeep. While not as flashy or feature-rich as SSIS, BCP is small, fast, and can perform simple imports with no hassle. BCP is handy for generating format files for BCP and other bulk import tools, for one-off imports where a full-blown SSIS package would be overkill, for exporting data from database tables to files, and for backward compatibility when you don’t have the resources to devote to immediately upgrading old BCP-based ETL processes. Figure 3-18 shows a simple command-line call to BCP to create a BCP format file and a listing of the format file. The format files generated by BCP can be used by BCP, SSIS, and the T-SQL BULK INSERT statement.
Figure 3-18. Generating a format file with BCP
SQL Server 2008 Books Online BOL is the primary reference for T-SQL and SQL Server 2008 programming and administration. You can access a locally installed copy of BOL or you can access it over the Web at Microsoft’s web site. I highly recommend installing the local version of BOL on any computer running SQL Server; you never know when you’re going to need it for reference when you sit down at a server. Figure 3-19 shows a search of a local copy of BOL.
CHAPTER 3 ■ TOOLS OF THE TRADE
Figure 3-19. Searching local BOL for information on the geometry data type You can get updates for BOL at www.microsoft.com/sql/default.mspx. The online version of SQL Server 2008 BOL is available at http://msdn2.microsoft.com/en-us/library/ bb543165(sql.100).aspx. Also keep in mind that you can search online and local versions of BOL, as well as several other SQL resources, via the Help Search function discussed previously in this chapter.
■Tip Microsoft now offers an additional option for obtaining the most up-to-date version of BOL. You can download the latest BOL updates from the Microsoft Update site, at http://update.microsoft.com/ microsoftupdate. Microsoft has announced plans to refresh BOL with updated content more often, and to integrate SQL Server developer and DBA feedback into BOL more quickly.
77
78
CHAPTER 3 ■ TOOLS OF THE TRADE
The AdventureWorks Sample Database As of SQL Server 2005, Microsoft finally put the good old Northwind sample database to rest. SQL Server 2008 has two main sample databases: the AdventureWorks OLTP and AdventureWorks Data Warehouse databases. In this book, I’ll refer to the AdventureWorks OLTP database for most samples. Microsoft now releases SQL Server sample databases through its CodePlex web site. You can download the AdventureWorks databases and associated sample code from www.codeplex.com/MSFTDBProdSamples.
■Note I highly recommend that you download the SQL Server AdventureWorks 2008 OLTP database so that you can run the sample code in this book as you go through each chapter.
Summary SQL Server 2008 includes several of the tools we’ve come to expect with any SQL Server release. In this chapter, I’ve provided an overview of several tools that will be important to you as a SQL Server 2008 developer. The tools discussed include the following: • SSMS, the primary GUI for SQL Server development and administration • SQLCMD, SSMS’s text-based counterpart • BIDS, which provides a Visual Studio–style designer for creating SSIS, SSAS, and SSRS packages • SQL Profiler, which supplies event capture and server-side tracing capabilities for analyzing SQL Server performance and auditing security • SSIS, the primary ETL tool for SQL Server 2008 • BCP, a command line–based bulk import tool • BOL, the first place to look when trying to locate information about all things SQL Server • AdventureWorks, the freely available Microsoft-supplied sample database These topics could easily fill a book by themselves (and many, in fact, have). In the next chapter, I will provide a survey of new SQL Server 2008 features, with contrast to both SQL Server 2005 and SQL Server 2000 functionality.
CHAPTER 3 ■ TOOLS OF THE TRADE
EXERCISES 1. SSMS is a SQL development and administration GUI tool. What two SQL Server 2000 GUI tools does SSMS replace? 2. [Choose all that apply] SQL Server 2008 SSMS provides which of the following features: a.
Automatic color-coding of SQL scripts
b.
An integrated Object Explorer for viewing and managing the server, databases, and database objects
c.
Intellisense, which suggests table, object, and function names as you type SQL statements
d.
PDF and PostScript query plans
3. SSIS is considered what type of tool? 4. [True/false] SQLCMD can use command-line options, environment variables, and SQLCMD :setvar commands to set scripting variables. 5. [Choose one] BCP can be used to perform which of the following tasks: a.
Generating format files for use with SSIS
b.
Importing data into tables without format files
c.
Exporting data from a table to a file
d.
All of the above
6. SQL Profiler allows you to specify the events you wish to capture during a trace. How can you further narrow down the data SQL Profiler reports during a trace? 7. BIDS allows you to create what three types of projects?
79
CHAPTER
4
Procedural Code and CASE Expressions T
-SQL has always included support for procedural programming in the form of control-offlow statements and cursors. One thing that throws developers from other languages off their guard when migrating to SQL is the peculiar three-valued logic (3VL) we enjoy. I will introduce SQL 3VL, which is different from most other programming languages’ simple two-valued Boolean logic, in this chapter. I will also discuss T-SQL control-of-flow constructs, which allow you to change the normally sequential order of statement execution. Control-of-flow statements allow you to branch your code logic with statements like IF...ELSE..., perform loops with statements like WHILE, and perform unconditional jumps with the GOTO statement. I will also introduce CASE expressions and CASE-derived functions that return values based on given comparison criteria in an expression. Finally, I will finish the chapter by explaining a topic closely tied to procedural code: SQL cursors.
Three-Valued Logic SQL Server 2008, like all ANSI-compatible SQL DBMS products, implements a peculiar form of logic known as 3VL. 3VL is necessary because SQL introduces the concept of NULL to serve as a placeholder for values that are not known at the time they are stored in the database. The concept of NULL introduces an unknown logical result into SQL’s ternary logic system. I will introduce SQL 3VL with a simple set of propositions: • Consider the proposition “1 is less than 3.” The result is logically true because the value of the number 1 is less than the value of the number 3. • The proposition “5 is equal to 6” is logically false because the value of the number 5 is not equal to the value of the number 6. • The proposition “X is greater than 10” presents a bit of a problem. The variable X is an algebraic placeholder for an actual value. Unfortunately, I haven’t told you what value X stands for at this time. Because you don’t know what the value of X is, you can’t say the statement is true or false; instead you can say the result is unknown. SQL NULL represents an unknown value in the database in much the same way that the variable X represents an unknown value in this proposition, and comparisons with NULL produce the same unknown logical result in SQL. 81
82
CHAPTER 4 ■ PROCEDURAL CODE AND CASE EXPRESSIONS
Because NULL represents unknown values in the database, comparing anything with NULL (even other NULLs) produces an unknown logical result. Figure 4-1 is a quick reference for SQL Server 3VL, where p and q represent 3VL result values.
Figure 4-1. SQL 3VL quick reference chart As mentioned previously, the unknown logic values shown in the chart are the result of comparisons with NULL. The following predicates, for example, all evaluate to an unknown result: @x = NULL FirstName NULL PhoneNumber > NULL If you used one of these as the predicate in a WHERE clause of a SELECT statement, the statement would return no rows at all—SELECT with a WHERE clause returns only rows where the WHERE clause predicate evaluates to true; it discards rows for which the WHERE clause is false or unknown. Similarly, the INSERT, UPDATE, and DELETE statements with a WHERE clause only affect rows for which the WHERE clause evaluates to true. SQL Server provides a proprietary mechanism, the SET ANSI_NULLS OFF option, to allow direct equality comparisons with NULL using the = and operators. The only ISO-compliant way to test for NULL is with the IS NULL and IS NOT NULL comparison predicates. I highly recommend that you stick with the ISO-compliant IS NULL and IS NOT NULL predicates for a few reasons:
CHAPTER 4 ■ PROCEDURAL CODE AND CASE EXPRESSIONS
• Many SQL Server features like computed columns, indexed views, and XML indexes require SET ANSI_NULLS ON at creation time. • Mixing and matching SET ANSI_NULLS settings within your database can confuse other developers who have to maintain your code. Using ISO-compliant NULL-handling consistently eliminates confusion. • SET ANSI_NULLS OFF allows direct equality comparisons with NULL, returning true if you compare a column or variable to NULL. It does not return true if you compare NULLs contained in two columns, though, which can be confusing. • To top it all off, Microsoft has deprecated the SET ANSI_NULLS OFF setting. It will be removed in a future version of SQL Server, so it’s a good idea to start future-proofing your code now.
IT’S A CLOSED WORLD, AFTER ALL The closed-world assumption (CWA) is an assumption in logic that the world is “black and white,” “true and false,” or “ones and zeros.” When applied to databases, the CWA basically states that all data stored within the database is true; everything else is false. The CWA presumes that only knowledge of the world that is complete can be stored within a database. NULL introduces an open-world assumption (OWA) into the mix. It allows you to store information in the database that may or may not be true. This means that a SQL database can store incomplete knowledge of the world—a direct violation of the CWA. Many relational management (RM) theorists see this as an inconsistency in the SQL DBMS model. This argument fills many an RM textbook and academic blog, including web sites like Hugh Darwen and C.J. Date’s “The Third Manifesto” (www.thethirdmanifesto.com/), so I won’t go deeply into the details here. Just realize that many RM experts dislike SQL NULL. As a SQL practitioner in the real world, however, you may discover that NULL is often the best option available to accomplish many tasks.
Control-of-Flow Statements T-SQL implements procedural language control-of-flow statements, including such constructs as BEGIN...END, IF...ELSE, WHILE, and GOTO. T-SQL’s control-of-flow statements provide a framework for developing rich server-side procedural code. Procedural code in T-SQL does come with some caveats, though, which I will discuss in this section.
The BEGIN and END Keywords T-SQL uses the keywords BEGIN and END to group multiple statements together in a statement block. The BEGIN and END keywords don’t alter execution order of the statements they contain, nor do they define an atomic transaction, limit scope, or perform any function other than defining a simple grouping of T-SQL statements. Unlike other languages, such as C++ or C#, which use braces ({ }) to group statements in logical blocks, T-SQL’s BEGIN and END keywords do not define or limit scope. The following sample C# code, for instance, will not even compile:
83
84
CHAPTER 4 ■ PROCEDURAL CODE AND CASE EXPRESSIONS
{ int j = 10; } Console.WriteLine (j); C# programmers will automatically recognize that the variable j in the previous code is defined inside braces, limiting its scope and making it accessible only inside the braces. T-SQL’s roughly equivalent code, however, does not limit scope in this manner: BEGIN DECLARE @j int = 10; END PRINT @j; The previous T-SQL code executes with no problem, as long as the DECLARE statement is encountered before the variable is referenced in the PRINT statement. The scope of variables in T-SQL is defined in terms of command batches and database object definitions (such as SPs, UDFs, and triggers). Declaring two or more variables with the same name in one batch or SP will result in errors.
■Caution T-SQL’s BEGIN and END keywords create a statement block but do not define a scope. Variables declared inside a BEGIN...END block are not limited in scope just to that block, but are scoped to the whole batch, SP, or UDF in which they are defined.
BEGIN...END is useful for creating statement blocks where you want to execute multiple statements based on the results of other control-of-flow statements like IF...ELSE and WHILE. BEGIN...END can also have another added benefit if you’re using SSMS 2008 or a good third-party SQL editor like ApexSQL Edit (www.apexsql.com/). In advanced editors like these, BEGIN...END can alert the GUI that a section of code is collapsible, as shown in Figure 4-2. This can speed up development and ease debugging, especially if you’re writing complex T-SQL scripts.
Figure 4-2. BEGIN...END statement blocks marked collapsible in ApexSQL Edit
CHAPTER 4 ■ PROCEDURAL CODE AND CASE EXPRESSIONS
■Tip Although it’s not required, I like to wrap the body of CREATE
PROCEDURE statements with BEGIN...END.
This clearly delineates the bodies of the SPs, separating them from other code in the same script.
The IF...ELSE Statement Like many procedural languages, T-SQL implements conditional execution of code using the simplest of procedural statements: the IF...ELSE construct. The IF statement is followed by a logical predicate. If the predicate evaluates to true, the single SQL statement or statement blocked wrapped in BEGIN...END is executed. If the predicate evaluates to either false or unknown, SQL Server falls through to the ELSE statement and executes the single statement or statement block following ELSE.
■Tip A predicate in SQL is an expression that evaluates to one of the logical results true, false, or unknown. Predicates are used in IF...ELSE statements, WHERE clauses, and anywhere that a logical result is needed.
The example in Listing 4-1 performs up to three comparisons to determine whether a variable is equal to a specified value. The second ELSE statement executes if and only if the tests for both true and false conditions fail. Listing 4-1. Simple IF...ELSE Example DECLARE @i int = NULL; IF @i = 10 PRINT 'TRUE.'; ELSE IF NOT (@i = 10) PRINT 'FALSE.'; ELSE PRINT 'UNKNOWN.'; Because the variable @i is NULL in the example, SQL Server reports that the result is unknown. If you assign the value 10 to the variable @i, SQL Server will report that the result is true; all other values will report false. To create a statement block containing multiple T-SQL statements after either the IF statement of the ELSE statement, simply wrap your statements with the T-SQL BEGIN and END keywords discussed in the previous section. The simple example in Listing 4-2 is an IF...ELSE statement with statement blocks. The example uses IF...ELSE to check the value of the variable @direction. If @direction is ASCENDING, a message is printed, and the top ten names, in order of last name, are selected from the Person.Contact table. If @direction is DESCENDING, a different message is printed, and the bottom ten names are selected from the Person. Contact table. Any other value results in a message that @direction was not recognized. The results of Listing 4-2 are shown in Figure 4-3.
85
86
CHAPTER 4 ■ PROCEDURAL CODE AND CASE EXPRESSIONS
Listing 4-2. IF...ELSE with Statement Blocks DECLARE @direction NVARCHAR(20) = N'DESCENDING'; IF @direction = N'ASCENDING' BEGIN PRINT 'Start at the top!'; SELECT TOP (10) LastName, FirstName, MiddleName FROM Person.Contact ORDER BY LastName ASC; END ELSE IF @direction = N'DESCENDING' BEGIN PRINT 'Start at the bottom!'; SELECT TOP (10) LastName, FirstName, MiddleName FROM Person.Contact ORDER BY LastName DESC; END ELSE PRINT '@direction was not recognized!';
Figure 4-3. The last ten contact names in the AdventureWorks database
CHAPTER 4 ■ PROCEDURAL CODE AND CASE EXPRESSIONS
The WHILE, BREAK, and CONTINUE Statements Looping is a standard feature of procedural languages, and T-SQL provides looping support through the WHILE statement and its associated BREAK and CONTINUE statements. The WHILE loop is immediately followed by a predicate, and WHILE will execute a given SQL statement or statement block bounded by the BEGIN and END keywords as long as the associated predicate evaluates to true. If the predicate evaluates to false or unknown, the code in the WHILE loop will not execute and control will pass to the next statement after the WHILE loop. The WHILE loop in Listing 4-3 is a very simple example that counts from 1 to 10. The result is shown in Figure 4-4. Listing 4-3. WHILE Statement Example DECLARE @i int = 1; WHILE @i 0 BEGIN SET @result = 1.0; WITH Numbers (num) AS ( SELECT 1 UNION ALL SELECT num + 1 FROM Numbers WHERE num < @n ) SELECT @result = @result * num FROM Numbers; END; RETURN @result; END; This rewrite of the dbo.CalculateFactorial function averts the recursive function call limit by eliminating the recursive function calls. Instead, it pushes the recursion back into the body of the function through the use of a recursive CTE. By default, SQL Server allows up to 100 levels of recursion in a CTE (you can override this with the MAXRECURSION option), greatly expanding your factorial calculation power. With this function, you can easily find out that 33! is 8.68331761881189E+36, or even that 100! is 9.33262154439441E+157. The important idea to take away from this discussion is that while recursive function calls have hard limits on them, you can often work around those limitations using other T-SQL functionality. Also keep in mind that although I used factorial calculation as a simple example of recursion, this method is considered naive, and there are several more-efficient methods of calculating factorials. Please note that no cats were harmed during the writing of this book.
CHAPTER 5 ■ USER-DEFINED FUNCTIONS
Procedural Code in User-Defined Functions So far, we’ve talked about simple functions that demonstrate the basic points of scalar UDFs. But in all likelihood, unless we’re implementing business logic for a swimming pool installation company, neither you nor I will likely need to spend much time calculating the area of a circle in T-SQL. A common problem that you have a much greater chance of running into is name-based searching. T-SQL offers tools for exact matching, partial matching, and even limited pattern matching via the LIKE predicate. T-SQL even offers built-in phonetic matching (sound-alike matching) through the built-in SOUNDEX function. Heavy-duty approximate matching, however, usually requires a more advanced tool, like a better phonetic matching algorithm. I’ll use one of these algorithms, the New York State Identification and Intelligence System (NYSIIS) algorithm, to demonstrate procedural code in UDFs.
THE SOUNDEX ALGORITHM The NYSIIS algorithm is an improvement on the Soundex phonetic encoding algorithm, itself nearly 90 years old. The NYSIIS algorithm converts groups of one, two, or three alphabetic characters (known as n-grams) in names to a phonetic (“sounds like”) approximation. This makes it easier to search for names that have similar pronunciations but different spellings, such as Smythe and Smith. As mentioned in this section, SQL Server provides a built-in SOUNDEX function, but Soundex provides very poor accuracy and usually results in many false hits. NYSIIS and other modern algorithms provide much better results than Soundex.
To demonstrate procedural code in UDFs, I will implement a UDF that phonetically encodes names using NYSIIS encoding rules. The rules for NYSIIS phonetic encoding are relatively simple, with the majority of the rules requiring simple n-gram substitutions. The following is a complete list of NYSIIS encoding rules: 1. Remove all nonalphabetic characters from the name. 2. The first characters of the name are encoded according to the n-gram substitutions shown in the “Start of Name” table in Figure 5-2. In Figure 5-2, the n-grams shown on the left-hand side of the arrows are replaced with the n-grams on the right-hand side of the arrows during the encoding process. 3. The last characters of the name are encoded according to the n-gram substitutions shown in the “End of Name” table in Figure 5-2. 4. The first character of the encoded value is set to the first character of the name. 5. After the first and last n-grams are encoded, all remaining characters in the name are encoded according to the n-gram substitutions shown in the “Middle of Name” table in Figure 5-2. 6. All side-by-side duplicate characters in the encoded name are reduced to a single character. This means that AA is reduced to A and SS is reduced to S.
123
124
CHAPTER 5 ■ USER-DEFINED FUNCTIONS
7. If the last character of the encoded name is S, it is removed. 8. If the last characters of the encoded name are AY, they are replaced with Y. 9. If the last character of the encoded name is A, it is removed. 10. The result is truncated to six characters maximum length.
Figure 5-2. NYSIIS phonetic encoding rules/character substitutions You could use some fairly large CASE expressions to implement these rules, but I’ve chosen the more flexible option of using a replacement table. This table will contain the majority of the replacement rules in just the three columns, as described here: • Location: This column tells the UDF whether the rule should be applied to the start, end, or middle of the name. • NGram: This column is the n-gram, or sequence of characters, that will be encoded. These n-grams correspond to the left-hand side of the arrows in Figure 5-2. • Replacement: This column represents the replacement value for the corresponding n-gram on the same row. These character sequences correspond to the right-hand side of the arrows in Figure 5-2. Listing 5-3 is a CREATE TABLE statement that builds the NYSIIS phonetic encoding replacement rules table.
CHAPTER 5 ■ USER-DEFINED FUNCTIONS
Listing 5-3. Creating the NYSIIS Replacement Rules Table -- Create the NYSIIS replacement rules table CREATE TABLE dbo.NYSIIS_Replacements (Location nvarchar(10) NOT NULL, NGram nvarchar(10) NOT NULL, Replacement nvarchar(10) NOT NULL, PRIMARY KEY (Location, NGram)); Listing 5-4 is a single INSERT statement that uses the new SQL Server 2008 row constructors to populate all of the NYSIIS replacement rules, as shown in Figure 5-2. Listing 5-4. INSERT Statement to Populate NYSIIS Replacement Rules Table INSERT INTO NYSIIS_Replacements (Location, NGram, Replacement) VALUES (N'End', N'DT', N'DD'), (N'End', N'EE', N'YY'), (N'End', N'IE', N'YY'), (N'End', N'ND', N'DD'), (N'End', N'NT', N'DD'), (N'End', N'RD', N'DD'), (N'End', N'RT', N'DD'), (N'Mid', N'A', N'A'), (N'Mid', N'E', N'A'), (N'Mid', N'I', N'A'), (N'Mid', N'K', N'C'), (N'Mid', N'M', N'N'), (N'Mid', N'O', N'A'), (N'Mid', N'Q', N'G'), (N'Mid', N'U', N'A'), (N'Mid', N'Z', N'S'), (N'Mid', N'AW', N'AA'), (N'Mid', N'EV', N'AF'), (N'Mid', N'EW', N'AA'), (N'Mid', N'IW', N'AA'), (N'Mid', N'KN', N'NN'), (N'Mid', N'OW', N'AA'), (N'Mid', N'PH', N'FF'), (N'Mid', N'UW', N'AA'), (N'Mid', N'SCH', N'SSS'), (N'Start', N'K', N'C'), (N'Start', N'KN', N'NN'), (N'Start', N'PF', N'FF'), (N'Start', N'PH', N'FF'), (N'Start', N'MAC', N'MCC'), (N'Start', N'SCH', N'SSS'); GO
125
126
CHAPTER 5 ■ USER-DEFINED FUNCTIONS
Listing 5-5 is the actual UDF that encodes a string using NYSIIS. This UDF demonstrates the complexity of the control-of-flow logic that can be implemented in a scalar UDF. Listing 5-5. Function to Encode Strings Using NYSIIS CREATE FUNCTION dbo.EncodeNYSIIS ( @String nvarchar(100) ) RETURNS nvarchar(6) WITH RETURNS NULL ON NULL INPUT AS BEGIN DECLARE @Result nvarchar(100); SET @Result = UPPER(@String); -- Step 1: Remove all nonalphabetic characters WITH Numbers (Num) AS ( SELECT 1 UNION ALL SELECT Num + 1 FROM Numbers WHERE Num < LEN(@Result) ) SELECT @Result = STUFF ( @Result, Num, 1, CASE WHEN SUBSTRING(@Result, Num, 1) >= N'A' AND SUBSTRING(@Result, Num, 1) 0) AND (UPDATE(SizeUnitMeasureCode) OR UPDATE(Size)) BEGIN ... END; Once the trigger has verified that at least one row was affected and the appropriate columns were modified, the trigger sets NOCOUNT ON to prevent the rows affected messages from being generated by the trigger. The IF EXISTS statement checks to make sure that valid unit-of-measure codes are used. If not, the trigger raises an error and rolls back the transaction. -- Eliminate "rows affected" messages SET NOCOUNT ON; -- Only accept recognized units of measure or NULL IF EXISTS (
CHAPTER 7 ■ TRIGGERS
SELECT 1 FROM inserted WHERE NOT ( SizeUnitMeasureCode IN (N'M', N'DM', N'CM', N'MM', N'IN') OR SizeUnitMeasureCode IS NULL ) ) BEGIN -- If the unit of measure wasn't recognized raise an error and roll back -- the transaction RAISERROR ('Invalid Size Unit Measure Code.', 10, 127); ROLLBACK TRANSACTION; END
■Tip The ROLLBACK
TRANSACTION statement in the trigger rolls back the transaction and prevents further triggers from being fired by the current trigger.
If the unit-of-measure validation is passed, the SizeUnitMeasureCode is set to centimeters and the Size is converted to centimeters for each inserted or updated row. BEGIN -- If the unit of measure is a recognized unit of measure then set the -- SizeUnitMeasureCode to centimeters and perform the Size conversion UPDATE Production.Product SET SizeUnitMeasureCode = CASE WHEN SizeUnitMeasureCode IS NULL THEN NULL ELSE N'CM' END, Size = CAST ( CAST ( CASE i.SizeUnitMeasureCode WHEN N'M' THEN CAST(i.Size AS float) * 100.0 WHEN N'DM' THEN CAST(i.Size AS float) * 10.0 WHEN N'CM' THEN CAST(i.Size AS float) WHEN N'MM' THEN CAST(i.Size AS float) * 0.10 WHEN N'IN' THEN CAST(i.Size AS float) * 2.54 END AS int ) AS nvarchar(5) )
203
204
CHAPTER 7 ■ TRIGGERS
FROM inserted i WHERE Production.Product.ProductID = i.ProductID AND i.SizeUnitMeasureCode IS NOT NULL; END; This trigger enforces simple business logic by ensuring that standard-size codes are used when updating the Production.Product table and converting the Size values to centimeters. To test the trigger, you can perform updates of existing rows in the Production.Product table. Listing 7-9 updates the sizes of the products with ProductID 680 and 780 to 600 millimeters and 22.85 inches, respectively. The results, with the Size values automatically converted to centimeters, are shown in Figure 7-4. Listing 7-9. Testing the Trigger by Adding a New Product UPDATE Production.Product SET Size = N'600', SizeUnitMeasureCode = N'MM' WHERE ProductId = 680; UPDATE Production.Product SET Size = N'22.85', SizeUnitMeasureCode = N'IN' WHERE ProductId = 706; SELECT ProductID, Name, ProductNumber, Size, SizeUnitMeasureCode FROM Production.Product WHERE ProductID IN (680, 706);
Figure 7-4. The results of the Production.ProductEnforceStandardSizes trigger test While the UPDATE function accepts a column name and returns true if the column is affected, the COLUMNS_UPDATED function accepts no parameters and returns a varbinary value with a single bit representing each column. You can use the bitwise AND operator (&) and a bit mask to test which columns are affected. The bits are set from left to right, based on the ColumnID number of the columns.
CHAPTER 7 ■ TRIGGERS
To create a bit mask, you must use 20 (1) to represent the first column, 21 (2) to represent the second column, and so on. Because COLUMNS_UPDATED returns a varbinary result, the column indicator bits can be spread out over several bytes. To test columns beyond the first eight, like the Size and SizeUnitMeasureCode columns in the example code (columns 11 and 12), you can use the SUBSTRING function to return the second byte of COLUMNS_UPDATED and test the appropriate bits with a bit mask of 12 (12 = 22 + 23). The sample trigger in Listing 7-8 can be modified to use the COLUMNS_UPDATED function, as shown here: IF (@@ROWCOUNT > 0) AND (SUBSTRING(COLUMNS_UPDATED(), 2, 1) & 12 0x00) The COLUMNS_UPDATED function will not return correct results if the ColumnID values of the table are changed. If the table is dropped and recreated with columns in a different order, you will need to change the triggers that use COLUMNS_UPDATED to reflect the changes. There may be specialized instances in which you’ll be able to take advantage of the COLUMNS_UPDATED functionality, but in general I would advise against using COLUMNS_UPDATED, and instead use the UPDATE function to determine which columns were affected by the DML statement that fired your trigger.
Triggers on Views Although you cannot create AFTER triggers on views, SQL Server does allow you to create INSTEAD OF triggers on your views. A trigger can be useful for updating views that are otherwise nonupdatable, such as views with multiple base tables or views that contain aggregate functions. INSTEAD OF triggers on views also give you fine-grained control, since you can control which columns of the view are updatable through the trigger. The AdventureWorks database comes with a view named Sales.vSalesPerson, which is formed by joining 11 separate tables together. The INSTEAD OF trigger in Listing 7-10 allows you to update specific columns of two of the base tables used in the view by executing UPDATE statements directly against the view. Listing 7-10. INSTEAD OF Trigger on a View ALTER TRIGGER Sales.vIndividualCustomerUpdate ON Sales.vIndividualCustomer INSTEAD OF UPDATE NOT FOR REPLICATION AS BEGIN -- First make sure at least one row was affected IF (@@ROWCOUNT > 0) BEGIN -- Turn off "rows affected" messages SET NOCOUNT ON; -- Initialize a flag to indicate update success DECLARE @UpdateSuccessful nchar(1) = N'N';
205
206
CHAPTER 7 ■ TRIGGERS
-- Check for updatable columns in the first table IF UPDATE(FirstName) OR UPDATE(MiddleName) OR UPDATE(LastName) BEGIN -- Update columns in the base table UPDATE Person.Person SET FirstName = i.FirstName, MiddleName = i.MiddleName, LastName = i.LastName FROM inserted i WHERE i.BusinessEntityID = Person.Person.BusinessEntityID; -- Set flag to indicate success SET @UpdateSuccessful = N'Y'; END; -- If updatable columns from the second table were specified, update those -- columns in the base table IF UPDATE(EmailAddress) BEGIN -- Update columns in the base table UPDATE Person.EmailAddress SET EmailAddress = i.EmailAddress FROM inserted i WHERE i.BusinessEntityID = Person.EmailAddress.BusinessEntityID; -- Set flag to indicate success SET @UpdateSuccessful = N'Y'; END; -- If the update was not successful, raise an error and roll back the -- transaction IF @UpdateSuccessful = N'N' RAISERROR('Must specify updatable columns.', 10, 127); END; END; GO The trigger in Listing 7-10 is created as an INSTEAD OF UPDATE trigger on the Sales.vIndividualCustomer view, as shown following: ALTER TRIGGER Sales.vIndividualCustomerUpdate ON Sales.vIndividualCustomer INSTEAD OF UPDATE NOT FOR REPLICATION
CHAPTER 7 ■ TRIGGERS
As with the previous examples in this chapter, this trigger begins by checking @@ROWCOUNT to ensure that at least one row was updated: -- First make sure at least one row was affected IF (@@ROWCOUNT > 0) BEGIN ... END; Once the trigger verifies that one or more rows were affected by the DML statement that fired the trigger, it turns off the rows affected messages and initializes a flag to indicate success or failure of the update operation: -- Turn off "rows affected" messages SET NOCOUNT ON; -- Initialize a flag to indicate update success DECLARE @UpdateSuccessful nchar(1) = N'N'; The trigger then checks to see if the columns designated as updatable were affected by the UPDATE statement. If the proper columns were affected by the UPDATE statement, the trigger performs updates on the appropriate base tables for the view. For purposes of this demonstration, the columns that are updatable by the trigger are the FirstName, MiddleName, and LastName columns from the Person.Person table, and the EmailAddress column from the Person. EmailAddress column. -- Check for updatable columns in the first table IF UPDATE(FirstName) OR UPDATE(MiddleName) OR UPDATE(LastName) BEGIN -- Update columns in the base table UPDATE Person.Person SET FirstName = i.FirstName, MiddleName = i.MiddleName, LastName = i.LastName FROM inserted i WHERE i.BusinessEntityID = Person.Person.BusinessEntityID; -- Set flag to indicate success SET @UpdateSuccessful = N'Y'; END; -- If updatable columns from the second table were specified, update those -- columns in the base table IF UPDATE(EmailAddress) BEGIN
207
208
CHAPTER 7 ■ TRIGGERS
-- Update columns in the base table UPDATE Person.EmailAddress SET EmailAddress = i.EmailAddress FROM inserted i WHERE i.BusinessEntityID = Person.EmailAddress.BusinessEntityID; -- Set flag to indicate success SET @UpdateSuccessful = N'Y'; END; Finally, if no updatable columns were specified by the UPDATE statement that fired the trigger, an error is raised and the transaction is rolled back: -- If the update was not successful, raise an error and roll back the -- transaction IF @UpdateSuccessful = N'N' RAISERROR('Must specify updatable columns.', 10, 127); Listing 7-11 demonstrates a simple UPDATE against the Sales.vIndividualCustomer view with the INSTEAD OF trigger from Listing 7-10 created on it. The result is shown in Figure 7-5. Listing 7-11. Updating a View Through an INSTEAD OF Trigger UPDATE Sales.vIndividualCustomer SET FirstName = N'Dave', MiddleName = N'Robert', EmailAddress = N'[email protected]' WHERE BusinessEntityID = 1699;
Figure 7-5. The result of the INSTEAD OF trigger view update
DDL Triggers Since SQL Server 2005, T-SQL programmers have had the ability to create DDL triggers that fire when DDL events occur within a database or on the server. In this section, I will discuss DDL triggers, the events that fire them, and the purpose. The format of the CREATE TRIGGER statement for DDL triggers is only slightly different from the DML trigger syntax, with the major difference being that you must specify the scope for the trigger, either ALL SERVER or DATABASE. The DATABASE scope causes the DDL trigger to fire if an event of a specified event
CHAPTER 7 ■ TRIGGERS
type or event group occurs within the database in which the trigger was created. ALL SERVER scope causes the DDL trigger to fire if an event of the specified event type or event group occurs anywhere on the current server. DDL triggers can only be specified as FOR or AFTER (there’s no INSTEAD OF–type DDL trigger). The event types that can fire a DDL trigger are largely of the form CREATE, ALTER, DROP, GRANT, DENY, or REVOKE. Some system SPs that perform DDL functions also fire DDL triggers. The ALTER TRIGGER, DROP TRIGGER, DISABLE TRIGGER, and ENABLE TRIGGER statements all work for DDL triggers just as they do for DML triggers. DDL triggers are useful when you want to prevent changes to your database, perform actions in response to a change in the database, or audit changes to the database. Which DDL statements can fire a DDL trigger depends on the scope of the trigger.
DDL EVENT TYPES AND EVENT GROUPS DDL triggers can fire in response to a wide variety of event types and event groups, scoped at either the database or server level. The events that fire DDL triggers are largely DDL statements like CREATE and DROP, and DCL (Data Control Language) statements like GRANT and DENY. Event groups form a hierarchical structure of DDL events in logical groupings, like DDL_FUNCTION_EVENTS and DDL_PROCEDURE_EVENTS. Event groups allow you to fire triggers in response to a wide range of DDL events. BOL has complete listings of all available DDL trigger event types and event groups, so I won’t reproduce them fully here. Just keep in mind that you can fire triggers in response to most T-SQL DDL and DCL statements.
With DDL triggers, you can specify either an event type or an event group, the latter of which can encompass multiple events or other event groups. If you specify an event group, any events included within that group, or within the subgroups of that group, will fire the DDL trigger.
■Note Creation of a DDL trigger with ALL
SERVER scope requires CONTROL SERVER permission on the server. Creating a DDL trigger with DATABASE scope requires ALTER ANY DATABASE DDL TRIGGER permissions.
Once the DDL trigger fires, you can access metadata about the event that fired the trigger with the EVENTDATA function. EVENTDATA returns information such as the time, connection, object name, and type of event that fired the trigger. The results are returned as a SQL Server xml data type instance. Listing 7-12 shows a sample of the type of data returned by the EVENTDATA function. Listing 7-12. EVENTDATA Function Sample Data
CREATE_TABLE 2008-03-22T21:08:28.527 115
209
210
CHAPTER 7 ■ TRIGGERS
SQL2008 SQL2008\Michael dbo AdventureWorks dbo MyTable TABLE
CREATE TABLE dbo.MyTable (i int);
You can use the xml data type’s value() method to retrieve specific nodes from the result. The sample DDL trigger in Listing 7-13 creates a DDL trigger that fires in response to the CREATE TABLE statement in the AdventureWorks database. It logs the event data to a table named dbo.DdlActionLog. Listing 7-13. CREATE TABLE DDL Trigger Example -- Create a table to log DDL CREATE TABLE actions CREATE TABLE dbo.DdlActionLog ( EntryNum int IDENTITY(1, 1) NOT NULL PRIMARY KEY, EventType nvarchar(200) NOT NULL, PostTime datetime NOT NULL, Spid int NOT NULL, LoginName sysname NOT NULL, UserName sysname NOT NULL, ServerName sysname NOT NULL, SchemaName sysname NOT NULL, DatabaseName sysname NOT NULL, ObjectName sysname NOT NULL, ObjectType sysname NOT NULL, CommandText nvarchar(max) NOT NULL ); GO CREATE TRIGGER AuditCreateTable ON DATABASE FOR CREATE_TABLE AS
CHAPTER 7 ■ TRIGGERS
BEGIN -- Assign the XML event data to an xml variable DECLARE @event_data xml; SET @event_data = EVENTDATA(); -- Shred the XML event data and insert a row in the log table INSERT INTO dbo.DdlActionLog ( EventType, PostTime, Spid, LoginName, UserName, ServerName, SchemaName, DatabaseName, ObjectName, ObjectType, CommandText ) SELECT EventNode.value(N'EventType[1]', N'nvarchar(200)'), EventNode.value(N'PostTime[1]', N'datetime'), EventNode.value(N'SPID[1]', N'int'), EventNode.value(N'LoginName[1]', N'sysname'), EventNode.value(N'UserName[1]', N'sysname'), EventNode.value(N'ServerName[1]', N'sysname'), EventNode.value(N'SchemaName[1]', N'sysname'), EventNode.value(N'DatabaseName[1]', N'sysname'), EventNode.value(N'ObjectName[1]', N'sysname'), EventNode.value(N'ObjectType[1]', N'sysname'), EventNode.value(N'(TSQLCommand/CommandText)[1]', 'nvarchar(max)') FROM @event_data.nodes('/EVENT_INSTANCE') EventTable(EventNode); END; GO The first part of the example in Listing 7-13 creates a simple table to store the eventspecific data generated by events that fire the DDL trigger: -- Create a table to log DDL CREATE TABLE actions CREATE TABLE dbo.DdlActionLog ( EntryNum int IDENTITY(1, 1) NOT NULL PRIMARY KEY, EventType nvarchar(200) NOT NULL, PostTime datetime NOT NULL, Spid int NOT NULL, LoginName sysname NOT NULL,
211
212
CHAPTER 7 ■ TRIGGERS
UserName sysname NOT NULL, ServerName sysname NOT NULL, SchemaName sysname NOT NULL, DatabaseName sysname NOT NULL, ObjectName sysname NOT NULL, ObjectType sysname NOT NULL, CommandText nvarchar(max) NOT NULL ); GO The DDL trigger definition begins with the name, the scope (DATABASE), and the DDL action that fires the trigger. In this example, the action that fires this trigger is the CREATE TABLE event. Notice that unlike DML triggers, DDL triggers do not belong to schemas and do not have schemas specified in their names. CREATE TRIGGER AuditCreateTable ON DATABASE FOR CREATE_TABLE The body of the trigger begins by declaring an xml variable, @event_data. This variable holds the results of the EVENTDATA function for further processing later in the trigger. -- Assign the XML event data to an xml variable DECLARE @event_data xml; SET @event_data = EVENTDATA(); Next, the trigger uses the nodes() and value() methods of the @event_data xml variable to shred the event data, which is then inserted into the dbo.DdlActionLog table in relational form: -- Shred the XML event data and insert a row in the log table INSERT INTO dbo.DdlActionLog ( EventType, PostTime, Spid, LoginName, UserName, ServerName, SchemaName, DatabaseName, ObjectName, ObjectType, CommandText ) SELECT EventNode.value(N'EventType[1]', N'nvarchar(200)'), EventNode.value(N'PostTime[1]', N'datetime'), EventNode.value(N'SPID[1]', N'int'), EventNode.value(N'LoginName[1]', N'sysname'), EventNode.value(N'UserName[1]', N'sysname'), EventNode.value(N'ServerName[1]', N'sysname'),
CHAPTER 7 ■ TRIGGERS
EventNode.value(N'SchemaName[1]', N'sysname'), EventNode.value(N'DatabaseName[1]', N'sysname'), EventNode.value(N'ObjectName[1]', N'sysname'), EventNode.value(N'ObjectType[1]', N'sysname'), EventNode.value(N'(TSQLCommand/CommandText)[1]', 'nvarchar(max)') FROM @event_data.nodes('/EVENT_INSTANCE') EventTable(EventNode); Listing 7-14 demonstrates the DDL trigger by performing a CREATE TABLE statement. Partial results are shown in Figure 7-6. Listing 7-14. Testing the DDL Trigger with a CREATE TABLE Statement CREATE TABLE dbo.MyTable (i int); GO SELECT EntryNum, EventType, UserName, ObjectName, CommandText FROM DdlActionLog; GO
Figure 7-6. DDL audit logging results Dropping a DDL trigger is as simple as executing the DROP TRIGGER statement, as shown in Listing 7-15. Notice that the ON DATABASE clause is required in this instance. The reason is that the DDL trigger exists outside the schemas of the database, so you must tell SQL Server whether the trigger exists at the database or server scope. Listing 7-15. Dropping a DDL Trigger DROP TRIGGER AuditCreateTable ON DATABASE; GO
Logon Triggers SQL Server offers yet another type of trigger: the logon trigger. Logon triggers were first made available in SQL Server 2005 SP 2. These triggers fire in response to a SQL Server LOGON event—
213
214
CHAPTER 7 ■ TRIGGERS
after authentication succeeds, but before the user session is established. You can perform tasks ranging from simple LOGON event auditing to more advanced tasks like restricting the number of simultaneous sessions for a login or denying users the ability to create sessions during certain times. The code example for this section uses logon triggers to deny a given user the ability to log into SQL Server during a specified time period (e.g., during a resource-intensive nightly batch process). Listing 7-16 begins the logon trigger example by creating a sample login and a table that holds a logon denial schedule. The first entry in this table will be used to deny the sample login the ability to log into SQL Server between the hours of 9:00 and 11:00 PM on Saturday nights. Listing 7-16. Creating a Test Login and Logon Denial Schedule CREATE LOGIN PublicUser WITH PASSWORD = 'p@$$w0rd'; GO CREATE TABLE dbo.DenyLogonSchedule ( UserId sysname NOT NULL, DayOfWeek int NOT NULL, TimeStart time NOT NULL, TimeEnd time NOT NULL, PRIMARY KEY (UserId, DayOfWeek, TimeStart, TimeEnd) ); GO INSERT INTO dbo.DenyLogonSchedule ( UserId, DayOfWeek, TimeStart, TimeEnd ) VALUES ( 'PublicUser', 7, '21:00:00', '23:00:00' ); GO The logon trigger that makes use of this table to deny logons on a schedule is shown in Listing 7-17.
CHAPTER 7 ■ TRIGGERS
Listing 7-17. Sample Logon Trigger CREATE TRIGGER DenyLogons ON ALL SERVER WITH EXECUTE AS 'sa' FOR LOGON AS BEGIN IF EXISTS ( SELECT 1 FROM AdventureWorks.dbo.DenyLogonSchedule WHERE UserId = ORIGINAL_LOGIN() AND DayOfWeek = DATEPART(WeekDay, GETDATE()) AND CAST(GETDATE() AS TIME) BETWEEN TimeStart AND TimeEnd ) BEGIN ROLLBACK TRANSACTION; END; END; GO
■Caution If your logon trigger errors out, you will be unable to log into SQL Server normally. You can still connect using the Dedicated Administrator Connection (DAC), which bypasses logon triggers, however. Make sure that your logon trigger works properly before putting it in production.
The CREATE TRIGGER statement begins much like the other trigger samples I’ve used to this point, by specifying the name and scope (ALL SERVER). The WITH EXECUTE clause is used to specify that the logon trigger should run under the sa security context, and the FOR LOGON clause indicates that this is actually a logon trigger. CREATE TRIGGER DenyLogons ON ALL SERVER WITH EXECUTE AS 'sa' FOR LOGON The trigger body is fairly simple. It simply checks for the existence of an entry in the AdventureWorks.dbo.DenyLogonSchedule table, indicating that the current user (retrieved with the ORIGINAL_LOGIN function) is denied login based on the current date and time. If there is an entry indicating that the login should be denied, then the ROLLBACK TRANSACTION statement is executed, denying the login.
215
216
CHAPTER 7 ■ TRIGGERS
IF EXISTS ( SELECT 1 FROM AdventureWorks.dbo.DenyLogonSchedule WHERE UserId = ORIGINAL_LOGIN() AND DayOfWeek = DATEPART(WeekDay, GETDATE()) AND CAST(GETDATE() AS TIME) BETWEEN TimeStart AND TimeEnd ) BEGIN ROLLBACK TRANSACTION; END; Notice that the three-part name of the table is used in this statement, since the user attempting to log in may be connecting to a different default database. Attempting to log on to SQL Server using the PublicUser account on Saturday night between the hours indicated results in an error message like the one shown in Figure 7-7.
■Tip Logon triggers are useful for auditing and restricting logins, but because they only fire after a successful authentication, they cannot be used to log unsuccessful login attempts.
Figure 7-7. A logon trigger denying a login The logon trigger also makes logon information available in XML format within the trigger via the EVENTDATA function. An example of the logon information generated by the LOGON event is shown in Listing 7-18. Listing 7-18. Sample Event Data Generated by a LOGON Event
LOGON 2008-03-22T23:18:33.357 110 SQL2008 PublicUser
CHAPTER 7 ■ TRIGGERS
SQL Login zgPcN6UCBE2j/HYTugOi4A== 0
Summary This chapter discussed triggers, including traditional DML triggers, DDL triggers, and logon triggers. As you’ve seen, triggers are useful tools for a variety of purposes. DML triggers are the original form of trigger. Much of the functionality that DML triggers were used for in the past, such as enforcing referential integrity, has been supplanted by newer and more efficient T-SQL functionality over the years, like cascading DRI. DML triggers are useful for auditing DML statements and for enforcing business rules and logic in the database. They can also be used to implement updating for views that are normally not updatable. In this chapter, I discussed the inserted and deleted virtual tables, which hold copies of the rows being affected by a DML statement. I also discussed the UPDATE and COLUMNS_UPDATED functions in DML triggers, which identify the columns that were affected by the DML statement that fired a trigger. Finally, I talked about the differences between AFTER and INSTEAD OF triggers and explained nested triggers and trigger recursion. DDL triggers, introduced in SQL Server 2005, can be used to audit and restrict database object and server changes. DDL triggers can help provide protection against accidental or malicious changes to, or destruction of, database objects. In this chapter, I discussed the EVENTDATA function and how you can use it to audit DDL actions within a database or on the server. Logon triggers, introduced in SQL Server 2005 SP 2, can likewise be used to audit successful logins and restrict logins for various reasons. In the next chapter, I will discuss the native encryption functionality available in SQL Server 2008.
EXERCISES 1. [True/false] The EVENTDATA function returns information about DDL events within DDL triggers. 2. [True/false] In a DML trigger, the inserted and deleted virtual tables are both populated with rows during an UPDATE event. 3. [Choose all that apply] Which of the following types of triggers does SQL Server 2008 support? a.
Logon triggers
b.
TCL triggers
c.
DDL triggers
d.
Hierarchy triggers
e.
DML triggers
4. [Fill in the blank] The ___ statement prevents triggers from generating extraneous rows affected messages.
217
218
CHAPTER 7 ■ TRIGGERS
5. [Choose one] The COLUMNS_UPDATED function returns data in which of the following formats? a.
A varbinary string with bits set to represent affected columns
b.
A comma-delimited varchar string with a column ID number for each affected column
c.
A table consisting of column ID numbers for each affected column
d.
A table consisting of all rows that were inserted by the DML operation
6. [True/false] @@ROWCOUNT, when used at the beginning of a DML trigger, reflects the number of rows affected by the DML statement that fired the trigger. 7. [True/false] You can create recursive AFTER triggers on views.
CHAPTER
8
Encryption S
QL Server 2008 supports built-in column- and database-level encryption functionality directly through T-SQL. Column-level encryption allows you to encrypt the data in your database at the column level. Back in the days of SQL Server 2000 (and before), you had to turn to third-party tools or write your own extended stored procedures (XPs) to encrypt sensitive data. Even with these tools in place, subpar implementation of various aspects of the system, such as encryption key management, could leave many systems in a vulnerable state. SQL Server 2008’s encryption model takes advantage of the Windows CryptoAPI to secure your data. With built-in encryption key management and facilities to handle encryption, decryption, and one-way hashing through T-SQL statements, SQL Server 2008 provides useful tools for efficient and secure data encryption. SQL Server 2008 also supports two new encryption options: transparent data encryption (TDE) for supporting encryption of an entire database, and extensible key management (EKM), which allows you to use third-party hardware-based encryption key management and encryption acceleration. In this chapter, I will discuss SQL Server 2008’s built-in column-level encryption and decryption functionality, key management capabilities, one-way hashing functions, and the new TDE and EKM functionality.
The Encryption Hierarchy SQL Server 2008 offers a layered approach to encryption key management by allowing several levels of key-encrypting keys between the top-level master key and the lowest-level data-encrypting keys. SQL Server also allows for encryption by certificates, symmetric keys, and asymmetric keys. The SQL Server 2008 encryption model is hierarchical, as shown in Figure 8-1. At the top of the SQL Server 2008 encryption hierarchy is the Windows Data Protection API (DPAPI), which is used to protect the granddaddy of all SQL Server 2008 encryption keys: the service master key (SMK). The SMK is automatically generated by SQL Server the first time it is needed to encrypt another key. There is only one SMK per SQL Server instance, and it directly or indirectly secures all keys in the SQL Server encryption key hierarchy on the server. While each SQL Server instance has only a single SMK, each database can have a database master key (DMK). The DMK is encrypted by the SMK. The DMK is used to encrypt lower-level keys and certificates. At the bottom of the SQL Server 2008 key hierarchy are the certificates, symmetric keys, and asymmetric keys used to encrypt data.
219
220
CHAPTER 8 ■ ENCRYPTION
Figure 8-1. SQL Server 2008 encryption hierarchy SQL Server 2008 also introduces the concept of the server certificate, which is a certificate created in the master database for the purpose of protecting database encryption keys. Database encryption keys are symmetric encryption keys created to encrypt entire databases via TDE.
Service Master Keys As I mentioned in the previous section, the SMK is automatically generated by SQL Server the first time it is needed. Because the SMK is generated automatically and managed by SQL Server, there are only a couple of administrative tasks you need to perform for this key, namely backing it up and restoring it on a server as necessary. Listing 8-1 demonstrates the BACKUP and RESTORE SERVICE MASTER KEY statements. Listing 8-1. BACKUP and RESTORE SMK Examples -- Back up the SMK to a file BACKUP SERVICE MASTER KEY TO FILE = 'c:\SQL2008.SMK' ENCRYPTION BY PASSWORD = 'p@$$w0rd'; -- Restore the SMK from a file RESTORE SERVICE MASTER KEY FROM FILE = 'c:\SQL2008.SMK' DECRYPTION BY PASSWORD = 'p@$$w0rd';
CHAPTER 8 ■ ENCRYPTION
The BACKUP SERVICE MASTER KEY statement allows you to back up your SMK to a file. The SMK is encrypted in the file, so the ENCRYPTION BY PASSWORD clause of this statement is mandatory. The RESTORE SERVICE MASTER KEY statement restores the SMK from a previously created backup file. The DECRYPTION BY PASSWORD clause must specify the same password used to encrypt the file when you created the backup. Backing up and restoring an SMK requires CONTROL SERVER permissions. The RESTORE SERVICE MASTER KEY statement can include the optional keyword FORCE to force the SMK to restore even if there is a data decryption failure. If you have to use the FORCE keyword, you can expect to lose data, so use this option with care and only as a last resort.
■Tip After installing SQL Server 2008, you should immediately back up your SMK and store a copy of it in a secure offsite location. If your SMK becomes corrupted or is otherwise compromised, you could lose access to all of your encrypted data if you don’t have a backup of the SMK.
In addition to BACKUP and RESTORE statements, SQL Server provides the ALTER SERVICE MASTER KEY statement to allow you to change the SMK for an instance of SQL Server. When SQL Server generates the SMK, it uses the credentials of the SQL Server service account to encrypt the SMK. If you change the SQL Server service account, you can use ALTER SERVICE MASTER KEY to update it using the current service account credentials. Alternatively, you can advise SQL Server to secure the SMK using the local machine key, which is managed by the operating system. You can also use ALTER SERVICE MASTER KEY to regenerate the SMK completely. As with the RESTORE SERVICE MASTER KEY statement, the ALTER SERVICE MASTER KEY statement allows use of the FORCE keyword. Normally, if there is a decryption error during the process of altering the SMK, SQL Server will stop the process with an error message. When FORCE is used, the SMK is regenerated even at the risk of data loss. Just like the RESTORE statement, the FORCE option should be used with care, and only as a last resort.
■Tip When you regenerate the SMK, all keys that are encrypted by it must be decrypted and reencrypted. This operation can be resource intensive and should be scheduled during off-peak time periods.
Database Master Keys Each database can have a single DMK, which is used to encrypt certificate private keys and asymmetric key-pair private keys in the current database. The DMK is created with the CREATE MASTER KEY statement, as shown in Listing 8-2.
221
222
CHAPTER 8 ■ ENCRYPTION
Listing 8-2. Creating a Master Key USE AdventureWorks; GO CREATE MASTER KEY ENCRYPTION BY PASSWORD = 'p@$$w0rd' ; The CREATE MASTER KEY statement creates the DMK and uses triple DES (Data Encryption Standard) to encrypt it with the supplied password. If the password you supply does not meet Windows’s password complexity requirements, SQL Server will complain with an error message like the following: Msg 15118, Level 16, State 1, Line 1 Password validation failed. The password does not meet Windows policy requirements because it is not complex enough. SQL Server 2008 automatically uses the SMK to encrypt a copy of the DMK. When this feature is used, SQL Server can decrypt your DMK when needed without the need to first open the master key. When this feature is not in use, you must issue the OPEN MASTER KEY statement and supply the same password initially used to encrypt the DMK whenever you need to use it. The potential downside to encrypting your DMK with the SMK is that any member of the sysadmin server role can decrypt the DMK. You can use the ALTER MASTER KEY statement to change the method SQL Server uses to decrypt the DMK. Listing 8-3 shows how to turn off encryption by SMK for a DMK. Listing 8-3. Turning Off DMK Encryption by the SMK ALTER MASTER KEY DROP ENCRYPTION BY SERVICE MASTER KEY; When the DMK is regenerated, all the keys it protects are decrypted and reencrypted with the new DMK. The FORCE keyword is used to force SQL Server to regenerate the DMK even if there are decryption errors. As with the SMK, the FORCE keyword should be used only as a last resort. You can expect to lose data if you have to use FORCE. You can also back up and restore a DMK with the BACKUP MASTER KEY and RESTORE MASTER KEY statements. The BACKUP MASTER KEY statement is similar in operation to the BACKUP SERVICE MASTER KEY statement. When you back up the DMK, you must specify the password that SQL Server will use to encrypt the DMK in the output file. When you restore the DMK, you must specify the same password in the DECRYPTION BY PASSWORD clause to decrypt the DMK in the output file. In addition, you must specify an encryption password that SQL Server will use to encrypt the password in the ENCRYPTION BY PASSWORD clause. Listing 8-4 demonstrates backing up and restoring a DMK.
CHAPTER 8 ■ ENCRYPTION
Listing 8-4. Backing Up and Restoring a DMK USE AdventureWorks; GO -- Back up DMK BACKUP MASTER KEY TO FILE = 'c:\AdventureWorks.DMK' ENCRYPTION BY PASSWORD = 'p@$$w0rd'; -- Restore DMK from backup RESTORE MASTER KEY FROM FILE = 'c:\AdventureWorks.DMK' DECRYPTION BY PASSWORD = 'p@$$w0rd' ENCRYPTION BY PASSWORD = '3rt=d4uy'; The FORCE keyword is available for use with the RESTORE MASTER KEY statement, but as with other statements, it should only be used as a last resort, as it could result in unrecoverable encrypted data. The DROP MASTER KEY statement can be used to remove a DMK from the database. DROP MASTER KEY will not remove a DMK if it is currently being used to encrypt other keys in the database. If you want to drop a DMK that is protecting other keys in the database, the protected keys must be altered to remove their encryption by the DMK first.
■Tip Always make backups of your DMKs immediately upon creation and store them in a secure location.
If you choose to disable automatic key management with the ALTER MASTER KEY statement, you will need to use the OPEN MASTER KEY and CLOSE MASTER KEY statements every time you wish to perform encryption and decryption in a database. OPEN MASTER KEY requires you to supply the same password used to encrypt the DMK in the DECRYPTION BY PASSWORD clause. This password is used to decrypt the DMK, a required step when you are encrypting and decrypting data. When finished using the DMK, issue the CLOSE MASTER KEY statement. If your DMK is encrypted by the SMK, you do not need to use the OPEN MASTER KEY and CLOSE MASTER KEY statements; SQL Server will handle that task for you automatically.
Certificates Certificates are asymmetric encryption key pairs with additional metadata, such as subject and expiration date, in the X.509 certificate format. Asymmetric encryption is a method of encrypting data using two separate but mathematically related keys. SQL Server 2008 uses the standard public key/private key encryption methodology. You can think of a certificate as a wrapper for an asymmetric encryption public key/private key pair. The CREATE CERTIFICATE statement can be used to either install an existing certificate or create a new certificate on SQL Server. Listing 8-5 shows how to create a new certificate on SQL Server.
223
224
CHAPTER 8 ■ ENCRYPTION
Listing 8-5. Creating a Certificate on SQL Server CREATE CERTIFICATE TestCertificate ENCRYPTION BY PASSWORD = 'p@$$w0rd' WITH SUBJECT = 'Adventureworks Test Certificate', EXPIRY_DATE = '2026-10-31'; The CREATE CERTIFICATE statement includes several options. The only things mandatory are the SQL Server identifier for the certificate immediately following the CREATE CERTIFICATE statement (in this case TestCertificate), and the WITH SUBJECT clause, which sets the certificate subject name. If the ENCRYPTION BY PASSWORD clause is not used when you create a certificate, the certificate’s private key is encrypted by the DMK. Additional options available to the CREATE CERTIFICATE statement include START_DATE and EXPIRY_DATE, which set the start and expiration dates for the certificate; and the ACTIVE FOR BEGIN DIALOG clause, which makes the certificate available for use by Service Broker dialogs.
■Tip If START_DATE is not specified, the current date is used. If EXPIRY_DATE is omitted, the expiration date is set to one year after the start date.
You can also use the CREATE CERTIFICATE statement to load an existing certificate in a variety of ways, including the following: • You can use the FROM ASSEMBLY clause to load an existing certificate from a signed assembly already loaded in the database. • You can use the EXECUTABLE FILE clause to create a certificate from a signed DLL file. • You can use the FILE clause to create a certificate from an existing Distinguished Encoding Rules (DER) X.509 certificate file. • You can also use the WITH PRIVATE KEY clause with the FILE or EXECUTABLE FILE options to specify a separate file containing the certificate’s private key. When you specify the WITH PRIVATE KEY clause, you can specify the optional DECRYPTION BY PASSWORD and ENCRYPTION BY PASSWORD clauses to specify the password that will be used to decrypt the private key if it is encrypted in the source file, and to secure the private key once it is loaded.
■Note SQL Server generates private keys that are 1024 bits in length. If you import a private key from an external source, it must be a multiple of 64 bits, between 384 and 3456 bits in length.
After creating a certificate—as with DMKs and SMKs—you should immediately make a backup and store it in a secure location. Listing 8-6 demonstrates how to make a backup of a certificate.
CHAPTER 8 ■ ENCRYPTION
Listing 8-6. Backing Up a Certificate BACKUP CERTIFICATE TestCertificate TO FILE = 'c:\TestCertificate.CER' WITH PRIVATE KEY ( FILE = 'c:\TestCertificate.PVK', ENCRYPTION BY PASSWORD = '7&rt0xp2', DECRYPTION BY PASSWORD = 'p@$$w0rd' ); The BACKUP CERTIFICATE statement in Listing 8-6 backs up the TestCertificate certificate to the c:\TestCertificate.CER file and the certificate’s private key to the c:\TestCertificate.PVK file. The DECRYPTION BY PASSWORD clause specifies the password to use to decrypt the certificate, and ENCRYPTION BY PASSWORD gives SQL Server the password to use when encrypting the private key in the file. There is no RESTORE statement for certificates; instead, the CREATE CERTIFICATE statement has all the options necessary to restore a certificate from a backup file. T-SQL also provides an ALTER CERTIFICATE statement that allows you to make changes to an existing certificate. You can use certificates to encrypt and decrypt data directly with the certificate encryption and decryption functions, EncryptByCert and DecryptByCert. The EncryptByCert function encrypts a given clear text message with a specified certificate. The function accepts an int certificate ID and a plain text value to encrypt. The int certificate ID can be retrieved by passing the certificate name to the Cert_ID function. Listing 8-7 demonstrates this function. EncryptByCert returns a varbinary value up to a maximum of 432 bytes in length (the length of the result depends on the length of the key). The “Limitations of Asymmetric Encryption” sidebar describes some of the limitations of asymmetric encryption on SQL Server, including encryption by certificate.
LIMITATIONS OF ASYMMETRIC ENCRYPTION Asymmetric encryption has certain limitations that should be noted before you attempt to encrypt data directly with certificates or asymmetric keys. The EncryptByCert function can accept a char, varchar, binary, nchar, nvarchar, or varbinary constant, column name, or variable as clear text to encrypt. Asymmetric encryption, including encryption by certificate, on SQL Server returns a varbinary result, but will not return a result longer than 432 bytes. As mentioned, the maximum length of the result depends on the length of the encryption key used. As an example, with the default private key length of 1024 bits, you can encrypt a varchar plain text message with a maximum length of 117 characters and an nvarchar plain text message with a maximum length of 58 characters. The result in either case is a varbinary result of 128 bytes. Microsoft recommends that you avoid using asymmetric encryption to encrypt data directly because of the size limitations, and for performance reasons. Symmetric encryption algorithms use shorter keys but operate more quickly than asymmetric encryption algorithms. The SQL Server 2008 encryption key hierarchy provides the best of both worlds—the long key lengths of asymmetric keys protecting the shorter, more efficient symmetric keys. To maximize performance, Microsoft recommends using symmetric encryption to encrypt data and asymmetric encryption to encrypt symmetric keys.
225
226
CHAPTER 8 ■ ENCRYPTION
The DecryptByCert function decrypts text previously encrypted by EncryptByCert. The DecryptByCert function accepts an int certificate ID, an encrypted varbinary cipher text message, and an optional certificate password that must match the one used when the certificate was created (if one was specified at creation time). If no certificate password is specified, the DMK is used to decrypt it. Listing 8-7 demonstrates encryption and decryption by certificate for short plain text. The results are shown in Figure 8-2. Listing 8-7. Sample Encryption and Decryption by Certificate -- Create a DMK CREATE MASTER KEY ENCRYPTION BY PASSWORD = 'P@55w0rd'; -- Create a certificate CREATE CERTIFICATE TestCertificate WITH SUBJECT = N'Adventureworks Test Certificate', EXPIRY_DATE = '2026-10-31'; -- Create the plain text data to encrypt DECLARE @plaintext nvarchar(58) = N'This is a test string to encrypt'; SELECT 'Plain text = ', @plaintext; -- Encrypt the plain text by certificate DECLARE @ciphertext varbinary(128) = EncryptByCert(Cert_ID('TestCertificate'), @plaintext); SELECT 'Cipher text = ', @ciphertext; -- Decrypt the cipher text by certificate DECLARE @decryptedtext nvarchar(58) = DecryptByCert(Cert_ID('TestCertificate'), @ciphertext); SELECT 'Decrypted text = ', @decryptedtext; -- Drop the test certificate DROP CERTIFICATE TestCertificate; -- Drop the DMK DROP MASTER KEY;
CHAPTER 8 ■ ENCRYPTION
Figure 8-2. Result of encrypting and decrypting by certificate Listing 8-7 first creates a DMK and a test certificate using the CREATE MASTER KEY and CREATE CERTIFICATE statements presented previously in this chapter. It then generates an nvarchar plain text message to encrypt. -- Create a DMK CREATE MASTER KEY ENCRYPTION BY PASSWORD = 'P@55w0rd'; -- Create a certificate CREATE CERTIFICATE TestCertificate WITH SUBJECT = N'Adventureworks Test Certificate', EXPIRY_DATE = '2026-10-31'; -- Create the plain text data to encrypt DECLARE @plaintext nvarchar(58) = N'This is a test string to encrypt'; SELECT 'Plain text = ', @plaintext; The sample uses the EncryptByCert function to encrypt the plain text message. The Cert_ID function is used to retrieve the int certificate ID for TestCertificate. -- Encrypt the plain text by certificate DECLARE @ciphertext varbinary(128) = EncryptByCert(Cert_ID('TestCertificate'), @plaintext); SELECT 'Cipher text = ', @ciphertext; The DecryptByCert function is then used to decrypt the cipher text. Again, the Cert_ID function is used to retrieve the TestCertificate certificate ID. -- Decrypt the cipher text by certificate DECLARE @decryptedtext nvarchar(58) = DecryptByCert(Cert_ID('TestCertificate'), @ciphertext); SELECT 'Decrypted text = ', @decryptedtext;
227
228
CHAPTER 8 ■ ENCRYPTION
The balance of the code performs some cleanup, dropping the certificate and DMK: -- Drop the test certificate DROP CERTIFICATE TestCertificate; -- Drop the DMK DROP MASTER KEY; You can also use a certificate to generate a signature for a plain text message. SignByCert accepts a certificate ID, a plain text message, and an optional certificate password. The result is a varbinary string, up to a length of 432 characters (again, the length of the result is determined by the length of the encryption key). When SignByCert is used, the slightest change in the plain text message—even a single character—will result in a completely different signature being generated for the message. This allows you to easily detect whether your plain text has been tampered with. Listing 8-8 uses the SignByCert function to create a signature for a plain text message. The results are shown in Figure 8-3. Listing 8-8. Signing a Message with the SignByCert Function -- Create a DMK CREATE MASTER KEY ENCRYPTION BY PASSWORD = 'P@55w0rd'; -- Create a certificate CREATE CERTIFICATE TestCertificate WITH SUBJECT = 'Adventureworks Test Certificate', EXPIRY_DATE = '2026-10-31'; -- Create message DECLARE @message nvarchar(4000) = N'Four score and seven years ago our fathers brought forth on this continent a new nation, conceived in Liberty, and dedicated to the proposition that all men are created equal. Now we are engaged in a great civil war, testing whether that nation, or any nation, so conceived and so dedicated, can long endure. We are met on a great battle-field of that war. We have come to dedicate a portion of that field, as a final resting place for those who here gave their lives that that nation might live. It is altogether fitting and proper that we should do this.
But, in a larger sense, we can not dedicate—we can not consecrate—we can not hallow—this ground. The brave men, living and dead, who struggled here, have consecrated it, far above our poor power to add or detract. The world will little note, nor long remember what we say here, but it can never forget what they did here. It is for us the living, rather, to be dedicated here to the unfinished work which they who fought here have thus far so nobly advanced. It is rather for us to be here dedicated to the great task remaining before us—that from these honored dead we take increased devotion
CHAPTER 8 ■ ENCRYPTION
to that cause for which they gave the last full measure of devotion—that we here highly resolve that these dead shall not have died in vain—that this nation, under God, shall have a new birth of freedom—and that government of the people, by the people, for the people, shall not perish from the earth.'; -- Sign the message by certificate SELECT SignByCert(Cert_ID(N'TestCertificate'), @message); -- Drop the certificate DROP CERTIFICATE TestCertificate; -- Drop the DMK DROP MASTER KEY;
Figure 8-3. Signature generated by SignByCert (partial)
Asymmetric Keys Asymmetric keys are actually composed of a key pair: a public key, which is publicly accessible, and a private key, which is kept secret. The mathematical relationship between the public and private keys allows for encryption and decryption without revealing the private key. T-SQL includes statements for creating and managing asymmetric keys. The CREATE ASYMMETRIC KEY statement allows you to generate an asymmetric key pair or install an existing key pair on the server, in much the same manner as when creating a certificate. Encryption key length is often used as an indicator of relative encryption strength, and when you create an asymmetric key on SQL Server, you can specify an RSA key length, as shown in Table 8-1. Table 8-1. Asymmetric Key Algorithms and Limits
Algorithm
Key Length
Plain Text
Cipher Text
Signature Length
RSA_512
512 bits
53 bytes
64 bytes
64 bytes
RSA_1024
1024 bits
117 bytes
128 bytes
128 bytes
RSA_2048
2048 bits
245 bytes
256 bytes
256 bytes
Listing 8-9 creates an asymmetric key pair on SQL Server 2008.
229
230
CHAPTER 8 ■ ENCRYPTION
Listing 8-9. Creating an Asymmetric Key Pair CREATE ASYMMETRIC KEY TempAsymmetricKey WITH ALGORITHM = RSA_1024; You can alter an existing asymmetric key with the ALTER ASYMMETRIC KEY statement. ALTER ASYMMETRIC KEY offers the following options for managing your asymmetric keys: • You can use the REMOVE PRIVATE KEY clause to remove the private key from the asymmetric public key/private key pair. • You can use the WITH PRIVATE KEY clause to change the method used to protect the private key. • You can change the asymmetric key protection method from DMK encryption to password encryption with the ENCRYPTION BY PASSWORD option. • You can switch from password protection for your asymmetric key to DMK protection with the DECRYPTION BY PASSWORD clause. • You can specify both the ENCRYPTION BY PASSWORD and DECRYPTION BY PASSWORD clauses together to change the password used to encrypt the private key. The DROP ASYMMETRIC KEY statement removes an asymmetric key from the database. The EncryptByAsymKey and DecryptByAsymKey functions allow you to encrypt and decrypt data with an asymmetric key, in the same way as EncryptByCert and DecryptByCert. The EncryptByAsymKey function accepts an int asymmetric key ID and plain text to encrypt. The AsymKey_ID function can be used to retrieve an asymmetric key ID by name. DecryptByAsymKey accepts an asymmetric key ID, encrypted cipher text to decrypt, and an optional password to decrypt the asymmetric key. If the password is specified, it must be the same password used to encrypt the asymmetric key at creation time.
■Tip The limitations for asymmetric key encryption and decryption on SQL Server are the same as those for certificate encryption and decryption.
Listing 8-10 demonstrates the use of asymmetric key encryption and decryption functions. The results are shown in Figure 8-4. Listing 8-10. Encrypting and Decrypting with Asymmetric Keys -- Create DMK CREATE MASTER KEY ENCRYPTION BY PASSWORD = 'P@55w0rd'; -- Create asymmetric key CREATE ASYMMETRIC KEY TestAsymmetricKey WITH ALGORITHM = RSA_512;
CHAPTER 8 ■ ENCRYPTION
-- Assign a credit card number to encrypt DECLARE @CreditCard nvarchar(26) = N'9000 1234 5678 9012'; SELECT @CreditCard; -- Encrypt the credit card number DECLARE @EncryptedCreditCard varbinary(64) = EncryptByAsymKey(AsymKey_ID(N'TestAsymmetricKey'), @CreditCard); SELECT @EncryptedCreditCard; -- Decrypt the encrypted credit card number DECLARE @DecryptedCreditCard nvarchar(26) = DecryptByAsymKey(AsymKey_ID(N'TestAsymmetricKey'), @EncryptedCreditCard); SELECT @DecryptedCreditCard; -- Drop asymmetric key DROP ASYMMETRIC KEY TestAsymmetricKey; -- Drop DMK DROP MASTER KEY;
Figure 8-4. Asymmetric key encryption results This example first creates a DMK and an RSA asymmetric key with a 512-bit private key length. Then it creates plain text representing a simple credit card number. -- Create DMK CREATE MASTER KEY ENCRYPTION BY PASSWORD = 'P@55w0rd'; -- Create asymmetric key CREATE ASYMMETRIC KEY TestAsymmetricKey WITH ALGORITHM = RSA_512; -- Assign a credit card number to encrypt DECLARE @CreditCard nvarchar(26) = N'9000 1234 5678 9012'; SELECT @CreditCard;
231
232
CHAPTER 8 ■ ENCRYPTION
The sample then encrypts the credit card number with the EncryptByAsymKey function, and decrypts it with the DecryptByAsymKey function. Both functions use the AsymKey_ID function to retrieve the asymmetric key ID. -- Encrypt the credit card number DECLARE @EncryptedCreditCard varbinary(64) = EncryptByAsymKey(AsymKey_ID(N'TestAsymmetricKey'), @CreditCard); SELECT @EncryptedCreditCard; -- Decrypt the encrypted credit card number DECLARE @DecryptedCreditCard nvarchar(26) = DecryptByAsymKey(AsymKey_ID(N'TestAsymmetricKey'), @EncryptedCreditCard); SELECT @DecryptedCreditCard; The sample finishes up with a little housekeeping; namely dropping the asymmetric key and the DMK created for the example. -- Drop asymmetric key DROP ASYMMETRIC KEY TestAsymmetricKey; -- Drop DMK DROP MASTER KEY; Like certificates, asymmetric keys offer a function to generate digital signatures for plain text. The SignByAsymKey function accepts a string up to 8000 bytes in length and returns a varbinary signature for the string. The length of the signature is dependent on the key length, as previously shown in Table 8-1. Listing 8-11 is a simple example of the SignByAsymKey function in action. The results are shown in Figure 8-5. Listing 8-11. Signing a Message by Asymmetric Key -- Create DMK CREATE MASTER KEY ENCRYPTION BY PASSWORD = 'P@55w0rd'; -- Create asymmetric key CREATE ASYMMETRIC KEY TestAsymmetricKey WITH ALGORITHM = RSA_512; -- Create message DECLARE @message nvarchar(4000) = N'Alas, poor Yorick!'; SELECT @message; -- Sign message by asymmetric key SELECT SignByAsymKey(AsymKey_ID(N'TestAsymmetricKey'), @message); -- Drop asymmetric key DROP ASYMMETRIC KEY TestAsymmetricKey;
CHAPTER 8 ■ ENCRYPTION
-- Drop DMK DROP MASTER KEY;
Figure 8-5. Signing a message with an asymmetric key
ASYMMETRIC KEY “BACKUPS” SQL Server provides no BACKUP or RESTORE statements for asymmetric keys. For physical backups of your asymmetric keys, you should install the asymmetric keys from an external source like an assembly, an executable file, a strong-name file, or a hardware security module (HSM). You can make backups of the source files containing your asymmetric keys. As an alternative, you can use certificates instead of asymmetric keys. Keep these options in mind when you are planning to take advantage of SQL Server 2008 encryption.
Symmetric Keys Symmetric keys are at the bottom of the SQL Server encryption key hierarchy. Symmetric encryption algorithms use trivially related keys to both encrypt and decrypt your data. Trivially related simply means that the algorithm can use either the same key for both encryption and decryption, or two keys that are mathematically related via a simple transformation to derive one key from the other. Symmetric keys on SQL Server 2008 are specifically designed to support SQL Server’s symmetric encryption functionality. The algorithms provided by SQL Server 2008 use a single key for both encryption and decryption. In the SQL Server 2008 encryption model, symmetric keys are encrypted by certificates or asymmetric keys, and they can be used in turn to encrypt other symmetric keys or raw data. The CREATE SYMMETRIC KEY statement allows you to generate symmetric keys, as shown in Listing 8-12. Listing 8-12. Creating a Symmetric Key CREATE SYMMETRIC KEY TestSymmetricKey WITH ALGORITHM = AES_128 ENCRYPTION BY PASSWORD = 'p@55w0rd'; The options specified in the CREATE SYMMETRIC KEY statement in Listing 8-12 specify that the symmetric key will be created with the name TestSymmetricKey, it will be protected by the
233
234
CHAPTER 8 ■ ENCRYPTION
password p@55w0rd, and it will use the Advanced Encryption Standard (AES) algorithm with a 128-bit key (AES_128) to encrypt data. When creating a symmetric key, you can specify any of several encryption algorithms, including the following: • AES_128, AES_192, and AES_256 specify the AES block encryption algorithm with a symmetric key length of 128, 192, or 256 bits, and a block size of 128 bits. • DES specifies the DES block encryption algorithm, which has a symmetric key length of 56 bits and a block size of 64 bits. • DESX specifies the DES-X block encryption algorithm, which was introduced as a successor to the DES algorithm. DES-X also has a symmetric key length of 56 bits (although because the algorithm includes security augmentations, the effective key length is calculated at around 118 bits) and a block size of 64 bits. • RC2 specifies the RC2 block encryption algorithm, which has a key size of 128 bits and a block size of 64 bits. • RC4 and RC4_128 specify the RC4 stream encryption algorithm, which has a key length of 40 or 128 bits. RC4 and RC4_128 are not recommended, as they do not generate random initialization vectors to further obfuscate the cipher text. The CREATE SYMMETRIC KEY statement also provides additional options that allow you to specify options for symmetric key creation, including the following: • You can specify a KEY_SOURCE to designate a passphrase to be used as key material from which the symmetric key is derived. If you don’t specify a KEY SOURCE, SQL Server generates the symmetric key from random key material. • The ENCRYPTION BY clause specifies the method used to encrypt this symmetric key in the database. You can specify encryption by a certificate, password, asymmetric key, another symmetric key, or HSM. • The PROVIDER_KEY_NAME and CREATION_DISPOSITION clauses allow you to use your symmetric key with EKM security. • The IDENTITY_VALUE clause specifies an identity phrase that is used to generate a GUID to “tag” data encrypted with the key.
TEMPORARY SYMMETRIC KEYS You can create temporary symmetric keys by prefixing the symmetric key name with a number sign (#). A temporary symmetric key exists only during the current session and is automatically removed when the current session ends. Temporary symmetric keys are not accessible to any sessions outside of the session they are created in. When referencing a temporary symmetric key, the number sign (#) prefix must be used. You can use the same WITH clause options described in this section to specify how the symmetric key should be created. To be honest, I don’t really see much use for temporary symmetric keys at this point, although I don’t want to discount them totally. After all, someone may find a use for them in the future.
CHAPTER 8 ■ ENCRYPTION
SQL Server also provides the ALTER SYMMETRIC KEY and DROP SYMMETRIC KEY statements for symmetric key management. The ALTER statement allows you to add or remove encryption methods on a symmetric key. As an example, if you created a symmetric key and encrypted it by password but later wished to change it to encryption by certificate, you would issue two ALTER SYMMETRIC KEY statements—the first ALTER statement would specify the ADD ENCRYPTION BY CERTIFICATE clause and the second would specify DROP ENCRYPTION BY PASSWORD, as shown in Listing 8-13. Listing 8-13. Changing the Symmetric Key Encryption Method OPEN SYMMETRIC KEY TestSymmetricKey DECRYPTION BY PASSWORD = 'pa55w0rd'; ALTER SYMMETRIC KEY TestSymmetricKey ADD ENCRYPTION BY CERTIFICATE TestCertificate; ALTER SYMMETRIC KEY TestSymmetricKey DROP ENCRYPTION BY PASSWORD = 'pa55w0rd'; CLOSE SYMMETRIC KEY TestSymmetricKey;
■Note Before you alter a symmetric key, you must first open it with the OPEN
SYMMETRIC KEY statement.
The DROP SYMMETRIC KEY statement allows you to remove a symmetric key from the database. Once you create a symmetric key, you can encrypt data with the EncryptByKey and DecryptByKey functions. Listing 8-14 creates a symmetric key and encrypts 100 names with it. Partial results are shown in Figure 8-6. Listing 8-14. Encrypting Data with a Symmetric Key -- Create a temporary table to hold results CREATE TABLE #TempNames ( BusinessEntityID int PRIMARY KEY, FirstName nvarchar(50), MiddleName nvarchar(50), LastName nvarchar(50), EncFirstName varbinary(200), EncMiddleName varbinary(200), EncLastName varbinary(200) ); -- Create DMK CREATE MASTER KEY ENCRYPTION BY PASSWORD = 'Test_P@ssw0rd';
235
236
CHAPTER 8 ■ ENCRYPTION
-- Create certificate to protect symmetric key CREATE CERTIFICATE TestCertificate WITH SUBJECT = 'AdventureWorks Test Certificate', EXPIRY_DATE = '2026-10-31'; -- Create symmetric key to encrypt data CREATE SYMMETRIC KEY TestSymmetricKey WITH ALGORITHM = AES_128 ENCRYPTION BY CERTIFICATE TestCertificate; -- Open symmetric key OPEN SYMMETRIC KEY TestSymmetricKey DECRYPTION BY CERTIFICATE TestCertificate; -- Populate temp table with 100 encrypted names from the Person.Person table INSERT INTO #TempNames ( BusinessEntityID, EncFirstName, EncMiddleName, EncLastName ) SELECT TOP(100) BusinessEntityID, EncryptByKey(Key_GUID(N'TestSymmetricKey'), FirstName), EncryptByKey(Key_GUID(N'TestSymmetricKey'), MiddleName), EncryptByKey(Key_GUID(N'TestSymmetricKey'), LastName) FROM Person.Person ORDER BY BusinessEntityID; -- Update the temp table with decrypted names UPDATE #TempNames SET FirstName = DecryptByKey(EncFirstName), MiddleName = DecryptByKey(EncMiddleName), LastName = DecryptByKey(EncLastName); -- Show the results SELECT BusinessEntityID, FirstName, MiddleName, LastName, EncFirstName, EncMiddleName, EncLastName FROM #TempNames;
CHAPTER 8 ■ ENCRYPTION
-- Close the symmetric key CLOSE SYMMETRIC KEY TestSymmetricKey; -- Drop the symmetric key DROP SYMMETRIC KEY TestSymmetricKey; -- Drop the certificate DROP CERTIFICATE TestCertificate; -- Drop the DMK DROP MASTER KEY; -- Drop the temp table DROP TABLE #TempNames;
Figure 8-6. Symmetric key encryption results (partial) Listing 8-14 first creates a temporary table to hold the encryption and decryption results: -- Create a temporary table to hold results CREATE TABLE #TempNames ( BusinessEntityID int PRIMARY KEY, FirstName nvarchar(50), MiddleName nvarchar(50), LastName nvarchar(50), EncFirstName varbinary(200), EncMiddleName varbinary(200), EncLastName varbinary(200) );
237
238
CHAPTER 8 ■ ENCRYPTION
Then a DMK is created to protect the certificate that will be created next. The certificate that’s created is then used to encrypt the symmetric key. -- Create DMK CREATE MASTER KEY ENCRYPTION BY PASSWORD = 'Test_P@ssw0rd'; -- Create certificate to protect symmetric key CREATE CERTIFICATE TestCertificate WITH SUBJECT = 'AdventureWorks Test Certificate', EXPIRY_DATE = '2026-10-31'; -- Create symmetric key to encrypt data CREATE SYMMETRIC KEY TestSymmetricKey WITH ALGORITHM = AES_128 ENCRYPTION BY CERTIFICATE TestCertificate; In order to encrypt data with the symmetric key, the sample must first execute the OPEN SYMMETRIC KEY statement to open the symmetric key. The DECRYPTION BY clause specifies the method to use to decrypt the symmetric key for use. In this example, the key is protected by certificate, so DECRYPTION BY CERTIFICATE is used. You can specify decryption by certificate, asymmetric key, symmetric key, or password. If the DMK was used to encrypt the certificate or asymmetric key, leave off the WITH PASSWORD clause. -- Open symmetric key OPEN SYMMETRIC KEY TestSymmetricKey DECRYPTION BY CERTIFICATE TestCertificate; The next step is to use the EncryptByKey function to encrypt the data. In this example, the FirstName, MiddleName, and LastName for 100 rows from the Person.Person table are encrypted with EncryptByKey. The EncryptByKey function accepts a clear text char, varchar, binary, varbinary, nchar, or nvarchar constant, column, or T-SQL variable with a maximum length of 8000 bytes. The result returned is the encrypted data in varbinary format with a maximum length of 8000 bytes. In addition to clear text, EncryptByKey accepts a GUID identifying the symmetric key you wish to encrypt the clear text with. The Key_GUID function returns a symmetric key’s GUID by name. -- Populate temp table with 100 encrypted names from the Person.Person table INSERT INTO #TempNames ( BusinessEntityID, EncFirstName, EncMiddleName, EncLastName )
CHAPTER 8 ■ ENCRYPTION
SELECT TOP(100) BusinessEntityID, EncryptByKey(Key_GUID(N'TestSymmetricKey'), FirstName), EncryptByKey(Key_GUID(N'TestSymmetricKey'), MiddleName), EncryptByKey(Key_GUID(N'TestSymmetricKey'), LastName) FROM Person.Person ORDER BY BusinessEntityID; The sample code then uses the DecryptByKey function to decrypt the previously encrypted cipher text in the temporary table. SQL Server stores the GUID of the symmetric key used to encrypt the data with the encrypted data, so you don’t need to supply the symmetric key GUID to DecryptByKey. In the sample code, the varbinary encrypted cipher text is all that’s passed to the EncryptByKey function. -- Update the temp table with decrypted names UPDATE #TempNames SET FirstName = DecryptByKey(EncFirstName), MiddleName = DecryptByKey(EncMiddleName), LastName = DecryptByKey(EncLastName); Finally, the results are shown and the symmetric key is closed with the CLOSE SYMMETRIC KEY statement: -- Show the results SELECT BusinessEntityID, FirstName, MiddleName, LastName, EncFirstName, EncMiddleName, EncLastName FROM #TempNames; -- Close the symmetric key CLOSE SYMMETRIC KEY TestSymmetricKey; The balance of the code drops the symmetric key, the certificate, the master key, and the temporary table: -- Drop the symmetric key DROP SYMMETRIC KEY TestSymmetricKey; -- Drop the certificate DROP CERTIFICATE TestCertificate; -- Drop the DMK DROP MASTER KEY; -- Drop the temp table DROP TABLE #TempNames;
239
240
CHAPTER 8 ■ ENCRYPTION
■Note You can close a single symmetric key by name or use the CLOSE ALL SYMMETRIC KEYS statement to close all open symmetric keys. Opening and closing symmetric keys affects only the current session on the server. All open symmetric keys available to the current session are automatically closed when the current session ends.
SALT AND AUTHENTICATORS The initialization vector (IV), or salt, is an important aspect of encryption security. The IV is a block of bits that further obfuscates the result of an encryption. The idea is that the IV will help prevent the same data from generating the same cipher text if it is encrypted more than once by the same key and algorithm. SQL Server does not allow you to specify an IV when encrypting data with a symmetric key, however. Instead SQL Server generates a random IV automatically when you encrypt data with block ciphers like AES and DES. The obfuscation provided by the IV helps eliminate patterns from your encrypted data—patterns that cryptanalysts can use to their advantage when attempting to hack your encrypted data. The downside to SQL Server’s randomly generated IVs is that they make indexing an encrypted column a true exercise in futility. In addition to random IV generation, SQL Server’s EncryptByKey and DecryptByKey functions provide another tool to help eliminate patterns in encrypted data. Both functions provide two options parameters: an add authenticator flag and an authenticator value. If the add authenticator flag is set to 1, SQL Server will derive an authenticator from the authenticator value passed in. The authenticator is then used to obfuscate your encrypted data further, preventing patterns that can reveal information to hackers through correlation analysis attacks. If you supply an authenticator value during encryption, the same authenticator value must be supplied during decryption.
When SQL Server encrypts your data with a symmetric key, it automatically adds metadata to the encrypted result, as well as padding, making the encrypted result larger (sometimes significantly larger) than the unencrypted plain text. The format for the encrypted result with metadata follows the following format: • The first 16 bytes of the encrypted result represent the GUID of the symmetric key used to encrypt the data. • The next 4 bytes represent a version number, currently hard-coded as 0x01000000. • The next 8 bytes for DES encryption (16 bytes for AES encryption) represent the randomly generated IV. • If an authenticator was used, the next 8 bytes contain header information with an additional 20-byte SHA1 hash of the authenticator, making the header information 28 bytes in length. • The last part of the encrypted data is the actual padded data itself. For DES algorithms, the length of this encrypted data will be a multiple of 8 bytes. For AES algorithms, the length will be a multiple of 16 bytes.
CHAPTER 8 ■ ENCRYPTION
In addition to DecryptByKey, SQL Server 2008 provides DecryptByKeyAutoCert and DecryptByKeyAutoAsymKey functions. Both functions combine the functionality of the OPEN SYMMETRIC KEY statement with the DecryptByKey function, meaning that you don’t need to issue an OPEN SYMMETRIC KEY to decrypt your cipher text. The DecryptByKeyAutoAsymKey function automatically opens an asymmetric key protecting a symmetric key, while DecryptByKeyAutoCert automatically opens a certificate protecting a symmetric key. If a password is used to encrypt your asymmetric key or certificate, that same password must be passed to these functions. If the asymmetric key is encrypted with the DMK, you pass NULL as the password. You can also specify an authenticator with these functions if one was used during encryption. Decryption of data in bulk using these functions might cause a pretty severe performance penalty over using the OPEN SYMMETRIC KEY statement and the DecryptByKey function.
Encryption Without Keys SQL Server 2008 provides additional functions for encryption and decryption without keys, and for one-way hashing. These functions are named EncryptByPassPhrase, DecryptByPassPhrase, and HashBytes, respectively. The EncryptByPassPhrase function accepts a passphrase and clear text to encrypt. The passphrase is simply a plain text phrase from which SQL Server can derive an encryption key. The idea behind the passphrase is that users are more likely to remember a simple phrase than a complex encryption key. The function derives a temporary encryption key from the passphrase and uses it to encrypt the plain text. You can also pass an optional authenticator value to EncryptByPassPhrase if you wish. EncryptByPassPhrase always uses the triple DES algorithm to encrypt the clear text passed in. DecryptByPassPhrase decrypts cipher text that was previously encrypted with EncryptByPassPhrase. To decrypt using this function, you must supply the same passphrase and authenticator options that you used when encrypting the clear text.
Hashing Data The HashBytes function performs a one-way hash on the data passed to it and returns the hash value generated. HashBytes accepts two parameters: a hash algorithm name and the data to hash. The return value is a fixed-length varbinary hash value, which is analogous to a fingerprint for any given data. Table 8-2 lists the SQL Server–supported hash algorithms. Table 8-2. SQL Server–Supported Hash Algorithms
Algorithm
Hash Length
MD2, MD4, MD5
128 bits (16 bytes)
SHA, SHA1
160 bits (20 bytes)
241
242
CHAPTER 8 ■ ENCRYPTION
■Caution For highly secure applications, the MD2, MD4, and MD5 series of hashes should be avoided. Cryptanalysts have produced meaningful hash collisions with these algorithms over the past few years that have revealed vulnerabilities to hacker attacks. A hash collision is a string of bytes that produces a hash value that is identical to another string of bytes. A meaningful hash collision is one that can be produced with meaningful (or apparently meaningful) strings of bytes. Generating a hash collision by modifying the content of a certificate would be an example of a meaningful, and dangerous, hash collision.
Listing 8-15 demonstrates the EncryptByPassPhrase, DecryptByPassPhrase, and HashBytes functions. The results are shown in Figure 8-7. Listing 8-15. Encryption and Decryption by Passphrase and Byte Hashing DECLARE @cleartext nvarchar(256); DECLARE @encrypted varbinary(512); DECLARE @decrypted nvarchar(256); SELECT @cleartext = N'To be, or not to be: that is the question: ' + N'Whether ''tis nobler in the mind to suffer ' + N'The slings and arrows of outrageous fortune, ' + N'Or to take arms against a sea of troubles'; SELECT @encrypted = EncryptByPassPhrase(N'Shakespeare''s Donkey', @cleartext); SELECT @decrypted = CAST ( DecryptByPassPhrase(N'Shakespeare''s Donkey', @encrypted) AS nvarchar(128) ); SELECT SELECT SELECT SELECT
@cleartext AS ClearText; @encrypted AS Encrypted; @decrypted AS Decrypted; HashBytes ('SHA1', @ClearText) AS Hashed;
CHAPTER 8 ■ ENCRYPTION
Figure 8-7. Results of encryption by passphrase and hashing
Extensible Key Management SQL Server 2008 adds a new feature known as EKM, which allows you to encrypt your SQL Server asymmetric keys (and symmetric keys) with keys generated and stored on a third-party HSM. To use EKM, you must first turn on the EKM provider enabled option with sp_configure, as shown in Listing 8-16.
■Note EKM is available only on the Enterprise, Developer, and Evaluation editions of SQL Server 2008, and it requires a third-party HSM and supporting software.
Listing 8-16. Enabling EKM Providers sp_configure 'show advanced', 1; GO RECONFIGURE; GO sp_configure 'EKM provider enabled', 1; GO RECONFIGURE; GO
243
244
CHAPTER 8 ■ ENCRYPTION
Once you have enabled EKM providers and have an HSM available, you must register a cryptographic provider with SQL Server. The cryptographic provider references a vendorsupplied DLL file installed on the server. Listing 8-17 gives an example of registering a cryptographic provider with SQL Server. Listing 8-17. Registering a Cryptographic Provider CREATE CRYPTOGRAPHIC PROVIDER Eagle_EKM_Provider FROM FILE = 'c:\Program Files\Eagle_EKM\SQLEKM.DLL'; GO Once your EKM provider is registered with SQL Server, creating an asymmetric key that is encrypted by an existing key on the HSM is simply a matter of specifying the EKM provider, the CREATION_DISPOSITION option, and the name of the key on the EKM device via the PROVIDER_KEY_NAME option. Listing 8-18 gives an example. Listing 8-18. Creating an Asymmetric Key with HSM Protection CREATE ASYMMETRIC KEY AsymKeyEKMProtected FROM PROVIDER Eagle_EKM_Provider WITH PROVIDER_KEY_NAME = 'EKM_Key_1', CREATION_DISPOSITION = OPEN_EXISTING; GO EKM is designed to support enterprise-level encryption key management by providing additional encryption key security. It provides this additional security by physically separating the encryption keys from the data they encrypt. In addition to external storage of encryption keys, HSM vendors can also provide hardware-based bulk encryption and decryption functionality and external support for additional encryption options beyond what is supported natively by SQL Server 2008. Some of the additional options provided by HSM vendors include key aging and key rotation functionality.
Transparent Data Encryption Up to this point, I’ve talked about the column-level encryption functionality available in SQL Server 2008. These functions are specifically designed to encrypt data stored in the columns of your database tables. SQL Server 2008 provides a new method of encryption, TDE, which allows you to encrypt your entire database at once. TDE automatically encrypts every page in your database and decrypts pages as required when you access them. This new feature allows you to secure an entire database without worrying about all those little details that pop up when encrypting at the column level. TDE does not require extra storage space, and it allows the query optimizer to generate far more efficient query plans than it can when you search on encrypted columns. As an added bonus, TDE is easy to implement and allows you to secure the data in your databases with no changes to middle-tier or front-end code. The first step to implement TDE in your database is to create a server certificate (see Listing 8-19). A server certificate is simply a certificate created in the master database for the purpose of encrypting databases with TDE.
CHAPTER 8 ■ ENCRYPTION
Listing 8-19. Creating a Server Certificate USE master; GO CREATE MASTER KEY ENCRYPTION BY PASSWORD = 'p@$$w0rd'; GO CREATE CERTIFICATE ServerCert WITH SUBJECT = 'Server Certificate for TDE', EXPIRY_DATE = '2022-12-31'; GO
■Tip Remember to back up your server certificate immediately after you create it!
Once you’ve created a server certificate, you can create a database encryption key in the database to be encrypted (see Listing 8-20). The database encryption key is created with the CREATE DATABASE ENCRYPTION KEY statement. Using this statement, you can create a key using one of the four different algorithms listed in Table 8-3. Table 8-3. Database Encryption Key Algorithms
Algorithm
Description
AES_128
AES, 128-bit key
AES_192
AES, 192-bit key
AES_256
AES, 256-bit key
TRIPLE_DES_3KEY
Three-key triple-DES, ~112-bit effective key
Listing 8-20. Creating a Database Encryption Key and Securing the Database USE AdventureWorks; GO CREATE DATABASE ENCRYPTION KEY WITH ALGORITHM = AES_128 ENCRYPTION BY SERVER CERTIFICATE ServerCert; GO ALTER DATABASE AdventureWorks SET ENCRYPTION ON; GO
245
246
CHAPTER 8 ■ ENCRYPTION
The obvious question at this point is, since TDE is so simple and secure, why not use it all the time? Well, the simplicity and security of TDE comes at a cost. When you encrypt a database with TDE, SQL Server also encrypts the database log file and the tempdb database. This is done to prevent leaked data that a hacker with the right tools might be able to access. Because tempdb is encrypted, the performance of every database on the same server takes a hit. Also, SQL Server incurs additional CPU overhead since it has to decrypt noncached data pages that are accessed by queries.
Summary Back in the days of SQL Server 2000, database encryption functionality could be achieved only through third-party tools or by creating your own encryption and decryption functions. SQL Server 2008 continues the tradition of T-SQL column-level encryption and decryption functionality introduced in SQL Server 2005. The tight integration of Windows DPAPI encryption functionality with native T-SQL statements and functions makes database encryption easier and more secure than ever. SQL Server 2008 also introduces new functionality, including TDE for quickly and easily encrypting entire databases transparently, and EKM for providing access to third-party HSMs to implement enterprise-level security solutions and bulk encryption functionality. In this chapter, I discussed the SQL Server hierarchical encryption model, which defines the relationship between SMKs, DMKs, certificates, asymmetric keys, and symmetric keys. SQL Server provides a variety of T-SQL statements to create and manage encryption keys and certificates, which I demonstrated in code samples throughout the chapter. SQL Server also provides several functions for generating one-way hashes, generating data signatures, and encrypting data by certificate, asymmetric key, symmetric key, and passphrase. In the next chapter, I’ll cover the topics of SQL windowing functions and common table expressions (CTEs).
EXERCISES 1. [True/false] Symmetric keys can be used to encrypt other symmetric keys or data. 2. [Choose all that apply] SQL Server provides native support for which of the following built-in encryption algorithms? a.
DES
b.
AES
c.
Loki
d.
Blowfish
e.
RC4
3. [True/false] SQL Server 2008 T-SQL includes a BACKUP ASYMMETRIC KEY statement. 4. [Fill in the blank] You must set the ___ option to turn on EKM for your server. 5. [True/false] TDE automatically encrypts the tempdb, model, and master databases. 6. [True/false] SQL Server automatically generates random initialization vectors when you use symmetric encryption.
CHAPTER
9
Common Table Expressions and Windowing Functions S
QL Server 2008 continues support for the extremely useful common table expression (CTE), first introduced in SQL Server 2005. CTEs can simplify your queries to make them more readable and maintainable. SQL Server also supports self-referential CTEs, which make for very powerful recursive queries. In addition, SQL Server supports windowing functions, which allow you to partition your results and apply numbering and ranking values to the rows in the result set partitions. This chapter begins with a discussion of the power and benefits of CTEs and finishes with a discussion of SQL Server windowing functions.
Common Table Expressions CTEs are a powerful addition to SQL Server. A CTE generates a named result set that exists only during the life of a single query or DML statement. CTEs offer several benefits over derived tables and views, including the following: • CTEs are transient, existing only for the life of a single query or DML statement. This means that you don’t have create them as permanent database objects like views. • A single CTE can be referenced multiple times by name in a single query or DML statement, making your code more manageable. Derived tables have to be rewritten in their entirety every place they are referenced. • CTEs can be self-referencing, providing a powerful recursion mechanism. CTEs can range in complexity from extremely simple to highly elaborate constructs. All CTEs begin with the WITH keyword followed by the name of the CTE and a list of the columns it returns. This is followed by the AS keyword and the body of the CTE. And every CTE is followed by an associated query or DML statement. Listing 9-1 is a very simple example of a CTE designed to show the basic syntax.
247
248
CHAPTER 9 ■ COMMON TABLE EXPRESSIONS AND WINDOWING FUNCTIONS
Listing 9-1. Simple CTE WITH GetNamesCTE ( BusinessEntityID, FirstName, MiddleName, LastName ) AS ( SELECT BusinessEntityID, FirstName, MiddleName, LastName FROM Person.Person ) SELECT BusinessEntityID, FirstName, MiddleName, LastName FROM GetNamesCTE; In Listing 9-1, the CTE is defined with the name GetNamesCTE and returns columns named BusinessEntityID, FirstName, MiddleName, and LastName. The CTE body consists of a simple SELECT statement from the AdventureWorks 2008 Person.Person table. The CTE has an associated SELECT statement immediately following it. The SELECT statement references the CTE in its FROM clause.
WITH OVERLOADED The WITH keyword is overloaded in SQL Server, meaning that it’s used in many different ways for many different purposes in T-SQL. It’s used to specify additional options in DDL CREATE statements, to add table hints to queries and DML statements, and to declare XML namespaces when used in the WITH XMLNAMESPACES clause, just to name a few. Now it’s also used as the keyword that indicates the beginning of a CTE definition. Because of this, whenever a CTE is not the first statement in a batch, the statement preceding it must end with a semicolon. This is one reason I strongly recommend using the statement-terminating semicolon throughout your code.
CHAPTER 9 ■ COMMON TABLE EXPRESSIONS AND WINDOWING FUNCTIONS
Simple CTEs have some restrictions on their definition and declaration: • All columns returned by a CTE must have a unique name. If all of the columns returned by the query in the CTE body have unique names, you can leave the column list out of the CTE declaration. • A CTE can reference other previously defined CTEs in the same WITH clause, but cannot reference CTEs defined after the current CTE (known as a forward reference). • You cannot use the following keywords, clauses, and options within a CTE: COMPUTE, COMPUTE BY, FOR BROWSE, INTO, and OPTION (query hint). Also, you cannot use ORDER BY unless you specify the TOP clause. • As I mentioned in the “WITH Overloaded” sidebar, when a CTE is not the first statement in a batch, the preceding statement must end with a semicolon statement terminator. Keep these restrictions in mind when you create CTEs.
Multiple Common Table Expressions You can define multiple CTEs for a single query or DML statement by separating your CTE definitions with commas. The main reason for doing this is to simplify your code to make it easier to read and manage. CTEs provide a means of visually splitting your code into smaller functional blocks, making it easier to develop and debug. Listing 9-2 demonstrates a query with multiple CTEs, with the second CTE referencing the first. Results are shown in Figure 9-1. Listing 9-2. Multiple CTEs WITH GetNamesCTE ( BusinessEntityID, FirstName, MiddleName, LastName ) AS ( SELECT BusinessEntityID, FirstName, MiddleName, LastName FROM Person.Person ), GetContactCTE ( BusinessEntityID, FirstName,
249
250
CHAPTER 9 ■ COMMON TABLE EXPRESSIONS AND WINDOWING FUNCTIONS
MiddleName, LastName, Email, HomePhoneNumber ) AS ( SELECT gn.BusinessEntityID, gn.FirstName, gn.MiddleName, gn.LastName, ea.EmailAddress, pp.PhoneNumber FROM GetNamesCTE gn LEFT JOIN Person.EmailAddress ea ON gn.BusinessEntityID = ea.BusinessEntityID LEFT JOIN Person.PersonPhone pp ON gn.BusinessEntityID = pp.BusinessEntityID AND pp.PhoneNumberTypeID = 2 ) SELECT BusinessEntityID, FirstName, MiddleName, LastName, Email, HomePhoneNumber FROM GetContactCTE;
Figure 9-1. Results of a query with multiple CTEs
CHAPTER 9 ■ COMMON TABLE EXPRESSIONS AND WINDOWING FUNCTIONS
CTE READABILITY BENEFITS You can use CTEs to make your queries more readable than equivalent query designs that utilize nested subqueries. To demonstrate, the following query uses nested subqueries to return the same result as the CTE-based query in Listing 9-2. SELECT gn.BusinessEntityID, gn.FirstName, gn.MiddleName, gn.LastName, gn.Email, gn.HomePhoneNumber FROM ( SELECT p.BusinessEntityID, p.FirstName, p.MiddleName, p.LastName, ea.Email, ea.HomePhoneNumber FROM Person.Person p LEFT JOIN ( SELECT ea.BusinessEntityID, ea.Email, pp.HomePhoneNumber FROM Person.EmailAddress ea LEFT JOIN ( SELECT pp.BusinessEntityID, pp.PhoneNumber AS HomePhoneNumber, pp.PhoneNumberTypeID FROM Person.PersonPhone pp ) pp ON ea.BusinessEntityID = pp.BusinessEntityID AND pp.PhoneNumberTypeID = 2 ) ea ON p.BusinessEntityID = ea.BusinessEntityID ) gn The CTE-based version of this query is much easier to read and understand than the nested subquery version, which makes it easier to debug and maintain in the long term.
251
252
CHAPTER 9 ■ COMMON TABLE EXPRESSIONS AND WINDOWING FUNCTIONS
The sample in Listing 9-2 contains two CTEs, named GetNamesCTE and GetContactCTE. The GetNamesCTE is borrowed from Listing 9-1; it simply retrieves the names from the Person.Person table. WITH GetNamesCTE ( BusinessEntityID, FirstName, MiddleName, LastName ) AS ( SELECT BusinessEntityID, FirstName, MiddleName, LastName FROM Person.Person ) The second CTE, GetContactCTE, joins the results of GetNamesCTE to the Person. EmailAddress table and the Person.PersonPhone tables: GetContactCTE ( BusinessEntityID, FirstName, MiddleName, LastName, Email, HomePhoneNumber ) AS ( SELECT gn.BusinessEntityID, gn.FirstName, gn.MiddleName, gn.LastName, ea.EmailAddress, pp.PhoneNumber FROM GetNamesCTE gn LEFT JOIN Person.EmailAddress ea ON gn.BusinessEntityID = ea.BusinessEntityID LEFT JOIN Person.PersonPhone pp ON gn.BusinessEntityID = pp.BusinessEntityID AND pp.PhoneNumberTypeID = 2 )
CHAPTER 9 ■ COMMON TABLE EXPRESSIONS AND WINDOWING FUNCTIONS
Notice that the WITH keyword is only used once at the beginning of the entire statement. The second CTE declaration is separated from the first by a comma, and does not accept the WITH keyword. Finally, notice how simple and readable the SELECT query associated with the CTEs becomes when the joins are moved into CTEs. SELECT BusinessEntityID, FirstName, MiddleName, LastName, Email, HomePhoneNumber FROM GetContactCTE;
■Tip You can reference a CTE from within the body of another CTE or from the associated query or DML statement. Both types of CTE references are shown in Listing 9-2—the GetNamesCTE is referenced by the GetContactCTE and the GetContactCTE is referenced in the query associated with the CTEs.
Recursive Common Table Expressions CTEs can reference themselves in the body of the CTE, which is a powerful feature for querying hierarchical data stored in the adjacency list model. Recursive CTEs are similar to nonrecursive CTEs, except that the body of the CTE consists of two sets of queries that generate result sets unioned together with the UNION ALL set operator. At least one of the queries in the body of the recursive CTE must not reference the CTE; this query is known as the anchor query. Recursive CTEs also contain one or more recursive queries that reference the CTE. These recursive queries are unioned together with the anchor query (or queries) in the body of the CTE. Recursive CTEs require a top-level UNION ALL operator to union the recursive and nonrecursive queries together. Multiple anchor queries may be unioned together with INTERSECT, EXCEPT, or UNION operators, while multiple recursive queries can be unioned together with UNION ALL. Listing 9-3 is a simple recursive CTE that retrieves a result set consisting of the numbers 1 through 10. Listing 9-3. Simple Recursive CTE WITH Numbers (n) AS ( SELECT 1 AS n UNION ALL SELECT n + 1 FROM Numbers WHERE n < 10 )
253
254
CHAPTER 9 ■ COMMON TABLE EXPRESSIONS AND WINDOWING FUNCTIONS
SELECT n FROM Numbers; The CTE in Listing 9-3 begins with a declaration that defines the CTE name and the column returned: WITH Numbers (n) The CTE body contains a single anchor query that returns a single row with the number 1 in the n column: SELECT 1 AS n The anchor query is unioned together with the recursive query by the UNION ALL set operator. The recursive query contains a self-reference to the Numbers CTE, adding 1 to the n column with each recursive reference. The WHERE clause limits the results to the first 10 numbers. SELECT n + 1 FROM Numbers WHERE n < 10 Recursive CTEs have a maximum recursion level of 100 by default. This means that the recursive query in the CTE body can only call itself 100 times. You can use the MAXRECURSION option to increase the maximum recursion level of CTEs on an individual basis. Listing 9-4 modifies the CTE in Listing 9-3 to return the numbers 1 to 1000. The modified query uses the MAXRECURSION option to increase the maximum recursion level. Without the MAXRECURSION option, this CTE would error out after the first 100 levels of recursion. Listing 9-4. Recursive CTE with MAXRECURSION Option WITH Numbers (n) AS ( SELECT 1 AS n UNION ALL SELECT n + 1 FROM Numbers WHERE n < 1000 ) SELECT n FROM Numbers OPTION (MAXRECURSION 1000); The MAXRECURSION value specified must be between 0 and 32767. SQL Server throws an exception if the MAXRECURSION limit is surpassed. A MAXRECURSION value of 0 indicates that no limit should be placed on recursion for the CTE. Be careful with this option—if you don’t properly limit the results in the query with a WHERE clause, you can easily end up in an infinite loop.
CHAPTER 9 ■ COMMON TABLE EXPRESSIONS AND WINDOWING FUNCTIONS
■Tip Creating a permanent table of counting numbers can be more efficient than using a recursive CTE to generate numbers, particularly if you plan to execute the CTEs that generate numbers often.
Recursive CTEs are useful for querying data stored in a hierarchical adjacency list format. As I discussed in Chapter 2, the adjacency list provides a model for storing hierarchical data in relational databases. In the adjacency list model, each row of the table contains a pointer to its parent in the hierarchy. The Production.BillOfMaterials table in the AdventureWorks database is a practical example of the adjacency list model. This table contains two important columns, ComponentID and ProductAssemblyID, that reflect the hierarchical structure. The ComponentID is a unique number identifying every component that AdventureWorks uses to manufacture their products. The ProductAssemblyID is a parent component created from one or more AdventureWorks product components. Figure 9-2 demonstrates the relationship between components and product assemblies in the AdventureWorks database.
Figure 9-2. Component/product assembly relationship The recursive CTE shown in Listing 9-5 retrieves the complete AdventureWorks hierarchical bill of materials (BOM) for a specified component. The component used in the example is the AdventureWorks silver Mountain-100 48-inch bike, ComponentID 774. Partial results are shown in Figure 9-3. Listing 9-5. Recursive BOM CTE DECLARE @ComponentID int = 774; WITH BillOfMaterialsCTE ( BillOfMaterialsID, ProductAssemblyID,
255
256
CHAPTER 9 ■ COMMON TABLE EXPRESSIONS AND WINDOWING FUNCTIONS
ComponentID, Quantity, Level ) AS ( SELECT bom.BillOfMaterialsID, bom.ProductAssemblyID, bom.ComponentID, bom.PerAssemblyQty AS Quantity, 0 AS Level FROM Production.BillOfMaterials bom WHERE bom.ComponentID = @ComponentID UNION ALL SELECT bom.BillOfMaterialsID, bom.ProductAssemblyID, bom.ComponentID, bom.PerAssemblyQty, Level + 1 FROM Production.BillOfMaterials bom INNER JOIN BillOfMaterialsCTE bomcte ON bom.ProductAssemblyID = bomcte.ComponentID WHERE bom.EndDate IS NULL ) SELECT bomcte.ProductAssemblyID, p.ProductID, p.ProductNumber, p.Name, p.Color, bomcte.Quantity, bomcte.Level FROM BillOfMaterialsCTE bomcte INNER JOIN Production.Product p ON bomcte.ComponentID = p.ProductID;
CHAPTER 9 ■ COMMON TABLE EXPRESSIONS AND WINDOWING FUNCTIONS
Figure 9-3. Partial results of the recursive BOM CTE Like the previous CTE examples, Listing 9-3 begins with the CTE name and column list declaration. WITH BillOfMaterialsCTE ( BillOfMaterialsID, ProductAssemblyID, ComponentID, Quantity, Level ) The anchor query simply retrieves the row from the table where the ComponentID matches the specified ID. This is the top-level component in the BOM, set to 774 in the example. Notice that the CTE can reference T-SQL variables like @ComponentID in the example. SELECT bom.BillOfMaterialsID, bom.ProductAssemblyID, bom.ComponentID, bom.PerAssemblyQty AS Quantity, 0 AS Level FROM Production.BillOfMaterials bom WHERE bom.ComponentID = @ComponentID
257
258
CHAPTER 9 ■ COMMON TABLE EXPRESSIONS AND WINDOWING FUNCTIONS
The recursive query retrieves successive levels of the BOM from the CTE where the ProductAssemblyID of each row matches the ComponentID of the higher-level rows. That is to say, the recursive query of the CTE retrieves lower-level rows in the hierarchy that match the hierarchical relationship previously illustrated in Figure 9-2. SELECT bom.BillOfMaterialsID, bom.ProductAssemblyID, bom.ComponentID, bom.PerAssemblyQty, Level + 1 FROM Production.BillOfMaterials bom INNER JOIN BillOfMaterialsCTE bomcte ON bom.ProductAssemblyID = bomcte.ComponentID WHERE bom.EndDate IS NULL The CTE has a SELECT statement associated with it that joins the results to the Production. Product table to retrieve product-specific information like the name and color of the component: SELECT bomcte.ProductAssemblyID, p.ProductID, p.ProductNumber, p.Name, p.Color, bomcte.Quantity, bomcte.Level FROM BillOfMaterialsCTE bomcte INNER JOIN Production.Product p ON bomcte.ComponentID = p.ProductID; The restrictions on simple CTEs that I described earlier in this chapter also apply to recursive CTEs. In addition, the following restrictions apply specifically to recursive CTEs: • Recursive CTEs must have at least one anchor query and at least one recursive query specified in the body of the CTE. All anchor queries must appear before any recursive queries. • All anchor queries must be unioned with the set operators UNION, UNION ALL, INTERSECT, or EXCEPT. When using multiple anchor queries and recursive queries, the last anchor query and the first recursive query must be unioned together with the UNION ALL operator. Additionally, all recursive queries must be unioned together with UNION ALL. • The data types of all columns in the anchor queries and recursive queries must match. • The recursive queries cannot contain the following operators and keywords: GROUP BY, HAVING, LEFT JOIN, RIGHT JOIN, OUTER JOIN, and SELECT DISTINCT. Recursive queries also cannot contain aggregate functions (like SUM and MAX), windowing functions, subqueries, or hints on the recursive CTE reference.
CHAPTER 9 ■ COMMON TABLE EXPRESSIONS AND WINDOWING FUNCTIONS
Windowing Functions SQL Server 2008 supports windowing functions that partition results and can apply numbering, ranking, and aggregate functions to each partition. The key to windowing functions is the OVER clause, which allows you to define the partitions, and in some cases the ordering of rows in the partition, for your data. In this section, I’ll discuss SQL Server 2008 windowing functions and the numbering, ranking, and aggregate functions that support the OVER clause.
The ROW_NUMBER Function You can use ROW_NUMBER to make light work of paging applications, such as front-end web applications that need to retrieve a fixed number of rows of data at a time, and other applications that require numbered rows in result sets. The ROW_NUMBER function takes the OVER clause with an ORDER BY clause and an optional PARTITION BY clause. Listing 9-6 retrieves names from the Person.Person table. The OVER clause is used to partition the rows by LastName and order the rows in each partition by LastName, FirstName, and MiddleName. The ROW_NUMBER function is used to assign a number to each row. Listing 9-6. ROW_NUMBER with Partitioning SELECT ROW_NUMBER() OVER ( PARTITION BY LastName ORDER BY LastName, FirstName, MiddleName ) AS Number, LastName, FirstName, MiddleName FROM Person.Person; The partition created in Listing 9-6 acts as a window that slides over your result set (hence the name “windowing function”). The ORDER BY clause orders the rows of each partition by LastName, FirstName, and MiddleName. SQL Server applies the ROW_NUMBER function to each partition. The net result is that the ROW_NUMBER function numbers all rows in the result set, restarting the numbering at 1 every time it encounters a new LastName, as shown in Figure 9-4.
■Note When PARTITION
BY is used, it must appear before ORDER BY inside of the OVER clause.
259
260
CHAPTER 9 ■ COMMON TABLE EXPRESSIONS AND WINDOWING FUNCTIONS
Figure 9-4. Using ROW_NUMBER to number rows in partitions The ROW_NUMBER function can also be used without the PARTITION BY clause, in which case the entire result set is treated as one partition. This is useful for numbering entire result sets for applications like front-end paging of result sets on web pages. Listing 9-7 is a stored procedure that uses ROW_NUMBER to number all rows in the Person.Person table in LastName, FirstName, MiddleName order. The procedure accepts a starting row number and returns the ten names from the result set beginning at the row number specified. Listing 9-7. ROW_NUMBER Function Example CREATE PROCEDURE Person.GetTenContacts @RowNum int AS BEGIN WITH PageContacts AS ( SELECT ROW_NUMBER() OVER ( ORDER BY LastName, FirstName, MiddleName ) AS PosNo, LastName, FirstName, MiddleName FROM Person.Person )
CHAPTER 9 ■ COMMON TABLE EXPRESSIONS AND WINDOWING FUNCTIONS
SELECT PosNo, LastName, FirstName, MiddleName FROM PageContacts WHERE PosNo BETWEEN @RowNum AND @RowNum + 9; END; GO EXEC Person.GetTenContacts 6100; The procedure in Listing 9-7 consists of a CTE that uses the ROW_NUMBER function to number all rows in the Person.Person table in order by LastName, FirstName, and MiddleName: SELECT ROW_NUMBER() OVER ( ORDER BY LastName, FirstName, MiddleName ) AS PosNo, LastName, FirstName, MiddleName FROM Person.Person The SELECT query associated with the CTE returns the ten rows from the CTE result set beginning with the row number specified by the @RowNum parameter in the procedure call: SELECT PosNo, LastName, FirstName, MiddleName FROM PageContacts WHERE PosNo BETWEEN @RowNum AND @RowNum + 9; The sample procedure call passes a @RowNum parameter value of 6100 to the procedure and returns the ten rows numbered 6100 to 6109, as shown in Figure 9-5.
261
262
CHAPTER 9 ■ COMMON TABLE EXPRESSIONS AND WINDOWING FUNCTIONS
Figure 9-5. Using ROW_NUMBER to implement client-side paging
The RANK and DENSE_RANK Functions The RANK and DENSE_RANK functions are SQL Server’s ranking functions. They both assign a numeric rank value to each row in a partition. Suppose you want to figure out AdventureWorks’s best one-day sales dates for the calendar year 2001. This scenario might be phrased with a business question like “What were the best one-day sales days in 2001?” RANK can easily give you that information, as shown in Listing 9-8. Partial results are shown in Figure 9-6. Listing 9-8. Ranking AdventureWorks Daily Sales Totals WITH TotalSalesBySalesDate ( DailySales, OrderDate ) AS ( SELECT SUM(soh.SubTotal) AS DailySales, soh.OrderDate FROM Sales.SalesOrderHeader soh WHERE soh.OrderDate >= '20010101' AND soh.OrderDate < '20020101' GROUP BY soh.OrderDate ) SELECT RANK() OVER ( ORDER BY DailySales DESC ) AS Ranking, DailySales, OrderDate
CHAPTER 9 ■ COMMON TABLE EXPRESSIONS AND WINDOWING FUNCTIONS
FROM TotalSalesBySalesDate ORDER BY Ranking;
Figure 9-6. Top ten AdventureWorks daily sales totals Listing 9-8 is a CTE that returns two columns, DailySales and OrderDate. The DailySales is the sum of all sales grouped by OrderDate. The results are limited by the WHERE clause to include only sales in the 2001 sales year. WITH TotalSalesBySalesDate ( DailySales, OrderDate ) AS ( SELECT SUM(soh.SubTotal) AS DailySales, soh.OrderDate FROM Sales.SalesOrderHeader soh WHERE soh.OrderDate >= '20010101' AND soh.OrderDate < '20020101' GROUP BY soh.OrderDate ) The RANK function is used with the OVER clause to apply ranking values to the rows returned by the CTE in descending order (highest to lowest) by the DailySales column: SELECT RANK() OVER ( ORDER BY DailySales DESC ) AS Ranking, DailySales, OrderDate
263
264
CHAPTER 9 ■ COMMON TABLE EXPRESSIONS AND WINDOWING FUNCTIONS
FROM TotalSalesBySalesDate ORDER BY Ranking; Like the ROW_NUMBER function, RANK can accept the PARTITION BY clause in the OVER clause. Listing 9-9 builds on the previous example and uses the PARTITION BY clause to rank the daily sales for each month. This type of query can answer a business question like “What were AdventureWorks’s best one-day sales days for each month of 2002?” Partial results are shown in Figure 9-7. Listing 9-9. Determining the Best Daily Sales per Month WITH TotalSalesBySalesDatePartitioned ( DailySales, OrderMonth, OrderDate ) AS ( SELECT SUM(soh.SubTotal) AS DailySales, DATENAME(MONTH, soh.OrderDate) AS OrderMonth, soh.OrderDate FROM Sales.SalesOrderHeader soh WHERE soh.OrderDate >= '20020101' AND soh.OrderDate < '20030101' GROUP BY soh.OrderDate ) SELECT RANK() OVER ( PARTITION BY OrderMonth ORDER BY DailySales DESC ) AS Ranking, DailySales, OrderMonth, OrderDate FROM TotalSalesBySalesDatePartitioned ORDER BY OrderMonth, Ranking;
CHAPTER 9 ■ COMMON TABLE EXPRESSIONS AND WINDOWING FUNCTIONS
Figure 9-7. Partial results of daily one-day sales rankings, partitioned by month The query in Listing 9-9, like the previous listing, begins with a CTE to calculate one-day sales totals for the year. The main differences between this CTE and the previous example are that Listing 9-9 returns an additional OrderMonth column and the results are limited to the year 2002. WITH TotalSalesBySalesDatePartitioned ( DailySales, OrderMonth, OrderDate ) AS ( SELECT SUM(soh.SubTotal) AS DailySales, DATENAME(MONTH, soh.OrderDate) AS OrderMonth, soh.OrderDate FROM Sales.SalesOrderHeader soh WHERE soh.OrderDate >= '20020101' AND soh.OrderDate < '20030101' GROUP BY soh.OrderDate ) The SELECT query associated with the CTE uses the RANK function to assign rankings to the results. The PARTITION BY clause is used to partition the results by OrderMonth so that the rankings restart at 1 for each new month. SELECT RANK() OVER ( PARTITION BY OrderMonth
265
266
CHAPTER 9 ■ COMMON TABLE EXPRESSIONS AND WINDOWING FUNCTIONS
ORDER BY DailySales DESC ) AS Ranking, DailySales, OrderMonth, OrderDate FROM TotalSalesBySalesDatePartitioned ORDER BY OrderMonth, Ranking; When the RANK function encounters two equal DailySales amounts in the same partition, it assigns the same rank number to both and skips the next number in the ranking. As shown in Figure 9-8, the DailySales total for two days in April 2002 was $11,230.6282, resulting in the RANK function assigning both days a Ranking value of 26. The RANK function then skips the Ranking value 27 and assigns the next row a Ranking of 28.
Figure 9-8. The RANK function skips a value in the case of a tie. DENSE_RANK, like RANK, assigns duplicate values the same rank, but with one important difference: it does not skip the next ranking in the list. Listing 9-10 modifies Listing 9-9 to use the DENSE_RANK function in place of RANK. As you can see in Figure 9-9, DENSE_RANK still assigns the same Ranking to both rows in the result, but it doesn’t skip the next Ranking value. Listing 9-10. Using DENSE_RANK to Rank Best Daily Sales Per Month WITH TotalSalesBySalesDatePartitioned ( DailySales, OrderMonth, OrderDate ) AS ( SELECT SUM(soh.SubTotal) AS DailySales, DATENAME(MONTH, soh.OrderDate) AS OrderMonth, soh.OrderDate FROM Sales.SalesOrderHeader soh WHERE soh.OrderDate >= '20020101' AND soh.OrderDate < '20030101' GROUP BY soh.OrderDate )
CHAPTER 9 ■ COMMON TABLE EXPRESSIONS AND WINDOWING FUNCTIONS
SELECT DENSE_RANK() OVER ( PARTITION BY OrderMonth ORDER BY DailySales DESC ) AS Ranking, DailySales, OrderMonth, OrderDate FROM TotalSalesBySalesDatePartitioned ORDER BY OrderMonth, Ranking;
Figure 9-9. DENSE_RANK does not skip ranking values after a tie.
The NTILE Function NTILE is another ranking function that fulfills a slightly different need. This function divides your result set into approximate n-tiles. An n-tile can be a quartile (1/4th, or 25 percent slices), a quintile (1/5th, or 20 percent slices), a percentile (1/100th, or 1 percent slices), or just about any other fractional slice you can imagine. The reason NTILE divides result sets into approximate n-tiles is that the number of rows returned might not be evenly divisible into the required number of groups. A table with 27 rows, for instance, is not evenly divisible into quartiles or quintiles. When you query a table with the NTILE function and the number of rows is not evenly divisible by the specified number of groups, NTILE creates groups of two different sizes. The larger groups will all be one row larger than the smaller groups, and the larger groups are numbered first. In the example of 27 rows divided into quintiles (1/5th), the first two groups will have six rows each, and the last three groups will have five rows each. Like the ROW_NUMBER function, you can include both PARTITION BY and ORDER BY in the OVER clause. NTILE requires an additional parameter that specifies how many groups it should divide your results into. NTILE is useful for answering business questions like “Which salespeople comprised the top 10 percent of the sales force in 2003?” Answers to questions like this can be used to determine things like which salespeople gets bonuses, which ones get additional training, and which ones get to collect unemployment benefits. Listing 9-11 uses NTILE to divide the AdventureWorks salespeople into ten groups, each one representing 10 percent of the total sales force. The ORDER BY clause is used to specify that rows are assigned to the groups in order of their total sales. The results are shown in Figure 9-10.
267
268
CHAPTER 9 ■ COMMON TABLE EXPRESSIONS AND WINDOWING FUNCTIONS
Listing 9-11. Using NTILE to Group and Rank Salespeople WITH SalesTotalBySalesPerson ( SalesPersonID, SalesTotal ) AS ( SELECT soh.SalesPersonID, SUM(soh.SubTotal) AS SalesTotal FROM Sales.SalesOrderHeader soh WHERE DATEPART(YEAR, soh.OrderDate) = 2003 GROUP BY soh.SalesPersonID ) SELECT NTILE(10) OVER ( ORDER BY st.SalesTotal DESC ) AS Tile, p.LastName, p.FirstName, p.MiddleName, st.SalesPersonID, st.SalesTotal FROM SalesTotalBySalesPerson st INNER JOIN Person.Person p ON st.SalesPersonID = p.BusinessEntityID;
Figure 9-10. AdventureWorks salespeople grouped and ranked by NTILE
CHAPTER 9 ■ COMMON TABLE EXPRESSIONS AND WINDOWING FUNCTIONS
The code begins with a simple CTE that returns the SalesPersonID and sum of the order SubTotal values from the Sales.SalesOrderHeader table. The CTE limits its results to the sales that occurred in the year 2003. WITH SalesTotalBySalesPerson ( SalesPersonID, SalesTotal ) AS ( SELECT soh.SalesPersonID, SUM(soh.SubTotal) AS SalesTotal FROM Sales.SalesOrderHeader soh WHERE DATEPART(YEAR, soh.OrderDate) = 2003 GROUP BY soh.SalesPersonID ) The SELECT query associated with this CTE uses NTILE(10) to group the AdventureWorks salespeople into ten groups of approximately 10 percent each. The OVER clause specifies that the groups should be assigned based on the SalesTotal in descending order. SELECT NTILE(10) OVER ( ORDER BY st.SalesTotal DESC ) AS Tile, p.LastName, p.FirstName, p.MiddleName, st.SalesPersonID, st.SalesTotal FROM SalesTotalBySalesPerson st INNER JOIN Person.Person p ON st.SalesPersonID = p.BusinessEntityID;
Aggregate Functions and OVER As previously discussed, the new numbering and ranking functions (ROW_NUMBER, RANK, etc.) all work with the OVER clause to define the order and partitioning of their input rows via the ORDER BY and PARTITION BY clauses. The OVER clause also provides windowing functionality to T-SQL aggregate functions such as SUM, COUNT, and SQL CLR user-defined aggregates. For instance, you can apply the OVER clause to the Purchasing.PurchaseOrderDetail table in the AdventureWorks database to retrieve the SUM of the quantities of products ordered, partitioned by ProductId, using the sample query in Listing 9-12. Partial results are shown in Figure 9-11.
269
270
CHAPTER 9 ■ COMMON TABLE EXPRESSIONS AND WINDOWING FUNCTIONS
Listing 9-12. Using the OVER Clause with the SUM Aggregate Function SELECT PurchaseOrderID, ProductID, SUM(OrderQty) OVER ( PARTITION BY ProductId ) AS TotalOrderQty FROM Purchasing.PurchaseOrderDetail;
Figure 9-11. Partial results of SUM with the OVER clause As you can see in Figure 9-11, the result of the aggregate function with the OVER clause is returned on every row of the result set. You can achieve the same result via an inner join and a subquery, as shown in Listing 9-13. Listing 9-13. Using INNER JOIN to Duplicate Aggregate OVER Clause Results SELECT pod.PurchaseOrderID, pod.ProductID, pqty.TotalOrderQty FROM Purchasing.PurchaseOrderDetail pod INNER JOIN ( SELECT ProductID, SUM(OrderQty) AS TotalOrderQty FROM Purchasing.PurchaseOrderDetail GROUP BY ProductID ) pqty ON pod.ProductID = pqty.ProductID;
CHAPTER 9 ■ COMMON TABLE EXPRESSIONS AND WINDOWING FUNCTIONS
NO ORDER BY ALLOWED When used with an aggregate function like SUM, COUNT, or AVG, or a user-defined aggregate, the OVER clause can only take a PARTITION BY clause—not an ORDER BY clause. This is a serious shortcoming in the SQL Server implementation of OVER for aggregate functions. ORDER BY in the OVER clause for aggregate functions allows you to easily perform single-statement running sum–type calculations. Running sum calculations without this feature require extensive joins, causing many people to fall back on cursors. ORDER BY for the aggregate OVER clause, and other features related to windowing functions, has been submitted as a feature request to Microsoft. Hopefully, we’ll see it implemented at some point in the near future.
Summary CTEs are powerful SQL Server features that come in two varieties: recursive and nonrecursive. Nonrecursive CTEs allow you to write expressive T-SQL code that is easier to code, debug, and manage than complex queries that make extensive use of derived tables. Recursive CTEs simplify queries of hierarchical data and allow for easily generating result sets consisting of sequential numbers, which are very useful in themselves. SQL Server’s support for windowing functions and the OVER clause makes partitioning, row numbering, and ranking result sets simple. SQL Server supports several windowing functions, including the following: • ROW_NUMBER: This function numbers the rows of a result set sequentially, beginning with 1. • RANK and DENSE_RANK: These functions rank a result set, applying the same rank value in the case of a tie. • NTILE: This function groups a result set into a user-specified number of groups. You can also use the OVER clause to apply windowing functionality to built-in aggregate functions and SQL CLR user-defined aggregates. Both CTEs and windowing functions provide useful functionality and extend the syntax of T-SQL, allowing you to write more powerful code than ever in a simpler syntax than was possible without them.
EXERCISES 1. [True/false] When a CTE is not the first statement in a batch, the statement preceding it must end with a semicolon statement terminator. 2. [Choose all that apply] A recursive CTE requires which of the following: a.
The WITH keyword
b.
An anchor query
c.
The EXPRESSION keyword
d.
A recursive query
271
272
CHAPTER 9 ■ COMMON TABLE EXPRESSIONS AND WINDOWING FUNCTIONS
3. [Fill in the blank] The MAXRECURSION option can accept a value between 0 and ___. 4. [Choose one] SQL Server supports which of the following windowing functions: a.
ROW_NUMBER
b.
RANK
c.
DENSE_RANK
d.
NTILE
e.
All of the above
5. [True/false] You can use ORDER BY in the OVER clause when used with aggregate functions. 6. [True/false] When PARTITION BY and ORDER BY are both used in the OVER clause, PARTITION BY must appear first. 7. [Fill in the blank] The names of all columns returned by a CTE must be ___.
CHAPTER
10
Integrated Full-Text Search F
ull-text search (FTS) provides the tools necessary to perform linguistic searches in a wide variety of languages against data and documents stored in SQL Server. Each new release of SQL Server has improved on FTS support since its initial introduction in SQL Server 7.0. SQL Server 2008 carries on with this tradition of continuous improvement in FTS functionality. The new integrated FTS (iFTS) model provides tighter integration with the SQL Server query engine, greater transparency with new dynamic management views and functions, improved support for more languages, and better T-SQL administration and management tools. In this chapter, I’ll introduce the new generation of SQL Server iFTS functionality.
iFTS Architecture The new iFTS differs from the FTS functionality available in previous versions of SQL Server in several ways. In previous releases of SQL Server, the full-text query engine was a completely separate service from the SQL Server service. In the classic architecture, the SQL Server query engine handed off full-text queries to the full-text query engine service for processing, and the full-text query engine passed results back to SQL Server. This interservice communication generated additional overhead. Because the full-text query engine was a separate service, the SQL Server query engine could not effectively estimate full-text query costs—a very important step in optimizing overall query performance when full-text queries are involved. A major enhancement in iFTS is the tight integration with the SQL Server query engine. SQL Server 2008 integrates the full-text query engine into the SQL Server query processor, eliminating a lot of interprocess overhead and allowing for much more efficient full-text query processing and optimizations. A simplified view of the new full-text engine integration with the SQL Server query processor is shown in Figure 10-1.
273
274
CHAPTER 10 ■ INTEGRATED FULL-TEXT SEARCH
Figure 10-1. New iFTS architecture (simplified) The new tighter integration of the full-text engine with the SQL Server query processor increases the efficiency, scalability, flexibility, and transparency of FTS, including the following: • The full-text engine is hosted in the SQL Server process eliminating much of the overhead associated with interservice communications. • SQL Server can use iFTS integration to better predict query performance through the use of new query operators. • SQL Server can optimize access to full-text indexes because they are now stored in the database. • New functionality is available for creating customized stoplists of words to ignore during FTS, adding flexibility to iFTS. • SQL Server provides new dynamic management views and functions that provide greater transparency in understanding how iFTS queries are processed and executed.
CHAPTER 10 ■ INTEGRATED FULL-TEXT SEARCH
Creating Full-Text Catalogs and Indexes The first step to take advantage of SQL Server iFTS is to create full-text catalogs and full-text indexes. A full-text catalog can contain one or more full-text indexes, and each full-text index can only be assigned to one full-text catalog. You can create full-text catalogs and full-text indexes in SQL Server Management Studio (SSMS) using GUI (graphical user interface) wizards or T-SQL statements.
Creating Full-Text Catalogs You can access the GUI full-text catalog wizard by right-clicking Full Text Catalogs in the SSMS Object Explorer. The New Full-Text Catalog option on the pop-up context menu starts the wizard (see Figure 10-2).
Figure 10-2. New Full-Text Catalog context menu option After selecting New Full-Text Catalog, SSMS presents the wizard’s New Full-Text Catalog window. This window allows you to define the name of your full-text catalog, the full-text catalog’s owner, an accent sensitivity setting, and whether or not this full-text catalog is designated as the default for a database. The New Full-Text Catalog window is shown in Figure 10-3.
275
276
CHAPTER 10 ■ INTEGRATED FULL-TEXT SEARCH
Figure 10-3. New Full-Text Catalog window For this sample full-text catalog, I chose the following options: • The full-text catalog is named AdventureWorksFTCat, and dbo is designated as the owner. • The full-text catalog is designated the default full-text catalog for the database. When a new full-text index is created, if a full-text catalog is not specified, the default catalog is used. • The accent sensitivity is set to Insensitive, meaning that words with accent marks are treated as equivalent to those without accent marks (e.g., for search purposes, resumé is the same as resume). You can also create and manage full-text catalogs using T-SQL statements. Listing 10-1 shows how to create the same full-text catalog that I created previously in this section with the SSMS wizard. Listing 10-1. Creating a Full-Text Catalog with T-SQL CREATE FULLTEXT CATALOG AdventureWorksFTCat WITH ACCENT_SENSITIVITY = OFF AS DEFAULT AUTHORIZATION dbo; Once you’ve created your full-text catalog, the next step is to build full-text indexes. I describe full-text index creation in the next section. Maximum-performance full-text catalogs, particularly those you anticipate will become very large, should be created on filegroups that
CHAPTER 10 ■ INTEGRATED FULL-TEXT SEARCH
are located on their own physical drives. This is also useful for administrative functions such as performing filegroup backups and restores independent of data and log files.
Creating Full-Text Indexes As with full-text catalogs, you have two options for creating full-text indexes—you can use the GUI wizard in SSMS or you can use T-SQL statements. Once you’ve created a full-text catalog, as described in the previous section, it’s time to define your full-text indexes. Begin by right-clicking a table in the SSMS Object Explorer to pull up the table context menu. From the context menu, choose the Full-Text Index ➤ Define Full-Text Index option, shown in Figure 10-4.
Figure 10-4. “Full-Text index” context menu The full-text index wizard shows a splash screen the first time you access it. You can choose to turn off the splash screen or just ignore it. On the next screen, shown in Figure 10-5, the wizard allows you to select a single-column unique index on the table. Every full-text index requires a single-column unique index that allows the full-text index to reference individual rows in the table. If you don’t have a single-column unique index defined on the table you’re trying to create a full-text index on, the wizard will display an error message as soon as you try to run it. In this example, I’ve chosen to use the table’s integer primary key for the full-text index.
■Tip It’s recommended that you specify a single-column unique index defined on an integer column when creating a full-text index. This will help maximize performance and minimize full-text index storage requirements.
277
278
CHAPTER 10 ■ INTEGRATED FULL-TEXT SEARCH
Figure 10-5. Selecting a single-column unique index After you select a unique index, you’ll choose the columns that will provide the searchable content for the full-text index. You can specify char, nchar, varchar, nvarchar, xml, varbinary, text, ntext, and image columns in this step. In Figure 10-6, the nvarchar and xml data type columns of the table are selected to participate in the full-text index. I’ve also selected English as the word-breaker language for each of these columns. The word-breaker language specification determines the language used for word-breaking and stemming.
Figure 10-6. Selecting columns to participate in full-text searches
CHAPTER 10 ■ INTEGRATED FULL-TEXT SEARCH
■Note The type column, not used in this example, is the name of a column indicating the document type (e.g., Microsoft Word, Excel, PowerPoint, Adobe PDF, and others) when you full-text index documents stored in varbinary(max) or image columns. Be aware that some document types require installation and configuration of additional IFilter components. More information is available on Microsoft TechNet at http://technet.microsoft.com/en-us/library/ms142499(SQL.100).aspx.
After you’ve selected the columns that will participate in full-text searches against a table, you must select the change-tracking option. Change tracking determines whether SQL Server maintains a change log for the full-text indexed columns, and how the log is used to update the full-text index. Figure 10-7 shows the change-tracking options available through the wizard.
Figure 10-7. Selecting a change-tracking option The change-tracking options available through the wizard include the following: • Automatically: SQL Server updates the full-text index automatically when data is modified in the columns that participate in the full-text index. This is the default option. • Manually: The change-tracking log is either used to update the full-text index via SQL Agent on a scheduled basis, or through manual intervention. This option is useful when automatic full-text index updates could slow down your server during business hours. • Do not track changes: SQL Server does not track changes. Updating the full-text index requires you to issue an ALTER FULLTEXT INDEX statement with the START FULL or INCREMENTAL POPULATION clause to populate the entire full-text index.
279
280
CHAPTER 10 ■ INTEGRATED FULL-TEXT SEARCH
■Tip Keep in mind that automatic updates to the full-text index are not necessarily immediate updates. When automatic change tracking is specified, there may be some lag time between changes in the table data and updates to the full-text index.
The next step in the wizard allows you to assign your full-text index to a full-text catalog. You can choose a preexisting full-text catalog, like the AdventureWorksFTCat shown in Figure 10-8, or you can create a new full-text catalog. You can also choose a filegroup and full-text stoplist for the full-text index in this step.
Figure 10-8. Assigning a full-text index to a catalog The final steps of the wizard allow you to create a full-text index population schedule and review your previous wizard selections. Since automatic population is used in the example, no schedule is necessary. In the review window of the wizard, shown in Figure 10-9, you can look at the choices you’ve made in each step of the wizard and go back to previous steps to make changes if necessary. Once you click the Finish button, the full-text index is created in your database.
CHAPTER 10 ■ INTEGRATED FULL-TEXT SEARCH
Figure 10-9. Review wizard selections The SSMS full-text index wizard is very thorough, but you can also create and manage full-text indexes using T-SQL statements. Listing 10-2 shows the T-SQL statements required to create and enable a full-text index with the same options previously selected in the SSMS wizard example. Listing 10-2. Creating a Full-Text Index with T-SQL Statements CREATE FULLTEXT INDEX ON Production.ProductModel ( CatalogDescription LANGUAGE English, Instructions LANGUAGE English, Name LANGUAGE English ) KEY INDEX PK_ProductModel_ProductModelID ON ( AdventureWorksFTCat ) WITH ( CHANGE_TRACKING AUTO ); GO ALTER FULLTEXT INDEX ON Production.ProductModel ENABLE; GO
281
282
CHAPTER 10 ■ INTEGRATED FULL-TEXT SEARCH
The CREATE FULLTEXT INDEX statement builds the full-text index on the Production. ProductModel table with the specified options. In this example, the CatalogDescription, Instructions, and Name columns are all participating in the full-text index. The LANGUAGE clause specifies that the English language word-breaker will be used to index the columns. The KEY INDEX clause specifies the primary key of the table, PK_ProductModel_ProductModelID, as the single-column unique index for the table. Finally, the CHANGE TRACKING AUTO option turns on automatic change tracking for the full-text index. The ALTER FULLTEXT INDEX statement in the listing enables the full-text index and starts a full population. ALTER FULLTEXT INDEX is a flexible statement that can be used to add columns to, or remove columns from, a full-text index. You can also use it to enable or disable a full-text index, set the change-tracking options, start or stop a full-text index population, or change full-text index stoplist settings.
■Note Stoplists are lists of words that are considered unimportant for purposes of FTS. These words are known as stopwords, and are equivalent to the noise words in previous releases of SQL Server. Stopwords are language dependent, with the English system stoplist containing words like a, an, and, and the (and many others). SQL Server 2008 provides a system stoplist and allows you to create your own custom stoplists. I will discuss stoplists later in this chapter.
Full-Text Querying After you create a full-text catalog and a full-text index, you can take advantage of iFTS with SQL Server’s FTS predicates and functions. SQL Server provides four ways to query a full-text index. The FREETEXT and CONTAINS predicates retrieve rows from a table that match a given FTS criteria, in much the same way that the EXISTS predicate returns rows that meet given criteria. The FREETEXTTABLE and CONTAINSTABLE functions return rowsets with two columns: a key column, which is a row identifier (the unique index value specified when the full-text index was created) and a rank column, which is a relevance rating.
The FREETEXT Predicate The FREETEXT predicate offers the simplest method of using iFTS to search character-based columns of a full-text index. FREETEXT searches for words that match inflectional forms and thesaurus expansions and replacements. The FREETEXT predicate accepts a column name or list of columns, a free-text search string, and an optional language identifier (a locale ID, or LCID). Because it is a predicate, FREETEXT can be used in the WHERE clause of a SELECT query or DML statement. All rows for which the FREETEXT predicate returns true (a match) are returned. Listing 10-3 shows a simple FREETEXT query that uses the full-text index created on the Production. ProductModel table in the previous section. The results are shown in Figure 10-10. The wildcard character (*) passed as a parameter to the FREETEXT predicate indicates that all columns participating in the full-text index should be searched for a match. The second FREETEXT parameter is the word you want to match.
CHAPTER 10 ■ INTEGRATED FULL-TEXT SEARCH
Listing 10-3. Simple FREETEXT Full-Text Query SELECT ProductModelID, Name, CatalogDescription, Instructions FROM Production.ProductModel WHERE FREETEXT(*, N'sock');
Figure 10-10. Using FREETEXT to find socks The FREETEXT predicate automatically stems words to find inflectional forms. The query in Listing 10-3 returns rows that contain an inflectional form of the word sock—in this case, iFTS finds two rows that contain the plural form of the word, socks. FREETEXT also performs iFTS thesaurus expansions and replacements automatically, if a thesaurus file is available. The integration of iFTS with the SQL Server query engine results in a more efficient FTS experience than in previous versions of FTS. In SQL Server 2008, iFTS can take advantage of new optimized operators like the Table Valued Function [FulltextMatch] operator shown in Figure 10-11. The query plan shown is generated by the query in Listing 10-3.
Figure 10-11. FREETEXT query execution plan
283
284
CHAPTER 10 ■ INTEGRATED FULL-TEXT SEARCH
IFTS PERFORMANCE OPTIMIZATION In previous releases of SQL Server, the FTS functionality was provided via an independent service known as MSFTESQL (Microsoft Full-Text Engine for SQL Server). Because it was completely separate from the SQL Server query engine, the MSFTESQL service could not take advantage of T-SQL operators to optimize performance. As an example, consider the following variation on the query in Listing 10-3: SELECT ProductModelID, Name, CatalogDescription, Instructions FROM Production.ProductModel WHERE FREETEXT(*, N'sock') AND ProductModelID < 100; Imagine for a moment that the Production.ProductModel table has 1,000,000 rows that match the FREETEXT predicate. Prior versions of SQL Server were incapable of using the additional T-SQL ProductModelID < 100 predicate in the WHERE clause to limit the rows accessed by the FTS service. In SQL Server 2005, the MSFTESQL service had to return all 1,000,000 rows from the FREETEXT predicate and then narrow them down. With SQL Server 2008’s new iFTS integration, the FTS engine can work in tandem with the SQL Server query engine to optimize the query plan and limit the number of rows touched by the FREETEXT predicate.
■Tip You’ll see heavy use of the phrase inflectional forms throughout this section. Inflectional forms of words include verb conjugations like go, goes, going, gone, and went. Inflectional forms also include plural and singular noun variants of words, like bike and bikes. Searching for any word with FREETEXT automatically results in matches of all supported inflectional forms.
Listing 10-4 demonstrates a FREETEXT query that performs automatic stemming of the word ride. This query retrieves all rows that contain inflectional forms of the word ride in the CatalogDescription column. Inflectional forms that are matched in this query include the plural noun riders and the verb riding. In this FREETEXT query, the CatalogDescription column name is identified by name to restrict the search to a single column, and the LANGUAGE specifier is used to indicate LCID 1033, which is US English. The results are shown in Figure 10-12.
CHAPTER 10 ■ INTEGRATED FULL-TEXT SEARCH
Listing 10-4. FREETEXT Query with Automatic Word Stemming SELECT ProductModelID, Name, CatalogDescription, Instructions FROM Production.ProductModel WHERE FREETEXT(CatalogDescription, N'weld', LANGUAGE 1033);
Figure 10-12. Automatic stemming with FREETEXT You can’t see the words that matched in the xml type CatalogDescription and Instructions columns in Figure 10-2 (there’s not enough space on the page to reproduce the entire result). Rest assured that FREETEXT has located valid matches in each row, though. To demonstrate, I’ve reproduced a portion of the matched content for each of the result rows in Figure 10-13. Notice that the word weld, used in the FREETEXT predicate, is automatically stemmed to match Welding and welded in the results.
Figure 10-13. Partial matched contents for the FREETEXT query
The CONTAINS Predicate In addition to the FREETEXT predicate, SQL Server 2008 supports the CONTAINS predicate. CONTAINS allows more advanced full-text query options than the FREETEXT predicate. Just like FREETEXT, the CONTAINS predicate accepts a column name or list of columns, a search condition, and an optional language identifier as parameters. The CONTAINS predicate can search for simple strings like FREETEXT, but it also allows sophisticated search conditions that include word or phrase prefixes, words that are in close proximity to other words, inflectional word forms, thesaurus synonyms, and combinations of search criteria.
285
286
CHAPTER 10 ■ INTEGRATED FULL-TEXT SEARCH
The simplest CONTAINS predicates are basic word searches, similar to FREETEXT. Unlike FREETEXT, however, the CONTAINS predicate does not automatically search for inflectional forms of words or thesaurus expansions and replacements. Listing 10-5 modifies Listing 10-4 to demonstrate a simple CONTAINS query. The results are shown in Figure 10-14. As you can see, a couple of rows that do not contain an exact match for the word weld are eliminated from the results. Listing 10-5. Simple CONTAINS Query SELECT ProductModelID, Name, CatalogDescription, Instructions FROM Production.ProductModel WHERE CONTAINS(*, N'weld');
Figure 10-14. Results of the simple CONTAINS query To use inflectional forms or thesaurus expansions and replacements with CONTAINS, use the FORMSOF generation term in your search condition. Listing 10-6 performs a CONTAINS search on the Name and CatalogDescription columns of the Production.ProductModel table. The results, which include matches for inflectional forms of the word sport, like sports and sporting, are shown in Figure 10-15. Listing 10-6. Sample CONTAINS Query with FORMSOF Inflectional Generation Term SELECT ProductModelID, Name, CatalogDescription FROM Production.ProductModel WHERE CONTAINS ( ( Name, CatalogDescription ), N'FORMSOF(INFLECTIONAL, sport)' );
CHAPTER 10 ■ INTEGRATED FULL-TEXT SEARCH
Figure 10-15. Results of the CONTAINS query with inflectional FORMSOF term The CONTAINS predicate also allows you to combine simple search terms like these with the AND (&), AND NOT (&!), and OR (|) Boolean operators. Listing 10-7 demonstrates combining two search terms in a CONTAINS predicate. The results of this sample query, which retrieves all rows containing inflectional forms of the word sport (like sports) or the word tube in the Name or CatalogDescription columns, are shown in Figure 10-16. Listing 10-7. Compound CONTAINS Search Term SELECT ProductModelID, Name, CatalogDescription FROM Production.ProductModel WHERE CONTAINS ( ( Name, CatalogDescription ), N'"tube" | FORMSOF(INFLECTIONAL, sport)' );
Figure 10-16. Results of the CONTAINS query with a compound search term Listing 10-7 uses FORMSOF to return matches for inflectional forms. You can also use the FORMSOF (THESAURUS, . . . ) format to return matches for expansions and replacements of words, as defined in your language-specific thesaurus files.
287
288
CHAPTER 10 ■ INTEGRATED FULL-TEXT SEARCH
CONTAINS also supports prefix searches using the wildcard asterisk (*) character. Place the search word or phrase, immediately followed by the wildcard character, in double quotes to specify a prefix search. Listing 10-8 demonstrates a simple prefix search to retrieve all rows that have a word starting with the prefix bot in the Name column. The results are shown in Figure 10-17. Listing 10-8. CONTAINS Prefix Search SELECT ProductModelID, Name FROM Production.ProductModel WHERE CONTAINS(Name, N'"bot*"');
Figure 10-17. Results of the CONTAINS prefix search The CONTAINS predicate also supports the NEAR (~) keyword for proximity searches. NEAR will return matches for words that are close to one another in the source columns. Listing 10-9 demonstrates a NEAR proximity search that looks for instances of the word aluminum that occur in close proximity to the word jig in the Instructions column. The results are shown in Figure 10-18.
■Tip The proximity search considers words that are within about 50 words of one another as close enough to be considered a match.
Listing 10-9. CONTAINS Proximity Search SELECT ProductModelID, Name FROM Production.ProductModel WHERE CONTAINS(Instructions, N'aluminum NEAR jig');
CHAPTER 10 ■ INTEGRATED FULL-TEXT SEARCH
Figure 10-18. CONTAINS proximity query results
The FREETEXTTABLE and CONTAINSTABLE Functions SQL Server provides TVF-based counterparts to the FREETEXT and CONTAINSTABLE predicates, known as FREETEXTTABLE and CONTAINSTABLE. These functions operate like the similarly named predicates, but both functions return result sets consisting of a table with two columns, named KEY and RANK. The KEY column contains the key index values relating back to the unique index of matching rows in the source table, and the RANK column contains relevance rankings. The FREETEXTTABLE function accepts the name of the table to search, a single column name or column list, a search string, and an optional language identifier just like the FREETEXT predicate. FREETEXTTABLE can also take an additional “top n by rank” parameter to limit the rows returned to a specific number of the highest-ranked rows. The results of FREETEXTTABLE are useful for joining back to the source table via the KEY column of the results. Listing 10-10 demonstrates a simple FREETEXTTABLE query that locates rows where the word aluminum appears in the Instructions column of the Production.ProductModel table. The results are joined back to the source table to return the ProductModelID and Name, as shown in Figure 10-19. Listing 10-10. FREETEXTTABLE Results Joined to Source Table SELECT ftt.[KEY], ftt.[RANK], pm.ProductModelID, pm.Name FROM FREETEXTTABLE ( Production.ProductModel, Instructions, N'aluminum' ) ftt INNER JOIN Production.ProductModel pm ON ftt.[KEY] = pm.ProductModelID;
289
290
CHAPTER 10 ■ INTEGRATED FULL-TEXT SEARCH
Figure 10-19. Results of the FREETEXTTABLE query The CONTAINSTABLE function offers the advanced search capabilities of the CONTAINS predicate in a function form. The CONTAINSTABLE function accepts the name of the source table, a single column name or list of columns, and a CONTAINS-style search condition. Like FREETEXTTABLE, the CONTAINSTABLE function also accepts an optional language identifier and “top n by rank” parameter. Listing 10-11 demonstrates the CONTAINSTABLE function in a simple keyword search that retrieves KEY and RANK values for all rows containing inflectional forms of the word tours. The results are shown in Figure 10-20. Listing 10-11. Simple CONTAINSTABLE Query SELECT [KEY], [RANK] FROM CONTAINSTABLE ( Production.ProductModel, [Name], N'FORMSOF(INFLECTIONAL, tours)' );
Figure 10-20. Results of the CONTAINSTABLE query with inflectional forms
CHAPTER 10 ■ INTEGRATED FULL-TEXT SEARCH
CONTAINSTABLE supports all of the options supported by the CONTAINS predicate, including the ISABOUT term, which assigns weights to the matched words it locates. With ISABOUT, each search word is assigned a weight value between 0.0 and 1.0. CONTAINSTABLE applies the weight to the relevance rankings returned in the RANK column. Listing 10-12 shows two CONTAINSTABLE queries. The first query returns all products with the words aluminum or polish in their XML Instructions column. The second query uses ISABOUT to assign each of these words a weight between 0.0 and 1.0, which is then applied to the result RANK for each row. The results, shown in Figure 10-21, demonstrate how ISABOUT weights can rearrange the rankings of your CONTAINSTABLE query results. Listing 10-12. ISABOUT in a CONTAINSTABLE Query SELECT ct.[RANK], ct.[KEY], pm.[Name] FROM CONTAINSTABLE ( Production.ProductModel, Instructions, N'aluminum OR polish' ) ct INNER JOIN Production.ProductModel pm ON ct.[KEY] = pm.ProductModelID ORDER BY ct.[RANK] DESC; SELECT ct.[RANK], ct.[KEY], pm.[Name] FROM CONTAINSTABLE ( Production.ProductModel, Instructions, N'ISABOUT(aluminum WEIGHT(1.0), polish WEIGHT(0.1))' ) ct INNER JOIN Production.ProductModel pm ON ct.[KEY] = pm.ProductModelID ORDER BY ct.[RANK] DESC;
291
292
CHAPTER 10 ■ INTEGRATED FULL-TEXT SEARCH
Figure 10-21. Changing result set rankings with ISABOUT
Thesauruses and Stoplists The FREETEXT predicate and FREETEXTTABLE function automatically perform word stemming for inflectional forms and thesaurus expansions and replacements. The CONTAINS predicate and CONTAINSTABLE function require you to explicitly specify that you want inflectional forms and thesaurus expansions and replacements with the FORMSOF term. While inflectional forms include verb conjugations and plural forms of words, thesaurus functionality is based on usermanaged XML files that define word replacement and expansion patterns. Each language-specific thesaurus is located in an XML file in the MSSQL\FTDATA directory of your SQL Server installation. The thesaurus files are named using the format tsnnn.xml, where nnn is a three-letter code representing a specific language. The file name tsenu.xml, for instance, is the US English thesaurus. To demonstrate the iFTS thesaurus capabilities, I’ll begin by creating a new full-text index on the Production.Product table using the code in Listing 10-13. Listing 10-13. Creating a Full-Text Index CREATE FULLTEXT INDEX ON Production.Product ( Name LANGUAGE English, Color LANGUAGE English ) KEY INDEX PK_Product_ProductID ON (AdventureWorksFTCat) WITH ( CHANGE_TRACKING AUTO, STOPLIST = SYSTEM ); GO
CHAPTER 10 ■ INTEGRATED FULL-TEXT SEARCH
ALTER FULLTEXT INDEX ON Production.Product ENABLE; GO You can edit the thesaurus XML files with a simple text editor or a more advanced XML editor. For this example, I opened the tsenu.xml thesaurus file in Notepad, made the appropriate changes, and saved the file back to the MSSQL\FTDATA directory. The contents of the tsenu.xml file, after my edits, are shown in Listing 10-14. Listing 10-14. tsenu.xml US English XML Thesaurus File
0
thin flat
sapphire indigo navy blue
After editing the XML thesaurus file, you can use the sys.sp_fulltext_load_thesaurus_file stored procedure (SP) to reload the thesaurus file. This procedure accepts an integer LCID parameter, as shown in Listing 10-15. The LCID used in the listing is 1033, which specifies US English.
■Note Unlike previous versions of SQL Server, reloading a thesaurus in SQL Server 2008 does not require a SQL Server service restart.
Listing 10-15. Reloading US English XML Thesaurus EXEC sys.sp_fulltext_load_thesaurus_file 1033; GO The diacritics_sensitive element of the thesaurus file indicates whether accent marks are replaced during expansion and replacement. For instance, if diacritics_sensitive is set to 0, the words cafe and café are considered equivalent for purposes of the thesaurus. If diacritics_sensitive is set to 1, however, these two words would be considered different.
293
294
CHAPTER 10 ■ INTEGRATED FULL-TEXT SEARCH
The expansion element indicates substitutions that should be applied during the full-text query. The word being searched is expanded to match the other words in the expansion set. In the example, if the user queries for the word thin, the search is automatically expanded to include matches for the word flat, and vice versa. An expansion set can include as many substitutions as you care to define, and the thesaurus can contain as many expansion sets as you need. The sample FREETEXT query in Listing 10-16 shows the expansion sets in action, with partial results shown in Figure 10-22. Listing 10-16. FREETEXT Query with Thesaurus Expansion Sets SELECT ProductID, Name FROM Production.Product WHERE FREETEXT(*, N'flat');
Figure 10-22. Partial results of the full-text query with expansion sets The replacement section of the thesaurus file indicates replacements for words that are used in a full-text query. In the example, I’ve defined patterns like navy, sapphire, and indigo, which will be replaced with the word blue. The result is that a full-text query for these replacement patterns will be converted internally to a search for blue. Listing 10-17 shows a FREETEXT query that uses the replacement patterns defined in the thesaurus. You can use any of the replacement patterns defined in the thesaurus file in the full-text query to get the same result. Figure 10-23 shows the results. Listing 10-17. FREETEXT Query with Thesaurus Replacement Patterns SELECT ProductID, Name, Color FROM Production.Product WHERE FREETEXT(*, N'navy');
CHAPTER 10 ■ INTEGRATED FULL-TEXT SEARCH
Figure 10-23. Partial results of the full-text query with replacement sets Previous versions of FTS had system-defined lists of noise words, which provided a way to essentially ignore commonly occurring words that don’t help the search. Commonly cited noise words included those like the, a, an, and others. The noise word implementation in previous versions stored the noise words in files in the file system. In SQL Server 2008, there’s a new implementation of the classic noise words, known in iFTS as stopwords. Stopwords are managed inside the SQL Server database using structures known as stoplists. You can use the system-supplied stoplists or create and manage your own language-specific stoplists with the CREATE FULLTEXT STOPLIST, ALTER FULLTEXT STOPLIST, and DROP FULLTEXT STOPLIST statements. The statement in Listing 10-18 creates a stoplist based on the system stoplist. Listing 10-18. Creating a Full-Text Stoplist CREATE FULLTEXT STOPLIST AWStoplist FROM SYSTEM STOPLIST; GO Stoplists are more flexible than the old noise word lists since you can easily use T-SQL statements to add words to your stoplists. Consider AdventureWorks product model searches where the word instructions appears in several of the XML documents in the Instructions column. You can add the word instructions to the previously created stoplist with the ALTER FULLTEXT STOPLIST statement, and then associate the stoplist with the full-text index on the Production.ProductModel table via the ALTER FULLTEXT INDEX statement, as shown in Listing 10-19. This will effectively ignore the word instructions during full-text searches on this column. Listing 10-19. Adding the Word “instructions” to the Stoplist ALTER FULLTEXT STOPLIST AWStoplist ADD N'instructions' LANGUAGE English; GO
295
296
CHAPTER 10 ■ INTEGRATED FULL-TEXT SEARCH
ALTER FULLTEXT INDEX ON Production.ProductModel SET STOPLIST AWStoplist; GO After application of the newly created stoplist, a full-text query against the Production. ProductModel table for the word instructions, as shown in Listing 10-20, will return no results. Listing 10-20. Full-Text Query with Newly Created Stoplist SELECT ProductModelID, Name FROM Production.ProductModel WHERE FREETEXT(*, N'instructions');
Stored Procedures and Dynamic Management Views and Functions SQL Server 2008 provides access to many of the legacy FTS SPs available in previous releases of SQL Server. Most of these procedures have been deprecated, however, and have been replaced by fully integrated T-SQL statements and dynamic management views and functions. SQL Server 2008 does introduce two new SPs to aid in iFTS management. The first is the sys.sp_fulltext_load_thesaurus_file procedure that I introduced earlier in this chapter to load an XML thesaurus file. The second is the sys.sp_fulltext_resetfdhostaccount procedure that updates the Windows username and password that SQL Server uses to start the new filter daemon service. A big issue for developers who used FTS in prior versions of SQL Server was the lack of transparency. Basically everything that FTS did was well hidden from view, and developers and administrators had to troubleshoot FTS issues in the dark. SQL Server 2008 introduces some new catalog views and dynamic management functions that make iFTS more transparent. If you’re experiencing iFTS query performance issues, the sys.fulltext_index_fragments catalog view can provide insight. This catalog view reports full-text index fragments and their status. You can use the information in this catalog view to decide if it’s time to reorganize your full-text index. The sys.fulltext_stoplists and sys.fulltext_stopwords catalog views let you see the user-defined stopwords and stoplists defined in the current database. The information returned by these catalog views is useful for troubleshooting issues with certain words being ignored (or not being ignored) in full-text queries. The sys.fulltext_system_stopwords catalog view returns a row for every stopword in the system stoplist, which is useful information to have if you want to use the system stoplist as the basis for your own stoplists. The sys.dm_fts_parser function is a useful tool for troubleshooting full-text queries. This function accepts a full-text query string, an LCID, a stoplist ID, and an accent sensitivity setting. The result returned by the function shows the results produced by the word breaker and stemmer for any given full-text query. This information is very useful if you need to troubleshoot or
CHAPTER 10 ■ INTEGRATED FULL-TEXT SEARCH
just want to better understand exactly how the word breaker and stemmer affect your queries. Listing 10-21 is a simple demonstration of stemming the word had with the sys.dm_fts_parser function. Results are shown in Figure 10-24. Listing 10-21. Using sys.dm_fts_parser to See Word Breaking and Stemming SELECT keyword, group_id, phrase_id, occurrence, special_term, display_term, expansion_type, source_term FROM sys.dm_fts_parser ( N'FORMSOF(FREETEXT, had)', 1033, NULL, 0 );
Figure 10-24. Results of word-breaking and stemming the word “had”
Summary SQL Server 2008 iFTS marks a big improvement in SQL Server FTS technology. The new iFTS functionality is better integrated with SQL Server than previous versions, providing more efficient full-text queries than ever before. Full-text indexes and stoplists are stored in the database, making iFTS more manageable, flexible, and scalable than in previous releases. SQL Server provides the powerful FREETEXT and CONTAINS predicates, and FREETEXTTABLE and CONTAINSTABLE functions, to perform full-text searches. SQL Server also supports thesaurus and stoplist functionality to help customize iFTS. SQL Server 2008 also provides new dynamic management views and functions to make FTS more transparent and easier to troubleshoot than was the case in previous versions of SQL Server.
297
298
CHAPTER 10 ■ INTEGRATED FULL-TEXT SEARCH
EXERCISES 1. [True/false] Stoplists and full-text indexes are stored in the database. 2. [Choose one] You can create a full-text index using which of the following methods: a.
Using a wizard in SSMS
b.
Using the T-SQL CREATE FULLTEXT INDEX statement
c.
Both (a) and (b)
d.
None of the above
3. [Fill in the blanks] The FREETEXT predicate automatically performs word stemming and thesaurus ___ and ___. 4. [Fill in the blank] Stoplists contain stopwords, which are words that are ___ during full-text querying. 5. [True/false] The sys.dm_fts_parser dynamic management function shows the results produced by word breaking and stemming.
CHAPTER
11
XML S
QL Server 2008 continues the standard for XML integration introduced with the SQL Server 2005 release. The new generation of XML support offers much tighter integration with T-SQL through the xml data type, support for the World Wide Web Consortium (W3C) XQuery and XML Schema recommendations, and improvements to legacy XML functionality. SQL Server 2008’s tight XML integration and the xml data type provide streamlined methods of performing several XML-related tasks that used to require clunky code to interface with COM objects and other tools external to the SQL Server engine. This chapter discusses the new xml data type and the XML tools built into T-SQL to take advantage of this new functionality.
Legacy XML T-SQL support for XML was introduced with the release of SQL Server 2000 via the FOR XML clause of the SELECT statement, the OPENXML rowset provider, and the sp_xml_preparedocument and sp_xml_removedocument system SPs. In this section, I’ll discuss the legacy OPENXML, sp_xml_preparedocument, and sp_xml_removedocument functionality. Though these tools still exist in SQL Server 2008 and can be used for backward-compatibility scripts, they are awkward and kludgy to use.
OPENXML OPENXML is a legacy XML function that provides a rowset view of XML data. The process of converting XML data to relational form is known as shredding. OPENXML is technically a rowset provider, which means its contents can be queried and accessed like a table. The legacy SQL Server XML functionality requires the sp_xml_preparedocument and sp_xml_removedocument system SPs to parse text into an XML document and clean up afterward. These procedures are used in conjunction with the OPENXML function to move XML data from its textual representation into a parsed internal representation of an XML document, and from there into a tabular format. This method is rather clunky compared to the newer methods first introduced by SQL Server 2005, but you might need it if you’re writing code that needs to be backward compatible with SQL Server 2000. The OPENXML method has certain disadvantages based on its heritage, some of which are listed here:
299
300
CHAPTER 11 ■ XML
• OPENXML relies on COM to invoke the Microsoft XML Core Services Library (MSXML) to perform XML manipulation and shredding. • When it is invoked, MSXML assigns one-eighth of SQL Server’s total memory to the task of parsing and manipulating XML data. • If you fail to call sp_xml_removedocument after preparing an XML document with the sp_xml_preparedocument procedure, it won’t be removed from memory until the SQL Server service is restarted.
■Tip I strongly recommend using xml data type methods like nodes(), value(), and query() to shred your XML data instead of using OPENXML. I’ll discuss these xml data type methods later in this chapter, in the section titled “The xml Data Type Methods.”
The sample query in Listing 11-1 is a simple demonstration of using OPENXML to shred XML data. The partial results of this query are shown in Figure 11-1. Listing 11-1. Simple OPENXML Query DECLARE @docHandle int; DECLARE @xmlDocument nvarchar(max) = N'
'; EXECUTE sp_xml_preparedocument @docHandle OUTPUT, @xmlDocument; SELECT Id, ParentId, NodeType, LocalName,
CHAPTER 11 ■ XML
Prefix, NameSpaceUri, DataType, Prev, [Text] FROM OPENXML(@docHandle, N'/Customers/Customer'); EXECUTE sp_xml_removedocument @docHandle; GO
Figure 11-1. Results of the OPENXML query The first step in using OPENXML is to call the sp_xml_preparedocument SP to convert an XML-formatted string into an XML document: DECLARE @docHandle int; DECLARE @xmlDocument nvarchar(max) = N'
'; EXECUTE sp_xml_preparedocument @docHandle OUTPUT, @xmlDocument;
301
302
CHAPTER 11 ■ XML
The sp_xml_preparedocument procedure invokes MSXML to parse your XML document into an internal Document Object Model (DOM) tree representation of the nodes. The sp_xml_preparedocument procedure accepts up to three parameters, as follows: • The first parameter, called hdoc, is an output parameter that returns an int handle to the XML document created by the SP. • The second parameter is the original XML document. This parameter is known as xmltext, and can be a char, nchar, varchar, nvarchar, text, ntext, or xml data type. If NULL is passed in or the xmltext parameter is omitted, an empty XML document is created. The default for this parameter is NULL. • A third optional parameter, xpath_namespaces, specifies the namespace declarations used in OPENXML XPath expressions. Like xmltext, the xpath_namespaces parameter can be a char, nchar, varchar, nvarchar, text, ntext, or xml data type. The default xpath_namespaces value is . The OPENXML rowset provider shreds the internal DOM representation of the XML document into relational format. The result of the rowset provider can be queried like a table or view, as shown following: SELECT Id, ParentId, NodeType, LocalName, Prefix, NameSpaceUri, DataType, Prev, [Text] FROM OPENXML(@docHandle, N'/Customers/Customer'); The OPENXML rowset provider accepts up to three parameters: • The first parameter, hdoc, is the int document handle returned by the call to the sp_xml_preparedocument procedure. • The second parameter, known as rowpattern, is an nvarchar XPath query pattern that determines which nodes of the XML document are returned as rows. • The third parameter is an optional flags parameter. This tinyint value specifies the type of mapping to be used between the XML data and the relational rowset. If specified, flags can be a combination of the values listed in Table 11-1.
CHAPTER 11 ■ XML
Table 11-1. OPENXML Flags Parameter Options
Value
Name
Description
0
DEFAULT
A flags value of 0 tells OPENXML to default to attribute-centric mapping. This is the default value if the flags parameter is not specified.
1
XML_ATTRIBUTES
A flags value of 1 indicates that OPENXML should use attributecentric mapping.
2
XML_ELEMENTS
A flags value of 2 indicates that OPENXML should use elementcentric mapping.
3
XML_ATTRIBUTES | XML_ELEMENTS
Combining the XML_ATTRIBUTES flag value with the XML_ELEMENTS flag value (logical OR) indicates that attributecentric mapping should be applied first, and element-centric mapping should be applied to all columns not yet dealt with.
8
A flags value of 8 indicates that the consumed data should not be copied to the overflow property @mp:xmltext. This value can be combined (logical OR) with any of the other flags values.
The internal XML document generated by sp_xml_preparedocument is cached and will continue to take up SQL Server memory until it is explicitly removed with the sp_xml_removedocument procedure. The sp_xml_removedocument procedure accepts a single parameter, the int document handle initially generated by sp_xml_preparedocument: EXECUTE sp_xml_removedocument @docHandle;
■Caution Always call sp_xml_removedocument to free up memory used by XML documents created with sp_xml_createdocument. Any XML documents created with sp_xml_createdocument remain in memory until sp_xml_removedocument is called or the SQL Server service is restarted. Microsoft advises that not freeing up memory with sp_xml_removedocument could cause your server to run out of memory.
OPENXML Result Formats The sample in Listing 11-1 returns a table in edge table format, which is the default OPENXML rowset format. According to BOL, “Edge tables represent the fine-grained XML document structure . . . in a single table” (http://msdn2.microsoft.com/en-us/library/ ms186918(SQL.100).aspx). The columns returned by the edge table format are shown in Table 11-2.
303
304
CHAPTER 11 ■ XML
Table 11-2. Edge Table Format
Column Name
Data Type
Description
id
bigint
The unique ID of the document node. The root element ID is 0.
parentid
bigint
The identifier of the parent of the node. If the node is a top-level node, the parentid is NULL.
nodetype
int
The column that indicates the type of the node. It can be 1 for an element node, 2 for an attribute node, or 3 for a text node.
localname
nvarchar
The local name of the element or attribute, or NULL if the DOM object does not have a name.
prefix
nvarchar
The namespace prefix of the node.
namespaceuri
nvarchar
The namespace URI of the node, or NULL if there’s no namespace.
datatype
nvarchar
The data type of the element or attribute row, which is inferred from the inline DTD or inline schema.
prev
bigint
The XML ID of the previous sibling element, or NULL if there is no direct previous sibling.
text
ntext
The attribute value or element content.
OPENXML supports an optional WITH clause to specify a user-defined format for the returned rowset. The WITH clause lets you specify the name of an existing table or a schema declaration to define the rowset format. By adding a WITH clause to the OPENXML query in Listing 11-1, you can specify an explicit schema for the resulting rowset. This technique is demonstrated in Listing 11-2, with results shown in Figure 11-2. The differences between Listings 11-2 and 11-1 are shown in bold. Listing 11-2. OPENXML and WITH Clause, Explicit Schema DECLARE @docHandle int; DECLARE @xmlDocument nvarchar(max) = N'
';
CHAPTER 11 ■ XML
EXECUTE sp_xml_preparedocument @docHandle OUTPUT, @xmlDocument; SELECT CustomerID, CustomerName, CompanyName, OrderDate FROM OPENXML(@docHandle, N'/Customers/Customer/Orders/Order') WITH ( CustomerID nchar(4) N'../../@CustomerID', CustomerName nvarchar(50) N'../../@ContactName', CompanyName nvarchar(50) N'../../@CompanyName', OrderDate datetime ); EXECUTE sp_xml_removedocument @docHandle; GO
Figure 11-2. Results of OPENXML with an explicit schema declaration The OPENXML WITH clause can also use the schema from an existing table to format the relational result set. This is demonstrated in Listing 11-3. The differences between Listing 11-3 and 11-2 are shown in bold. Listing 11-3. OPENXML with WITH Clause, Existing Table Schema DECLARE @docHandle int; DECLARE @xmlDocument nvarchar(max) = N'
305
306
CHAPTER 11 ■ XML
'; EXECUTE sp_xml_preparedocument @docHandle OUTPUT, @xmlDocument; CREATE TABLE #CustomerInfo ( CustomerID nchar(4) NOT NULL, ContactName nvarchar(50) NOT NULL, CompanyName nvarchar(50) NOT NULL ); CREATE TABLE #OrderInfo ( CustomerID nchar(4) NOT NULL, OrderDate datetime NOT NULL ); INSERT INTO #CustomerInfo ( CustomerID, ContactName, CompanyName ) SELECT CustomerID, ContactName, CompanyName FROM OPENXML(@docHandle, N'/Customers/Customer') WITH #CustomerInfo; INSERT INTO #OrderInfo ( CustomerID, OrderDate ) SELECT CustomerID, OrderDate FROM OPENXML(@docHandle, N'//Order') WITH #OrderInfo;
CHAPTER 11 ■ XML
SELECT c.CustomerID, c.ContactName, c.CompanyName, o.OrderDate FROM #CustomerInfo c INNER JOIN #OrderInfo o ON c.CustomerID = o.CustomerID; DROP TABLE #OrderInfo; DROP TABLE #CustomerInfo; EXECUTE sp_xml_removedocument @docHandle; GO The WITH clause used by each OPENXML query in Listing 11-3 specifies a table name. OPENXML uses the table’s schema to define the relational format of the result returned.
FOR XML Clause SQL Server 2000 introduced the FOR XML clause for use with the SELECT statement to efficiently convert relational data to XML format. The FOR XML clause is highly flexible and provides a wide range of options that give you fine-grained control over your XML result.
FOR XML RAW The FOR XML clause appears at the end of the SELECT statement and can specify one of five different modes and several mode-specific options. The first FOR XML mode is RAW mode, which returns data in XML format with each row represented as a node with attributes representing the columns. FOR XML RAW is useful for ad hoc FOR XML queries while debugging and testing. The FOR XML RAW clause allows you to specify the element name for each row returned in parentheses immediately following the RAW keyword (if you leave it off, the default name, row, is used). The query in Listing 11-4 demonstrates FOR XML RAW, with results shown in Figure 11-3. Listing 11-4. Sample FOR XML RAW Query SELECT ProductID, Name, ProductNumber FROM Production.Product WHERE ProductID = 770 FOR XML RAW;
307
308
CHAPTER 11 ■ XML
Figure 11-3. Results of the FOR XML RAW query The FOR XML clause modes support several additional options to control the resulting output. The options supported by all FOR XML modes are shown in Figure 11-4.
Figure 11-4. FOR XML clause options The options supported by FOR XML RAW mode include the following: • The TYPE option specifies that the result should be returned as an xml data type instance. This is particularly useful when you use FOR XML in nested subqueries. By default, without the TYPE option, all FOR XML modes return XML data as a character string. • The ROOT option adds a single top-level root element to the XML result. Using the ROOT option guarantees a well-formed XML (single root element) result.
CHAPTER 11 ■ XML
• The ELEMENTS option specifies that column data should be returned as subelements instead of attributes in the XML result. The ELEMENTS option can have the following additional options: • XSINIL specifies that columns with SQL nulls are included in the result with an xsi:nil attribute set to true. • ABSENT specifies that no elements are created for SQL nulls. ABSENT is the default action for handling nulls. • The BINARY BASE64 option specifies that binary data returned by the query should be represented in Base64-encoded form in the XML result. If your result contains any binary data, the BINARY BASE64 option is required. • XMLSCHEMA returns an inline XML schema definition (the W3C XML Schema Recommendation is available at www.w3.org/XML/Schema). • XMLDATA appends an XML-Data Reduced (XDR) schema to the beginning of your XML result. This option is deprecated and should not be used for future development. If you currently use this option, Microsoft recommends changing your code to use the XMLSCHEMA option instead. As I discuss the other FOR XML modes, I will point out the options supported by each.
FOR XML AUTO For a query against a single table, the AUTO keyword retrieves data in a format similar to RAW mode, but the XML node name is the name of the table and not the generic label row. For queries that join multiple tables, however, each XML element is named for the tables from which the SELECT list columns are retrieved. The order of the column names in the SELECT list determine the XML element nesting in the result. The FOR XML AUTO clause is called similarly to the FOR XML RAW clause, as shown in Listing 11-5. The results are shown in Figure 11-5. Listing 11-5. FOR XML AUTO Query on a Single Table SELECT ProductID, Name, ProductNumber FROM Production.Product WHERE ProductID = 770 FOR XML AUTO;
309
310
CHAPTER 11 ■ XML
Figure 11-5. Results of the FOR XML AUTO single-table query Listing 11-6 demonstrates using FOR XML AUTO in a SELECT query that joins two tables. The results are shown in Figure 11-6. Listing 11-6. FOR XML AUTO Query with a Join SELECT Product.ProductID, Product.Name, Product.ProductNumber, Inventory.Quantity FROM Production.Product Product INNER JOIN Production.ProductInventory Inventory ON Product.ProductID = Inventory.ProductID WHERE Product.ProductID = 770 FOR XML AUTO;
Figure 11-6. Results of the FOR XML AUTO query with a join The FOR XML AUTO statement can be further refined by adding the ELEMENTS option. Just as with the FOR XML RAW clause, the ELEMENTS option transforms the XML column attributes into subelements, as demonstrated in Listing 11-7, with results shown in Figure 11-7.
CHAPTER 11 ■ XML
Listing 11-7. FOR XML AUTO Query with ELEMENTS Option SELECT ProductID, Name, ProductNumber FROM Production.Product WHERE ProductID = 770 FOR XML AUTO, ELEMENTS;
Figure 11-7. Results of the FOR XML AUTO query with the ELEMENTS option The FOR XML AUTO clause can accept almost all of the same options as the FOR XML RAW clause. The only option that you can use with FOR XML RAW that’s not available to FOR XML AUTO is the user-defined ElementName option, since AUTO mode generates row names based on the names of tables in the query.
FOR XML EXPLICIT The FOR XML EXPLICIT clause is flexible but complex. This clause allows you to specify the exact hierarchy of XML elements and attributes in your XML result. This structure is specified in the SELECT statement itself using a special ElementName!TagNumber!AttributeName!Directive notation.
■Tip The FOR
XML PATH clause, described in the next section, also allows you to explicitly define your XML result structure. The FOR XML PATH clause accepts XPath-style syntax to define the structure and node names, however, and is much easier to use than FOR XML EXPLICIT. As a general recommendation, I would advise using FOR XML PATH instead of FOR XML EXPLICIT for new development and converting old FOR XML EXPLICIT queries to FOR XML PATH when possible.
311
312
CHAPTER 11 ■ XML
In order to get FOR XML EXPLICIT to convert your relational data to XML format, there’s a strict requirement on the results of the SELECT query—it must return data in universal table format that includes a Tag column defining the level of the current tag and a Parent column with the parent level for the current tag. The remaining columns in the query are the actual data columns. Listing 11-8 demonstrates a FOR XML EXPLICIT query that returns information about a product, including all of its inventory quantities, as a nested XML result. The results are shown in Figure 11-8. Listing 11-8. FOR XML EXPLICIT Query SELECT 1 AS Tag, NULL AS Parent, ProductID AS [Products!1!ProductID!element], Name AS [Products!1!ProductName], ProductNumber AS [Products!1!ProductNumber], NULL AS [Products!2!Quantity] FROM Production.Product WHERE ProductID = 770 UNION ALL SELECT 2 AS Tag, 1 AS Parent, NULL, NULL, NULL, Quantity FROM Production.ProductInventory WHERE ProductID = 770 FOR XML EXPLICIT;
Figure 11-8. Results of the FOR XML EXPLICIT query
CHAPTER 11 ■ XML
The FOR XML EXPLICIT query in Listing 11-8 defines the top-level elements with Tag = 1 and Parent = NULL. The next level is defined with Tag = 2 and Parent = 1, referencing back to the top level. Additional levels can be added by using the UNION keyword with additional queries that increment the Tag and Parent references for each additional level. Each column of the query must be named with the ElementName!TagNumber!Attribute➥ Name!Directive format that I mentioned previously. As specified by this format, ElementName is the name of the XML element, in this case Products. TagNumber is the level of the element, which is 1 for top-level elements. AttributeName is the name of the attribute if you want the data in the column to be returned as an XML attribute. If you want the item to be returned as an XML element, use AttributeName to specify the name of the attribute, and set the Directive value to element. The Directive values that can be specified include the following: • The hide directive value, which is useful when you want to retrieve values for sorting purposes but do not want the specified node included in the resulting XML. • The element directive value, which generates an XML element instead of an attribute. • The elementxsinil directive value, which generates an element for SQL null column values. • The xml directive value, which generates an element instead of an attribute, but does not encode entity values. • The cdata directive value, which wraps the data in a CDATA section and does not encode entities. • The xmltext directive value, which wraps the column content in a single tag integrated with the document. • The id, idref, and idrefs directive values, which allow you to create internal document links. The additional options that the FOR XML EXPLICIT clause supports are BINARY BASE64, TYPE, ROOT, and XMLDATA. These options operate the same as they do in the FOR XML RAW and FOR XML AUTO clauses.
FOR XML PATH The FOR XML PATH clause was first introduced in SQL Server 2005. It provides another way to convert relational data to XML format with a specific structure, but is much easier to use than the FOR XML EXPLICIT clause. Like FOR XML EXPLICIT, the FOR XML PATH clause makes you define the structure of the XML result. But the FOR XML PATH clause allows you to use a subset of the well-documented and much more intuitive XPath syntax to define your XML structure. The FOR XML PATH clause uses column names to define the structure, as with FOR XML EXPLICIT. In keeping with the XML standard, column names in the SELECT statement with a FOR XML PATH clause are case sensitive. For instance, a column named Inventory is different from a column named INVENTORY. Any columns that do not have names are inlined, with their content inserted as XML content for xml data type columns or as a text node for other data types. This is useful for including the results of nameless computed columns or scalar subqueries in your XML result.
313
314
CHAPTER 11 ■ XML
FOR XML PATH uses XPath-style path expressions to define the structure and names of nodes in the XML result. Because path expressions can contain special characters like the forward slash (/) and at sign (@), you will usually want to use quoted column aliases as shown in Listing 11-9. The results of this sample FOR XML PATH query are shown in Figure 11-9. Listing 11-9. FOR XML PATH Query SELECT p.ProductID AS "Product/@ID", p.Name AS "Product/Name", p.ProductNumber AS "Product/Number", i.Quantity AS "Product/Quantity" FROM Production.Product p INNER JOIN Production.ProductInventory i ON p.ProductID = i.ProductID WHERE p.ProductID = 770 FOR XML PATH;
Figure 11-9. Results of the FOR XML PATH query The FOR XML PATH clause imposes some rules on column naming, since the column names define not only the names of the XML nodes generated, but also the structure of the XML result. You can also use XPath node tests in your FOR XML PATH clauses. These rules and node tests are summarized in Table 11-3.
CHAPTER 11 ■ XML
Table 11-3. FOR XML PATH Column-Naming Conventions
Column Name
Result
text()
The string value of the column is added as a text node.
comment()
The string value of the column is added as an XML comment.
node()
The string value of the column is inserted inline under the current element.
*
This is the same as node().
data()
The string value of the column is inserted as an atomic value. Spaces are inserted between atomic values in the resulting XML.
processing-instruction(name)
The string value of the column is inserted as an XMLprocessing instruction named name.
@name
The string value of the column is inserted as an attribute of the current element.
name
The string value of the column is inserted as a subelement of the current element.
elem/name
The string value of the column is inserted as a subelement of the specified element hierarchy, under the element specified by elem.
elem/@name
The string value of the column is inserted as an attribute of the last element in specified hierarchy, under the element specified by elem.
The FOR XML PATH clause supports the BINARY BASE64, TYPE, ROOT, and ELEMENTS options, and the user-defined ElementName options. The additional FOR XML PATH options operate the same as they do for the FOR XML AUTO and FOR XML RAW clauses.
The xml Data Type SQL Server’s legacy XML functionality can be cumbersome and clunky to use at times. Fortunately, SQL Server 2008 provides much tighter XML integration with its xml data type. The xml data type can be used anywhere that other SQL Server data types are used, including variable declarations, column declarations, SP parameters, and UDF parameters and return types. The T-SQL xml data type provides built-in methods that allow you to query and modify XML nodes. When you declare instances of the xml data type, you can create them as untyped (which is the default), or you can associate them with XML schemas to create typed xml instances. This section discusses both typed and untyped xml in T-SQL. The xml data type can hold complete XML documents or XML fragments. An XML document must follow all the rules for well-formed XML, including the following: • Well-formed XML must have at least one element. • Every well-formed XML document has a single top-level, or root, element.
315
316
CHAPTER 11 ■ XML
• Well-formed XML requires properly nested elements (tags cannot overlap). • All tags must be properly closed in a well-formed XML document. • Attribute values must be quoted in a well-formed XML document. • Special characters in element content must be properly entitized, or converted to XML entities such as & for the ampersand character. An XML fragment must conform to all the rules for well-formed XML, except that it may have more than one top-level element. The stored internal representation of an XML document or fragment stored in an xml variable or column maxes out at around 2.1 GB of storage.
Untyped xml Untyped xml variables and columns are created by following them with the keyword xml in the declaration, as shown in Listing 11-10. Listing 11-10. Untyped xml Variable and Column Declarations DECLARE @x XML; CREATE TABLE XmlPurchaseOrders ( PoNum int NOT NULL PRIMARY KEY, XmlPurchaseOrder xml ); Populating an xml variable or column with an XML document or fragment requires a simple assignment statement. You can implicitly or explicitly convert char, varchar, nchar, nvarchar, varbinary, text, and ntext data to xml. There are some rules to consider when converting from these types to xml: • The XML parser always treats nvarchar, nchar, and ntext data as a two-byte Unicodeencoded XML document or fragment. • SQL Server treats char, varchar, and text data as a single-byte-encoded XML document or fragment. The code page of the source string, variable, or column is used for encoding by default. • The content of varbinary data is passed directly to the XML parser, which accepts it as a stream. If the varbinary XML data is Unicode encoded, the byte-order mark/encoding information must be included in the varbinary data. If no byte-order mark/encoding information is included, the default of UTF-8 is used.
■Note The binary data type can also be implicitly or explicitly converted to xml, but it must be the exact length of the data it contains. The extra padding applied to binary variables and columns when the data they contain is too short can cause errors in the XML-parsing process. Use the varbinary data type when you need to convert binary data to XML.
CHAPTER 11 ■ XML
Listing 11-11 demonstrates implicit conversion from nvarchar to the xml data type. The CAST or CONVERT functions can be used when an explicit conversion is needed. Listing 11-11. Populating an Untyped xml Variable DECLARE @x xml = N'
47.642737 -122.130395 ONE MICROSOFT WAY REDMOND WA 98052 US '; SELECT @x;
Typed xml To create a typed xml variable or column in SQL Server 2008, you must first create an XML schema collection with the CREATE XML SCHEMA COLLECTION statement. The CREATE XML SCHEMA COLLECTION statement allows you to specify a SQL Server name for your schema collection and an XML schema to add. Listing 11-12 shows how to create an XML schema collection. Listing 11-12. Creating a Typed xml Variable CREATE XML SCHEMA COLLECTION AddressSchemaCollection AS N'
'; GO
317
318
CHAPTER 11 ■ XML
DECLARE @x XML (CONTENT AddressSchemaCollection); SELECT @x = N'
47.642737 -122.130395 ONE MICROSOFT WAY REDMOND WA 98052 US '; SELECT @x; DROP XML SCHEMA COLLECTION AddressSchemaCollection; GO The first step in creating a typed xml instance is to create an XML schema collection, as I did in Listing 11-12: CREATE XML SCHEMA COLLECTION AddressSchemaCollection AS N'
';
■Tip The World Wide Web Consortium (W3C) maintains the standards related to XML schemas. The official XML Schema recommendations are available at www.w3.org/TR/xmlschema-1/ and www.w3.org/TR/ xmlschema-2/. These W3C recommendations are an excellent starting point for creating your own XML schemas.
CHAPTER 11 ■ XML
The next step is to declare the variable as xml type, but with an XML schema collection specification included: DECLARE @x XML (CONTENT AddressSchemaCollection); In the example, I used the CONTENT keyword before the schema collection name in the xml variable declaration. SQL Server offers two keywords, DOCUMENT and CONTENT, that represent facets you can use to constrain typed xml instances. Using the DOCUMENT facet in your typed xml variable or column declaration constrains your typed XML data so that it must contain only one top-level root element. The CONTENT facet allows zero or more top-level elements. CONTENT is the default if neither is specified explicitly. The next step in the example is the assignment of XML content to the typed xml variable. During the assignment, SQL Server validates the XML content against the XML schema collection. SELECT @x = N'
47.642737 -122.130395 ONE MICROSOFT WAY REDMOND WA 98052 US '; SELECT @x; The DROP XML SCHEMA COLLECTION statement in the listing removes the XML schema collection from SQL Server. DROP XML SCHEMA COLLECTION AddressSchemaCollection; You can also add new XML schemas and XML schema components to XML schema collections with the ALTER XML SCHEMA COLLECTION statement.
The xml Data Type Methods The xml data type has several methods for querying and modifying xml data. The built-in xml data type methods are summarized in Table 11-4.
319
320
CHAPTER 11 ■ XML
Table 11-4. xml Data Type Methods
Method
Result
query(xquery)
Performs an XQuery query against an xml instance. The result returned is an untyped xml instance.
value(xquery, sql_type)
Performs an XQuery query against an xml instance and returns a scalar value of the specified SQL Server data type.
exist(xquery)
Performs an XQuery query against an xml instance and returns one of the following bit values: 1 if the xquery expression returns a nonempty result 0 if the xquery expression returns an empty result NULL if the xml instance is NULL
modify(xml_dml)
Performs an XML Data Modification Language (XML DML) statement to modify an xml instance.
nodes(xquery) as table_name(column_name)
Performs an XQuery query against an xml instance and returns matching nodes as a SQL result set. The table_name and column_name specify aliases for the virtual table and column to hold the nodes returned. These aliases are mandatory for the nodes() method.
This section introduces each of these xml data type methods.
The query Method The xml data type query() method accepts an XQuery query string as its only parameter. This method returns all nodes matching the XQuery as a single untyped xml instance. Conveniently enough, Microsoft provides sample typed xml data in the Resume column of the HumanResources.JobCandidate table. Though all of its xml is well formed with a single root element, the Resume column is faceted with the default of CONTENT. Listing 11-13 shows how to use the query() method to retrieve names from the resumes in the HumanResources.JobCandidate table. Listing 11-13. Using the query Method on the HumanResources.JobCandidate Resume XML SELECT Resume.query(N'declare namespace ns = "http://schemas.microsoft.com/sqlserver/2004/07/adventure-works/Resume"; /ns:Resume/ns:Name') AS [NameXML] FROM HumanResources.JobCandidate; The first thing to notice is the namespace declaration inside the XQuery query via the declare namespace statement. This is done because the Resume column’s xml data declares a namespace. In fact, the namespace declaration used in the XQuery is exactly the same as the declaration used in the xml data. The declaration section of the XQuery looks like this: declare namespace ns = "http://schemas.microsoft.com/sqlserver/2004/07/adventure-works/Resume";
CHAPTER 11 ■ XML
The actual query portion of the XQuery query is a simple path expression: /ns:Resume/ns:Name A sample of the results of Listing 11-13 are shown in Figure 11-10 (reformatted for easy reading).
Figure 11-10. Retrieving job candidate names with the query method (partial results)
■Tip SQL Server 2008 implements a subset of the W3C XQuery recommendation. Chapter 12 discusses SQL Server’s XPath and XQuery implementations in detail. If you’re just getting started with XQuery, additional resources include the W3C recommendation available at www.w3.org/TR/2004/WD-xquery-20040723/, and on BOL at http://msdn2.microsoft.com/en-us/library/ms189919(SQL.100).aspx.
The value Method The xml data type’s value() method performs an XQuery query against an xml instance and returns a scalar result. The scalar result of value() is automatically cast to the T-SQL data type specified in the call to value(). The sample code in Listing 11-14 uses the value() method to retrieve all last names from AdventureWorks job applicant resumes. The results are shown in Figure 11-11.
321
322
CHAPTER 11 ■ XML
Listing 11-14. xml Data Type value Method Sample SELECT Resume.value (N'declare namespace ns = "http://schemas.microsoft.com/sqlserver/2004/07/adventure-works/Resume"; (/ns:Resume/ns:Name/ns:Name.Last)[1]', 'nvarchar(100)') AS [LastName] FROM HumanResources.JobCandidate;
Figure 11-11. Using the value method to retrieve job candidate last names Like the query() method described previously, the value() method sample XQuery query begins by declaring a namespace: declare namespace ns = "http://schemas.microsoft.com/sqlserver/2004/07/adventure-works/Resume"; The actual query portion of the XQuery query is a simple path expression: (/ns:Resume/ns:Name/ns:Name.Last)[1] Because value() returns a scalar value, the query is enclosed in parentheses with an XQuery numeric predicate [1] following it to force the return of a singleton atomic value. The second parameter passed into value() is the T-SQL data type that value() will cast the result to, in this case nvarchar. The value() method cannot cast its result to a SQL CLR user-defined type or an xml, image, text, ntext, or sql_variant data type.
The exist Method The xml data type provides the exist() method for determining if an XML node exists in an xml instance, or if an existing XML node value meets a specific set of criteria. The example in Listing 11-15 uses the exist() method in a query to return all AdventureWorks job candidates that reported a bachelor’s degree level of education. The results are shown in Figure 11-12.
CHAPTER 11 ■ XML
Listing 11-15. xml Data Type exist Method Example SELECT Resume.value (N'declare namespace ns = "http://schemas.microsoft.com/sqlserver/2004/07/adventure-works/Resume"; (/ns:Resume/ns:Name/ns:Name.Last) [1]', 'nvarchar(100)') AS [BachelorsCandidate] FROM HumanResources.JobCandidate WHERE Resume.exist (N'declare namespace ns = "http://schemas.microsoft.com/sqlserver/2004/07/adventure-works/Resume"; /ns:Resume/ns:Education/ns:Edu.Level [ . = "Bachelor" ]') = 1;
Figure 11-12. Using the exist method to retrieve bachelor’s degree job candidates The first part of the query borrows from the value() method example in Listing 11-13 to retrieve matching job candidate names: SELECT Resume.value (N'declare namespace ns = "http://schemas.microsoft.com/sqlserver/2004/07/adventure-works/Resume"; (/ns:Resume/ns:Name/ns:Name.Last) [1]', 'nvarchar(100)') AS [BachelorsCandidate] FROM HumanResources.JobCandidate The exist() method in the WHERE clause specifies the xml match criteria. Like the previous sample queries, the exist() method XQuery query begins by declaring a namespace: declare namespace ns = "http://schemas.microsoft.com/sqlserver/2004/07/adventure-works/Resume"; The query itself compares the Edu.Level node text to the string Bachelor: /ns:Resume/ns:Education/ns:Edu.Level [ . = "Bachelor" ] If there is a match, the query returns a result and the exist() method returns 1. If there is no match, there will be no nodes returned by the XQuery query, and the exist() method will return 0. If the xml is NULL, exist() returns NULL. The query limits the results to only matching resumes by returning only those where exist() returns 1.
The nodes Method The nodes() method of the xml data type retrieves XML content in relational format—a process known as shredding. The nodes() method returns a rowset composed of the xml nodes that
323
324
CHAPTER 11 ■ XML
match a given XQuery expression. Listing 11-16 retrieves product names and IDs for those products with the word Alloy in the Material node of their CatalogDescription column. The table queried is Production.ProductModel. Notice that the CROSS APPLY operator is used to perform the nodes() method on all rows of the Production.ProductModel table. Listing 11-16. xml Data Type nodes Example SELECT ProductModelId, Name, Specs.query('.') AS Result FROM Production.ProductModel CROSS APPLY CatalogDescription.nodes('declare namespace ns = "http://schemas.microsoft.com/sqlserver/2004/07/adventure-works/➥ ProductModelDescription"; /ns:ProductDescription/ns:Specifications/Material/text() [ contains ( . , "Alloy" ) ]') AS NodeTable(Specs); The first part of the SELECT query retrieves the product model ID, the product name, and the results of the nodes() method via the query() method: SELECT ProductModelId, Name, Specs.query('.') AS Result FROM Production.ProductModel One restriction of the nodes() method is that the relational results generated cannot be retrieved directly. They can only be accessed via the exist(), nodes(), query(), and value() methods of the xml data type, or checked with the IS NULL and IS NOT NULL operators. The CROSS APPLY operator is used with the nodes() method to generate the final result set. The XQuery query used in the nodes() method begins by declaring a namespace: CROSS APPLY CatalogDescription.nodes('declare namespace ns = "http://schemas.microsoft.com/sqlserver/2004/07/adventure-works/➥ ProductModelDescription"; The query portion is a path expression that retrieves XML nodes in which a Material node’s text contains the word Alloy: /ns:ProductDescription/ns:Specifications/Material/text() [ contains ( . , "Alloy" ) ]') Notice that the nodes() method requires you to provide aliases for both the virtual table returned and the column that will contain the result rows. In this instance, I chose to alias the virtual table with the name NodeTable and the column with the name Specs. AS NodeTable(Specs);
CHAPTER 11 ■ XML
The modify Method The xml data type modify() method can be used to modify the content of an xml variable or column. The modify() method allows you to insert, delete, or update xml content. The main restrictions on the modify() method is that it must be used in a variable SET statement or in the SET clause of an UPDATE statement. The example in Listing 11-17 demonstrates the modify() method on an untyped xml variable. The results are shown in Figure 11-13.
■Tip Although the SELECT and SET statements are similar in their functionality when applied to variables, the modify() method of the xml data type will not work in SELECT statements—even SELECT statements that assign values to variables. Use the SET statement as demonstrated in Listing 11-17 to use the modify() method on an xml variable.
Listing 11-17. xml Data Type modify Method Example DECLARE @x xml = N'
1 MICROSOFT WAY REDMOND WA 98052 US http://www.microsoft.com '; SELECT @x; SET @x.modify ('insert ( Microsoft Corporation, http://msdn.microsoft.com, Microsoft Developer Network ) into (/Address)[1] '); SET @x.modify('replace value of (/Address/Street/text())[1] with "ONE MICROSOFT WAY" '); SET @x.modify(' delete /Address/Website '); SELECT @x;
325
326
CHAPTER 11 ■ XML
Figure 11-13. Before-and-after results of the modify method The sample begins by creating an xml variable and assigning XML content to it: DECLARE @x xml = N'
1 MICROSOFT WAY REDMOND WA 98052 US http://www.microsoft.com '; SELECT @x; The XML DML insert statement inserts three new nodes into the xml variable, right below the top-level Address node: SET @x.modify ('insert ( Microsoft Corporation, http://msdn.microsoft.com, Microsoft Developer's Network ) into (/Address)[1] '); The replace value of statement specified in the next modify() method updates the content of the Street node with the street address our good friends at Microsoft prefer: ONE MICROSOFT WAY, instead of 1 MICROSOFT WAY.
CHAPTER 11 ■ XML
SET @x.modify('replace value of (/Address/Street/text())[1] with "ONE MICROSOFT WAY" '); Finally, the XML DML method delete statement is used to remove the old tag from the xml variable’s content: SET @x.modify(' delete /Address/Website '); SELECT @x;
XML Indexes SQL Server provides XML indexes to increase the efficiency of querying xml data type columns. XML indexes come in two flavors: • Primary XML index: An XML column can have a single primary XML index declared on it. The primary XML index is different from the standard relational indexes most of us are used to. Rather, it is a persisted preshredded representation of your XML data. Basically, the XML data stored in a column with a primary XML index is converted to relational form and stored in the database. By persisting an xml data type column in relational form, you eliminate the implicit shredding that occurs with every query or manipulation of your XML data. In order to create a primary XML index on a table’s xml column, a clustered index must be in place on the primary key columns for the table. • Secondary XML index: Secondary XML indexes can also be created on a table’s xml column. Secondary XML indexes are nonclustered relational indexes created on primary XML indexes. In order to create secondary XML indexes on an xml column, a primary XML index must already exist on that column. You can declare any of three different types of secondary XML index on your primary XML indexes: • The PATH index is a secondary XML index optimized for XPath and XQuery path expressions that rely heavily on path and node values. The PATH index creates an index on path and node values on the columns of the primary XML index. The path and node values are used as key columns for efficient path seek operations. • The VALUE index is optimized for queries by value where the path is not necessarily known. This type of index is the inverse of the PATH index, with the primary XML index node values indexed before the node paths. • The PROPERTY index is optimized for queries that retrieve data from other columns of a table based on the value of nodes or paths in the xml data type column. This type of secondary index is created on the primary key of the base table, node paths, and node values of the primary XML index.
327
328
CHAPTER 11 ■ XML
Consider the example XQuery FLWOR (for, let, where, order by, return) expression in Listing 11-18 that retrieves the last, first, and middle names of all job applicants in the HumanResources.JobCandidate table with an education level of Bachelor. The results of this query are shown in Figure 11-14. Listing 11-18. Retrieving Job Candidates with Bachelor’s Degrees SELECT Resume.query('declare namespace ns = "http://schemas.microsoft.com/sqlserver/2004/07/adventure-works/Resume"; for $m in /ns:Resume where $m/ns:Education/ns:Edu.Level[. = "Bachelor" ] return { data(($m/ns:Name/ns:Name.Last)[1]), data(($m/ns:Name/ns:Name.First)[1]), data(($m/ns:Name/ns:Name.Middle)[1]) } ') FROM HumanResources.JobCandidate; GO
Figure 11-14. Retrieving candidate names with a FLWOR expression I’ll describe FLWOR expressions in greater detail, with examples, in Chapter 12. For the purposes of this discussion, however, the results are not as important as what’s going on under the hood. This FLWOR expression is returning the last, first, and middle names of all candidates for which the Edu.Level node contains the value Bachelor. As shown in Figure 11-15, the execution cost of this query is 41.2849.
CHAPTER 11 ■ XML
Figure 11-15. The execution cost of the query By far the most expensive part of this query is contained in a step called Table Valued Function [XML Reader with XPath Filter]. This is the main operator SQL Server uses to shred XML data on the fly whenever you query XML data. In this query plan, it is invoked two times at a cost of 13.052 each, and three more times at a cost of 4.89054 each, accounting for over 98 percent of the query plan cost (see Figure 11-16).
Figure 11-16. Table Valued Function [XML Reader with XPath Filter] cost
329
330
CHAPTER 11 ■ XML
Adding XML indexes to this column of the HumanResources.JobCandidate table significantly improves XQuery query performance by eliminating on-the-fly XML shredding. Listing 11-19 adds a primary and secondary XML index to the Resume column. Listing 11-19. Adding XML Indexes to the Resume Column CREATE PRIMARY XML INDEX PXML_JobCandidate ON HumanResources.JobCandidate (Resume); GO CREATE XML INDEX IXML_Education ON HumanResources.JobCandidate (Resume) USING XML INDEX PXML_JobCandidate FOR PATH; GO With the primary and secondary XML indexes in place, the query execution cost drops significantly, from 41.2849 to 0.278555, as shown in Figure 11-17.
Figure 11-17. The query execution cost with XML indexes The greater efficiency is brought about by the XML Reader with XPath Filter step being replaced with efficient index seek operators on both clustered and nonclustered indexes. The primary XML index eliminates the need to shred XML data at query time and the secondary XML index provides additional performance enhancement by providing a nonclustered index that can be used to efficiently fulfill the FLWOR expression where clause. The CREATE PRIMARY XML INDEX statement in the example creates a primary XML index on the Resume column of the HumanResources.JobCandidate table. The primary XML index provides a significant performance increase by itself, since it eliminates on-the-fly XML shredding at query time.
CHAPTER 11 ■ XML
CREATE PRIMARY XML INDEX PXML_JobCandidate ON HumanResources.JobCandidate (Resume); The primary XML index is a prerequisite for creating the secondary XML index that will provide additional performance enhancement for XQuery queries that specify both a path and a predicate based on node content. The CREATE XML INDEX statement in the example creates the secondary XML PATH index. CREATE XML INDEX IXML_Education ON HumanResources.JobCandidate (Resume) USING XML INDEX PXML_JobCandidate FOR PATH; The USING XML INDEX clause of the CREATE XML INDEX statement specifies the name of the primary XML index on which to build the secondary XML index. The FOR clause determines the type of secondary XML index that will be created. You can specify a VALUE, PATH, or PROPERTY type as described previously. The optional WITH clause of both of the XML index creation statements allows you to specify a variety of XML index creation options, as shown in Table 11-5. Table 11-5. XML Index Creation Options
Option
Description
PAD_INDEX
This option specifies whether index padding is on or off. The default is OFF.
FILLFACTOR
This option indicates how full the leaf level index pages should be made during XML index creation or rebuild. Values of 0 and 100 are equivalent. The FILLFACTOR option is used in conjunction with the PAD_INDEX option.
SORT_IN_TEMPDB
This option specifies that intermediate sort results should be stored in tempdb. By default, SORT_IN_TEMPDB is set to OFF and intermediate sort results are stored in the local database.
STATISTICS_NORECOMPUTE
This option indicates whether distribution statistics are automatically recomputed. The default is OFF.
DROP_EXISTING
This option specifies that the preexisting XML index of the same name should be dropped before creating the index. The default is OFF.
ALLOW_ROW_LOCKS
This option allows SQL Server to use row locks when accessing the XML index. The default is ON.
ALLOW_PAGE_LOCKS
This option allows SQL Server to use page locks when accessing the XML index. The default is ON.
MAXDOP
This option determines the maximum degree of parallelism SQL Server can use during the XML index creation operation. MAXDOP can be one of the following values: 0: Uses up to the maximum number of processors available. 1: Uses only one processor; no parallel processing. 2 through 64: Restricts the number of processors used for parallel processing to the number specified or less.
331
332
CHAPTER 11 ■ XML
XSL Transformations One of the powerful features available to SQL Server 2008 is its ability to execute .NET Framework–based code via the SQL Common Language Runtime (SQL CLR). You can use standard .NET Framework classes to access XML-based functionality that is not supported directly within T-SQL. One useful feature that can be accessed via SQL CLR is the W3C Extensible Stylesheet Language Transformations (XSLT). As defined by the W3C, XSLT is a language designed for the sole purpose of “transforming XML documents into other XML documents.” SQL Server 2008 provides access to XSL transformations via a combination of the built-in xml data type and the .NET Framework XslCompiledTransform class.
■Tip The XSLT 1.0 standard is available at www.w3.org/TR/xslt.
You can access XSLT from SQL Server to perform server-side transformations of your relational data into other XML formats. I’ve chosen to use XHTML as the output format for this example, although some would argue that generating XHTML output is best done away from SQL Server, in the middle tier or presentation layer. Arguments can also be made for performing XSL transformations close to the data, for efficiency reasons. I’d like to put those arguments aside for the moment, and focus on the main purpose of this example: demonstrating that additional XML functionality is available to SQL Server via SQL CLR. Listing 11-20 demonstrates the first step in the process of performing server-side XSL transformations: using FOR XML to convert relational data to an xml variable. Listing 11-20. Using FOR XML to Convert Relational Data to Populate an xml Variable DECLARE @xml xml = ( SELECT p.ProductNumber AS "@Id", p.Name AS "Name", p.Color AS "Color", p.ListPrice AS "ListPrice", p.SizeUnitMeasureCode AS "Size/@UOM", p.Size AS "Size", p.WeightUnitMeasureCode AS "Weight/@UOM", p.Weight AS "Weight", ( SELECT COALESCE(SUM(i.Quantity), 0) FROM Production.ProductInventory i WHERE i.ProductID = p.ProductID ) AS "QuantityOnHand" FROM Production.Product p WHERE p.FinishedGoodsFlag = 1
CHAPTER 11 ■ XML
ORDER BY p.Name FOR XML PATH ('Product'), ROOT ('Products') ); The resulting xml document looks like Figure 11-18.
Figure 11-18. Partial results of the FOR XML product query The next step is to create the XSLT style sheet to specify the transformation and assign it to an xml data type variable. Listing 11-21 demonstrates a simple XSLT style sheet to convert XML data to HTML. Listing 11-21. XSLT Style Sheet to Convert Data to HTML DECLARE @xslt xml = N'
AdventureWorks Product Listing Report
| ID | Product Name | On Hand | List Price | Color | Size | Weight | | |
|---|
';
■Tip I won’t dive into the details of XSLT style sheet creation in this book, but information can be found at the official W3C XSLT 1.0 standard site, at www.w3.org/TR/xslt. My book Pro SQL Server 2008 XML (Apress, 2008) also offers a detailed discussion of XSLT on SQL Server.
The final step is to create a SQL CLR SP that accepts the raw XML data and the XSLT style sheet, performs the XSL transformation, and writes the results to an HTML file. The SQL CLR SP code is shown in Listing 11-22. Listing 11-22. SQL CLR SP for XSL Transformations using System.Data.SqlTypes; using System.Xml; using System.Xml.Xsl; namespace Apress.Samples { public partial class XSLT { [Microsoft.SqlServer.Server.SqlProcedure] public static void XmlToHtml ( SqlXml RawXml, SqlXml XslStyleSheet, SqlString OutputPage )
335
336
CHAPTER 11 ■ XML
{ // Create and load the XslCompiledTransform object XslCompiledTransform xslt = new XslCompiledTransform(); XmlDocument xmldoc1 = new XmlDocument(); xmldoc1.LoadXml(XslStyleSheet.Value); xslt.Load(xmldoc1); // Create and load the Raw XML document XmlDocument xml = new XmlDocument(); xml.LoadXml(RawXml.Value); // Create the XmlTextWriter for output to HTML document XmlTextWriter htmlout = new XmlTextWriter ( OutputPage.Value, System.Text.Encoding.Unicode ); // Perform the transformation xslt.Transform ( xml, htmlout ); // Close the XmlTextWriter htmlout.Close(); } } };
CHAPTER 11 ■ XML
SQL CLR SECURITY SETTINGS There are a few administrative details you need to take care of before you deploy SQL CLR code to SQL Server. The first thing to do is set the database to trustworthy mode with the ALTER DATABASE statement, as shown following: ALTER DATABASE AdventureWorks SET TRUSTWORTHY ON; A better alternative to setting your database to trustworthy mode is to sign your assemblies with a certificate. While signing SQL CLR assemblies is beyond the scope of this book, authors Robin Dewson and Julian Skinner cover this topic in their book Pro SQL Server 2005 Assemblies (Apress, 2005). For the example in Listing 11-22, which accesses the local file system, you also need to set the CLR assembly permission level to External. You can do this through Visual Studio, as shown in the following illustration, or you can use WITH PERMISSION_SET clause of the CREATE ASSEMBLY or ALTER ASSEMBLY statements in T-SQL.
For SQL CLR code that doesn’t require access to external resources or unmanaged code, a permission level of Safe is adequate. For SQL CLR assemblies that need access to external resources like hard drives or network resources, External permissions are the minimum required. Unsafe permissions are required for assemblies that access unsafe or unmanaged code. Always assign the minimum required permissions when deploying SQL CLR assemblies to SQL Server. Finally, make sure the SQL Server service account has permissions to any required external resources. For this example, the service account needs permissions to write to the c:\Documents and Settings\ All Users\Documents directory.
After you have deployed the SQL CLR assembly to SQL Server and set the appropriate permissions, you can call the XmlToHtml procedure to perform the XSL transformation, as shown in Listing 11-23. The resulting HTML file is shown in Figure 11-19.
337
338
CHAPTER 11 ■ XML
Listing 11-23. Performing a SQL CLR XSL Transformation EXECUTE XmlToHtml @xml, @xslt, 'c:\Documents and Settings\All Users\Documents\adventureworks-inventory.html';
Figure 11-19. Results of the XML-to-HTML transformation
Summary In this chapter, I discussed SQL Server 2008’s integrated XML functionality. I began with a discussion of legacy XML functionality carried forward, and in some cases improved upon, from the days of SQL Server 2000. This legacy functionality includes the flexible FOR XML clause and the OPENXML rowset provider. I then discussed the powerful xml data type and its many methods: • The query() method allows you to retrieve XML nodes using XQuery queries. • The value() method lets you retrieve singleton atomic values using XQuery path expressions to locate nodes.
CHAPTER 11 ■ XML
• The exist() method determines whether a specific node exists in your XML data. • The modify() method allows you to use XML DML to modify your XML data directly. • The nodes() method makes shredding XML data simple. I also presented SQL Server’s primary and secondary XML indexes, which are designed to optimize XML query performance. Finally, I touched on SQL Server’s SQL CLR integration and demonstrated how to use it to access .NET Framework XML functionality not directly available through the T-SQL language. In the next chapter, I will continue the discussion of SQL Server XML by introducing XPath and XQuery support, including a more detailed discussion of the options, functions, operators, and expressions available for querying and manipulating XML on SQL Server.
EXERCISES 1. [Choose all that apply] SQL Server’s FOR XML clause supports which of the following modes: a.
FOR XML RAW
b.
FOR XML PATH
c.
FOR XML AUTO
d.
FOR XML EXPLICIT
e.
FOR XML RECURSIVE
2. [Fill in the blank] By default, the OPENXML rowset provider returns data in ___ table format. 3. [True/false] The xml data type query() method returns its results as an untyped xml data type instance. 4. [Choose one] A SQL Server primary XML index performs which of the following functions: a.
It creates a nonclustered index on your xml data type column or variable.
b.
It creates a clustered index on your xml data type column or variable.
c.
It stores your xml data type columns in a preshredded relational format.
d.
It stores your xml data type columns using an inverse index format.
5. [True/false] When you perform XQuery queries against an xml data type column with no primary XML index defined on it, SQL Server automatically shreds your XML data to relational format. 6. [True/false] You can access additional XML functionality on SQL Server through the .NET Framework via SQL Server’s SQL CLR integration.
339
CHAPTER
12
XQuery and XPath A
s I described in Chapter 11, SQL Server 2008 continues the high level of XML integration begun in SQL Server 2005. As part of that integration, SQL Server’s xml data type provides built-in functionality for shredding XML data into relational format, querying XML nodes and singleton atomic values via XQuery, and modifying XML data via XML Data Modification Language (XML DML). This chapter focuses on how to get the most out of SQL Server’s implementation of the powerful and flexible XPath and XQuery standards. The XML data model represents a departure from the relational model SQL Server developers know so well. XML is not a replacement for the relational model, but it does nicely complement relational data. XML is very useful for sharing data with a wide variety of web services and disparate systems, and highly structured XML data from remote data sources is often shredded to relational format for easy storage and querying. The SQL Server 2008 xml data type and XML-specific query and conversion tools represent a marriage of some of the best features of relational database and XML technologies.
■Note This chapter is not meant to be a comprehensive guide to XPath and XQuery, but rather an introduction to SQL Server’s XPath and XQuery implementations, which are both subsets of the W3C XPath 1.0 and XQuery 1.0 recommendations. In addition to the discussion in this chapter, Appendix B provides a reference to the XQuery Data Model (XDM) type system as implemented by SQL Server.
XPath and FOR XML PATH The FOR XML PATH clause of the SELECT statement uses XPath 1.0–style path expressions to specify the structure of the XML result. Listing 12-1 demonstrates a simple FOR XML PATH query that returns the names and e-mail addresses of people in the AdventureWorks database. Partial results are shown in Figure 12-1.
341
342
CHAPTER 12 ■ XQUERY AND XPATH
Listing 12-1. Retrieving Names and E-mail Addresses with FOR XML PATH SELECT p.BusinessEntityID AS "Person/ID", p.FirstName AS "Person/Name/First", p.MiddleName AS "Person/Name/Middle", p.LastName AS "Person/Name/Last", e.EmailAddress AS "Person/Email" FROM Person.Person p INNER JOIN Person.EmailAddress e ON p.BusinessEntityID = e.BusinessEntityID FOR XML PATH;
Figure 12-1. Partial results of retrieving names and e-mail addresses with FOR XML PATH Because they are used specifically to define the structure of an XML result, FOR XML PATH XPath expressions are somewhat limited in their functionality. Specifically, you cannot use features that contain certain filter criteria or use absolute paths. Briefly, here are the restrictions: • A FOR XML PATH XPath expression may not begin or end with the / step operator, and it may not begin with, end with, or contain //. • FOR XML PATH XPath expressions cannot specify axis specifiers such as child:: or parent::. • The . (context node) and .. (context node parent) axis specifiers are not allowed.
CHAPTER 12 ■ XQUERY AND XPATH
• The functions defined in Part 4 of the XPath specification, Core Function Library, are not allowed. • Predicates, which are used to filter result sets, are not allowed. [ position() = 4 ] is an example of a predicate. Basically, the FOR XML PATH XPath subset allows you to specify the structure of the resulting XML relative to the implicit root node. This means that advanced functionality of XPath expressions above and beyond defining a simple relative path expression is not allowed. In general, XPath 1.0 features that can be used to locate specific nodes, return sets of nodes, or filter result sets are not allowed with FOR XML PATH. By default, FOR XML PATH uses the name row for the root node of each row it converts to XML format. The results of FOR XML PATH also default to an element-centric format, meaning that results are defined in terms of element nodes. In Listing 12-1, I’ve aliased the column names using the XPath expressions that define the structure of the XML result. Because the XPath expressions often contain characters that are not allowed in SQL identifiers, you will probably want to use quoted identifiers. SELECT p.BusinessEntityID AS "Person/ID", p.FirstName AS "Person/Name/First", p.MiddleName AS "Person/Name/Middle", p.LastName AS "Person/Name/Last", e.EmailAddress AS "Person/Email" XPath expressions are defined as a path separated by step operators. The step operator (/) indicates that a node is a child of the preceding node. For instance, the XPath expression Person/ID in the example indicates that a node named ID will be created as a child of the node named Person in a hierarchical XML structure.
XPath Attributes Alternatively, you can define a relational column as an attribute of a node. Listing 12-2 modifies Listing 12-1 slightly to demonstrates this. I’ve shown the differences between the two listings in bold print. Partial results are shown in Figure 12-2, reformatted slightly for easier reading. Listing 12-2. FOR XML PATH Creating XML Attributes SELECT p.BusinessEntityID AS "Person/@ID", e.EmailAddress AS "Person/@Email", p.FirstName AS "Person/Name/First", p.MiddleName AS "Person/Name/Middle", p.LastName AS "Person/Name/Last" FROM Person.Person p INNER JOIN Person.EmailAddress e ON p.BusinessEntityID = e.BusinessEntityID FOR XML PATH;
343
344
CHAPTER 12 ■ XQUERY AND XPATH
Figure 12-2. Creating attributes with FOR XML PATH The bold portion of the SELECT statement in Listing 12-2 generates XML attributes of the ID and Email nodes by preceding their names in the XPath expression with the @ symbol. The result is that ID and Email become attributes of the Person element in the result: p.BusinessEntityID AS "Person/@ID", e.EmailAddress AS "Person/@Email",
Columns Without Names and Wildcards Some of the other XPath expression features you can use with FOR XML PATH include columns without names and wildcard expressions, which are turned into inline content. The sample in Listing 12-3 demonstrates this. Listing 12-3. Using Columns Without Names and Wildcards with FOR XML PATH SELECT p.BusinessEntityID AS "*", ',' + e.EmailAddress, p.FirstName AS "Person/Name/First", p.MiddleName AS "Person/Name/Middle", p.LastName AS "Person/Name/Last" FROM Person.Person p INNER JOIN Person.EmailAddress e ON p.BusinessEntityID = e.BusinessEntityID FOR XML PATH;
CHAPTER 12 ■ XQUERY AND XPATH
In this example, the XPath expression for BusinessEntityID is the wildcard character, *. The second column is defined as ',' + EmailAddress and the column is not given a name. Both of these columns are turned into inline content immediately below the row element, as shown in Figure 12-3. This is particularly useful functionality when creating lists within your XML data, or when your XML data conforms to a schema that looks for combined, concatenated, or list data in XML text nodes.
Figure 12-3. Columns without names and wildcard expressions in FOR XML PATH
Element Grouping As you saw in the previous examples, FOR XML PATH groups together nodes that have the same parent elements. For instance, the First, Middle, and Last elements are all children of the Name element. They are grouped together in all of the examples because of this. However, as shown in Listing 12-4, this is not the case when these elements are separated by an element with a different parent element. Listing 12-4. Two Elements with a Common Parent Element Separated SELECT p.BusinessEntityID AS "@ID", e.EmailAddress AS "@EmailAddress", p.FirstName AS "Person/Name/First", pp.PhoneNumber AS "Phone/BusinessPhone", p.MiddleName AS "Person/Name/Middle", p.LastName AS "Person/Name/Last"
345
346
CHAPTER 12 ■ XQUERY AND XPATH
FROM Person.Person p INNER JOIN Person.EmailAddress e ON p.BusinessEntityID = e.BusinessEntityID INNER JOIN Person.PersonPhone pp ON p.BusinessEntityID = pp.BusinessEntityID AND pp.PhoneNumberTypeID = 3 FOR XML PATH; The results of this query include a new Phone element as a direct child of the Person element. Because this new element is positioned between the Person/Name/First and Person/Name/Middle elements, FOR XML PATH creates two separate Person/Name elements: one to encapsulate the First element, and another to encapsulate the Middle and Last elements, as shown in Figure 12-4.
Figure 12-4. Breaking Element Grouping with FOR XML PATH
The data Function The FOR XML PATH XPath expression provides support for a function called data(). If the column name is specified as data(), the value is treated as an atomic value in the generated XML. If the next item generated is also an atomic value, FOR XML PATH appends a space to the end of the data returned. This is useful for using subqueries to create lists of items, as in Listing 12-5, which demonstrates use of the data() function.
CHAPTER 12 ■ XQUERY AND XPATH
Listing 12-5. The FOR XML PATH XPath data Node Test SELECT DISTINCT soh.SalesPersonID AS "SalesPerson/@ID", ( SELECT soh2.SalesOrderID AS "data()" FROM Sales.SalesOrderHeader soh2 WHERE soh2.SalesPersonID = soh.SalesPersonID FOR XML PATH ('') ) AS "SalesPerson/@Orders", p.FirstName AS "SalesPerson/Name/First", p.MiddleName AS "SalesPerson/Name/Middle", p.LastName AS "SalesPerson/Name/Last", e.EmailAddress AS "SalesPerson/Email" FROM Sales.SalesOrderHeader soh INNER JOIN Person.Person p ON p.BusinessEntityID = soh.SalesPersonID INNER JOIN Person.EmailAddress e ON p.BusinessEntityID = e.BusinessEntityID WHERE soh.SalesPersonID IS NOT NULL FOR XML PATH; This sample retrieves all SalesPerson ID numbers from the Sales.SalesOrderHeader table (eliminating NULLs for simplicity) and retrieves their names in the main query. The subquery uses the data() function to retrieve a list of each salesperson’s sales order numbers and places them in a space-separated list in the Orders attribute of the SalesPerson element. A sample of the results is shown in Figure 12-5.
Figure 12-5. Creating lists with the data node test
347
348
CHAPTER 12 ■ XQUERY AND XPATH
NODE TESTS AND FUNCTIONS The SQL Server 2008 FOR XML PATH expression provides access to both the text() function and the data() node test. In terms of FOR XML PATH, the text() function returns the data in the text node as inline text with no separator. The data() node test returns the data in the XML text node as a spaceseparated concatenated list. In XQuery expressions, the data() node test, the text() function, and the related string() function all return slightly different results. The following code snippet demonstrates their differences: DECLARE @x xml; SET @x = N'123456789987654321'; SELECT @x.query('/a/text()'); SELECT @x.query('data(/a)'); SELECT @x.query('string(/a[1])'); The text() function in this example returns the concatenated text nodes of the elements; in this example, it returns 123987. The data() node test returns the concatenated XML text nodes of the elements and all their child elements. In this example, data() returns 123456789 987654321, the concatenation of the elements and the and subelements they contain. The data() node test puts a space separator between the elements during the concatenation. The string() function is similar to the data() node test in that it concatenates the data contained in the specified element and all child elements. The string() function requires a singleton node instance, which is why I specified string(/a[1]) in the example. The result of the string() function used in the example is 123456789. I’ll discuss the text() and string() functions in greater detail later in this chapter.
XPath and NULL In all of the previous examples, FOR XML PATH maps SQL NULL to a missing element or attribute. Consider the results of Listing 12-1 for Kim Abercrombie, shown in Figure 12-6. Because her MiddleName in the table is NULL, the Name/Middle element is missing from the results.
Figure 12-6. NULL middle name eliminated from the FOR XML PATH results
CHAPTER 12 ■ XQUERY AND XPATH
If you want SQL NULL-valued elements and attributes to appear in the final results, use the ELEMENTS XSINIL option of the FOR XML clause, as shown in Listing 12-6. Listing 12-6. FOR XML with the ELEMENTS XSINIL Option SELECT p.BusinessEntityID AS "Person/ID", p.FirstName AS "Person/Name/First", p.MiddleName AS "Person/Name/Middle", p.LastName AS "Person/Name/Last", e.EmailAddress AS "Person/Email" FROM Person.Person p INNER JOIN Person.EmailAddress e ON p.BusinessEntityID = e.BusinessEntityID FOR XML PATH, ELEMENTS XSINIL; With the ELEMENTS XSINIL option, Kim’s results now look like the results shown in Figure 12-7. The FOR XML PATH clause adds a reference to the xsi namespace, and elements containing SQL NULL are included but marked with the xsi:nil="true" attribute.
Figure 12-7. NULL marked with the xsi:nil attribute
The WITH XMLNAMESPACES Clause Namespace support is provided for FOR XML clauses and other XML functions by the WITH XMLNAMESPACES clause. The WITH XMLNAMESPACES clause is added to the front of your SELECT queries to specify XML namespaces to be used by FOR XML clauses or xml data type methods. Listing 12-7 demonstrates the use of the WITH XMLNAMESPACES clause with FOR XML PATH. Listing 12-7. Using WITH XMLNAMESPACES to Specify Namespaces WITH XMLNAMESPACES('http://www.apress.com/xml/sampleSqlXmlNameSpace' as ns) SELECT p.BusinessEntityID AS "ns:Person/ID", p.FirstName AS "ns:Person/Name/First",
349
350
CHAPTER 12 ■ XQUERY AND XPATH
p.MiddleName AS "ns:Person/Name/Middle", p.LastName AS "ns:Person/Name/Last", e.EmailAddress AS "ns:Person/Email" FROM Person.Person p INNER JOIN Person.EmailAddress e ON p.BusinessEntityID = e.BusinessEntityID FOR XML PATH; The WITH XMLNAMESPACES clause in this example declares a namespace called ns with the URI http://www.apress.com/xml/sampleSqlXmlNameSpace. The FOR XML PATH clause adds this namespace prefix to the Person element, as indicated in the XPath expressions used to define the structure of the result. A sample of the results is shown in Figure 12-8.
Figure 12-8. Adding an XML namespace to the FOR XML PATH results
Node Tests In addition to the previous options, the FOR XML PATH XPath implementation supports four node tests, including the following: • The text() node test turns the string value of a column into a text node. • The comment() node test turns the string value of a column into an XML comment. • The node() node test turns the string value of a column into inline XML content; it is the same as using the wildcard * as the name. • The processing-instruction(name) node test turns the string value of a column into an XML-processing instruction with the specified name. Listing 12-8 demonstrates use of XPath node tests as column names in a FOR XML PATH query. The results are shown in Figure 12-9.
CHAPTER 12 ■ XQUERY AND XPATH
Listing 12-8. FOR XML PATH Using XPath Node Tests SELECT p.NameStyle AS "processing-instruction(nameStyle)", p.BusinessEntityID AS "Person/@ID", p.ModifiedDate AS "comment()", pp.PhoneNumber AS "text()", FirstName AS "Person/Name/First", MiddleName AS "Person/Name/Middle", LastName AS "Person/Name/Last", EmailAddress AS "Person/Email" FROM Person.Person p INNER JOIN Person.EmailAddress e ON p.BusinessEntityID = e.BusinessEntityID INNER JOIN Person.PersonPhone pp ON p.BusinessEntityID = pp.BusinessEntityID FOR XML PATH;
Figure 12-9. Using node tests with FOR XML PATH In this example, the NameStyle column value is turned into an XML-processing instruction called nameStyle, the ModifiedDate column is turned into an XML comment, and the contact PhoneNumber is turned into a text node for each person in the AdventureWorks database.
XQuery and the xml Data Type XQuery represents the most advanced standardized XML querying language to date. Designed as an extension to the W3C XPath 2.0 standard, XQuery is a case-sensitive, declarative, functional language with a rich type system based on the XDM. The SQL Server 2008 xml data type supports querying of XML data using a subset of XQuery via the query() method. Before diving into the details of the SQL Server implementation, I’m going to start this section with a discussion of XQuery basics.
351
352
CHAPTER 12 ■ XQUERY AND XPATH
Expressions and Sequences XQuery introduces several advances on the concepts introduced by XPath and other previous XML query tools and languages. Two of the most important concepts in XQuery are expressions and sequences. A sequence is an ordered collection of items—either nodes or atomic values. The word ordered, as it applies to sequences, does not necessarily mean numeric or alphabetic order. Sequences are generally in document order (the order in which their contents appear in the raw XML document or data) by default, unless you specify a different ordering. The roughly analogous XPath 1.0 structure was known as a node set, a name that implies ordering was unimportant. Unlike the relational model, however, the order of nodes is extremely important to XML. In XML, the ordering of nodes and content provides additional context and can be just as important as the data itself. The XQuery sequence was redefined to ensure that the importance of proper ordering is recognized. There are also some other differences that I will cover later in this section. Sequences can be returned by XQuery expressions or created by enclosing one of the following in parentheses: • Lists of items separated by the comma operator (,) • Range expressions • Filter expressions
■Tip Range expressions and the range expression keyword to are not supported in SQL Server 2008 XQuery. If you are converting an XQuery with range expressions like (1 to 10), you will have to modify it to run on SQL Server 2008.
A sequence created as a list of items separated by the comma operator might look like the following: (1, 2, 3, 4, (5, 6), 7, 8, (), 9, 10) The comma operator evaluates each of the items in the sequence and concatenates the result. Sequences cannot be nested, so any sequences within sequences are “flattened out.” Also, the empty sequence (a sequence containing no items, denoted by empty parentheses: ()) is eliminated. Evaluation of the previous sample sequence results in the following sequence of ten items: (1, 2, 3, 4, 5, 6, 7, 8, 9, 10) Notice that the nested sequence (5, 6) has been flattened out, and the empty sequence () is removed during evaluation.
■Tip SQL Server 2008 XQuery does not support the W3C-specified sequence operators union, intersect, and except. If you are porting XQuery code that uses these operators, it will have to be modified to run on SQL Server 2008.
CHAPTER 12 ■ XQUERY AND XPATH
Another method of generating a sequence is with a filter expression. A filter expression is a primary expression followed by zero or more predicates. An example of a filter expression to generate a sequence might look like the following: (//Coordinates/*/text()) An important property of sequences is that a sequence of one item is indistinguishable from a singleton atomic value. So the sequence (1.0) is equivalent to the singleton atomic value 1.0. Sequences come in three flavors: empty sequences, homogeneous sequences, and heterogeneous sequences. Empty sequences are sequences that contain no items. As mentioned before, the empty sequence is annotated with a set of empty parentheses: (). Homogeneous sequences are sequences of one or more items of the same or compatible types. The examples already given are all examples of homogenous sequences. Heterogeneous sequences are sequences of two or more items of incompatible types, or singleton atomic types and nodes. The following is an example of a heterogeneous sequence: ("Harry", 299792458, xs:date("2006-12-29Z")) SQL Server does not allow heterogeneous sequences that mix nodes with singleton atomic values. Trying to declare the following sequence results in an error: (, "you are it!")
■Note Singleton atomic values are defined as values that are in the value space of the atomic types. The value space is the complete set of values that can be expressed with a given type. For instance, the complete value space for the xs:boolean type is true and false. Singleton atomic values are indivisible for purposes of the XDM standard (although you can extract portions of their content in some situations). Values that fall into this space are decimals, integers, dates, strings, and other primitive data types.
Primary expressions are the building blocks of XQuery. An expression in XQuery evaluates to a singleton atomic value or a sequence. Primary expressions can be any of several different items, including the following: • Literals: These include string and numeric data type literals. String literals can be enclosed in either single or double quotes and may contain the XML-defined entity references >, 500.0; SELECT ProductID, OldListPrice, NewListPrice FROM #AuditPriceChange ORDER BY NewListPrice; DROP TABLE #AuditPriceChange;
529
530
CHAPTER 17 ■ NEW T-SQL FEATURES
Figure 17-4. Results of the composable DML statement The example in Listing 17-5 begins by creating a temporary table to hold the logged entry results, including the ProductID, OldListPrice, and NewListPrice: CREATE TABLE #AuditPriceChange ( ProductID int NOT NULL PRIMARY KEY, OldListPrice money NOT NULL, NewListPrice money NOT NULL ); The composable DML statement contains an UPDATE statement with an OUTPUT clause that acts as a subquery. This UPDATE statement increases all list prices in the Production.Product table by 20 percent across the board. ( UPDATE Production.Product SET ListPrice = ListPrice + (ListPrice * 0.20) OUTPUT inserted.ProductID AS ProductID, deleted.ListPrice AS OldListPrice, inserted.ListPrice AS NewListPrice ) s The UPDATE statement uses the OUTPUT clause to return the ProductID and new list price from the inserted virtual table and the old list price from the deleted virtual table. The outer INSERT statement is fed by a SELECT query. The SELECT query, in turn, uses the results of the UPDATE statement as a source subquery. The SELECT query also has a WHERE clause that limits the results to only those where the new list price is greater than $500.00.
CHAPTER 17 ■ NEW T-SQL FEATURES
INSERT INTO #AuditPriceChange ( ProductID, OldListPrice, NewListPrice ) SELECT s.ProductID, s.OldListPrice, s.NewListPrice FROM ( ... ) s WHERE s.NewListPrice > 500.0; The net effect is that every single product has its ListPrice increased by 20 percent, but only those items where the new list price is more than $500.00 are logged to the temp table. The balance of the code queries the temp table to show the results, and then drops the temp table.
■Note Currently, the only statement that can use composable DML as a source is the INSERT statement.
The TOP Keyword The TOP keyword has long been a staple of SQL SELECT statements. Beginning with SQL Server 2005, TOP has been considerably improved. In SQL Server 2008, you can use a T-SQL variable to specify the number of rows to return. You can apply this to percentages or actual row counts, as shown in Listing 17-6, with partial results shown in Figure 17-5. Listing 17-6. Selecting TOP Rows with a Variable DECLARE @i int = 20; SELECT TOP (@i) PERCENT FirstName, MiddleName, LastName FROM Person.Person ORDER BY FirstName, MiddleName, LastName;
531
532
CHAPTER 17 ■ NEW T-SQL FEATURES
Figure 17-5. Retrieving the top 20 percent of Person.Person names with a variable Doing something this simple in SQL Server prior to the 2005 release required kludging ugly dynamic SQL or using the SET ROWCOUNT statement. Additionally, you can use a subquery to specify the number of rows to return. Listing 17-7 returns one-fifth of the rows from the Person.Person table. Listing 17-7. Selecting TOP Rows with a Subquery SELECT TOP ( SELECT COUNT(*) / 5 FROM Person.Person ) FirstName, MiddleName, LastName FROM Person.Person ORDER BY FirstName, MiddleName, LastName; You can also use the TOP keyword with a constant value just like in prior versions of SQL Server. Although you can leave the parentheses off when using SELECT TOP, don’t rely on this backward-compatibility feature. With new T-SQL scripts, always use parentheses around the expression to specify the number of rows to return.
■Note When you use a variable or subquery with SELECT TOP, you must enclose it in parentheses. For compatibility with SQL Server 2000 and 2005 scripts, the parentheses aren’t required if you specify a constant value with SELECT TOP. This backward-compatibility feature might be removed in a future version of SQL Server, and Microsoft now recommends always using parentheses with TOP.
CHAPTER 17 ■ NEW T-SQL FEATURES
The TOP keyword was not introduced in T-SQL until SQL Server 7.0. And in SQL Server 7.0 and 2000, the TOP keyword was allowed only in SELECT statements. SQL Server 2008 also allows the TOP keyword with the INSERT, UPDATE, DELETE, and MERGE DML statements. When used with DML statements, the order of rows affected cannot be specified explicitly. For all intents and purposes, you can consider a DELETE TOP statement as a “random” deletion of the specified number of rows from your table. This limits the usefulness of this particular feature unless you are modifying rows in a table and don’t particularly care which rows are affected.
CROSS APPLY and OUTER APPLY Probably one of the most frequently asked questions on the SQL Server newsgroups (news:// microsoft.public.sqlserver.programming) concerns passing columns as parameters to TVFs. In SQL Server 2000, this required resorting to procedural code or cursors. SQL Server 2008 supports the CROSS APPLY and OUTER APPLY operators to resolve this problem. Like the JOIN operators, APPLY operators take tables on both sides of the operator. The APPLY operators allow columns from the left-hand table to be used as parameters for a TVF on the right side of the operator. As a simple example, Listing 17-8 creates a simple inline TVF that returns the square (n2) and cube (n3) of a number passed to it. The CROSS APPLY operator in the example applies the numbers in a table to the TVF. The results are shown in Figure 17-6. Listing 17-8. Using CROSS APPLY to Apply Result Set Rows to a Function CREATE FUNCTION dbo.fnPowers (@Num INT) RETURNS TABLE AS RETURN ( SELECT @Num * @Num AS Squared_Result, @Num * @Num * @Num AS Cubed_Result ); GO WITH Numbers (Number) AS ( SELECT 1 UNION SELECT 2 UNION SELECT 3 )
533
534
CHAPTER 17 ■ NEW T-SQL FEATURES
SELECT n.Number, s.Squared_Result, s.Cubed_Result FROM Numbers n CROSS APPLY dbo.fnPowers (n.Number) s; GO DROP FUNCTION dbo.fnPowers; GO
Figure 17-6. Using CROSS APPLY to pass rows to a function The sample first creates an inline TVF that returns the square and cube of an integer passed to it: CREATE FUNCTION dbo.fnPowers (@Num INT) RETURNS TABLE AS RETURN ( SELECT @Num * @Num AS Squared_Result, @Num * @Num * @Num AS Cubed_Result ); GO The CROSS APPLY sample query starts with a CTE that simply returns a set of numbers as a result set. In this example, it just returns the numbers 1, 2, and 3. WITH Numbers (Number) AS ( SELECT 1 UNION SELECT 2 UNION SELECT 3 )
CHAPTER 17 ■ NEW T-SQL FEATURES
The CROSS APPLY operator used in the SELECT statement takes every row from the Numbers CTE and passes the integer Number column to the inline TVF. The columns of the CTE and the columns returned by the inline TVF are all available to the SELECT statement: SELECT n.Number, s.Squared_Result, s.Cubed_Result FROM Numbers n CROSS APPLY dbo.fnPowers (n.Number) s; You’ve encountered the CROSS APPLY operator in examples in previous chapters. Some common uses of CROSS APPLY are to shred XML data into relational results using the xml data type nodes method, and to pass rows of data to DMFs for further processing. While the CROSS APPLY operator returns every row for which the TVF returns results for the left table, OUTER APPLY returns all rows, NULL-extended—even those for which the function returns no results. In this respect, CROSS APPLY has the behavioral characteristics of an inner join while OUTER APPLY behaves more like an outer join. If no results are returned by the TVF for a given input row, OUTER APPLY returns NULL values for the TVF columns.
The TABLESAMPLE Clause Occasionally, it’s necessary to select a random sample of data from a table. Many people have come up with inventive solutions for this on the SQL Server 2000 platform, including methods based on pregenerated random numbers, procedural code, or globally unique identifiers (GUIDs). SQL Server 2008 supports the TABLESAMPLE clause for the SELECT statement to make the task of random sampling easier. The TABLESAMPLE clause follows the table name in the WHERE clause. The TABLESAMPLE clause accepts a sample_number parameter that specifies a percent or number of rows to return in the sample. The sample method actually samples a percentage of pages randomly, so the number of rows specified might not be the exact number or percent requested.
■Note When you specify an exact number of rows, TABLESAMPLE converts the number to a percentage of rows before executing. So even if you specify an exact number of rows, you will still get an approximate number of rows in the result set. TABLESAMPLE always returns an approximate number of rows because of the way it samples data. The required percentage is the number of data pages SQL Server retrieves in full to fulfill your TABLESAMPLE request. The number of rows returned by TABLESAMPLE will often be slightly lower or higher than the specified amount.
You can use the TOP clause in the SELECT statement to further limit rows to the exact number required. The SYSTEM keyword specifies a system-dependent random sampling method. Since SQL Server 2008 offers only one random sampling method, the SYSTEM keyword has no
535
536
CHAPTER 17 ■ NEW T-SQL FEATURES
effect. The random sampling method used by SQL Server 2005 involves retrieving a random number of complete physical pages that make up the specified table. This means that the number of rows returned will always be approximate and that tables occupying more storage space and containing more rows will more closely approximate the specified TABLESAMPLE percentage. A small table that takes up only one physical page, for instance, will return either all rows or none. If you need to repeat the same random sampling multiple times, specify REPEATABLE with repeat_seed, which is a random seed generation number. Specifying the same repeat_seed with the same SELECT statement on the same data produces the same results.
■Note The REPEATABLE keyword, even with the same repeat_seed, will produce different results from query to query if the data stored in the table or the structure of the table change.
The SELECT statement shown in Listing 17-9 randomly selects approximately 10 percent of the rows from the Person.Person table. Listing 17-9. Randomly Selecting 10 Percent of Table Data with TABLESAMPLE SELECT FirstName, MiddleName, LastName FROM Person.Contact TABLESAMPLE (10 PERCENT); You can use the TABLESAMPLE clause only when querying local tables and locally defined temporary tables. You cannot use it on views, derived tables from subqueries, result sets from TVFs and rowset functions, linked server tables, OPENXML, or table variables. If you need to retrieve a random sampling of rows from a view, derived table, or linked server table, consider using a method like that shown in Listing 17-10, popularized by SQL Server MVP Erland Sommarskog. Listing 17-10. Alternate Method of Retrieving Random Rows SELECT TOP (10) PERCENT FirstName, MiddleName, LastName FROM HumanResources.vEmployee ORDER BY NEWID(); This method works by generating a GUID for each row, sorting based on the value generated, and selecting the top 10 percent from that result. The result is a random sample of rows from your table. Although not a true statistical sampling, these random sampling methods are adequate for most development and testing purposes.
CHAPTER 17 ■ NEW T-SQL FEATURES
The NEWSEQUENTIALID Function The new NEWSEQUENTIALID function generates GUIDs represented in T-SQL with the data type uniqueidentifier. This function generates sequential GUIDs in increasing order. You can use the NEWSEQUENTIALID function only as a DEFAULT for a uniqueidentifier-type column of a table, as demonstrated in Listing 17-11. Results are shown in Figure 17-7; notice that the GUID digits are displayed in groups in reverse order. In the results, the first byte of each GUID represents the sequentially increasing values generated by NEWSEQUENTIALID with each row inserted. Listing 17-11. Generating Sequential GUIDs CREATE TABLE #TestSeqID ( [ID] uniqueidentifier DEFAULT NEWSEQUENTIALID() PRIMARY KEY NOT NULL, Num int NOT NULL ); INSERT INTO #TestSeqID ( Num ) VALUES (1), (2), (3); SELECT [ID], Num FROM #TestSeqID; DROP TABLE #TestSeqID;
Figure 17-7. Results generated by the NEWSEQUENTIALID function The NEWSEQUENTIALID function is useful when you are using a uniqueidentifier as the clustered index on a table. Because it generates GUIDs in increasing order, the NEWSEQUENTIALID function eliminates costly page splits and their associated overhead.
537
538
CHAPTER 17 ■ NEW T-SQL FEATURES
Date and Time Functions Back in Chapter 2, I covered the new SQL Server date and time data types, which bring a new level of precision and accuracy to time-based data in the database. In addition to these new data types—date, time, datetimeoffset, and datetime2—SQL Server 2008 provides new builtin date- and time-related functions. The SYSDATETIME function returns the system date and time, as reported by the server’s local operating system, as a datetime2 value without time offset information. The value returned by SYSDATETIME is the date and time reported by Windows on the computer where your SQL Server instance is installed. The SYSUTCDATETIME function returns the system date and time information converted to UTC as a datetime2 value. As with the SYSDATETIME function, the value returned does not contain additional time offset information. The SYSDATETIMEOFFSET function returns the system date and time as a datetimeoffset value, including the time offset information. Listing 17-12 uses these functions to display the current system date and time in various formats. The results are shown in Figure 17-8. Listing 17-12. Using the New Date and Time Functions SELECT SYSDATETIME() AS "SYSDATETIME"; SELECT SYSUTCDATETIME() AS "SYSUTCDATETIME"; SELECT SYSDATETIMEOFFSET() AS "SYSDATETIMEOFFSET";
Figure 17-8. The current system date and time in a variety of formats SQL Server 2008’s new time offset support, enabled by the datetimeoffset data type, introduces the need for new time offset–enabled functions for conversions and calculations. The TODATETIMEOFFSET function allows you to add time offset information to date and time data without time offset information. You can use TODATETIMEOFFSET to add time offset information to a date, time, datetime, datetime2, or datetimeoffset value. The result returned by the function is a datetimeoffset value with time offset information added. Listing 17-13 demonstrates by adding time offset information to a datetime value. The results are shown in Figure 17-9.
CHAPTER 17 ■ NEW T-SQL FEATURES
Listing 17-13. Adding an Offset to a datetime Value DECLARE @current datetime = '2008-02-14 10:00:00'; SELECT @current AS "No_Offset"; SELECT TODATETIMEOFFSET(@current, '-04:00') AS "With_Offset";
Figure 17-9. Converting a datetime value to a datetimeoffset The SWITCHOFFSET function adjusts a given datetimeoffset value to another given time offset. This is useful when you need to convert a date and time to another time offset. In Listing 17-14, I use the SWITCHOFFSET function to convert a datetimeoffset value in Los Angeles to several other regional time offsets. The results are shown in Figure 17-10.
■Tip You can use the Z time offset in datetimeoffset literals as an abbreviation for UTC (+00:00 offset). You cannot, however, specify Z as the time offset parameter with the TODATETIMEOFFSET and SWITCHOFFSET functions.
Listing 17-14. Converting a datetimeoffset to Several Time Offsets DECLARE @current datetimeoffset = '2008-05-23 19:30:00 -07:00'; SELECT 'Los Angeles' AS "Location", @current AS "Current Time" UNION SELECT 'New York', SWITCHOFFSET(@current, '-04:00') UNION SELECT 'Bermuda', SWITCHOFFSET(@current, '-03:00')
539
540
CHAPTER 17 ■ NEW T-SQL FEATURES
UNION SELECT 'London', SWITCHOFFSET(@current, '+01:00');
Figure 17-10. Date and time information in several different time offsets
TIME ZONES AND OFFSETS Time offsets are not the same thing as time zones. A time offset is relatively easy to calculate—it’s simply a plus or minus offset in hours and minutes from the UTC offset (+00:00), as defined by the ISO 8601 standard. A time zone, however, is an identifier for a specific location or region and is defined by regional laws and regulations. Time zones can have very complex sets of rules that include such oddities as Daylight Savings Time (DST). SQL Server uses time offsets in calculations, not time zones. If you want to perform date and time calculations involving actual time zones, you will have to write custom code. Just keep in mind that time zone calculations are fairly involved, especially since calculations like DST can change over time. Case in point— the start and end dates for DST were extended in the United States beginning in 2007.
In addition to the new date and time functions, SQL Server 2008 enhances the classic DATEPART function, which returns an int value representing a specific part of a given date. SQL Server 2008 supports all of the existing DATEPART options (e.g., year, month, and day), but it also allows you to retrieve the microsecond, nanosecond, time offset, and ISO standard week parts of a given date. Table 17-1 lists the new options supported by DATEPART. Table 17-1. New DATEPART Options
Date Part
Abbreviation
microsecond
mcs
nanosecond
ns
TZoffset
tz
ISO_WEEK
isowk, isoww
CHAPTER 17 ■ NEW T-SQL FEATURES
The TZoffset option returns the time offset in minutes. For a date with a time offset of –04:00, DATEPART with the TZoffset option returns –240. The ISO_WEEK option returns the week number for a date, as defined by the ISO 8601 standard. In the ISO week numbering system, weeks begin on Monday, and week 1 of the year is defined as the week containing the first Thursday of that year. This means that in the ISO system, years can have either 52 or 53 weeks, and some days in a given year can end up being attributed to weeks in the previous or next year. While the ISO calculation is a bit more complicated than the simple week number calculation common in the United States, the ISO version is commonly used by governments and international agencies.
The max Data Types In the heady days of SQL Server 2000, large object (LOB) data storage and manipulation required use of the old style text, ntext, and image data types. If you’ve ever tried to use the text, ntext, and image data types, you’ll be happy to hear they’ve been deprecated and replaced with new, easier-to-use types. SQL Server 2008 supports the max data types, varchar(max), nvarchar(max), and varbinary(max), which were first introduced in SQL Server 2005. The max data types are complete replacements for the older LOB data types. Like the older types, each of these new data types can hold over 2.1 billion bytes of character or binary data. Unlike the legacy LOB types, however, the max data types operate similarly to the standard varchar, nvarchar, and varbinary data types. Standard string manipulation functions such as LEN and CHARINDEX, which didn’t work well with the older LOB data types, work as expected with the new max data types. The new data types also eliminate the need for kludgy solutions involving the TEXTPTR, READTEXT, and WRITETEXT statements to manipulate LOB data.
■Note The varchar(max), nvarchar(max), and varbinary(max) data types are complete replacements for the SQL Server 2000 text, ntext, and image data types. The text, ntext, and image data types and their support functions will be removed in a future version of SQL Server. Because they are deprecated, Microsoft recommends you avoid these older data types for new development.
The new max data types support a .WRITE clause extension to the UPDATE statement to perform optimized minimally logged updates and appends to varchar(max), varbinary(max), and nvarchar(max) types. You can use the .WRITE clause by appending it to the end of the column name in your UPDATE statement. The example in Listing 17-15 compares performance of the .WRITE clause to a simple string concatenation when updating a column. The results of this simple comparison are shown in Figure 17-11. Listing 17-15. Comparison of .WRITE Clause and String Append -- Turn off messages that can affect performance SET NOCOUNT ON; -- Create and initially populate a test table CREATE TABLE #test
541
542
CHAPTER 17 ■ NEW T-SQL FEATURES
( Id int NOT NULL PRIMARY KEY, String varchar(max) NOT NULL ); INSERT INTO #test ( Id, String ) VALUES ( 1, '' ), ( 2, '' ); -- Initialize variables and get start time DECLARE @i int = 1; DECLARE @quote varchar(50) = 'Four score and seven years ago...'; DECLARE @start_time datetime2(7) = SYSDATETIME(); -- Loop 2500 times and use .WRITE to append to a varchar(max) column WHILE @i < 2500 BEGIN UPDATE #test SET string.WRITE(@quote, LEN(string), LEN(@quote)) WHERE Id = 1; SET @i += 1; END; SELECT '.WRITE Clause', DATEDIFF(ms, @start_time, SYSDATETIME()), 'ms'; -- Reset variables and get new start time SET @i = 1; SET @start_time = SYSDATETIME(); -- Loop 2500 times and use string append to a varchar(max) column WHILE @i < 2500 BEGIN UPDATE #test SET string += @quote WHERE Id = 2;
CHAPTER 17 ■ NEW T-SQL FEATURES
SET @i += 1; END; SELECT 'Append Method', DATEDIFF(ms, @start_time, SYSDATETIME()), 'ms'; SELECT Id, String, LEN(String) FROM #test; DROP TABLE #test;
Figure 17-11. Testing the .WRITE clause against simple string concatenation As you can see in this example, the .WRITE clause is appreciably more efficient than a simple string concatenation when updating a max data type column. Note that these times were achieved on one of my development machines, and your results may vary significantly depending on your specific configuration. You can expect the .WRITE method to perform more efficiently than simple string concatenation when updating max data type columns, however. You should note the following about the .WRITE clause: • The second .WRITE parameter, @offset, is a zero-based bigint and cannot be negative. The first character of the target string is at offset 0. • If the @offset parameter is NULL, the expression is appended to the end of the target string. @length is ignored in this case. • If the third parameter, @length, is NULL, SQL Server truncates anything past the end of the string expression (the first .WRITE parameter) after the target string is updated. The @length parameter is a bigint and cannot be negative.
Synonyms Synonyms provide a handy way to alias database objects. This can help make code easier to read and reduce the number of keystrokes while coding. Synonyms are particularly useful for aliasing three- and four-part names. You can create synonyms for a variety of database
543
544
CHAPTER 17 ■ NEW T-SQL FEATURES
objects, including tables, views, procedures, functions, and aggregates. The CREATE SYNONYM statement creates a synonym, as demonstrated in Listing 17-16. Listing 17-16. Creating a Synonym for a Table CREATE SYNONYM Folks FOR AdventureWorks.Person.Person; SELECT LastName, FirstName, MiddleName FROM Folks; Listing 17-16 creates the synonym Folks for the AdventureWorks.Person.Person table. You can use the synonym to reference the base object as I did with the SELECT query in the sample listing. You can drop synonyms with the DROP SYNONYM statement, shown in Listing 17-17. Listing 17-17. Dropping a Synonym DROP SYNONYM Folks;
■Tip Synonyms use late binding, so the object a synonym references does not have to exist at the time you create the synonym.
FILESTREAM Support SQL Server is optimized for dealing with highly structured relational data, but SQL developers have long had to deal with heterogeneous unstructured data. The varbinary(max) LOB data type provides a useful method of storing arbitrary binary data directly in database tables; however, it still has some limitations, including the following: • There is a hard 2.1 GB limit on the size of binary data that can be stored in a varbinary(max) column, which can be an issue if the documents you need to store are larger. • Storing and managing large varbinary(max) data in SQL Server can have a negative impact on performance, owing largely to the fact that the SQL Server engine must maintain proper locking and isolation levels to ensure data integrity in the database. Many developers and administrators have come up with clever solutions to work around this problem. Most of these solutions are focused on storing binary large object (BLOB) data as files in the file system and storing file paths pointing to those files in the database. This introduces additional complexities to the system since you must maintain the links between
CHAPTER 17 ■ NEW T-SQL FEATURES
database entries and physical files in the file system. You also must manage BLOB data stored in the file system using external tools, outside of the scope of database transactions. Finally, this type of solution can double the amount of work required to properly secure your data, since you must manage security in the database and separately in the file system. SQL Server 2008 provides a third option: integrated FILESTREAM support. SQL Server can store FILESTREAM-enabled varbinary(max) data as files in the file system. SQL Server can manage the contents of the FILESTREAM containers on the file system for you and control access to the files, while the NT File System (NTFS) provides efficient file streaming and file system transaction support. This combination of SQL Server and NTFS functionality provides several advantages when dealing with LOB data, including increased efficiency, manageability, and concurrency. Microsoft provides some general guidelines for use of FILESTREAM over regular LOB data types, including the following: • When the average size of your BLOBs is greater than 1 MB • When you have to store any BLOBs that are larger than 2.1 GB • When fast read access is a priority • When you want to access BLOB data from middle-tier code
■Tip For smaller BLOB data, storing the data directly in the database might make more sense than using FILESTREAM.
Enabling FILESTREAM Support The first step to using FILESTREAM functionality in SQL Server is enabling it. You can enable FILESTREAM support through the SQL Server Configuration Manager. You can set FILESTREAM access in the SQL Server service Properties ➤ FILESTREAM page. Once you’ve enabled FILESTREAM support, you can set the level of access for the SQL Server instance with sp_configure. Listing 17-18 enables FILESTREAM support on the SQL Server instance for the maximum allowable access. Listing 17-18. Enabling FILESTREAM Support on the Server EXEC sp_ configure 'filestream access level', 2; GO RECONFIGURE; GO Currently, when you change the FILESTREAM support level on a SQL Server instance, you receive a message that you need to restart the server. The SQL Server team is working to eliminate this requirement. The configuration value defines the access level for FILESTREAM support. The levels supported are listed in Table 17-2.
545
546
CHAPTER 17 ■ NEW T-SQL FEATURES
Table 17-2. FILESTREAM Access Levels
Configuration Value
Description
0
Disabled (default)
1
Access via T-SQL only
2
Access via T-SQL and file system
You can use the query in Listing 17-19 to see the FILESTREAM configuration information at any time. Sample results from my local server are shown in Figure 17-12. Listing 17-19. Viewing FILESTREAM Configuration Information SELECT SERVERPROPERTY('ServerName') AS Server_Name, SERVERPROPERTY('FilestreamSharename') AS Share_Name, CASE SERVERPROPERTY('FilestreamEffectiveLevel') WHEN 0 THEN 'Disabled' WHEN 1 THEN 'T-SQL Access Only' WHEN 2 THEN 'Local T-SQL/File System Access Only' WHEN 3 THEN 'Local T-SQL/File System and Remote File System Access' END AS Effective_Level, CASE SERVERPROPERTY('FilestreamConfiguredLevel') WHEN 0 THEN 'Disabled' WHEN 1 THEN 'T-SQL Access Only' WHEN 2 THEN 'Local T-SQL/File System Access Only' WHEN 3 THEN 'Local T-SQL/File System and Remote File System Access' END AS Configured_Level;
Figure 17-12. Viewing FILESTREAM configuration information
Creating FILESTREAM Filegroups Once you’ve enabled FILESTREAM support on your SQL Server instance, you have to create a SQL Server filegroup with the CONTAINS FILESTREAM option. This filegroup is where SQL Server will store FILESTREAM BLOB files. The AdventureWorks 2008 sample database already contains a FILESTREAM filegroup, which is shown in the CREATE DATABASE statement in Listing 17-20. The FILEGROUP clause of the statement that creates the FILESTREAM filegroup is shown in bold.
CHAPTER 17 ■ NEW T-SQL FEATURES
Listing 17-20. CREATE DATABASE for AdventureWorks 2008 Database CREATE DATABASE AdventureWorks ( NAME = N'AdventureWorks2008_Data', FILENAME = N'C:\Program Files\Microsoft SQL Server\MSSQL10.MSSQLSERVER\➥ MSSQL\DATA\AdventureWorks2008.mdf' ), FILEGROUP DocumentFileStreamGroup CONTAINS FILESTREAM DEFAULT ( NAME = N'FileStreamDocuments', FILENAME = N'C:\Program Files\Microsoft SQL Server\MSSQL10.MSSQLSERVER\➥ MSSQL\DATA\AdventureWorks2008_2.Documents' ) LOG ON ( NAME = N'AdventureWorks2008_Log', FILENAME = N'C:\Program Files\Microsoft SQL Server\MSSQL10.MSSQLSERVER\➥ MSSQL\DATA\AdventureWorks2008_1.ldf' ); GO Alternatively, if your existing database doesn’t contain a FILESTREAM filegroup, but you would like to add one, you can use the ALTER DATABASE statement as shown in Listing 17-21. Listing 17-21. Adding a FILESTREAM Filegroup to an Existing Database ALTER DATABASE AdventureWorks ADD FILEGROUP DocumentFileStreamGroup CONTAINS FILESTREAM; GO ALTER DATABASE AdventureWorks ADD FILE ( NAME = N'FileStreamDocuments', FILENAME = N'C:\Program Files\Microsoft SQL Server\MSSQL10.MSSQLSERVER\➥ MSSQL\DATA\AdventureWorks2008_2.Documents' ) TO FILEGROUP DocumentFileStreamGroup; GO
547
548
CHAPTER 17 ■ NEW T-SQL FEATURES
FILESTREAM-Enabling Tables Once you’ve enabled FILESTREAM on the server instance and created a FILESTREAM filegroup, you’re ready to create FILESTREAM-enabled tables. FILESTREAM storage is accessed by creating a varbinary(max) column in a table with the FILESTREAM attribute. The FILESTREAM-enabled table must also have a uniqueidentifier column with a ROWGUIDCOL attribute. The Production. Document table in the AdventureWorks sample database is FILESTREAM-enabled. The Document column is declared as a varbinary(max) with the FILESTREAM attribute, and the rowguid column is declared as a uniqueidentifier with the ROWGUIDCOL attribute. Listing 17-22 shows the CREATE TABLE statement for the Production.Document table, with the Document and rowguid columns shown in bold. Listing 17-22. Production.Document FILESTREAM-Enabled Table CREATE TABLE Production.Document ( DocumentNode hierarchyid NOT NULL PRIMARY KEY, DocumentLevel AS (DocumentNode.GetLevel()), Title nvarchar(50) NOT NULL, Owner int NOT NULL, FolderFlag bit NOT NULL, FileName nvarchar(400) NOT NULL, FileExtension nvarchar(8) NOT NULL, Revision nchar(5) NOT NULL, ChangeNumber int NOT NULL, Status tinyint NOT NULL, DocumentSummary nvarchar(max) NULL, Document varbinary(max) FILESTREAM NULL, rowguid uniqueidentifier ROWGUIDCOL NOT NULL, ModifiedDate datetime NOT NULL ); GO The AdventureWorks database also comes standard with sample files stored in the FILESTREAM filegroup accessible through the Document column of the Production.Document table. You can view these files in Windows Explorer, as shown in Figure 17-13. The file names appear as a jumble of grouped digits that don’t offer up much information about the BLOB files’ contents.
■Caution SQL Server also creates a file named filestream.hdr. This file is used by SQL Server to manage FILESTREAM data. Do not open or modify this file.
CHAPTER 17 ■ NEW T-SQL FEATURES
Figure 17-13. BLOB files stored in the FILESTREAM filegroup
Accessing FILESTREAM Data You can access and manipulate your FILESTREAM-enabled varbinary(max) columns using standard SQL Server SELECT queries and DML statements like INSERT and DELETE. Listing 17-23 demonstrates querying the varbinary(max) column of the Production.Document table. The results are shown in Figure 17-14. Listing 17-23. Querying a FILESTREAM-Enabled Table SELECT d.Title, d.Document.PathName() AS BLOB_Path, d.Document AS BLOB_Data FROM Production.Document d WHERE d.Document IS NOT NULL;
Figure 17-14. Results of querying the FILESTREAM-enabled table
549
550
CHAPTER 17 ■ NEW T-SQL FEATURES
A property called PathName() is exposed on FILESTREAM-enabled varbinary(max) columns to retrieve the full path to the file containing the BLOB data. The query in Listing 17-23 uses PathName() to retrieve the BLOB path along with the BLOB data. As you can see from this example, SQL Server abstracts away the NTFS interaction to a large degree, allowing you to query and manipulate FILESTREAM data as if it were relational data stored directly in the database.
■Tip In most cases, it’s not a good idea to retrieve all BLOB data from a FILESTREAM-enabled table in a single query as in this example. For large tables with large BLOBs, this can cause severe performance problems and make client applications unresponsive. In this case, however, the BLOB data being queried is actually very small in size, and there are few rows in the table.
SQL Server 2008 provides support for the OpenSqlFilestream API for accessing and manipulating FILESTREAM data in client applications. A full description of the OpenSqlFilestream API is beyond the scope of this book, but Accelerated SQL Server 2008, by Rob Walters et al. (Apress, 2008), provides a description of the OpenSqlFilestream API with source code for a detailed client application.
Summary In this chapter, I’ve taken a step back to discuss functionality supported by SQL Server 2008 that was first introduced in SQL Server 2005. Synonyms, for example, provide a means of aliasing database objects, simplifying coding, management, and administration. The SQL Server max data types greatly simplify the task of querying, managing, and manipulating LOB data inside the database. New set-based operators like INTERSECT and EXCEPT provide a simplified way to use a result set to restrict the results produced by another result set. Additional features like the OUTPUT clause provide real-time feedback about rows affected by the INSERT, UPDATE, DELETE, and MERGE DML statements. The TOP keyword has been enhanced with options to use a variable or subquery to specify the number of rows to return. TOP functionality has also been extended to DML statements like UPDATE and DELETE in addition to SELECT queries. The NEWSEQUENTIALID function allows you to generate sequential GUIDs to minimize page splitting caused by clustered indexes. CROSS APPLY and OUTER APPLY allow you to invoke functions on query result set rows using a set-based syntax. The TABLESAMPLE clause allows you to quickly and easily retrieve random rows from a table. I also continued the exploration of new SQL Server 2008 features like the new date and time manipulation functions in support of the new SQL Server 2008 date and time data types. I also discussed SQL Server 2008’s FILESTREAM support, which allows SQL Server to store BLOB data in the file system, increasing BLOB data retrieval efficiency, increasing scalability, and simplifying management and administration.
CHAPTER 17 ■ NEW T-SQL FEATURES
EXERCISES 1. [Choose all that apply] SQL Server 2008 supports which of the following set-based operators: a.
INTERSECT
b.
EXCEPT
c.
COMPLEMENT
d.
INCLUDED
2. [True/false] The OUTPUT clause provides real-time feedback about rows affected by DML statements like DELETE and INSERT. 3. [Fill in the blank] The TABLESAMPLE clause returns a ___ sample of rows from a table. 4. [Choose one] Which of the following functions adjusts a given datetimeoffset value to another specified time offset: a.
TODATETIMEOFFSET
b.
SWITCHOFFSET
c.
CHANGEOFFSET
d.
CALCULATEOFFSET
5. [Choose all that apply] Which of the following LOB data types are deprecated: a.
image
b.
varchar(max)
c.
text
d.
ntext
e.
All of the above
6. [True/false] The FILESTREAM functionality in SQL Server 2008 uses NTFS to provide streaming BLOB data support.
551
CHAPTER
18
Error Handling and Dynamic SQL P
rior to SQL Server 2005, error handling was limited almost exclusively to the @@error system function and the RAISERROR statement, or through client-side exception handling. T-SQL in SQL Server 2008 still provides access to these tools, but also supports modern structured error handling similar to that offered by other high-level languages such as C++, C#, and Visual Basic. In this chapter, I will discuss legacy T-SQL error-handling functionality and the newer structured error-handling model in T-SQL. This chapter introduces tools useful for debugging server-side code, including T-SQL statements and the Visual Studio IDE. I will also discuss dynamic SQL in this chapter, which is often more difficult to debug and manage than standard (nondynamic) T-SQL statements. Dynamic SQL, while a useful tool, also has security implications, which I will address.
Error Handling SQL Server 2008 provides improvements in error handling over SQL Server 2000 and prior releases. In this section, I’ll discuss legacy error handling and SQL Server 2008 improved TRY...CATCH structured error handling.
Legacy Error Handling In SQL Server 2000, the primary method of handling exceptions was through the @@error system function. This function returns an int value representing the current error code. An @@error value of 0 means no error occurred. One of the major limitations of this function is that it is automatically reset to 0 after every successful statement. This means you cannot have any statements between the code that you expect might produce an exception and the code that checks the value of @@error. This also means that after @@error is checked, it is automatically reset to 0, so you can’t both check the value of @@error and return @@error from within a SP. Listing 18-1 demonstrates an SP that generates an error, and attempts to print the error code from within the procedure and return the value of @@error to the caller. Listing 18-1. Incorrect Error Handling with @@error CREATE PROCEDURE dbo.TestError (@e int OUTPUT) AS
553
554
CHAPTER 18 ■ ERROR HANDLING AND DYNAMIC SQL
BEGIN INSERT INTO Person.Person(BusinessEntityID) VALUES (1); PRINT N'Error code in procedure = ' + CAST(@@error AS nvarchar(10)); SET @e = @@error; END GO DECLARE @ret int, @e int; EXEC @ret = dbo.TestError @e OUTPUT; PRINT N'Returned error code = ' + CAST(@e AS nvarchar(10)); PRINT N'Return value = ' + CAST(@ret AS nvarchar(10)); The TestError procedure in Listing 18-1 demonstrates one problem with @@error. The result of executing the procedure should be similar to the following: Msg 515, Level 16, State 2, Procedure TestError, Line 4 Cannot insert the value NULL into column 'PersonType', table 'AdventureWorks.Person.Person'; column does not allow nulls. INSERT fails. The statement has been terminated. Error code in procedure = 515 Returned error code = 0 Return value = -6 As you can see, the error code generated by the failed INSERT statement is 515 when printed inside the SP, but a value of 0 (no error) is returned to the caller via the OUTPUT parameter. The problem is with the following line in the SP: PRINT N'Error code in procedure = ' + CAST(@@error AS nvarchar(10)); The PRINT statement automatically resets the value of @@error after it executes, meaning you can’t test or retrieve the same value of @@error afterward (it will be 0 every time). The workaround is to store the value of @@error in a local variable immediately after the statement you suspect might fail (in this case the INSERT statement). Listing 18-2 demonstrates this method of using @@error. Listing 18-2. Corrected Error Handling with @@error CREATE PROCEDURE dbo.TestError2 (@e int OUTPUT) AS BEGIN INSERT INTO Person.Person(BusinessEntityID) VALUES (1); SET @e = @@error;
CHAPTER 18 ■ ERROR HANDLING AND DYNAMIC SQL
PRINT N'Error code in procedure = ' + CAST(@e AS nvarchar(10)); END GO DECLARE @ret int, @e int; EXEC @ret = dbo.TestError2 @e OUTPUT; PRINT N'Returned error code = ' + CAST(@e AS nvarchar(10)); PRINT N'Return value = ' + CAST(@ret AS nvarchar(10)); By storing the value of @@error immediately after the statement you suspect might cause an error, you can test or retrieve the value as often as you like for further processing. The following is the result of the new procedure: Msg 515, Level 16, State 2, Procedure TestError2, Line 4 Cannot insert the value NULL into column 'PersonType', table 'AdventureWorks.Person.Person'; column does not allow nulls. INSERT fails. The statement has been terminated. Error code in procedure = 515 Returned error code = 515 Return value = -6 In this case, the proper @@error code is both printed and returned to the caller by the SP. Also of note is that the SP return value is automatically set to a nonzero value when the error occurs.
Try...Catch Exception Handling SQL Server 2008 supports the TRY...CATCH model of exception handling common in other modern programming languages. In the T-SQL TRY...CATCH model, you wrap the code you suspect could cause an exception in a BEGIN TRY...END TRY block. This block is immediately followed by a BEGIN CATCH...END CATCH block that will be invoked only if the statements in the TRY block cause an error. Listing 18-3 demonstrates TRY...CATCH exception handling with a simple SP. Listing 18-3. Sample TRY...CATCH Error Handling CREATE PROCEDURE dbo.TestError3 (@e int OUTPUT) AS BEGIN SET @e = 0; BEGIN TRY INSERT INTO Person.Address (AddressID) VALUES (1); END TRY
555
556
CHAPTER 18 ■ ERROR HANDLING AND DYNAMIC SQL
BEGIN CATCH SET @e = ERROR_NUMBER(); PRINT N'Error Code = ' + CAST(@e AS nvarchar(10)); PRINT N'Error Procedure = ' + ERROR_PROCEDURE(); PRINT N'Error Message = ' + ERROR_MESSAGE(); END CATCH END GO DECLARE @ret int, @e int; EXEC @ret = dbo.TestError3 @e OUTPUT; PRINT N'Error code = ' + CAST(@e AS nvarchar(10)); PRINT N'Return value = ' + CAST(@ret AS nvarchar(10)); The result is similar to Listing 18-2, but SQL Server’s TRY...CATCH support gives you more control and flexibility over the output, as shown here: (0 row(s) affected) Error Code = 544 Error Procedure = TestError3 Error Message = Cannot insert explicit value for identity column in table 'Address' when IDENTITY_INSERT is set to OFF. Returned error code = 544 Return value = -6 The T-SQL statements in the BEGIN TRY...END TRY block execute normally. If the block completes without error, the T-SQL statements between the BEGIN CATCH...END CATCH block are skipped. If an exception is thrown by the statements in the TRY block, control transfers to the statements in the BEGIN CATCH...END CATCH block. The CATCH block exposes several functions for determining exactly what error occurred and where it occurred. I used some of these functions in Listing 18-3 to return additional information about the exception thrown. These functions are available only between the BEGIN CATCH...END CATCH keywords, and only during error handling when control has been transferred to it by an exception thrown in a TRY block. If used outside of a CATCH block, all of these functions return NULL. The functions available are listed in Table 18-1. Table 18-1. CATCH Block Functions
Function Name
Description
ERROR_LINE()
Returns the line number on which the exception occurred
ERROR_MESSAGE()
Returns the complete text of the generated error message
ERROR_PROCEDURE()
Returns the name of the SP or trigger where the error occurred
ERROR_NUMBER()
Returns the number of the error that occurred
CHAPTER 18 ■ ERROR HANDLING AND DYNAMIC SQL
Function Name
Description
ERROR_SEVERITY()
Returns the severity level of the error that occurred
ERROR_STATE()
Returns the state number of the error that occurred
TRY...CATCH blocks can be nested. You can have TRY...CATCH blocks within other TRY blocks or CATCH blocks to handle errors that might be generated within your exception-handling code. You can also test the state of transactions within a CATCH block by using the XACT_STATE function. I strongly recommend testing your transaction state before issuing a COMMIT TRANSACTION or ROLLBACK TRANSACTION statement in your CATCH block to ensure consistency. Table 18-2 lists the return values for XACT_STATE and how you should handle each in your CATCH block. Table 18-2. XACT_STATE Function Return Values
XACT_STATE
Meaning
-1
There is an uncommittable transaction pending. Issue a ROLLBACK TRANSACTION statement.
0
There is no transaction pending. No action is necessary.
1
There is a committable transaction pending. Issue a COMMIT TRANSACTION statement.
The T-SQL TRY...CATCH method of error handling has certain limitations attached to it. For one, TRY...CATCH can only capture errors that have a severity greater than 10 that do not close the database connection. The following errors are not caught: • Errors with a severity of 10 or lower (informational messages) are not caught. • Errors with a severity level of 20 or higher (connection-termination errors) are not caught, because they close the database connection immediately. • Most compile-time errors, such as syntax errors, are not caught by TRY...CATCH, although there are exceptions (e.g., when using dynamic SQL). • Statement-level recompilation errors, such as object-name resolution errors, are not caught, due to SQL Server’s deferred-name resolution. Also keep in mind that errors captured by a TRY...CATCH block are not returned to the caller. You can, however, use the RAISERROR statement (described in the next section) to return error information to the caller.
The RAISERROR Statement The RAISERROR statement is a T-SQL statement that allows you to throw an exception at runtime. It is similar to the throw statement, used to throw and rethrow exceptions in languages such as C++ and C#. The RAISERROR statement accepts a message ID number or message string, severity level, state information, and optional argument parameters for special formatting codes in error messages. Listing 18-4 uses RAISERROR to throw an exception with a custom error message, a severity level of 17, and a state of 127.
557
558
CHAPTER 18 ■ ERROR HANDLING AND DYNAMIC SQL
Listing 18-4. Raising a Custom Exception with RAISERROR RAISERROR ('This is an exception.', 17, 127); When you pass a string error message to the RAISERROR statement, as in Listing 18-4, a default error code of 50000 is raised. If you specify a message ID number instead, the number must be between 13000 and 2147483647, and it cannot be 50000. The severity level is a number between 0 and 25, with each level representing the seriousness of the error. Table 18-3 lists the severity levels recognized by SQL Server. Table 18-3. SQL Server Error Severity Levels
Range
Description
0–10
Informational messages
11–18
Errors
19–25
Fatal errors
■Tip Only members of the sysadmin fixed server role of users with ALTER
TRACE permissions can specify
severity levels greater than 18 with RAISERROR, and the WITH LOG option must be used.
The state value passed to RAISERROR is a user-defined informational value between 1 and 127. The state information can be used to help locate specific errors within your code when using RAISERROR. For instance, you can use a state of 1 for the first RAISERROR statement in a given SP and a state of 2 for the second RAISERROR statement in the same SP. The state information provided by RAISERROR isn’t as necessary in SQL Server 2008 since you can retrieve much more descriptive and precise information from the functions available in CATCH blocks. The RAISERROR statement supports an optional WITH clause for specifying additional options. The WITH LOG option logs the error raised to the application log and the SQL error log, the WITH NOWAIT option sends the error message to the client immediately, and the WITH SETERROR option sets the @@error system function (in a CATCH block) to an indicated message ID number. This should be used with a severity of 10 or less to set @@error without causing other side effects (e.g., batch termination). RAISERROR can be used within a TRY or CATCH block to generate errors. Within the TRY block, if RAISERROR generates an error with severity between 11 and 19, control passes to the CATCH block. For errors with severity of 10 or lower, processing continues in the TRY block. For errors with severity of 20 or higher, the client connection is terminated and control does not pass to the CATCH block. For these high-severity errors, the error is returned to the caller.
Debugging Tools In procedural languages like C#, debugging code is somewhat easier than in declarative languages like T-SQL. In procedural languages, you can easily follow the flow of a program, setting breakpoints at each atomic step of execution. In declarative languages, however, a
CHAPTER 18 ■ ERROR HANDLING AND DYNAMIC SQL
single statement can perform dozens or hundreds of steps in the background, most of which you will probably not even be aware of at execution time. The good news is that the SQL Server team did not leave us without tools to debug and troubleshoot T-SQL code. The unpretentious PRINT statement provides a very simple and effective method of debugging.
PRINT Statement Debugging The PRINT statement, as demonstrated in Listing 18-3, is a simple and useful server-side debugging tool. Simply printing constants and variable values to standard output during script or SP execution often provides enough information to quickly locate problem code. PRINT works from within SPs and batches, but does not work inside of UDFs, because of the built-in restrictions on functions causing side effects. Consider the sample code in Listing 18-5, in which I am trying to achieve an end result where @i is equal to 10. Because the end result of the code is not @i = 10, I’ve added a couple of simple PRINT statements to uncover the reason. Listing 18-5. Debugging Script with PRINT DECLARE @i int; PRINT N'Initial value of @i = ' + COALESCE(CAST(@i AS nvarchar(10)), N'NULL'); SET @i += 10; PRINT N'Final value of @i = ' + COALESCE(CAST(@i AS nvarchar(10)), N'NULL'); The result, shown in Figure 18-1, shows that the desired end result is not occurring because I failed to initialize the variable @i to 0 at the beginning of my script. Because the initial value of @i is NULL, my end result is NULL. Once I’ve identified the issue, fixing it is a relatively simple matter in this example.
Figure 18-1. Results of PRINT statement debugging In addition to the simple PRINT statement, you can use the RAISERROR statement with NOWAIT clause to send a message or status indication immediately to the client. While the PRINT statement waits for the buffer to flush, RAISERROR with the NOWAIT clause sends the message immediately.
Trace Flags SQL Server 2008 provides several trace flags that can help with debugging, particularly when you suspect you have a problem with SQL Server settings. Trace flags can turn on or off specific SQL Server behavior, or change other server characteristics temporarily for a server or session. As an example, trace flag 1204 returns the resources and types of locks participating in a deadlock, and the current command affected.
559
560
CHAPTER 18 ■ ERROR HANDLING AND DYNAMIC SQL
■Tip Many trace flags are undocumented, and may only be revealed to you by Microsoft Product Support Services when you report a specific issue; but those that are documented can provide very useful information. BOL provides a complete list of documented SQL Server 2008 trace flags under the title of “Trace Flags.”
Turning on or off a trace flag is as simple as using the DBCC TRACEON and DBCC TRACEOFF statements, as shown in Listing 18-6. Listing 18-6. Turning Trace Flag 1204 On and Off DBCC TRACEON (1204, -1); GO DBCC TRACEOFF (1204, -1); GO Trace flags may report information via standard output, the SQL Server log, or additional log files created just for that specific trace flag. Check BOL for specific information about the methods that specific trace flags report back to you.
SSMS Integrated Debugger SQL Server 2005 did away with the integrated user interface debugger in SSMS, although it was previously a part of Query Analyzer (QA). Apparently, the thought was that Visual Studio would be the debugging tool of choice for stepping through T-SQL code and setting breakpoints in SPs. Now, in SQL Server 2008, integrated SSMS debugging is back by popular demand. The SSMS main menu contains several debugging actions accessible through the new Debug menu, as shown in Figure 18-2.
Figure 18-2. The SSMS Debug menu The options are similar to the options available when debugging Visual Studio projects. From this menu, you can start debugging, step into/over your code one statement at a time, and manage breakpoints. Figure 18-3 shows an SSMS debugging session that has just hit a breakpoint inside the body of a SP.
CHAPTER 18 ■ ERROR HANDLING AND DYNAMIC SQL
Figure 18-3. Stepping into code with the SSMS debugger The SSMS debugger provides several windows that provide additional debugging information, including the Call Stack, Breakpoints, Command, Output, Locals, and Watch windows.
Visual Studio T-SQL Debugger Visual Studio 2008 Pro and Team editions also offer an excellent facility for stepping through SPs and UDFs just like any Visual Basic or C# application. You can access Visual Studio’s T-SQL debugger through the Server Explorer window. Simply expand the data connection pointing at your SQL Server instance and the SP or function you wish to debug under the appropriate database. Then right-click the procedure or function and select either the Step Into Procedure or Step Into Function option from the pop-up context menu. Figure 18-4 demonstrates by selecting to step into the dbo.uspGetBillOfMaterials SP in the AdventureWorks 2008 database.
■Tip It’s much easier to configure Visual Studio T-SQL debugging on a locally installed instance of SQL Server than to set up remote debugging. BOL offers information about setting up both local and remote SQL Server debugging in the article “Debugging SQL” (http://msdn.microsoft.com/en-us/library/ zefbf0t6.aspx).
561
562
CHAPTER 18 ■ ERROR HANDLING AND DYNAMIC SQL
Figure 18-4. Stepping into the dbo.uspGetBillOfMaterials procedure If your function or procedure requires parameters, the Run Stored Procedure window will open and ask you to enter values for the required parameters (see Figure 18-5). For this example, I’ve entered 770 for the @StartProductID parameter and 7/10/2001 for the @CheckDate parameter required by the dbo.uspGetBillOfMaterials procedure.
Figure 18-5. Entering parameter values in the Run Stored Procedure window After you enter the parameters, the procedure will begin running in Debug mode in Visual Studio. Visual Studio shows the script and highlights each line in yellow as you step through it, as shown in Figure 18-6.
CHAPTER 18 ■ ERROR HANDLING AND DYNAMIC SQL
Figure 18-6. Stepping through an SP in Debug mode In Debug mode, you can set breakpoints by clicking the left border and using the Continue (F5), Stop Debugging (Shift+F5), Step Over (F10), Step Into (F11), and Step Out (Shift+F11) commands, just like when you debug C# or Visual Basic programs. You can also add watches and view locals to inspect parameter and variable values as your code executes. Any result sets and return values from the SP are shown in the Visual Studio Output window, as in Figure 18-7.
Figure 18-7. The Visual Studio Output window
563
564
CHAPTER 18 ■ ERROR HANDLING AND DYNAMIC SQL
Dynamic SQL SQL Server MVP Erland Sommarskog said it best: dynamic SQL is a curse and a blessing. Put simply, dynamic SQL is a means of constructing SQL statements as strings in your server-side (or even client-side) applications and executing them dynamically, on the fly. When used properly, dynamic SQL can be used to generate complex queries at runtime, in some cases improve performance, and do tasks that just aren’t possible (or are extremely difficult) in standard, nondynamic T-SQL. The downside is that there are numerous ways to shoot yourself in the foot with dynamic SQL. If not used properly, dynamic SQL can open up security holes in your system big enough to drive a truck through. Even as I began writing this book, I received a newsletter highlighting a recent spate of SQL injection attacks against over half a million web pages, including some United Nations–owned web sites. In this section, I will discuss the various methods of executing dynamic SQL, as well as some of the risks and rewards that Erland alludes to.
The EXECUTE Statement The most basic form of server-side dynamic SQL is achieved by simply passing a SQL query or other instruction as a string to the EXECUTE statement (often abbreviated EXEC). The EXECUTE statement accepts a char, varchar, nchar, or nvarchar constant, variable, or expression that contains valid T-SQL statements. Listing 18-7 shows the most basic form of dynamic SQL with an EXECUTE statement and a string constant. Listing 18-7. Basic EXECUTE Statement EXECUTE (N'SELECT ProductID FROM Production.Product'); As you can see, there is no real advantage to performing dynamic SQL on a string constant. A simple SELECT statement without the EXECUTE would perform the same function and return the same result. The true power of dynamic SQL is that you can build a SQL statement or query dynamically and execute it. Listing 18-8 demonstrates how this can be done. Listing 18-8. More Complex Dynamic SQL Example DECLARE @min_product_id int = 500; DECLARE @sql_stmt nvarchar(128) = N'SELECT ProductID ' + N'FROM Production.Product ' + N'WHERE ProductID >= ' + CAST(@min_product_id AS nvarchar(10)); EXECUTE (@sql_stmt); Now that I’ve given you this simple code sample, let’s explore all the things that are wrong with it.
SQL Injection and Dynamic SQL In Listing 18 -9, the variable @sql_stmt contains the dynamic SQL query. The query is built dynamically by appending the minimum product ID to the WHERE clause. This is not the recommended method of performing this type of query, and I show it here to make a point.
CHAPTER 18 ■ ERROR HANDLING AND DYNAMIC SQL
One of the problems with this method is that you lose some of the benefits of cached query plan execution. SQL Server 2008 has some great features that can help in this area, including parameter sniffing and the ability to turn on forced parameterization, but there are many exceptions to SQL Server’s ability to automatically parameterize queries or clauses. To guarantee efficient reuse of cached query execution plans as the text of your query changes, you should parameterize queries yourself. But the big problem here is SQL injection. Although not really a problem when appending an integer value to the end of a dynamic query (as in Listing 18-8), SQL injection can provide a back door for hackers trying to access or destroy your data when you concatenate strings to create dynamic SQL queries. Take a look at the innocent-looking dynamic SQL query in Listing 18-9. I will discuss how a hacker could wreak havoc with this query after the listing. Listing 18-9. Basic Dynamic SQL Query with a String Appended DECLARE @product_name nvarchar(50) = N'Mountain'; DECLARE @sql_stmt NVARCHAR(128) = N'SELECT ProductID, Name ' + N'FROM Production.Product ' + N'WHERE Name LIKE ''' + @product_name + N'%'''; EXECUTE (@sql_stmt); This query simply returns all product IDs and names of all products that begin with the word Mountain. The problem is with how SQL Server interprets the concatenated string. The EXECUTE statement sees the following concatenated string (the bold portion reflects the value of the variable that was concatenated into the query). SELECT ProductID, Name FROM Production.Product WHERE Name LIKE 'Mountain%' A simple substitution for @product_name can execute other unwanted statements on your server. This is especially true with data coming from an external source (e.g., from the front end or application layer). Consider the following change to Listing 18-9: DECLARE @product_name nvarchar(50) = N'''; DROP TABLE Production.Product; --' The EXECUTE statement now executes the following string (again, the portion provided by the variable is shown in bold): SELECT ProductID, Name FROM Production.Product WHERE Name LIKE ''; DROP TABLE Production.Product; --%' The simple dynamic SQL query is now two queries, the second of which will drop the Production.Product table from the database! Now consider if the value of the @product_name variable had been retrieved from a user interface, like a web page. A malicious hacker could easily issue arbitrary INSERT, UPDATE, DELETE, DROP TABLE, TRUNCATE TABLE, or other statements to destroy data or open a back door into your system. Depending on how secure your server is,
565
566
CHAPTER 18 ■ ERROR HANDLING AND DYNAMIC SQL
a hacker may be able to use SQL injection to grant himself administrator rights, retrieve and modify data stored in your server’s file system, take control of your server, or access network resources. The only justification for using the string concatenation method with EXECUTE is if you have to dynamically name the tables or columns in your statements. And this is far rarer than many people think. In fact, the only time this is usually necessary is if you need to dynamically generate SQL statements around database, table, or column names—if you are creating a dynamic pivot table–type query or coding an administration tool for SQL Server, for instance. If you must use string concatenation with the EXECUTE method, be sure to take the following precautions with the strings being passed in from the user interface: • Don’t ever trust data from the front end. Always validate the data. If you are expecting only the letters A through Z and the numbers 0 through 9, reject all other characters in the input data. • Disallow apostrophes, semicolons, parentheses, and double hyphens (--) in the input if possible. These characters have special significance to SQL Server and should be avoided. If you must allow these characters, scrutinize the input thoroughly before using it. • If you absolutely must allow apostrophes in your data, escape them (double them up) before accepting the input. • Reject strings that contain binary data, escape sequences, and multiline comment markers (/* and */). • Validate XML input data against an XML schema when possible. • Take extra special care when input data contains xp_ or sp_, as it may indicate an attempt to run procedures or XPs on your server.
■Tip If you are concatenating one-part table and object names into SQL statements on the server side, you can use the QUOTENAME function to safely quote them. The QUOTENAME function does not work for two-, three-, and four-part names, however.
Usually, data validations like the ones listed previously are performed on the client side, on the front end, in the application layer, or in the middle tiers of multitier systems. In highly secure and critical applications, it may be important to also perform server-side validations or some combination of client- and server-side validations. Triggers and check constraints can perform this type of validation on data before it’s inserted into a table, and you can create UDFs or SPs to perform validations on dynamic SQL before executing it. Listing 18-10 shows a simple UDF that uses the Numbers table created in Chapter 5 to perform basic validation on a string, ensuring that it contains only the letters A through Z, the digits 0 through 9, and the underscore character (_), which is a common validation used on usernames, passwords, and other simple data.
CHAPTER 18 ■ ERROR HANDLING AND DYNAMIC SQL
Listing 18-10. Simple T-SQL String Validation Function CREATE FUNCTION dbo.ValidateString (@string nvarchar(4000)) RETURNS int AS BEGIN DECLARE @result int = 0; WITH Numbers (Num) AS ( SELECT 1 UNION ALL SELECT Num + 1 FROM Numbers WHERE Num