Building VPN tunnels using IKE between NetScreen and Cisco IOS
379 97 334KB
English Pages 13
Recommend Papers


- Similar Topics
- Computers
- Networking
File loading please wait...
Citation preview
Interoperability
Building VPN tunnels using IKE between Netscreen and Cisco IOS
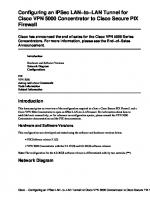
Introduction This is a guide, with examples, on how to build an IKE-based VPN tunnel between a Netscreen firewall (version 2.0) and a Cisco IOS (version 12) based router for site-to-site VPN. Sample network configuration IP Test Network (e.g., Internet) Cisco PCLeft IP: 10.1.1.61 Subnet: 255.255.255.0 Gateway route: 10.1.1.60
Netscreen
Internal Ethernet (E1) 10.1.1.60 Subnet: 255.255.255.0
Trust 10.5.1.2 Subnet: 255.255.255.0
External Ethernet (E0) 10.5.2.2 Subnet: 255.255.255.0
Untrust 10.5.2.1 Subnet: 255.255.255.0
Gateway route: 10.5.2.1
Gateway route: 10.5.2.2
PCRight IP: 10.5.1.3 Subnet: 255.255.255.0 Gateway route: 10.5.1.2
The site-to-site tunnel was setup between the Cisco on the left and the Netscreen on the right to allow hosts on the 10.1.1.0 network (e.g., PCLeft at 10.1.1.61) to talk with hosts on the 10.5.1.0 network (e.g., PCRight at 10.5.1.3). Site-to-site VPN Netscreen Configuration The complete Netscreen configuration is in Appendix B. Netscreen Basic Network Configuration The Netscreen relevant network configuration commands: set admin sys-ip 0.0.0.0 set interface trust ip 10.5.1.2 255.255.255.0 set interface untrust ip 10.5.2.1 255.255.255.0 set interface untrust gateway 10.5.2.2 set flow tcp-mss Or if using the WebUI: All the IP address information can be set in the “Configuration” screen and “Interfaces” tab.
NetScreen Confidential
4/01
You’ll have to execute the “set flow tcp-mss” command from the CLI (command line interface). The CLI can be done by telnet’ing to the Netscreen or using the console on the serial interface. Netscreen Address, VPN Gateway and IKE Definitions On the Netscreen, define the relevant address blocks: Via command line: set address untrust "ITS LAN" 10.1.1.0 255.255.255.0 set address trust "10.5.1.0" 10.5.1.0 255.255.255.0
Or via the WebUI, select the "Address" button and enter the relevant address blocks: This defines the LAN addresses behind the remote Cisco, hence the "Untrust" radio button is selected since this subnet is reachable through the Netscreen’s "Untrust" interface:
NetScreen Confidential
NetScreen Confidential
On the Netscreen, we should also define the internal IP numbers that can use this VPN tunnel. In our example, this is the 10.5.1.0/24 subnet. Via the WebUI, we select the "Trust" button since this subnet is reachable (from the Netscreen’s perspective) via its "Trust" interface:
NetScreen Confidential
Now we need to create the VPN gateway and AutoIKE definitions. Click on the "VPN" button of the WebUI's left frame and select the "Gateway" tab. Select the "New Remote Gateway" link at the bottom of the right frame to define the parameters related to the gateway at the other end of the tunnel. In our example, this is the Cisco:
NetScreen Confidential
Set the "Preshare Key". This is then activated on the netscreen by choosing a Phase 1 Proposal that starts with a "pre-…" instead of a "rsa-…" option (which is for use with certificates). In our case, we chose "pre-g2-des-md5". We are going to use pre-shared secrets and not certificates, DiffieHellman group 2 for the shared secret calculation, DES encryption, and MD5 authentication hash. These same options need to be selected on the other VPN tunnel end-point. In this case, the Cisco. The Cisco’s external interface IP address is entered in the "Remote Gateway's IP Address" field. In our example, this is 10.5.2.2. You should use "Main Mode" when you can, as it is a bit more secure then "Aggressive Mode". After you click "OK" at the bottom of the screen, then click on the "AutoKey IKE" tab to finish adding the VPN definitions. Click on "New AutoKey IKE Entry" at the bottom of the right frame:
NetScreen Confidential
Here we define the rest of the IKE parameters. In our example, we have chosen to disable "replay" protection. Just make sure you set this option to be the same on both ends of the tunnel. The "Remote Gateway Tunnel Name" is the gateway we just defined above under the "Gateway" tab. The Phase 2 proposal needs to be the same on both systems. In our example, we chose "nopfsesp-des-md5" meaning we want the tunnel to do no Perfect Forward Secrecy and set the tunnel up using DES encryption and the MD5 authentication hash. Don't forget to click the "OK" button at the bottom of the screen. Setting the Policy on the Netscreen Now set the policy to link all the Address and VPN definitions together and activate the tunnel. Select the "Policy" button of the left frame. Select the "Outgoing" tab. Then select "New Policy" at the bottom of the right frame:
NetScreen Confidential
We've selected the source and destination addresses to be the two Address blocks we've defined earlier. The service is "Any" meaning allow all IP traffic between these two sites across this tunnel. You could change this to limit traffic to a particular protocol or set of protocols. The action is to "Encrypt" which tells the Netscreen to VPN. The "VPN Tunnel" is set to the tunnel we defined under the "AutoKey IKE" tab of the "VPN" screen. Make sure you hit "OK" at the bottom. For new policies, the Netscreen places the policy at the bottom (or last) of the list. When a Netscreen receives an IP packet, the Netscreen does a policy search starting at the top of the policy list. Once it matches a policy, it executes the action associated with that policy. So you want to reorder your polices so the VPN is before the general "permit" policy that allows outbound (unencrypted) traffic to the Internet. To reorder, just click on the "circular" arrows under the "Config" header at the right hand side of the policy table and move the policy to the appropriate place in the list. Once reordered:
NetScreen Confidential
All this WebUI work will have generated the following commands on the Netscreen for the VPN: set ike gateway "cisco" ip 10.5.2.2 Main preshare "ihopethisworks" proposal "pre-g2-des-md5" set vpn "cisco" gateway "cisco" no-replay proposal "nopfs-esp-des-md5" set policy id 2 outgoing "10.5.1.0" "ITS LAN" "ANY" Encrypt vpn-tunnel "cisco" log count set policy id 0 outgoing "Inside Any" "Outside Any" "ANY" Permit log count Now we need to setup the Cisco router at the other end of the tunnel. Cisco Configuration The complete Cisco configuration is in Appendix A. Cisco Basic Network Configuration The following configuration information sets up the basic network information for the Cisco for the test environment depicted in the “Sample network configuration” earlier in this document. ! interface Ethernet0 ip address 10.5.2.2 255.255.255.0 no ip directed-broadcast ! interface Ethernet1 ip address 10.1.1.60 255.255.255.0 no ip directed-broadcast ! ip classless ip route 0.0.0.0 0.0.0.0 10.5.2.1 ! Cisco VPN and IKE Parameters The following configuration information sets up the IPSEC and IKE information for the Cisco for the test environment depicted in the “Sample network configuration” earlier in this document. ! crypto isakmp policy 10 hash md5 authentication pre-share group 2 lifetime 28800 crypto isakmp key ihopethisworks address 10.5.2.1 ! crypto ipsec transform-set ciscotrans esp-des esp-md5-hmac ! crypto map test 10 ipsec-isakmp set peer 10.5.2.1 set transform-set ciscotrans match address 101 !
NetScreen Confidential
Setting the Policy on the Cisco The following configuration information sets up the policy information and applies it to the external interface of the Cisco for the test environment depicted in the “Sample network configuration” earlier in this document. ! interface Ethernet0 ip address 10.5.2.2 255.255.255.0 no ip directed-broadcast crypto map test ! ! access-list 101 permit ip 10.5.1.0 0.0.0.255 10.1.1.0 0.0.0.255 access-list 101 permit ip 10.1.1.0 0.0.0.255 10.5.1.0 0.0.0.255 ! Testing and Debugging the Client’s VPN At this point, the client on the 10.1.1.0 subnet should be able to talk to the systems on the 10.5.1.0 subnet via the VPN tunnel and vi ce-versa. You can watch the IKE negotiations on the Netscreen by activating the “debug ike 10” command on the console. The following commands are useful for debugging on the Netscreen: On the console via the CLI (command line interface): "get session" will show you existing sessions and the tunnels they are using; "get sa" will show you the security associations (e.g., VPN tunnels) that have been negotiated; "debug ike 10" will show you the IKE negotiation as it happens; "debug ike 0" will turn off the IKE debugging; "debug flow 1" will show you all the information related to every packet traversing the Netscreen; "debug flow 0" will turn off the flow debugging. Never leave the debug options enabled. They cause the system to substantially slow down. If you are having troubles getting a tunnel to form, try issue the following commands: “unset ike policy-checking” “save” Also, always make sure the Netscreen has the “set flow tcp-mss” option enabled. Conclusion This document has sample configurations to set up a site-to-site VPN using IKE with pre-shared secrets between a Netscreen running ScreenOS 2.0 and a Cisco router with IOS 12.
10 NetScreen Confidential
Appendix A – Complete Cisco Configuration Router#sh run Building configuration... Current configuration: ! version 12.0 service timestamps debug uptime service timestamps log uptime no service password-encryption ! hostname Router ! boot system flash c1600-sy-mz.121-1.bin enable secret 5 $1$Wjs9$kb7bvw1eexaU3TIh0VSP01 ! ! ! ! ! ip subnet-zero no ip domain-lookup ! ! ! crypto isakmp policy 10 hash md5 authentication pre-share group 2 lifetime 28800 crypto isakmp key ihopethisworks address 10.5.2.1 ! ! crypto ipsec transform-set ciscotrans esp-des esp-md5-hmac ! ! crypto map test 10 ipsec-isakmp set peer 10.5.2.1 set transform-set ciscotrans match address 101 ! ! ! interface Ethernet0 ip address 10.5.2.2 255.255.255.0 no ip directed-broadcast crypto map test ! interface Ethernet1 ip address 10.1.1.60 255.255.255.0 no ip directed-broadcast ! ip classless ip route 0.0.0.0 0.0.0.0 10.5.2.1 no ip http server ! access-list 101 permit ip 10.5.1.0 0.0.0.255 10.1.1.0 0.0.0.255 access-list 101 permit ip 10.1.1.0 0.0.0.255 10.5.1.0 0.0.0.255 access-list 199 permit ip any any !
11 NetScreen Confidential
line con 0 transport input none line vty 0 4 password chair login ! end
Appendix B – Complete Netscreen Configuration set auth type 0 set auth timeout 10 set admin format dos set admin sys-ip 10.5.1.2 set interface trust ip 10.5.1.2 255.255.255.0 set interface untrust ip 10.5.2.1 255.255.255.0 set interface untrust gateway 10.5.2.2 set interface trust ping set interface trust telnet set interface trust scs set interface trust snmp set interface trust global set interface trust web unset interface trust ident-reset unset interface untrust ping unset interface untrust telnet unset interface untrust scs unset interface untrust snmp unset interface untrust global unset interface untrust web unset interface untrust ident-reset set interface DMZ ping unset interface DMZ telnet unset interface DMZ scs unset interface DMZ snmp unset interface DMZ global unset interface DMZ web unset interface DMZ ident-reset set flow tcp-mss set address untrust "ITS LAN" 10.1.1.0 255.255.255.0 set address trust "10.5.1.0" 10.5.1.0 255.255.255.0 set syn-alarm 1024 set syn-qsize 10240 set syn-timeout 20 set syn-threshold 200 set firewall tear-drop set firewall syn-attack set firewall ip-spoofing set firewall ping-of-death set firewall src-route set firewall land unset firewall icmp-flood unset firewall udp-flood unset firewall winnuke unset firewall port-scan unset firewall addr-sweep unset firewall applet set firewall default-deny unset firewall bypass-others-ipsec unset firewall bypass-non-ip
12 NetScreen Confidential
set snmp name "ns100" set ike gateway "cisco" ip 10.5.2.2 Main preshare "ihopethisworks" proposal "pre-g2-des-md5" unset ike policy-checking unset ike accept-all-proposal set vpn "cisco" gateway "cisco" no-replay proposal "nopfs-esp-des-md5" set ike id-mode subnet set policy id 2 outgoing "10.5.1.0" "ITS LAN" "ANY" Encrypt vpn-tunnel "cisco" log count set policy id 0 outgoing "Inside Any" "Outside Any" "ANY" Permit log count set pki ldap server-name "10.1.1.126" set pki x509 dn country-name "US" set pki x509 dn state-name "Michigan" set pki x509 dn local-name "Detroit" set pki x509 dn org-name "Ideal" set pki x509 dn org-unit-name "IT" set pki x509 dn name "ns100" set pki x509 dn phone "248-398-5500" set pki x509 dn email "[email protected]" set pki x509 dn ip "10.5.2.1" set pki x509 default crl-refresh "default"
13 NetScreen Confidential