Pathfinder Adventure Path #49: The Brinewall Legacy (Jade Regent 1 of 6) 9781601253613
hapter 1: "The Brinewall Legacy" by James Jacobs When a trove of fireworks falls into the hands of the goblin
1,849 447 47MB
English Pages 102 Year 2011
Recommend Papers


- Author / Uploaded
- James Jacobs
File loading please wait...
Citation preview
The Brinewall Legacy By James Jacobs
Goblins Goblins have lived along the Lost Coast for as long as anyone can remember, but that certainly doesn’t mean they’re welcome. Viewed as pests by most and monsters by all, goblins’ reliance on the garbage of greater societies has ensured their simpering, cavorting proximity to better civilizations since the start. Goblins are naturally craven, gleefully foolish, and ever eager to visit atrocity and pain upon those they encounter, a combination that one might think would have led to their eradication by their betters long ago. But goblins are fecund and stubborn if nothing else. Much to the distress of the rest of us, goblins are here to stay.
Sandpoint Devil They say it’s bad luck to see the Sandpoint Devil—that it’s the son of a widow who brokered a deal with a devil to gain a child, and that it stalks children and snatches them from their beds through windows left foolishly open. They say the beast is so hideous that even drawings and pictures of the fiend are prone to bursting into flame. That the Sandpoint Devil actually exists is not debated—it’s been sighted by too many reputable folk, and savaged too many innocent victims to be compeltely a myth. Rumors abound as to its lair and its genesis, but the Devil itself is very much a real creature—flesh and blood and smoke and fire and all.
®
M
ADVENTURE PATH • PART 1 of 6
The
Brinewall Legacy
® ®
™™
credits Creative Director • James Jacobs Senior Art Director • Sarah E. Robinson Managing Editor • F. Wesley Schneider Development Lead • Rob McCreary Editing • Judy Bauer, Christopher Carey, Liz Courts, Christopher Self, and James L. Sutter Editorial Assistance • Jason Bulmahn, Mark Moreland Stephen Radney-MacFarland, and Sean K Reynolds Editorial Intern • Michael Kenway Graphic Designer • Andrew Vallas Production Specialist • Crystal Frasier Publisher • Erik Mona Cover Artist Wayne Reynolds Cartographer Jared Blando Contributing Artists ™ Nelson, Sara Otterstätter, Mariusz Gandzel, Andrew Hou, Sung Yoon Ko, Jim Miroslav Petrov, Doug Stambaugh, and Christer Sveen Contributing Authors Dave Gross, James Jacobs, Tim Nightengale, and Mike Shel Paizo CEO • Lisa Stevens Vice President of Operations • Jeffrey Alvarez Director of Sales • Pierce™Watters Finance Manager • Christopher Self Staff Accountant • Kunji Sedo Technical Director • Vic Wertz Marketing Director • Hyrum Savage Special Thanks The Paizo Customer Service, Warehouse, and Website Teams “The Brinewall Legacy” is a Pathfinder Adventure Path scenario designed for four 1st-level characters. By the end of this adventure, characters should reach 4th level. This product makes use of the Pathfinder Roleplaying Game Core Rulebook, Pathfinder Roleplaying Game Advanced Player’s Guide, Pathfinder Roleplaying Game GameMastery Guide, Pathfinder Roleplaying Game Bestiary, Pathfinder Roleplaying Game Bestiary 2, and Pathfinder RPG Ultimate Combat. These rules can be found online as part of the Pathfinder Roleplaying Game Reference Document at paizo.com/pathfinderRPG/prd. This adventure is compliant with the Open Game License (OGL) and is suitable for use with the Pathfinder Roleplaying Game or the 3.5 edition of the world’s oldest fantasy roleplaying game. The OGL can be found on page 92 of this product. Product Identity: The following items are hereby identified as Product Identity, as defined in the Open Game License version 1.0a, Section 1(e), and are not Open Content: All trademarks, registered trademarks, proper names (characters, deities, etc.), dialogue, plots, storylines, locations, characters, artwork, and trade dress. (Elements that have previously been designated as Open Game Content or are in the public domain are not included in this declaration.) Open Content: Except for material designated as Product Identity (see above), the game mechanics of this Paizo Publishing game product are Open Game Content, as defined in the Open Game License version 1.0a Section 1(d). No portion of this work other than the material designated as Open Game Content may be reproduced in any form without written permission.
Paizo Publishing, LLC 7120 185th Ave NE, Ste 120 Redmond, WA 98052-0577 paizo.com Pathfinder Adventure Path #49: The Brinewall Legacy © 2011, Paizo Publishing, LLC. All Rights Reserved. Paizo Publishing, LLC, the golem logo, Pathfinder, and GameMastery are registered trademarks of Paizo Publishing, LLC; Pathfinder Adventure Path, Pathfinder Campaign Setting, Pathfinder Module, Pathfinder Player Companion, Pathfinder Roleplaying Game, Pathfinder Society, Pathfinder Tales, and Titanic Games are trademarks of Paizo Publishing, LLC. Printed in China.
table of contents
Foreword
4
The Brinewall Legacy
6
by James Jacobs
NPC Gallery
52
Jade Regent Treasures
60
Sandpoint Hinterlands
62
Ecology of the Oni
68
Pathfinder’s Journal: Husks, 1 of 6
74
Bestiary
80
Campaign Outline
90
Preview
92
by James Jacobs by James Jacobs by James Jacobs by Mike Shel
by Dave Gross
by James Jacobs and Tim Nightengale
I
Years in the Making
’ve wanted to do the Jade Regent Adventure Path from the beginning. You can see the initial groundwork for this, the ninth Pathf inder Adventure Path, hidden away in the adventure that launched the very f irst Adventure Path. In that adventure, “Burnt Offerings,” I introduced a character named Ameiko Kaijitsu. Lovely Ameiko was far more than me sneaking one of my PCs into print (although I admit that sneaking PCs into print so you can get artists like Wayne Reynolds to illustrate them is one of the more delightful perks of being Creative Director here at Paizo)—she was intended to be the star of an upcoming Adventure Path from the start. Hints of the Kaijitsu family’s history with Minkai and their links to that nation’s royalty can be seen in “Burnt Offerings” if you know where to look. Originally, Jade Regent was to be the fourth Adventure Path, but then we went and decided to launch our own version of the game with the Pathfinder RPG, and
publishing a campaign that crawled from one end of the world to the other and would require a lot of supplementary material beyond the Adventure Path’s support articles seemed like a poor idea at the time. So Jade Regent got pushed back a year and a half, and was going to be the seventh Adventure Path. I even previewed the attack on the Licktoad village as a special “Adventure Path Preview” at Paizocon II, and went as far as to announce “Jade Regent” as the next Adventure Path. Then, when we realized that we wouldn’t have the resources to pull off a trip across the world in time, I had to do a bit of backpedaling. Serpent’s Skull took Jade Regent’s place, and Jade Regent got pushed back another year. And so here we are. Finally. And you know what? Looking at what our authors and artists have already started brewing up for the volumes to come, and seeing the rules our rulebook line has in Ultimate Combat for samurai, ninja, martial arts, and Asian weaponry of all sorts, I think it’s worth the wait.
4
Foreword Campaign Continuity
On the Cover
Jade Regent functions as a sequel of sorts to the Rise of the Runelords Adventure Path. Not so much in story, since this campaign won’t stay in Varisia for long and has nothing to do with Runelords at all, but certainly in spirit—we assume that the events portrayed in Rise of the Runelords (and to a lesser extent those in Second Darkness) have taken place, as two characters who played roles in those campaigns, Ameiko Kaijitsu and Shalelu Andosana, have important roles in Jade Regent. As such, a few spoilers for those campaigns are present in this volume’s adventure, although we’ve taken pains to minimize the spoilers as much as possible. If you wish to avoid many of these spoilers, skip the rest of this section and continue down to the next one, A Fresh Start, which provides a few bits of advice on how to run Jade Regent without assuming any previous Adventure Paths have taken place. Lonjiku’s Fate: Lonjiku, Ameiko’s father, is assumed to have died at some point, likely murdered by Tsuto as detailed in the events of “Burnt Offerings.” If he somehow survived that adventure, you’ll need to orchestrate his death just before the events of this campaign’s start, as the Jade Regent Adventure Path requires Ameiko Kaijitsu to be the eldest surviving member of the Amatatsu family line, since she’s supposed to be the next in line to inherit rule of Minkai and claim its Jade Throne. Tsuto’s Fate: Like his father, Tsuto is assumed to be dead as this adventure begins. Unlike his father, though, Tsuto has no legitimate claim to the Jade Throne in Minkai, and if he somehow survived the events of Rise of the Runelords, he can play any role you wish (perhaps as an antagonist who follows the PCs’ caravan with a small group of mercenaries eager to try to steal Ameiko’s birthright). Ameiko’s Fate: Ameiko is assumed to have survived the events of Rise of the Runelords—if this isn’t the case, and you aren’t interested in retconning her survival, then replace Ameiko in this campaign with her half-sister Amaya, newly arrived in Sandpoint from Westcrown. Although Amaya was born from Lonjiko’s scandalous affair with a Chelish noblewoman in 4680, she inherits the Rusty Dragon and several other Kaijitsu holdings upon Ameiko’s death and comes to town to investigate her inheritance. Charmed with the town, she decides to take up the role of proprietor of the Rusty Dragon. If you use this plot, Amaya only truly becomes a legitimate heir to the Jade Throne when the PCs manage to recover the Amatatsu Seal at the end of this adventure, and just as the seal invests the PCs with the divine right to rule, it does the same for her (see page 60 for more details). Note that Amaya is first mentioned in Pathfinder Adventure Path #25—if for some reason she perished during Council of Thieves, you can simply substitute a third heretofore unknown Kaijitsu scion into Ameiko’s role.
Wayne Reynolds makes his triumphant return to the cover of Pathfinder Adventure Path, perfectly capturing Ameiko Kaijitu’s charming swagger and personality as Sandpoint’s least-likely aristocrat. She’s destined to become the new empress of Minkai—if she and her friends can defeat the Jade Regent—but you’ll have to wait until the last cover in this Adventure Path to see how she “cleans up” in the role of a much more powerful noble!
Shalelu’s Fate: Jade Regent actually marks Shalelu’s third appearance in a Paizo Adventure Path—if, in your continuity, she has already perished, you can simply replace her in this campaign with some other elf. Rebuilding Sandpoint: Sandpoint suffered much during Rise of the Runelords. In the years since those events, most if not all of this damage has been repaired, and with the exception of scarred memories and perhaps a few town memorials, little remains in the town today to show the aftermath of these attacks. Previous Player Characters: Characters who made it to the end of Rise of the Runelords are likely close to 17th or 18th level, and if they haven’t retired, can be assumed to be on suitably legendary adventures elsewhere on Golarion or even out in the Great Beyond. You should avoid having them be present in Sandpoint during this adventure, in any event, since “The Brinewall Legacy” is intended to give a new batch of heroes a chance to rise to the occasion.
A Fresh Start If you haven’t run Rise of the Runelords, then you need not worry about fitting a previous Adventure Path’s continuity into your game. Note that if you wish to run Rise of the Runelords later, you’ll probably need to find a replacement for the Kaijitsus in “Burnt Offerings.” Since things like ancient birthrights don’t really matter in “Burnt Offerings,” replacing the Kaijitsus with similarly minded but different characters won’t really affect the adventure’s plot at all. Heck, go ahead and replace Ameiko with one of your own PCs from a game you played a long time ago. It worked for me, after all!
James Jacobs Creative Director [email protected]
5
The Brinewall Legacy Part One: Fires Over Brinestump
In search of fireworks-wielding goblins, the PCs venture into Brinestump Marsh, where they learn of a close friend’s family legacy that has lain hidden in the swamp for decades.
Page 8
Part Two: The Legacy’s Lure
Gathering their resources, the PCs and their friend Ameiko Kaijitsu join a Varisian caravan traveling north to the ruined town of Brinewall in search of Ameiko’s lost heritage.
Page 23
Part Three: Ruins of Brinewall
To find the Kaijitsu family legacy, the PCs must face the monstrous inhabitants of the haunted and cursed ruins of Brinewall Castle, under the command of a strange creature from Tian Xia.
Page 24
6
Advancement Track “The Brinewall Legacy” uses the medium XP track.
1
The PCs begin this adventure at 1st level.
2
By the time the PCs have finished with Brinestump Marsh, they should be well into 2nd level.
3
The PCs should reach 3rd level before they make a serious attempt to explore Brinewall Castle. The PCs should be 4th level by the adventure’s end.
The Brinewall Legacy Adventure Background
focused in Magnimar and the recently founded town of Sandpoint, he decided to return to Brinewall and recover the Amatatsu Seal. He also brought his son Lonjiku with him, finally ready to reveal to him the family legacy. As father and son arrived in Brinewall, a series of powerful storm hit the Varisian coast. Rokuro loaded his extended family, servants, and all his belongings onto three ships, but the storms prevented their immediate return to Magnimar. Stranded in Brinewall for days, Rokuro agonized on how best to reveal the family legacy to his son, and this hesitation soon stretched Lonjiku’s patience beyond its limits. Long frustrated at his father’s silence regarding his ancestry, Lonjiku took matters into his own hands and opened the warding box containing the Amatatsu Seal— and in so doing, exposed the seal to magical observation. Horrified that this act might have alerted the Five Storms and that oni agents would soon come to Brinewall to finish things off, Rokuro ordered his bodyguard Tsutamu to organize the return to Magnimar with his family and belongings, then to prepare for a new relocation farther south. Once he could be sure that the Five Storms had not noticed the opening of the seal’s case, Rokuro would follow later. As the three ships sailed south into the storms, Rokuro returned the Amatatsu Seal to its warding box in the secure and hidden vaults below Brinewall and alerted Brinewall’s commander, a man named Andril Kortun, that dangerous foes might soon strike. But Rokuro never learned of the loss of his ships in the storms off Varisia’s Lost Coast, or of his despondent wife’s suicide not long after, for the Five Storms struck far more quickly than even he had anticipated. The Five Storms had lost track of the Amatatsus in Kalsgard many years before, but they left a small group of oni and ninja there to keep an eye out for any sign of the missing family. When Five Storm seers back in Minkai noticed the Amatatsu Seal’s brief f lash of power, they sent orders to the Kalsgard group, now known as the Frozen Shadows, to mobilize and investigate. The Frozen Shadows swept into Brinewall, using the storms still pounding the town to great advantage. They devastated the town, setting its buildings on fire, and by the time the castle’s troops were organized to launch a counterattack, the Frozen Shadows were already inside the castle walls. They murdered the entire population of Brinewall in less than an hour, so quickly that they didn’t discover the hidden vault that held the Amatatsu Seal. Rokuro was killed in the battle, but learning that he had sent his family and belongings into the storms to Magnimar, the Frozen Shadows moved farther south in pursuit, leaving Brinewall empty. But while the Frozen Shadows were numerous enough to overrun Brinewall, they could not do the same to the much larger city of Magnimar. Instead, they infiltrated
Hundreds of years ago in the distant land of Minkai, a powerful cabal of evil spirits known as oni emerged from the mysterious Forest of Spirits. Intent on seizing control of a land they felt they deserved to rule, these oni, known as the Five Storms, began a covert war against the five royal families of Minkai, for by obscure but nonetheless binding divine laws, only once all five families had been wiped out or controlled could the Five Storms take control. By 4652 ar, the Five Storms had come close to their goal. Yet when the oni turned their attention to this last family of nobles, the Amatatsus, they discovered that the family had f led Minkai over the Crown of the World, the inhospitable northern continent at Golarion’s north pole. When the exiled Amatatsus emerged from the Crown of the World and staggered into the Linnorm Kingdom city of Kalsgard, their numbers had been reduced to a small fraction of a once-grand dynasty. Led by the youngest and only surviving son, Amatatsu Tsutoku, the exiles sold their legendary family sword Suishen to finance a stealthy integration into an alien society. In order to finalize their hidden exile and throw off further pursuit from the Five Storms, the Amatatsus changed their family name to Kaijitsu, and the exiled royals chose new names and switched their order to match Avistan’s naming conventions. Thus did Amatatsu Tsutoku became Rokuro Kaijitsu. Using some of the money they’d received from the sale of Suishen, the Kaijitsus secured a home in the small town of Brinewall and paid to have the only remaining proof of their royal lineage, a minor artifact called the Amatatsu Seal, held in a magical warding box that blocked divination magic in a secure vault under Brinewall Keep. The Kaijitsus became merchants and glassblowers, hoping that the very idea of a royal family changing its name and working as common merchants would be all but unthinkable to the Five Storms. For several years, it looked as if these drastic steps would work. Eventually, the Kaijitsus’ artistry and skill at glassblowing attracted the attention of several merchant nobles in Magnimar, who offered the family a small villa if they would relocate to the larger city and join Magnimar’s growing aristocracy. Rokuro Kaijitsu accepted the offer, reasoning that belonging to Varisian nobility could only further hide the truth of his family’s legacy from the Five Storms. Rokuro left most of the family servants and business concerns (including the Amatatsu Seal) safe and secure in Brinewall, but moved himself and his wife to Magnimar. Over the next several years, the Kaijitsus had a son named Lonjiku, helped found the town of Sandpoint, and saw their fortunes as minor nobles in a frontier town rise. It wasn’t until Rokuro turned 60 in 4687 that he finally allowed himself to believe that the Five Storms had given up on chasing him. With most of his business concerns now
7
cryptic clues from her tortured sleep, Ameiko encourages the PCs to seek her family’s legacy in Brinewall. When the PCs do, they find the ruined castle itself firmly in the control of monstrous foes commanded by the turncoat oni Kikonu. By defeating him and discovering the hidden vault below, not only can the PCs solve one of Varisia’s greatest recent mysteries, but they can also learn that Ameiko Kaijitsu is destined to rule Minkai.
Goblins of Brinestump
The story of the Licktoad goblins and their attempts to acquire fireworks forms the plot of Pathfinder Module: We Be Goblins!, available in print or as a free PDF at paizo.com. That adventure serves as a prequel for the events in “The Brinewall Legacy” and the rest of the Jade Regent Adventure Path. In addition, Pathfinder Player Companion: Goblins of Golarion provides plenty of extra information on goblin society and tactics, including new goblin feats and magic items, if you really want to make the Licktoad goblins come to life!
Part One: Fires Over Brinestump
This adventure begins in the town of Sandpoint with reports that the Licktoad goblins of Brinestump Marsh have grown unusually aggressive. The reason for this uncharacteristic bravery seems clear—the goblins have somehow managed to arm themselves with what appears to be a considerable supply of fireworks. The problem stems not so much from the additional “firepower” these fireworks provide as from the inf lated sense of ego and power that the devices have given the goblins—the fireworks have made them dangerously brave. Several merchant caravans and travelers have been attacked so far, and according to the victims, the damage caused by horses panicking at the sight and sound of exploding pyrotechnics is almost as destructive as the goblin attacks themselves. With the last few attacks resulting in severe injuries to three unfortunate travelers, the problem has escalated from an annoyance to a threat. However, as none of the attacks have yet inconvenienced Magnimar (only Sandpointers and other Lost Coasters have been hit so far), the city has been slow to react. Unwilling to idly sit by and wait for the goblin problem to escalate to actual deaths on the Lost Coast Road in order to attract Magnimar’s attention, Sandpoint’s leaders have put out the call for goblin exterminators. But after a time of upheaval a few years back involving goblins, giants, and even a dragon, Sandpoint has since returned to being a relatively sleepy town. It doesn’t take long for life to settle down once things return to normal, and with Varisia’s adventurers now more eager to try their luck at finding their fortunes in legendary Xin-Shalast, there simply aren’t a lot of volunteers to fight goblins around. Always running at a lean enrollment, Sandpoint’s city watch can’t afford to send patrols into the trackless expanse of Brinestump, although they have stepped up their presence along the Lost Coast Road itself. The task of wading into the notorious local wetland falls instead to adventurers—be they concerned locals honestly eager to aid the town or greedy mercenaries looking to make relatively easy coin. A few adventurers have already made the attempt, but nothing has been heard of them in the 3 days since they entered Brinestump Marsh, and just last night, another round of colorful explosions burst over the wetlands south of Sandpoint. The goblins are doubtless readying a new attack!
Magnimar in disguise and learned that Rokuro’s wife had committed suicide upon learning of the loss of her husband’s three ships at sea. Assuming that the Amatatsu Seal was on board when the ships sank, the Frozen Shadows returned to Kalsgard with news that the family had finally been wiped out. The Five Storms could finally begin the last stages of their plot to seize control of Minkai. But here, through the whims of fate, the Five Storms made a critical error. For not all of the Kaijitsus perished in the storms—Lonjiku Kaijitsu survived after spending several weeks adrift in the Varisian Gulf, and eventually returned to Sandpoint to rebuild his family. These events transpired almost 25 years ago, and the Five Storms have finally reached their plot’s end game. Following the secret assassination of the Minkai emperor just a few years ago, one of the Five Storms now rules Minkai in all but name as the empire’s Jade Regent. When the proper time of mourning has passed, and no true contenders step forth to claim the throne, rule of Minkai will pass to the oni of the Five Storms. But Lonjiku Kaijitsu’s legitimate heir, Ameiko, still lives in Sandpoint, and though she remains unaware of her family’s true heritage, she is the only person who can challenge the Jade Regent.
Adventure Summary When goblins armed with fireworks begin raiding merchant caravans on Varisia’s Lost Coast, the PCs enter the trackless swamps of Brinestump Marsh to put a stop to them. But there are greater dangers growing in the marsh—after defeating the goblins, the PCs learn of a rising undead threat in a nearby cave. Investigating, they defeat the undead and discover a document that indicates a great Kaijitsu family legacy lies hidden to the north in Brinewall. Upon learning of this, the PCs’ good friend Ameiko Kaijitsu gathers her resources, and with the PCs’ help, she and several others travel north with a caravan of Varisian wanderers to Brinewall, where a supernatural malaise aff licts Ameiko, rendering her comatose. Speaking in
8
The Brinewall Legacy Starting the Adventure
The wetland is a tangle of nettles, reeds, and other swamp plants often supplemented by larger vegetation—cypress, eucalyptus, oak, and willow trees mostly. Movement along trails is at 3/4 speed, while movement through the undergrowth is at 1/4 speed. The aptly named Soggy River is the primary waterway that f lows through Brinestump. The river averages 20 feet deep, while its smaller creeks average 5 feet deep. A DC 10 Swim check is required to navigate these placid waters. As the PCs explore, you should take pains to present the swamp as a frightening, oppressive place. Though small on a geographic scale, the marsh is fecund and spooky. Fog often shrouds the place, particularly at dawn and dusk, and animal calls that might be soothing elsewhere take on a strange, almost menacing tone in the dripping wetland. Sudden movement in the underbrush or in the tree canopy above, the splashing of something large wading through the swamp just out of sight, and eerie low growls and bellows from deeper in the swamp should help to keep the PCs on their toes. One way to keep the PCs nervous is the Soggy River Monster (see area F). You can have the PCs periodically make Perception checks for no reason, but now and then they might find a strangely mutilated animal on the trail, a soggy three-toed footprint slowly filling with water as if whatever made the print only recently passed by, or even a brief glimpse of a pale, human-shaped figure watching from a distant gap in the undergrowth that vanishes before anyone else can see it. If the PCs are brave enough to camp in the open wilds of Brinestump, you can even have the Soggy River Monster attack their camp at night in an attempt to drag one of the characters off to its lair to eat.
To deal with the goblin threat, Sheriff Belor Hemlock has restored Sandpoint’s old “goblin bounty” after several years of inactivity—it was suspended when a group of eager but too-young adventurers were swept out to sea while in pursuit of goblin ears. The town of Sandpoint will pay 10 gp for every relatively fresh goblin ear delivered to the town hall—with an additional reward of 300 gp for the group who can bring in the head of the Licktoads’ leader, Chief Gutwad. If your players are using the Jade Regent Player’s Guide as an aid to get started in this Adventure Path, they’ll start play with established ties not only to Sandpoint, but to each other as well. Since all the PCs should also have ties to Ameiko Kaijitsu and the Rusty Dragon, the old cliché of starting the adventure in a tavern seems strangely apt— perhaps they’ve come to the Rusty Dragon to figure out their plan of attack for dealing with the Licktoad goblins. A complete gazetteer of the town of Sandpoint can be found in Pathfinder Adventure Path #1, though that writeup is not necessary to run this adventure. In addition, the “Sandpoint Hinterlands” article that begins on page 62 of this book not only provides some basic information on Sandpoint, but also numerous rumors that can help get the PCs started. Before the PCs begin, though, they should be given a warning and a bit of advice. Brinestump Marsh may not be as large as the Mushfens farther to the south, but the swamp is dense and tangled. It’s easy to get lost in the place. No one’s made a really detailed map of Brinestump—there’s been no need, since there’s not much of value within. But if anyone knows his way around in the marsh, it’d be that old eccentric half ling Walthus Proudstump, the self-appointed “warden” of the swamp. A f ishing trail leads from the Lost Coast Road directly to Walthus’s shack in the swamp. If the PCs wish to explore the marsh, they could do a lot worse than following that trail to seek out the half ling’s advice.
A. New Fish Trail Despite Brinestump’s reputation, many local fishermen swear by the fine fishing in the swamp, using this trail to access the marsh’s best fishing holes. This trail also leads to self-appointed swamp “warden” Walthus Proudstump’s shack (area G).
Into the Marsh
B. Old Fish Trail
Brinestump Marsh is a relatively small region, but it’s fantastically overgrown with vegetation. Given the frequent stretches of muddy bogs and snaking waterways, moving through the marsh is a tiring and frustrating procedure. The marsh itself is bounded on its southern edge by a cliff that rises an average of 40 feet from the wetlands below to the moors above—characters who take the time to scout out this southern approach can get a relatively good view of the marsh and its major waterways, but spotting details (such as individual buildings) is quite difficult, because of the height of the trees that grow so thickly in the wetland. Brinestump Marsh extends just over 2 miles at its widest point (measuring from the southwest to the northeast).
Decades ago, locals used this trail for f ishing in Brinestump—the trail once led all the way to the shore, but now stops at the Licktoad village (area H). Since the goblins moved in, use of the trail has dropped off, and the fishermen now use the New Fish Trail to the north (area A).
C. Hidden Path Actually the southern extent of the Old Fish Trail, this path becomes difficult to see as it approaches the 40-foothigh cliff bordering the swamp. A faint trail leads from the swamp up along the cliff—it takes a DC 12 Perception check to notice the trail, and a DC 5 Climb check to navigate it.
9
A
E E
B
I
E C
i ve
E
S og g y R
J
H
s t R oad
E
t Coa
E
Sog’s Bay
K
F
L os
G
r
D
D. Witch’s Walk
F. The Soggy River Monster (CR 2)
This trail is mostly worn away, and bears a somewhat dark stigma—locals believe it leads directly to the dismal home of Old Megus the Swamp Witch (area J). Those rumors are correct, but Old Megus has been dead for many months. Anyone who has traveled one of the other trails can make a DC 15 Survival check to note that this trail is more overgrown and hasn’t been used for about half a year.
A ten-foot-high mound of branches, logs, and reeds lies amid the trees here, nestled in a narrow, muddy clearing. Flies buzz and swarm around the foul-smelling mound of rotting vegetation. For the past 3 years, fishermen and farmers have told stories of a pale monster with legs that bend like a dog’s, that dresses in rags, and that hunts along the shores of the Soggy River. Sightings of the so-called “Soggy River Monster” are most common near Brinestump Marsh, causing most to believe the creature dwells somewhere in the swamp. The creature has been blamed for at least five disappearances over the past year, although Sandpoint’s militia suspects these disappearances are, in fact, simply bored sons and daughters running away from home to seek an exciting life in Magnimar. The PCs can come across this site as a result of tracking the Soggy River Monster after they spot it elsewhere in the swamp, or they can simply stumble across it while exploring this region of the marsh. The monster’s crude lair is crafted out of fallen logs, branches, and mud. From the outside, the lair looks like a mound of vegetation heaped by f loodwaters, but a DC 15 Knowledge (nature) or Survival check is enough to note that it is artificial in construction.
E. Bridges Several swamp bridges cross rivers and creeks along the various trails. These bridges are all soggy wooden affairs with mossy surfaces and a few missing planks. Although they look treacherous, they are safe to cross, but they’re also popular places for predators to lurk. Each time the PCs cross a bridge, there’s a 20% chance of a random encounter (only check for a random encounter once per day, however). This encounter rate drops to 10% on the New Fish Trail (area A). If an encounter occurs, choose one of the following encounters: 1d6 goblins (Pathfinder RPG Bestiary 156), a giant leech (Bestiary 187), a constrictor snake (Bestiary 255), the Soggy River Monster (see page 11), or another creature of your choice. Be careful of encounters above CR 2 early in the adventure, though—you don’t want to kill off the party in their first fight as the result of a random die roll!
10
The Brinewall Legacy Alternatively, a DC 15 Perception check notes the large pile of animal bones heaped among the undergrowth to the south side of the mound, near the mound’s entrance. A narrow opening along the southern side of the 10-footdiameter mound allows entrance into its cramped, dripping interior. The walls of the place are decorated with nearly two dozen articles of shredded and bloodstained clothing, from smallclothes to jackets—all trophies collected by the sinspawn from its victims. These unfortunates number 11 in all: the five missing locals and six other travelers and indigents who disappeared along the banks of the Soggy River or the Lost Coast Road without anyone noticing over the past few years. The monster’s lair also contains a filthy bed of mud and reeds and brown grass, as well as a strange mound of what looks like a stack of nearly a dozen muddy spheres. These are the poorly preserved heads of the monster’s 11 victims, packed in mud in a grisly attempt by the thing to preserve the heads as trophies. Although little but bone and scraps of hair remain, these skulls, in combination with the tattered clothes, are enough to provide closure to the poor families who’ve had sons and daughters go missing. Creature: The Soggy River Monster is, in fact, a sinspawn that recently escaped from the ancient catacombs below Sandpoint. The monster made its way down the coast, and eventually settled here in Brinestump Marsh. The Soggy River Monster is roughly humanoid in shape, although its legs bend backward like those of a dog, its pallid skin is crisscrossed by a network of visible veins, and its jaws split down the middle into tiny grasping claws. If the PCs haven’t caught glimpses of the Soggy River Monster yet, then the lair should be empty the first time the PCs stumble across it. If they’ve spotted the Soggy River Monster, or if it’s attacked and perhaps f led from their camp, then the monster can be encountered here, either rearranging its grisly trophies or messily eating a large wild pig it recently killed. If confronted in its lair, the Soggy River Monster fights to the death. Soggy River Monster
XP 600
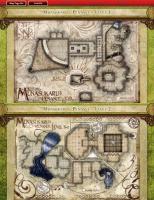
Rooms in Walthus’s House
Walthus’s home consists of the following areas (see the map on page 14). G1. Main Room: This living room features a settle and several somewhat damaged potted plants. G2. Dining Room: A wooden table with a single chair decorates this dining room along with a simple woodburning stove. G3. Pantry: Food and water are stored here. G4. Storage: Several wicker cages containing sparrows, mice, and other live food for the snakes in area G5 are kept here. G5. Snake Garden: This garden is open to the sky and walled in with a 10-foot-high brick wall (DC 10 Climb check to scale). Walthus’s three remaining snakes live here (see Creatures, below). G6. Supply Room: This room contains tools, hunting supplies, and spare weapons, including three handaxes, a longbow, 40 arrows, and two Small suits of leather armor. G7. Guest Room: Sheets cover the furniture in this usually unused guest room. G8. Walthus’s Room: This bedroom looks well lived in. G9. Saferoom: The locked, wooden secret door to this room can be found with a DC 25 Perception check (DC 25 Disable Device check to open). Walthus Proudstump is currently holed up in this chamber. The room contains enough food and water to last for several days.
for nearly 5 years, but none in Sandpoint can rightfully claim to know the near-hermit. Walthus likes to think of himself as retired after a short but excessively dangerous adventuring career in which he and several other half ling slaves abandoned a sinking Chelish merchant ship bound for Nisroch. Walthus chose to f lee north along the coast on his own, and by the time he reached Sandpoint he’d had quite enough of adventure. He’d also had enough of city life, and spent nearly all of the money he’d made on his adventurous trek north to purchase an old building, sight unseen, in Brinestump Marsh. The scam artist who sold Walthus the old building walked away from the deal thinking he’d gotten the better of the half ling, but in fact, Walthus knew exactly what he was paying for—isolation and a place to hide from any Chelaxians who come north looking for escaped slaves. Walthus spends most of his time fishing, patrolling the relatively small “island” his home is located on, and tending to his collection of snakes. The latter factor, more than his reclusive lifestyle or lack of personal hygiene, is the primary reason so few come to visit the half ling. Walthus understands this, and sees it as a welcome side
CR 2
Sinspawn (Pathfinder RPG Bestiary 2 246) hp 19
G. Warden’s Shack (CR 2) A muddy trail leads up to a swampy lagoon. The open ocean is visible just beyond these shallow waters, while an old two-story building, its walls soggy with moss and its roof sagging with age, sits on the lagoon’s eastern shore. Walthus Proudstump, half ling ranger and self-avowed snake wrangler, has lived in the Sandpoint hinterlands
11
effect of his love of serpents. But he never anticipated that know that much about the Licktoads, but he does know that his beloved snakes would one day save his life. their village is to the southeast, and that it can be reached via Creatures: A day before the PCs first visit this location, the Old Fish Trail (area B). He even makes up stories about Walthus’s luck in avoiding Brinestump’s more dangerous how he suspects the goblins are getting ready for an all-out inhabitants ran out when his home was invaded by a faceless attack on the humans of the area in hopes of instilling a stalker. Originally created by ancient aboleths to serve as sense of urgency in the PCs so they will leave him alone. If surface-dwelling spies, today these rugose shapechangers the PCs ask about why he seems to be in pain or is so tired, live in small tribal societies, their old links to their aquatic Volorog claims to have recently run a giant snake off his masters all but forgotten. For many decades, a tribe of land, and that he’s still suffering a bit from its poison. If he faceless stalkers has lived in Brinestump, but a combination thinks the PCs can help him with his poisoning, he might of inbreeding and malnutrition has seen the tribe all but even try to get them to do so. die out. Only a few undersized specimens During the conversation, have Volorog make remain in the marsh today, like the one a Bluff check. If the PCs seem suspicious that recently stumbled across Walthus’s of the disguised faceless stalker, they home—a runt named Volorog. can make Sense Motive checks against Volorog attacked Walthus while the Volorog’s Bluff checks to get hints that half ling was tending to his snakes in the the “half ling” is hiding something. garden (area G5). The resulting battle was After the conversation with Volorog difficult on both sides—while Walthus continues for a few minutes, make managed to severely wound Volorog with a Disguise check for the faceless poison both from his weapons and his stalker and have all of the PCs make pet snakes, the stalker managed to pin Perception checks—anyone who exceeds the poor half ling and nearly killed Volorog’s Disguise check notices a strange him with its blood drain ability rippling effect that seems to slither over before Walthus managed to break “Walthus’s” face or hand. away, f leeing upstairs to hide in his Volorog knows he’s not really in any saferoom (area G9). Since then, both sort of shape to fight, but if it seems Walthus Proudstump combatants have spent the last 16 hours apparent that his guests are about to in great pain, slowly recovering from the see through his ruse, he feels he has wounds they inf licted on each other. no choice and attacks, hoping to surprise his enemies. When the PCs first arrive at the shack, the real Walthus Volorog attacks if a PC draws a weapon or casts a spell, if a has passed out from the pain in his saferoom, which Volorog PC starts searching the house or wanders off on her own hasn’t yet found. Volorog thinks Walthus f led into the even after Volorog firmly asks them to leave his things swamp, and has been watching for his return for the past alone, or if the PCs call him out on the weird rippling effect several hours, afraid to even sleep for fear the half ling will or for not knowing something Walthus would know. In the find him helpless and finish him off. The thought of simply unlikely event that the PCs heal him and cure his poison, abandoning the home has not crossed Volorog’s mind—he he cackles in delight and attacks as soon as he’s fully healed. fought too hard to claim the home as his own, after all, and When Volorog attacks, he reverts to his true form (a doesn’t want to give it up. The faceless stalker is exhausted, wrinkled, hunch-backed humanoid creature with mottled both from being awake for so long and from the poison of brown-and-red f lesh and a spherical head with no true Walthus’s snakes. Yet if he sees the PCs, he quickly greets face—only a crooked slit from which a rasplike tongue them in the guise of Walthus, though his exhaustion and periodically lashes and licks) as a swift action, gaining a +2 wounds remain apparent even in that form. morale bonus on attack rolls, damage rolls, skill checks, Volorog has assumed Walthus’s shape, but doesn’t really and saving throws for that round (whether it’s a surprise know much about the half ling’s personality. He tries to be round or a normal round). As he changes, have him pleasant with visitors, but tells them that his home is a mess make a Bluff check and a Disguise check—the PCs can and is thus in no shape to accept visitors. If the PCs press, oppose these with Sense Motive and Perception checks, Volorog relents and invites them into the dining room (area respectively. Any PC who beats one of Volorog’s rolls can G2). He goes through the motions of fixing them a meal, act in the surprise round. all the while doing what he can to urge the PCs to move Note that while Walthus’s snakes are relatively timid on. If the PCs ask about the goblins, their fireworks, or the and unlikely to attack anyone who doesn’t attack them swamp, Volorog tries to encourage the PCs to seek out the first, three of his pet swamp vipers (the only ones Volorog goblins rather than stay here. The faceless stalker doesn’t hasn’t yet killed) dwell in the underbrush of area G5.
12
The Brinewall Legacy Swamp Vipers (3)
XP 200 each
CR 1/2
CG Small humanoid (halfling) Init +3; Senses Perception +9
Variant viper (Pathfinder RPG Bestiary 133) hp 3 each
DEFENSE
AC 17, touch 15, flat-footed 13 (+2 armor, +3 Dex, +1 dodge, +1 size) hp 15 (3d10+9; normally 30 hp) Fort +2, Ref +8, Will +4; +2 vs. fear
SPECIAL ABILITIES
Poison (Ex) Bite—injury; save Fort DC 9; frequency 1/round for 6 rounds; effect 1d2 Dex; cure 1 save
OFFENSE
Volorog
XP 600
CR 2
Speed 20 ft. Melee handaxe +4 (1d4/×3) Ranged mwk longbow +8 (1d6/×3) Special Attacks favored enemy (goblinoids +2)
Undersized faceless stalker (Pathfinder RPG Bestiary 2 122) CE Small aberration (shapechanger) Init +2; Senses darkvision 60 ft.; Perception +9
STATISTICS
Str 11, Dex 17, Con 5 (usually 14), Int 10, Wis 12, Cha 10 Base Atk +3; CMB +2; CMD 16 Feats Dodge, Endurance, Point-Blank Shot, Rapid Shot Skills Acrobatics +5, Climb +2, Handle Animal +6, Heal +7, Knowledge (nature) +6, Perception +9, Stealth +13, Swim +6 Languages Common, Halfling SQ favored terrain (swamp +2), track +1, wild empathy +3 Gear leather armor, handaxe, masterwork longbow with 20 arrows, cloak of resistance +1, 43 gp
DEFENSE
AC 15, touch 9, flat-footed 15 (+2 armor, –2 Dex, +4 natural, +1 size) hp 18 (5d8+15; normally 37 hp) Fort +4, Ref –1, Will +6 DR 5/piercing or slashing Weakness fatigued OFFENSE
Speed 20 ft. Melee slam +5 (1d4+1 plus grab) Special Attacks blood drain (1 Con), sneak attack +2d6 Spell-Like Abilities (CL 5th; concentration +8) Constant—tongues
Development: If the PCs fight the faceless stalker, the noise of the combat eventually wakes Walthus in area G9. He listens to the fight, and once it’s over, he risks investigating by opening the secret door and calling out. If he hears anyone other than Volorog reply, he begins sobbing in relief. The half ling can describe to the PCs what happened, and thanks them profusely for saving his life and driving “that monster” off. He even offers the PCs his magical cloak of resistance +1 as a reward for their services. In addition, Walthus invites the PCs to stay the night in his home—he’ll cook them a meal and will answer any questions they might have. He also offers the use of his home as a safe place, where the PCs can retreat to and rest while they explore the swamp. Walthus can certainly confirm that the Licktoad goblins have been acting a bit braver than normal of late. He’s not sure where they got their fireworks, but he can confirm to the PCs that the Old Fish Trail (area B) leads to their village. If you think the PCs could use an ally and ask for his help, Walthus even agrees to accompany them on their exploration of Brinestump. If the PCs don’t uncover what’s really going on here and come back later, there’s a chance that Walthus is dead. Every day that Volorog is allowed to live here after the PCs’ first visit, there’s a cumulative 10% chance that the faceless stalker finds and kills Walthus, then buries his body in the swamp. At this point, Volorog continues living as “Walthus” until the truth is found out. Story Award: If the PCs manage to save Walthus, award them 600 XP, as if they had defeated him in combat.
TACTICS
During Combat Volorog attacks flat-footed foes in the first round of combat in order to maximize his sneak attack damage. After combat is fully under way, the faceless stalker moves to fight adjacent to walls to prevent foes from flanking him. Morale If reduced to fewer than 6 hit points, Volorog attempts to flee into the swamp. He won’t pursue foes into area G5, and if faced with a foe who uses poison or snakes, he attempts to flee immediately, regardless of how many hit points he has. STATISTICS
Str 12 (normally 14), Dex 7 (normally 19), Con 16, Int 13, Wis 15, Cha 16 Base Atk +3; CMB +3 (+7 grapple); CMD 11 Feats Combat Reflexes, Deceitful, Improved Initiative Skills Bluff +10, Disguise +14 (+24 when using change shape), Escape Artist +10, Perception +9, Sleight of Hand +3, Stealth +10 Languages Aquan, Common; tongues SQ change shape (Small humanoid, alter self ), compression, faceless Gear leather armor Walthus Proudstump
XP 600
CR 2
Male halfling ranger 3
13
G3 G4
J1
G9
G2 G1
G7
G5
a J5
G8
J3
G6
L1 J2
b J4
L2 H1 H5
L4 H2
H3 H4
L6
H4 H5
L3
H8
H5
H5
H5 H6
H4
H9
H5 H7
H12
L5
H10
H11
H. Licktoad Village (CR varies)
Licktoad chieftain, a portly creature named Rendwattle Gutwad, sent four of his best goblins out on a mission to retrace Scribbleface’s path and bring back more fireworks. Those goblins succeeded beyond Rendwattle’s wildest dreams, returning from the wreck of the Kaijitsu Star (area I) with a chest filled with fireworks and with an ivory fan on which a map of Brinestump Marsh had been scrawled. Rendwattle sent his goblin heroes out to explore the sites indicated on this new map—another old shipwreck (area K) and a heretofore-unknown cave (area L). Several days later, the goblin “heroes” returned with several crates of treasure looted from the cave and even more fireworks. So armed with plenty of explosives, the goblins immediately made plans to use the fireworks to start raiding travelers along the Lost Coast Road. Unfortunately for the Licktoads, though, a bejeweled scroll tube containing an ancient secret lay hidden among the fireworks, and its theft woke an ancient, relentless spirit. Just a few days ago, the undead guardians of the treasures the goblins had looted arrived at the village—a small army of human skeletons led by an undead commander. Chief Gutwad’s goblin heroes met the skeletons in battle at the pond at area H2 but were swiftly cut down. Panic spread through the village as the relentless skeletons surged into
A filthy village-fort surrounded by a crude wooden palisade sits atop a low hummock of solid ground here. A wooden gate in the north wall of the palisade lies in shambles on the ground. Nearby, a large, algae-filled pool on the northeastern side breaks the palisade and allows a clearer view into the village’s interior, which consists of a collection of ramshackle huts connected by wooden walkways, all built on thick wooden stilts. This crude village is the home of the Licktoad goblins, the smallest of the numerous goblin tribes in the Sandpoint hinterlands. Historically, the tribe’s small size has kept them from joining in the time-honored pursuit of raids on human settlements—the majority of the Licktoads’ triumphs have normally come from scavenging from the swamp itself, a pursuit that is as dangerous for goblins as for most other explorers of the treacherous wetland. Recently the Licktoads discovered that one of their own, a goblin named Scribbleface, was engaging in the taboo act of writing. Scandalized, they drove Scribbleface out into the swamp and tore down his home, but in doing so discovered that Scribbleface had been stockpiling fireworks he’d recovered from a site deeper in the swamp. Intrigued, the
14
The Brinewall Legacy the village and marched from door to door, killing goblins in their search for the stolen treasures. It wasn’t until Chief Gutwad realized what the skeletons were looking for and ordered his bodyguards to push what remained of all the stolen treasure out of his home and onto the ground below that the skeletons finally stopped their attack. They gathered up the treasures and returned to the cave, leaving the Licktoads devastated and fearful of the night ever since. When the PCs come to the Licktoad village, they find it in a state of disrepair. The skeleton assault on the village was devastating, but the panicked goblins did more damage to their homes in trying to escape than the skeletons did in their search for the stolen treasures. The surviving goblins threw the bones of the few skeletons they managed to destroy into the pool at area H2 and burned the bodies of their dead in the pit in area H3, and have huddled frightened in their homes ever since. The Licktoad Village consists of the following areas (see the map on page 14). You can use these brief descriptions to f lesh out the PCs’ exploration of the village as appropriate. Each of the village’s buildings (and the wooden walkways connecting them) stands 5 feet above the muddy ground on wooden stilts. H1. Palisade: The front gate lies in shambles after several panicked goblins bashed it down in their efforts to f lee the village when the skeletons attacked. The remaining goblins haven’t bothered to repair it yet. Elsewhere, climbing over the 10-foot-tall palisade requires a DC 10 Climb check. H2. Pool: Used mostly as a source of water by the goblins, this algae-filled pool is 10 feet deep at its deepest point. A rickety wooden pier projects a few feet into the pool. Although an effective barrier for most enemies, the skeletons that attacked a few nights ago simply walked through it to invade the village. H3. Pig Pen: Until recently, this pit contained one of the Licktoads’ mascots, a hyperactive piglet named Squealy Nord, who finally managed to escape this muddy pit during the skeleton attack and f led into the surrounding swamp. His fate remains unknown. All that remains here now are the mostly cremated bodies of a dozen goblins. H4. Guard Posts: These three 10-foot-square huts serve as watchtowers. Each has numerous windows affording excellent views of the surrounding area. H5. Goblin Huts: These six huts each serve as homes for the tribe’s goblins. At one point, each of these buildings housed up to half a dozen goblins each, but after the devastating attack by the skeletons, these rooms are mostly empty. H6. Storage: This large room stores tools, food, and other supplies. The Licktoads being poor organizers, the room’s contents look more like a junkyard heap to nongoblins. Nothing of value can be found here. H7. Slorb’s House: This building was once the home of Slorb, a pompous goblin who served as Chief Gutwad’s
advisor. Slorb died when the chief pushed him off the walkway during the skeleton attack (Gutwad hoped that offering up Slorb would appease the skeletons—it did, but only for as long as it took the skeletons to kill Slorb). A DC 15 Perception check made while searching this building finds a hidden stash of 23 gp and three skyrocket fireworks (see page 60). H8. Ruined Building: This charred and demolished building was once the home of the goblin traitor Scribbleface. There is nothing of interest left here. H9. Chief Gutwad’s Throne Room: The double doors to this room are barred from the inside—they can be smashed down with a DC 22 Strength check, or a cunning character can lift the bar from the outside with a sword blade or other narrow tool inserted into the door gap and a DC 12 Disable Device check. The walls of the throne room are decorated with numerous poorly preserved horse and dog heads, along with other trophies like broken weapons, brinepickled bodies of brutally slaughtered furry animals, and other bits of grisly ephemera. Chief Gutwad’s throne—a rickety, 5-foot-tall wooden chair with a ladder built into the side that the goblins call the “Teeter Chair”—sits against the southern wall. H10. Gutwad’s Bedroom: The chieftain’s bed is little more than a big, nasty pile of ratty blankets, moss, and foul-smelling animal furs. The walls of this room are decorated in similar motifs to the throne room. H11. Licktoad Treasury: This room once contained the Licktoads’ accumulated treasures, but today the chamber is nearly empty. What little remains is detailed under Treasure on page 17. H12. Secret Escape Route: The secret doors leading here can be found with DC 20 Perception checks. Of course, the presence of a ladder leading up to the outer door from the ground below serves as an unintentional clue—any creature who climbs up this ladder gains a +8 circumstance bonus on Perception checks made to discover the southern secret door. Creatures: Before the skeleton attack, the Licktoad tribe numbered over three dozen goblins in all. Today, with over half their number dead or f led, only 16 goblins (including Chief Gutwad) remain in the village, and they’re terrified that the skeletons might come back at any moment. When the PCs first arrive at the village, they may think the goblin village is deserted—the goblins stay in hiding until the PCs first enter a building containing goblins. At this time, Chief Gutwad’s followers have split into five groups of three goblins each. Each of these cowering groups is a CR 1 encounter, but taken overall, a group of 15 goblins led by their chief would constitute a CR 6 encounter. You should thus not inf lict all of the goblins on the PCs at once. Instead, let the PCs explore the village for a bit at first—impress on them the eerie “ghost town” feel of the place, and let tensions build.
15
As they explore, give the PCs a chance to notice a lone goblin turn cackling or shrieking at the gory results rather than peeking at them through a window in one of the huts, who attacking. A goblin might try a particularly impressive but illquickly ducks out of view if spotted. advised acrobatic tactic, such as attempting to run between One of the five groups of goblins hides with Chief a PC’s legs to get at someone on the other side (Acrobatics Gutwad in area H9—place the other four groups in various check to move through an occupied square), trying to climb buildings as you see fit. When the PCs enter one of these up onto a roof to jump down from above (DC 10 Climb check buildings, the goblins within shriek and howl, then attack on the first round to get up on the roof, followed by a DC 15 in a blind panic. The first goblins the PCs encounter are Acrobatics check to leap down onto shaken for the duration of the fight, but this same panic a PC—if this Acrobatics check is blinds them to their danger, and they fight to the death. successful, treat it as a charge attack Once the initial fight is over, the remaining that leaves the goblin prone at the goblins in the village quickly rise to the end of the round), or attempting to defense of their homes, grapple, disarm, or trip PCs. howling and shrieking Once the PCs defeat at least seven in rage—they’ve finally of the goblins, the surviving realized that the PCs goblins panic and f lee toward aren’t undead, and are area H9, attempting to clamber up preparing to attack. Only to the double doors and hammering 1 round after the first fight, on them to be let in. Chief Gutwad the three goblins in the nearest won’t open the doors under any circumstance, building to the PCs burst out of and after 1d4 rounds of hammering, the goblins their hut and charge forth to attack outside f lee into the surrounding swamp unless the PCs. As this fight commences, stopped by the PCs. feel free to have other goblin groups Chief Gutwad won’t emerge to attack until emerge from their houses to join the food stores inside his home run out—and the melee as well, depending on how he’s got enough food to last him difficult the PCs are finding the fight. for a week. It’s unlikely that such Only the goblins in area H9 refuse to a siege will come to pass, however, leave their building. since getting into his “fortress” is The Licktoad goblins are all a relatively simple task—setting the armed with dogslicers (treat as building on fire is an excellent way to a short sword, but it gains the force the chieftain out, for example. broken condition on a natural Once the PCs finally confront Gutwad, 1 on an attack roll). In addition, however, the chieftain’s cowardice each group of three goblins possesses vanishes. The portly goblin shrieks, a single Desnan candle firework (see orders his three goblin guards to page 60)—the only ranged weapons the attack, then joins the fray himself. goblins have (with the exception of Chief If Chief Gutwad is slain, all Gutwad, who owns a bow). When a group the remaining Licktoads of goblins first attacks, the one with the f lee the village to take their Desnan candle lights it and chances in the swamp. begins firing pyrotechnics at the PCs—his companions Goblins (15) CR 1/2 hang back to watch the show XP 135 each until the candle expires or hp 6 each (Pathfinder RPG Bestiary 156) the PCs attack them. As with all goblins, the Chief Rendwattle Gutwad CR 2 Licktoads should be presented XP 600 in combat with equal amounts Male goblin ranger 3 of foolish bravery and sadistic CE Small humanoid (goblinoid) comedy. If the PCs manage to Init +4; Senses Chief Rendwattle Gutwad critically hit a goblin, other darkvision 60 ft.; goblins might spend their Perception +7
16
The Brinewall Legacy DEFENSE
After The Goblins...
AC 20, touch 16, flat-footed 15 (+4 armor, +4 Dex, +1 dodge, +1 size) hp 27 (3d10+6) Fort +4, Ref +7, Will +2
The secrets contained in the Brinestump Caverns have lain quiet for many years, and unless the PCs explore the cave, they’ll lie there for many more. As a result, this adventure’s plot hinges heavily at the start on the PCs’ curiosity and greed. There are several hints in this part of the adventure that should eventually encourage the PCs to seek out the Brinestump Caverns at area L, but if you find that your players aren’t taking the bait, you can use friendly NPCs to encourage them onward. Perhaps Walthus wants the PCs to accompany him to explore the site so he can satisfy his own curiosity at a heretofore unknown cave. Alternatively, Sandpoint’s sheriff or mayor could ask the PCs to continue exploring the swamp—after these latest events, the time has finally come for the swamp to be properly mapped. The mayor or sheriff can offer a payment of 1,000 gp to the PCs for a map of the region and a fair assessment of the threats contained within. Finally, if no other lures work, you can have the undead who’ve recently awoken in the Brinestump Caverns become more and more disruptive. After years of lying quiet, the goblins have woken them by stealing their treasure, and now that these skeletons are awake, the evil that compels them to life after death can drive them to start attacking travelers along the Lost Coast Road. In this event, the PCs may be called upon to enter the swamp again, this time to stop an undead menace rather than a tribe of goblins.
OFFENSE
Speed 30 ft. Melee spear +5 (1d6+1) Ranged mwk composite longbow +9 (1d6+1/×3) Special Attacks favored enemy (humans +2) TACTICS
During Combat Chief Gutwad hangs back for the first few rounds of a fight, using his skyrockets and arrows to attack. He only has six normal arrows left, and even in his frantic state he won’t use his precious animal bane arrows except against animal companions the PCs may have. Once out of arrows, he continues the fight with his spear. The chief drinks a potion of cure light wounds if he’s reduced to fewer than 15 hit points. Morale Chief Gutwad hates humans only a little more than he hates those who associate with humans. He fights to the death as long as he’s faced with human foes (or those he suspects of being human sympathizers). STATISTICS
Str 13, Dex 18, Con 13, Int 8, Wis 12, Cha 8 Base Atk +3; CMB +3; CMD 18 Feats Dodge, Endurance, Point-Blank Shot, Rapid Shot Skills Handle Animal +5, Intimidate +5, Perception +7, Ride +13, Stealth +17 Languages Goblin SQ favored terrain (swamp +2), track +1, wild empathy +2 Combat Gear +1 animal bane arrows (5), potions of cure light wounds (2), skyrocket fireworks (2; see page 60); Other Gear masterwork chain shirt, masterwork composite longbow with 6 arrows, spear, 32 gp
is messy, but a DC 15 Knowledge (local) check is enough to decipher it. The map depicts Brinestump Marsh, along with the locations of two shipwrecks and a cave. These are located at areas I, K, and L respectively. It was this crude map, originally drawn by the goblin cannibal Vorka, that led the Licktoads to investigate the Brinestump Caverns, and it can easily do the same for the PCs. Development: After the goblins are defeated, a closer investigation can reveal clues as to recent events in the village. A DC 15 Perception check and 10 minutes of investigation confirm that a deadly and violent battle recently took place in the village. If the PCs manage to capture any of the goblins alive and interrogate them, the goblins are only too eager to recount the harrowing skeleton attack, along with the events that led up to the attack. The goblins believe (correctly, as it happens) that the skeletons owned the treasures the goblins liberated from the cave to the southwest, and wish that they’d never messed with the cursed treasure in the first place—they’re eager for the PCs to let them go, and they hope that wild tales of all the treasure the skeletons took back with them will convince the PCs to do just that.
Treasure: Although Chief Gutwad sacrificed all of the treasure his minions looted from the cave along with a fair amount of other valuables, a fraction of treasure remains still in area H11, inside a single beautiful red chest. This chest, looted several weeks ago from the wreck of the Kaijitsu Star (see area I), is itself a work of art—if the mud and filth that encrust its lacquered sides and velvet interior are cleaned off, the chest is worth 150 gp. A DC 15 Knowledge (geography) check is enough to recognize the chest and its delicate etchings of cranes and frogs playing along a beach as being of Minkai manufacture. Inside the chest lies the remaining treasure of the Licktoad tribe: six masterwork shuriken, 329 sp and 112 gp in loose coins, a long hairpin with a red pearl at one end worth 150 gp, and a gold-and-ivory fan depicting a gecko walking amid cherry blossoms. The fan is worth 80 gp, but a crude map has been painted on the reverse side. The map
17
Further clues can be found just south of the village, for the amount of treasure the skeletons took with them back to the cave was significant. They left a relatively obvious trail as they returned—while the trail disappears where it crosses waterways, a DC 12 Survival check is good enough to pick it up on the opposite side. Note that every day that passes after this adventure begins increases the DC to follow this trail by 1. The trail is indicated by the dotted line on the map of Brinestump Marsh on page 10—PCs who wish to follow the trail must make a new Survival check every 1,200 feet. If the trail is lost, an hour of searching is required to find it again. Story Award: If the PCs break up the Licktoad tribe by defeating Chief Gutwad and causing any surviving goblins to f lee into the swamp, award them 800 XP, along with full XP awards for any goblins who escaped and then f led into Brinestump.
supplies she couldn’t procure from the wild. The nature of the supplies she purchased—glass f lasks, strange alchemical reagents, and disturbing books delivered to Sandpoint from faraway places as strange as Nex and Irrisen—did little to soften her reputation as a fearful witch, nor did periodic glimpses of the strange ratlike creature she kept hidden in the folds of her robes. Far from a kindly soul, Old Megus was fascinated by creatures that transform during their lives—tadpoles to frogs, caterpillars to butterf lies, and so on. Much of her life was spent attempting to trigger such transformations in other creatures, and in the end, it was an attempt to transform herself that spelled her doom. Today, Megus’s home is well on its way to being reclaimed by the swamp. All of the doors are swollen shut with moisture, requiring DC 14 Strength checks to force open. Nothing larger than a cat has been inside the building for months, and the f loorboards are already starting to warp and decay, eaten away by the fungus and the damp. Simply moving through the shack causes alarming creaks and groans. Each round that a creature of Small or larger size takes violent action in here (such as attempting an Acrobatics check, trying to break open a door, or attacking a foe), there’s a 20% chance the f loorboards give way, causing the creature to fall prone unless it makes a DC 12 Ref lex save. At your discretion, once the PCs have broken a total of 10 parts of the shack (such as by bashing down doors, breaking through the f loor, or smashing holes in walls), the entire building begins to collapse. Large bits of wall plaster and portions of the roof begin falling for 1d4+1 rounds, after which the entire building crumbles. Any creatures still inside must make a DC 15 Ref lex save to avoid taking 2d6 points of damage from the crumbling, soggy timbers and becoming partially buried (requiring 3d6 rounds of struggle to eventually escape). A 50-foot-long trail winds from the back of the house (at area J3b) down to the water, where a rickety pier still harbors a well-made rowboat that can seat four. This rowboat remains seaworthy, and can be used to navigate the swamp’s waterways with ease. As the PCs explore Old Megus’s shack, allow them to make DC 15 Perception checks to note what seems like a large number of rat tracks in the dirt and mold on the f loor. Whoever gets the highest result on the Perception check notices something disturbing—many of the so-called “rat tracks” look just like tiny little human handprints. Creatures: Apart from the three dire rats dwelling in the storage shed (area J1), only one creature now lives in Old Megus’s shack: Skitterfoot, a hideous creature known as a ratling and the witch’s onetime familiar. With the face and front hands of a wrinkled old man but the body of a rat, Skitterfoot has lived alone in the shack since his mistress’s death. He doesn’t miss Megus at all—the woman was a cruel mistress, after all.
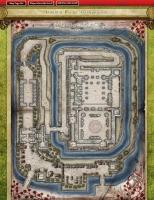
I. Kaijitsu Star This is the location of one of the two Kaijitsu ships that wrecked on the shore during the storm 24 years ago. The Kaijitsu Star was the smallest ship in the f leet, and having been driven into the swamp by the storm surge, it has better endured the elements. For a time, this shipwreck served as the home of a notorious goblin cannibal named Vorka; this avid explorer of Brinestump had found clues in the wreck indicating the possibility that other ships with similar treasures could be found elsewhere in the swamp. The Kaijitsu Star is the primary adventure site of Pathfinder Module: We Be Goblins!, which you can use to fill in details for this shipwreck if you wish. However, this adventure assumes that the goblins have already looted the Kaijitsu Star, killed Vorka, and set the wreck on fire. If you’re not expanding this site into an additional encounter area for your game, describe this site merely as a recently burnt-out hulk of a shipwreck, with nothing of interest remaining save for fragments bearing its name: Kaijitsu Star.
J. Old Megus’s Shack (CR 3) A sagging one-story shack sits in this clearing, its walls dingy with age and encrusted with lichen and fungus. A partially collapsed shed sits just to the northeast, while small pouches, twisted knots of feathers, and dangling wind chimes made of bones hang from branches and roof edge alike. Rumors of an old swamp witch living in Brinestump Marsh have existed for decades—since the foundation of Sandpoint itself. And the rumors were true until a few years ago, when Brinestump’s so-called “Swamp Witch,” Old Megus, finally fell victim to her own magic. During her long life, Megus only rarely left her home in the swamps. Whispers of her sinister experiments were mostly wild conjecture, based on her rare visits to Sandpoint for certain
18
The Brinewall Legacy Skitterfoot now thinks of the shack as his home. The ratling does not suffer intruders, and once he notices the PCs (automatically within 1d3 rounds of their entering the shack, unless they’ve taken steps to be particularly stealthy), Skitterfoot scurries out to the storage shed (area J1) to speak with the dire rats that live there. The dire rats fear Skitterfoot, and quickly obey his commands to go into the main building to attack the PCs. While the PCs fight the dire rats, Skitterfoot goes to area J5, seeks out the stash of scrolls there, and casts false life on himself. He then seeks the PCs out, using his spell-like abilities to attack. Skitterfoot hides inside the house’s walls, and can move throughout the shack with great speed, traversing the walls quickly and efficiently. While moving inside a wall (including beneath the f loorboards or in the rafters), the ratling has total cover and total concealment from attacks, and uses his burrow speed to move about. The ratling must come out of the house’s structure to attack, of course, but does so with hit-and-run tactics, waiting for an unsuspecting PC to come within 5 feet before stealthily emerging to make a sneak attack. If reduced to fewer than 6 hit points, Skitterfoot retreats to area J5 to use one of the healing scrolls, but otherwise he fights to the death to defend his home. Dire Rats (3)
XP 135 each
Rooms in Megus’s Shack
Old Megus’s shack consists of the following areas (see the map on page 14). J1. Storage Shed: Once used to store supplies, this building has mostly collapsed. Three dire rats nest here now—they are aggressive and attack any who enter their lair (see Creatures below). J2. Entry: Sheets of fungus grow along the walls and floor of this room, and on the numerous gourds, twigs, and bones hanging from the ceiling on sinew and string. The door to the north leads to a small closet. J3. Living Room: More fungus and mold grows on the sagging benches, broken table, and narrow cupboards here. An old brick stove sits against the west wall. Area J3a is a lavatory, while area J3b leads to a back door. J4. Bedroom: A large bed, its sheets thick with mold and puddles of water from the leaky roof, slumps in the corner of this room. Numerous ruined books lie stacked nearby, their contents destroyed by the damp. J5. Laboratory: Once an alchemical laboratory, the equipment in this room has fallen into decay. Ancient chemical spills create weird stains and colorful crystalline growths amid the partially collapsed workbenches. Old Megus’s skeleton, still dressed in tattered clothes, also lies among the workbenches. An examination of the witch’s remains quickly reveals that some hideous transformation or deformity has disfigured her skeleton—the skull seems half melted and weirdly elongated in the face, one arm looks more like a bird’s talon, and the ribs have grown long spurs of bone that protrude both into and out of the rib cage. It was this last deformity, brought on by Megus’s final experiment, that killed her.
CR 1/3
hp 5 each (Pathfinder RPG Bestiary 232) Skitterfoot
XP 600
CR 2
Male ratling (see page 86) hp 31 (19 without false life) Treasure: While neglect has ruined most of Old Megus’s treasure, Skitterfoot has stashed away a few of the witch’s magical supplies in a relatively dry nook in the laboratory (area J5) that can be discovered with a DC 20 Perception check. The stash contains 33 gp, a masterwork dagger in a steel scabbard worth 15 gp, and a scroll tube containing two scrolls of cure light wounds, two scrolls of false life, and a scroll of water walk (all of these scrolls function at caster level 7th). In addition, this stash of treasure contains perhaps an even greater boon for the PCs: a detailed map of Brinestump Marsh. Having lived there for so many years, Old Megus was perhaps the greatest living expert on the swamplands. The map is curled with the scrolls in the tube, and shows every significant location in the marsh, with the exception of the lair of the Soggy River Monster (area F). The map even indicates the hidden path at area C and the shipwrecks at areas I and K. The cave network at area L is shown merely as a cave entrance, and bear a skull-shaped rune of warning and a note indicating that Megus hadn’t explored the caverns because she didn’t think it was worth the risk.
K. Kaijitsu’s Blossom (CR 1) What appears at first to be a strange tangle of branches is in fact the moss-covered ribs of a wrecked ship. The ruined ship lies on its side, split down the middle and mostly sunken into the mud and murky water. Little remains of this once-large ship today, but a search of the wreck reveals it to be of a similar style to the wrecked ship at area I. A successful DC 15 Perception check discovers a verdigris-encrusted nameplate that reads Kaijitsu’s Blossom. The ship is in even worse shape than her sister ship, the Kaijitsu Star, but the Kaijitsu’s Blossom was the larger and more important of the two ships. Creatures: While most of the survivors of the Kaijitsu’s Blossom f led to the cave to the south (area L), seeking shelter from the storm that wrecked the ship, some were
19
abandoned here to their fate. Three skeletons rise from the swampy murk soon after the PCs begin exploring the wreck—if possible, just after the ship’s corroded nameplate is found. As the undead skeletons rise from the mud, they draw rusty but still quite functional wakizashi (Pathfinder RPG Ultimate Combat 134; treat as short swords if you don’t have access to that book) from their rib cages with a rattle, and attack, fighting until destroyed. Human Skeletons (3)
XP 135 each
CR 1/3
hp 4 each (Pathfinder RPG Bestiary 250)
L. Brinestump Caverns (CR varies) A fifty-foot-high cliff rises along the marsh’s southern border, its face a thick tangle of jutting rocks and bright green vines and nettles. A curtain of these thick nettle vines partially conceals a cave opening at the base of the cliff. When the Kaijitsu f leet ran into trouble on their hasty return from Brinewall 24 years ago, two of the ships were driven toward shore while the third was swept out to sea. The crew of the two ships that ran aground (the Kaijitsu’s Blossom and Kaijitsu Star) sheltered in their wrecked, half-f looded ships for several hours before meeting very different fates. As the storm worsened, those who had survived the wreck of the smaller Kaijitsu Star drowned. Recognizing this exact danger, the survivors of the Kaijitsu’s Blossom decided to gather the greatest treasures from their ship’s hold and risk an overland f light. Staggering away from the shore through the storm-lashed swamp, they came to this cave entrance. The leader of this group, a grizzled samurai who had accompanied the royal family over the Crown of the World and had changed his name to Tsutamu to hide his link to the Amatatsus, initially saw the cave as a lifesaver. Yet soon after his people took shelter within, they discovered to their horror that the cave was the lair of a tribe of faceless stalkers. The crew was devastated by the faceless stalkers’ attack, but Tsutamu was overcome by a righteous anger. Even as the rest of the survivors were slain, he managed to kill all of the faceless stalkers. Yet, as the fight ended and his rage gave way to shame at having so failed his employer and his comrades, Tsutamu took his own life in the dark cave, and his corpse and restless spirit have remained within for decades. When a group of goblins came to the cave just a few weeks ago, they found several human skeletons along with several crates of incredible treasures. The looting of these treasures drove Tsutamu’s wrathful spirit to return to his corpse, and he rose not long after as a skeletal champion. Such was his anger at this final desecration and shame that the remains of the slaughtered soldiers rose as well, a skeletal army bound to his anger.
Today, these caverns serve as the lair of the fallen samurai and his undead soldiers—compelled only by their shame and anger, they remember little of their lives before. They want only to guard their treasures until destroyed. If left to fester for much longer, the wrath fueling Tsutamu and his soldiers will eventually compel the skeletons to begin stalking larger and larger surrounding areas, eventually making them a threat to the Lost Coast Road and, if not stopped, a danger to Sandpoint as well. The Brinestump Caverns are presented in abbreviated format below (see the map on page 14). The small cave complex extends well over a hundred feet beneath the cliff. The caverns sit mostly level, just 10 feet or so above sea level. With the exception of a few verminous denizens, the primary dangers in the caverns are the undead guardians, but the PCs won’t rouse the skeletons’ wrath until they press too far into the caverns. Present the exploration of these caverns as a creepy, claustrophobic event—the ceilings rarely rise more than 7 feet in height, and moisture constantly drips down from above to make slippery puddles and rivulets in the f loor. While movement through the caverns isn’t particularly difficult, the slippery f loor does increase the DC of all Acrobatics checks made inside by +2. L1. Entrance: The curtain of nettles that partially obscures the cave entrance can be dangerous if touched. If the PCs don’t take steps to hack down or burn away the hanging vines before they enter (or take care to push the vines aside with a DC 12 Ref lex save), they suffer painful stings from the nettles. Anyone who touches the nettles must make a DC 12 Fortitude save or be sickened for 24 hours. L2. Spider Nest (CR 1): This cavern is the den of a giant wolf spider—the hairy, red-backed creature is busy feeding on the carcass of a giant gecko it dragged back into the cave, but it immediately leaps to attack if its meal is interrupted by intruders. Giant Spider
XP 400
CR 1
hp 16 (Pathfinder RPG Bestiary 258) L3. Cavern Pool: These brackish waters remain behind from periodic storms and f loods, slowly seeping into the rock. The water here is 3 feet deep at its deepest point, but the rock f loor beneath the water is slippery. Crossing the pool or wading in it requires a DC 14 Acrobatics check to avoid falling prone. L4. Island Lure (CR 1): A number of glittering crystals protrude from an island surrounded by a 5-foot-deep pool of dark water here. The crystals are just rock crystals (worth 20 gp total if harvested), but a giant amoeba lurks beneath the waters. The watery-looking ooze surges up from the water to attack anyone who approaches within 5 feet of the pool’s edge.
20
The Brinewall Legacy Giant Amoeba
CR 1
XP 400
DEFENSE
AC 17, touch 12, flat-footed 15 (+3 armor, +2 Dex, +2 natural) hp 30 (4 HD; 2d8+2d10+10) Fort +5, Ref +2, Will +5 Defensive Abilities channel resistance +4, self reliant; DR 5/ bludgeoning; Immune cold, undead traits
hp 15 (Pathfinder RPG Bestiary 2 24) L5. Cavern of Shame (CR 3): Six human skeletons lie on the ground, scattered throughout this large cavern (two of them lie underwater, where they can only be spotted with a DC 15 Perception check before they rise). The skeletons remain quiet as long as the PCs simply explore the cave. A PC can attempt to destroy one of these skeletons by delivering a coup de grace while it lies on the ground, but the remaining skeletons immediately animate and rise to attack after the attempt. These skeletons are unarmed, attacking with just their claws. If Tsutamu (see area L6) is destroyed, these skeletons are immediately destroyed as well. The skeletons’ broken armor can be identified as Tian in style with a DC 15 Knowledge (geography) or Knowledge (local) check. Human Skeletons (6)
XP 135 each
OFFENSE
Speed 20 ft. Melee Whispering Shrike +8 (1d6+5/18–20), claw +2 (1d4+2) Special Attacks challenge (+2 damage, 1/day), command skeletons TACTICS
During Combat When Tsutamu attacks, he issues a challenge to one of his foes (preferably another samurai or cavalier) as a swift action, allowing his melee attacks to deal +2 points of damage to that foe for as long as the foe lives. While challenging a foe, Tsutamu takes a –2 penalty to his Armor Class against opponents other than his challenged target. Faced with multiple enemies, Tsutamu commands his skeletons to attack opponents other than his target. Morale Tsutamu fights until destroyed.
CR 1/3
STATISTICS
Str 19, Dex 14, Con —, Int 8, Wis 10, Cha 14 Base Atk +3; CMB +7; CMD 19 Feats Cleave, Improved Initiative, Iron Will, Power Attack Skills Diplomacy +9, Intimidate +9, Perception +7, Sense Motive +5 Languages Common, Tien SQ mount (currently none), order (ronin), resolve 1/day Gear broken masterwork chainmail, Whispering Shrike (+1 wakizashi; see page 61), bronze key on necklace (opens chest in area L6)
hp 4 each (Pathfinder RPG Bestiary 250) L6. Treasury (CR 3): The skeletal champion samurai Tsutamu sits motionless atop a large jade and cherry wood chest here. He does not move, even to assist his skeletal minions in area L5, until the PCs approach within 10 feet of the center of this area, at which point he animates and attacks. If the skeletons in area L5 have not yet risen, they also do so at this time. This combat should be resolved not as one huge fight, but as a series of smaller fights against the lesser skeletons, finally culminating in a fight against Tsutamu himself. Tsutamu is a samurai, an alternate class for the cavalier base class. The cavalier is presented in the Pathfinder RPG Advanced Player’s Guide. Tsutamu
XP 800
CR 3
Male human variant skeletal champion samurai 2 (Pathfinder RPG Bestiary 252, Pathfinder RPG Ultimate Combat 18) LE Medium undead Init +6; Senses darkvision 60 ft.; Perception +7
SPECIAL ABILITIES
Command Skeletons (Su) Tsutamu has a unique bond to the skeletons found in Brinestump Marsh. He can command their actions as a free action via telepathy as long as they’re within line of sight. If Tsutamu is destroyed, the other skeletons immediately collapse to the ground as well, for it is the samurai’s will that keeps them animated. Order (Ex) Tsutamu’s order is ronin. Whenever Tsutamu is the target of a challenge by another samurai or cavalier and he Tsutamu issues a challenge against that character in return, he receives a +1 bonus on attack rolls made against the target of his challenge and a +1 dodge bonus to AC
21
against attacks made by the target of his challenge. Resolve (Ex) Once per day, whenever Tsutamu is required to make a Fortitude or Will save, he can take an immediate action to roll twice and take the better result. He must decide to use this ability before he rolls the saving throw. Self Reliant (Ex) Whenever Tsutamu fails a Will save against an effect with a duration greater than 1 round, he can attempt another saving throw at the end of the second round of the effect. If he makes this saving throw, it has the same effect as if he had made the original save.
Brinewall: A DC 14 Knowledge (history) check recalls that an unknown scourge destroyed the colony of Brinewall on the first day of Sarenith in 4687, just a few days after the date on the letter. Kortun: A DC 18 Knowledge (history) check reveals that Brinewall’s last commander at the time the colony was destroyed was a man named Andril Kortun. Rokuro Kaijitsu*: A DC 15 Knowledge (nobility) check is enough to know that Rokuro Kaijitsu was Ameiko’s grandfather, which would make the letter’s unnamed and intended recipient her father, the now-deceased Lonjiku Kaijitsu. Tsutamu*: A DC 25 Knowledge (nobility) check reveals that Tsutamu was Rokuro Kaijitsu’s devoted bodyguard.
Treasure: The skeletons have stored the whole cause of their obsession in this cavern, locked away inside a large jade and cherry wood chest. The chest weighs just over 50 pounds with all of its contents, and is worth 250 gp if undamaged. It can be unlocked with a DC 30 Disable Device check or with the key that hangs on Tsutamu’s neck. Once the chest is opened, it’s obvious that many objects (mostly fireworks and potions) have been removed from numerous slots in the chest’s velvet-lined interior— the handiwork of the Licktoad goblins. However, the chest still holds five potions of cure light wounds, two potions of cure moderate wounds, three potions of lesser restoration, a ring of climbing, a wand of identify with 19 charges, a masterwork chain shirt, a masterwork cold iron wakizashi, 11 Desnan candles, and four skyrockets (see page 60), in addition to 3,820 sp, 421 gp, and various pieces of fine jewelry worth 560 gp total. Yet perhaps the most important piece of treasure in the entire cavern is hidden in a secret compartment in the pommel of Tsutamu’s sword, Whispering Shrike, which can be found with a DC 20 Perception check. A miniature mithral scroll tube worth 100 gp rests inside. While this scroll tube is too small to store a magical scroll, it does hold a letter—Rokuro Kaijitsu’s last letter to his son Lonjiku—that indicates a powerful Kaijitsu secret might still lie hidden in the ruins of Brinewall.
Concluding Part One While the PCs can continue exploring Brinestump Marsh and the Sandpoint Hinterlands if they wish (see the article on page 62 for further details), Part One concludes as soon as they discover the letter hidden in the hilt of Whispering Shrike, the wakizashi wielded by the undead Tsutamu. The rest of this adventure assumes that the PCs find Rokuro’s letter. If it doesn’t look like the PCs will discover the note, whomever they hire to repair the sword’s hilt finds the note and returns it to them. If the PCs sell the sword, the buyer finds the note and gives it back to them. Only if the PCs completely ignore the valuable treasure should you alter things—perhaps allowing them to find the note in some other spot among the treasures. In a worst-case scenario, someone is certain to find the note at some point, be it in a week or a month, and passes the note along to Ameiko—destiny, in this event, should have a way of working things out so that she eventually ends up with the letter her father never received. Technically, the scroll belongs to the Kaijitsu family, as does all of the treasure in the chest found in the Brinestump Caverns, but if the PCs give the letter to their friend and ally, Ameiko, she graciously allows them to keep all of the contents of the treasure chest save the scroll itself. Once Ameiko gains the scroll, proceed to Part Two. Because of the PCs’ links with Ameiko (see the Jade Regent Player’s Guide), they will likely feel compelled to inform Ameiko of their discovery, but there’s always a chance that they won’t, for whatever reason. In this case, you should try to encourage them to inform Ameiko anyway—but if the PCs instead wish to travel to Brinewall on their own to solve the mystery without telling her, let them. Be aware that such an undertaking will be all the more dangerous without the support of a caravan nearby, though! Story Award: Award the PCs 1,200 XP for giving the scroll to Ameiko.
Rokuro’s Letter Written on fine paper in black ink, the words of this letter are inscribed in Tien. If none of the PCs can read Tien, they know that their friend Ameiko Kaijitsu can certainly translate the letter. A translation of the note is reproduced on page 23. Even if the PCs can’t immediately read the letter, a DC 15 Perception check is enough to note a faint watermark on the paper that bears the image of a castle and the word “Brinewall.” A DC 20 Knowledge (history or local) check confirms that the paper itself was likely made in the now-deserted settlement of Brinewall, far to the north. After reading the letter, several clues can be explained further with successful Knowledge checks—those checks marked with an asterisk can be automatically explained by Ameiko.
22
The Brinewall Legacy
Player Handout
Part Two: The Legacy’s Lure
Once Ameiko reads Rokuro’s letter, she becomes fascinated to the point of obsession over it. She never had what one could call a “stable” relationship with her father, but the revelation that members of her family may have once lived in Brinewall—and might even have been there when whatever doom came to that colony struck—is almost as intriguing to her as the wonder of what strange legacy might be hidden in the “warding box” mentioned in the note. The opportunity to track down a family secret and go on an adventure is too much for Ameiko to ignore, but after her previous experiences as an adventurer, she knows better than to go it alone. Impressed with how her friends, the PCs, managed to recover the treasure from the swamp in the f irst place, she all but begs them to accompany her north to Brinewall to seek this hidden family legacy. How much work Ameiko needs to do to convince the PCs to accompany her depends on your players, of course, but if they’re using the Jade Regent Player’s Guide, they should have several built-in reasons to accompany her—especially upon learning that she plans on recruiting three more allies to join her—the elf ranger Shalelu Andosana, the
Varisian caravan master Sandru Vhiski, and Koya Mvashti, the Varisian cleric of Desna. By recruiting Sandru and his caravan, Ameiko hopes to find safety in numbers—a trip to Brinewall isn’t an idle journey, after all. All three of these NPCs eagerly accept Ameiko’s offer to join her on the adventure—something that should further encourage the PCs to come along. If the PCs are still hesitant, though, have Ameiko (or whichever of the four NPCs the PCs are closest to) encourage them with tales of treasure, fame, and excitement. If the PCs still refuse, Ameiko sadly leaves them behind. A few weeks later, word that the caravan has apparently gone missing should compel the PCs to travel north to investigate, in which case they can rescue Ameiko and her allies from the Brinewall dungeons (see area V8 on page 45).
Organizing the Caravan At this point in the campaign, four NPCs become key members of the storyline. Make sure you’re familiar with these four NPCs before proceeding—Ameiko, Koya, Sandru, and Shalelu are presented in detail on pages 52– 59. The PCs should already know these four characters— indeed, they should be close allies, depending upon the
23
nature of the Campaign Traits they chose from the Jade Regent Player’s Guide. Before Sandru’s caravan leaves Sandpoint, though, a few last-minute bits of preparation are required. Provisions and supplies must be purchased, and additional travelers such as guards, drivers, cooks, wainwrights, and the like need to be hired. The PCs can certainly fill some of these roles, but if the caravan is to be successful, numerous improvements to the three wagons Sandru already owns should be addressed. If the PCs suggest taking a boat to Brinewall instead, Ameiko points out that not only would that be more expensive (considering she’s already got allies who own a caravan), but they’re unlikely to find anyone willing to set sail for the notorious ruin anyway. Rules for building, maintaining, and adventuring with caravans can be found in the Jade Regent Player’s Guide. In large part, you can leave the decisions as to how to prepare for the journey up to the PCs. To prepare for the journey, Ameiko offers 2,000 gp in financing to purchase supplies, new wagons, and enhancements to wagons, and to pay for additional traveler wages. Anything the PCs wish to donate to the cause is welcome, but is not required to ensure their positions on the journey. If you’re not using the Jade Regent Player’s Guide or the caravan rules presented therein, you can simply assume that the PCs’ journey north to Brinewall occurs without incident and proceed with Part Three of the adventure.
The Journey North Once Sandru’s caravan is prepared and ready to go, Ameiko leaves her manor in southern Sandpoint in the care of her house staff and makes sure that her employees are ready to handle running business at the Rusty Dragon. The other three NPCs have no real responsibilities in town, but the PCs might. They should see to them before they leave, for the journey may well take weeks to resolve, especially since so little is known about the current state of affairs in the ruins of Brinewall. The journey to Brinewall takes the caravan from Sandpoint up along the Lost Coast Road, passes through the villages of Galduria and Wolf ’s Ear, cuts through the northeastern reach of Churlwood, and eventually reaches the northern town of Roderic’s Cove. Unless the PCs pressure him to choose otherwise, Sandru prefers to avoid Riddleport entirely, following an old track north of Roderic’s Cove that skirts the southern Stony Mountains, then winds up into the Velashu Uplands, following the river northwest to a low pass in the mountains and then due north into the Nolands and, eventually, to Brinewall. The farther north this route goes, the more disused the roads become. By the time the caravan winds through the Velashu Uplands, the road is little more than a track. With the loss of Brinewall as a viable port, most trade between
Varisia and the Lands of the Linnorm Kings has been via the sea route, but the trail the caravan follows isn’t completely abandoned. Sandru is quick to point out that several Varisian caravans take the route yearly, although he does admit that they generally make a wide detour around Brinewall, which is believed by most to be haunted, cursed, or both. Overall, the journey from Sandpoint to Brinewall covers about 500 miles—unless the PCs upgrade Sandru’s caravan, it’ll take them about 16 days to reach their destination. If the caravan remains on the roads and tracks, its travel speed is not impacted at all by the terrain it travels through. See page 81 for possible encounters the PCs can run into while traveling to Brinewall.
Part Three: Ruins of Brinewall
The colony of Brinewall was founded over 250 years ago in 4442. Construction on Brinewall Castle began soon thereafter, but funding problems and several disasters along the way slowed construction to a crawl. The worst disaster to strike occurred when the castle’s partially completed eastern wall collapsed into a cavern network below. Hideous demon-worshiping creatures known as dire corbies emerged from the now-exposed cavern complex to attack the colony, and final construction on castle was not completed until 4469. After Magnimar was founded in 4608, Brinewall finally began to come into its own—trade picked up, and several important and powerful merchants, among them the Kaijitsus, took an interest in helping the town grow. But Brinewall never saw the success that visited Korvosa, Magnimar, and Riddleport, and finally fell to an enemy more swift and efficient in dealing death than the dire corbies, Nolanders, and Linnorm Kingdoms raiders combined. The oni of the Five Storms, working with allied ninja of the Frozen Shadows guild, swept in and slaughtered the entire population of the small village during a terrible storm. They then overran the castle itself and finished the task of slaying every resident within. The final battles took place in the castle donjon, where both commander Andril Kortun and Rokuro Kaijitsu were among the last to fall. The oni chose to make examples of these two, using dark magic to transform them into undead before they left Brinewall to its fate. Today, the Five Storms and the Frozen Shadows have all but forgotten Brinewall, and believe that their swift attack and the storm that apparently destroyed the remaining Amatatsu f leet had finished the job. They returned to Kalsgard in the Lands of the Linnorm Kings to continue their watch there. Only one of their number stayed behind in Brinewall—a yamabushi tengu named Kikonu. Intrigued by the strange birdlike men that he found dwelling in caverns under Brinewall castle, Kikonu left the Five Storms and moved into the depopulated castle
24
The Brinewall Legacy
to become a leader of sorts over the dire corbies. Over time, other violent creatures have come to Brinewall, and while they don’t always work well together, Kikonu has accepted them all as new members of his extended family. That Kikonu’s presence has somewhat ameliorated the dire corbies’ natural xenophobia is impressive, for while the dire corbies generally avoid interactions with the ettercap, harpy, troglodytes, ogrekin, and other creatures they share their home with, neither do they seek conf lict with them. The oni enjoys his role as ruler of this small “kingdom” of monsters, but also knows that until his it is large enough to defend itself from an invading army, his greatest defense is secrecy. His minions dwell within the castle walls, under orders to avoid the ruined village down the hill save for periodic foraging trips or stealthy patrols. Kikonu keeps an eye on all intruders, and does his best to maintain the myth that Brinewall is haunted or cursed using illusions and other tools at his disposal, but should anyone attempt to infiltrate his domain atop the hill—Brinewall Castle— he and his minions rise up in a righteous fury to defend their home.
Ameiko’s Coma When Lonjiku Kaijitsu opened the warding box that kept the Amatatsu Seal hidden so many years ago, a portion of the family’s ancient spirit—a kami—escaped from confinement. This kami serves as the guardian spirit of the Amatatsu Seal itself, but when Lonjiku’s father closed the warding box, the kami was prevented from returning to the seal. Cut off from the seal, the kami could not form a physical body of its own, and was helpless to do anything but watch as the oni overran Brinewall. The kami did what it could to inf luence events to prevent the oni from discovering the secret vault wherein the Amatatsu Seal was hidden, and while its powers were limited, it was these inf luences that likely prevented the Five Storms from not only finding the seal, but from further pursuing the Kaijitsu family as well. For the next 24 years, the kami waited hopefully for a member of the Amatatsu family to return to the region, but being separated from the object it was supposed to guard took its toll on the kami’s mind. Today, the spirit is a chaotic fragment of what it once was, and until it can be
25
returned to the Amatatsu Seal it is little more than a potent force of spiritual energy. But with Ameiko’s arrival in the region, the kami sees a chance to return the Amatatsu Seal to its rightful owners. As the PCs’ caravan approaches Brinewall, impress upon them the oppressive feeling of the place. The track they’ve been following all this time passes about half a mile east of Brinewall, continuing north and crossing the Steam River into the Nolands over a weathered wood-and-stone bridge. An old signpost about a hundred yards south of this bridge reads “To Brinewall,” and points down an overgrown trail that winds through a forest. This track quickly fades away entirely into the undergrowth, and further progress toward the ruined village must be made on foot. Unfortunately for Ameiko, however, exploration of Brinewall is not in the cards. As the PCs near Brinewall, Ameiko grows more and more listless and sickly. She tries to hide her condition, figuring she’s simply exhausted from the long journey or that she ate something that disagrees with her, but as the PCs reach the end of the road and prepare to explore Brinewall, a DC 15 Perception check allows a PC to note how pale and shaky she looks. A few moments later, she collapses to the ground, unconscious. Ameiko’s growing listlessness is a physical reaction to the kami’s initial attempts to communicate with her. Increasingly frustrated, the kami finally breaks several ancient divine laws prohibiting the merging of kami with sentient creatures and attempts to possess Ameiko, but the result is only partially successful. Unsure of how to function in a human body, the kami becomes trapped in Ameiko, causing her to fall into a coma. As long as the kami remains inside her, Ameiko remains unconscious. The spirit protects her from further harm during this time (she doesn’t starve, grow thirsty, or even age), but it doesn’t let her wake. So desperate is the kami to get Ameiko reunited with the Amatatsu Seal that if she’s taken farther away from Brinewall, her body begins shaking as if undergoing a fit. Eventually she begins screaming in her sleep and thrashing with increasing violence. These fits immediately cease if Ameiko is allowed to remain motionless and isn’t taken farther away from Brinewall. The magic required to expel the kami from Ameiko (such as dispel law) is likely beyond the PCs’ reach at this point. A DC 20 Heal check is enough to diagnose that Ameiko is in some sort of magically induced coma, while an examination with detect law reveals that some potent lawful spiritual force has invaded her—a DC 25 Knowledge (planes) check identifies the spirit as a kami, a spirit normally associated with the protection of an animal, object, or location. Why it merged with a living human is a question that no Knowledge check can reveal. Regardless of what the PCs learn, Sandru, Koya, and Shalelu agree that whatever is causing Ameiko’s coma
likely has something to do with the Kaijitsu legacy hidden somewhere in Brinewall. Although she’s unconscious, Ameiko seems to be sleeping peacefully. For now, the three other NPCs are content to remain at the caravan to guard and protect Ameiko while the PCs head into Brinewall to attempt to solve the mystery of what’s aff licting their friend. The NPCs won’t want to leave Ameiko behind, but if you feel that the PCs could use a bit of help exploring Brinewall, one of the NPCs could accompany them as you see fit. While in Ameiko’s body, the kami can periodically communicate with the PCs, and does so to encourage them to seek out the Amatatsu Seal. The kami communicates by making Ameiko talk in her sleep. The first time this occurs, she speaks in Tien. If no one can understand her, future communication attempts are in Common. Exactly what “Ameiko” whispers in her sleep is up to you, but it should be brief, cryptic hints and phrases rather than exact directions. The kami possessing her is somewhat insane from its long separation from the seal, after all. Some possible hints could include the following: “One treasure beyond two seals in the third vault...” “Beware the birds who wish to f ly but cannot...” “A key you seek lies in the grip of the ten-handed one—his fear is your greatest ally...” “Beware the cuckolded cuckoo—it is in his shattered silent love you should seek aid...” “Grandfather waits in the dark, but he knows not who he was...”
Brinewall Village With the exception of the lagoon (area O), the cemetery (area Q), and the ruined lighthouse (area R), Brinewall Village itself is largely deserted—yet the PCs shouldn’t know this when they first explore the place. The woodlands surrounding the village are particularly dense with undergrowth—these areas are treated as difficult terrain for creatures moving through them. Descriptions of the village’s primary locations follow below (see the map on page 27). M. Waterfront: A naturally deep harbor has formed where the waters of the Steam River f low into Bunyip Bay to the west. Two ruined piers extend into the only relatively shallow portion of the harbor here, and once served all of Brinewall as moorings for visiting ships. While both piers are now mostly collapsed, the westernmost one has what appears to be a relatively recent visitor: a Linnorm Kingdoms longship is tied to the pier. The longship seems relatively new, but the vessel is partially destroyed and half-sunken. A search of the ship reveals signif icant damage to the ship in the form of tremendous claw marks and what appear to be scorch marks from a powerful electrical attack. The longship belonged to a group of raiders who came to Brinewall 2 weeks ago to
26
The Brinewall Legacy
S t e a m R i ve r
R S1 T
S2
Bu
n y ip
Bay
M
N
N N
O
P
loot the place, but a sea drake that had been dwelling in the harbor attacked them as they disembarked. The drake slew all but one of the raiders, who f inally managed to kill the beast in the lagoon after it emerged from the water and f lew after her. The sole survivor is a stubborn woman named Kelda Oxgutter. Even after the terrible f ight against the sea drake, she continued to explore the area, only to be captured by the denizens of Brinewall Castle. She can be found now in area V8. N. Ruined Buildings: Among the ruined buildings that once composed Brinewall Village, the PCs can find barracks, a smithy, several homes, a glassworks (with several architectural designs similar to those of the larger glassworks in Sandpoint owned by Ameiko Kaijitsu), a trading post, and a stable. The two largest ruins are located in the eastern part of town, and consist of a town hall to the north and an almost completely collapsed temple of Desna to the south, near the entrance to the cemetery. O. Lagoon (CR 3): Once used mostly for fishing, this algae-choked lagoon is only 10 feet deep at its deepest point. On the lagoon’s northwestern shore, the rotting carcass of a sea drake lies half submerged in the water. Larger than a horse, this bright green aquatic reptile has finned, winglike arms and a draconic visage—no Heal check is necessary to determine it was slain by several
Q
violent strikes with an edged weapon. While no clues await discovery here, two reefclaws dwelling in the lagoon periodically feed upon the drake’s carcass. These aquatic aberrations attack any creatures attempting to search the dead drake, fighting to the death. They pursue f leeing foes, even onto land, for 1d3 rounds before returning to feed on the carcass. Reefclaws (2)
XP 400 each
CR 1
hp 13 each (Pathfinder RPG Bestiary 2 234) P. Cemetery Gates: A rickety wooden fence surrounds the clearing beyond, but the gates here are made of iron and f lanked on either side by statues of a beautiful woman with butterf ly wings. A DC 10 Knowledge (religion) check identifies the statues as depicting the goddess Desna. Q. Cemetery: This clearing consists of a low hill containing nearly two dozen graves. A stone crypt sits atop the hill to the east. The entire graveyard is unusually well tended—the grass appears to be weeded and the gravestones are quite clean. The crypt contains only one body, that of Admiral Mercatio Kiameleu, Brinewall’s founder. What appears to be a gravestone set apart from the rest of the graves near the northern edge of the
27
cemetery is in fact a small, well-tended shrine to Desna that consists of a marble statue of the deity holding aloft a small copper bowl. Although worth 25 gp, as long as the bowl is left in place, any water poured into it automatically becomes holy water. The bowl can perform this minor miracle once per day. When the PCs f irst arrive, the rainwater in the bowl has already been blessed in this manner. The bowl can hold 3 f lasks’ worth of holy water at a time, and is currently full. The lyrakien Spivey (see below) lives in this graveyard. R. Lighthouse: This stone lighthouse is now little more than an empty shell after its roof caved in many years ago. A DC 15 Perception check made while searching the rubble around the structure locates a partially crushed strongbox containing 93 gp and a single rusty key. Left behind by the long-dead lighthouse tender, this is a skeleton key that can open all of the locks on the ground and upper f loors of Brinewall Castle. Unless repaired with a make whole or mending spell, though, the key breaks after opening 1d6 locked doors. S. Hidden Entrances: Two secret entrances to the tunnels under Brinewall Castle lie hidden outside the castle. Locating either entrance from the outside requires a DC 22 Perception check made by anyone searching within 20 feet of the area. Winding tunnels beyond each secret door lead through several empty caverns before joining the tunnels under the castle. The entrance marked S1 on the cliff below the castle leads to area V6, while the entrance at S2 in the woods to the east leads to area V10a. T. Brinewall Castle: The large castle that once protected Brinewall Village is described in more detail on page 29.
Spivey Brinewall’s oldest resident—a tiny, butterf ly-winged azata—came to the region nearly 10 years ago and has been lurking in the area ever since. This azata is a lyrakien cleric of Desna named Spivey, long stranded on the Material Plane after her mistress was slain by a “hungry plant” (actually a giant f lytrap). After several months of aimless wandering, Spivey came upon the ruins of the church of Desna here and took it as a sign. She originally tried to rebuild the temple, but gave up when she started attracting the wrong kind of attention from the denizens of the castle. Instead, she’s taken to living in the cemetery, where she does her best to keep the graveyard clean and free of undead and other desecrations. The inhabitants of the castle aren’t really sure what Spivey is—she’s quick to stay hidden when they come looking for her—but many of them have tasted her magic, and thinking she’s a ghost haunting the graveyard, they leave her alone. The PCs are the first friendly faces Spivey’s seen in a long, long time, but she’s not naive. She won’t immediately reveal herself to the PCs. Where and how she first notices
the PCs is left up to you, but it most likely happens either when they explore the cemetery or after they get in a fight with the reefclaws in the lagoon. Spivey hides as she watches and follows the PCs. Since she can’t use magic to hide, you should periodically give the PCs chances to notice the tiny cleric watching them from the undergrowth, but her size and skill at hiding make spotting her unlikely. Only once she’s sure the PCs could be friends (likely after she sees them returning from Brinewall Castle after several fights there, or as soon as she notices any clerics or worshipers of Desna among them) does she decide to approach them, but even then she hesitates, waiting until the PCs obviously need her help. You can have Spivey swoop in to provide emergency healing or perhaps cast a key spell to defeat or distract an enemy, as needed. Once Spivey contacts the PCs, she’s eager to f ind out what they’re doing in Brinewall. She encourages the PCs to try to clean out the castle, and while she won’t accompany them (unless you think they could use the help), she does explain how the holy water font in the cemetery works, and offers them use of the cemetery as a place to rest in between forays into the castle, promising them free healing whenever they need it. Spivey is reluctant to abandon the area as long as the dire corbies and other monsters dwell in Brinewall Castle, but if the PCs clean the place out and manage to convince her with a DC 20 Diplomacy check, she’ll accompany them on their journey (giving her the phylactery of faithfulness from the despoiled shrine in area U15 automatically befriends her in this manner). In this case, Spivey can f ill the role of guard, healer, or spellcaster in the caravan, but doesn’t count against the traveler total, nor does she increase the caravan’s consumption score. Spivey
XP 1,600
CR 5
Female lyrakien cleric of Desna 3 (Pathfinder RPG Bestiary 2 38) CG Tiny outsider (azata, chaotic, extraplanar, good) Init +5; Senses darkvision 60 ft., detect evil, detect magic, lowlight vision; Perception +14 DEFENSE
AC 20, touch 17, flat-footed 15 (+3 armor, +5 Dex, +2 size) hp 41 (6 HD; 3d10+3d8+12) Fort +6, Ref +9, Will +11 DR 5/evil; Immune electricity, petrification; Resist cold 10, fire 10 OFFENSE
Speed 30 ft., fly 80 ft. (perfect) Melee mwk starknife +11 (1d2–1/×3) and mwk starknife +11 (1d2–1/×3) or mwk starknife +13 (1d2–1/×3) Ranged mwk starknife +13 (1d2–1/×3) Space 2-1/2 ft.; Reach 0 ft.
28
The Brinewall Legacy Special Attacks channel positive energy 8/day (DC 16, 2d6), starlight blast Cleric Spell-Like Abilities (CL 3rd; concentration +8) 8/day—liberty’s blessing* Lyrakien Spell-Like Abilities (CL 3rd; concentration +8) Constant—detect evil, detect magic, freedom of movement At will—dancing lights, daze (DC 15), summon instrument, ventriloquism (DC 16) 1/day—cure light wounds, lesser confusion (DC 16), silent image (DC 16) 1/week—commune (6 questions, CL 12th) Spells Prepared (CL 3rd; concentration +8) 2nd—lesser restoration, remove paralysis D, spiritual weapon 1st—command (DC 16), divine favor, magic stone, remove fear, sanctuaryD (DC 16) 0 (at will)—detect magic, mending, read magic, stabilize D Domain spell; Domains Liberation (Freedom subdomain*), Travel TACTICS
During Combat Spivey avoids melee combat if she can, preferring to stay at the edge of a battle and use command, daze, lesser confusion, magic stone, and spiritual weapon. She casts sanctuary to come help heal allies in melee if it looks like they are in trouble, and resorts to hurling her starknives only as a last resort. Morale Spivey flees any combat if she’s reduced to fewer than 8 hit points, unless a fellow worshiper of Desna is still in danger, in which case she stays behind to help her ally at all costs.
Spivey
STATISTICS
Str 9, Dex 20, Con 15, Int 12, Wis 20, Cha 20 Base Atk +5; CMB +8; CMD 17 Feats Scribe Scroll, Two-Weapon Fighting, Weapon Finesse Skills Fly +26, Heal +11, Knowledge (religion) +10, Perception +14, Spellcraft +10, Stealth +22 Languages Celestial, Draconic; truespeech SQ agile feet (8/day), traveler’s friend Combat Gear scrolls of cure moderate wounds (2), scrolls of lesser restoration (3), scroll of remove disease; Other Gear masterwork studded leather, masterwork starknives (3) * See the Advanced Player’s Guide. Story Award: If the PCs manage to recruit Spivey into their caravan, award them 1,600 XP as if they had defeated her in combat.
Brinewall Castle Brinewall Castle is a large and intimidating structure. Although only two stories tall (with the exception of one
three-story tower and the dungeons beneath it), the squat castle looks all the larger for its position atop the bluff west of the village, looming over the surrounding region with a commanding presence. The castle is built of gray stone, though close inspection reveals numerous different types of stone were used in its construction (as parts of the castle were rebuilt several times). Brinewall Castle is divided into four different areas: the ground f loor (area T), the upper f loors (area U), the dungeon (area V), and the vaults beneath the castle (area W). The castle’s curtain wall is 15 feet high—it’s a DC 20 Climb check to scale it (or any other exterior wall). The numerous arrowslits can be squeezed through with a DC 30 Escape Artist check (Small creatures gain a +8 bonus on this check). While the castle walls allow its denizens a commanding view of the castle approach, no creatures guard the walls when the PCs first come to the castle. Inside, ceiling height averages 10 feet, and rooms are unlit
29
T17 T19
T18 T8
T2
T2 T16
T7
T9
T6
T14
T2
T12
T13 T14
T10
T3 T4
T15
T11
T5
T2
T2 T2
T1
unless otherwise indicated (although arrowslits provide dim light in those rooms that feature them). Doors in the castle are of good wooden construction (hardness 5, hp 15) and are unlocked, unless otherwise noted. Solving the Brinewall Mystery: In seven areas in the castle, clues to the mystery of what happened to Brinewall can be discovered, presented in the text as “Brinewall Clues.” If the PCs uncover all of these clues, they’ll gather enough information to piece together a relatively accurate description of Brinewall’s doom. When the PCs achieve this task, award them 1,600 XP for unraveling one of Varisia’s most talked-about recent mysteries.
Brinewall’s Schedule Most of Brinewall Castle’s residents tend to stay in the areas they’re detailed as inhabiting in the following descriptions, but this doesn’t hold true for the castle’s most numerous denizens: the dire corbies. There are 12 of these monsters living in Brinewall in all, not counting their priestess Nevakali, who is always encountered in the shrine at area U15. Originally dwelling in the caverns below, these creatures now live fully on the aboveground levels, leaving the dungeons to a small band of troglodytes and other monsters. The following encounter areas present the dire corbies as they’re normally spread throughout
T2
the castle, but at certain times, these monsters gather for dinner or go out into the woods to hunt. Hunting Parties: Once every other day, the two dire corbies from area T1 and a third from area U1 leave their posts at noon to go hunt in the southern woods. They return at dusk with large burlap bags filled with slaughtered forest creatures to feed their kin for the next 2 days. Dinnertime: Every evening at sunset, all 12 dire corbies gather in the feasting hall (area U8) to eat. These feasts last for an hour. Bedtime: After their evening meal, the dire corbies retire to their sleeping quarters (area U14a), unless the PCs have invaded the castle in the past 4 days. In this event, the dire corbies sleep in shifts at night—six of them sleep in area U14a while the other six patrol the walls.
T1. Gatehouse (CR 3) This stone structure has a floor of packed dirt and numerous wooden support beams for the stone ceiling above. Two rusted iron gates allow access through the gatehouse, while to the north, a pair of wooden ladders climb to the roof above. Both of the gates are kept closed and locked at all times. The levers that unlock and open the gates are inside the
30
The Brinewall Legacy gatehouse, but the gates themselves are in poor condition after years of no maintenance (hardness 10, hp 30, Break DC 22). Creatures: Two dire corbies stand guard in this chamber. These hideous creatures look like muscular humanoids with ravenlike heads and covered with black feathers. They do not wear armor or wield weapons, for their thick muscles, talons, and sharp beaks are armor and weapons enough. These two dire corbies are supposedly watching the approach and are in charge of opening and closing the gates when patrols come and go from the castle, but when the PCs f irst approach, there’s a 50% chance that the creatures are sleeping instead. If they notice the PCs approaching, the dire corbies begin making deep, raspy cries of alarm, but don’t attack unless the PCs manage to break into the gatehouse (in which case they f ight to the death). Dire Corbies (2)
XP 400 each
Brinewall Clue: A DC 15 Perception check made while searching any of these areas reveals ancient clues like spilled arrows, old bloodstains, dropped (and long since ruined) longbows, and the like, indicating that some massive battle took place here long ago.
T3. Courtyard This barren courtyard of hard-packed earth contains clumps of tough-looking weeds, furrows in the ground as if made by taloned feet, and chalky white mounds of dung the size of human heads. The castle’s central courtyard is quite open. Anyone passing through it is automatically noticed by the three dire corbies on the gatehouse roof or castle walls (area U1) unless extreme measures like invisibility (or sneaking along the walls with Stealth checks after dark) are employed. The dire corbies sound the alarm but don’t immediately descend to attack, instead watching with glee as the inhabitant of area T4 opens the stable doors to let his pet out to feed. As this battle begins, they quickly run from the gatehouse roof to area U3 to try to get the old catapult ready to attack the PCs—see that area’s description for details on how this works out for all involved. The secret door leading into the main keep can be discovered with a DC 25 Perception check.
CR 1
NE Medium monstrous humanoid (Misfit Monsters Redeemed 21) Init +1; Senses darkvision 60 ft., Perception +6 DEFENSE
AC 13, touch 11, flat-footed 12 (+1 Dex, +2 natural) hp 15 each (2d10+4) Fort +2, Ref +4, Will +3 Defensive Abilities ferocity
T4. Stable (CR 4)
OFFENSE
Speed 30 ft., climb 30 ft. Melee 2 claws +3 (1d4+1) Special Attacks leap, rend (2 claws, 1d4+1)
The walls of this wooden stable are gray with age and sag ominously, yet the building seems relatively sound. An old forge sits to the south, while five empty horse stalls stand to the north.
STATISTICS
Str 13, Dex 12, Con 15, Int 7, Wis 10, Cha 8 Base Atk +2; CMB +3; CMD 14 Feats Blind-Fight Skills Acrobatics +10, Climb +13, Perception +6, Stealth +5 Languages Aklo
Creatures: This building is now the home of a particularly emaciated ettercap named Flatbelly and his pet giant hunting spider. Flatbelly has a loose alliance with the dire corbies—they provide him with periodic offerings of deer or other creatures caught in the woods in return for the promise to guard the courtyard. If the alarm is raised, Flatbelly sends his giant spider out to attack intruders. If the spider is slain, the ettercap shrieks in rage and scuttles out to attack the murderers. If confronted inside, however, Flatbelly and his spider attack together.
SPECIAL ABILITIES
Leap (Ex) A dire corby can perform a special kind of pounce attack by jumping into combat. When a dire corby charges, it can make a DC 20 Acrobatics check to jump into the air and land next to its enemies. If it makes the Acrobatics check, it can make a full attack against foes in reach.
T2. Tower Guardpost
Flatbelly
XP 800
This cramped room contains several old crates and barrels covered with thick layers of dust.
CR 3
Male ettercap (Pathfinder RPG Bestiary 129) hp 30
Once used to store arrows, torches, and other supplies, these cramped rooms are all abandoned now. Ladders and trap doors in the ceiling of each tower lead up to the guard towers above (area U2).
Giant Hunting Spider
XP 400
hp 16 (Pathfinder RPG Bestiary 258)
31
CR 1
T5. Cloister (CR 3)
Device DC 30). None of the castle’s current inhabitants have been able to get through this door, so they enter the donjon This smaller courtyard contains what may have once been a beyond via the upper f loor when necessary. The stairs to fine garden, but neglect has seen the death of the flowers that the east lead up to area U8. The secret door to the northwest once grew here. Several broken benches complete the sense of into area T8 can be found with a DC 20 Perception check. loss. An area in the middle of the old cloister has been cleared Creatures: During the day, the self-styled lord of of debris, and is marred by numerous bloodstains. Brinewall, a yamabushi tengu named Kikonu, can be found in this room. Once a member of the Five Storms, The secret door to the north, leading to area T13, can be Kikonu abandoned his allegiance to that group almost a found with a DC 20 Perception check. quarter of a century ago in order to become the ruler Creatures: Two malformed humanoids are of the strangely intriguing birdmen he found currently wrestling in the circular area living here. Kikonu has long had an affinity they’ve cleared in the middle of this for tengus, but the dire corbies are new to cloister. Each is a towering specimen, him, and he has yet to grow tired of ruling a muscular humanlike figure nearly them. He doesn’t share the dire corbies’ 7 feet tall and riddled with deformities religious beliefs or their bloodlust, but as well as numerous bruises and is amused by both and keeps a group of wounds. These are the ogrekin four dire corbies at his side at all times brothers of the brute Muthildah for his entertainment. in area T11, and distant cousins Although Kikonu and the four dire of the ogre Slugwort in area V8. When corbies constitute a CR 7 encounter, the PCs first arrive, these two are in the his overconfidence and twisted sense middle of a violent but (in theory) nonlethal of humor are a significant advantage for the wrestling match. The ogrekin enjoy these PCs, for it will take some time for the oni to even matches perhaps a bit too much—they’re both consider the PCs a threat. The first time the Kikonu wounded and fatigued from their exertions. PCs come to the castle, Kikonu is enjoying If a fight breaks out in the courtyard (area his power by directing four dire corbies to T3), the ogrekin come to watch, but they don’t intervene— perform a play he wrote about a f lock of ravens who woke they’re frightened by giant spiders, alive or dead. If the up one day to discover they were trapped in f lightless PCs attempt to enter their cloister, though, they attack at human bodies. The dire corbies aren’t very good at acting, once. As soon as one is slain, the other retreats to area T11, however, but Kikonu finds that more delightful than jabbering and hollering for help from his older sister. anything else. When he hears the alarms, he doesn’t bother calling an end to the play—instead, he keeps things going Wounded Ogrekin (2) CR 1 until the PCs enter. XP 400 each Kikonu is in his humanoid form—appearing as hp 12 each (normally 25; Pathfinder RPG Bestiary 2 204) a wild eyed Tian man with a bristly goatee, deep red Weaknesses fatigued skin, and a prodigious nose. He idly toys with a strange weapon—a combination sickle and weighted chain called a Development: If the ogrekin are not defeated when the kusarigama—and when the PCs enter he cackles in delight PCs first explore this area, they’re rested and perhaps and invites them to be seated as his “latest masterpiece” healed the next time the PCs visit, and return to being CR concludes. Whether or not the PCs comply, Kikonu orders 2 menaces. the four dire corbies to attack the PCs, then capers and dances and cackles in glee as the battle progresses. Kikonu himself hrone oom doesn’t attack at first, beyond using ventriloquism to make the dire corbies appear to spout strange lines like, “You took Rotting, faded banners hang from the walls of this long hall, my wings, you f lying things!” or “Bring me their eyes and depicting a stylized castle sitting on a seaside cliff. Thick stone sorrowful sighs!” A few rounds after combat begins, Kikonu pillars support the ceiling, while at the far end of the hall sits an shifts into his true form, but once the four dire corbies are old wooden throne, its back carved to resemble the towers of a slain or the PCs attack him, he shrieks, “That’s not in the castle wrapped in the coils of a serpentine dragon. play! You’re ruining it all, you hideous apes!” He then uses dimension door to f lee the room, traveling up to area U7 to The door to the north leading to area T17 is locked and rage and curse about the interruption to his play—see that made of iron (hardness 10, hp 60, Break DC 28, Disable area for his further actions.
T6. T
R
(CR 7)
32
The Brinewall Legacy Dire Corbies (4)
XP 400 each
CR 1
hp 15 each (see page 31) Kikonu
XP 1,600
CR 5
Male yamabushi tengu (see page 88) hp 1,600
that can be pieced together from the documents here is the fact that the guards believed that the citizens of the village below were rioting, and that several of the buildings had caught on fire. They were preparing to mount an expedition to investigate and bring order, but there is no indication of their success or failure.
T8. East Barracks (CR 3)
Treasure: Kikonu wields a unique magical kusarigama named Dancing Wasp (see page 60). In addition, the oni carries a small leather pouch at his side containing several vials of ink, five shiny pearls worth 100 gp each, and a darkwood-and-silver disc decorated with an intricate etching of Brinewall under the noonday sun. This disc radiates faint transmutation magic, and unknown to Kikonu, is one of two crests required to access Brinewall Castle’s subterranean vaults (area W1).
T7. Briefing Room (CR 3)
Several ruined beds lie in various states of disrepair in this room, their moldy mattresses piled into a filthy heap against the northern wall. The secret door to the northeast, leading into area T6, can be found with a DC 20 Perception check. Creatures: A second pair of lazy troglodytes are sleeping here in the lap of luxury—on stolen, half rotted, 24-yearold mattresses. They wake if a fight in area T7 takes more than 4 rounds, or soon after the PCs enter the room. Troglodytes (2)
A large table lies in shambles in the middle of this room, while crumbled suits of armor bearing decorations of dragons twisting around castle towers lie in heaps along the walls. A flight of stairs winds up along a curved wall to the north. The air in this room feels stuffy and carries an eye-watering reptilian stink. The stairs to the north lead up to area U13, while a door to the south opens onto a stairway leading down to area V1. Creatures: Once used as a briefing room for the castle’s guards, this room and others nearby serve as dens for a small squad of troglodytes that came up through the caverns below via the tunnel at area V6. The troglodytes here are supposed to be guarding the stairs leading down to their den, but they’re distracted by squabbles over their latest meal—a blood-gorged and not-long-dead giant tick. The troglodytes have a –5 penalty on Perception checks to notice the PCs enter, but once they see the PCs, the troglodytes howl and attack. The din of the troglodytes fighting with the PCs doesn’t sound much different than the troglodytes fighting over a delicious giant tick, so the two troglodytes sleeping in the next room (area T8) don’t wake and come investigate unless the battle here lasts more than 4 rounds. Troglodytes (2)
XP 400 each
CR 1
hp 13 each (Pathfinder RPG Bestiary 267) Brinewall Clue: Although the room is in disarray, a DC 20 Perception check is enough to recognize a number of documents, maps, and troop lists that date back to the night Brinewall was attacked. This room has sheltered the documents somewhat, but they’re still damaged. All
XP 400 each
CR 1
hp 13 each (Pathfinder RPG Bestiary 267) Treasure: The troglodytes have stashed their greatest treasure, a bejeweled silk gown set with pearls worth 450 gp that is in remarkably clean condition, under their almost-as-precious mattresses.
T9. West Barracks (CR 2) A large number of ruined bunks have been heaped into a nestshaped mound in the center of this room. Creature: The troglodytes’ pet, an enormous cave lizard, lives in this chamber. The lizard is relatively foul tempered as it’s halfway through shedding its skin. The loose skin hanging from its face not only makes the thing look particularly ferocious, but also obscures its vision. The lizard is not quite blind, but all creatures it faces effectively gain partial concealment, so the lizard suffers a 20% miss chance on its attacks. This doesn’t stop it from attacking foes that stumble into the room—troglodyte, human, or anything else. Monitor Lizard
XP 600
CR 2
hp 22 (Pathfinder RPG Bestiary 194)
T10. Washroom This room was used as a washroom and latrine for the keep. The denizens of the castle have not discovered the secret door just outside this room that leads out to the courtyard. It can be located with a DC 25 Perception check.
33
T11. Kennel (CR 3) Four stone pillars support the roof of this large hall. What appear to have once been wooden cages lie in shambles throughout the room. A heap of rags and furs in the middle of the room seems to be some sort of makeshift bed, while a large heap of partially eaten birds, squirrels, and wild turnips mounded nearby reeks with the stink of compost. Creature: This chamber once served the castle as a kennel, but today the only animals here are dead ones, brought by the two ogrekin in area T5 eager to keep their perpetually hungry big sister well fed. Muthildah came to Brinewall nearly a decade ago, followed by her slowwitted brothers, after she was driven out of her shack by thugs from Riddleport. When she arrived, Muthildah offered the dire corbies a bag of gold as “rent.” The offer caught the monsters off guard, and they accepted. Kikonu has since made it clear that the dire corbies aren’t allowed to rent out rooms in the castle, but the oni decided to let the ogrekin stay once he realized how strong these allies would be. Muthildah eats constantly, but she remains lanky and gangling. Her legs bend in three joints like a dog’s legs, giving her increased speed. Her large milky eyes are particularly sensitive to light, and she prefers not to leave this dimly lit room as a result. She attacks anyone other than her brothers who disturbs her. Muthildah
XP 800
CR 3
Female human ogrekin ranger 3 (Pathfinder RPG Bestiary 2 204) CE Medium humanoid (giant) Init +2; Senses low-light vision; Perception +7 DEFENSE
AC 17, touch 12, flat-footed 15 (+2 armor, +2 Dex, +3 natural) hp 36 (3d10+15) Fort +7, Ref +5, Will +4 Weaknesses light sensitivity OFFENSE
Speed 40 ft. Melee +1 flail +6 (1d8+6) and spiked gauntlet +4 (1d4+2) Special Attacks favored enemy (elves +2) TACTICS
During Combat Muthildah shrieks in anger if anyone other than her brothers disrupts her nearly constant banquet— especially if she sees any particularly delicious elves. Muthildah likes elf ears in particular, and attacks elves in preference to all other foes. Morale Muthildah fights to the death. STATISTICS
Str 20, Dex 15, Con 19, Int 8, Wis 12, Cha 6 Base Atk +3; CMB +8; CMD 20
Feats Endurance, Improved Iron Will, Iron Will, Two-Weapon Fighting, Weapon Focus (flail) Skills Climb +11, Handle Animal +4, Intimidate +4, Perception +7, Stealth +8, Survival +7 Languages Common SQ deformities (doglegs [+10 base speed], light sensitive), favored terrain (underground +2), track +1, wild empathy +1 Gear leather armor, +1 flail, spiked gauntlet, 77 gp
T12. Ballroom This large circular room features a ring of pillars that support a balcony just over fifteen feet above. A flight of stairs winds up to the balcony along the southern wall. Faded paintings of dancing elves decorate the walls, spattered here and there with ancient bloodstains. The stairs along the south wall lead to the ballroom balcony above (area U7), while the stairway behind the door to the west leads down to area V4. Development: If the PCs come here after encountering Kikonu in area T6, the yamabushi tengu is likely up on the balcony above the ballroom. See area U7 for Kikonu’s actions if the PCs encounter him here. Brinewall Clue: A DC 15 Perception check made while searching this ballroom reveals not only that a terrible battle took place here long ago, but also that at least one of the aggressors in the f ight possessed prodigious strength, judging from the deep gouges in the walls near the largest bloodstains (the gouges appear to have been created by an enormous axe or similar weapon in several places).
T13. Vestibule This short hallway connects the castle to the guard post to the east. The secret doors in the north and south walls can be found with DC 20 Perception checks.
T14. Storerooms Treasure: These two rooms were used as storerooms during Brinewall’s heyday. The northern storeroom is unremarkable, but a DC 20 Perception check made while searching the southern storeroom reveals a case of 20 masterwork cold iron arrows and a single +1 f laming burst arrow wrapped in red silk.
T15. Buttersnips’s Parlor (CR 3) It’s impossible to tell what this room may have originally been used for, as the walls and floor are decorated with countless preserved animals and creatures, ranging from small birds and forest creatures to fearsome predators. Several of the displays look uncomfortably fresh or humanoid in shape.
34
The Brinewall Legacy Creature: Once a watchpost, this chamber is now the lair of one of Kikonu’s favorite allies—a 2-1/2-foot-tall horror named Buttersnips. Appearing as a dainty elf like creature with long twitching antennae and wearing a brightly colored dress made from butterf ly wings and preserved wildf lower petals, Buttersnips is a quickling. While she might not appear to be a sadist, she is—most of the taxidermic trophies she’s decorated her home with were alive throughout most of the preservation process. Indeed, the demented quickling is rather proud of how long she can keep her subjects alive before they expire— she almost sees this as a service to them, so her victims get a chance to see how wonderful they’ll be on display before they expire. Her great hope is to someday stitch a pair of humans together, face to face, to create what she wistfully refers to as her “great unrealized ref lective masterpiece.” Buttersnips moved into this building not long after the Five Storms depopulated the castle. The quickling has since become one of Kikonu’s most valued allies, if only because the oni doesn’t want to become the maniacal quickling’s enemy. Buttersnips carries 5 doses of Medium spider venom and prefers to poison a single target (preferably the most attractive target possible) with multiple hits, then attempts to kill off any of that target’s allies so that by the time the poison does its job and renders her victim helpless, she can begin her taxidermy without interruptions. Buttersnips
XP 800
CR 3
Female quickling (Pathfinder RPG Bestiary 2 227) hp 18 Treasure: In addition to her f ive vials of poison, Buttersnips has further decorated several of her elf and human taxidermic displays with jewelry—rings, necklaces, anklets, and bracelets worth 220 gp in all.
T16. Inner Courtyard (CR 3) This courtyard may have once been a delightful garden, but now it’s a tangle of weeds surrounding a pool of water choked with thick, slimy green algae. The secret door to the south, leading to area T13, can be found with a DC 20 Perception check. Creature: This 10-foot-deep pond has become the home of a giant toe-biter. The enormous aquatic insect would have died of starvation not long after its birth, but Kikonu has taken a liking to it and makes sure that the dire corbies keep the thing well-fed with creatures caught in the woods and thrown into the pond every few days. If any of the PCs are captured, being thrown into this pond after being stripped of their gear is a very real possibility.
Giant Toe-Biter
XP 800
CR 3
Belostomatid (see page 82) hp 800
T17. Haunted Donjon (CR 4) Old tapestries depicting a seaside castle hang askew on the walls of this circular room and a thick layer of dust cakes the floor. The air is musty and weirdly cold. Old bloodstains splatter the walls, along with numerous brutal gashes and slashes to the stone itself. Two doors hang askew on hinges in a passageway to the south, while to the north, a third door lies in fragments on the floor, opening onto a flight of stairs leading down into darkness. A second staircase leads upward against the north wall. The last few defenders of Brinewall made their stand here—the final two survivors f led to the vault below, but were eventually slain as well. The stairs up lead to area U16, while the other stairs lead down to Brinewall’s vaults (area W1). Any significant noise in this chamber brings the denizen of area T19 to investigate in 1d3 rounds. Haunt: This room still carries echoes of the final horrific moments and overwhelming despair of the soldiers who fell here. The slaughtered spirits remain as a haunt, a traplike manifestation of despair and horror. This haunt is particularly focused near the stairs leading down to the vault, where the last few soldiers died. Haunts are presented in detail in the Pathfinder RPG GameMastery Guide. Slaughtered Soldiers
XP 1,200
CR 4
NE persistent haunt (10-foot-radius around entrance to stairs leading down to area W1) Caster Level 4th Notice Perception DC 15 (to notice the bloodstains on the walls growing fresh and runny) hp 18; Trigger touch (any attempt to enter stairwell leading down); Reset 1 hour Effect Ghostly soldiers seemingly made of blood emerge shrieking from the bloody swaths on the walls in the haunt’s area of effect, only to be hewn apart by unseen blows, spattering all creatures in the area with the blood. All creatures in this area take 1d6 points of negative energy damage and become frightened for 1 round. A DC 13 Will save reduces the negative energy damage to 1 point and negates the fear effect, but a new save must be made each round that a victim remains in the haunt’s area of effect for as long as the haunt persists. Creatures fleeing this haunt in fear cannot flee downstairs; they must flee upstairs or out of the donjon if possible. Destruction The death of Kikonu, the sole remaining oni from the slaughter, puts this haunt to rest.
35
T18. Captain’s Office The officer’s desk and the chairs that once decorated this room lie in shambles on the floor. A flight of stairs leads up to the southeast. The battered door to this room hangs askew, revealing a short hallway beyond. The stairs lead up to the narrow hallway leading to the secret exit at area U6. Any significant noise in this chamber brings the denizen of area T19 to investigate in 1d3 rounds.
Brinewall Clue: A DC 15 Perception check reveals several scattered and hastily written notes among the desk’s shambles, one of which is part of a letter mentioning an attack on Brinewall Castle. The letter describes the attack as a night assault by men dressed in dark robes. The letter is unfinished and contains no further information.
T19. Captain’s Quarters (CR 3) Trophy displays for armor and weapons, along with a large bed, an ornate writing desk, and a leather chair, lie in shambles in this chamber, smashed to ruins. A thick layer of dust clings to everything in the room. Creature: After he was slaughtered, the onetime commander of the garrison, Andril Kortun, was one of two victims animated by the oni to serve as an undead mockery and guardian—the other was Rokuro Kaijitsu himself (see area W1 below). In a grim parody of his duties while he was alive, Andril was placed on guard in this chamber by the oni, ready to defend the donjon from intruders. Andril is now a wight—a nearly skeletal mockery of the commander he was in life. He wears a dragon helm and the bloodstained remnants of a destroyed suit of half-plate (the ruined armor neither increases his Armor Class nor impedes his movement), and while his sword hangs at his belt, he does not draw the weapon in battle, seeking instead to claw and gouge f lesh with his terrible, blackened claws. Andril f ights until destroyed. He pursues foes throughout the donjon area but not into the castle beyond. Andril Kortun
XP 800
CR 3
Male wight (Pathfinder RPG Bestiary 276) hp 26 Treasure: Andril’s dragon helm is a work of art worth 250 gp, and can be identified with a DC 20 Knowledge (history) check as the traditional helm worn by Brinewall’s commanding officer. The sword that hangs at his belt is a +1 longsword.
U1. Gatehouse Roof (CR 4) Andril Kortun
The top of the gatehouse roof is a large open area of flat stone surrounded by low stone battlements. The small towers to the north contain trap doors in the f loors leading to the gatehouse below (area T1). Creatures: Three dire corbies stand guard here—at any one time, two of the creatures are walking lazy patrols along the walls to areas U3 and U5. Very little approaches
36
The Brinewall Legacy
a
U16
U17
U11 U13
U2
U12
U3
U10
a
a U6
U9
U2
U8 a
U2
U14
a
U7 U4
U5
a b a
a
U15a U2
U15
U2
U4 U2
U2
U1
the castle these days, so the first time the PCs approach, the dire corbies aren’t being very attentive and take a –5 penalty on Perception checks to notice intruders. The dire corbies have no ranged weapons, and when they see intruders, they quickly relocate to area U3, eager to try out the old catapult on anyone who makes it into the courtyard below. If attacked with ranged weapons, the creatures take full cover behind the battlements and slowly make their way down to the gatehouse below, joining the dire corbies there and opening the southern gate to storm out and attack the PCs. Dire Corbies (3)
XP 400 each
CR 1
hp 15 each (see page 31) Development: After the f irst time the PCs visit the castle, the dire corbies stationed here are each armed with a heavy crossbow and 10 bolts taken from the armory (area V2).
U2. Guard Towers Each of these guard towers features a trap door in the f loor that leads down to the corresponding tower guardpost below (area T2).
U3. Catapult Station An ancient-looking catapult sits atop the stone roof of this flattopped building. Moss grows on the catapult’s ropes and on the four round boulders sitting nearby. The strong wooden doors into the keep to the east are kept locked (hardness 5, hp 20, Break DC 25, Disable Device DC 30). Development: The catapult here is about as sound as it looks, but this doesn’t keep the dire corbies from racing to try it out if the PCs manage to get into the courtyard. It’s easiest to assume that the dire corbies reach the catapult, get it loaded, and are ready to fire it as soon as the PCs finish fighting against Flatbelly and his spider (see area T4). When the dire corbies actually fire the catapult, however, things don’t go quite as planned. The combination of the catapult’s poor condition and the zeal with which they crank it causes the arm to smash through the catapult’s guard. The boulder loaded into the catapult has a 50% chance of simply f lying off harmlessly into the woods to the south; otherwise, it slams into the ground near one randomly determined PC. That PC must make a DC 14 Ref lex save or take 2d6 points of damage from the glancing blow. At the same time, the
37
catapult tears itself apart in an explosion of snapping ropes and wooden splinters deal 2d4 points of damage to all of the dire corbies. Dissuaded by their failure, the dire corbies clamber down the wall to finish their attack on the PCs the old fashioned corby way—with beaks and talons.
U4. Locked Doors The strong wooden double doors at these locations are kept locked (hardness 5, hp 20, Break DC 25, Disable Device DC 30).
U5. Solarium (CR 3) This chamber may have once had a beautiful roof of glass, but little remains today save for a few precariously leaning wooden timbers hanging above a swath of crumbled stone and ruined furniture. The roof covering the southern half of the room has been crudely repaired with thick sheets of canvas and furs that have been stretched and fastened over the frames, creating a dark, almost cavelike, nesting area. Creature: The dire corbies created the jury-rigged covered area at their priestess Nevakali’s command, as a nest for her mobat ally. During the day, the horse-sized black bat sleeps here, hanging upside down from the wooden frame, but it quickly rouses to attack any non-dire corby traversing this part of the wall. The mobat is intelligent, and while it cannot speak, it understands Aklo and treats Nevakali as a good friend. At night, the mobat f lies out to hunt in the woods surrounding the castle. Mobat
XP 800
CR 3
hp 34 (Pathfinder RPG Bestiary 2 42)
U6. Secret Exit The secret doors located here allowed for easy escape from the donjon—except in the case of the final attack on Brinewall, when the invaders came from this f loor and worked their way downward. The secret doors are difficult to find, requiring a DC 30 Perception check to locate, but no mechanism for opening them exists on the outside. A DC 30 Disable Device check is needed to open them from the castle wall. Inside, the doors can be opened normally to exit the donjon. Beyond the doors, stairs lead down to area T19.
U7. Ballroom Balcony A ten-foot wide balcony winds around an ancient ballroom below. A rickety-looking railing runs along the balcony’s edge.
Kikonu
The railing is as untrustworthy as it looks; anyone leaning against it crashes through, falling 15 feet into the ballroom below. The stairs along the southern wall lead down to area T12. Creature: If Kikonu retreats to this area after the PCs disrupt the performance of his latest play in area T6, the unhinged oni spends 1d6 minutes stomping around the balcony here, shrieking and cursing the PCs for interrupting the performance. If the PCs encounter
38
The Brinewall Legacy him here or in the ballroom below before he calms down, he shrieks in rage and scuttles around the edge of the balcony, firing rays of enfeeblement and scorching rays down at them for 1d4 rounds until he curses again. At this point (or after he cools down on his own) he retreats to area V1 (via dimension door if the PCs are attacking him) and rouses the troglodytes there to hunt down the PCs. Kikonu’s next round of tactics is detailed in that room. Kikonu
XP 1,600
CR 5
Male yamabushi tengu (see page 88) hp 1,600
U8. Feasting Hall (CR 4 or 8) This chamber reeks of rotten food and bird droppings. A long dining table sits in the middle of the room, heaped with partially eaten animal carcasses and several thick eggshells. The stairs to the southeast lead down to area T6. Creatures: Although dire corbies aren’t particularly interested in cleanliness, their lord Kikonu is. Every day, three dire corbies must scour the castle of filth, keeping the place relatively clean. While this duty rankles the dire corbies, they’ve learned that the alternative to cleaning—being sent to “play” with Buttersnips in area T15—is even worse. This room is traditionally the filthiest, so the three dire corbies assigned to cleaning for the day are likely to be found here, but the PCs can encounter them anywhere else in the castle if you wish, save for areas where other creatures dwell or the donjon itself (where the dire corbies fear to tread). Dire Corbies (3)
XP 400 each
CR 1
hp 15 each (see page 31) Development: All of the dire corbies gather in this room to feed every evening at sunset—squabbling and bickering over the choicest cuts of wild animals the day’s hunt produced (supplemented by any eggs the females among them have laid—the dire corbies are disturbingly fond of their own eggs). If the PCs enter this room within an hour of sunset, they’ll find all of the dire corbies in the castle (save for Nevakali, their priestess) gathered here. At full strength, these 12 dire corbies constitute a CR 8 encounter—fortunately for the PCs, however, the creatures are noisy and distracted by their hideous meal, and take a –10 penalty on Perception checks to notice intruders.
U9. Washroom This small chamber serves as both a washroom and a lavatory for the castle’s upper f loor—although since
the dire corbies are relatively filthy creatures and tend to relieve themselves wherever they wish, this room is unusually clean.
U10. Servants’ Quarters The door to this room is stuck shut. It hasn’t been opened in years, but a DC 16 Strength check is enough to bash it open. Filaments of white, fibrous mold grow all along the walls and across the bunk beds in this room, giving the room a foul, musty stink. Here and there, thicker mounds of fungus grow in nauseating colors. The fungus in this room has been growing since Brinewall fell. Fortunately, the fungus is harmless (if nasty looking). The three large mounds of fungus cover the soggy bones of long-dead servants. Brinewall Clue: The fungus-covered corpses of the servants here are among the few existing remains of the castle’s original doomed inhabitants. Although only a few bones are left, an investigation of them (once the mold’s cleared away) reveals limbs and heads severed by sharp slashing weapons, and no sign of skulls (these were taken as trophies).
U11. Servants’ Quarters Several bunk beds lean precariously against the walls in this cramped chamber. Treasure: Unlike area U10, there are neither fungi nor mortal remains to be found in this room. Nevertheless, a DC 20 Perception check reveals a cleverly hidden niche in the eastern wall behind a loose brick, where a servant long ago stashed several stolen pieces of fine silverware. The silverware hidden here is are worth 100 gp in all.
U12. Storeroom (CR 4) The denizens of Brinewall avoid this room, and the door is stuck closed, requiring DC 16 Strength check to smash open. If an attempt to break open the door fails, a DC 12 Perception check hears the sounds of a young child sobbing in the room beyond. Although this storeroom may have once been well organized, the fallen crates and broken barrels that fill the room now present a tangle of debris. Creature: When the Five Storms attacked Brinewall, most of the castle’s inhabitants, young and old alike, rose to its defense. In the case of a young boy named Tolo, however, fate had another doom in store. When the attack came, Tolo’s parents tried to escape the castle only to be cut
39
down by ninja. Terrified, Tolo f led into this storeroom to hide, but as he clambered into the room, his panic brought a stack of old braziers and firewood down onto him. The child was buried under the falling logs and died a horrible, lonely death while listening to the murders of Brinewall’s residents all around him. Several months later, Tolo’s spirit rose as a tragic undead creature: an attic whisperer. The undead child remains bound to this chamber, content to play with several “toys” crafted from his body’s bones and bits of wood and rubble gathered from the room itself, but anytime a creature attempts to enter, he breaks down into mournful sobbing. The supernatural power of the attic whisperer’s aura of sobs frightens the dire corbies terribly, and they stay clear of this room as a result. If the PCs enter the room, the attic whisperer’s distress turns to cold, cruel vengeance as it attacks the intruders, manifesting as a skeletal human child with a wolf ’s skull for a head. The distressing undead creature fights until destroyed, but does not pursue foes beyond the boundaries of this room. Attic Whisperer
XP 1,200
CR 4
hp 45 (Pathfinder RPG Bestiary 2 34) Brinewall Clue: A DC 12 Perception check is all that’s required to find poor Tolo’s skeleton, still pinned to the f loor beneath a stack of old firewood and a heavy iron brazier. The child had tried to distract himself from the sounds of battle outside by scribbling drawings on the wall with charcoal—these images depict crude representations of ninja with throwing stars, frightening bird-headed men, and lumbering magical ogres wielding axes—images made all the more frightening by their childlike quality.
U13. Study This chamber’s furniture—couches, drawing tables, and empty bookshelves—lie in disarray, with the exception of one writing desk and chair in the center of the room, its surface heaped with pages of parchment and paper. Kikonu spends most of his evenings in this chamber, scribbling new pages for his endlessly evolving dramatic masterpiece. The pages on the desk are covered with dense scribblings and revisions in messy Tien writing—a DC 25 Linguistics check made by someone able to read that language is enough to reveal that the pages seem to be for a nonsensical play about a family of crows that turn into bitter, insane humans. The stairs along the north wall lead down to area T7, while a similar stairway to the south leads up to area U17.
Development: After dark, there’s a 75% chance of encountering Kikonu in this chamber—otherwise, he can be found in his bedroom (area U14b). If he’s encountered here, the oni is enraged at the distraction but spends only a single round in combat before using dimension door to relocate to area U7 to collect his thoughts and plan his next step against the intruders.
U14. Bedroom Wing This wing of the castle contains several chambers once used as bedrooms and guest quarters—most of these rooms are in relatively good repair, as the dire corbies nest in them. During the day, these rooms remain empty. At night, the dozen dire corbies in the castle spread out among the rooms labeled U14a, while the castle’s master bedroom, area U14b, is reserved for Kikonu himself. The yamabushi tengu is only present in this room at night 25% of the time—if he’s not here, he can be found in area U13.
U15. Despoiled Shrine (CR 4) Dozens of paintings of a towering humanoid figure with four wings, a bird’s head, and a scorpion’s tail decorate the walls of this room, seemingly painted in blood. Old pews sit in a line facing the eastern wall, where a hideously defaced statue of a winged woman stands. This room was once a shrine to Desna, but the dire corbies’ priest, a cultist of Pazuzu named Nevakali, has done her best to redecorate the room as an appropriate temple to her demonic patron. The statue of Desna has been particularly despoiled—her wings hacked down the middle to give the impression of having four wings instead of two, her head removed and replaced with a crude carving of a leering bird’s head, and a long, barbed tail made of braided dried nettles hanging from her posterior. Creature: Nevakali dresses in filthy robes caked with blood—filth that often mats her feathers and smears her beak and talons as well. She rarely leaves this chamber. While the dire corbies themselves respect her, they also fear her. They only enter this room when they need healing, but if they’re having particular trouble against the PCs, they may come here to beg Nevakali for help. The violent priestess is likely to murder the dire corby asking for help, but she’ll seek out the PCs thereafter. Nevakali
XP 1,200
CR 4
Female dire corby cleric of Pazuzu 3 (see page 31) CE Medium monstrous humanoid Init +2; Senses darkvision 60 ft.; Perception +12 DEFENSE
AC 17, touch 12, flat-footed 15 (+3 armor, +2 Dex, +2 natural)
40
The Brinewall Legacy hp 42 (5 HD; 2d10+3d8+18) Fort +5, Ref +6, Will +8 Defensive Abilities ferocity OFFENSE
Speed 30 ft., climb 30 ft. Melee mwk longsword +6 (1d8/19–20), claw –1 (1d4) Special Attacks channel negative energy 3/day (DC 11, 2d6), leap, rend (2 claws, 1d4) Domain Spell-Like Abilities (CL 3rd; concentration +5) 5/day—copycat (3 rounds), lightning arc (1d6+1 electricity) Spells Prepared (CL 3rd; concentration +5) 2nd—darkness, invisibilityD, sound burst (DC 14) 1st—cause fear (DC 13), cure light wounds, magic stone, obscuring mistD 0 (at will)—detect magic, guidance, mending, resistance D Domain spell; Domains Air, Trickery TACTICS
The two side rooms (areas U16a) were once armories, but these chambers now stand empty. The stairs to the north lead down to area T17. Haunt: As with the donjon below, this chamber is infused with the tormented spiritual energy of the soldiers who fought and died here—although the haunt here is somewhat less dangerous than the one on the f loor below. Shrieking Walls
XP 600
CR 2
NE haunt (10-foot-radius in center of room) Caster Level 2nd Notice Perception DC 15 (to notice the bloodstains on the walls growing fresh and runny) hp 4; Trigger proximity; Reset 1 day Effect When this haunt is triggered, ghostly faces suddenly animate on the walls, unleashing nerve-wracking shrieks
During Combat Nevakali begins combat by casting sound burst to try to stun the PCs, then casts darkness to give herself an area to lurk in while she casts magic stone or uses other ranged spells on the PCs. If reduced to fewer than 20 hit points, she casts invisibility on herself and flees to area U5 to recruit the aid of her mobat ally, returning to this room with the giant bat to finish the fight after she uses her scrolls and spells to heal herself back to full hit points. Morale Nevakali fights to the death. STATISTICS
Str 10, Dex 15, Con 14, Int 10, Wis 15, Cha 10 Base Atk +4; CMB +4; CMD 16 Feats Combat Casting, Toughness, Weapon Focus (longsword) Skills Acrobatics +14, Climb +11, Knowledge (religion) +4, Linguistics +5, Perception +12 Languages Abyssal, Aklo, Common Combat Gear scrolls of cure moderate wounds (2), scroll of dispel magic, wand of inflict moderate wounds (12 charges); Other Gear studded leather, masterwork longsword, silver unholy symbol of Pazuzu worth 100 gp Treasure: Nevakali did an excellent job despoiling the temple, but not a thorough one. Area U15a is a small cell once used by the priest who tended the shrine, and the dire corby didn’t bother to defile this small room. As a result, she never found the footlocker tucked under the cramped room’s bed, but the PCs can find it with a DC 20 Perception check. The locker contains a small stash of magic that has lain here forgotten for 24 years, including four +2 evil outsider bane arrows, a scroll of cure moderate wounds, a scroll of remove disease, a scroll of restoration, and a phylactery of faithfulness.
Nevakali
U16. Haunted Guard Post (CR 2) Judging from the blood and gouges marring the walls, a terrific battle once took place in this guard room.
41
of terror and horror. All creatures in the area of the haunt are affected as if by a scare spell (save DC 13). Destruction The death of Kikonu, the sole remaining oni from the slaughter, puts this haunt to rest.
U17. Tower Library (CR 5) The walls of this semicircular room are lined with bookshelves, although the majority of the books lie in disorganized piles on the floor. A large, filthy nest of grass, branches, and strips of cloth is tucked in the northeastern corner of the room, while a wooden door sits in the wall to the northwest and a flight of stairs leads down to the south. The northern door is unlocked and ajar so that it can be moved through as a move action. The balcony out front (area U17a) overlooks the cliffs beneath the castle—a character who falls from this edge can land on a narrow ledge 20 feet below with a DC 15 Ref lex save; otherwise it’s a 70-foot fall into the deep water below. The stairs lead down to area U13. Creature: Once the castle library, this chamber is now the home of an unusual harpy named Zaiobe. As long as she can remember, Zaiobe has been mute. She has vague memories of a demonic wind snatching her voice away after she found a strange statue of a four-winged demon in a high cave in the western Kodar Mountains 2 years ago, and no memories at all before then. Since that time, Zaiobe has been developing strange new magical powers, and has followed a twisted urge to f ly south, to seek out other statues and sites sacred to the four-winged demon. She knows now that this demon is Pazuzu, and she’s come to believe he stole her voice to compel her to accomplish a mission, but she’s still unclear on what that mission is. Upon finding the small cult of Pazuzu at Brinewall several months ago, however, she offered her services—although mute, she was able to speak with Kikonu via a limited form of telepathy—and secured a place among his followers. It wasn’t long before she and Kikonu became lovers, and not long after that before they had the first of many powerful arguments and disagreements. Their latest spat threatens to be their greatest yet, for when Kikonu discovered that he could speak in Zaiobe’s voice when he used his steal voice ability on her, the harpy grew enraged and shot Kikonu through the arm with a f laming arrow. Kikonu took the shot in stride, so amused was he at being able to use her voice when she could not. The two haven’t communicated since. Zaiobe’s nearly made the decision to leave Brinewall and continue her journey south to seek out an even stronger vision of her demonic ally, a being called the Red Bishop (see page 66), but for now the combination of depression and inertia has kept her here. When she first meets the PCs, Zaiobe sees them as tools she can use to get her revenge on Kikonu. She initially
adopts as nonthreatening a stance as she can, and tries to convince one of the PCs (preferably one who looks shifty, not one who looks like a champion of law or good) to let her touch him so she can communicate telepathically. If a PC allows this, she explains that she wants the PCs’ aid in killing her lover; in return, she’ll leave the PCs alone and won’t contest their presence in Brinewall. If the PCs agree, Zaiobe can be a handy ally—she’ll even consent to casting a few healing spells on the PCs if asked. She suggests the PCs pick a place in the castle (preferably outside) where they can lay an ambush for Kikonu. When the PCs are in position, she’ll telepathically contact him, claiming to want to patch things up and reestablish their romance. In this case, Kikonu automatically believes her and comes into the ambush, where Zaiobe and the PCs can join forces to attack him. Faced with this betrayal, Kikonu focuses his attacks on Zaiobe and fights to the death as long as she lives. No matter which of the two wins the battle, the survivor turns on the PCs once the other is dead—Kikonu out of wrath, and Zaiobe out of greed (she hopes to kill them and claim all their delightful-looking gear). If, on the other hand, the PCs don’t wish to ally with Zaiobe, she shrugs and exits the library onto the balcony, taking to the air to attack the PCs. Zaiobe
XP 1,600
CR 5
Female harpy oracle 2 (Pathfinder RPG Bestiary 172, Pathfinder RPG Advanced Player’s Guide 42) CE Medium monstrous humanoid Init +7; Senses darkvision 60 ft.; Perception +12 DEFENSE
AC 18, touch 13, flat-footed 15 (+4 armor, +3 Dex, +1 natural) hp 58 (9 HD; 7d10+2d8+11) Fort +3, Ref +8, Will +8 Resist electricity 5 OFFENSE
Speed 20 ft., fly 80 ft. (average) Melee 2 talons +9 (1d6+1) Ranged +1 composite longbow +12/+7 (1d8+2/×3) Oracle Spells Known (CL 2nd; concentration +7) 1st (6/day)—alter winds*, cause fear (DC 16), cure light wounds, entropic shield 0 (at will)—detect magic, guidance, mending, spark*, stabilize Mystery wind TACTICS
During Combat Zaiobe avoids melee combat, casting entropic shield on herself on the first round of combat after using flight to put some distance between herself and her enemies. She saves cause fear to drive away anyone who manages to stay in melee with her, relying primarily on her longbow to take down foes. She’s saving her flaming arrows for Kikonu—she suspects the next time they interact, he’ll
42
The Brinewall Legacy push her over the edge, after all—but if brought below 25 hit points, she uses the arrows on her most dangerous foe at that time instead. She casts cure light wounds on herself whenever she drops below 20 hit points. Morale Zaiobe fights to the death, confident that her mysterious connection to Pazuzu will protect her until proven otherwise. STATISTICS
Str 12, Dex 17, Con 12, Int 10, Wis 10, Cha 21 Base Atk +8; CMB +9; CMD 22 Feats Deadly Aim, Improved Initiative, Martial Weapon Proficiency (longbow), Point-Blank Shot, Precise Shot Skills Acrobatics +12 (+8 jump), Fly +13, Knowledge (religion) +4, Perception +12, Stealth +13 Languages Common (cannot speak); telepathy (touch), telepathic bond (with Kikonu) SQ oracle’s curse (mute), revelation (spark skin) Combat Gear +1 flaming arrows (5), potions of cure moderate wounds (2); Other Gear chain shirt, +1 composite longbow with 20 arrows SPECIAL ABILITIES
Mute (Ex) Zaiobe’s oracle curse renders her mute—she can’t speak, use verbal spell components, or use her captivating song as a result. This same curse, though, grants her the ability to cast all spells as if using the Silent Spell metamagic feat without modifying that spell’s actual level. In addition, Zaiobe can communicate telepathically with any creature she is in physical contact with. She can also maintain a telepathic bond with one specific creature at a time by taking a full-round action to link her mind to that creature during telepathic communication. Currently, she shares this link with Kikonu, even though, ironically, the two are not speaking. Zaiobe can change the target of her telepathic link once per day. * See the Advanced Player’s Guide.
Zaiobe
Development: If hard pressed, Kikonu attempts to make amends with Zaiobe via the telepathic link they share—see Development in area V1 for details on how this could work out for the oni.
V1. Mess Hall (CR 4) Long benches in various states of disrepair and several battered and filthy wooden tables stand between stone pillars in this room. The air here stinks of reptiles. The door in the northwest wall opens onto a stairway leading up to area T7. Creatures: Once the mess hall for the castle’s guards, this room is now the home of several troglodytes who came to Brinewall several years ago. At first, the troglodytes and
the dire corbies didn’t get along, but Kikonu eventually convinced the two to begrudgingly accept each other through a masterful mix of diplomacy and intimidation. Four troglodytes are currently in the room, guarding the armory (area V2) and killing time until either Kikonu or their commander in area V3 has a task for them. Upon seeing intruders, the troglodytes begin a semiorganized retreat to area V3 so they can fight alongside their boss. Troglodytes (4)
XP 400 each
hp 13 each (Pathfinder RPG Bestiary 267)
43
CR 1
V6
W1
V5
V10a
W2
V9
V4
V10 V8
V7
V1
V2
V10b V3
Development: Depending upon developments in the castle above, the yamabushi tengu Kikonu may end up retreating to this room. In this case, Kikonu sends one troglodyte to fetch their commander from area V3, and once all the troglodytes are gathered, Kikonu charges them with the task of heading upstairs to hunt down and slay the PCs. The troglodytes fear Kikonu’s magic and make haste to obey—how and where the PCs encounter the troglodyte death squad is up to you (with their leader, they’re a CR 6 encounter), but the troglodytes aren’t subtle—the PCs should have at least a few rounds to prepare when they hear (or smell) the troglodytes approaching. As the troglodytes head off, Kikonu f inally attempts to contact his estranged harpy lover Zaiobe (in area U17) via their telepathic link, asking her to seek out the PCs as well and promising her all sorts of rewards in return. Zaiobe agrees, and asks Kikonu to meet her at the catapult station on the roof (area U3). In fact, she goes to f ind the PCs to recruit them to help her kill her lover, as detailed in area U17.
V2. Armory This room appears to be an armory, yet the majority of the armor stands, weapons racks, and shelves stand empty.
Treasure: Most of the weapons stored here were used (or lost, or destroyed) during the final battle for Brinewall 24 years ago, but a few items remain here, including a suit of half-plate armor, a masterwork heavy steel shield, four heavy crossbows, 40 crossbow bolts, and a case containing 10 f lasks of alchemist’s fire.
V3. Arena (CR 4) The fifteen-foot-high ceiling of this hexagonal room is supported by four stone pillars. The middle of the room sags in a bowllike depression, leaving a five-foot-wide ring of level ground around the room’s perimeter. Remnants of a low wooden railing mark the edge of the depression, but most of the fence has collapsed. A large chair sits in the center of the room next to a table heaped with doubtful-looking cuts of rancid meat. Creatures: This room was used as a sort of arena for sparring matches and sport fighting among the castle guards, who enjoyed boxing and wrestling as both a training exercise and entertainment. Since the troglodytes took over this wing of the dungeon, though, they’ve given this room over to their leader, a particularly muscular troglodyte named Orbakhag. This monster spends much of his time lounging on the homemade throne his subjects
44
The Brinewall Legacy have provided him, feasting on the choicest cuts of meat and dallying with his latest consorts or watching the two fight for his amusement, as he is currently doing when the PCs enter the room. When confronted, Orbakhag and his two consorts attack at once, fighting to the death. While his consorts are typical troglodytes, Orbakhag is an advanced specimen who fights with a +1 cold iron morningstar. Orbakhag
XP 600
CR 2
Advanced troglodyte (Pathfinder RPG Bestiary 267, 294) hp 17 Melee +1 cold iron morningstar +5 (1d8+4), claw –1 (1d4+1), bite –1 (1d4+1) Troglodytes (2)
XP 400 each
heaps of even more repulsive molds and mushrooms, some of which have grown to prodigious size, like the large mound of green mold sprouting dozens of purple-capped mushrooms in the center of the room. Creature: Most of the fungus growing in this room is harmless, but the mound in the center of the room is more dangerous—this patch is actually a deadly fungus called a phycomid. A combination of sickly green mold and purple-capped mushrooms, this fungus reacts quickly to intruders by firing pellets of acid from its stalks. If the door is broken open, this ravenous fungus pursues foes (albeit slowly) throughout the dungeon. Canny PCs can take advantage of this to lure the fungus into attacking other creatures in the castle.
CR 1
hp 13 each (Pathfinder RPG Bestiary 267)
Phycomid
XP 1,200
CR 4
hp 39 (Pathfinder RPG Bestiary 2 210) Treasure: In addition to his magical morningstar, Orbakhag carries 2 potions of cure light wounds.
V4. Kitchen Stone pillars support the ceiling over this large kitchen— although the fire pits, tables, and pantries here look like they haven’t been used in decades. Thick layers of dust cover everything in the room. The current denizens of Brinewall have little interest in cooked food, and thus this chamber, once one of the castle’s busiest rooms, has lain dormant since the castle’s fall. The room serves as little more than a crossroads now, as the paths of dire corby and troglodyte prints between areas V1, V6, and V7 attest. The strong wooden door in the east wall is locked (hardness 5, hp 20, Break DC 25, Disable Device DC 30). It was via the tunnel beyond this door that the initial dire corby invasion of the castle occurred during Brinewall’s earliest days. The single door to the south opens onto a stairway leading up to area T12.
V5. Laundry (CR 4) The door leading into this long-disused laundry room is swollen shut (hardness 5, hp 15, Break DC 16). If successfully broken open, the door gives way with sudden ease. The character who bashed in the door must make a DC 15 Ref lex save to avoid falling prone in the 5-foot square directly inside the room. This foul-smelling chamber drips with moisture—it runs down the walls in rivulets amid thick tangles of nasty-looking fungus. Three washing bins in the walls are completely clogged with
V6. Escape Cavern A tangle of stalactites and stalagmites fills this low-ceilinged cavern, with only a five-foot-wide path running along the southern wall being clear of obstruction. The f loor of the cavern beyond the clear path along the south wall is considered difficult terrain. The path itself ends at a locked secret door (hardness 8, hp 60, Break DC 28, Disable Device DC 30) that can be discovered with a DC 20 Perception check. Beyond the door, a passageway winds down through the rock until it ends at a second, equally difficult to locate and equally locked secret door. Past this second door is a cavern that’s partially f looded at high tide but that leads out to a narrow beach at the base of the cliffs 60 feet below the castle (area S1).
V7. Cistern A pool of dark water lies in the center of this domed room, surrounded by four stone pillars. This room contains the castle’s primary water supply, although the water itself tastes a bit brackish. It is otherwise empty.
V8. Dungeon (CR 4) Not quite a torture chamber, this dungeon features three cells made of iron bars—one to the north and two to the south. A filthy, nestlike bed lies in the middle of the room, heaped around a central stone pillar next to what can only be a half-eaten giant centipede the size of a horse.
45
The iron doors to the three cells are kept locked (hardness 10, hp 60, Break DC 28, Disable Device DC 30). The secret door in the east wall can be discovered with a DC 25 Perception check. Creatures: This dungeon is the home of a particularly muscular but relatively dim-witted ogre named Slugwort, a distant relative of the ogrekin who live in the castle above and now a loyal (if somewhat simpleminded) minion of Kikonu, whom Slugwort calls “little birdface,” much to Kikonu’s delight. Slugwort killed his brothers and father over an argument about the outcome of a game of skulltuck gone wrong. But after a night alone in the family cave, Slugwort came to believe his home was haunted and left to seek out kin elsewhere. All he had to go on was his father’s claim that his “better looking kids” all went to live at Brinewall. He was overjoyed to find the ogrekin here, even if Muthildah and her brothers were less than delighted to see him. Kikonu took to Slugwort immediately, though, and offered him a job as a jailer—until then, the yamabushi tengu had left dire corbies in charge of the prison whenever he caught victims, but an ogre seemed to be a much more intimidating jailor to the oni. Slugwort agreed, and takes his role as the oni’s turnkey very seriously. As much as temptation might prod him, he’s yet to harm any of the prisoners kept here without Kikonu’s permission. Currently, Slugwort has only one prisoner, a feisty and stubborn Ulfen woman named Kelda Oxgutter (see Development, below). If any of the PCs (or any of the NPCs accompanying the caravan) have been captured, they are held in the cells here as well. Slugwort reacts with dull shock when the PCs enter. It takes him a round to process the fact that they’re not supposed to be here, making him f lat-footed for the first round of combat. He yells phrases like “You’s not allowed in here. ’Cept if you’re here for to be going in a cage? You want in cage?” Unless the PCs let Slugwort lock them up and confiscate their gear, the ogre fights to the death. Slugwort
XP 1,200
CR 4
Advanced ogre (Pathfinder RPG Bestiary 220, 294) hp 38 Treasure: Slugwort carries little treasure—his greatclub (an uprooted sapling whose roots are caked with numerous layers of gravel and tar) is his favorite possession. He carries a small, ratty pouch made out of a cow’s stomach in which he keeps his collection of shiny river rocks, a few dead turtles for munching, the key to the three cells, 77 gp, a filthy masterwork dagger for pimple care, and his lucky rock (which is, unknown to Slugwort, an earth elemental gem). The southwestern cage holds a small pile of armor and weapons—Kelda’s gear.
Development: Kelda Oxgutter is the only survivor of a raiding party that came to loot Brinewall of its treasures. She remained convinced of her chances for success even after her shield-brothers died in a battle against a sea drake because she’d come across a partial and early plan for Brinewall castle that showed the location of a secret entrance. She hoped to use this entrance as a direct route to Brinewall’s treasury, but unfortunately for her, the entrance led instead to the lair of the most dangerous creature dwelling in the caverns below the castle. She was quickly captured and turned over to Kikonu by the denizen of area V10. The oni has imprisoned her in the northern cage here while he decides what to do with her. Kelda is ashamed of having been captured. If the PCs defeat Slugwort, she stands in her cell, dressed in rags but silently defiant as she glowers at the PCs. She won’t ask to be let out, but if the PCs offer, she nods to them in thanks. Normally a woman of few words, she’s particularly closemouthed about how and why she became imprisoned. If the PCs can befriend her with a DC 20 Diplomacy check (they get a +8 bonus on this check if they return her gear to her), she explains why she came to Brinewall and how she got caught. She’s lost interest in Brinewall’s treasure, and wants only to leave. If the PCs tell her about their caravan and offer her a place there to recover from her ordeal, she agrees to serve them as a driver, guard, or scout for a few months, free of charge. Eventually, Kelda wants to return to the Lands of the Linnorm Kings, and tells the PCs that if they wish to accompany her back to her home in Kalsgard, she’ll see that they’re properly rewarded for their service to her. Details on this reward can be found in the next adventure in the Jade Regent Adventure Path, “Night of Frozen Shadows.” Once she’s reequipped, Kelda’s stats (while raging) are as follows. Kelda Oxgutter
XP 600
CR 2
Female human barbarian 3 CN Medium humanoid (human) Init +1; Senses Perception +7 DEFENSE
AC 17, touch 9, flat-footed 16 (+6 armor, +1 Dex, –2 rage, +2 shield) hp 3 (normally 40; HD 3d12+15) Fort +8, Ref +4, Will +4 Defensive Abilities trap sense +1, uncanny dodge OFFENSE
Speed 45 ft. Melee mwk longsword +8 (1d8+4/19–20) Ranged javelin +4 (1d6+4) Special Attacks rage (11 rounds/day), rage powers (swift foot +5 feet) TACTICS
Base Statistics When not raging, Kelda’s statistics are AC 19,
46
The Brinewall Legacy touch 11, flat-footed 18; hp 34; Fort +6, Will +2; Speed 40 ft.; Melee mwk longsword +6 (1d8+2/19–20); Ranged javelin +4 (1d6+2); Str 15, Con 16; CMB +5.
treasure from the crypt long ago, leaving nothing but empty, despoiled sarcophagi in the niches. Development: If the PCs are particularly noisy or obvious as they approach this area, they attract the attention of the creature in area V10, who reacts by using its ability to create minor images to cause an image of Pharasma, surrounded by a nimbus of faint blue light, to manifest at the far edge of the room, f loating in the air just above the first drop-off into area V10. Speaking Varisian, Nindinzego claims to be a manifestation of Pharasma, telling the PCs that if they discard their weapons and enter the crypt peacefully, she will reward them with potent boons. Of course, if the PCs fall for this ruse, the half-fiend decapus simply waits for them to near the illusion before rising up into view and attacking.
STATISTICS
Str 19, Dex 13, Con 20, Int 8, Wis 12, Cha 10 Base Atk +3; CMB +7; CMD 16 Feats Cleave, Lightning Reflexes, Power Attack Skills Handle Animal +6, Intimidate +6, Perception +7, Profession (sailor) +4, Survival +7 Languages Common, Skald SQ fast movement Gear +1 scale mail, heavy steel shield, javelins (4), masterwork longsword, 97 gp Story Award: If the PCs rescue Kelda, award them 800 XP.
V9. Crypt
V10. Pazuzu’s Sanctum (CR 6)
An intricate iron screen blocks further progress into this large chamber, although a wooden door painted with the image of a tall, beautiful blue-skinned woman sitting on a throne stands in the middle of the screen. Beyond, the room stretches dozens of feet to the east, supported by stone pillars and with deep funerary alcoves to the north and south. The far end of the room seems to have partially collapsed into a large cavern in which faintly glowing motes of light swirl and dance in the air.
The floor of this vast cavern descends in two twenty-foot drops into a large, eerie grotto. The walls drip with moisture and bear strange and disturbing cave paintings of towering four-winged humanoid shapes. Tiny motes of glowing light drift and bob in the air, giving the place an almost nauseating feeling, as if the cavern is viewed through a dreamlike haze. The glowing motes of light are small airborne clusters of phosphorescent spores— they’re eerie but harmless, and fill the cave with dim light. A DC 15 Climb check is required to navigate any of the 20-foot-high ledges that descend into the cavern itself. The tunnels to the north at area V10a wind through a number of old caverns and chambers that once served as the main nest for the dire corbies. Deeper tunnels once led into the Darklands, but they have long since collapsed, and the only way out of this network now is via the secret exit to the east of Brinewall Castle (area S2). Creature: Although the dire corby priest Nevakali might appear to be the unholy spiritual leader of the Pazuzu-worshiping monsters, this is not the case. The true power behind the small cult is an ancient monstrosity that, for many long years, lay imprisoned in this cavern inside a strange
The door through the iron screen is locked (hardness 5, hp 15, Break DC 18, Disable Device DC 30). A DC 10 Knowledge (religion) check identifies the blue woman painted on the door as a representation of the goddess Pharasma. The crypt beyond once contained the dead bodies of most of the previous commanders of Kelda Oxgutter Brinewall (although its first is buried in the cemetery at area Q), but the oni stole all of the bodies and their
47
leathery egg sac. When the dire corbies discovered the egg, they tried to tear it open and eat the delicious goo within. What emerged from the egg, though, was a hideous Abyssal nightmare: a half-fiend decapus. With a slimy mollusklike body complete with 10 tentacles (two of which ended in savage claws), a monstrous face, and large leathery wings, this creature was one of dozens of an otherwise extinct brood of abominations that once dwelt in the ancient Thassilonian realm of Cyrusian. Specially bred as weapons of war to be used against the elven nation of Celwynvian, this last strange scion of Pazuzu knows nothing of its heritage, only that the strange whispers and visions its unseen master grants it are impossible to ignore. Named Nindinzego, this monster spared no time in oppressing the dire corbies—it ate a dozen of their kind before they became little more than slaves to its desires. By the time the builders of Brinewall broke into the dire corby caverns, Nindinzego had ruled the tribe for nearly 5 decades. It was Nindinzego who urged the dire corbies to attack the castle, and years later when the oni Kikonu came, it was Nindinzego who commanded the dire corbies to move up into the castle—for strange visions granted to it by its demonic sire have shown it that what strengthens Kikonu’s goals strengthens Pazuzu’s plans for Varisia. What those plans are, not even Nindinzego can say. Nindinzego’s plans rarely extend farther than seeking to fulfill his previous round of demonic visions, and these latest visions have warned it of a band of humanoids that will appear before it and perhaps slay it. The half-fiend is both distressed about the nature of these visions and eager to prove them false, so when the PCs appear in its den, it becomes nearly overwhelmed with a combination of grim fatalism and violent conviction. Nindinzego uses its illusion abilities to distract and baff le the PCs first (as detailed in area V9), but once it has a chance, it launches its attack, bellowing in a strange voice that seems almost to be composed of a dozen different voices in Abyssal, shouting vile epithets and eager challenges at the creatures its visions have shown it might just be its doom. Nindinzego
XP 2,400
DEFENSE
TACTICS
During Combat Nindinzego is a powerful melee combatant, but its sense of doom prevents it from immediately swooping in to fight foes in melee. Instead, it hovers near the ceiling so it can use unholy blight and its wand of scorching ray for the first few rounds of combat, flying in to cast poison on the most heavily-armored foe. It retreats into the air to use its wand for 1d3 rounds after each time its sense of doom activates. Morale If reduced to 7 or fewer hit points, Nindinzego spends its next turn shrieking into the air, “Father! Help! Faaaathhhherrrr! Pazuzu!” If the creature survives this round, it continues to fight thereafter to the death. STATISTICS
Str 18, Dex 17, Con 19, Int 14, Wis 13, Cha 14 Base Atk +6; CMB +10 (+14 grapple); CMD 23 (can’t be tripped) Feats Combat Casting, Improved Initiative, Iron Will, Toughness Skills Acrobatics +14, Bluff +13, Climb +23, Fly +18, Knowledge (religion) +13, Perception +16, Stealth +14, Use Magic Device +13 Languages Abyssal, Aklo, Varisian SQ sound mimicry (voices), tentacles Combat Gear wand of scorching ray (30 charges); Other Gear circlet of persuasion SPECIAL ABILITY
Sense of Doom (Ex) The sense of doom that fills Nindinzego’s alien mind causes it to take a –4 penalty on saving throws against fear effects. In addition, each time it rolls a natural 1 on an attack roll or saving throw, and each time it takes a critical hit, it becomes shaken for the following round, taking a –2 penalty on all d20 rolls for that duration.
CR 6
Advanced half-fiend decapus (Pathfinder RPG Bestiary 171, Pathfinder RPG Bestiary 2 77) CE Medium outsider (native) Init +7; Senses darkvision 60 ft.; Perception +16 AC 19, touch 13, flat-footed 16 (+3 Dex, +6 natural) hp 76 (8d8+40) Fort +6, Ref +5, Will +9; –4 vs. fear effects DR 5/magic; Immune poison; Resist acid 10, cold 10, electricity 10, fire 10; SR 17 Weaknesses sense of doom
OFFENSE
Speed 10 ft., climb 30 ft., fly 20 ft. (good) Melee bite +10 (1d6+4), 2 claws +10 (1d4+4), tentacles +10 (2d4+4 plus grab) Special Attacks constrict (2d4+6), smite good 1/day Spell-Like Abilities (CL 8th; concentration +10) Constant—minor image (DC 14) 3/day—darkness, poison (DC 16) 1/day—desecrate, unholy blight (DC 16)
Treasure: Nindinzego spent most of the last 10,000 years or so in a state of stasis inside of an eldritch egg in the small cavern to the south (area V10b). Remnants of that leathery time capsule lie strewn across the f loor there, still weirdly moist and pulsing. But a small hoard of treasure consisting of offerings to the fiend from its loyal dire corby followers sits on a f lat rock at the far end of the room. This hoard consists of a +1 light fortification light steel shield bearing the image of Castle Brinewall, a +1 returning starknife, a pearl of power (1st level), a ring of the ram with 10 charges remaining, a wayfinder (Inner Sea World Guide 299), 1,320 gp, and 800 gp in jewelry and gems.
48
The Brinewall Legacy Two additional items of interest lie amid these treasures as well. The first of these is a darkwood-and-silver disc decorated with an intricate etching of Brinewall under the midnight moon. This disc radiates faint transmutation magic and is one of two crests needed to access Brinewall Castle’s vaults (area W1). Kikonu gave Nindinzego this disc as proof of his friendship, telling the fiend that it was one of two keys needed to access the vault. The second item is a stone statuette of Pazuzu depicting the demon lord as a bird-headed, four winged humanoid with his right arm raised. The statuette is an insidious cursed item. When carried by a worshiper of Pazuzu, it f ills its owner with conf idence and grants a +4 enhancement bonus to the carrier’s Charisma score. When carried by any other creature, however, the statuette functions as a stone of weight that also bars the character from being able to use f ly speeds, even those magically granted. Worse, every night, there’s a 10% chance that the stone f ills its owner’s dreams with terrible nightmares of being eaten alive by birds. These nightmares prevent the user from gaining the benef its of a full night of rest and deal 1 point of Wisdom damage.
Storms slew Brinewall’s last two defenders here, they looted the place. It was only through sheer fortune that the oni, perhaps blinded by bloodlust and greed, failed to notice the cleverly hidden secret door to the east. The PCs can discover this door (as well as the second one 5 feet beyond the first) with a DC 30 Perception check. Creature: While the oni took Brinewall’s commander, Andril Kortun, back upstairs to area T19 and transformed him into a wight, they chose to despoil their greatest enemy here where he fell. Rokuro Kaijitsu’s body is long gone, but his spirit remains bound to this vault in the form of an insane and enraged wraith. When the PCs lower the portcullis into this room, the dust on the f loor swirls into the air, coalescing into an ominous shadowy form that takes on the ghostly image of an old but handsome Tian man. The spirit adopts a defensive pose, his katana held before him menacingly, but does not attack until anyone enters the room or attacks him first. At this point, he howls in rage, raises his sword, and f lies through the air to attack in turn. Although Rokuro’s wraith attacks with a sword, this attack resolves as a wraith’s typical incorporeal touch, save that it drains Charisma from those it strikes, not Constitution. rinewall ault When Rokuro’s wraith first manifests, The stairs from area T17 lead down to an iron have every character who can see it and portcullis (hardness 10, hp 60, Break DC 28) who knows Ameiko Kaijitsu make a DC barring passage into the room beyond— 25 Perception check. PCs who have visited Statuette of Pazuzu the bars themselves are sunken deep into Ameiko’s home may have actually seen the f loor and ceiling, with no obvious portraits of old Rokuro in her home—these method of passing into the chamber beyond. A DC 20 characters receive a +8 bonus on their Perception checks. If Perception check is enough to note two 5-inch-diameter you’re using the Jade Regent Player’s Guide, you can assume circular depressions in the walls to the left and right of the that any PC who chose Ameiko as the associated NPC for portcullis, faintly inscribed with an image of the sun (to the their Campaign Trait gains this +8 bonus. On a successful left) and the moon (to the right). Placing the two Brinewall check, a character recognizes the family resemblance— crests (found in areas T6 and V10b) into the proper slots and if they’ve seen Rokuro’s portrait (or have read his letter causes the iron bars of the portcullis to slowly grind down from area L6 and make the leap of logic), they recognize into the ground. The bars remain retracted until the crests this tormented spirit for who he really is. are removed and placed in the opposing slots. If anyone calls out to the spirit and uses any of the Once the PCs have opened the portcullis, read or following words in his presence: “Rokuro,” “Kaijitsu,” paraphrase the following. “Lonjiku,” or “Amatatsu,” the wraith’s eyes bulge and he freezes motionless. He lowers his sword, then says The walls of this room are of smooth stone, spattered with in a mournful voice in Common: “I... know... this... ancient bloodstains and deep, violent gouges. Deep drifts of naaaaaammmmmeeeeee...” A moment later, he raises dust lie on the floor, while immense stone doors hang open to his arms and cries out in anguish, then turns to face the the southwest, revealing empty vaults beyond. PCs, tears of dust running down his incorporeal cheeks. He says, “Take the Seal away from here—take it to my During Brinewall Castle’s height, the two vaults to the child—it is no longer safe—and I am no longer worthy of southwest were filled with treasure, but after the Five guarding it...” The wraith points toward the hidden secret
W1. B
V
(CR 5)
49
All in the Family
It’s possible that one of the PCs is playing one of Ameiko’s younger siblings, depending on the Campaign Trait they chose. In this case, Rokuro makes a DC 20 Perception check each round. If he’s successful, he recognizes that PC as his grandchild. This triggers his destruction as if a PC had used a name to remind him of his past, only instead of saying, “I know this name,” his first words are directed at the PC in question: “I know you, my grandson/granddaughter...”
NPC Relationships
If you’re using the relationship rules presented in the Jade Regent Player’s Guide, the PCs have the opportunity during this adventure to further increase their Relationship Scores with the significant NPCs traveling with them. The PCs can increase their Relationship Scores with the following NPCs by the listed amount for taking the following actions or completing the following tasks: Ameiko Kaijitsu: giving Ameiko Rokuro’s letter (area L6): +1; giving Ameiko the Amatatsu Seal (area W2): +1 Koya Mvashti: cleansing Desna’s shrine (area U15): +2 Sandru Vhiski: adding at least two wagons to Sandru’s caravan: +1 Shalelu Andosana: killing at least 10 goblins: +1
door to area W2 as it does this, then with another agonized cry, f lies apart into dust and is destroyed. Once Rokuro points out the location of the secret door, Perception checks made to locate it gain a +10 circumstance bonus. Rokuro Kaijitsu
XP 1,600
CR 5
Variant wraith (Pathfinder RPG Bestiary 281) hp 47 Melee incorporeal touch +6 (1d6 negative energy plus 1d6 Cha drain) Story Award: If the PCs defeat Rokuro by making him remember a name, award them XP as if they had defeated him in combat.
W2. Secret Vault This chamber appears to be only half-excavated—the eastern portion of the room remains a rough cavern wall. Three identical darkwood chests bound with bronze sit against the base of this rough wall.
Treasure: This chamber contains the final goal the PCs seek, the treasure that not only do they need to wake their friend Ameiko, but also that is destined to send them across the world to seek their true destiny in a distant land. The three darkwood chests are locked, and the keys are long lost. A DC 30 Disable Device check is required to open the left and right chests, but destiny, fate, or perhaps the echoes of the kami who once guarded what lies within cause the central chest to pop open at the first touch. The central chest contains the Amatatsu Seal, still sitting safely inside its warding box (see page 61 for details on these two items). The contents of the other two chests are left to you to customize. The treasures within should be magical items, not monetary objects—these magic items were stored in this secret vault by long-dead allies of Brinewall’s commander, just as Rokuro paid to store the Amatatsu Seal here. These magic items should cost no more than 9,000 gp—unless, that is, you’re feeling particularly generous! Note that the PCs should feel almost like they were destined to find this treasure. Destiny, as a theme, plays a strong role in the Jade Regent Adventure Path, and you want the PCs thinking that they’re on the right track when they recover the Amatatsu Seal! Then again, if you feel the PCs have found enough magic, then the other chests can just be empty.
Visions of Jade The Amatatsu Seal is a potent artifact, one capable of altering destiny and changing the course of nations. When the PCs first open the warding box that contains it, the Amatatsu Seal immediately marks each character as an agent of the family, turning them into Amatatsu scions, as detailed on page 60. In addition, the PCs momentarily black out and experience a rapid series of visions. In the visions, the PCs see an army of terrible fiends—with burning skin, glaring eyes, and sharp tusks, wearing strange armor and wielding exotic weapons—emerge in a storm from a vast forest, then descend upon a nation populated by Tian people. This vision is swiftly followed by another: a young man dressed in royal robes stands over a simple well, a friend at his side. Suddenly, the friend grows nearly three times in size and is sheathed in a frightening suit of jade armor. The jade warrior draws a sword and strikes down his royal friend, then holds the bloody sword aloft in triumph. A third vision follows, this time of a young Tian man handing a beautiful sword to a richly dressed Ulfen man in exchange for a bag of gold. Finally, this vision fades, and the PCs see their friend Ameiko waking from her deep sleep, but she is dressed in the finery of an empress. She rises from sleep not in a humble Varisian caravan, but from a resting spot within the arms of a jade throne. These visions pass in the span of a few heartbeats, and after they do, they impart knowledge to the PCs’ minds. The PCs know that the land they saw invaded by fiends
50
The Brinewall Legacy
was Minkai, that the man they saw murdered by the jade warrior was Emperor Shigure of Minkai. They know that Ameiko Kaijitsu’s true family name is Amatatsu, one of the five royal families of Minkai—indeed, the last surviving royal family. The PCs recognize the young Tian man with the sword as Ameiko’s grandfather, Rokuro Kaijitsu, formerly Amatatsu Tsutoku, selling the family’s legendary sword Suishen to the Ulfen merchant Fynn Snaevald in the city of Kalsgard to finance his family’s f light and exile. They also know that Suishen is intelligent, and can impart much more knowledge of the Amatatsu family’s legacy if recovered. Further, they know that Ameiko herself is the heir of her line. Finally, the PCs know all of the powers and abilities of both the Amatatsu Seal and its warding box— including the danger of leaving the warding box open, which would allow the oni of the Five Storms to once more track the Amatatsu Seal. Back at the caravan, Ameiko experiences these same visions, and as they pass, she wakes with a gasp as the kami possessing her returns in a f lash back to the Amatatsu Seal. She quickly recovers from the ordeal, and like the PCs, may
be a bit overwhelmed at what the visions revealed, but by the time “Night of Frozen Shadows” begins, she is eager to travel to Minkai to seize her birthright and save an empire.
Concluding the Adventure
Although this adventure’s plot is technically concluded as soon as the PCs claim the Amatatsu Seal, they are free to continue exploring Brinewall Castle as they wish. Once Ameiko is restored, she and some of the other NPCs can even accompany the PCs to aid in “mopping up” the remaining encounters in the castle. The visions granted by the Amatatsu Seal should leave the PCs with a very clear indication of where they should go next—the city of Kalsgard, in the Lands of the Linnorm Kings, to recover the Amatatsu family heirloom Suishen. Unfortunately, though, the PCs have played their hand, even if unintentionally. With the activation of the Amatatsu Seal, the oni of the Five Storms know that their old enemies are rising again, and it won’t be long before the PCs face powerful new enemies from the distant land that they and their allies are destined to one day rule!
51
AMEIKO KAIJITSU
Although she’s technically the head of one of Sandpoint’s noble families, Ameiko Kaijitsu is more at home running things at her tavern, the Rusty Dragon, than she is among the small town’s aristocracy.
Ameiko Kaijitsu
XP 1,200
CR 4
Female human aristocrat 1/bard 3/rogue (rake) 1 (Advanced Player’s Guide 134) CG Medium humanoid (human) Init +2; Senses Perception +7 DEFENSE
AC 17, touch 14, flat-footed 14 (+3 armor, +1 deflection, +2 Dex, +1 dodge) hp 26 (5d8+5) Fort +2, Ref +7, Will +6; +4 vs. bardic performance, languagedependent, and sonic OFFENSE
Speed 30 ft. Melee +1 mithral rapier +5 (1d6+2/18–20) Ranged dagger +4 (1d4+1/19–20) Special Attacks bardic performance 12 rounds/day (countersong, distraction, fascinate, inspire competence +2, inspire courage +1), bravado’s blade*, sneak attack +1d6 Bard Spells Known (CL 3rd; concentration +7) 1st (4/day)—charm person (DC 15), cure light wounds, feather step*, unseen servant 0 (at will)—detect magic, light, mage hand, prestidigitation, summon instrument, unwitting ally* (DC 14) TACTICS
Before Combat Ameiko casts unseen servant every morning. During Combat When able to strike first in a combat, Ameiko uses bravado’s blade to intimidate foes instead of dealing sneak attack damage. Ameiko begins combat by activating her bardic performance. She always uses Arcane Strike in battle (these bonuses are included in her stats above). Morale Ameiko is loyal to her friends, and never abandons an ally in combat. Alone, her bravery isn’t as great. When she is faced with a dangerous foe and has no allies in peril, she prefers to flee if reduced below 15 hit points. STATISTICS
Str 10, Dex 14, Con 13, Int 12, Wis 8, Cha 18 Base Atk +2; CMB +2; CMD 16 Feats Arcane Strike, Dodge, Iron Will, Weapon Finesse Skills Acrobatics +10, Bluff +12, Diplomacy +12, Intimidate +12, Knowledge (arcana) +6, Knowledge (local) +8, Knowledge (nobility) +6, Knowledge (religion) +6, Perception +7, Perform (sing) +12, Perform (string) +12 (+14 with mwk
samisen), Profession (tavern keeper) +4, Spellcraft +9, Stealth +10 Languages Common, Tien, Varisian SQ bardic knowledge +1, PC gear, versatile performance (string) Combat Gear potion of remove disease, wand of cure moderate wounds (25 charges), wand of identify (40 charges); Other Gear +1 leather armor, +1 mithral rapier, daggers (3), ring of protection +1, belt pouch, gold signet ring worth 100 gp, masterwork samisen, silver holy symbol of Shelyn, spell component pouch, 18 pp, 3 gp * See the Advanced Player’s Guide. Ameiko is a beautiful but somewhat irreverent woman of Tian descent who runs Sandpoint’s Rusty Dragon tavern and happens to be a member of one of Sandpoint’s founding families. Her parents and older siblings have met unfortunate ends over the past several years, leaving the young woman as the sole remaining Kaijitsu in town. Ameiko may be among the town’s nobility, but she’s never really cared for the aristocracy—she’s always had an urge to explore, and loves hearing stories of adventures and daring deeds. While she has a lot of friends and admirers in town, Ameiko has never accepted anyone as anything more than a friend, diplomatically avoiding personal questions and proposals of romance, much to the frustration of several eager suitors in Sandpoint. She’s a talented singer and samisen player, and if she wanted, Ameiko could probably lead a comfortable life in Sandpoint, but she’s growing increasingly bored and impatient with having a “safe life” in a “safe town.” If the chance to go on a grand adventure presents itself, she’d sell the Rusty Dragon in a heartbeat to seek her fortune.
History Ameiko was born in 4689 ar to Lonjiku and Atsuii Kaijitsu. Although she’s not Atsuii’s or Lonjiku’s first child, she was the first legitimate child from that marriage. Ameiko had a lonely childhood. Her father strictly controlled who she could keep as friends, and filled her days with lessons in music, diplomacy, magic, and academic subjects. He kept a close eye on her, but Ameiko still managed to sneak into town to play with friends, explore old buildings, and visit her half-elven half-brother Tsuto at Sandpoint’s Turandarok Academy every chance she could.
52
NPC Gallery When she was 13, Ameiko tried to reconcile the bad blood between her brother and father, but the attempt backfired. Tsuto struck her in a fit of rage, and Ameiko was so betrayed and distraught by this that she ran away from home to Magnimar for several months. When she learned of her mother’s death in a fall from the cliffs near her house, though, Ameiko returned home to Sandpoint. She found life at home more unpleasant than ever, but when another family argument broke out at her mother’s funeral and Tsuto left town, Ameiko resigned herself to staying in Sandpoint to care for her father. Ameiko left home for the second time at age 16 after life in the house alone with her father and the help grew too depressing to bear. She joined an adventuring group, and became particularly good friends with the group’s priest of Shelyn, a handsome young Varisian man named Alder Vhiski. But in 4706, the group was captured by a degenerate family of backwoods cannibals living in an old mine in the southern Fogscar Mountains. The group was within a hair’s breadth of being eaten, abused, and worse by the degenerates, but Alder led a heroic attempt to escape. The resulting f light from the mine was nightmarish, as members of the group were picked off one by one by the pursuing cannibals, who were led by a spry druid who favored snakes as his pets. As the group neared the exit, only Ameiko, Alder, and Alder’s brother Sandru remained alive, but as they prepared to scramble into a rickety rowboat that would take them to safety, Ameiko was attacked by the druid’s animal companion, a viper of prodigious size. Bitten twice, Ameiko would have died had Alder not pulled her to safety, and in so doing Alder was himself bitten. Already weakened from the fight, the snake’s venom killed him. The last Ameiko saw of Alder, he was being torn apart by the degenerates. With Sandru’s help, the two survivors eventually made it back to Sandpoint, but they never spoke of what they had endured in that old mine. Some months later, Ameiko got a tattoo of a snake on her left arm and shoulder as a sort of memorial to Alder, then cashed in most of her earnings from her adventures and purchased an old tavern in downtown Sandpoint called the Rusty Dragon. Since then, she’s run the Rusty Dragon as a place for adventurers to gather and relax.
The last few years have been hard on Ameiko, with the death of both her father and her half-brother during a series of violent goblin attacks on Sandpoint. While she now runs both the Rusty Dragon and the Sandpoint Glassworks, and she still has pride in what she’s accomplished in town, her hopes to leave Sandpoint and its bitter memories behind for a grand new adventure grow with each day.
Campaign Role Although she doesn’t realize this at the start of the Adventure Path, Ameiko is legitimate heir of the Amatatsu family, with the divine right to rule the empire of Minkai. Once the PCs recover the Amatatsu Seal, they become scions of the line as well—“insurance” of a sort, should Ameiko not survive to the end of the campaign. As the central significant NPC in the Jade Regent Adventure Path, Ameiko’s campaign role is complex, and as a result, each volume will contain notes and advice on how to handle her role as the campaign progresses. The following section outlines possible roles for Ameiko in the PCs’ caravan, as well as things that can affect the PCs’ relationship with Ameiko. See the Jade Regent Player’s Guide for details on caravans and relationships with significant NPCs in the campaign. Caravan Jobs: Ameiko can perform the following caravan jobs: cook, entertainer, fortune-teller, guard, passenger, spellcaster, or trader. Preferred Gifts: bardthemed magic items, exotic or beautiful works of art, exciting adventure stories Hated Insults: blasphemy against Shelyn, misogyny, racist comments Devotion Boon: Once per game session, you may gain the benefits of Ameiko’s inspire courage or inspire competence bardic performance as a swift action, regardless of the distance between you and Ameiko. Once activated, this effect persists for a number of rounds equal to your Relationship Score with Ameiko divided by 10 (rounded down). Enmity Boon: Gain a +4 bonus on saving throws against sonic and mindaffecting attacks. Romance Score: 40
53
Koya Mvashti
While most people might think Koya’s lived a full life, she aches to make one grand journey worthy of being retold as a legend before she grows too old to travel.
Koya Mvashti
XP 800
CR 3
Female old human cleric of Desna 4 CG Medium humanoid (human) Init +0; Senses Perception +4 DEFENSE
AC 14, touch 11, flat-footed 14 (+3 armor, +1 deflection) hp 25 (4d8+4) Fort +5, Ref +1, Will +8 OFFENSE
Speed 40 ft. Melee mwk starknife +1 (1d4–3/×3) Ranged mwk starknife +4 (1d4–3/×3) Special Attacks channel positive energy 7/day (DC 14, 2d6) Domain Spell-Like Abilities (CL 4th; concentration +8) 7/day—bit of luck Cleric Spells Prepared (CL 4th; concentration +8) 2nd—aid D, augury, lesser restoration, make whole 1st—bless, comprehend languages, longstrider D, obscuring mist, sanctuary (DC 15) 0 (at will)—create water, detect magic, light, mending D Domain spell; Domains Luck, Travel TACTICS
During Combat Koya avoids combat if possible, preferring instead to cast sanctuary and then move among the battlefield casting healing magic on her allies. If faced with a situation where she can’t avoid healing enemies with her channel energy ability, Koya always chooses to use the ability anyway if an ally is wounded and she has no other options. If confronted on her own, she uses sanctuary to aid in her escape after casting longstrider to increase her speed. Morale Koya flees from any combat where she has no allies, but if even one ally remains alive, she remains to try to keep him alive as long as she can. STATISTICS
Str 5, Dex 10, Con 12, Int 12, Wis 19, Cha 14 Base Atk +3; CMB +0; CMD 11 Feats Brew Potion, Extra Channel, Fortune Teller* Skills Heal +11, Knowledge (religion) +8, Profession (fortuneteller) +11, Sense Motive +11, Spellcraft +8 Languages Common, Varisian SQ agile feet (7/day), PC gear Combat Gear scrolls of cure moderate wounds (5), scroll
of remove curse, scroll of remove disease, wand of cure light wounds (28 charges); Other Gear +1 leather armor, masterwork starknives (2), ring of protection +1, amethyst ring worth 100 gp, harrow deck, silver holy symbol of Desna, silver necklace worth 30 gp, 17 gp * See the Inner Sea World Guide. Until she passed away from natural causes just a few months ago, Madame Niska Mvashti was the oldest person in Sandpoint. No one quite knows exactly how old the Varisian seer actually was when she died (she was already old when Sandpoint was founded over 40 years ago)—but the fact that her only daughter Koya is herself an old woman is a telling fact. Koya has spent a fair amount of her life traveling Varisia with a number of caravans, serving as a healer when she was younger and more recently as a fortune-teller. For the past several years, she’s in the company of her adopted son Sandru Vhiski as they travel on a regular caravan route between Riddleport, Magnimar, and Korvosa two or three times a year. Their caravan spends most of its time relatively close to Sandpoint, though, and that has suited Koya f ine, since it gave her more time to care for her aged mother. Now that old Niska has f inally died, though, Koya’s mourning has transitioned into a sort of morose melancholy. A life-long worshiper of Desna, she’s come to realize that while she’s traveled extensively throughout the Varisian lowlands, she’s never been beyond the region’s borders. Tales of other Desnan explorers have long delighted Koya’s sense of wonder—even her own mother reputedly took part in several extensive caravans that traveled as far as the Lands of the Linnorm Kings and even down to Qadira. Koya’s having something of a latelife crisis as a result—a growing sense of disappointment that she’s never made a long caravan trek. With her mother dead, Koya has little reason to stay in Varisia, and she’s been pressuring Sandru to take a long journey soon: “The sooner the better, ’cause I won’t be around for long!” Koya’s in remarkably good shape, physically, for a woman well over 60 years in age—obviously, longevity runs in her family—but with each year that passes, the chance of her getting to experience a truly epic journey like the ones in her favorite stories grows narrower.
54
NPC Gallery History Koya has wanted to travel to the far corners of Golarion since she was a child and first saw a map of the world in an old history book she came across while sneaking through her mother’s impressive collection of notes, trophies, and keepsakes from her extensive travels. Although Koya has since come to learn that the old map was rather inaccurate, she’s never lost the sense of wonder she gained from the simple notion that the world she’d thought she’d known was so much larger than she’d ever imagined. Likewise, a childhood trip to Korvosa impressed upon her how different the world can be as you travel from plains to forests to swamps to mountains to large urban centers. The idea that one could make journeys 10 or even 100 times as long as the caravan route running from Sandpoint to Korvosa has long been a point of fascination and wonder for Koya. But Koya never went on that long journey. She always assumed there would be the chance for an adventure in the near future, but the present always seemed to have a knack for getting in the way. Responsibilities to her family caravan, her several tempestuous love affairs as a young woman, the task of caring for unfortunate children who had no mother of their own (most notably Sandru Vhiski, and perhaps one of the PCs if the character selected the correct Campaign Trait from the Jade Regent Player’s Guide), and most recently caring for her elderly, but not quite completely inf irm, mother all worked to keep her at home. Just as one phase of her life seemed ready to close, the next began, and before she knew it, the unwelcome kiss of old age had crept into her aching bones and wrinkled face. With her mother now dead, Koya is eager to seize what she thinks might be her last chance for that great, world-spanning journey. Lately she’s been traveling with her adopted son Sandru in his caravan, serving as a fortuneteller, and she hopes that her frequent attempts to convince him to make a long journey will bear fruit soon. Koya longs to travel beyond the borders of Varisia, whether south to Cheliax and beyond or north to the Lands of the Linnorm Kings and the Crown of the World.
Koya would love to visit another continent as well, if the opportunity presented itself, so she could leave her own “found-mark” in distant lands.
Campaign Role Koya serves as the spiritual core of the caravan. As the most likely candidate for the caravan’s fortune-teller job, she serves as an advisor for most of the travelers in the caravan, and Koya’s stories, fortune-telling, and sense of humor should be a staple of all nights spent on the road. The longer the journey progresses and the more miles the caravan piles on, the more energetic and excited Koya seems to become, almost as if the journey is invigorating her rather than exhausting her, as one might expect from such a long journey. The following section outlines possible roles for Koya in the PCs’ caravan, as well as things that can affect the PCs’ relationship with Koya. See the Jade Regent Player’s Guide for details on caravans and relationships with signif icant NPCs in the campaign. Caravan Jobs: Koya can perform the following caravan jobs: fortune-teller, guard, healer, passenger, or spellcaster. Preferred Gifts: brightly colored clothes, detailed maps (the older, the better), fortune-telling tools Hated Insults: blasphemy against Desna, crass comments about her advanced age, jokes about being a homebody or having never traveled outside of Varisia Devotion Boon: Koya makes potions for free for you. Every game session, Koya gives you a number of new potions of your choice with a total gp value equal to your Relationship Score × 10. You must visit her to claim these potions. In addition, if you can create potions yourself, Koya’s aid allows you to save 10% of the gp cost in crafting potions. Enmity Boon: Your luck seems worse than ever, and you suspect it’s because Koya has put some sort of weird, subtle Varisian curse on you. As a result, you’re more suspicious than normal, and gain a +4 bonus on all saving throws against illusions and on all Sense Motive checks to see through deceptions from Bluff attempts. Romance Score: 32
55
Sandru Vhiski
Sandru Vhiski never took the easy path in life—mostly because life’s easiest path could have been to follow his brother into a life of crime among the Sczarni, a path Sandru prides himself for having never set a single foot upon.
Sandru Vhiski
XP 1,200
CR 4
Male human rogue (swashbuckler) 4 (Advanced Player’s Guide 135) NG Medium humanoid (human) Init +6; Senses Perception +7 DEFENSE
AC 19, touch 12, flat-footed 17 (+5 armor, +2 Dex, +2 shield) hp 29 (4d8+8) Fort +2, Ref +6, Will +3; +1 vs. fear Defensive Abilities evasion, uncanny dodge OFFENSE
Speed 30 ft. Melee +1 scimitar +8 (1d6+4/18–20) Ranged mwk shortbow +6 (1d6/×3) Special Attacks sneak attack +2d6 TACTICS
During Combat Sandru stays mobile in combat, using Acrobatics to avoid attacks of opportunity as he flanks foes and to prevent enemies from taking full-attack actions on him. He uses Power Attack in all fights, but does so with a relatively unique style that makes him seem more graceful than brutal in nature. Morale Sandru is stubbornly brave and has a hard time envisioning his own demise. As a result of this attitude, he fights to the death. STATISTICS
Str 16, Dex 14, Con 12, Int 10, Wis 10, Cha 13 Base Atk +3; CMB +6; CMD 18 Feats Improved Initiative, Iron Will, Power Attack, Toughness, Weapon Focus (scimitar) Skills Acrobatics +9, Appraise +7, Bluff +8, Craft (carpentry) +7, Diplomacy +8, Disable Device +8, Handle Animal +5, Knowledge (history) +4, Perception +7, Profession (merchant) +7 Languages Common, Varisian SQ daring*, martial training*, PC gear, rogue talents (combat trick, weapon training) Combat Gear potions of cure light wounds (3), potion of cure moderate wounds; Other Gear +1 chain shirt, +1 buckler, +1 scimitar, mwk shortbow with 20 arrows, belt pouch, bottle of fine brandy worth 50 gp (4), everburning torch, masterwork thieves’ tools, trail rations (4 days), wineskin, 76 gp * See the Advanced Player’s Guide.
Only a few years from middle age, Sandru Vhiski is a charming man, handsome and irreverent in precisely the ways that could have made him a highly successful Sczarni con artist, even before one takes into account in the fact that his older brother, Jubrayl, is Sandpoint’s local Sczarni leader. Sandru doesn’t live in Sandpoint, although he considers himself one of the town’s citizens nevertheless. He’s only in town a few days out of every month, for his caravan is one of the region’s busier examples. Traveling with his adopted mother Koya Mvashti and a pair of Varisian brothers named Bevelek and Vankor Dalmuvian, Sandru makes the trip from Riddleport to Magnimar to Korvosa several times a year. While he makes enough money on these journeys from trade, money isn’t Sandru’s primary motivation—he loves the road, and he loves the tradition. It doesn’t take much to get Sandru talking about Varisian history, dance traditions, scarves, fortune-telling, horses and wagons, landmarks and legends. In the off-seasons, when weather makes travel too dangerous or too uncomfortable, Sandru prefers to stay in Magnimar, where he helps other Varisians with his carpentry skills and f lirts with the political scene in that town. He’s not yet had the conviction to fully become a representative of his people in Magnimar, though, since he knows the call of the road will pull him from any local responsibilities as soon as the rains clear each spring.
History The Vhiski family has been involved with the Sczarni for as many generations as anyone cares to look back upon. Not every Vhiski throws in with the gang, but enough do that when one comes along who has no interest in the Sczarni life, it’s difficult for him to prove his disinterest in crime to outsiders. Sandru’s early childhood schools were back alleys and waterfront taverns, and training in the art of the con, dirty fighting, sabotage, and picking locks replaced lessons in numbers, arts, and literature. From an early age, though, Sandru’s sense of fairness and compassion hampered his advancement in the ranks of the Sczarni, and the mockery and derision his hesitance earned him only strengthened his convictions. When a violent storm struck the Varisian coast in 4687 ar, Sandru’s parents were among those slain by the f loods and winds that tore the Lost Coast apart. Sandru and his
56
NPC Gallery brothers Alder and Jubrayl emerged from that catastrophic event as orphans. Yet while tragic, this event was ironically just the thing to save Sandru from a life of crime. While Jubrayl was old enough at that point to strike out on his own (and thus fell in completely with the family’s criminal traditions), Sandru was still a young child of 7 and his younger brother Alder barely 2. His care fell to Koya Mvashti, a family friend and practically an aunt to the young Sandru. Under her guidance and support, Sandru managed to avoid falling in with the Sczarni, and when he grew of age, he sought employment as a caravan guard. For several years, Sandru avoided Sandpoint, but after he lost his job, he joined up with a group of adventurers eager to explore western Varisia. As fate would have it, Ameiko Kaijitsu was also in the group. Sandru and Ameiko hit it off at once and became close friends. Indeed, Sandru was quite taken with the lovely young woman, but their age difference (he was 26, while she was only 17) and Sandru’s sense of honor kept him from pursuing a romantic relationship with her. Instead, he watched enviously (yet graciously) as Ameiko and his younger brother Alder began to fall in love. The trio’s brief adventuring career was quite successful, but as recounted in Ameiko’s history, ended in tragedy. For many years after Alder rescued Ameiko and lost his life to the cannibals, Sandru couldn’t stand to be around the young Tian—she reminded him of lost opportunities and lost family. So while Ameiko invested her adventuring spoils in Sandpoint, Sandru invested his in the road, throwing himself into a much more honorable Varisian occupation, that of caravan owner. For the next several years, Sandru’s life was the road. He’s since mostly recovered from the bad times, and now visits Sandpoint and Ameiko often. He thinks of her now as a younger sister, and often worries that her capricious and often rebellious nature will someday force her to choose between the life she wants and the life she’s inherited as one of Sandpoint’s nobles.
Campaign Role Sandru is the owner and primary driver of the caravan destined to take the PCs over the Crown of the World and into Minkai. Just as he plays the
role of surrogate older brother to Ameiko, he should start to fill that role for most, if not all, of the PCs. Sandru’s led a relatively lonely life, though, and most of those who have shown romantic interest in him have been associated with the Sczarni, while those to whom he is attracted tend to see him either as a brother or are already in relationships. While Sandru knows he could woo a paramour away from his or her lover if he put his mind and his charms to the task, he also knows he could never stay long with a lover who wasn’t faithful or devoted enough to stick with whoever came before him. Caught in this complex tangle of emotions and honor, Sandru has started to think of himself as a life-long bachelor, and with each passing year consigns himself to the growing certainty that he’ll remain alone until his final days. As a result, while he’s a friendly and personable character, he tends to miss such social cues or avoid romantic approaches entirely. The following section outlines possible roles for Sandru in the PCs’ caravan, as well as things that can affect the PCs’ relationship with Sandru. See the Jade Regent Player’s Guide for details on caravans and relationships with significant NPCs in the campaign. Caravan Jobs: Sandru can perform the following caravan jobs: driver, guard, passenger, trader, or wainwright. Preferred Gifts: art objects and jewelry in Varisian traditions, fine foodstuffs (particularly shellfish and brandy), swashbuckler-themed magic items Hated Insults: anti-Varisian slurs or comments, implications of criminal ties (especially with the Sczarni), slander against Ameiko Devotion Boon: Sandru’s graceful and almost dancelike combat style has worn off on you. Whenever you move at least 10 feet in combat, you gain a +1 dodge bonus to your Armor Class. Enmity Boon: You’ve come to enjoy anything that gets Sandru angry, and as a result, you’ve inadvertently absorbed quite a bit of lore about the Sczarni— particularly the art of striking first in a fight. You gain a +4 bonus on Initiative checks. Romance Score: 38
57
Shalelu
Shalelu Andosana is older than the town of
Sandpoint,
yet she’s come to think of it as
her hometown—a town that has finally grown up enough to survive on its own without her watching over it from the wild.
Shalelu Andosana
XP 1,600
CR 5
Female elf fighter 2/ranger 4 CG Medium humanoid (elf ) Init +3; Senses low-light vision; Perception +12
amulet of natural armor +1, campfire bead*, cloak of resistance +1, backpack, bedroll, climber’s kit, flint and steel, manacles, silk rope (50 ft.), sunrods (3), trail rations (4 days), waterskin, winter blanket, wooden holy symbol of Desna, 8 pp, 2 gp * See the Advanced Player’s Guide.
DEFENSE
AC 19, touch 14, flat-footed 15 (+4 armor, +3 Dex, +1 dodge, +1 natural) hp 53 (6d10+16) Fort +10, Ref +8, Will +3; +2 vs. enchantments, +1 vs. fear Defensive Abilities bravery +1 OFFENSE
Speed 30 ft. Melee mwk short sword +8/+3 (1d6+1/19–20) Ranged +1 composite longbow +11/+6 (1d8+1/×3) Special Attacks favored enemy (goblinoids +2) Ranger Spells Prepared (CL 1st; concentration +2) 1st—resist energy TACTICS
During Combat Shalelu prefers to fight with her bow, resorting to melee only when truly desperate or when an ally seems in dire need of healing from her wand. Morale Shalelu is loyal to her friends, and as long as even one of them remains in danger she won’t abandon them. That said, if she feels she can escape, get help, and return in time to save anyone captured by enemies before it’s too late, she might try to do so. STATISTICS
Str 12, Dex 16, Con 14, Int 12, Wis 13, Cha 8 Base Atk +6; CMB +7; CMD 21 Feats Dodge, Endurance, Point-Blank Shot, Precise Shot, Rapid Shot, Skill Focus (Acrobatics), Weapon Focus (composite longbow) Skills Acrobatics +12, Knowledge (nature) +8, Perception +12, Stealth +15, Survival +10, Swim +10 Languages Common, Elven, Goblin SQ elven magic, favored terrain (forest +2), hunter’s bond (companions), PC gear, track +2, weapon familiarity, wild empathy +3 Combat Gear sleep arrows (10), potion of delay poison, potions of lesser restoration (2), wand of cure light wounds (25 charges), antitoxin (2); Other Gear +1 studded leather, +1 composite longbow with 20 arrows, masterwork short sword,
Although Shalelu Andosana is something of a mystery in Sandpoint, she’s certainly one of the town’s most admired defenders. Like Sandru Vhiski, she doesn’t actually live in town, but she sometimes spends the night at the Rusty Dragon free of charge, thanks to her friendship with Ameiko Kaijitsu. Everyone in town knows that Shalelu is something of a loner and prefers to spend her time wandering and exploring the wilderness around Sandpoint. She periodically vanishes from the region for weeks or even months at a time to visit friends elsewhere in Varisia, but she never fails to return to Sandpoint. No one quite understands why she keeps coming back. When asked why, she merely says, “Someone’s got to keep an eye on you all.” Her reports of goblin activity have helped save folk from ambushes or warned the militia of possible attacks on the town or its farmlands numerous times. Yet in recent days, Sheriff Hemlock has taken a more active role in watching over the surrounding land. His militia is better trained than ever before, and Shalelu’s aid in keeping an eye on the hinterlands is growing less and less necessary. She actually seems relatively pleased with this, as if she’s proud that Sandpoint is finally starting to look after itself. She’s even hinted that she’s thinking of taking a long journey away from town sometime in the future, but when pressed for details, she just shrugs and changes the topic.
History Shalelu is still relatively young at 130 years of age, but she can remember when the Lost Coast was truly lost, when only goblin lairs and Thassilonian ruins could be found along its length. Yet for much of her life, Shalelu’s visits to southern Varisia were not nearly as common. Born and raised in the small village of Crying Leaf, Shalelu is an only child whose father was slain not long after she was born by a particularly brutal bugbear assassin, exposing Shalelu to far more goblinoid cruelty than most elves her age dream of in their worst nightmares.
58
NPC Gallery It took Shalelu’s mother Seanthia nearly a hundred years to find a new love, and when she did, she chose a human mercenary, scandalizing much of Crying Leaf. As shocking as the choice may have been, Shalelu saw how happy this man Jakardos made her mother, and she loved him as a father for that kindness. But when her mother died in a fight a green dragon a few years later, Jakardos left without saying goodbye, shattering Shalelu’s opinion of him. The loss of her mother and stepfather sent Shalelu into a terrible depression, and she left Crying Leaf to seek out a new home. Shalelu came to Sandpoint, where she found a burgeoning human village that was growing rapidly into a town, but that was plagued by goblins. Shalelu took Sandpoint under her wing, and for many years she protected it from goblins, bugbears, ghouls, and worse. Recently, Shalelu sought out Jakardos at his new home in central Varisia, and her reconciliation with her aging stepfather finally helped her come to terms with the violent attack that killed her mother. And when Shalelu returned to Crying Leaf to aid in dealing with the drow problem in the nearby Mierani Forest, she was able to help kill the same green dragon responsible for her mother’s death. Shalelu is now in one of the happiest times of her life, and has been seized with a restless wanderlust. In recent years, Shalelu has built a strong friendship with Ameiko Kaijitsu as well, and sees her as a younger sister. Shalelu knows that Ameiko is haunted by tragedies, and in some ways sees a ref lection of her own sad history in Ameiko. Shalelu hopes to find some way soon of helping her friend overcome her melancholia—perhaps a nice long trip will fit the bill.
Hated Insults: anti-elf jokes (particularly about ear length), implications that she’s frigid or incapable of love, pro-goblin comments Devotion Boon: Shalelu’s love of the natural world has opened your eyes to the same beauty. When you’re in wilderness areas, you gain a +1 morale bonus on all saving throws—in forests, this bonus increases to +3. Enmity Boon: You don’t get along well with Shalelu, but you have to admit that she knows how to hold a grudge. Choose one creature type from the list of ranger favored enemies. You gain a +2 bonus on all attack rolls and weapon damage rolls against those creatures. Romance Score: 35
Campaign Role Shalelu is the highest-level significant NPC that accompanies the PCs in this adventure, and while the PCs will eventually eclipse her power, for now she should act as a protective guardian. She’s always ready to step in and save friends, but she also believes that coddling allies robs them of the opportunity to improve themselves. She won’t fight the PCs’ battles for them, but she’ll do what she can to ensure they survive long enough to find their own way. The following section outlines possible roles for Shalelu in the PCs’ caravan, as well as things that can affect the PCs’ relationship with Shalelu. See the Jade Regent Player’s Guide for details on caravans and relationships with significant NPCs in the campaign. Caravan Jobs: Shalelu can perform the following caravan jobs: guard, passenger, and scout. Preferred Gifts: archery equipment (particularly magic equipment), nature-themed works of art, survivalist gear and tools
59
Jade Regent Treasures
The following unique treasures can be found in “The Brinewall Legacy.” Playerappropriate handouts appear in the GameMastery Jade Regent item card set.
Fireworks Tian f ireworks come in many forms, some of which can be found in “The Brinewall Legacy.” Desnan Candle: When lit, this foot-long wooden tube launches a f laming pyrotechnic “candle” every round for 4 rounds. Each projectile deals 1 point of nonlethal damage and 1 point of fire damage if it hits; on a critical hit, the target is also blinded for 1 round. The projectiles shed light as candles for 1 round and have a range increment of 5 feet. Attacking with a Desnan candle is a ranged touch attack and always has a –4 nonproficiency penalty. A Desnan candle costs 5 gp. Skyrocket: When lit, this foot-long wooden tube begins to shake and emit a handful of white sparks, shedding light as a torch. One round later it takes f light, moving in a straight line with a f ly speed of 90 for 1d6 rounds before loudly exploding in an burst of light and sound, and dealing 2d6 points of fire damage in a 10-foot burst (DC 15 Ref lex save for half ). If a skyrocket impacts a solid surface or a creature before reaching its maximum range, it detonates prematurely at the point of impact. Anyone who takes damage from the explosion is either blinded or deafened (a 50% chance of either) for 1 round. A skyrocket costs 50 gp and weighs 1 pound. Starfountain: This tree-stump-sized bundle of tubes immediately begins to emit arcs of multicolored sparks when lit. Starting 1d6 rounds after lighting, it loudly releases brightly colored streaks of tiny f laming particles for 4 full rounds. Outdoors, these particles soar far up into the sky before dispersing. Indoors or in a closed area, the ricocheting fireworks deal 1d6 points of fire damage each round in a 20-foot spread (DC 15 Ref lex save for half ). Creatures who fail their saves are blinded for 1d4 rounds and deafened for 1 hour. A starfountain costs 500 gp and weighs 100 pounds.
Magic Items Several key items from the adventure are described below.
be able to take up that charge, however, the Amatatsu Seal can invest the right to rule as an Amatatsu in any number of living humanoid hosts. These Amatatsu scions often experience a series of visions of the past, present, and possible future. The Amatatsu Seal has a daily allotment of 5 charges that it can use to cast the following spells on an Amatatsu scion: cure serious wounds, remove curse, remove disease, or restoration. Each casting uses up 1 daily charge. Alternatively, the seal can cast heal on an Amatatsu scion, but doing so expends all 5 charges. Finally, and only at the seal’s discretion, it can cast resurrection on an Amatatsu scion, but doing so renders its spellcasting powers useless for a month. The Amatatsu Seal itself radiates strong magic, and those with the proper resources can sense this magic across oceans and continents, allowing it to be tracked across any distance. Originally meant to allow its rightful owners the ability to track it if stolen, this feature makes it dangerous to remove the seal from its warding box, for as long as the warding box is open, the oni of the Five Storms can track it. The repercussions of this are detailed in later adventures in the Jade Regent Adventure Path. One final ward exists on the Amatatsu Seal, confounding attempts to whisk it quickly away from its homeland but also making returning a stolen seal home an arduous task. The Amatatsu Seal can never be transported by teleportation magic or dimensional travel. It cannot be taken from the Material Plane save via special portals blessed by the gods, and characters who carry the seal cannot cast or otherwise use teleportation effects. DESTRUCTION
To destroy the Amatatsu Seal, rightful scions of each of the five royal families of Minkai must, of their own free will, cast their families’ seals together into the Well of Demons in the Imperial Shrine in Kasai Harbor. Dancing Wasp Aura moderate conjuration; CL 7th Slot none; Price 12,392 gp; Weight 3 lbs. DESCRIPTION
Amatatsu Seal (Minor Artifact) Aura strong (all schools); CL 20th Slot none; Weight — DESCRIPTION
This stone statuette of a dragon is one of five royal seals of Minkai, and represents the Amatatsu family’s divine right to rule the empire of Minkai. Should no Amatatsus of pure blood
This +1 kusarigama (Ultimate Combat 132) makes a shrill whistling sound whenever it is used in combat. Once per day as a standard action, the wielder of Dancing Wasp can whirl the weapon above his head as a full-round action to summon a giant wasp (Pathfinder RPG Bestiary 275). The wasp appears in the air above the wielder’s head and follows the wielder’s mental commands to the best of its ability as long as the user continues
60
Jade Regent Treasures
Dancing Wasp
Fireworks Amatatsu Seal
Warding Box Whispering Shrike to twirl the weapon (requiring a standard action each round), to a maximum of 5 rounds, after which the wasp vanishes.
must be used to switch the two portable holes. Doing so destroys both portable holes and the warding box along with them.
CONSTRUCTION
Requirements Craft Magic Arms and Armor, summon monster IV or summon nature’s ally IV; Cost 6,352 gp Warding Box (Minor Artifact) Aura Strong abjuration; CL 20th Slot none; Weight 5 lbs.
Whispering Shrike Aura faint abjuration; CL 5th Slot none; Price 5,940 gp; Weight 2 lbs. DESCRIPTION
DESTRUCTION
Whispering Shrike is a +1 wakizashi (Ultimate Combat 134) of incredibly beautiful design. The sword is etched with images of seven shrikes perched on a coiling branch that runs the length of the blade. Once per day, Whispering Shrike can be used to cast shield other on any creature touched by the blade while you wield it. The blade’s tsuka (hilt) has not weathered the passage of time as well as the blade itself, and until the pommel is repaired (a process requiring 600 gp, a day’s work, and a DC 20 Craft [weapons] check), attacks with the weapon take a –2 penalty due to the loose grip. A DC 20 Perception check (an automatic success once repair is underway) reveals a secret compartment in the hilt just large enough to hold a small item such as a flask or rolled piece of paper. This compartment currently holds an important letter—see page 22 for details on this find.
A warding box can be destroyed by placing a portable hole inside it, closing the lid, and then placing the box inside a second portable hole. This second portable hole must be closed, and then a wish
Requirements Craft Magic Arms and Armor, shield other; Cost 3,140 gp
DESCRIPTION
A warding box is a powerful magical container built to obscure and confound any attempt to locate objects kept inside. The box can hold one object no larger than 8 inches × 8 inches × 3 inches (or up to 25 pounds) in each of its three compartments at any one time. The box’s lid and additional compartments are sealed, but the box can be opened or closed as a full-round action. While the lid is closed, the warding box and all objects inside it are protected from all divination spells. In this state, no divination spell save for those employed by the gods can detect the warding box or its contents.
CONSTRUCTION
61
Sandpoint Hinterlands The Lost Coast numbers among the most picturesque of a thousand enchanting Varisian backdrops. Misty woodlands ornament a land of supple fields and mysterious cliffs like the fluttering scarves of native dancers. Swamps and rugged tors hold secrets known only to this ancient land’s lost peoples, daring explorers to peel back the ages and discover epics only guessed at by poets. Waves of emerald lap the wild coast, dancing before a ghostly chain of island mountains hidden even on clear days to all but the keen-eyed and lucky. This is truly a place of wonders. But as with any true treasure, its marvels do not go unguarded. —Cevil “Redwing” Charms, Esq., Eidolon
62
Sandpoint Hinterlands
W
Notable NPCs Mayor Kendra Deverin (NG female human aristocrat 4/ expert 3) Sheriff Belor Hemlock (CG human male fighter 4) Town Priest Abstalar Zantus (CG male human cleric of Desna 4) Nobleman Titus Scarnetti (LN male human aristocrat 6) Nobleman Ethram Valdemar (NG male human aristocrat 5/ expert 2) Noblewoman Ameiko Kaijitsu (CG female human aristocrat 1/bard 3/rogue 1)
hile the region known today as Varisia has long been inhabited (all the way back to the Age of Legend, when powerful wizards known as runelords ruled the region as the Empire of Thassilon), it wasn’t until relatively recently that it came to the attention of the nations of the Inner Sea. Cheliax made an aggressive attempt to colonize Varisia, but conf lict with its native peoples and the remote location made such attempts diff icult. By the time of Aroden’s death and the Chelish Civil War, Cheliax’s colonies in Varisia had already become independent. While the inland highlands of Varisia remain wild and untamed, a fair amount of its coastal lowlands are now civilized. Three cities in particular—Korvosa, Magnimar, and Riddleport—represent civilization’s three greatest modern triumphs in the region. Each of these cities has a number of smaller villages in its outlying reaches, and of these smaller settlements, the town of Sandpoint is among the largest and most successful—the perfect spot for f ledgling heroes to start careers of adventure.
Base Value 1,300 gp; Purchase Limit 7,500 gp; Spellcasting 4th Minor Items 3d4*; Medium Items 1d6*; Major Items — * The Resources section lists specific items for sale in Sandpoint at the start of this adventure. Every month, roll 3d4 to see how many new minor items are for sale, and 1d6 to see how many new medium items are for sale. Healing items that might be offered by the Sandpoint Cathedral or other individuals do not count against these limits.
Sandpoint
Resources
Founded in 4666 ar along the Lost Coast, just a day’s ride north of Magnimar, Sandpoint has grown into a rustic and prosperous town of just over 1,200 citizens. The town has dealt with a number of disasters in the past 5 decades, including several powerful storms, goblin uprisings, trouble with dragons, devastating fires, and deranged serial killers. Yet Sandpoint weathered these trials and emerged stronger after each one. Today, the town hosts several thriving industries (including lumber, fishing, farming, and glassblowing) as well as a number of unique businesses and entertainment venues. The town seems comfortable in its transitory position between rural charm and urban convenience, and is a healthy and vibrant settlement despite its slow growth. While Sandpoint itself doesn’t play a huge role in “The Brinewall Legacy” (beyond being the likely home of the PCs and the starting point for the adventure), the following information should be enough to cover the basics. More information on the town can be found in Pathfinder Adventure Path #1.
MARKETPLACE
Although Sandpoint is a relatively small town with citizens prone to living relaxed and unexciting lives, the town’s hinterlands hold numerous opportunities for adventure. As such, many of Sandpoint’s businesses cater to adventurers. The following locations and services offered in Sandpoint should be of particular interest to adventuring PCs. Sandpoint Cathedral: Tended by Father Abstalar Zantus, a cleric of Desna, the Sandpoint Cathedral is a pantheistic temple that contains shrines to Abadar, Desna, Erastil, Gozreh, Sarenrae, and Shelyn. Zantus and his four 1st-level acolytes can provide a limited amount of healing every day. Magic Items for Sale: Beyond the numerous healing items available at the Sandpoint Cathedral, several other shops in Sandpoint periodically offer magic items for sale as well. At the start of the Jade Regent Adventure Path, the following specific items are for sale at the listed shops (these items are in addition to Sandpoint’s normal base gp value).
Magic Items for Sale Item For Sale at +2 dagger Savah’s Armory +2 spell resistance (13) Savah’s Armory studded leather armor periapt of health The Feathered Serpent potion of protection Pillbug’s Pantry from chaos potion of levitate Pillbug’s Pantry ring of feather falling The Feathered Serpent scroll of mirror image The Curious Goblin wand of magic vestment The Feathered Serpent (27 charges)
Sandpoint NG small town Corruption +0; Crime +0; Economy +1; Law +0; Lore +2; Society +0 Qualities Prosperous, Rumormongering Citizens Danger +0 DEMOGRAPHICS
Government autocracy (mayor) Population 1,240 (1,116 humans, 37 halflings, 25 elves, 24 dwarves, 13 gnomes, 13 half-elves, 12 half-orcs)
63
Price 8,302 gp 16,175 gp 7,400 gp 50 gp 300 gp 2,200 gp 150 gp 6,075 gp
5
Places to Relax: Sandpoint offers several places to relax and spend the night, including taverns, inns, and even a brothel. The White Deer and the Rusty Dragon are Sandpoint’s two inns—their prices are comparable, but the Rusty Dragon specifically caters to adventurers, and its owner, Ameiko Kaijitsu, has been known to offer discount rates to adventurers in return for entertaining tales of their escapades. For taverns and eateries, visitors can choose between Cracktooth’s Tavern (specializing in amateur entertainments, ale, and crunchy snacks), Fatman’s Feedbag (specializing in enormous servings of mediocre food, rum, and bar fights), the Hagfish (specializing in seafood, gambling, and boasting), Risa’s Place (specializing in potato dishes, cider, and stories; particularly valued by the locals since this place isn’t well known by visitors), and the Rusty Dragon (specializing in spicy and exotic dishes, mead, and adventurers). The Pixie’s Kitten is Sandpoint’s only brothel, but its sense of style and panache belies the rural environs.
6
7
8
Rumors Sandpoint’s citizens are fond of gossip. You can use the following table to randomly determine a bit of scuttlebutt to reward PCs who ask around town for information. If you want to limit rumors the PCs hear to ones that have direct links to “The Brinewall Legacy,” roll a d4 instead of a d8.
Sandpoint Rumors Roll Rumor 1 The Soggy River Monster was seen again, this time by a fisherman on the New Fish Trail. He said it stood taller than a man, had white skin, and had a mouth that opened up all the way down its neck. It was eating what looked like a goblin on the far side of the river, which is why the farmer managed to escape. (True— the Soggy River Monster is detailed on page 10.) 2 The Licktoad Goblins have never been much of a problem before, but now that they’ve found all those fireworks, they seem braver, that’s for sure. Some folks say that they’ve even learned how to make them, and that they’re getting ready set Sandpoint on fire! (True and false—although the goblins have found a lot of fireworks, they haven’t learned how to make them yet.) 3 It’s been a long time since Old Megus came to town. My neighbor says it’s because she used witch magic to turn into some sort of swamp zombie and now she’s stalking Brinestump looking for people to eat! (False— Old Megus’s actual fate is detailed on page 18.) 4 That weird halfling who lives at the end of the New Fish Trail in Brinestump Marsh raises snakes as pets. I kid you not! He coddles them like my niece coddles her pet rabbit, Mr. Nibbles! Takes a special kind of weirdo to keep snakes as pets! (True—the self-appointed “warden” of the swamp is detailed on page 11.)
Farmers around Egan’s Wood say that there’s been muddy hoofprints appearing on their roofs lately. Sounds like the Sandpoint Devil’s looking for someone ’round those parts to carry off for a meal! (False—the farmers faked the footprints and are just looking for attention.) Some travelers coming from up coast say they saw a dragon—a big black one—flying around above central Mosswood. Hope they were drunk or something. We don’t need dragons living that close to town! (True— see Dragon’s Punchbowl on page 65.) A couple of weird holes have shown up in the fields around Pauper’s Graves, and the old tree in the cemetery seems to be leaning funny, almost like something’s been digging around in there. Hope it’s not ghouls! (True—see Pauper’s Graves on page 67.) A lot of the fishermen been talking about some sort of red seagull they been seeing lately. Thing is, the seagull always seems to show up just before some sort of accident or other bit of bad luck happens. They’ve been calling the thing the “Stoot Bird” of late, saying it’s soaked in blood or something and that the bird’s possessed by that maniac Stoot’s ghost. (True—this eerie red gull is in fact the disguised Red Bishop. See Grubber’s Hermitage on page 66.)
The Hinterlands
This volume’s adventure focuses on Brinestump Marsh, only one of the numerous adventure sites located within a few hours’ walk of the town of Sandpoint. Yet several other intriguing sites exist in the Sandpoint hinterlands—areas ripe for new adventurers to test their mettle. Some of these sites are relatively safe to explore, but others could well contain challenges for parties of 7th level or higher. The following gazetteer brief ly describes several different locations in the Sandpoint hinterlands beyond Brinestump Marsh where adventures could take place—each location is listed with a suggested CR so that you can build levelappropriate challenges for that area. In the case of an area listing a range of numbers for its CR, that site features multiple encounter areas suitable for longer-term exploration in a multilevel complex or ruin. Entries without CRs listed are generally safe and have few indigenous dangers. Ashen Rise (CR 1): The smaller of the two limestone escarpments in the area is the so-called Ashen Rise. Unlike Devil’s Platter, Ashen Rise is relatively safe—the only peril explorers are likely to face up here are f locks of stirges or uncommonly aggressive ravens and crows. Biston’s Pond (CR 2): Named after an eccentric Varisian druid who lived his whole life on the western shore, this pond gathers at the convergence of Weasel Creek and the larger Turandarok River. Goblins from Mosswood often fish along the eastern shore, and the dilapidated shack
64
Sandpoint Hinterlands
that once served as Biston’s home still sits on the western shore, supposedly haunted by the old druid’s spirit. These stories are lent credence by the unusually hostile attitude of the coyotes, wolves, boars, and other wild animals who dwell in the area. The pond itself is relatively shallow and well-stocked with trout and freshwater f lounders. Brinestump Marsh (CR 1): This tangled, overgrown swampland is presented in detail in Part One of this volume’s adventure. Devil’s Platter (CR 3): The edges of Devil’s Platter are known haunts for the Birdcrunchers—a small tribe of relatively nonaggressive goblins that dwells in numerous caverns along the Platter’s western edge. Deeper in, it’s rumored that the place is controlled by devil-worshiping bugbears who avoid the light of day but emerge at night from caves to light their fires. Numerous clefts, cracks, and caverns lie scattered throughout the bleak, desolate expanse of this limestone escarpment. Routes up the sheer sides are few, and are often sites of goblin or bugbear ambushes. Dragon’s Punchbowl (CR 8–11): This bowl-shaped island is little more than a series of stony ridges surrounding a small lake. Wyverns roost in caves here, and rumors hold that a dragon visits the place once or twice a year for unknown reasons. In fact, until recently, two black
dragons lived in the partially f looded caverns accessible from the punchbowl’s lake. The eldest of these is the black dragon Scarhorn, a brutish creature with a missing horn who recently kicked her younger sibling out of their lair (see the Tors on page 67). Scarhorn spends much of her time scouring the farther islands of the Varisian Gulf for treasure, particularly in the ruins of Xin-Bakrakhan on the lower slopes of Rivenrake Island. Egan’s Wood (CR 2): This small copse of trees grows along the lee of Ashen Rise, a thick tangle of pine trees once owned by a local eccentric named Egan who forbade any clearing of the land for farming. His shack lies hidden somewhere in the woods. Although Egan died long ago, the giant spiders that infest his beloved woods remain very much alive. They rarely emerge from the woods, which is fine with the farmers who toil in the surrounding f latlands. Farmlands (CR 1): The farmlands south of Sandpoint are relatively safe, but farmers are always getting into trouble with local wildlife or various local dangers—particularly goblins or mites. At any given time, at least two or three farms need help in running off predators or mischiefseeking troublemakers. Foxglove Manor (CR 4–5): This old seaside manor house was built in 4624, but a series of tragedies saw the
65
The Red Bishop
place abandoned for many years. Known today as “The Misgivings,” the place is reputedly haunted. Foxglove Manor is presented in detail in Pathfinder Adventure Path #2. Grubber’s Hermitage (CR 6–9): A notorious generator of shipwrecks, Grubber’s Hermitage is a small, isolated island containing a thorp of a dozen fishing families—insular folk that generally don’t welcome visitors. Sandpoint citizens theorize that lepers, ghosts, or worse infest the island. Of late, little has been heard from the Hermitage—with no love lost between this thorp and Sandpoint, no one has gone to investigate the silence as of yet. In fact, the people of Grubber’s Hermitage have recently been devastated by a supernatural and deadly entity known as the Red Bishop, a mothman cleric of Pazuzu whose strange obsession with Sandpoint brought it to the region. The Red Bishop played a key role in the corruption of Jervas Stoot into a maniacal serial killer several years ago, and this was but the first in several manipulations of events in the region
toward a devastating endgame known only to it. The slaughter and subjugation of Grubber’s Hermitage is the latest atrocity engineered by the Red Bishop, who now dwells on the island and manipulates the town’s few remaining survivors from the safety of a corrupted monastery of Gozreh that looms above the town. Habe’s Sanatorium (CR 1): A wealthy alienist named Erin Habe owns and runs this three-story brick hospice, more properly known as “The Saintly Haven of Respite.” Some folk whisper that the asylum is less a place of healing and more a place for its reclusive owner to perform strange experiments on the desperate souls in his care. Habe’s Sanatorium is detailed in Pathfinder Adventure Path #2. Hag’s Plummet: Old Varisian tales recount the tragic tale of young Bevanaka, who found a gray hair and sought out an old witch for an elixir of beauty. The witch gave her the potion, but warned her that the effects would last only as long as she didn’t fall in love. For many years, Bevanaka lived as a lonely but beautiful woman, until the day her loneliness grew too great and she fell in love with a young man. Bevanaka grew old in the blink of an eye, but hoped her true love would still love her. Alas, she was wrong. Horrified by her sudden age, he spurned her. In a fit of despair, Bevanaka threw herself from the cliffs at Hag’s Plummet. Since then, these cliffs have been a popular place both for young lovers to sneak away and profess their love and for suicides. The Moors (CR 2): The three moors that stretch through much of the hinterlands consist of poor-quality soil and stony ground. The northernmost is Ashen Moor, a stretch of low-lying land that slopes gradually to the west toward Hag’s Plummet. On the far side of Brinestump Marsh from Ashen Moor lies Bleaklow Moor, a higher-altitude swath of land said to be infested by ghouls below its barren expanse. Whisperwood Moor, the largest of the three moors, lies to the southeast and is often shrouded in fog well into the day. Goblin dogs, wolves, worgs, and worse hunt here, often coming north to prey on the livestock of outlying farmlands. Mosswood (CR 3): One of two significantly sized woodlands to the east of Sandpoint, Mosswood is the less tangled, less dangerous of the two, yet the forest is far from safe. Mosswood’s primary inhabitants are goblins, and the Mosswood tribe remains the largest of the Sandpoint goblin tribes today. Part of the Mosswood goblins’ tenacity doubtlessly comes from the tribe’s chieftain, Big Gugmut, who claims to be the son of a hobgoblin and a wild boar. Mosswood’s trees tend to be larger, mostly redwood, resulting in much more open forest f loor than undergrowth-heavy Nettlewood to the north. Nettlewood (CR 3): North of Mosswood lies Nettlewood, a frustratingly tangled forest. Whereas the trees of Mosswood grow tall and stately, those north of the Lost Coast Road in Nettlewood are lower and share much of
66
Sandpoint Hinterlands their growing space with snarls of nettles and thorny underbrush. Nettlewood’s dense undergrowth makes it one of the least-explored regions of the hinterlands. Pauper’s Graves (CR 3–4): Before Sandpoint was settled, Varisians often visited the coastline here, one of many traditional graveyard sites used by the travelers in the region. When Sandpoint began construction, a large inf lux of poor and desperate laborers from Magnimar came to the region, hoping to be rewarded for helping build a new town by being given a place in it, and were buried here. Today, these bodies are gone, devoured by the ghouls now inhabiting the twisting warrens beneath the area. The Pit (CR 2–7): The most notorious site on Devil’s Platter is a dark, circular pit hidden somewhere near the escarpment’s center. From above, the Pit is only accessible by f light or via a winding network of mazelike furrows in the Platter’s surface, while from below the numerous caves that branch off of the Pit’s walls connect to underground lairs throughout the hinterlands. In this way, the Pit forms the nexus of a “mini-Darklands” below the region. Something like a sinkhole, the circular shaft stretches nearly a hundred feet across, its inner walls crisscrossed with ledges and rope ladders leading deeper into the mist-shrouded depths. Numerous cave entrances along these ledges lead into complexes within the escarpment itself—goblin tribes, infestations of gremlins, sinister lairs inhabited by derros and dark folk, and troglodyte warrens are among the dangers one faces in these numerous caverns. The deepest reaches of the pit share an ancient temple devoted to Kabriri (the demon lord of ghouls) and the lair of the infamous Sandpoint Devil. The connection between the denizens of this temple of Kabriri and the ghoul activity in the region seems obvious, but what unholy link the ghouls and their cult leaders might have to the Sandpoint Devil is unclear. The Pyre: The ancient Varisians of the region used this promontory for many rituals, including their yearly Swallowtail Festival, but the Pyre hasn’t been so used since Sandpoint’s founding. Ravenroost: This ragged range of broken hills is decorated here and there by isolated copses of eucalyptus and pines. Not a lot lives here apart from relatively harmless wild animals, although of late, the ravens that give the hills their name seem unusually loud and aggressive. Shank’s Wood (CR 2): This small pine and eucalyptus forest is relatively small. The goblins of the Seven Tooth tribe claim this forest as their territory, and often sneak west to raid Sandpoint’s junkyard for “treasure.” Sog’s Bay (CR 2): This shallow bay has a notorious reputation for being a shipwrecker. Dozens of sandbars and hidden perils fill the area, and the masts of unfortunate ships protrude from the shallows in multiple spots. Ships take pains to not approach the shore too closely here, so gradual is the change from sea to swamp. The waters of the
bay are thick with reefclaws, giant crabs, giant urchins, and other tidal predators and scavengers. Thistletop (CR 3–4): Perhaps the most aggressive goblin tribe in the region, the Thistletop goblins and their unusual lair are presented in great detail in Pathfinder Adventure Path #1. The Three Cormorants (CR 5): Three towering sea stacks protrude from the waves here, their crowns supporting miniature forests of eucalyptus and cypress trees. A small group of harpies dwells amid these trees, but apart from periodically tormenting goblins, the monsters don’t meddle with mainland concerns. Tickwood (CR 2): Although giant ticks are known in this wood, the primary denizens of this long, narrow forest of pines, firs, and redwoods are boars. As a result, the wood is a popular hunting ground among the wealthier residents of Sandpoint. The Tors (CR 1–7): Situated to the east of Devil’s Platter, these three groups of stony hills are known collectively as the Tors. Named after three adventurers who explored many of the nooks, caverns, and old Varisian tombs here before Sandpoint was founded, the Tors hide many new secrets and small hidden complexes that await discovery. In addition, the black dragon Scarhorn’s bitter and surly younger brother Black Fang has recently settled in an old tomb in the Tors, where he makes plans to gain enough resources and strength to return to Dragon’s Punchbowl and reclaim the home he sees as rightfully his own. Traditionally, neither dragon has bothered Sandpoint much, since they have little desire to rile up would-be dragonslayers so close to home, but the recent upset in their living situation could well drive Black Fang to extreme measures. Whisperwood (CR 2–4): Only the northern tip of this large forest intrudes into the Sandpoint hinterlands. Whisperwood runs along much of the Lost Coast, its towering redwoods a humbling testimony to the grace of nature. Solitary bugbear stalkers lurk in these woods, along with a few Sczarni hideouts. Tales of hidden Thassilonian ruins from both Shalast and Bakrakhan often lure adventurers into these woods, but most fall prey to the wolves, bugbears, and thugs who lie in wait for intruders. Wisher’s Well (CR 4–8): One of the lesser-known Thassilonian ruins in the region, this landmark consists of a circular stone tower only 30 feet high from the outside that drops away into a 100-foot-deep shaft ending in a deep pool of water on the inside. Of course, all manner of monsters dwell in the f looded caverns below the well, including a small tribe of skum and a slightly larger tribe of faceless stalkers. Both tribes are ruled by an albino aboleth named Vorimorath, who came to the region via submerged tunnels deep below, likely drawn by the promise of strange Thassilonian treasures in the f looded depths.
67
Ecology of the Oni “I spit on you all! You who have always known physical form, you have no real understanding of what it means to truly consume life! We oni embrace the world, grasp at it with a passion you fools can never approach. Golarion is wasted on you creatures. One day, oni shall possess all! We shall see, hear, smell, taste, and touch everything. You are mere pedestrians in this life! We detest you and your timidity. We oni devour, we suck the very marrow out of every experience while you nibble at the edges like toothless old women!” —From the interrogation of Temen Nuju, a kuwa oni captured by Eagle Knights north of Augustana, 4699 ar
68
Ecology of the Oni
T
he oni are a diverse group of evil spirits who take on the form of humanoid creatures so that they can enjoy the pleasures and vices of the f lesh. The most widespread of the oni are the creatures known across the world as ogre mages. They are but one variety of these evil spirits. More common in Tian Xia than other parts of the world, oni clothe themselves in a variety of humanoid bodies—often in lumbering forms with monstrous features, distortions of given humanoid breeds. When an oni first takes humanoid shape, it remains bound to that shape for the rest of its life. Its features may be oversized (large fangs or huge malformed ears), misshapen (hunched back or twisted arms), or appear in grotesque abundance (three or more eyes or six-fingered hands). While their powers are nearly as varied as their forms, all oni are shapechangers, though the shapes they assume are generally similar to their true forms. In some cases, particularly among the less powerful oni, some of their monstrous features can be seen even in these alternate forms.
magical means. Once in physical form, an oni is free to enjoy the pleasures of the f lesh (food, drink, sex, violence, power—whatever its particular obsessions might be), and often does so by subjugating humanoids or other nearby creatures, using them as slaves or dupes to indulge its material cravings. Oni and kami are diametrically opposed to one another. Kami see oni as being derelict in their duty and disconcerting threats to the natural order. However, kami are also ashamed of oni and secretly fear that they may one day fail and become oni themselves. Oni are filled with utter hatred and contempt for kami, seeing them as pathetic creatures who lack the courage to enjoy what physical life offers, naive meddlers, and fools. While the malicious cunning of oni serves them well, kami are clearly favored by the gods and this makes for a relatively equal balance between the two forces. Because both kami and oni are bound by rules greater than themselves, they can’t effectively oppose one another in direct ways. When they do clash,
History of the Oni
Minkai has long been a battleground between otherworldly spirits. These spirits are known as kami (KAH-mee) and oni (OH-nee), and the metaphysical clash between these spirits has long bled over into the Material Plane. Originally, the gods fashioned the kami to protect those parts of the world incapable of self-awareness, such as plants, stones, rivers, and even whole lands. Kami must abide by a complex series of rules put in place by the gods—rules that proscribe how they may interact with sentient creatures or manipulate events in the world. These rules are known as the Laws of Golden Perfection, and all kami must abide by their complex constraints, lest they be punished. When a kami fails to carry out its duties due to negligence, it can be cast out and lose its status as a kami. Most kami sadly accept this judgment, becoming aimless spirits who have no purpose or means of interacting with the Material Plane. However, when a kami resents this fate (a common reaction of kami turned to evil), or wanders the Great Beyond long enough to become corrupted by its despair, it transforms into an oni. There have also been documented cases of humanoid beings transformed into oni through powerful curses or as punishment for dreadful transgressions against the gods, although these are much rarer incidents. Unlike kami, oni loathe their spiritual forms and wish only to exist as physical beings. They no longer feel a special bond with unintelligent or inanimate objects, instead gravitating toward humanoids, forming bodies that mimic mortals. Being evil and corrupt, their forms are distorted and unsettling, although many oni have the ability to hide this ugliness by
Ice Yai
69
they tend to do so via proxies—physical creatures—and in so doing threaten the delicate balance. Kami often seek the assistance of mortals. Oni, by their very nature deceptive and cruel, seek to trick humanoids into aiding their causes, or bend mortal wills to their nefarious purposes through artifice, intimidation, or violence.
already despoiled by sin, tragedy, or cruelty. The type of oni a spirit transforms into is inf luenced by a wide variety of variables, ranging from the nature of what the oni spirit was before to the location into which it is born into the world of f lesh and blood. Once an oni manifests its physical body, it remains bound to that body for life. With the exception of the most powerful of their kind, oni cannot revert to their original incorporeal forms. Still, it is the oni’s mystical connection to the spirit realm which accounts for their ability to regenerate—in essence, this connection serves to reinvigorate damaged tissue, in a sense recreating it unless the damage incurred is inf licted by acid or fire. For this reason, oni are generally not distressed by sensations of physical pain; some even seek out such experiences, knowing that most physical damage is brief and temporary. It is treated as simply one more way to indulge the f lesh. This can make oni seem fearless in physical confrontations, grinning madly in response to even the most terrible of wounds. In order to understand oni, it is important to consider that these beings were once bodiless spirits tasked with protecting a material realm they now believe is undeserving of such care and concern—indeed, the physical world is to be dominated and consumed. They arrive in physical existence starved for sensory experience, and devour it ravenously. In fact, it is difficult for anyone but those who have been aff licted by an addiction to appreciate the oni obsession with indulging the senses. It is not uncommon for oni to become pathologically fixated on one specific experience and repeat it compulsively—the taste of a cherry, the feel of a feather brushed against the cheek, the visual contrast of two juxtaposed colors, the sound of a particular wind chime, the sensation of a knife’s edge penetrating f lesh, the smell of fat burning in a fire, any sensation can become an oni’s obcession. It is also important to understand that oni immoderation is also affected by their corrupted and evil natures—that is, no pleasure is more enjoyable as when it deprives or wounds another.
Oni Physiology
When a kami (or rarely, a humanoid’s soul) is transformed into an oni, the evil spirit is initially nothing more than that—a disembodied, incorporeal spirit. Most mortals are more familiar with oni once they emerge onto the Material Plane. The methods by which an oni can manifest its body on the Material Plane vary, but generally occur in places
Oni Society
Oni enter the physical world hungering for experience, but they are also filled with an angry conceit, believing that the material world has been wasted on mortals. This creates a desire to engage physical existence “correctly” (from the depraved perspective of the oni) and to punish and abuse mortals for their perceived failures to do so. The vast majority of oni scorn the worship of deities. Although they fear the gods, they give these higher beings no more than begrudging acknowledgment— the oni know that the gods smile on the hated kami rather than their own kind. Instead, oni universally embrace what could be called the three pillars of oni philosophy: maekaga (achieving
Fire Yai
70
Ecology of the Oni dominance), kaedakaga (punishing the undeserving), and tezukaga (living hedonistically). While different breeds of oni may define these concepts in different ways, they are the central tenets of every oni’s physical existence. If oni have any core philosophy at all, it is tezukaga. More sophisticated oni call their indulgent orgies of physical experience “sacred delights,” each tied to one of the five senses: the Delight of Flesh (touch, physical sensation), the Delight of Scent, the Delight of Sight, the Delight of Sound, and the Delight of Taste. While some oni are drawn to one delight more than others, many seek experiences that engage as many of the senses at one time as possible. Oni tend not to congregate together, seeking instead to infiltrate or subjugate humanoid groups that most closely match their true forms and true appetites. While two or three oni may team up for a time to achieve some end, such alliances are relationships of convenience and typically short-lived—oni do not abide rivals for power and fierce enmity between two oni is extremely common. In some ways these conf licts are predictable: one can expect to witness breathtakingly petty insults and injuries, jawdropping treachery, and melodramatic confrontations that invariably involve one or more disembowelments, and may the gods have mercy on those mortals caught up in these histrionic debacles. The only exception to this general rule is when lesser oni are in the service of one of the most powerful of their kind, the varied yai oni. Only yai can effectively maintain control over large groups of oni for long periods of time, making these types of oni the most dangerous of their kind. Most oni seek to achieve and maintain positions of authority and inf luence in humanoid societies so that they may indulge themselves while taking their rightful place in the order of things, which of course involves putting mortals in their proper place—beneath the boot of the oni. Methods for accomplishing these goals differ between varieties of oni, but they often involve subterfuge, sorcery, fraud, intimidation, and naked aggression. Oni who choose to remain solitary still find ways to cause as much misery to mortals as possible, while gratifying every whim of their infinite sensory appetites. It is said that no humanoid has ever read the Laws of Golden Perfection in their voluminous entirety, and both kami and oni contend that these tenets are largely beyond the comprehension of mere mortals. These rules bind both oni and kami as surely as iron shackles, preventing even the most chaotic oni from defying their most sacred strictures. Among the greatest of these is that which prevents open warfare between the kami and oni, driving oni to instead cajole, manipulate, or fool humanoids into serving as their surrogates. Likewise, they are forbidden to engage in specific acts that would have profound impact on the existing order of things, such as the outright
Oni and K ami in the R eal World
The oni and kami found in the Pathfinder campaign setting draw heavily upon the folklore and religion of real-world Japan. Considerable care has been paid to make sure the spirit of these creatures and the ancient legends detailing them are handled with respect. That said, creatures like oni have existed in roleplaying games for decades and have developed their own roles in various fantasy worlds. Thus, we’ve attempted to strike a stance supporting these creatures’ place in past roleplaying games that does homage to the faith and respect paid these beings in the real world, and integrates them as mystically inhabitants of Golarion. Readers seeking more details on these creatures are encouraged to explore the vast and fascinating body of work on Japanese folklore and the Shinto religion.
destruction of the works of man or the crushing of royal lineages. It is these laws that most confound the oni, for such destruction is what they most often desire. As such, oni are meticulous in the crafting of their long-term plans, and are masters at slipping through the gray areas in the laws. While an oni is forbidden from killing a king and taking his place as the ruler of a nation, no laws prevent the oni from employing non-oni agents in subverting the king’s rule, arranging his assassination, and then replacing him after deluding the nation that the oni (in its humanoid form) should rule in the dead king’s place. Ironically, these methods often result in oni having much stronger holds over the humanoid societies they invade than did the original rulers.
The Tayagama
The Improbable Saga of Jinsen Tayago and His Astonishing War with the Oni, or more simply, The Tayagama, is a myth cycle of 100 poems preserved by Minkai artists and scholars for millennia. Parts of this ancient folktale have been converted into popular songs and plays, its episodes are frequent subjects of Minkai artwork, and many pithy bits of wisdom are actually drawn directly from this enchanting, if fanciful, legend. It tells the tale of a whimsical and work-shy farm boy in the fantastical empire of Mun (a thinly veiled stand-in for Minkai), who is recruited by a kami to battle the hated oni who, having conquered seven of the eight kingdoms of Mun, are intent on ruling the eighth as well. Tayago nearly always prevails through humor, perseverance, and happy accident. The poetic cycle abounds with wit and high adventure, much of it obvious artistic and comic exaggeration. For instance, in the opening lines of the first poem, the kami so startles Tayago that he runs across a pond on lily pads, his
71
Types of Oni
feet never touching the water. However, many facts about the cruel and insidious oni and their weaknesses are revealed or at least hinted at in the epic’s lines. The final episodes of the saga involve the beloved hero’s confrontation with four separate yai oni, culminating in his defeat by Uwa Suwo, an odious wind yai. However, the gods have come to have such affection for Tayago that they strike down the wind yai and cast the farm boy’s body up into the sky, where he is transformed into a star. Every Minkai bard worth his salt has memorized the Tayagama, and can draw liberally from its rich tapestry to enlighten his art. How much of the ancient poem cycle is drawn from actual history is unknown, though more than one con artist has made a fair living selling “Tayago’s Matchless Katana,” his “Fan of Masquerade,” or one of his “Floating Stones” to eager dupes. Regardless, the epic certainly provides a vivid window on Minkai customs and social practice, and reveals many values of peasant culture (such as the importance of hard work, family, humor, and kindness) and its lasting archetypes: the haughty samurai, the weeping courtesan, the overbearing mother-in-law, the greedy merchant, and more. The nobility of Minkai are also enamored with the Tayagama, and some of the most treasured possessions of the wealthy are lavishly illuminated scrolls or codices of the lengthy saga. The following epithets and phrases spoken by the common folk are all derived from the epic, tragicomic Tayagama: May your luck exceed that of Tayago: A kind farewell. As busy as a shrine kami: A reference to how hard Tayago’s guardian kami works to keep the careless boy safe from harm; applied to an extremely busy person or one engaged in an endless, hopeless, or thankless task. White Yai: Refers to an ice yai villain in the Tayagama; an epithet used to denote a particularly emotionless or unkind person with power or authority. Besemon approaches: A reference to a fire yai in the Tayagama; applied to a person about to lose his temper in an extravagant or self-destructive way. Tree kami watch you: A reference to the fact that Tayago is often aided by friendly tree kami; a phrase for wishing someone a safe journey. Kami Kazu: The name of a f lighty and unreliable ally of Tayago; appellation for a person lacking in wisdom or something of dubious value. Desai Su Kami: Butterf ly kami whose aid to Tayago is always useless or nonsensical; epithet hurled at a foolish or ineffectual person. Ruko’s storm: Reference to an episode of the poem in which a storm erupts suddenly and causes a f lash f lood, saving Tayago from an angry cohort of samurai led by the oni Seibu Ruko; employed to describe a particularly sudden development which foils someone’s scheme or changes an outcome, usually for the better.
Theoretically, as many types of oni exist as there are types of humanoid, although the majority of oni are among one of the following races. All oni are native outsiders who share similar traits—the ability to regenerate and change their shape (as detailed on page 221 of the Pathfinder RPG Bestiary). Listed below are brief descriptions (and their altered humanoid forms) of 12 common oni. Game statistics for the ogre mage can be found in the Pathfinder RPG Bestiary, and statistics for the fire yai, kuwa oni, spirit oni, void yai, and water yai can be found in the upcoming Pathfinder RPG Bestiary 3. The yamabushi tengu is presented on page 88 of this volume, while the remaining five types of oni will be presented in upcoming installments of the Jade Regent Adventure Path. Atamahuta (ettin): These filthy, two-headed oni most resemble ettins, though they tend to be covered by soiled patches of matted fur, and their left heads always possess three or more eyes. An atamahuta oni fights with weapons traditional to the ettin, but simultaneously employs spelllike powers. An atamahuta always communicates with its right head; the left head mutters and drools constantly, but is the source of the oni’s magical abilities. Ja Noi (hobgoblin): In their true form, ja noi oni look like hobgoblins with reddish skin, coal-black eyes, and heavyboned brows. Ja noi adore carnage and are perhaps the most warlike of the oni, seeking out every opportunity to shed blood. Unlike most of their oni kin, it is not unusual for ja noi to band together, seeking to outdo one another in audacious acts of martial brutality. Kuwa (human): Oni who take human form are known as kuwa oni. Perhaps the most insidious of all oni, kuwa are notorious for their ability to cleverly infiltrate human societies at every level. Their natural appearance is less noticeably monstrous than other oni: perhaps they have blackened or pointed teeth, exaggerated eyebrows, modest horns, or other such qualities that are easy to conceal, though clearly alien and menacing when exposed. While other oni tend to seek positions of ultimate authority, kuwa more often work their way into positions where they might manipulate the f low of events and other creatures, orchestrating complex plots intended to cause maximum harm. Nogitsune (kitsune): The true form of these demonic creatures resembles that of the foxlike humanoids known as kitsune. Nogitsune oni have one or more foxlike tails which they tend to conceal, as the number is often a clue to a nogitsune’s power—the nine-tailed nogitsune, for instance, is rumored to be the most deadly of the breed. Mysterious and secretive, nogitsune are almost always solitary. Nogitsune possess magical abilities that aid their natural stealth and trickery, and they often take up residence in the seedier haunts of large urban centers, commonly assuming the role of hired assassins. Persons employing them should
72
Ecology of the Oni be wary lest they too become victims of the nogitsune’s almost limitless appetite for bloodshed. Ogre Mage (ogre): The breed of oni best known to dwellers of the Inner Sea region of Golarion is the ogre mage. Ogre mages wear ogre f lesh and either come to lead tribes of ogres through brutality and cunning, or live as lone bandits terrorizing isolated villages or poorly patrolled highways. Spirit Oni: Before an oni takes on a physical form, it exists as a disembodied spirit. These spirit oni are the least of all oni, despite the fact that their incorporeal forms afford them significant protection. A spirit oni has no physical body, but it can manifest a demonic face to interact with or attack creatures on the Material Plane. Powerful spellcasters sometimes choose spirit oni as familiars. As long as a spirit oni is bound to a mortal spellcaster in such a manner, it cannot manifest into a more powerful oni form. Yai: The natural form of a yai oni is that of a demonic giant with multiple eyes, protuberant fangs, unusually colored skin, or other monstrous features. These terrifying beings elicit one of two responses from most other oni: terrified awe or slavish obedience. The most common breeds of yai are listed below. Fire Yai ( fire giant): These oni resemble fire giants with bright red skin and black or yellow fangs. Fire yai are filled with fury and are the most impulsive of the breed—several Minkai tales tell of clever heroes taunting fire yai to act rashly. Ice Yai ( frost giant): These oni resemble 18-foot-tall frost giants with red-rimmed yellow eyes that contrast strikingly with their ice-blue skins. Fanged ivory teeth protrude awkwardly from their mouths, ice crystals rime their frosty hair and beards, and a gelid mist constantly enshrouds their frigid forms. Void Yai (varies): The most powerful of oni are known as void yai—tremendous creatures of brutal strength and fierce magical power. Alone among the oni, void yai seem to arise from giants of great power or even lesser yai. They can shift between a physical and incorporeal form, making them even more dangerous than others of their kind. Water Yai (storm giant): These oni take the form of storm giants with milky green or blue skin (ref lecting their kinship to salt or fresh water respectively) clad in elaborate multicolored kimonos of silk. These yai are the variety most given to luxury and can seem distracted or even playful, prone to acts of unexpected frivolity. Wind Yai (cloud giant): These oni take the form of 20-foottall cloud giants with long, windblown hair that always seems to be dancing in a strong breeze. Their gray skin is the color of storm clouds, and they wear rough furs and ragged leathers. Their eyes are yellow and their mouths
are filled with yellow-white fangs. A wind yai never seems to touch the ground, striding on the very air. Yamabushi Tengu (tengu): Yamabushi tengu are exceptionally wily oni who can shift their forms between that of a winged tengu-like creature and a human with a long, beak-like nose. These foul creatures tend to skulk in the shadows, most often acting as murderers and thieves who prey on the weakest and most vulnerable, for the last thing a yamabushi tengu wants is a fair fight. Other: Besides the 12 common oni detailed here, other breeds of oni are rumored to exist, with forms as varied as those of bugbears, great cyclopes, stone giants, trolls, and more.
Water Yai
73
The Flayed Man
Pathfinder’s Journal: Husks 1 of 6
M
y first look at the other side of the world was of a girl kneeling beside a corpse. They were just outside the conjuring circle we’d appeared inside. The boss and I turned back to back, scanning the room for movement as our eyes adjusted after the white f lash of teleportation. The boss drew his sword. The big knife was already in my hand. Beside us, Arnisant tensed but remained silent. In just a few months, the boss had him trained well. Better than me, he liked to say. Funny guy, the boss. A closed sliding panel door was the only exit. Except for the f licker of light from huge candles in each corner, nothing stirred. The boss went to the corpse. I went to the girl. That’s pretty much the difference between us.
The dead guy had to be our host, a Pathf inder named Yamana Hisao. I f igured the girl for his daughter or a servant. “Come here, kid.” She looked up, and I realized she was not a child but a tiny young woman. When she saw my face, she said a few quick foreign words. “Help me out here, boss.” “Hm?” One of his hands came away bloody from the corpse. “Of course.” He plucked a riff le scroll from one of the little holsters on his belt and thumbed a spell at me. My nose tickled. I suppressed a sneeze until the feeling passed. “You all right, miss?” “I am unharmed.” Her words were perfectly understandable with the spell on my tongue.
74
The Flayed Man “What’s your name?” She glanced back down at the corpse until I took her hands and pulled her up. In this light I should have passed for human, but she shuddered at my touch. “I am Kazuko, Yamana’s housekeeper.” Her eyes and hair were black. Her skin was the color of seashells except for her f lushed cheeks. The top of her head barely reached my chin, which made her tiny compared to Chelish women. “Well, Kazuko, you’re safe now. I’m Radovan. This is the count. He’s good at sorting out this sort of thing.” “What sort of thing?” “Mysteries.” Count Varian Jeggare was half a head taller than me and slim as a rapier. Like me, he was not fully human, but his half-elven ancestry made the girls f lutter, not f linch. If he had half my charm and rugged good looks, he’d be a lady-killer. The boss returned the corpse to its original position, slumped facedown over its left arm. He tugged a handkerchief out of his breast pocket and wiped the blood from his fingers. “Is there anyone else in the house?” he asked Kazuko. He didn’t need a spell to communicate. The boss collected languages the way he collected books. “No, honorable sir.” “Wait here,” he said. “Come, Arnisant.” The hound took his place just behind his master’s left heel. The boss plucked another riff le scroll from his belt and stepped out of the room. I showed Kazuko the little smile. “How long you been keeping house for Yamana?” She kept her eyes on the f loor. “Almost ten months. I assisted his former housekeeper while she was with child. Since she gave birth, I have worked alone.” “You live here?” “No,” she said. “Usually I am home at this hour, but tonight Master Yamana asked me to attend his guests.” “That’d be us. He good to work for?” “Yamana was kind and generous to all of his servants.” “You can’t think of anyone who’d want to hurt him?” Kazuko considered the question. “Yamana had no enemies.” She seemed more shy than evasive, but her eyes told me she understood I was interrogating her. “What do you know about Pathfinders?” “Yamana was one, but he no longer traveled. Sometimes he provided information for colleagues visiting Oda. He bought this house from a fellow conjurer and maintained this room as a place where Pathfinders could transport their colleagues from distant lands.” That information jibed with what little I knew of Yamana and our reason for being here. We’d left Absalom
in a hurry after the Decemvirate, the boss’s bosses, had summoned him to some secret meeting. Whatever they’d discussed, it made him mad as hell. When he’s irritated, he complains for hours. When he’s furious, his lips turn white and he speaks in ordinary sentences instead of his usual f loral arrangements. The boss had sent me to fetch supplies before returning to the Pathfinder headquarters in Absalom. It was all high ceilings and arches until we arrived at the summoning chamber, a hollow granite cube. There, a tall masked man—at least, I think it was a man under all those robes— stared daggers at the boss until a portly woman arrived to cast the spell that sent us here. Loud voices outside interrupted my reverie. The law had arrived. Kazuko led me through a few chambers of wooden frames and paper windows. The boss and Arnisant joined us at the front door, and together we stepped out into a garden lit only by the waxing moon. The Decemvirate’s conjurer had teleported us from Absalom in the middle of the afternoon, but here on the other side of the world it was past midnight. Thinking how far we’d traveled and whether we’d gone across Golarion, through it, or neither made me dizzy. I put it out of my mind. Outside the gate stood three men, two tidy guards and their shabby-looking commander. The tallest of them was still an inch or two shorter than me. The guards stiffened at the sight of Arnisant. The commander made a short bow. His men bowed a couple inches deeper. The boss murmured in Taldane, “Return the gesture. Lower than the leader, but higher than his men.” I did that, but the boss himself barely nodded. The commander noticed the pecking order and accepted it as his cue. “Takeda Yoshio of the eleventh precinct of Oda city, inspector second class.” “Count Varian Jeggare of Imperial Cheliax, venturecaptain of the Pathfinder Society, and invited guest of my late colleague, the honorable Yamana Hisao.” Takeda bowed again, this time slightly lower. His men did the same, but their eyes f licked between Arnisant and me. I tipped them a wink to give them something to think about. Kazuko led us back into the house. At the threshold, one of Takeda’s men pulled a face as the hound followed. All three constables looked at me like I should do something about it. The boss noticed the exchange and gave me a discreet Pathfinder hand sign. I showed Arnisant an obvious signal for “stay,” and he did. The wolf hound was born in Ustalav, where the people love dogs, even giving them the run of the streets in some towns. In Greengold we couldn’t bring him inside a tavern,
75
and in Absalom we tried four inns before we found one where the hound could sleep at the foot of the boss’s bed. When we presented ourselves to the Decemvirate, the boss told me that Arnisant had to appear to be my dog rather than his, lest someone among the Decemvirate consider the count unclean. They paused at the entrance to take off their shoes. Kazuko’s were a pair of wooden clogs that looked uncomfortable, while the men’s were thick-soled slippers. I looked to the boss. He removed his fancy buckled shoes. I took off my black leather kickers. At the scene of the crime, Takeda took one look at the summoning circle and a longer one at me. He didn’t like the hint of Hell in my eyes. He didn’t make such a good first impression either. Even from a few feet away, Takeda smelled like a man who hadn’t been home for a couple of days. He’d shaved the top of his head and tied his hair back in a sloppy queue. His robe needed mending here and there. The zinnia leaves printed on its fabric had faded. Unlike his men, who wore two swords in their sashes, he had only a single short blade. The boss stayed back as Takeda examined the body. Kazuko stood two steps behind the count, meek as a mouse. Despite her timid demeanor, she didn’t look away as the constables turned over the body and peeled away the bloody robes. Someone had skinned Yamana’s left arm with a sharp knife. The edges were perfect at shoulder and wrist. There were no other obvious wounds, but Yamana’s face was all twisted up. His open eyes peered down and to the left. I got the idea that those who’d f layed him made him watch. Takeda stepped back and pinched his lower lip. I caught one of his men smiling at the other. They’d seen that reaction before. The smile vanished the moment the man saw me looking. “Please do me the honor of answering a few questions,” said Takeda. He asked the obvious things.
The boss didn’t go into detail about our mission in Oda. When he admitted that he had touched Yamana’s body, Takeda asked why. “To ascertain whether his life was beyond saving,” said the count. “And to uncover any clues the killers left behind.” “You say ‘killers,’” said Takeda. His tone wasn’t sly, but I figured it was a trap. The boss didn’t step into it. “There were at least three assailants. No fewer than two to restrain Yamana, and one to f lay the tattoo from his arm.” “What makes you think he had a tattoo?” “Look here.” He turned one of his rings around and cupped his palm. He stroked the diamond with his thumb, triggering a bright light. He shone it on Yamana’s face. “Observe the marks on either side of the mouth and these thread fragments in the teeth. They indicate that Yamana was gagged with a red cloth. Finding no such cloth here, I postulate that the killers took it away. Also note this ligature around the throat. It trends upward across the outer jawbone. At this angle, the garrote would not have caused asphyxiation. Thus it is probable that Yamana was not strangled but constrained by someone standing behind him. That person stands f ive or six inches taller than Yamana, whose height I estimate as f ive feet f ive inches.” I watched the faces of the locals while the boss did his thing. Their skepticism gradually relaxed as the boss listed a dozen details they had overlooked. It had been a long time since I’d heard him go at it with such confidence, but he was back in fighting trim after our expedition in Ustalav. All it took was some distance from court, from his peers—and, most of all, from his wine cellar. “Here at the wrist you will note a ligature similar to the one around the neck. The bruise on the back of the hand indicates a knot in the cloth. I expect a man, another strong one, held Yamana’s arm stretched out from his body—a position consistent with the copious blood spatter on the f loor—as a third party cut away the tattoo.” “But how, honorable count, do you know there was a tattoo?” Takeda’s polite tone kept the question just short of an accusation. The boss has a knack for keeping a straight face when he’s showing off. “The presence of a tattoo is suggested by the particular course of the f laying implement. See here in the exposed muscles the deeper incision along the inner arm? It
“Kazuko is cute as a bug, but that won’t protect her if the killers decide to take out the only witness.”
76
The Flayed Man is an irregular but not random path, suggesting that those removing the skin wished to cut around the borders of a pattern, in this case a sinuous line. Perhaps Yamana had a snake or dragon tattooed on his arm.” Takeda rubbed the back of his neck and smiled. “Your observations are most keen, honorable count.” “How many previous victims have you found?” Takeda blinked. The count was too polite to explain what I’d already sussed out: the inspector had obviously been without a bath for days, too busy on the case to go home. “Yamana is the third such victim.” “Since you are the investigating official, may I assume all of the murders have occurred within the eleventh precinct? “The second victim was found within the twelfth, but I retain jurisdiction.” “When did they begin?” “We found the first victim two nights ago, another last night.” “And the others were f layed in areas other than the left arm, yes?” Takeda smiled his appreciation. Back in Cheliax, the boss had trouble with officials afraid he was out to steal their glory. This guy seemed more concerned about getting the job done. “Right and left legs. “And the subjects of the missing tattoos?” “A tengu and a yeti.” “Miss Kazuko, can you tell us what your master had tattooed on his arm?” I was looking at her when the count asked the question, so I saw her shock at the question. “I was my master’s housekeeper only.” “Did he have a wife?” “My master’s wife died seven years ago.” “A concubine?” “No.” “A body servant?” She shook her head. The count returned his attention to the inspector. “Have you compiled a list of the city’s tattoo artists?” Takeda gestured, and one of his men presented a scroll. “There are more than one hundred such persons in Oda,” said Takeda. “With our meager resources already stretched thin, we have only begun to inquire.” “You may find it useful to prioritize the interrogations by neighborhood,” said the boss. He scanned the list of names. “If I may be so bold as to offer a suggestion...” “Please, honorable count, be so bold.” “First question those tattoo artists who work in proximity to the victims. It will be helpful to annotate a map.” Takeda dispatched one of his men to summon a stretcher for Yamana and to return with a map. The other he set to
guarding the gate. When they were gone, he straightened his robes and bowed low toward the count. “How else would you advise me, honorable Count Jeggare?” The boss returned the bow, lower than before, but still not as low as Takeda. “Forgive my manner, Inspector Takeda. I mean no disrespect to the efforts you and your men have undertaken. It is all too easy for an armchair investigator like me to dispense opinion after the hard work of dutiful men.” Yamana accepted the compliment with a bow. They did it again. I’d never seen so much bowing before, and I’m from Cheliax. “You are too kind, honorable count.” They compared bows again, so I sidled over to whisper to Kazuko. “What’s a tengu?” “A bird spirit,” she said. “Half man, half raven. They are thieves and cutthroats.” “Shapeshifters, is it? We’ve dealt with their kind before.” Kazuko shot me a skeptical look. “You have never been to Minkai, have you?” I shrugged. “Tengus do not change shape. They are always half men, like—” She covered her mouth, but I saw the smile. Go on, I thought. Say, “Half men like you and your boss.” She didn’t. The boss and Takeda weren’t the only polite ones in the room. I’d heard enough about tengus. “What’s a yeti?” Half an hour later, more guards arrived to remove Yamada’s body. As they departed, I caught the names of the first two men, Shiro and Osamu. They followed Takeda and the boss as they inspected the grounds and house. I followed them, just in case my Hell-touched vision picked up something the boss’s elven eyes missed. No chance of that with the moon all fat and bright. In the dark, I’m the one you want searching for that coin you dropped. In the moonlight, the boss is your man. We left Arnisant to stand sentinel in the yard. If anything bigger than a squirrel put its head over the wall, he’d let us know. I sat in the kitchen with Kazuko as she boiled water for tea. It was ready by the time the other men returned. They accepted the porcelain cups without looking at her. When it was my turn—last, of course—I nodded over the cup to thank Kazuko. She blushed and looked away. She’d come around. The boss and Takeda consulted the list of tattoo artists, marking their locations on the map. Comparing them with the sites of the murders, they narrowed the list to nine. “It is possible that the murdered men went to an artist outside of their district,” said Takeda. “That is assuming they
77
received their tattoos from the same source.” His voice was weary, like he was all too used to running down dead leads. “Indeed,” said the count. “Yet when time is of the essence, we must explore the probable before the merely possible.” Takeda nodded agreement. “Here.” He pointed to one of the marks indicating a tattoo shop. “This is the Felicitous Moon. Its owner is known throughout the city for the quality of his work.” “Is his price high?” Takeda nodded. “Yamada was a man of substantial means. What of the other victims?” “Both were wealthy.” “And yet there was no evidence of theft at any of the murder scenes?” Takeda shook his head. “The absence of other robbery convinced me the thieves are after the tattoos alone.” “The people of Oda are fortunate to have such a man as you investigating this crime.” Takeda bowed. “If you and your man do not have pressing business elsewhere, perhaps you would be so good as to accompany me to the Felicitous Moon. I would be grateful if you would offer your advice as we proceed with the investigation.” They weren’t fooling me with this little pantomime, but Takeda’s men looked impressed. They stood a little straighter, proud in the ref lected glory of the boss’s compliment. I’d have bet a fat purse that the boss and Takeda arranged this mummery while the guards were busy elsewhere. Or maybe guys like them just knew when to put on the show. While the boss protested that we would only be in the way—a ruse even Shiro and Osamu saw through—I watched Kazuko. She had become still once she saw that we were about to leave her there alone. “Want me to walk her home?” I asked the boss. Only then did I realize the problem: I didn’t know the way to this tattoo shop. It would have to be one of Takeda’s men. He considered the question for a moment before addressing Takeda. “Were there witnesses to the previous murders?” Takeda pinched his lower lip. “I take your meaning.” He looked at his men, and I could see each of them trying to make himself less conspicuous than his partner. “I need at least one of my men to maintain this site.” “Please do not trouble yourselves,” said Kazuko. “No,” said Takeda. “It is best you remain with us until I can assign protectors to watch over you.” Kazuko accepted his decision by lowering her gaze. “We shall await you outside the gate,” said the boss. Beyond Yamada’s garden was a narrow lane bordered on one side by high brick walls, on the other by a row of single-story houses. The moonlight turned the roof tiles blue, but I could barely see past the f lared edges. I looked straight up, and Desna smiled on me. There was her Stair
of Stars. My gaze climbed it to Cynosure, the pole star, and I got my bearings. To the north the alley disappeared into darkness, although I could make out a cat prowling east to west at the end. To the south was a wider street full of narrow townhouses. “Questions?” asked the boss. He likes to quiz me during a case, to see how well I’m keeping up. “I’m good,” I said. “You want to know what a yeti is?” He started to answer before realizing I was having a joke. “This is not the time for levity,” he said. “Our only contact is dead, and there is no sign of the pearl in his house.” “The pearl?” “It is the pleasure of my... superiors,” he nearly choked on the word, “that we recover a rare magical pearl. Or rather, the husk of a pearl that once held a powerful magic, now expended.” “What for?” “It was deemed unnecessary to supply us with the details.” “Huh,” I said. “I guess you pissed off some high muckymuck in your little club.” He glowered. “Not the time for levity.” “Got it.” “What is your impression of Takeda?” “I like him. He doesn’t seem too crafty, but he’s smart. He’s tired, but it doesn’t make him irritable. His men look to him.” The boss nodded. He often already knows my opinion, but he likes to hear it all the same. He grew up in a high tower, me in the gutter. We see things from different angles, and he likes to compare the difference when there is one. He calls it “triangulating.” “Did you notice his wakizashi?” The spell that let me understand the local lingo also let me know that word meant the shorter of the two blades the other men wore. “Yeah, he doesn’t have the long one. Maybe he lost it in a bet.” “No, the katana is not only a weapon but a sign of station. Takeda and his men are samurai, knights.” “Knights lose at dice.” “Samurai do not lose their katanas.” “Maybe he likes fighting close-up.” That’s another difference between the boss and me. He fights at the end of a long blade. I like the personal touch. “What of the housekeeper?” “Kazuko? She’s cute as a bug. I think she likes me.” He sighed. “I mean, what is your impression of her testimony?” I knew what he meant. “She seems straight enough. Scared, but not so much that I figure she’s putting it on.” “She left the house to summon the constabulary,” said the boss. “Upon finding her employer dead, she could have removed the pearl to a hiding place.”
78
The Flayed Man “In that case, why did she come back?” He shot me a disappointed look, but I got it. “Sure, sure, to throw us off the scent. But what would a servant girl need with some magic—or formerly magic—pearl? You’d expect her to steal something she could use or fence.” The boss, like his peers, tends to suspect the servants first. A sound on the nearest roof alerted me to the intruder. The boss heard it too, but before his hand could touch his sword, I whipped him around against the wall, under the sheltering eaves. That move made me his shield against the second attacker, the one we hadn’t heard. Metal struck divots in the bricks to either side of me. Three solid blows hit me in the neck and shoulder. I glimpsed one of them out of the corner of my vision. It was a throwing star the size of a biscuit. Arnisant barked to wake the moon. The boss dipped low and stepped to his right. A riff le scroll in his hand came alive, shooting a beam of white f lame under my arm and across the alley. It struck a figure crouching on the opposite wall. The fire lit up his black clothes and washed over his leather mask. There was something eerie about that mask. Its surface was irregular but all black. I couldn’t make out the details. His target marked, Arnisant leaped at our attacker. The wolf hound was big enough to put his paws on my shoulders and look down at me. His jaws snapped at the man’s hands. Startled, the masked man fell back behind the wall, slapping at the f lames. The big knife was in my hand, a pair of throwing knives in the other. I turned my back on the boss and scanned the wall for any other movement. Seeing none, I whirled diagonally away to have a look at the roof. Two more figures knelt there. One f ired a little bow. I swept out my arm to def lect an arrow, but instead a hard lead ball deadened my wrist. I lost the big knife. The second figure f lung more stars. One tugged at my jacket as it passed through the leather.
“Ninja!” yelled Shiro. Through the boss’s spell, I understood the word to mean “spy,” “assassin,” and something more than either of those words. Shiro and Osamu rushed out of Yamada’s yard, each drawing his katana. Behind them, Takeda pushed Kazuko behind the shelter of the gate and raised his wakizashi over his head. His sword drawn and a riff le scroll in his other hand, the boss moved toward me, but I waved him back. I f licked my knives at the archer. One hit, but I saw the other wink in the moonlight as it f lew past. The hit didn’t drop the man, but it spoiled his aim. Shiro cursed as another lead shot cracked off the pavement at his feet. Osamu fumbled with a whistle he wore on a string around his neck, but by the time the shrill note woke the neighborhood, the assassins were gone. We withdrew to Yamada’s yard and stood near the gate. Arnisant followed close behind. He coughed up a pair of black-gloved fingers. I kicked them away before he could gobble them up again. The boss opened my jacket and eased a ragged dart out of my neck. It hurt worse coming out than it had going in. He examined the star and took a whiff of it. “Not poisoned,” he said, sniffing again. “Probably.” “Terrific.” More constables’ whistles answered Shiro’s call. Judging from the sound, they were close. I shrugged off my jacket to let the boss remove the other darts without spoiling the leather. Kazuko tore strips off her hem to bandage me. “You don’t have to,” I said, but it was too late. And it was a good thing she’d done it, because my bleeding was, as the boss might say, copious. The count gave me a crystal f lask the size of my thumb. It was one of the healing potions he’d had me buy in Absalom. “You sure?” I knew how much they’d cost. “Drink it,” he said. “And pray we do not need them all before this night is through.”
“Takeda clearly has the respect of his men—and for good reason.”
79
Bestiary Even crude beasts and parasites take on monstrous shapes in the swampy rivers and boggy forests of the Varisian frontier— if “frontier” and “civilization” can truly be distinguished in such a crude land. In my first week upon the Yondabakari I saw five of my porters consumed. But not by firepelt, or giant lizard, or titanic serpent—no, their deaths weren’t meant for such creatures of passable dignity. Those men lost their lives to water bugs. I can imagine few more pathetic deaths, yet daily this accursed land confounds me with whole dimensions of indignities no gentleman has ever sunk so low as to imagine. —Darvayne Gios Amprei, Merciless: Abendego, Belkzen, Varisia, and Other Hells
80
Bestiary
D
angers from the Varisian wilds f ill out this month’s entry into the Pathf inder Bestiary, along with the f iendish masters of storms and scavengers. Cued to the themes and settings of this month’s adventure, “The Brinewall Legacy,” any of these creatures would make f ine optional encounters as the characters journey across some of Varisia’s most dangerous hinterlands.
Creating A dditional Caravan Encounters
You can use the caravan encounters presented here as guides for creating additional encounters of your own design. Use the following guidelines. Combat Encounter: Designing stats for a combat encounter is relatively easy—simply pick a CR, then use Table 1–1 from page 291 of the Pathfinder RPG Bestiary to set the encounter’s AC and hit points. Its attack should equal the high attack roll, while its average damage should equal that CR’s high average damage (you can assign different dice and different modifiers as needed to hit the total). Some more dangerous combat encounters might utilize special attacks, but you should avoid this additional level of complexity for now. See the third adventure in this campaign, “The Hungry Storm,” for advice on how to build combat encounters that utilize special attacks. Non-Combat Encounter: Non-combat encounters can grant temporary bonuses or penalties to caravan rolls or speed, can grant or take away supplies, and can even give the caravan a chance to hire new travelers. If you wish to assign a Stability or a Resolve check to an encounter, a DC equal to 10 + the caravan’s level is considered an average challenge. Add or subtract from this DC to make the roll as simple or tough as you wish.
Caravan Encounters
In this month’s adventure the player characters have the opportunity to join and customize their own caravan, launching into a journey across Varisia. But their trek is far from safe. Dangerous weather, unscrupulous criminals, and savage monsters all conspire to put an end to the PCs’ f ledgling adventuring career. As the caravan travels north, there’s a 10% chance of an encounter each day. Encounters indicated with an asterisk have a 50% chance of occurring at night while the caravan is camped. All other encounters occur while the caravan is on the move. Encounters don’t occur if the caravan camps at a settlement. If an encounter occurs, roll on the following table to see what the PCs have encountered. Note that all of the following encounters are caravan encounters and use the caravan combat rules found online in the free Jade Regent Player’s Guide. Bad Weather: Fog, rain, high winds, or some other form of bad weather slows the caravan, reducing its overall speed by half for the day unless the caravan makes a DC 12 Security check. Bandit Ambush (CR 2): The caravan must make a DC 15 Security check to notice this ambush in time to react; if this check fails, the caravan takes a –2 penalty to its Armor Class and on attack rolls for the f irst round of combat. The ambushers could be a group of bandits, a gang of highwaymen, or even a small tribe of Nolander barbarians. Regardless of their makeup, the ambushers’ stats and aggression are identical (AC 14; hp 20; Attack +4; Damage 2d6+3). They f ight to the death. If defeated, 1 cargo unit of treasure worth 250 gp can be recovered. Goblin Raiders (CR 1/2): A shrieking band of goblins wielding dogslicers and broken branches attacks the caravan (AC 11; hp 10; Attack +1; Damage 1d8). If the PCs have a horse train, the goblins are more timid than normal and take a –2 penalty on attack rolls. If defeated, a search of the goblins reveals a single cargo unit of treasure worth 125 gp. Ogre Assault (CR 3): A small band of ogres lumbers out of the surrounding foliage to attack the caravan (AC 15; hp 30; Attack +6; Damage 3d4+6). The ogres f lee if reduced below 10 hit points. If they’re slain, looting produces 2 cargo units of treasure worth 400 gp each. Treacherous Road: The road conditions become hazardous. They might be muddy, partially f looded, or
Varisia Caravan Encounters d% Roll 01–15 16–30 31–50 51–55 56–65 66–100
Encounter Bad Weather Bandit Ambush Goblin Raiders Ogre Assault Treacherous Road Varisian Caravan
even blocked by a fallen tree. The caravan must make a DC 14 Security check or lose 2d6 miles of progress for the day as the situation is dealt with. Varisian Caravan: The PCs encounter another Varisian caravan heading in the opposite direction. With a DC 12 Resolve check, the PCs can befriend the other caravan. If this encounter occurs during the day, the caravan can give the PCs advice as to what lies ahead, reducing the chance of an encounter to 5% per day for the next 1d6 days. If the encounter occurs during the evening, the caravan agrees to share their camp, allowing the PCs to trade with them. The caravan can purchase up to 2,000 gp in objects, and can offer anything worth 600 gp or less for sale.
81
Aquatic Insects
In swift-f lowing rivers and mysterious lakes dwell the immature forms of many strange insects, numbering in the hundreds in a mere 1-square-foot area. Normally, aquatic insects are tiny, measuring in fractions of an inch, but in some areas of Golarion, monstrous versions of terrifying sizes roam free and seek livelier meals than mere algae.
Belostomatid Six powerful legs, each ending in a hooked claw, jut from the shieldlike body of this massive insect. Belostomatid
XP 800
CR 3
N Large vermin Init +1; Senses darkvision 60 ft., tremorsense 60 ft.; Perception +0 Aura stench (DC 15, 3 rounds) DEFENSE
AC 18, touch 10, flat-footed 17 (+1 Dex, +8 natural. –1 size) hp 30 (4d8+12) Fort +7, Ref +2, Will +1 Immune mind-affecting effects OFFENSE
Speed 20 ft., fly 20 ft. (poor), swim 40 ft. Melee 2 claws +6 (1d4+3 plus grab), bite +6 (1d8+4 plus digestive enzymes) Space 10 ft.; Reach 10 ft. Special Attacks digestive enzyme STATISTICS
Str 19 Dex 13, Con 16, Int —, Wis 11, Cha 2 Base Atk +3; CMB +8 (+12 grapple); CMD 19 (27 vs. trip) Skills Fly +1, Stealth +0 (+8 in water), Swim +14; Racial Modifiers +8 on Stealth in water SQ hold breath ECOLOGY
Environment temperate lakes, rivers, or swamps Organization solitary Treasure none SPECIAL ABILITIES
Digestive Enzymes (Ex) A belostomatid injects a corrosive enzyme into its prey that both paralyzes and liquefies flesh. A creature struck by the belostomatid’s piercing bite must succeed at a DC 15 Fortitude save or be paralyzed for 1d4 rounds. For every round the creature is paralyzed it takes 1d2 points of Constitution damage. Hold Breath (Ex) A belostomatid can hold its breath for a number of rounds equal to 4 times its Constitution score before it risks drowning. The belostomatid is the monstrous form of its diminutive counterpart, a 5-inch-long “giant” water bug commonly known as a “toe-biter.” A monstrous belostomatid has a
f lattened, oval-shaped body measuring 12 feet long, and four rear, oarlike legs, which it uses to thrust through the water. The belostomatid’s front two legs are thick and end in sharp, single-tipped claws, which it uses to slay its prey. Two large black eyes are mounted on each side of the creature’s rostrum, and it uses its 2-foot-long, beaklike proboscis to inject its deadly acidic enzymes into its victims. Belostomatids are ambush predators. They hide amid f loating snags and piles of debris in still and slow-moving waters, seamlessly blending in with their surroundings despite their size. With a powerful surge forward, a belostomatid grabs its prey, thrusts its rostrum deep into the prey’s body, and begins pumping a paralyzing digestive enzyme into its prey, dissolving it from the inside out.
Water Strider Swarm Countless thousands of long-legged water bugs glide soundlessly over the surface of the water, skimming over it in a wave of twitching bodies. Water Strider Swarm
XP 400
CR 1
N Diminutive vermin (swarm) Init +4; Senses darkvision 60 ft., tremorsense 30 ft.; Perception +6 DEFENSE
AC 18, touch 18, flat-footed 14 (+4 Dex, +4 size) hp 9 (2d8) Fort +3, Ref +4, Will +0 Defensive Abilities swarm traits; Immune mind-affecting effects, weapon damage Weaknesses swarm traits OFFENSE
Speed 10 ft., swim 20 ft., water walk 30 ft. Melee swarm (1d6 plus blood drain and distraction) Space 10 ft.; Reach 0 ft. Special Attacks blood drain (1d2 Constitution), distraction (DC 11) STATISTICS
Str 1 Dex 18, Con 10, Int —, Wis 10, Cha 2 Base Atk +1; CMB —; CMD — Skills Acrobatics +6 (+12 jump), Perception +6, Swim +3; Racial Modifiers Acrobatics (+6 jump), +4 Perception SQ water walking ECOLOGY
Environment temperate lakes, rivers, or swamps Organization solitary or pair Treasure none SPECIAL ABILITIES
Water Walking (Ex) Water striders are covered with waterrepellent hairs that prevent them from sinking beneath the water’s surface. The swarm’s movement speed across water is 30 feet.
82
Bestiary Water striders are aquatic insects that skate across the surface of still water. Their bodies are long and narrow, with an individual measuring less than 1 inch in length. The body and legs of a water strider are covered with a layer of water-repelling hairs, making it possible for the strider to resist the surface tension of the water. The insect stands on its front and rear legs, and pushes against the water surface with its middle legs to propel itself forward. Water striders are also excellent jumpers, launching themselves distances of up to 5 feet. Any movement on land is limited to jumping. Swarms of particularly vicious water striders commonly gather at the edges of bodies of water, attacking anything that disturbs the surface of their pools.
Giant Hellgrammite More than a dozen segmented black legs propel this giant, caterpillar-like insect, its thick head dominated by a pair of powerful, gnashing pincers. Giant Hellgrammite
XP 1,600
CR 5
N Large vermin (aquatic) Init +0; Senses darkvision 60 ft., Perception +5 DEFENSE
AC 16, touch 9, flat-footed 16 (+7 natural, –1 size) hp 52 (7d8+21) Fort +8, Ref +2, Will +1 Immune mind-affecting effects
Giant hellgrammites are the fierce and predacious larvae of dobsonf lies of terrifying size. While their diminutive brethren measure several inches long, the monstrous variety measure 10 feet long and weigh up to 800 pounds. The body of the giant hellgrammite is long and f lattened, and generally ranges from dark brown to reddish in color. The front third of its body consists of a well-armored head and thoracic segments, with stout, segmented legs. The head possesses a fearsome set of jaws, small antennae, and a set of clustered eye spots on either side. The posterior twothirds of the hellgrammite consist of nine densely haired abdominal segments, each with a pair of lateral filaments and gill tufts underneath for underwater breathing. The hellgrammite’s abdomen ends in pair of terminal prolegs, each with a pair of hooks, which aid the creature in climbing or anchoring itself in fast-moving currents, and can be used in a tail slap to slash at its enemies. The giant hellgrammite is a simple but ferocious predator. It latches onto its prey with its deadly jaws and proceeds to crush the life from it, feeding on the body after its victim can no longer struggle. The hellgrammite often attempts to drag the prey back to a protected area between or behind stream boulders, or down to the bottom of a deep side-pool. The strength of a hellgrammite’s jaws is so great that, even in death, they clench tightly and do not relinquish their grip.
OFFENSE
Speed 30 ft., swim 20 ft. Melee bite +8 (2d8+4 plus grab), tail slap +3 (1d8+2) Space 10 ft.; Reach 10 ft. Special Attacks death grip, constrict (2d8+4) STATISTICS
Str 19 Dex 11, Con 16, Int —, Wis 9, Cha 2 Base Atk +5; CMB +10 (+14 grapple); CMD 20 (28 vs. trip) Skills Climb +8, Perception +5 (+9 in water), Stealth +1 (+9 in water), Swim +7; Racial Modifiers +4 Perception (+8 in water), +8 Stealth in water SQ amphibious ECOLOGY
Environment temperate rivers or streams Organization solitary or pair Treasure none SPECIAL ABILITIES
Death Grip (Ex) Upon its death, a hellgrammite’s massive jaws close tightly and lock. Any creature or object that is grappled at the time of the hellgrammite’s death takes an additional 1d8+2 points of damage per round unless it makes a DC 22 Escape Artist check, makes a DC 20 Strength check, or deals an additional 10 points of damage to the hellgrammite’s corpse to escape.
83
Demon, Hala
DEFENSE
Skin the color of thunderheads and wings made for soaring through the most violent winds mark this lean, cyclopic being as a master of terrible storms. The sound of shrieking wind emanates from its mouth full of needle-sharp teeth. Hala
XP 1,200
CR 4
CE Medium outsider (air, chaotic, demon, evil, extraplanar) Init +4; Senses darkvision 60 ft.; Perception +8 Aura stormwind aura
AC 18, touch 14, flat-footed 14 (+4 Dex, +4 natural) hp 37 (5d10+10) Fort +6, Ref +8, Will +1 Defensive Abilities vengeful wind DR 10/cold iron or good; Immune electricity, poison Resist acid 10, cold 10, fire 10; SR 15 Weaknesses enemy of dragons and eagles OFFENSE
Speed 30 ft., fly 60 ft. (perfect) Melee 2 claws +9 (1d4+3), bite +9 (1d6+3) Special Attacks hailstorm Spell-Like Abilities (CL 5th; concentration +7) At will—alter winds (DC 13) 3/day— gust of wind (DC 14), river of wind* (DC 16) 1/day—control winds (DC 17), summon (level 3, 1 hala 40%) * See the Advanced Player’s Guide. STATISTICS
Str 16, Dex 19, Con 14, Int 12, Wis 11, Cha 15 Base Atk +5; CMB +8; CMD 22 Feats Flyby Attack, Hover, Weapon FinesseB, Wingover Skills Acrobatics +12, Escape Artist +12, Fly +20, Intimidate +10, Knowledge (planes) +9, Perception +8, Stealth +12 Languages Abyssal, Celestial, Draconic, telepathy 100 ft. ECOLOGY
Environment any (Abyss) Organization solitary Treasure standard SPECIAL ABILITIES
Enemy of Dragons and Eagles (Ex) Halas are hated enemies of dragons and eagles. Those creatures gain a +2 bonus on attack and damage rolls against hala demons. Hailstorm (Su) A hala can call down hailstones from surrounding clouds once every 1d4 rounds as a standard action. These hailstones deal 1d6 points of bludgeoning damage and 1d6 points of cold damage to all creatures within a 20-foot radius that have no overhead cover. A DC 14 Reflex save halves this damage. The save DC is Constitution-based. To use this ability, the hala must be outside and there must be clouds in the sky. Stormwind Aura (Su) Halas surround themselves with a buffeting shroud of supernatural, windstorm-force winds. These winds shield a hala from any other wind effects and form a shell of breathable air around it, allowing the hala to breathe underwater. Ranged weapons and gases directed toward a hala are affected as the spell wind wall. Vengeful Wind (Su) Anytime a hala takes damage from a critical hit, a powerful blast of wind explodes forth in the direction of the attacker. This blast takes the form of a 60-foot-long gale, treated as a gust of wind spell,
84
Bestiary directed from the hala toward the opponent that scored the critical hit against it (if that creature is more than 60 feet away, the wind is aimed in its direction but doesn’t come close enough to affect it). This wind is also charged with electricity. Any creature in or that enters the area of effect must make a DC 14 Reflex save or take 3d6 points of electricity damage. The save DC is Constitution-based.
Halas in Mythology
The “hala” or “ala” is a creature exclusive to the folklore of Bulgaria, Macedonia, and Serbia. Halas are considered the demons of bad weather, leading severe thunderstorms and hail over fields, vineyards, and orchards with the sole purpose of destroying the crops or pillaging them. It was believed that halas would “drink the crops,” or steal the crops and give them to another village, thus explaining why some villages were more prosperous than others. Another common belief was that the voracity of halas was so extreme that they often tried to eat the sun or the moon, causing eclipses. The hala’s general appearance in folklore is quite diverse, and ranges from a large, indistinct form of black winds and clouds to a serpentine demon with huge wings and a sword-like tail. Tales also credit halas with a range of abilities, such as causing those who see them to go mad, blind, deaf, or lame. A hala could also possess humans, overwhelming them with insatiable hunger. The Serbians believed that dragons and eagles were the chief enemies of the hala. Dragons were seen as the guardians of the fields and harvest, who wielded lightning against the hala; hence, lightning and thunder represented a fight in the clouds between dragons and halas.
Hala demons are commonly known as storm demons. Bound to service by Pazuzu, these demons ride the winds across the Abyssal skies, lurk within dark and turbulent clouds, and act as his scouts and spies. Halas have a single, blood-red eye, an enormous mouth lined with razor-sharp teeth, and lengthy horns growing from their heads. A typical hala stands 7 feet tall, weighs 200 pounds, and possesses large wings that span 20 feet across.
Ecology Hala demons form from covetous souls, those who desired the possessions of others so much so that they indulged in such acts as murder, theft, or blackmail. The more persons harmed by these desires, the more likely the soul is to become a hala in the Abyss. Halas are masters of the winds, harnessing the power of storms, redirecting and amplifying that energy to cause the most damage and chaos possible. They relish the destructive forces of their storms, and can manipulate a storm’s energy to rain down hailstones to pelt the area. Their command of the winds also aids them in f light. They are never impeded by storm winds, but instead ride them, often achieving top speeds by accelerating the wind currents around them. Due to the nature of their origin, halas are highly possessive. A hala will often refer to the storm clouds they marshal as “my storm.” A hala is predisposed to grab any item it f inds particularly desirable, and will actively pillage regions that its storm passes over. The desire to take from others remains so prevalent in the hala’s nature that it often carries large sacks in which to place all the items it takes during its f lights. Bags of holding or handy haversacks are highly prized possessions to a hala, as it allows it to pillage even more items. Halas are voracious, with large mouths that open nearly ear-to-ear. Edible items they f ind in their pillaging are often consumed immediately. This includes a particular appetite for children and other Small humanoids.
Habitat & Society Halas can be seen throughout the Abyss, roaming the skies in servitude to Pazuzu as his dedicated scout force. Their heaviest concentration, however, exists in High M’Vania, as all hala demons are required to return to Pazuzu’s realm once a century to report all that they have observed. Despite
the duty to return to High M’Vania, halas are solitary demons, distrusting all others, especially other hala demons, fearing that they will attempt to take their pillaged possessions. Therefore, most halas live in isolated, remote areas where they maintain their hoards of ill-gotten gains. Pazuzu values his hala minions not only for the intelligence they gather on the activities of his enemies in the Abyss, but also for the chaos and destruction they bring on the winds. He is especially fond of sending halas to the Material Plane to ravage the countryside with storms and hail. As in the Abyss, halas on the Material Plane prefer to reside in remote areas. The lair of a hala is often located in a hidden cave in an isolated mountain range, or in the hollow of a giant, ancient tree deep in a forest or swamp. While hala demons have a general dislike for or distrust of nearly all creatures, they have an especially strong fear and hatred of two creatures: eagles and dragons. Eagles have an innate response to attack and drive a hala from the skies, possibly due to the threat the hala represents to the eagle’s territory and offspring. Dragons—of any breed—largely view the storm demons as a danger to their own hoards of treasure, for if a hala discovers the dragon’s lair, it will stop at nothing to possess all that lies within it.
85
Ratling
This ratlike creature has tiny human hands in place of its front paws, and an unnerving human face with a toothy mouth. Ratling
XP 600
CR 2
CE Tiny magical beast Init +2; Senses darkvision 60 ft., low-light vision; Perception +6
qualities in the ratling’s saliva, are capable of inf licting particularly dangerous, bleeding wounds. A ratling is just over 2 feet long (although half that length is its long, ratty tail) and weighs 10 pounds.
Ecology
SPECIAL ABILITIES
Ratlings are carnivores. While they can subsist on prey less able to defend itself, such as grubs, other rodents, and carrion, they much prefer the warm f lesh of living food. Children are their preferred meals, not only because such targets are easier to catch and generally safe to chase, but also because the sadistic ratling enjoys the purer sense of fear a screaming child might offer as dinnertime entertainment. The elderly and inf irm are also common targets, both because of their lessened ability to defend themselves and simply because older victims are often in high supply in the places ratlings prefer to dwell. A ratling can (and often does) mate with normal rats. If the ratling parent is male, the products of such disturbing unions are large and particularly aggressive rats (often with vestigial humanlike features or other sickening deformities). If the ratling parent is female, she will spawn a litter of a dozen or so young, including one infant ratling, with the remainder being horribly deformed rats. The stronger and deadlier infant ratling generally feeds upon its brothers and sisters. At the very least, it dismembers them and arranges the torn limbs and entrails in strange patterns, as its not-yetfully-developed sense of the occult and more heinous magical traditions compels it to enact proto-rituals out of necromantic curiosity. Ratlings understand that most larger creatures present a signif icant danger. In combat, they generally do not remain around long enough for most f ights to last more than a round or two. A ratling’s preferred tactic is to become invisible, scuttle out to bite a target to gain the advantage of its sneak attack, then scurry away to a safe vantage point so it can, hopefully, watch its bitten victim bleed to death from its wounds.
Scroll Use (Ex) A ratling can cast spells from any magic scroll as if it possessed the spell on its spell list.
Habitat & Society
The rats that dwell in the walls of old edif ices or amid the dripping tunnels of crumbling sewers are not always simple animals. At times, the hidden scrabbling of tiny paws comes from sources altogether more sinister and vile. The ratling is a hideous amalgamation of rat and human: a long-haired rodent with front paws that are more accurately called hands, and a face reminiscent of a leering old man. Within the ratling’s humanoid mouth can be found long, yellow incisors more akin to those one might f ind in the jaws of a rat. These teeth are remarkably sharp, and when combined with the blood-thinning
Ratlings are far smarter than typical rats. On average, their intellect exceeds that of a typical human. As such, ratlings prefer to dwell in areas where their constant thirst for knowledge and boundless curiosity can continuously be quenched. Universities, wizards’ guilds, libraries, and the like are the favorite haunts of ratlings. Old manors of families with long traditions of scholastic pursuit are even greater catches, for here, ratlings do not have to contest with increased levels of traff ic or interruption. They often pilfer scrolls and books to quench their thirst for knowledge, just as they chase children to quench their thirst for blood.
DEFENSE
AC 16, touch 15, flat-footed 13 (+2 Dex, +1 dodge, +1 natural, +2 size) hp 19 (3d10+3) Fort +4, Ref +5, Will +1 Defensive Abilities evasion; Immune disease, poison OFFENSE
Speed 30 ft., burrow 10 ft., climb 20 ft., swim 30 ft. Melee bite +3 (1d3–2 plus bleed) Special Attacks bleed (1), sneak attack +1d6 Spell-Like Abilities (CL 6th; concentration +7) Constant—detect magic, read magic, speak with animals (rodents only), spider climb, tongues 3/day—cause fear (DC 12), dimension door, invisibility (self only) 1/day—summon swarm (rat swarm only) 1/week—commune (only when serving as a familiar; 6 questions, CL 12th) STATISTICS
Str 6, Dex 15, Con 13, Int 12, Wis 10, Cha 13 Base Atk +3; CMB +3; CMD 12 (16 vs. trip) Feats Dodge, Mobility Skills Climb +6, Knowledge (planes) +4, Perception +6, Stealth +16, Swim +6 Languages Aklo; tongues SQ scroll use ECOLOGY
Environment any urban Organization solitary or conclave (2–20 ratlings with 2–12 dire rats and 1–4 rat swarms) Treasure standard
86
Bestiary A ratling generally enjoys the company of normal rats. In most cases, the creature is a loner among its own kind, but ratling conclaves are well-documented in the basements and attics of certain particularly old and large repositories of knowledge. These gatherings of ratlings often ape the structure of a typical university, with a group led by the most knowledgeable among the conclave, who serves to direct the “studies” of the younger members of the group. These elder ratlings often demand forays into the structure itself, scavenging missions to gather up books and scrolls for further study, but the conclaves are always careful to limit these stolen texts to ones that they observe as having been forgotten or generally unused. Ratlings know that humanoids are dangerous foes, and the longer a ratling conclave can hide its presence in an active building, the better. Ratling elders often advance as clerics, oracles, witches, or wizards; they rarely gain levels as non-spellcasting classes (although some have been known to take on rogue levels—particularly those who dwell alongside thieves’ guilds or among wererats). Ratlings who take witch or wizard levels and have a familiar most often choose rats—an association that often brings with it more than mere supernatural companionship. Although ratlings are capable of gaining improved familiars, they can never select another ratling as a familiar.
Brown Jenkin
The ratling is inspired by a character from H. P. Lovecraft’s story “Dreams in the Witch House.” In this story, an eerie witch named Keziah Mason has a singularly disturbing familiar—a ratlike thing named Brown Jenkin. As described in the story: “Witnesses said it had long hair and the shape of a rat, but that its sharp-toothed, bearded face was evilly human while its paws were like tiny human hands. It took messages betwixt old Keziah and the devil, and was nursed on the witch’s blood—which it sucked like a vampire. Its voice was a kind of loathsome titter, and it could speak all languages...” In designing the ratling for use as a monster in the Pathfinder Roleplaying Game, Brown Jenkin served as both an inspiration and a model. The end result isn’t quite identical to the creature that serves Keziah Mason in the story, but it’s close enough that players familiar with this classic story will certainly get a kick out of encountering ratlings in your game!
Ratlings as Familiars While many creatures might balk at the concept of becoming a familiar, ratlings quite enjoy the role. Not only does being a spellcaster’s familiar give a ratling the security of having a powerful guardian who seeks to keep it safe, but also the ratling familiar has all but guaranteed access to texts and scrolls to read and study. Most spellcasters who take on ratlings as familiars also allow the ratlings to sup on their blood, giving their familiars an even greater reason to remain loyal and devoted to their masters or mistresses. A ratling who serves as a familiar gains the ability to use commune once per week as a spell-like ability. A ratling can serve a spellcaster as a familiar if the spellcaster has the Improved Familiar feat. In order to gain a ratling familiar, the spellcaster must be chaotic evil and at least 7th level. A spellcaster with a ratling familiar typically carries numerous scrolls on his person for the ratling to access during combat.
87
Oni, Yamabushi Tengu
This humanoid creature has a fearsome mien, with a cruel red face, glaring yellow eyes, a prodigious nose, and large ravenlike wings. Yamabushi Tengu
XP 1,600
CR 5
LE Medium outsider (native, oni, shapechanger, tengu) Init +8; Senses darkvision 60 ft., low-light vision, see invisibility; Perception +15 DEFENSE
AC 18, touch 14, flat-footed 14 (+2 armor, +4 Dex, +2 natural) hp 57 (6d10+24); regeneration 2 (fire or acid) Fort +9, Ref +9, Will +4; –2 vs. illusion (pattern) spells
SR 16 Weaknesses susceptible to patterns OFFENSE
Speed 30 ft., fly 30 ft. (average) Melee +1 kusarigama +10/+5 (1d6+4/×3), bite +3 (1d4+1) Ranged composite longbow +10/+5 (1d8+2/×3) Special Attacks steal voice Spell-Like Abilities (CL 5th; concentration +8) Constant—see invisibility, ventriloquism (DC 14) 3/day—dimension door, hideous laughter (DC 15), ray of enfeeblement (DC 14), scorching ray 1/day—blur, glitterdust (DC 15) STATISTICS
Str 15, Dex 19, Con 18, Int 12, Wis 15, Cha 16 Base Atk +6; CMB +8; CMD 22 Feats Combat Casting, Combat Reflexes, Improved Initiative Skills Acrobatics +13, Bluff +12, Disguise +12, Fly +13, Knowledge (planes) +10, Perception +15, Stealth +13; Racial Modifiers +4 Perception Languages Common, Tengu, Tien SQ change shape (Medium humanoid, alter self ), yamabushi weapons Gear leather armor ECOLOGY
Environment temperate mountains Organization solitary, pair, or patrol (1–2 plus 3–8 tengus or dire corbies) Treasure double (leather armor, +1 kusarigama, composite longbow [+2 Str] with 20 arrows, other treasure) SPECIAL ABILITIES
Yamabushi Weapons (Ex) A yamabushi tengu is proficient with all monk weapons and all swordlike weapons (including katanas and wakizashi), and gains a +1 bonus on attack rolls and damage rolls with such weapons. Yamabushi tengus who do not use swords favor the kusarigama. Steal Voice (Su) Up to three times per day, but no more than once per target, a yamabushi tengu can attempt to steal a victim’s voice as part of its bite attack. When it does so, the creature bitten must make a DC 16 Will save or lose the ability to speak aloud. This prevents the use of any spell with verbal components and the use of commandword-activated magic items, among other difficulties. The yamabushi tengu’s voice changes to match the one stolen. The victim’s voice remains stolen until the oni steals another voice, until the oni agrees to give the stolen voice back (a standard action requiring the oni to touch the victim), or until the next sunrise. Any effect that removes curses (such as remove curse or break enchantment) can restore a stolen voice (DC for success equals the save DC of the steal voice ability—DC 16 for most yamabushi tengu), as does the death of the oni who stole the voice in the first place. The save DC is Charisma-based.
88
Bestiary Susceptible to Patterns (Ex) A yamabushi tengu takes a –2 penalty on all saving throws against illusion spells of the pattern subschool. For 1 round after a yamabushi tengu either makes a successful save against a pattern or recovers from the effects of a pattern, it is dazzled.
Tengus and Yamabushi Tengus
In presenting the yamabushi tengu, we have an unusual situation. In traditional Japanese folklore, these oni are much more akin to the mythological creatures known as tengus. In the Pathfinder RPG, though, tengus are a specific race of birdlike humanoids who have very little to do with the supernatural or spiritual world. As a result, we’ve created the yamabushi tengu as a replacement of sorts for the traditional tengu. If you prefer to have tengus in your campaign that cleave more closely to real-world mythology, you should instead call these creatures tengus and then find an alternative name for the humanoids of the same name detailed in the Pathfinder RPG Bestiary.
Yamabushi tengus are oni with a predilection toward thievery and trickery, wearing the f lesh of wicked, fiendish tengus. When a yamabushi tengu first appears, its first course of action is invariably to seek out a well-hidden nest or other nook to serve as a lair. Despite their ability to f ly, most yamabushi tengus are nervous in open areas, since it’s easy to be seen in such environs. A yamabushi tengu is more at home indoors or at night, where it can skulk in the shadows when it’s unsure of its surroundings. A yamabushi tengu is 5 feet tall and weighs 120 pounds.
Ecology While most yamabushi tengus look like normal tengus, they can actually manifest in a number of humanoid bird shapes. Ravens and crows are the most common model which these creatures take their appearance from, yet tales exist of yamabushi tengus with features more akin to cranes, eagles, peacocks, gulls, vultures, and even pelicans. Only the features of ducks and other billed avians (like geese) are notably absent from yamabushi tengus. In fact, yamabushi tengus have a strange loathing for ducks—they find these birds to be a mix of comic tragedy and pitiful hideousness, from the blunt shape of their bills to their distinctive gait and their warbling quacks. The presence of a duck can often provoke even the most restrained and crafty yamabushi tengu into making poor choices: faced with choosing between attacking a truly dangerous foe or using their weapons and magic against a nearby duck, most yamabushi tengus make the choice to kill the duck, even if such an act might compromise their position to their actual enemy.
Habitat & Society Yamabushi tengus are driven by greed, particularly for shiny treasures like coins, jewels, gems, and polished weapons. Many extend this obsession to clothing (favoring brightly colored silks) and armor (preferring light armor over medium or heavy armor). Most of what a yamabushi tengu plots or plans can be traced to a desire to gather as much shiny treasure as possible, but they are also especially entranced and intrigued by avian humanoids—particularly tengus, dire corbies (see Pathfinder Campaign Setting: Misfit Monsters Redeemed) and garudas (see Pathfinder Module: Cult of the Ebon Destroyers). Yamabushi tengus share the most in common with tengus, of course, for it is from these creatures that the oni take their forms. Dire corbies and garudas, being non-humanoid monsters (monstrous humanoids and outsiders respectively) are in strange ways
both similar and quite different from tengus, and as such yamabushi tengus find them endlessly fascinating. In the case of dire corbies, the creatures’ feral natures, xenophobic personalities, and overall lack of civilization make them ideal groups for a yamabushi tengu to infiltrate and take control of—although in most cases, a yamabushi tengu who infiltrates a dire corby f lock eventually grows tired of the crude creatures and moves on. Garudas are more difficult for yamabushi tengus to interact with, for these outsiders are generally good. Encounters between garudas and yamabushi tengus almost always end in combat, typically with the more powerful garuda the victor. As a result, when confronted by a garuda, most yamabushi tengus choose subtlety over direct confrontation. In a best-case scenario, a yamabushi tengu’s minions or allies capture and restrain the garuda, giving the yamabushi tengu ample opportunity to interrogate or even vivisect the garuda prisoner. Most yamabushi tengus, though, find greatest comfort dwelling among thieves’ guilds—particularly among those populated by tengus, in which case a yamabushi tengu appears in its natural form, using its wings as an obvious badge of superiority over its f lightless tengu kin. Among thieves of other races (such as humans), a yamabushi tengu prefers to stay in its humanoid form. However, when a yamabushi tengu assumes the form of anything other than a tengu, its true nature is difficult for it to hide, for invariably the shapechanged oni’s nose remains quite prodigious, usually to an almost comical degree. Strangely enough, however, yamabushi tengus generally don’t think of their unusual noses as f laws in their magical disguises. A yamabushi tengu can also retain its wings when using its change shape ability, and these pinions, as well as its beaklike nose, are a sure way to tell a disguised yamabushi tengu apart from others.
89
The Path of Destiny
N
orth of Minkai, the land is dominated by expansive and mysterious woodlands known as the Forest of Spirits. It was here, long ago, that the gods created the protector spirits known as kami. Kami were not the only inhabitants of the Forest of Spirits, however. A powerful group of oni known as the Five Storms (symbolizing the five elements sacred to oni—fire, water, air, earth, and void) dwelt deep in the forest. The Five Storms did not want to stay in the forest, for just as they wore humanoid f lesh, so to did they lust for humanoid triumphs—they wanted the nation of Minkai as their own. Numerous rules set in place by the gods prevented the oni from taking direct action to seize control of Minkai. When the collapse of the vast empire of Lung Wa on mainland Tian Xia threw the continent into chaos at the beginning of the Age of Lost Omens, the Five Storms saw their opportunity. With Minkai distracted, focusing its attention on aggression from beyond its borders, the Five Storms infiltrated the ranks of dozens of organizations, from the imperial army to powerful merchant guilds and ninja clans. Over the century that followed, the oni, patient and deliberate, worked to gain power. Yet the greatest threat to their plan was the fact that as long as anyone of the divine line of emperors existed, there would always be someone capable of removing any pretender to the throne. The oni decided to prune the royal family trees to stumps. Over the course of several generations, they murdered, corrupted, and disposed of any who could trace their lineage to one of the five families to whom the gods had, in Minkai’s ancient past, granted the right to rule. In the case of most of these families, the task was relatively simple. Rule in Minkai had for several generations rested with the Higashiyama clan, and the other four families either had fallen into obscurity or were otherwise unprepared for what the oni had planned for them. The Five Storms managed to destroy three of those five families, taking possession of the families’ royal seals (minor artifacts capable of investing the divine right to rule in new families in the event that a previous family line dies out) and locking the royal seals away in a vault. The current ruling clan, the Higashiyamas, were so thoroughly infiltrated and corrupted by the oni that they were no longer a threat. By 4652 ar, only one family remained as a viable contender for the Jade Throne—the Amatatsus. Yet the oni underestimated the Amatatsus’ ability to react and interpret world events. When the Amatatsus realized what
was happening, the family patriarch made a scandalous choice—he decided to abandon his homeland. He took his family and f led north over the Crown of the World, following the trade route known as the Path of Aganhei all the way to the Lands of the Linnorm Kings. The oni discovered the plan too late, but sent agents after the Amatatsus, hoping to slay them to the last child and claim the Amatatsu Seal as their own. Complicating this was the fact that as long as a royal seal remained unused in its magical warding box, it could not be magically tracked or located—effectively serving to obscure those around it from divination, making it the perfect cloak to hide under as the Amatatsus f led north. When they reached Kalsgard, the Amatatsus went into hiding. They changed their name to Kaijitsu and took up the role of merchants and glassblowers to hide from their pursuers. Today, the legitimate heir of the Kaijitsu line is Ameiko Kaijitsu. After her father’s death during a recent attack on her home town of Sandpoint at the hands of a group of goblins allied to her estranged half-brother (also deceased at this time), she became the heir to the Kaijitsu fortune. As an available noble, she’s had no end of wouldbe suitors, but she’s rebuffed them all. She has no idea what destiny has in store for her.
The Brinewall Legacy By James Jacobs Pathfinder Adventure Path #49, Levels 1–3 When the Licktoad Goblins discover a cache of fireworks and start menacing travelers on the Lost Coast Road, a group of heroes delve into Brinestump Marsh to put a stop to them. But defeating the goblins only reveals a more sinister threat, for the goblins have angered a group of undead that must be put to rest. Amid the remains of these skeletons, the PCs find a curious letter—a missive from Ameiko Kaijitsu’s grandfather indicating that a great Kaijitsu treasure and legacy lies hidden in the ruins of Brinewall. With Ameiko’s aid, the PCs organize a caravan and travel to Brinewall to investigate, only to have their companion fall into a magical coma as they near the mysterious ruined village. The PCs search Brinewall for the cure for Ameiko’s coma, yet soon discover the ruins are under the rule of sadistic dire corby cultists of Pazuzu led by a strange foreign fiend. They defeat Brinewall’s new denizens and recover the Kaijitsu legacy—a royal seal that reveals a startling truth even as it wakens Ameiko. The Kaijitsus are the last surviving royal family of Minkai, and if Ameiko doesn’t
90
Campaign Outline travel to Minkai, her ancestral homeland, it will fall to the rule of a powerful warlord known as the Jade Regent.
Spoiler Warning!
Presented here is the background and outline for the Jade Regent Adventure Path. If you intend to play in this campaign, be warned! These pages spoil the upcoming adventures as thoroughly as possible.
Night of Frozen Shadows By Greg A. Vaughan Pathfinder Adventure Path #50, Levels 4–6 Acting on visions granted by the royal seal, the PCs travel to the Lands of the Linnorm Kings as they begin to retrace in reverse the route taken so many years ago by Ameiko’s ancestors as they f led Minkai. The PCs’ attempts to recover the Kaijitsu ancestral sword Suishen as well as to secure the aid of a guide named Ulf Gormundr to help lead their caravan over the Crown of the World are complicated as they run afoul of a mysterious group of thieves and assassins known as the Frozen Shadows. It soon becomes apparent that the Five Storms, the oni who would rule Minkai and thus seek to end the Kaijitsu line, have long had a presence in the Linnorm Kingdoms. Caught between blood-feuding barbarians and the ninja of the Frozen Shadows, the PCs must recover Suishen, rescue Ulf, and defeat the ogre mage Kimandatsu (leader of the Frozen Shadows and agent of the Five Storms) if they hope to survive the journey over the Crown of the World and into Minkai.
the Five Storms. But not everyone wants them dead—they meet a mysterious kitsune woman named Miyaro who promises to lead them to allies deep in the Forest of Spirits. The PCs learn from the forest’s kami protectors that their shared enemies, the oni of the Five Storms, once dwelt in a fortress deep in the forest. There, within the walls of the House of Withered Blossoms, the PCs can learn much about the enemies waiting for them in Minkai and their weaknesses. Of course, the Five Storms didn’t completely abandon their old fortress, and what remains behind in the House of Withered Blossoms will test the PCs’ strengths like nothing they’ve yet encountered.
Tide of Honor By Tito Leati Pathfinder Adventure Path #53, Levels 12–13 After successfully discovering the secrets and weaknesses of the Five Storms and their mortal agent, the warlord known as the Jade Regent, the PCs finally arrive in Minkai only to find the empire on the verge of chaos. Before they can risk confronting the Jade Regent at the nation’s capital, though, the PCs must first earn the respect and support of Minkai’s people. After teaming up with a band of ronin led by an honorable but frustrated soldier named Jiro, the PCs seek out ancient monasteries, ninja clans, merchants, geishas, and samurai armies for support, all the while trying to remain undercover and invisible to the ever-growing paranoia and anger of the Jade Regent.
The Hungry Storm By Jason Nelson Pathfinder Adventure Path #51, Levels 7–9 This adventure begins as the PCs leave Kalsgard and set off on a journey that will take them across the Path of Aganhei through the Crown of the World, the continental mass that sits at Golarion’s north pole. As they venture into the frozen north with their caravan, any safety that the PCs might have gained by defeating the western agents of the Five Storms fades as they become increasingly aware that a sinister entity is growing in power. This entity is a half-fiend sylph named Katiyana, a priestess of the nascent demon lord of blizzards who has found a way to control and direct the so-called morozkos—“hungry storms”— that periodically scour the Crown of the World. Left to her own devices, Katiyana hopes to send these hungry storms south into both Avistan and Tian Xia to spread the power of her patron. After confronting and defeating Katiyana in her eerie northern fortress, though, the PCs must face her vengeful ghost in an underground pass through the final mountains if they are to escape alive.
The Empty Throne By Neil Spicer Pathfinder Adventure Path #54, Levels 14–15 Now that they’ve gained the support of Minkai’s citizens, the PCs must earn the respect and blessings of the ancestors. They travel to the Imperial Shrine, a mystic necropolis on an island in the capital city of Kasai’s harbor, where they discover proof of the actual fate of the previous emperor— he was assassinated by the Jade Regent and his body thrown into the Well of Demons. By recovering the previous emperor’s body, the PCs gain the ancestors’ blessings for Ameiko to take the throne—all that remains is to travel to the Imperial Palace, defeat the Five Storms, and confront the Jade Regent and his powerful allies in a final conf lict, with the empire of Minkai as the prize!
Forest of Spirits By Richard Pett Pathfinder Adventure Path #52, Levels 10–11 The PCs emerge from the Crown of the World and follow the Path of Aganhei down to the landlocked trade city of Ordu-Aganhei, where they once again must face agents of
91
Next Month Night of Frozen Shadows By Greg A. Vaughan The first stage of the expedition from Varisia to distant Minkai begins with a journey into the Lands of the Linnorm Kings, where the heroes must prepare for the coming ordeal in which they must traverse the frozen northern continent known as the Crown of the World. The trade route that links the Linnorm Kingdoms to Tian Xia is fraught with peril, and those who know its dangers are much in demand from merchant houses. In order to secure the all-important guide for this stage of the journey—and recover an ancient weapon that will help the PCs and their allies face the Jade Regent— the PCs must match blades with the mysterious assassins’ guild known only as the Frozen Shadows, an order of silent killers who strike swiftly in the darkness and rarely leave witnesses to their deeds.
Kalsgard A bastion against the cold and the wild creatures of the north, Kalsgard stands as the greatest city and capital of the savage Lands of the Linnorm Kings. Discover marvels from across the viking homeland, the hearty people who
live their lives upon the freezing plains, and the intrigues of a city where strength is law.
Shelyn Experience the wonders of Shelyn, goddess of art, beauty, and love, and learn the secrets of her faithful, luminaries who aren’t afraid to fight in the name of their art.
And More! A rash of mysterious killings and stolen tattoos abound in Dave Gross’s next entry into the Pathf inder’s Journal. Also, denizens of Tian Xia and the frozen north face off in the Pathf inder Bestiary.
Subscribe to Pathfinder Adventure Path! The Jade Regent Adventure Path has begun! Don’t miss a single volume—venture over to paizo.com/pathfinder and subscribe today! Have each Pathfinder Adventure Path, Pathfinder Campaign Setting, Pathfinder Player Companion, Pathfinder Module, and GameMastery product delivered to your door! Also, download the free Jade Regent Player’s Guide, available now!
OPEN GAME LICENSE Version 1.0a The following text is the property of Wizards of the Coast, Inc. and is Copyright 2000 Wizards of the Coast, Inc (“Wizards”). All Rights Reserved. 1. Definitions: (a) “Contributors” means the copyright and/or trademark owners who have contributed Open Game Content; (b) “Derivative Material” means copyrighted material including derivative works and translations (including into other computer languages), potation, modification, correction, addition, extension, upgrade, improvement, compilation, abridgment or other form in which an existing work may be recast, transformed or adapted; (c) “Distribute” means to reproduce, license, rent, lease, sell, broadcast, publicly display, transmit or otherwise distribute; (d) “Open Game Content” means the game mechanic and includes the methods, procedures, processes and routines to the extent such content does not embody the Product Identity and is an enhancement over the prior art and any additional content clearly identified as Open Game Content by the Contributor, and means any work covered by this License, including translations and derivative works under copyright law, but specifically excludes Product Identity. (e) “Product Identity” means product and product line names, logos and identifying marks including trade dress; artifacts, creatures, characters, stories, storylines, plots, thematic elements, dialogue, incidents, language, artwork, symbols, designs, depictions, likenesses, formats, poses, concepts, themes and graphic, photographic and other visual or audio representations; names and descriptions of characters, spells, enchantments, personalities, teams, personas, likenesses and special abilities; places, locations, environments, creatures, equipment, magical or supernatural abilities or effects, logos, symbols, or graphic designs; and any other trademark or registered trademark clearly identified as Product identity by the owner of the Product Identity, and which specifically excludes the Open Game Content; (f ) “Trademark” means the logos, names, mark, sign, motto, designs that are used by a Contributor to identify itself or its products or the associated products contributed to the Open Game License by the Contributor (g) “Use”, “Used” or “Using” means to use, Distribute, copy, edit, format, modify, translate and otherwise create Derivative Material of Open Game Content. (h) “You” or “Your” means the licensee in terms of this agreement. 2. The License: This License applies to any Open Game Content that contains a notice indicating that the Open Game Content may only be Used under and in terms of this License. You must affix such a notice to any Open Game Content that you Use. No terms may be added to or subtracted from this License except as described by the License itself. No other terms or conditions may be applied to any Open Game Content distributed using this License. 3. Offer and Acceptance: By Using the Open Game Content You indicate Your acceptance of the terms of this License. 4. Grant and Consideration: In consideration for agreeing to use this License, the Contributors grant You a perpetual, worldwide, royalty-free, non-exclusive license with the exact terms of this License to Use, the Open Game Content. 5. Representation of Authority to Contribute: If You are contributing original material as Open Game Content, You represent that Your Contributions are Your original creation and/or You have sufficient rights to grant the rights conveyed by this License. 6. Notice of License Copyright: You must update the COPYRIGHT NOTICE portion of this License to include the exact text of the COPYRIGHT NOTICE of any Open Game Content You are copying, modifying or distributing, and You must add the title, the
copyright date, and the copyright holder’s name to the COPYRIGHT NOTICE of any original Open Game Content you Distribute. 7. Use of Product Identity: You agree not to Use any Product Identity, including as an indication as to compatibility, except as expressly licensed in another, independent Agreement with the owner of each element of that Product Identity. You agree not to indicate compatibility or co-adaptability with any Trademark or Registered Trademark in conjunction with a work containing Open Game Content except as expressly licensed in another, independent Agreement with the owner of such Trademark or Registered Trademark. The use of any Product Identity in Open Game Content does not constitute a challenge to the ownership of that Product Identity. The owner of any Product Identity used in Open Game Content shall retain all rights, title and interest in and to that Product Identity. 8. Identification: If you distribute Open Game Content You must clearly indicate which portions of the work that you are distributing are Open Game Content. 9. Updating the License: Wizards or its designated Agents may publish updated versions of this License. You may use any authorized version of this License to copy, modify and distribute any Open Game Content originally distributed under any version of this License. 10. Copy of this License: You MUST include a copy of this License with every copy of the Open Game Content You distribute. 11. Use of Contributor Credits: You may not market or advertise the Open Game Content using the name of any Contributor unless You have written permission from the Contributor to do so. 12. Inability to Comply: If it is impossible for You to comply with any of the terms of this License with respect to some or all of the Open Game Content due to statute, judicial order, or governmental regulation then You may not Use any Open Game Material so affected. 13. Termination: This License will terminate automatically if You fail to comply with all terms herein and fail to cure such breach within 30 days of becoming aware of the breach. All sublicenses shall survive the termination of this License. 14. Reformation: If any provision of this License is held to be unenforceable, such provision shall be reformed only to the extent necessary to make it enforceable. 15. COPYRIGHT NOTICE Open Game License v 1.0a © 2000, Wizards of the Coast, Inc. System Reference Document. © 2000, Wizards of the Coast, Inc; Authors: Jonathan Tweet, Monte Cook, Skip Williams, based on material by E. Gary Gygax and Dave Arneson. Bat, Mobat from the Tome of Horrors, Revised. © 2002, Necromancer Games, Inc.; Authors: Scott Peterson and Clark Peterson, based on original material by Gary Gygax. Decapus from the Tome of Horrors, Revised. © 2002, Necromancer Games, Inc.; Author: Scott Greene, based on original material by Jean Wells. Dire Corby from the Tome of Horrors, Revised. © 2002, Necromancer Games, Inc.; Author: Scott Greene, based on original material by Jeff Wyndham. Phycomid from the Tome of Horrors, Revised. © 2002, Necromancer Games, Inc.; Author: Scott Greene, based on original material by Gary Gygax. Quickling from the Tome of Horrors, Revised. © 2002, Necromancer Games, Inc.; Author: Scott Greene, based on original material by Gary Gygax. Pathfinder Adventure Path #49: The Brinewall Legacy. © 2011, Paizo Publishing, LLC; Author: James Jacobs.
92
Explore New Horizons ®
ISBN–13: 978-1-60125-327-9 Paperback $9.99
™
Amazing Stories Set in the Pathfinder Campaign Setting
I
n the foreboding north, the demonic hordes of the magic-twisted hellscape known as the Worldwound encroach upon the southern kingdoms of Golarion. Their latest escalation embroils a preternaturally handsome and coolly charismatic swindler named Gad, who decides to assemble a team of thieves, cutthroats, and con artists to take the fight into the demon lands and strike directly at the fiendish leader responsible for the latest raids—the demon Yath, the Shimmering Putrescence. Can Gad hold his team together long enough to pull off the ultimate con, or will trouble from within his own organization lead to an untimely end for them all? From gaming legend and popular author Robin D. Laws comes a fantastic new adventure of swords and sorcery, set in the award-winning world of the Pathfinder Roleplaying Game.
O
ISBN–13: 978-1-60125-357-6 Paperback $9.99
n a mysterious errand for the Pathfinder Society, Count Varian Jeggare and his hellspawn bodyguard Radovan journey to the distant land of Tian Xia. When disaster forces him to take shelter in a warrior monastery, “Brother” Jeggare finds himself competing with the monks of the Dragon Temple as he unravels a royal mystery. Meanwhile, Radovan—trapped in the body of a devil—must serve a twisted master by defeating the land’s deadliest champions and learning the secret of slaying an immortal foe. Together with an unlikely army of spirits, the two companions must take the lead in an ancient conflict that will carry them all the way to the Gates of Heaven and Hell. From fan-favorite author Dave Gross comes a new fantastical adventure set in the award-winning world of the Pathfinder Roleplaying Game.
paizo.com Paizo Publishing, LLC, the golem logo, and Pathfinder are registered trademarks of Paizo Publishing, LLC Pathfinder Tales and Pathfinder Roleplaying Game are trademarks of Paizo Publishing, LLC © 2011, Paizo Publishing, LLC
®
™
UlTImaTe CombaT
Prepare for Glory! S
Available Now!
eize the initiative and chop your foes to pieces with this exhaustive guide to the art of martial combat—an exciting new rulebook for the smash-hit Pathfinder Roleplaying Game, suitable for players and Game Masters alike! This comprehensive 256-page hardcover reference reveals the martial secrets of the Pathfinder RPG rules like never before and also introduces three new classes: the ninja, samurai, and gunslinger! All this plus tons of new armor and weapons, a complete treatment of firearms in the Pathfinder RPG, a vast array of martial arts, finishing moves, vehicle combat, duels, and new combatoriented spells for every spellcasting class in the game!
Paizo Publishing LLC he Paizo golem logo and Pa hfinder are regis ered rademarks of Paizo Publishing LLC and he Pa hfinder Roleplaying Game is a rademark of Paizo Publishing LLC © 2011 Paizo Publishing LLC
paizo.com
®®
™™
Find Your Path
Pathfinder Adventure Path is your monthly Pathfinder campaign resource. Each volume explores new locations, unveils new monsters unique to Golarion, and gives Game Masters another entry in a complete campaign. Adventures, wealth, and fame await within! Pathfinder #43 Carrion Crown: The Haunting of Harrowstone ® Pathfinder #44 Carrion Crown: Trial of the Beast Pathfinder #45 Carrion Crown: Broken Moon ™ Watcher Pathfinder #46 Carrion Crown: Wake of the Pathfinder #47 Carrion Crown: Ashes at Dawn ® Pathfinder #48 Carrion Crown: Shadows of Gallowspire Pathfinder #49 Jade Regent: The Brinewall Legacy ™ Pathfinder #50 Jade Regent: Night of Frozen Shadows Pathfinder #51 Jade Regent: The Hungry Storm Pathfinder #52 Jade Regent: Forest of Spirits Pathfinder #53 Jade Regent: Tide of Honor Pathfinder #54 Jade Regent: The Empty Throne ®
$19.99 $19.99 $19.99 $19.99 $19.99 $19.99 $19.99 $19.99 $19.99 $19.99 $19.99 $19.99
☐ ☐ ☐ ☐ ☐ ☐ ☐ ☐ ☐ ☐ ☐ ☐
®
™
™
Golarion is the world of Paizo’s Pathfinder campaign setting. These evocative accessories give Game Masters exciting new looks into exotic adventuring locales, previously only explored via Pathfinder Adventure Path and the Pathfinder Modules. Don’t miss out on a single one—it’s your world now. Pathfinder Campaign Setting: The Inner Sea World Guide Pathfinder Campaign Setting: Inner Sea Poster Map Folio Pathfinder Campaign Setting: Rival Guide ™ Pathfinder Campaign Setting: Undead Revisited ® Pathfinder Campaign Setting: Dungeons of Golarion ® Pathfinder Campaign Setting: Pathfinder Society Field Guide Pathfinder Campaign Setting: Carrion Crown Poster Map Folio ™ Pathfinder Campaign Setting: Inner Sea Magic Pathfinder Campaign Setting: Lands of the Linnorm Kings Pathfinder Campaign Setting: Horsemen of the Apocalypse, Book of the Damned, Vol. 3 Pathfinder Campaign Setting: Dragon Empires Gazetteer ®
$49.99 $19.99 $19.99 $19.99 $19.99 $19.99 $15.99 $19.99 $19.99 $19.99 $19.99
☐ ☐ ☐ ☐ ☐ ☐ ☐ ☐ ☐ ☐ ☐
®
™
™
Each Pathfinder Player Companion explores a major theme in the Pathfinder campaign setting, with expanded regional gazetteers, new player character options, and organizational overviews to help players flesh out their character backgrounds and provide players and Game Masters with new sources for campaign intrigue. Pathfinder Player Companion: Inner Sea Primer Pathfinder Player Companion: Faiths of Purity Pathfinder Player Companion:™Humans of Golarion Pathfinder Player Companion: Faiths of Balance Pathfinder Player Companion: Goblins of Golarion Pathfinder Player Companion: Faiths of Corruption
$10.99 $10.99 $10.99 $10.99 $10.99 $10.99
☐ ☐ ☐ ☐ ☐ ☐
®
Every good Game Master needs good game accessories, and Paizo’s GameMastery line has exactly what you need to enhance your Pathfinder Roleplaying Game experience! GameMastery Critical Hit Deck GameMastery Critical Fumble Deck GameMastery Combat Pad GameMastery Condition Cards GameMastery Chase Card Deck GameMastery Item Cards: Jade Regent GameMastery Map Pack: Shrines GameMastery Flip Map: Monastery All trademarks are property of Paizo Publishing®, LLC © 2011 Paizo Publishing. Permission granted to photocopy this page.
$10.99 $10.99 $16.95 $10.99 $10.99 $10.99 $12.99 $12.99
☐ ☐ ☐ ☐ ☐ ☐ ☐ ☐
®
TM
The perfect world guide for Pathfinder RPG players and Game Masters alike, this definitive 320-page full-color hardcover volume contains expanded coverage of more than 40 nations; details on gods, religions, and factions; new character options; monsters; and more. Plus, chart the events of your Pathfinder campaign with a beautiful poster map that reveals the lands of the Inner Sea region in all their treacherous glory!
Available Now! Paizo Publishing LLC he Paizo golem logo and Pa hfinder are regis ered rademarks of Paizo Publishing LLC and he Pa hfinder Roleplaying Game is a rademark of Paizo Publishing LLC © 2011 Paizo Publishing LLC
paizo.com/pathfinder
Sea Drakes Many are the terrors that dwell in the watery deeps of the Varisian Gulf. Hungry reefclaws, ravenous bunyips, and foul-blooded devilfish are wellknown horrors to the fisherfolk of the region, yet the dreaded sea drake is perhaps the most ferocious of the Gulf ’s regular predators. As with the other terrors, these monsters prefer to dwell near coastlines, where they can prey upon their favored meals—fishermen and sailors. Their lightning breath and uncanny knack for capsizing boats to better get to the juicy morsels within have earned sea drakes a special place in the hearts of those who travel the Gulf—a place of fear and hatred.
Tengus They are not common among the cities and villages of Varisia, but the people of this land know well the stories of the tengus. Far to the south, the pirates of the Shackles believe them capable of absorbing bad luck, and keep tengu “mascots” on their ships to combat fate, while to the north in the Linnorm Kingdoms, the crow folk dwell in ghettos and earn rightful reputations as scoundrels and sneaks. To the Varisians, a tengu is at once a curriosity and perhaps something to be wary of, for the region has long been plagued by myths of demons who take the shapes of birds and seek to pluck the eyes and tongues of those who ask too many questions.
The Path of Destiny
W
hen a trove of fireworks falls into the hands of the goblins of Brinestump Marsh, the people of Sandpoint fear an explosive invasion. But there’s more afoot in the soggy wilderness than goblin hijinks and dangerous pyrotechnics. An investigation reveals mysteries and menaces aplenty, but also a treasure holding the answer to not just one of Varisia’s greatest mysteries, but a conspiracy spanning continents and empires. Can the adventurers piece together a puzzle that links the owner of a sleepy village tavern to the unsolved destruction of a fortress-settlement? And can they withstand the ancient forces and secret destiny that have waited for them for decades? This volume of Pathfinder Adventure Path launches the Jade Regent Adventure Path and includes: • “The Brinewall Legacy,” a Pathfinder RPG adventure for 1st-level characters, by James Jacobs. • An exploration of the hinterlands surrounding the town of Sandpoint, a region that’s anything but peaceful, by James Jacobs. • A look into the mysteries of the oni, cunning fiends that can assume humanoid forms, by Mike Shel. • Murder in a distant land in the Pathfinder’s Journal, by Dave Gross. • Four new monsters by James Jacobs and Tim Nightengale.
paizo.com/pathfinder
Printed in China. PZO9049
Brinestump Marsh: Areas G, H, J and L G3 G4
G1
G7
G5
Player View On
J1
G9
G2
Map Tags Off
a J5
G8
J3
G6
L1 J2
b J4
L2
H1 H5
L3
L4
H2
H3 H4
L6
H4 H5
H8
H5
H5
H5 H4
H6
H9
H5 H7
H12
L5
H10
H11
Brinewall Castle: Main Floor
Map Tags Off
T17 T19
T18 T8
T2
T2 T16
T7
T9
T6
T14
T2
T12
T4
T11
T5
T2 T1
T15
T14
T10
T3
T2
T13
T2
T2
Player View On
Brinewall Castle: Upper Floor
Map Tags Off
a
U16
U17
U11 U13
U2
Player View On
U12
U3
U10
a
a U6
U9
U2
U8 a
U2
U14
a
U7 U4
U5
a b a
U15a
a
U2
U15
U2
U4 U2
U2
U1
Brinewall Castle: Dungeon
V6
Map Tags Off
W1
V5
Player View On
V10a
W2
V9
V4
V10
V7
V1
V2
V8
V10b
V3