Mototrbo connect plus multi-site digital trunking system planner
Mototrbo connect plus multi-site digital trunking system planner. Руководство по планированию и проектированию многосайт
201 41 2MB
English Pages [151]
Recommend Papers


File loading please wait...
Citation preview
TM
MOTOTRBO Connect Plus
MULTI-SITE DIGITAL TRUNKING
System Planner
September 2010
MOTOTRBO Connect Plus System Planner 1.0 Disclaimer The information in this document is carefully examined, and is believed to be entirely reliable. However no responsibility is assumed for inaccuracies. Furthermore, Motorola reserves the right to make changes to any products herein to improve readability, function, or design. Motorola does not assume any liability arising out of the applications or use of any product or circuit described herein; nor does it cover any license under its patent rights nor the rights of others.
2 of 151
MOTOTRBO Connect Plus System Planner 1.0
References: [1] MOTOTRBO System Planner, November 2009 [2] MOTOTRBO Connect Plus Portable User Guide [3] MOTOTRBO Connect Plus Mobile User Guide [4] MOTOTRBO Connect Plus User Guide for XRC 9000 [5] Motorola Quality Standards Fixed Network Equipment Installation Manual R56
3 of 151
MOTOTRBO Connect Plus System Planner 1.0 1 2
Introduction ....................................................................................................................9 Connect Plus System Feature Overview ........................................................................9 2.1 Introduction to Connect Plus..................................................................................9 2.2 Basic Connect Plus System Components.............................................................10 2.2.1 XRC 9000 Trunking Controller .......................................................................11 2.2.2 Control Channel Operation ..............................................................................12 2.2.3 Control Channel Requirements ........................................................................12 2.2.4 Connect Plus Subscriber Radio ........................................................................13 2.2.5 Connect Plus Option Board Functions .............................................................13 2.2.6 Configuring Connect Plus Subscriber Radios ..................................................13 2.3 Connect Plus Channel Access ..............................................................................14 2.3.1 Polite and Impolite Operation ..........................................................................14 2.3.2 Repeater Wake-up Provisioning ......................................................................14 2.4 Connect Plus Features ..........................................................................................15 2.4.1 Registration & De-Registration .......................................................................15 2.4.2 Receiving & Validating Call Requests ............................................................17 2.4.3 Voice Calls with No Control Channel Acknowledgement ..............................18 2.4.4 Voice Calls Requiring a Control Channel Acknowledgement ........................19 2.4.5 Other Voice Call Features ................................................................................20 2.4.6 Control Channel CSBK Data Calls ..................................................................22 2.4.7 Trunk-to Timeslot IP Data Calls ......................................................................24 2.4.8 Connect Plus Integrated Data ...........................................................................24 2.5 MOTOTRBO CPS Data Configuration ...............................................................24 2.6 Connect Plus Text Messaging ..............................................................................26 2.6.1 Text Messaging Services .................................................................................26 2.6.2 Text Messaging features only available in Connect Plus ................................27 2.6.3 Text Message Transmission & Delivery ..........................................................28 2.6.4 Controller Programming for Text Messaging Services ...................................29 2.6.5 SU Programming for Text Message Services ..................................................29 2.6.6 Connect Plus Interface to Text Message Application ......................................31 2.6.7 Text Messaging Features not Available in Connect Plus.................................33 2.7 Connect Plus Location Services ...........................................................................33 2.7.1 Single Location Update ....................................................................................35 2.7.2 Periodic Location Update.................................................................................36 2.7.3 Sending Reports to the Location Application ..................................................37 2.7.4 Location Services and Presence Notification...................................................37 2.7.5 Controller Programming for Location Services ...............................................37 2.7.6 SU Programming for Location Services ..........................................................38 2.7.7 Connect Plus GPS Performance Specifications ...............................................39 2.7.8 Location Report Rates in Connect Plus ...........................................................39 2.7.9 Location Features not Available in Connect Plus ............................................40 2.8 Connect Plus Over-The-Air File Transfer............................................................40 2.8.1 Supported File Types .......................................................................................40 2.8.2 OTA File Transfer Settings for MOTOTRBO CPS .........................................41 2.8.3 OTA File Transfer Settings for Connect Plus CPS ..........................................41 2.8.4 OTA File Transfer Configuration in the XRC 9000 Controller.......................42 4 of 151
MOTOTRBO Connect Plus System Planner 1.0 2.8.5 Controller File Handling for OTA Transmission .............................................43 2.8.6 OTA File Transfer: Unconfirmed File Transfer...............................................43 2.8.7 OTA File Transfer Effects on Call Transmissions ...........................................45 2.8.8 Selecting Optimal Conditions for OTA File Transfer......................................45 2.8.9 Assigning Repeater for OTA File Transfer......................................................46 2.8.10 Special Considerations for the Network Frequency File .............................47 2.8.11 Radio User Request to Re-join OTA File Transfer ......................................47 2.9 Busy Queue ..........................................................................................................47 2.10 Network Frequency File.......................................................................................48 2.10.1 Importance of Network Frequency File .......................................................48 2.10.2 Changes Impacting the Frequency File ........................................................49 2.11 Controller Multi-Site Features .............................................................................50 2.11.1 Registration & De-Registration in a Multi-Site Environment .....................50 2.11.2 Call Processing & Set-up in a Multi-Site Environment ...............................51 2.12 Roam (Site Search) in Connect Plus System .......................................................51 2.12.1 Events that Initiate Site Search ....................................................................51 2.12.2 When Connect Plus Radio Will not Initiate Search .....................................52 2.12.3 Frequencies Searched ...................................................................................52 2.12.4 Qualifying Searched Sites ............................................................................54 2.12.5 Roam Request ..............................................................................................55 2.12.6 Radio Operation during Search ....................................................................55 2.12.7 Indications of Successful Registration .........................................................55 2.12.8 Reacquiring the Same Site after Period of Fade ..........................................55 2.12.9 Disable Roam ...............................................................................................56 2.12.10 Site Lock ......................................................................................................56 2.12.11 Connect Plus Performance While Roaming .................................................56 2.12.12 Programmable RSSI Settings .......................................................................57 2.12.13 CSBK Roam Delay Time .............................................................................62 2.13 Network ID ..........................................................................................................62 2.13.1 Relationship of Network ID to Site Number................................................63 2.14 Programmable Range for Connect Plus IDs ........................................................63 2.15 Features Not Supported in This Connect Plus Release ........................................64 2.16 Connect Plus Voice and Data Privacy .................................................................65 2.17 Connect Plus RDAC Interface .............................................................................66 2.18 Connect Plus and Application Developer Program (ADP) ..................................67 3 Connect Plus System Components and Topologies .....................................................68 3.1 Connect Plus System Components ......................................................................68 3.1.1 Fixed End Components ....................................................................................68 3.1.2 Mobile Components .........................................................................................73 3.1.3 User Interface & Ergonomics in Connect Plus ................................................75 3.1.4 Connect Plus Data Applications.......................................................................79 3.2 Connect Plus System Topologies .........................................................................80 3.2.1 Direct Mode .....................................................................................................80 3.2.2 Repeater Mode .................................................................................................81 3.2.3 Topologies of a Connect Plus System..............................................................82 3.2.4 Network IP Topologies for Connect Plus System ...........................................84 5 of 151
MOTOTRBO Connect Plus System Planner 1.0 4
Connect Plus System Design Considerations ..............................................................93 4.1 Migrating to Connect Plus from other MOTOTRBO Digital Modes ..................93 4.2 Connect Plus Frequency Licensing Considerations .............................................94 4.2.1 Acquiring Frequencies .....................................................................................94 4.2.2 Repeater Continuous Wave Identification (CWID) for Connect Plus .............94 4.3 Digital Repeater Loading for Connect Plus .........................................................95 4.3.1 Voice and Data Traffic Profiles .......................................................................95 4.3.2 Estimating Loading For Connect Plus .............................................................96 4.3.3 Setting Repeater Hang Times in Connect Plus ..............................................100 4.4 Multiple Digital Repeaters in Connect Plus Mode ............................................100 4.4.1 Configuring Connect Plus Repeaters with MOTOTRBO CPS......................100 4.4.2 Coverage Area of Connect Plus Repeaters in Single site Configuration .......102 4.4.3 Frequencies and Color Codes in a Connect Plus Single Site System ............102 4.4.4 Coverage Area of Connect Plus Repeaters in Multisite Configuration .........104 4.4.5 Frequencies and Color Codes in a Connect Plus Multisite System ...............104 4.4.6 Considerations for the Connect Plus Backend Network ................................105 4.4.7 Connect Plus IP Network Security Considerations ........................................111 4.4.8 Connect Plus Behaviors in Presence of Failures ............................................111 4.4.9 Connect Plus Failure Preparedness ................................................................112 4.5 Connect Plus Data Sub-System Design Considerations ....................................113 4.5.1 Connect Plus Example System IP Plan ..........................................................113 4.5.2 Port Assignments and Forwarding .................................................................114 4.5.3 Connect Plus Simplified Example IP Plan .....................................................115 4.6 MOTOTRBO CPS Programming Considerations for the Connect Plus SU .....116 4.6.1 Enabling the Connect Plus Feature ................................................................118 4.6.2 Setting the Connect Plus Radio ID ................................................................118 4.6.3 Other General Settings Critical to Connect Plus Operation ...........................119 4.6.4 Network Settings Critical to Connect Plus Operation ...................................120 4.6.5 MOTOTRBO CPS Zone & Channel Configuration for Connect Plus ..........121 4.7 Connect Plus Customer Fleetmap Development ...............................................126 4.7.1 Identifying the Needs of Connect Plus Users ................................................126 4.7.2 Important Information about Connect Plus Call Initiation Privileges ...........129 4.7.3 Who will the Connect Plus radio user hear? ..................................................129 4.7.4 Who will the Connect Plus radio user talk to? ...............................................130 4.7.5 Assigning Connect Plus Radio IDs ................................................................131 4.7.6 Assigning Aliases for Connect Plus Radio IDs .............................................132 4.7.7 Assigning Connect Plus Group IDs ...............................................................132 4.7.8 Programming Connect Plus Group IDs .........................................................133 4.7.9 Making a Group Call......................................................................................133 4.7.10 Assigning Connect Plus Multigroup IDs ...................................................134 4.7.11 Programming Connect Plus Multigroup IDs .............................................135 4.7.12 Making a Multigroup Call..........................................................................136 4.7.13 Site All Call ID ..........................................................................................136 4.7.14 Making a Site All Call ...............................................................................138 4.7.15 Connect Plus Private Calls .........................................................................138 4.7.16 Initiating a Private Call in Connect Plus ....................................................139 6 of 151
MOTOTRBO Connect Plus System Planner 1.0 4.7.17 Configuring Priority Levels in Connect Plus .............................................140 4.7.18 Text Messaging Considerations for Fleet Mapping Design.......................141 4.7.19 Emergency Calls and Connect Plus ...........................................................142 4.7.20 Fleet Mapping Considerations for Other Call Features .............................142 4.7.21 Fleet Mapping Considerations for Over-the-Air File Transfer ..................144 4.8 Configurable Timers: Connect Plus CPS ...........................................................145 4.9 Configurable Timers: XRC 9000 Network Manager .........................................147 4.10 Backup Power Source ........................................................................................149 4.11 Grounding and Surge Suppression .....................................................................149 Appendix A Acronyms ...................................................................................................150 Appendix B Sample (Suggested) Network Topology ....................................................151
7 of 151
MOTOTRBO Connect Plus System Planner 1.0
Table of Figures and Tables Figure 2-1 Group Call Initiation Example ...........................................................................19 Figure 2-2 Late Entry Example ............................................................................................21 Figure 2-3 Connect Plus Text Messaging Services .............................................................27 Figure 2-5 Connect Plus Neighbor List Example ................................................................54 Figure 2-6 Dense Overlapping Coverage (Urban) ...............................................................58 Figure 2-7 Isolated Non-Overlapping Coverage (Rural) .....................................................59 Figure 2-8 Corridor Coverage ..............................................................................................60 Figure 2-9 Multi-Story Coverage .........................................................................................61 Table 2-1 Recommended RSSI Settings ..............................................................................62 Table 3-1 Expected Battery Life ..........................................................................................73 Figure 3-1 Connect Plus Sites Connected through LAN .....................................................85 Figure 3-2 Connect Plus Sites Connected through WAN ....................................................87 Figure 3-3 Connect Plus Single Site Configuration .............................................................88 Figure 3-4 Connect Plus Multisite Configuration ................................................................90 Table 4-1 Voice and Data Traffic Profiles ...........................................................................96 Figure 4-1 Users vs. Number of Channels for High Voice-Only Traffic ............................97 Figure 4-2 Users vs. Number of Channels for Low Voice-Only Traffic .............................98 Figure 4-3 Users vs. Number of Channels for High Voice & Low GPS Traffic .................99 Figure 4-4 Users vs. Number of Channels for Low Voice & Low GPS Traffic .................99 Figure 4-5 Multiple Digital Repeaters in Connect Plus Single Site ..................................103 Figure 4-6 Multiple Digital Repeaters in a Connect Plus Multisite System ......................105 Table 4-2 Bandwidth Calculation Matrix ..........................................................................108 Table 4-3 Example of Bandwidth Calculations for Connect Plus Site ..............................108 Figure 4-7 Example for Calculating Bandwidth Requirements w/o Secure VPN .............109 Figure 4-8 WAN Bandwidth Requirements for Multisite System (no VPN) ....................110 Figure 4-9 Example System IP Plan ..................................................................................114 Table 4-4 IP Address Matrix for the Example System ......................................................114 Table 4-5 Port Forwarding Example ..................................................................................115 Figure 4-10 Simplified Example IP Plan ...........................................................................115 Figure B 1 Sample Network Topology with Private IP Plan .............................................151
8 of 151
MOTOTRBO Connect Plus System Planner 1.0
1 Introduction The Connect Plus is an integrated digital trunking solution for voice and data, built on the MOTOTRBO system components. This system planner will enable the reader to understand the features and capabilities of the Connect Plus system, and will provide guidance on how to deploy and configure the system to utilize all its capabilities. This document should be used in conjunction with the following documentation: MOTOTRBO™ System Planner MOTOTRBO™ Customer Programming Software (CPS) and related training MOTOTRBO™ Connect Plus Option Board CPS1 and related training System workshop/system service training Product specification sheets This system planner has been developed under the assumption that the reader is familiar with the MOTOTRBO technology as well as the different system configurations offered by MOTOTRBO in digital mode such as: Single Site Repeater Talkaround IP Site Connect Capacity Plus For a broader discussion and explanation of the underlying TDMA radio technology, system equipment, configurations and features the reader can refer to [1]. This document is structured in such a way that it compares Connect Plus to the other (non-Connect Plus) modes of operation to highlight the advantages as well as identify features that are not offered or required with Connect Plus.
2 Connect Plus System Feature Overview 2.1 Introduction to Connect Plus Connect Plus is a single-site or multi-site trunking solution that utilizes MOTOTRBO repeaters and subscribers for its RF components. Because the radios operate in digital mode, a Connect Plus system combines the advantages of MOTOTRBO digital signaling (two voice conversations per repeater, integrated digital features, etc.) with the efficiency of trunking. A Connect Plus system provides the following capabilities: Up to 15 repeaters (30 timeslots) per Connect Plus site. Up to 6 networked sites2 (Release 1.0). For multisite network configuration (or for any XRC 9000 connected to a Trident ECHO) the controllers need to be purchased with such options.
For brevity, the MOTOTRBO™ Connect Plus Option Board CPS will be referred to simply as Connect Plus CPS from here on. 1
9 of 151
MOTOTRBO Connect Plus System Planner 1.0
Dedicated Control Channel timeslot supporting prioritized Busy Queue. Most of the same voice & data features available in digital conventional operation. Additional features not found in other MOTOTRBO digital modes, including (but not limited to) the following: o
Dedicated Control Channel Timeslot
o
Validation of Radio IDs and Group ID
o
Validation of Connect Plus ESN
o
Remote access for user, site, and network management.
o
Prioritized Busy Queue
o
Text Message Mailboxing, with Store and Forward Capability
o
Multigroup ID for Voice and Data Calls
o
Ability to update frequency information and Option Board firmware Over-the-air (OTA)
o
In Multi-site network operation, the XRC 9000 controllers track each Subscriber Unit (SU) through Connect Plus registration and de-registration messages. This process allows the system to use RF resources efficiently. Calls are only carried at sites where radios are presently registered to the target ID.
2.2 Basic Connect Plus System Components In addition to the MOTOTRBO repeater and subscriber radios, Connect Plus trunking requires the following basic system components: (For a more detailed discussion of System Components, including optional components, see the “Connect Plus System Components and Topologies” section). One XRC 9000 Controller per site. Each controller requires a static IP address. Each SU in the Connect Plus network must be enabled for Connect Plus operation. An Option Board must be installed in each Connect Plus-enabled SU. The Option Board must be loaded with MOTOTRBO™ Connect Plus Option Board firmware, which requires a purchasable license. Additional hardware for IP communications:
2
MOTOTRBO Connect Plus Network Manager allows for configuration of 7 network sites. Site numbers 16 can only be assigned to RF sites. Site 255 may only be assigned to a Trident ECHO – a device that provides the interface to a digital wireline console, as well as certain airtime logging features.
10 of 151
MOTOTRBO Connect Plus System Planner 1.0 o
Single-site: At a minimum, this requires an Ethernet switch3 and cables to connect the XRC 9000 Controller and MOTOTRBO repeaters to the switch.
o
Multi-site: In addition to the hardware required for single-site operation, a multi-site network requires additional IP infrastructure. This varies according to network configuration and the type of connections utilized.
2.2.1 XRC 9000 Trunking Controller The XRC 9000 site controller is the core of the Connect Plus infrastructure. The controller’s primary responsibilities are outlined as follows: Via the OTA interface, the XRC 9000 communicates with Connect Plus subscribers in order to Validate registrations and Call Requests Facilitate data transfer Assign RF resources Maintain a Busy Queue when no RF resources are available Via its IP interface, The XRC 9000 communicates with all of the site’s repeaters in order to Assign calls to available timeslots Decide which audio packets should be transmitted on the repeater downlink Assist repeater with FCC compliance (CWID, Level I and II Monitoring) Via its IP interface, the XRC 9000 communicates with other network controllers in order to Track registrations and de-registrations throughout the Connect Plus network Facilitate network call set-up Duplicate and forward voice packets to any site where the Target ID is registered Route text messages and Location Requests to any site where the Target ID is registered The XRC 9000 provides resources for network management4 in order to: Validate and configure privileges for Connect Plus subscribers Configure site and network parameters Monitor site RF activity in real time Monitor airtime usage and diagnostic information
3 4
Connect Plus has been tested and validated with the HP ProCurve 2510-24 Ethernet switch. Requires the MOTOTRBO™ Connect Plus Network Manager software
11 of 151
MOTOTRBO Connect Plus System Planner 1.0
2.2.2 Control Channel Operation Each Connect Plus site utilizes a dedicated timeslot for Control Channel signaling. The XRC 9000 controller uses the Control Channel timeslot for the following operations: Receives and responds to registration requests Receives and responds to call requests Assigns calls to trunk-to timeslots Periodically re-sends information for calls-in-progress (thereby supporting late entry) Transmits information about surrounding sites (Multi-site operation only) Call exchanges that utilize Control Signaling Block (CSBK) Messages occur entirely on the Control Channel timeslot. Sometimes these are called “Command and Control” call features. They include: o
Radio Check
o
Call Alert
o
Radio Disable
o
Radio Enable
o
Private Call confirmation prior to assigning a trunk-to timeslot
o
Remote Monitor confirmation prior to assigning a trunk-to timeslot
2.2.3 Control Channel Requirements Each Connect Plus site requires a dedicated Control Channel timeslot The Control Channel timeslot will always be Timeslot 1 of the Control Channel repeater. Timeslot 2 of the Control Channel is a trunk-to resource for voice and data calls The downlink of the Control Channel timeslot transmits continuously. This minimizes the time the SU spends searching for service, and it allows the system to quickly respond to registrations and call requests. Any interruption to this continuous messaging adversely affects system performance. This requirement has the following implications: o
Control Channel frequency pairs require a Protected Service Area. Non-exclusive licenses such as FB2 or FB6 are not suitable for Control Channel operation.
o
Whenever possible, Base Station Identification (also called CWID) should be sent on trunk channel repeaters only. BSI on the Control Channel repeater interrupts control messaging, which is detrimental to system performance.
12 of 151
MOTOTRBO Connect Plus System Planner 1.0
2.2.4 Connect Plus Subscriber Radio In order for a MOTOTRBO subscriber radio to operate on a Connect Plus System, it must meet all of the following requirements. Connect Plus requires radio software version R01.06.30 or later A Motorola Option Board must be installed in the SU. Prior to the installation of MOTOTRBO™ Connect Plus Option Board firmware, the radio’s Option Board is referred to as a Generic Option Board (GOB). Following installation of Connect Plus software, the Option Board is referred to as Connect Plus Option Board. In order for the Connect Plus Option Board to enable its OTA interface and “talk” to the XRC 9000 controller, it must first verify that the Connect Plus feature has been enabled in the MOTOTRBO subscriber unit. See “Enabling the Connect Plus Feature” in the “Connect Plus System Design Considerations” section for more information.
2.2.5 Connect Plus Option Board Functions Connect Plus trunking logic for subscriber radio resides in its Connect Plus Option Board. The Connect Plus Option Board communicates with the MOTOTRBO SU to facilitate the following operations: Storing frequency information, and executing frequency changes Transmission and reception of Connect Plus control messaging Transmission and reception of audio Transmission and reception of IP data packets Executing Connect Plus features Providing ergonomic feedback to the radio user (LED, tones, radio display)
2.2.6 Configuring Connect Plus Subscriber Radios Configuring a subscriber radio for Connect Plus operation involves the following: Using MOTOTRBO™ Customer Programming Software (CPS) to enable “Option Board Trunking” for each Connect Plus personality5. Using MOTOTRBO™ Connect Plus Option Board CPS for advanced configuration of Connect Plus parameters, which includes: o
Creating Connect Plus Contacts
See “Connect Plus System Design Considerations” section, for more detailed discussion on MOTOTRBO CPS programming.
5
13 of 151
MOTOTRBO Connect Plus System Planner 1.0 o
Assigning knob positions
o
Entering Network, Site, & Frequency information
o
Configuring Connect Plus feature options
o
Configuring Connect Plus Menu Operation
2.3 Connect Plus Channel Access 2.3.1 Polite and Impolite Operation When programming the SU with MOTOTRBO CPS, Connect Plus requires that the Admit Criteria be set to “Always” for every Connect Plus channel. However, this does not mean that the Connect Plus SU will always use “Impolite” Channel Access. In fact, the Connect Plus subscriber radio uses a combination “Polite” and “Impolite” channel access, depending on the specific operation as discussed below: Control Channel Registration messages and Call Requests are transmitted impolitely. If the SU does not hear a response within the expected period, it sends retries at a random interval. If the first request was not decoded because it collided with a request from another radio, the random retry interval significantly decreases the chance of two consecutive collisions with the same radio. For the first voice transmission on a trunk-to channel, the initiating Connect Plus Option Board assumes the channel is available and will request the radio to transmit accordingly. When the radio receives the Option Board transmit request, it will act on the request per its programmed Admit Criteria. Because the Connect Plus system is in charge of channel assignment, it is unlikely that another radio will already be transmitting on the channel. For subsequent voice transmissions on a trunk-to channel, the Connect Plus Option Board acts politely. It will not request the radio to transmit if it is aware that another Connect Plus subscriber is already transmitting. When the Option Board determines that it can transmit and sends a transmit request to the radio, the radio will act on the request per its programmed In Call Criteria. When the Connect Plus Option Board requests the radio to transmit IP data packets, the radio always executes such requests in a polite manner. It must ascertain the channel is free prior to transmitting. Because the Connect Plus system is in charge of channel assignment, it is unlikely that another radio will already be transmitting on the channel.
2.3.2 Repeater Wake-up Provisioning Just as in conventional operation, the radio cannot execute a transmit request until it synchronizes with the targeted timeslot. Also as in conventional operation, the radio will attempt to wake-up the repeater (by sending a wake-up message) if it receives a transmit request, but has not yet
14 of 151
MOTOTRBO Connect Plus System Planner 1.0 synchronized with the targeted timeslot. However, the radio rarely has to transmit a wake-up message in Connect Plus operation for the following reasons: The Control Channel repeater transmits continuously. This makes the wake-up message unnecessary for the Control Channel. When the controller assigns a call to an idle trunk-to repeater, the controller sends an IP message that causes the targeted repeater to activate its downlink for the duration of its SIT timer. By the time the Connect Plus subscriber changes to the assigned channel and timeslot, the repeater will already be transmitting idles. This allows the SU to forego the “wake-up” message and quickly align with the assigned slot.
2.4 Connect Plus Features 2.4.1 Registration & De-Registration Before a Connect Plus subscriber can make or receive calls on the trunking system, it must successfully register with the XRC 9000 controller. Registration is also prerequisite for data services. The radio user doesn’t need to do anything except power-up the unit and select a Connect Plus-enabled zone and channel. The SU automatically searches for a site and, upon detecting an acceptable site and signal, sends the registration request. The registration message exchange between the controller and the Connect Plus SU occurs on the site’s Control Channel timeslot. The messages used are special Connect Plus CSBKs. Connect Plus does not use the MOTOTRBO Automatic Registration Service (ARS). In fact, MOTOTRBO CPS automatically disables ARS when “Option Board Trunking” is selected for a CPS personality. The controller receives the Connect Plus registration request and checks three IDs contained in the registration request. These ID’s must be configured into the controller’s user database before the registration can be successful. Unit ID (also called Radio ID and User ID): Each radio in the Connect Plus system must have a unique6 Radio ID, which is programmed into the radio with MOTOTRBO CPS. A record for this ID must be created in the controller’s user database, and the Record Status must be set to “enabled”. Each Unit Record in the controller database has a field called, “MOTOTRBO Serial Number”. Before the unit can successfully register on the system, its MOTOTRBO S/N must be entered into this field. The MOTOTRBO Serial Number can be obtained by reading the radio with MOTOTRBO CPS, or by removing the battery and looking at the back of the radio. This number is not transmitted over-the-air “as is”. Instead, the Connect Plus system converts the MOTOTRBO S/N to another number, known as the Connect Plus ESN, for OTA transmission. This conversion occurs behind the scenes and is transparent to the end user. The controller will not allow a registration request unless the ESN information transmitted by the SU matches what the controller expects through the programming of the MOTOTRBO Serial Number field on the Unit Record. Registration Group ID: For every Connect Plus registration, the registering unit must affiliate with a specific Group ID, known as the Registration Group ID (sometimes called the Selected Group ID). The Registration Group ID for each Connect Plus channel knob It is allowed to reuse a Connect Plus repeater radio ID (1 – 15) for a subscriber radio, although this is not recommended. 6
15 of 151
MOTOTRBO Connect Plus System Planner 1.0 position (portable) or channel rocker position (mobile) is selected when programming the SU with Connect Plus CPS. Upon receiving the registration request, the controller checks this ID with its user database. There must be a record for the Group ID in the user database, and the Record Status must be set to “enabled”. If the “Site All Call ID” is selected as the Registration Group, it is not necessary to create a record for this group, since it is already hard-coded into the controller. If all of the IDs are valid in the database, the controller sends an affirmative response to accept the registration. The SU provides a successful registration tone to the radio user, which indicates that the SU is ready to make and receive calls. If any of the IDs are unknown or marked as “disabled”, the controller rejects the registration by sending a response that disables the registering unit and causes the radio to provide the “disabled” tone to the radio user. See the section on “Control Channel CSBK Data Calls” for more information on “Disable” and “Enable”. The Connect Plus registration process has two main purposes: (1) It limits system access to authorized users, and (2) It provides the controller with the important information it needs to properly route calls and efficiently utilize RF and IP bandwidth. All of the following events cause a Connect Plus radio to transmit a registration request to the site controller: The Connect Plus SU will request registration after power-up. The Connect Plus SU will request registration when the radio user selects (or changes) a Connect Plus zone. The Connect Plus SU will request registration when it changes sites. The Connect Plus SU will request registration when it loses signal from a Connect Plus site, and then reacquires the same site after an extended period of fade. The Connect Plus SU will request registration when the radio user changes the position of the channel knob (portable) or the channel rocker (mobile). This requirement assures that the controller will affiliate the SU with the “Registration Talk Group” that has been programmed for each knob or channel rocker position. The process of de-registration is also important because it tells the controller which SU’s and Talk Groups no longer require system resources. The following events cause the controller to adjust its list of registered units: The controller adjusts its registration lists with each new registration request by the SU. The controller will de-register the unit from its former site when it registers with a new site. The controller de-registers the unit from its previous Talk Group affiliation when the SU registers with a different Talk Group. The controller adjusts its registration lists whenever a unit is de-registered from the network. There are two events that cause the controller to de-register a SU from the Connect Plus network: o
When the Unit is selected to a Connect Plus zone and registered to a site, and the radio user powers the radio down, the SU will automatically send a de-registration message on Control Channel timeslot prior to shutting off. If the controller decodes the message, it de-registers the SU from the network.
16 of 151
MOTOTRBO Connect Plus System Planner 1.0 o
The controller sends one or more controller-initiated Radio Checks to the SU after a period of inactivity and the SU fails to respond to any of the Radio Check attempts. The purpose of controller-initiated radio check is to identify and deregister units that no longer require system resources. The controller provides three programmable parameters that affect Control Initiated Radio Check:
The controller provides a programmable parameter called “SU Inactivity Time”. The timer is set on a site-wide basis, but is tracked for each individual SU. The timer is reset whenever an SU registers, sends a call request, keys-up during a voice call, or acknowledges a Control Channel Message. If the timer expires, the Controller schedules a Controller Initiated Radio Check at the earliest opportunity. When the “SU Inactivity Timer” expires, the Controller will send at least one Controller Initiated Radio Check. Whether it sends additional retries depends on the value configured into the controller’s of “CSBK Call Retries” parameter (0-4). If the controller is programmed for retries, the interval between retries is determined by the “CSBK Call Retry Interval” setting. The target SU must acknowledge the Controller Initiated Radio Check to remain registered to the site. If the Controller finishes its Radio Check attempt (and any programmed retries), and receives no SU acknowledgement, the controller will de-register the SU from the network and decrement the number of unit’s registered to it’s “Registration Talk Group” by one.
2.4.2 Receiving & Validating Call Requests The SU sends all Call Requests on the Control Channel timeslot. Upon receiving a Call Request, the controller performs several checks before it responds to the request. Every Call Request contains two Connect Plus IDs – the Source ID and the Destination ID. The Source ID is the Unit ID for the initiating radio. The Destination ID can be another Unit ID or a Group ID, depending on the type of call that is being requested. The controller checks whether there are records for both IDs in the user database, and that both IDs are configured as “enabled”. If the Source ID is not present or is “disabled” in the database, the controller denies the call request and disables the initiating unit. If the Destination ID is not present or is “disabled” in the database, or if there are insufficient privileges required for the call type, the controller denies the call request, but it does not disable the initiating unit. If the IDs are valid, and all required privileges are in order, the controller checks calls currently in progress. The purposes of this check are (1) to see if the Destination ID is already active in a call and (2) for calls requiring a trunk-to timeslot – to see if a resource is currently available. If the controller sees that the Destination ID is already active in call, a response to this effect is returned to the source SU and the radio user will have to try again later. If a trunk-to timeslot is needed, but none is available, the controller informs the source SU that its call has been placed in the Busy Queue. If there are no problems with any of these checks, the controller proceeds with call set-up. The call set-up procedure varies depending on the call type, of which there are different categories for Connect Plus: Voice Calls that require no Control Channel acknowledgement from the Destination Radio(s) Voice Calls that require Control Channel acknowledgement from the Destination Radio(s)
17 of 151
MOTOTRBO Connect Plus System Planner 1.0 CSBK Control Channel Data Calls Trunk-to Channel IP Data Calls
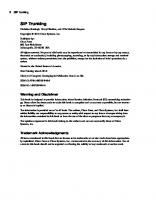
2.4.3 Voice Calls with No Control Channel Acknowledgement Calls in this category include Group Calls, Multigroup Calls and Site All Call (voice). All of these calls do not require a Control Channel acknowledgement from the target radio. Group Call: One or more voice transmissions heard by all available radios that are programmed with and registered to the same Talk Group ID. Group Calls are message trunking. At release of PTT the assigned trunk-to timeslot enters the Group Call Hang Time for a period of time determined through repeater programming. During the Group Call Hang Time, any Group member may transmit on the same trunk-to timeslot. If the Hang Time expires with no further transmissions the call ends. Radios already involved in a previous call on another timeslot will not be aware of the Group Call transmission(s). Multigroup Call: A one-way voice transmission heard by all available radios that are programmed with the same Multigroup ID. To initiate a Multigroup Call, the SU must have the “Multigroup Initiation” privilege on its SU record in the controller database. At release of PTT the assigned trunk-to timeslot enters the Group Call Hang Time for a period of time determined through repeater programming. During the Group Call Hang Time, only the call initiator may transmit again. If the Hang Time expires with no further transmissions the call ends. Radios already involved in a previous call on another timeslot will not be aware of the Multigroup transmission(s). Site All Call (Voice): A one-way voice transmission heard by all available radios registered to the same site where the transmission occurs. To initiate a Site All Call voice transmission, the SU must have the “Site All Call Initiation” privilege on its SU record in the controller database. At release of PTT the call ends immediately. There is no Call Hang Time. Radios already involved in a previous call on another timeslot will not be aware of the Site All Call transmission(s). For these call types, the controller sends a Channel Grant assigning the Source and Destination IDs to a trunk-to timeslot. As long as the call is active on the trunk-to timeslot, the controller will periodically re-send the Channel Grant on the Control Channel timeslot. The repeated Channel Grants are sent for the benefit of late-joiners and radios that return to the Control Channel timeslot before the call ends due to fade. Figure 2-1 provides an example of a Group Call Initiation process.
18 of 151
MOTOTRBO Connect Plus System Planner 1.0
Gr ou pA Gr ca ou ll r pA eq ue ca st (G ll a on oT ss F2 o R ign ,s ptr me lot ID nt o 1 3, slo n F1 t 1 , sl ot ) 1
Call Request (Control Ch Timeslot)
TX Radio
Ethernet Switch
XRC 9000 Controller
TX=F1 RX=F2
TX=F3 RX=F4
TX=F5 RX=F6
... ...
Cntrl Ch Slot
Slot 1
Slot 1
Slot 1
Slot 2
Slot 2
Slot 2
Slot 2
Rptr Radio ID 1
Rptr Radio ID 2
Rptr Radio ID 3
Rptr Radio ID … (max of 15 Rptrs per site)
GRP GRP GRP GRP GRP GRP A B B B A A
Listening to Control Ch slot
Figure 2-1 Group Call Initiation Example
2.4.4 Voice Calls Requiring a Control Channel Acknowledgement Calls in this category include Private Calls and Remote Monitor. All of these calls require a Control Channel acknowledgement from the target radio. Private Call: One or more voice transmissions between two specific radios; the Source SU and the Destination SU. In MOTOTRBO digital conventional operation, Private Calls can be configured as “confirmed” or “unconfirmed” based on MOTOTRBO programming. In Connect Plus, a Private Call always requires a Control Channel acknowledgement from the destination SU before the controller will assign a trunk-to timeslot. In this sense, Connect Plus Private Calls are always confirmed. However, the “Private Call Confirmed” checkbox must not be enabled for any Connect Plus channel via MOTOTRBO CPS. This requirement prevents the participating radios from performing an additional and unnecessary CSBK exchange on the trunk-to timeslot prior to transmitting voice. In order for a Connect Plus Private Call to take place; all of the following must occur: (a) The Source ID must be enabled for the “Private Call Initiation” privilege on its SU Record in the controller database, (b) The Destination ID must be enabled for the “Private Call Receive” privilege on its SU Record in the controller database, (c) the Destination SU must be registered to a network site and not currently busy in a call, and (d) the Destination SU must acknowledge a Control Channel query before the controller will assign a trunk-to timeslot for the call. Private Calls are message trunking. At release of PTT the assigned trunk-to timeslot enters the Private Call Hang Time for a period of time determined through repeater programming. During the Private Call Hang Time, either party may transmit on the same trunk-to timeslot. If the Hang Time expires with no further transmissions the call ends. Remote Monitor: The Remote Monitor feature allows a remote user to activate a target radio’s microphone and transmitter for a period of time. A call is silently set up on the target radio, and its PTT is controlled remotely without any indications given to the end user. The duration that the target radio transmits after receiving a Remote Monitor command is set in the target radio through Connect Plus CPS programming. When receiving the Remote Monitor command, the target radio initiates a single, one-way Private Call voice
19 of 151
MOTOTRBO Connect Plus System Planner 1.0 transmission back to the originator of the Remote Monitor command. This feature is used to ascertain the situation of a target radio which is powered-on, but is unresponsive. This is beneficial in a number of situations including theft, incapacity of the radio user, or other situations necessitating a “hands-free” transmission. In order for Remote Monitor to take place; all of the following must occur: (a) The Source ID must be enabled for the “Remote Monitor Initiation” privilege on its SU Record in the controller database, (b) The Destination ID must be enabled for the “Remote Monitor Receive” privilege on its SU Record in the controller database, (c) the Destination SU must be registered to a network site and not currently busy in a call, and (d) the Destination SU must acknowledge a Control Channel query before the controller will assign a trunk-to timeslot for the Remote Monitor transmission. For these call types, the controller repeats the Call Request CSBK on the Control Channel downlink as a query for the Destination SU. The Destination SU must send acknowledgement on the Control Channel uplink before the call assignment can proceed. If the Control Channel does not receive acknowledgement from the Destination SU, it looks to its programmable “CSBK Call Retry” parameter to see how many times it should resend the Call Request on the Control Channel downlink. If the controller receives no acknowledgement to any of these attempts, it sends a Negative Response to the source SU, which then informs the radio user that the call attempt was not successful. Once the controller receives acknowledgment from the Destination SU, it assigns a trunk-to timeslot for the voice call to proceed.
2.4.5 Other Voice Call Features The following features are inherent to all Connect Plus Voice Calls: Connect Plus Scan (responding to assigned calls): When a registered Connect Plus radio is not involved in a call, it listens to all messages transmitted on the Control Channel timeslot. If it decodes any of the call assignments listed below, it responds by moving to the assigned channel and timeslot and joining the call. It will remain on the assigned trunkto timeslot until the call ends, at which point the Connect Plus SU returns to the Control Channel timeslot. The Connect Plus SU responds to the following call assignments on a first-come, first served basis. In other words, it will not ignore one of these call assignments while it awaits another. Furthermore, while the Connect Plus SU is on the trunk-to timeslot, it will not be aware of (or respond to) Control Channel messages for other calls. Once the Connect Plus SU transitions back to the Control Channel it will respond to the following events: o
The Connect Plus SU will respond to a call assignment targeting its Unit ID
o
The Connect Plus SU will respond to a call assignment targeting its “Registration Group ID” (sometimes called the Selected Group ID)
o
The Connect Plus SU will respond to a call assignment targeting its Multigroup ID.
o
The Connect Plus SU will respond to a call assignment targeting the Site All Call ID.
In the initial Connect Plus release, there are no programmable settings associated with scan – other than the option to not configure the SU with a Multigroup ID. (If a Multigroup ID is programmed, it will be scanned by the SU.) The concepts of “Priority” and “Non-Priority” scan do not apply in Connect Plus.
20 of 151
MOTOTRBO Connect Plus System Planner 1.0 Late entry for voice Calls: For as long as a voice call continues on a trunk-to timeslot, the Control Channel will periodically repeat the call assignment message on the control channel timeslot. This supports late entry for the following circumstances: o
A radio that registers after the call started can join the call late.
o
A radio that returned to the Control Channel from another call can join the call late.
o
A radio that faded from the call and returned to the Control Channel will attempt to rejoin the call.
Ethernet Switch
XRC 9000 Controller
TX=F3
RX=F4
TX=F5 RX=F6
... ...
Slot 1
Slot 1
Slot 1
Slot 2
Slot 2
Slot 2
Slot 2
Rptr Radio ID 1
Rptr Radio ID 2
ud io on F6 ,
GRP GRP GRP A A A
Listening to Trunk-to ch slot
t1 slo
TX Radio
, F5 on io ud
TX A
Rptr Radio ID … (max of 15 Rptrs per site)
ta
Listening to Control Ch slot
Rptr Radio ID 3
a pe
GRP GRP GRP B B B
slo t1
Cntrl Ch Slot
Re
C Gr ont ou ro pA lC ca h pe ll a rio s d (G oT of la sign icall me y r o R te j o ptr in nt f epe ID ers or b ats 3, en slo efi t1 t )
TX=F1 RX=F2
Figure 2-2 Late Entry Example PTT ID and Aliasing: This feature allows the target radio to identify the originator of a call. If programmed with the Connect Plus CPS, a user friendly alphanumeric name or “alias” can also be displayed. These user friendly aliases are also used when initiating voice calls and digital signaling features. The alias information in the transmitting radio should correspond with the alias information in the receiving radio. The transmitting radio ID is sent over the air and, if there is an alias for that ID in the receiving radio, the receiving radio displays the alias. If no alias is configured at the receiving radio for that ID, then only the transmitting radio's SUID is shown. Call Hang Time: When radios move to a trunk-to timeslot to participate in a voice call, the Call Hang Time allows an opportunity for talk-back using the same Call ID, without having to return to the Control Channel to request a new call. Besides providing an opportunity for talk-back on the assigned timeslot, the Call Hang Time helps provide continuity to the conversation and prevents the channel from being assigned to another call. The Call Hang Time is programmed into the repeater via MOTOTRBO CPS, and is settable per call type for “Group Call” and “Private Call”. Connect Plus does not recommend or support a value of zero for any Call Hang Time. The value chosen for each Hang Time setting must be programmed the same into each Connect Plus repeater network-wide. There is nothing in the software to prevent mis-configuration in this regard. It is the responsibility of the Network Administrator to assure that the Hang Time values are set the same Networkwide. The Hang Time starts at the end of a voice transmission (either due to release of
21 of 151
MOTOTRBO Connect Plus System Planner 1.0 PTT or fade by the transmitting radio). During the Call Hang Time, other parties in the call may transmit. If the Hang Time expires with no further transmission, the call is considered to be over and radios participating in the call return to the Control Channel timeslot. If a radio user presses PTT after the Hang Time expires, a new voice call will be started using the radio’s selected Contact Name, which may be a different ID than the call which just expired. Multigroup Calls use the Group Call Hang Time, but only the initiating radio is allowed to key-up during the Call Hang Time for a Multigroup Call. Site All Call does not use a Hang Time. The call terminates when the first (and only) transmission by the initiating radio is finished.
2.4.6 Control Channel CSBK Data Calls Calls in this category include Radio Check, Call Alert, Radio Disable, and Radio Enable. They are also known as “Command and Control” call features. Radio Check: The Radio Check feature checks if a radio is active in a system without notifying the user of the target radio. Besides the Busy LED, there is no other audible or visual indication on the checked radio. The receiving radio automatically and silently responds with an acknowledgement to the initiating radio. This feature is used to discreetly determine if a target radio is available. For example, if a radio user is non-responsive, Radio Check could be used to determine if the target radio is switched on and monitoring the channel. If the target radio responds with an acknowledgement, the initiator could then take additional action such as using the Remote Monitor command to activate the target radio’s PTT. If the target radio is not reachable the initiator will receive an indication that the party is not available. The Radio Check message exchange takes place entirely on the Control Channel timeslot. To initiate a Radio Check, the SU must have the “Radio Check Initiation” privilege on its SU record in the controller database. “Controller-initiated Radio Check” is an automatic system feature that the controller uses to determine whether or not an inactive SU should remain registered to the site. Both the SU Inactivity Time and the number of required retries prior to de-registering the SU are programmable settings in the controller. Call Alert: The Call Alert feature allows a radio user to essentially page another user. To initiate a Call Alert, the SU must have the “Call Alert Initiation” privilege on its SU record in the controller database. When a radio receives a Call Alert, a persistent audible and visual alert is presented to the user. The initiator of the Call Alert is also displayed. If a user is away from his radio at the time of the reception, the alert remains until the user clears the Call Alert screen. If the user presses the PTT while the Call Alert screen is active, he/she starts a Private Call to the originator of the Call Alert provided the radio has Private Call Initiation privilege on its SU Record. Radio Disable: This feature allows for a radio, typically in a supervisory role, to disable another radio via over the air signaling. The Radio Disable feature can be used to stop an inappropriate use of a radio, or to prevent a stolen radio from making or receiving calls. All messaging related to the Disable feature occurs on the Control Channel timeslot. In order for one radio to remotely disable another, all of the following must occur: (a) The Source ID must be enabled for the “Disable Command Initiation” privilege on its SU Record in the controller database, (b) The Destination ID must be enabled for the “Disable Command Receive” privilege on its SU Record in the controller database, and (c) the Destination SU must be registered to a network site and not currently busy in a call. When an authorized radio sends the “Disable” command, the controller automatically sets the status on the SU Record to “User Disabled”. This assures that even if the target radio doesn’t hear the Disable Command, it will be disabled by the controller the next time it attempts to register or initiate a call. Upon receiving the Disable Command, the disabled radio sounds the
22 of 151
MOTOTRBO Connect Plus System Planner 1.0 “disabled tone”. If the disabled unit has a display, it shows “Disabled”. A disabled radio is no longer able to make or receive calls in any Connect Plus zone. However, the radio still listens to the Control Channel, responds to certain Control Channel commands, and will search for another site if it loses acceptable signal. Unlike conventional operation, the Disable Command only affects the Connect Plus zones where the command is received. Non-Connect Plus channels are still operable. The radio remains disabled until one of the following occurs: (1) the radio is changed to non-Connect Plus zone, (2) the radio receives a Connect Plus Enable Command in the affected zone, or (3) The SU successfully completes a valid Connect Plus registration. In regards to the latter, the radio will attempt another Connect Plus registration if the user re-cycles power, changes to a Connect Plus zone, or if the radio roams to another Connect Plus site. However, if nothing has changed and SU record is still set to “User Disabled”, the controller will disable the SU again when it attempts to register. The controller will automatically disable a SU if (a) there is no SU Record, or (b) there is an SU Record, but it is set to “Disabled”. Because the SU Record can be set to “User Disabled” via the Network Manger software, the System Administrator can disable any SU via this mechanism. The “Disable Command Receive” privilege only comes into play when the Disable Command is initiated by another radio user. Radio Enable: This feature allows for a radio, typically in a supervisory role, to Enable another radio via over the air signaling. This assumes, of course, that the target radio was in the disabled condition prior to receiving the Enable command. All messaging related to the Enable feature occurs on the Control Channel timeslot. In order for one radio to remotely Enable another, all of the following must occur: (a) The Source ID must be enabled for the “Enable Command Initiation” privilege on its SU Record in the controller database, (b) The Destination ID must be enabled for the “Enable Command Receive” privilege on its SU Record in the controller database, and (c) the Destination SU must be listening to a network site and within range of Control Channel signaling. When an authorized radio sends the “Enable” command, the controller automatically sets the status on the SU Record to “User Enabled”. This assures that even if the target radio doesn’t hear the Enable Command, it will be enabled by the controller the next time it attempts to register. (The radio will make a registration attempt if (a) the user recycles power, (b) the user changes into a Connect Plus zone, or (b) the radio attempts to Roam to another Connect Plus site.) Upon receiving the Enable Command, the target radio resumes normal operation. Because the SU Record can be set to “User Enabled” via the Network Manger software, the System Administrator can Enable any SU via this mechanism. The “Enable Command Receive” privilege only comes into play when the Enable Command is initiated by another radio user. For these call types, the controller repeats the Call Request CSBK on the controller channel downlink as a query for the Destination SU. The Destination SU must send acknowledgement on the Control Channel uplink and provide the user ergo associated with the call type (or for Radio Check no ergo indication at all). If the Control Channel does not receive acknowledgement from the Destination SU, it looks to its programmable “CSBK Call Retry” parameter to see how many times it should resend the Call Request on the Control Channel downlink. The interval between retries is determined by another programmable controller parameter, the “CSBK Call Retry Interval”. If the controller receives no acknowledgement to any of these attempts, it sends a Negative Response to the source SU, which then informs the radio user that the call attempt was not successful. If the controller receives acknowledgement from the Destination ID, it repeats the acknowledgement on the Control Channel timeslot. Upon decoding the acknowledgement, the Source SU informs the radio user that the call attempt was successful. When the SU attempts one of these call types, it will stay with the attempted call until all retries are finished or the call times out. During this time, the radio user will not be able to cancel the current call attempt or initiate a different type of call. To decrease the time that the radio remains in this state, reduce the number of “CSBK Call Retries”.
23 of 151
MOTOTRBO Connect Plus System Planner 1.0 Note: The “CSBK Call Retry” and “CSBK Call Retry Interval” settings also control the retries when the controller queries the target SU prior to assigning a trunk-to timeslot for a Private Call or Remote Monitor.
2.4.7 Trunk-to Timeslot IP Data Calls For these types of calls, the controller sends a control channel message that assigns the Destination ID(s) to a trunk-to timeslot for the IP data exchange between the controller and the SU(s). Calls that fall into this category include Text Messages, GPS Location Updates, and Overthe-air File Transfer. For more information, see Connect Plus Integrated Data.
2.4.8 Connect Plus Integrated Data Just as in other MOTOTRBO digital modes, a Connect Plus radio can be used as an integrated voice and data unit. While Connect Plus offers many of the same data features available in other digital modes – such as Text Messaging and GPS Location Updates – there are some differences in configuration and operation, which will be discussed in the sections that follow. There will also be a discussion of Over-the-air File transfer, an integrated data feature that is only available in Connect Plus mode.
2.5 MOTOTRBO CPS Data Configuration The System Design Section has a thorough discussion of how a Connect Plus radio should be programmed with MOTOTRBO CPS. The following section discusses how MOTOTRBO CPS Data parameters impact Connection operation. Some MOTOTRBO CPS data settings carry through to Connect Plus personalities, operating the same way in Connect Plus as they do in other digital personalities. Other MOTOTRBO CPS data settings affect only non-Connect Plus modes of operation. Unless specifically stated otherwise, the settings on the following list affect Connect Plus data operation in the same way as they affect other digital modes. MOTOTRBO CPS Screen General Settings
Setting/Parameter affecting Connect Plus operation Radio ID. Connect Plus supports Radio IDs in the range of 1 to 16776351. 16776352 through 16776415 are configurable with MOTOTRBO CPS, but must not be used for Connect Plus radios.
General Settings
TX Preamble Duration (In Connect Plus, the TX Preamble precedes IP data transmissions only. It does not precede Connect Plus CSBKs. If the radio is used for Connect Plus operation only, the TX Preamble should be set to zero. If the radio contains non-Connect Plus channels that require a TX preamble, it should be set as short as possible. Otherwise, it may adversely affect Connect Plus operation.)
Network Screen
Radio IP. This is usually left at default setting of 192.168.10.1. Connect Plus will still operate correctly if value is changed.
Network Screen
CAI Network. Must be left at default value of 12.
24 of 151
MOTOTRBO Connect Plus System Planner 1.0 Network Screen
CAI Group Network. Must be left at default value of 225.
Network Screen
Maximum Transmit PDU Size. Must be set large enough to accommodate the largest text message or LRRP Report transmitted by the radio while operating in a Connect Plus zone. Recommend 500 bytes or larger.
Channel Screen
Compressed UDP Data Header (do NOT enable for Connect Plus personalities)
Channel Screen
Data Call Confirmed Checkbox (Must be enabled for Connect Plus personalities)
Due to the Connect Plus Option Board’s role in providing data services, there are some MOTOTRBO CPS parameters that affect non-Connect Plus personalities only. The settings listed in the following table are important for other digital modes, but they have no effect on Connect Plus operation, provided that programmable port numbers are not set to ports already used by Connect Plus Option Board. To avoid conflicts with Connect Plus, the programmer must NOT use any of the following ports for the configurable port settings shown below; 4061, 4062, 4063, 4004. MOTOTRBO CPS Screen General Settings
Setting/Parameter that does not affect Connect Plus operation Persistent LRRP Requests: Checkbox labeled “save”
General Settings
Persistent LRRP Requests: Checkbox labeled “delete”
Network Screen
Telemetry UDP Port
Network Screen
“Forward to PC” checkbox
Network Screen
ARS Radio ID
Network Screen
ARS Radio Port
Network Screen
TMS Radio ID
Network Screen
User Defined UDP Port #1
Network Screen
User Defined UDP Port #2
Network Screen
User Defined UDP Port #3
Text Messages
Text Messages (programmed “Quick Text” messages are entered via Connect Plus CPS, not MOTOTRBO CPS)
Telemetry
Settings on these screen are not used in Connect Plus operation
Channel screen
ARS (grayed-out when Option Board trunking is enabled)
25 of 151
MOTOTRBO Connect Plus System Planner 1.0
2.6 Connect Plus Text Messaging 2.6.1 Text Messaging Services In many regards, Connect Plus Text Messaging Service (TMS) operates the same as other MOTOTRBO digital modes. This includes all of the following points: A radio user can create a text message in one of two ways; Quick text or limited free-form text messages. Connect Plus CPS supports entry of 10 Quick Text Messages. The Connect Plus user can send a Text Message to a Text Message Dispatch Call ID, to an individual Connect Plus radio, or to a Connect Plus Group ID. When receiving a text message, the user is notified of a new message by an icon, display string, and an audible tone if enabled in the codeplug via the Connect Plus CPS. A Connect Plus radio can store up to 30 received or sent text messages at a time. o
The user is notified once the Inbox and sent folder storage becomes full.
o
Once full, subsequent new messages automatically cause the oldest messages to be deleted.
o
Messages are not deleted when the radio is turned off.
A user can store up to 10 draft text messages in the Drafts folder at a time. o
Once full, subsequent new drafts automatically cause the oldest draft(s) to be deleted. A user can opt to Send, Edit, or Delete the drafts in the Drafts folder.
o
The user can opt to Save a text message that is being written or edited to the Drafts folder.
o
If a high priority event causes the radio to exit the text message editing screen, the current text message is automatically saved into the Drafts folder.
o
A draft that is sent is deleted from the Drafts folder and stored to the Sent folder.
The user can scroll through messages stored in the various Text Message folders, and can select a specific message for various options such as delete, forward, reply, etc. Available options vary by folder. If the Connect Plus SU receives a text message containing a subject line, the radio will preserve the Subject Line and automatically include it in any reply message. (The subject line is not displayed when the user creates a reply, but it will be seen by the recipient of the reply.) Non-display and limited display radios have very limited Text Message capability. They can send a Quick Text message (the Quick Text Message, Destination ID, and One-touch-call button
26 of 151
MOTOTRBO Connect Plus System Planner 1.0 assignment must be configured with Connect Plus CPS), but they cannot send a limited free form text message, or receive a text message.
IP to other Connect Plus Sites
IP to XRC 9000 Controller
Application Server Text Message Server Text Message Dispatch Watcher Application (Subscribes to Connect Plus Presence Notification Service)
XRC 9000 Controller Handles OTA transmission to/from Connect Plus SU’s Provides Text Message store & forward Presence Notification Service
Site Repeaters
IP to Text Message Dispatch Clients
Connect Plus Site TX/RX
TX/RX
Cell Phone or e-mail addressable device (if supported by Text Message Server)
TX/RX
MOTOTRBO Portable & Mobile Radios (operating in Connect Plus digital mode)
Figure 2-3 Connect Plus Text Messaging Services
Figure 2-3 provides a sample Connect Plus Text Messaging Services configuration. The Text Messaging features are outlined in more detail in the following sections.
2.6.2 Text Messaging features only available in Connect Plus Connect Plus provides several text messaging features not available in other digital modes: Mail Boxing: In Connect Plus, text messages are never transmitted directly from one SU to another. Instead, they always pass through the Connect Plus controller. This approach provides significant advantages to the end user. In other digital modes, the text message cannot be successfully sent unless the destination SU is available and listening to the same open channel as the source SU. In Connect Plus, the source SU sends the text message regardless of whether the destination SU is currently available. The controller receives the text message on behalf of the destination SU, places the message in the subscriber’s mailbox, and delivers the message at the earliest opportunity. In this regard, the Connect Plus system emulates how text messages are sent on a cellular telephone network. In the controller, each SU has a mailbox that can store up to ten undelivered messages. If a radio or Text Message Service (TMS) Client attempts to send a message to an SU with a full controller mailbox, the source will be notified “mailbox full”, and will
27 of 151
MOTOTRBO Connect Plus System Planner 1.0 have to try again at a later time. Any text message older than 168 hours will be automatically deleted by the controller7. Store and Forward Capability: In a multi-site Network, the text message source does not need to know where in the network the destination SU is currently located. The controller will forward the text message to the registered site and attempt delivery at the earliest opportunity. For a text message to an individual SU, the controller requires OTA acknowledgement from the receiving radio. If OTA acknowledgement is not received, the message is re-queued, and delivery is re-attempted at a later time. If the unit changes sites, the controller will forward the message to the new site to attempt delivery. This process continues until the message is acknowledged, or it times out. Text Messages to a Group ID receive no OTA acknowledgement. They are transmitted (in “unconfirmed” mode) at every network site where the Group ID is registered at the time the message is received by the controller. Text Message to a Multigroup ID: When the Source radio has been configured with the proper initiation privilege, Connect Plus supports text message transmission to a Multigroup ID. The text message will be sent to all SU’s network-wide that share the same Multigroup ID, and who are not already occupied in another call-in-progress. Like all Text Messages to a Group ID, the text message is transmitted “unconfirmed”. Text Message to a Site All Call ID: When the Source radio has been configured with the proper initiation privilege, Connect Plus supports text message transmission to a special Site All Call ID. The text message will be sent to all SU’s that are currently registered to the same site where the source radio is located, and who are not already occupied in another call-in-progress. Like all Text Messages to a Group ID, the text message is transmitted “unconfirmed”.
2.6.3 Text Message Transmission & Delivery In other MOTOTRBO digital modes, a Text Message to a Group ID is always sent “unconfirmed” and a Text Message to an Individual (Unit) ID can be sent “confirmed” or “unconfirmed”, depending on CPS programming. Connect Plus also uses “unconfirmed” delivery for Text Messages to a Group ID, but it always uses “confirmed” delivery for individual ID’s. For this reason, the “Data Call Confirmed” checkbox must always be enabled for Connect Plus channels via MOTOTRBO CPS. However, note that “confirmed” delivery does not imply end-to-end confirmation from the source to the target SU. The confirmation is from the controller to the source SU. In other digital modes, text messages are always transmitted directly from the source SU to one or more destination SU’s. In Connect Plus, text messages are never transmitted directly from one SU to another. They always go through the Connect Plus controller. This means that Connect Plus text message transfer is a two-step process. In the first step, the Source SU requests an available timeslot for text message transmission. The controller assigns a trunk-to timeslot. The Source SU moves to the trunk-to timeslot and transmits the text message to the controller as an IP datagram. The controller receives the text message on behalf of the destination SU, and places the message in the subscriber’s mailbox. The controller sends OTA acknowledgement upon receiving the message, and the source SU displays, “Message Sent”.
7
This is not a configurable option for the current release.
28 of 151
MOTOTRBO Connect Plus System Planner 1.0 When a timeslot and the Destination ID are both available, the controller initiates the second step in the process, text message delivery, by sending a Control Channel message to assign the trunk-to timeslot. On the trunk-to timeslot, the controller delivers the text message(s) to the Destination ID. When the controller delivers a text message to an individual ID, it expects to receive OTA acknowledgement for each transmitted message. If OTA acknowledgement is not received, the message is re-queued, and the controller re-attempts delivery at a later time. For text messages to a Group ID, the controller does not expect to receive OTA acknowledgement since the message is transmitted in “unconfirmed” mode.
2.6.4 Controller Programming for Text Messaging Services The XRC 9000 controller has several parameters that affect Text Messaging. These are configured with the MOTOTRBO™ Connect Plus Network Manager8 software: In order for a radio to receive text messages, the radio must have a display, and the “Text RX Capable Radio” checkbox must be enabled on the SU’s user record in the controller database. In order for a radio to send a text message to its Multigroup ID, the “Multigroup Call Init” checkbox must be enabled on the SU’s user record in the controller database. Otherwise, the controller will deny the request. In order for a radio to send a text message to the Site All Call Text ID, the “Site All Call Text Init” checkbox must be enabled on the SU’s user record in the controller database. Otherwise, the controller will deny the request The next two settings affect Text Message exchange between the Connect Plus setting and a Text Message Server: o
The Site Configuration screen has a field called, “Text UDP Listen Port”. This setting determines which UDP port the controller utilizes to listen for incoming messages from the Text Message application. Unless it creates UDP port conflict, this should be left at the default setting of UDP Port 4007.
o
The XRC 9000 can be configured with a Destination IP address and Port for the Text Message Server. This is only necessary when there are multiple Connect Plus sites, but all sites do not share the same (IP address) perspective back to the TMS server. Otherwise, the controller can use the Server IP address and port that was provided in a special message sent by the Text Message Server.
2.6.5 SU Programming for Text Message Services The System Design Section has a thorough discussion of how a Connect Plus radio should be programmed with MOTOTRBO CPS. The following section discusses how specific MOTOTRBO CPS settings affect text message operation on Connect Plus channels: The Connect Plus Radio ID is set with MOTOTRBO CPS. Select a Radio ID between 1 and 16776351 that has not been used for any other radio in the Connect Plus network.
For brevity, the MOTOTRBO™ Connect Plus Network Manager will be referred to simply as Network Manager from here on. 8
29 of 151
MOTOTRBO Connect Plus System Planner 1.0 This is used as the Source ID for text messages created by this Connect Plus SU and as the Destination ID for text messages created by other SU’s and destined for this radio. Connect Plus requires that the CAI Network and CAI Group Network settings must be left at the default values. In order for the radio to transmit a maximum size text message plus overhead, the Max TX PDU size should be 500 bytes or larger. TX Preamble Duration determines the length of the preamble that is sent before all text messages, regardless of digital mode. If the radio is used for Connect Plus only, this value can be set to zero. If the radio contains non-Connect Plus channels that require a TX preamble, it should be set as short as possible. Otherwise, it may adversely affect Connect Plus operation. For Connect Plus digital channels, Compressed UDP Data Header should be disabled (unchecked) For Connect Plus Channels, Data Call Confirmed should be enabled (checked) The following MOTOTRBO settings affect Text Message operation when the radio is selected to non-Connect Plus digital channels, but they are not used by Connect Plus. If the Connect Plus radio is also used for non-Connect Plus digital operation (Digital Conventional, IP Site Connect, Capacity Plus), the MOTOTRBO parameters immediately below should be set according to the requirements of those operations. They have no affect on Connect Plus Operation: Pre-programmed (quick text) messages that are programmed with MOTOTRBO CPS. TMS Radio ID TMS UPD Port Forward to PC checkbox Digital Contacts created with MOTOTRBO CPS The following settings in Connect Plus CPS affect text messages Create Digital Contacts to represent other radios that this SU may send a text message to, or receive a text message from. Failure to create a digital contact will not keep a display radio, provisioned for Manual Dial, from sending messages to SU’s that aren’t on the Contact list (or receiving messages from SU’s that aren’t on the Contact list), but the ID information will be displayed by number only, not by alias. The, “Dispatch Call” contact type, is used exclusively for text messages exchanged between the SU and Text Message Dispatch Clients. A Text Message Dispatch Client is a non-radio entity, such as a Text Message Dispatcher PC. Use the Text Messages screen to create programmed (quick text) messages, if desired. If desired, use the Buttons screen to set a “One Touch Call”, which can be used to send a configured Quick Text message to a specific Destination ID.
30 of 151
MOTOTRBO Connect Plus System Planner 1.0
2.6.6 Connect Plus Interface to Text Message Application Just as in other MOTOTRBO digital modes, Connect Plus supports text message transfer between Connect Plus SU’s and non-Connect Plus entities, such as a Text Message Dispatch PC. The text message transfer is facilitated via the controller’s IP connection to a Text Message application, sometimes referred to as the “Text Message Server”. Connect Plus supports the following services for its interface to the Text Message application: A Text Message Dispatch Client can send a text message to a Connect Plus SU. A Text Message Dispatch Client can send a text message to a Connect Plus Group ID. A Text Message Dispatch Client can send a text message to a Connect Plus Multigroup ID. A Text Message Dispatch Client can send a text message to the Connect Plus Site All Text ID. A Connect Plus SU can send a text message to a TMS Dispatch Client. The Connect Plus controller provides mailboxing for text messages, which allows for store and forward. The Connect Plus controller provides automatic retries for text messages sent from a Text Message application to individual Connect Plus ID’s, and for text message sent from a Connect Plus SU to a Text Message application. The Connect Plus controller sends a “Confirmation of transmission” text message to a Text Message Client when a message is delivered OTA. The Connect Plus controller sends an “Undeliverable Notification” text message to a Text Message Client when a message cannot be delivered OTA. While many of the Connect Plus services to the TMS application are also available in other MOTOTRBO digital modes, the system architecture for providing these services is different in Connect Plus. In other digital modes, the Text Message application resides on a PC that has a USB connection to a mobile radio. The control station radio acts as peer to other subscriber units in the field via the Common Air Interface. Connect Plus does not use this architecture. In Connect Plus, the Text Message application resides on a PC that is connected via IP to a XRC 9000 Controller. This can be any Connect Plus controller on the radio network. The controller is the application’s gateway to the Common Air Interface. This architecture provides several significant advantages: The controller supplies immediate acknowledgement upon receiving the text message via IP. The Text Message application is not responsible for the possible complications of overthe-air delivery. The controller – not the Text Message application – manages over-the-air retries for confirmed text messages. By sending the message to the Connect Plus controller, the application is handing it to the central intelligence of the Connect Plus system. The controller is the system component with the required knowledge to locate the destination SU, identify an available RF resource, and deliver the message to its intended target.
31 of 151
MOTOTRBO Connect Plus System Planner 1.0 The application can send the text message to any controller at any time. It does not need to worry about where the Destination SU is currently registered, whether the destination SU is currently busy or idle, whether there is a channel currently available for text message transmission, etc. Upon receiving the text message, the controller places the message in the mailbox of the destination SU, and will deliver the message at the earliest opportunity. When the controller delivers a text message from a Text Message Dispatch Client to an individual Connect Plus ID, the controller expects to receive OTA acknowledgement that the message has been received from the destination SU. Upon receiving this acknowledgement, the controller sends a “confirmation of transmission” text message to the Text Message Dispatch Client. Or, if transmission cannot be completed successfully, the source Dispatch Client receives an “undeliverable” notification. The Motorola Multi-Channel Device Driver (MCDD) is not required, nor used in Connect Plus. Just as in other digital modes, the “Dispatch Call” Contact type is used to facilitate Text Message exchange between an SU and a TMS Dispatch Client. To illustrate how the Connect Plus system uses this contact type, the following steps are provided: 1. The Connect Plus radio is programmed (via Connect Plus CPS) with one or more “Dispatch Call” entries in its Contact List. When creating the contact, a “Call ID” must be entered for the record (1-16776351). An alias (such as “Central Dispatch”, for example) may be entered as well. 2. The Connect Plus user follows the normal procedure to create a text message (or use a programmed “quick text message”) and selects a target ID from the Contact List. The Dispatch Call ID (“Central Dispatch, for example) is available as a target. The radio user presses OK. 3. The Source radio requests a timeslot for text message transmission and sends the text message to the controller. The controller knows through a couple of different mechanisms that message is destined for a TMS Dispatch Client. However, the message itself does not include the IP address of the TMS Server, or the TMS Dispatch Client. 4. The controller looks up the Destination IP address and port number for the Text Message Server, and forwards the message accordingly via its IP connection. There are two different ways the controller can determine the Text Message Sever IP. a. The Text Message server can send a special message to the controller called the “Text Message Service Availability Message”. The message targets a specific SU, and it provides the IP address of the Text Message Server. Upon receiving the message, the controller stores this information on behalf of the targeted SU. When the SU sends a message to the Text Message Server, the controller can use this stored IP address when forwarding the text message to the Text Message Server. This approach allows different SU’s to have different Text Message Servers, but it cannot be used in a multisite network when different sites have a different (IP address) perspective back to the TMS Server. In that case, the controller must use a programmed IP address for the Text Message Server as discussed in the next paragraph. Which approach is actually used (Service Availability Message or programmed Text Message Service IP address) is determined through controller programming. b. The XRC 9000 controller can be programmed with a Destination IP address and port for the Text Message Server. Because this is a site-wide setting (which means that the controller will use the same Text Message Server IP for all SU’s),
32 of 151
MOTOTRBO Connect Plus System Planner 1.0 programming the Text Message Server IP address into the controller provides somewhat less flexibility than obtaining this address from the Service Availability Message. This approach is required in a multisite network when different sites have a different (IP address) perspective back to the TMS Server. Regardless of which approach is used, it should be noted that Connect Plus does not support multiple Text Message Servers for messages sourced by the same SU. 5. The server receives the text message and decodes the “Dispatch Call ID” that was selected by the radio user. The server has a lookup table to translate the Call ID to a user name, destination IP address and port. This tells the Text Message server how to route the message to the destination Dispatch Client. If supported by the Text Message Server, the Dispatch Call ID can be translated into an email address; thereby providing a text message interface between Connect Plus SU’s and email clients. It should be noted that all text messages exchanged with the Connect Plus system have a maximum length of 138 characters, which is the same as other MOTOTRBO digital modes. When a Text Message Dispatch Client sends a Text Message to a Connect Plus SU, the process described above is followed in reverse. In order to receive a text message from a Dispatch Client, the SU doesn’t necessarily have to be programmed with the Dispatch Call ID used by the Text Message server, but this is highly recommended. It is required in order to display a programmed alias, and it is also required for the SU to source a text message to the Dispatch Client (unless the SU is replying to a previously received message).
2.6.7 Text Messaging Features not Available in Connect Plus The following Text Message features are not available in Connect Plus: In other digital modes, Text Messages to an individual SU can be sent either confirmed (acknowledgement requested) or unconfirmed (no acknowledgement requested). This is a programmable option with MOTOTRBO CPS. In Connect Plus, all Text Messages to an individual SU must be transmitted in confirmed mode. This means that the “Data Call Confirmed” checkbox must enabled for all Connect Plus personalities when programming the radio with Connect Plus CPS. In other digital modes, the SU can be configured so that it will forward text messages received OTA to a connected PC. This option is not available for Connect Plus operation. In other digital modes, the radio will transmit text messages that were received from a directly connected PC. This is not available for Connect Plus operation.
2.7 Connect Plus Location Services Just as in other MOTOTRBO digital modes, Connect Plus Location Services support “single” and “periodic” Location Updates for GPS-equipped SU’s. Just as in other digital modes, these updates are initiated at the request of a Location Server. However, the system architecture for the Location Request Response Protocol (LRRP) interface in Connect Plus is different from other digital modes.
33 of 151
MOTOTRBO Connect Plus System Planner 1.0
IP to other Connect Plus Sites
Application Server
IP to XRC 9000 Controller
XRC 9000 Controller
Location Server (Initiates Requests/Receives Reports) Location Dispatch Watcher Application (Subscribes to Connect Plus Presence Notification Service)
Handles OTA transmission to/from Connect Plus SU’s Schedules periodic Location Requests Forwards Location Requests to other sites (if necessary) Presence Notification Service Site Repeaters
Connect Plus Site
IP to Location Clients
RX Location Request TX Location Report
RX Location Request TX Location Report
RX Location Request TX Location Report
GPS equipped MOTOTRBO Portable & Mobile Radios (operating in Connect Plus digital mode)
Figure 2-4 Connect Plus Location Services In other digital modes, the Location application software resides on a PC that has a USB connection to a mobile radio. The control station radio acts as peer to other subscriber units in the field via the Common Air Interface. Connect Plus does not use this architecture. In Connect Plus, the Location application resides on a PC that is connected via IP to a XRC 9000 Controller. This can be any Connect Plus controller on the radio network. The controller is the application’s gateway to the Common Air Interface. Figure 2-4 shows the described Location Service configuration. This architecture provides several significant advantages: By sending the Location Request to the Connect Plus controller, the application is handing it to the central intelligence of the Connect Plus system. The controller is the system component with the required knowledge to locate the destination SU, identify an available RF resource, and send the Location Request to its intended target. The application does not need to worry about the destination SU is currently busy or idle, whether there is a channel currently available for Location request transmission, etc. Upon receiving the Location Request, the controller will transmit the Request to the destination SU at the earliest opportunity.
34 of 151
MOTOTRBO Connect Plus System Planner 1.0 Because the controller assigns which timeslot will be used for Location Requests and Reports, it can utilize any available timeslot. Connect Plus does not use a “GPS Revert Channel” or a “Data Revert Channel”9. In other digital modes, the SU runs a timer to track its “periodic interval”, and transmits its Location update to the “Selected Channel” or its “GPS Revert Channel” (depending on CPS programming) when the timer expires. This approach is susceptible to collisions that occur when two or more SU’s pick the same time and channel to transmit their location update. In Connect Plus, the controller tracks both the periodic interval and assigns the timeslot for the Location Update. This allows the Connect Plus system manage resource assignment in an orderly manner, and to provide a collision-free environment for periodic Location updates. The Multi-Channel Device Driver (MCDD)10 is not required for the Location Server when interfacing to the Connect Plus network. The application sends the request to any XRC 9000 controller in the network. The application does not need to be concerned about what site or channel the SU is currently using. Tracking the SU between sites is the responsibility of the controller. The Location Report might not come from the same controller that received the Location Request.
2.7.1 Single Location Update When the XRC 9000 controller receives a Single Location Update request for a registered SU, the operation is as follows: The controller forwards the request to the registered site (if different from the site receiving the request). The controller of the registered site checks SU and timeslot availability. At the earliest opportunity, it sends a Control Channel message to move the destination SU to a trunk-to timeslot. On the trunk-to timeslot, the controller transmits the Location Request, using confirmed data transfer. On the same trunk-to timeslot (during the same session), the SU transmits its Location Report, also using confirmed data transfer. The controller forwards the Location report to the requesting Location application. After completing the process, the controller deletes the Request and its corresponding Report.
9
The reader can refer to the MOTOTRBO System Planner regarding the GPS Revert Channel and Data Revert Channel features. 10 The reader can refer to the MOTOTRBO System Planner regarding the Multi-Channel Device Driver.
35 of 151
MOTOTRBO Connect Plus System Planner 1.0
2.7.2 Periodic Location Update When the XRC 9000 controller receives a Periodic Location Request (also called a “Triggered Request with Periodic Interval”) for a registered SU, the operation is as follows: The controller sends a message to the requesting application verifying receipt of the periodic Location Request. The controller forwards the request to the registered site (if different from the site receiving the request). The controller converts the request to a Single Location Request, making note of the requested periodic interval. The controller of the registered site checks SU and timeslot availability. At the earliest opportunity, it sends a Control Channel message to move the destination SU to a trunk-to timeslot. The controller tells the SU that it should store the imminent Location Request. On the trunk-to timeslot, the controller transmits the Location Request, using confirmed data transfer. On the same trunk-to timeslot (during the same session), the SU transmits its Location Report, also using confirmed data transfer. The controller converts the Single Location to a Periodic Location Report (to match the original request), and forwards the Location report to the requesting Location application. The controller tracks the requested periodic interval. When the requested interval expires, the controller of the registered site checks SU and timeslot availability. At the earliest opportunity, it sends a Control Channel message to move the destination SU to a trunk-to timeslot. The controller tells the SU that it should use its stored Location Request. This speeds up the data transfer on the trunk-to timeslot. On the assigned trunk-to timeslot the SU transmits a Location Report based on its stored Location Request. It is important to point out that the combined duration for Location Request from the controller and the corresponding Location Report from the SU is about 23 seconds (assuming no retries). After receiving the Location Report the controller resets the timer for the periodic interval for the given SU. The net effect of this approach is that the actual periodic interval is increased by 2-3 seconds. The controller converts the Single Location to a Periodic Location Report (to match the original request), and forwards the Location report to the requesting Location application. The process described above is repeated at each periodic until in one of the following occurs: o
The requesting Location application cancels the periodic request, or
o
The requesting application sends a new periodic request, or
o
The request times out. To prevent the request from timing out, the application must resend the request prior to expiration of the controller’s Location Request Time Out (24 hours).
36 of 151
MOTOTRBO Connect Plus System Planner 1.0 o
The SU de-registers from the network
The Connect Plus system supports just one periodic request at a time for any SU (and therefore just one requesting application at a time for any SU).
2.7.3 Sending Reports to the Location Application When the XRC 9000 controller sends the Location Report to the requesting application, there are two different ways the controller can determine what IP address and port it should use for the Location application: Upon receiving a Location Request from a Location application, the controller stores the Source IP and Port from the received request. When the SU sends the Location Report to the XRC 9000, the controller can use this stored IP address when forwarding the report to the requesting application. This approach provides the most flexibility. Because the controller uses the IP address stored from the request, multiple Location servers can request a single location update from same SU (but just one a time). For periodic updates, this approach allows different SU’s to have different Location Servers (but all periodic updates for the same SU will be sent to the same Location Server). This approach (using the IP address stored with the request) cannot be used in a multisite network when different sites have a different (IP address) perspective back to the LRRP Server. In that case, the controller must use a programmed IP address for the Location Server as discussed in the next paragraph. Which approach is actually used (using the IP address from the request or using a programmed Location Server IP address) is determined through controller programming. The XRC 9000 controller can be programmed with a Destination IP address and port for the Location Server. Pre-configuring the Location Server IP address into the controller provides somewhat less flexibility than obtaining this information from the received request. Because this is a site-wide setting, all location reports (both “single” and “periodic” reports), for all SU’s, go back to the same Location Server. This approach is required in a multisite network when different sites have a different (IP address) perspective back to the LRRP Server.
2.7.4 Location Services and Presence Notification The Connect Plus system does not retain any type of Location Request when the destination Connect Plus SU de-registers from the network. Also, if the controller receives a Location Request for an un-registered SU, it does not store the request. The Location application must send the request while the SU is registered with the network. For these reasons, it is highly recommended that Location application take advantage of the controller’s Presence Notification services. By implementing this interface, the Location application can send the Location Request when it receives a message from the controller (acting as Presence Notifier) which indicates that the SU is “present” in the network. For more information, see “Connect Plus Presence Notifier” section.
2.7.5 Controller Programming for Location Services The XRC 9000 controller has several parameters that affect Location Services. These are configured with the XRC 9000 Network Manager software:
37 of 151
MOTOTRBO Connect Plus System Planner 1.0
In order for a radio to respond to Connect Plus location requests, the radio must be GPSequipped, and the “GPS capable radio” checkbox must be checked on the SU’s user record in the controller database. The Site Configuration screen has a field called, “LRRP UPD Listen Port”. This setting determines which UDP port the controller utilizes to listen for incoming Location requests from the Location application. Unless it creates UDP port conflict, this should be left at the default setting of UDP Port 4001. The XRC 9000 can be configured with a Destination IP address and Port for the Location Server. This is only necessary when there are multiple Connect Plus sites, but all sites do not share the same (IP address) perspective back to the LRRP server. Otherwise, the controller can use the Server IP address and port that was provided in the location request.
2.7.6 SU Programming for Location Services The System Design Section has a thorough discussion of how a Connect Plus radio should be programmed with MOTOTRBO CPS. The following section discusses how specific MOTOTRBO CPS Settings affect Location Services for the Connect Plus SU: For a GPS equipped radio, the “GPS” checkbox must be enabled on the General Settings screen with Connect Plus CPS. This enables the GPS receiver and causes a display radio to show the GPS icon. In Connect Plus mode, the GPS icon is visible while the Option Board is idle and monitoring the control channel. The icon is not shown during a call-inprogress. o
The absence of this icon indicates that the location service is disabled.
o
The icon shows a full satellite dish when good GPS signals are detected.
o
The icon shows an empty satellite dish when the radio is receiving poor GPS signals. In such case, the SU will still transmit its last known location even though it may represent “stale” GPS coordinates.
The Connect Plus Radio ID is set with MOTOTRBO CPS. Select a Radio ID between 1 and 16776351 that has not been used for any other radio in the Connect Plus network. This ID must be configured into the Location server, along with the requested attributes (location, velocity, etc.) The Radio ID is used as the Destination ID for Location Requests sent to this Connect Plus SU, and it is used as the Source ID for Location reports received from this SU. Connect Plus requires that the CAI Network and CAI Group Network settings must be left at the default values. The Max TX PDU must be large enough to accommodate the largest Location Report expected from this SU. Recommended value is 500 bytes or larger. TX Preamble Duration determines the length of the preamble that is sent before the IP datagram containing the SU’s Location Report. If the radio is used for Connect Plus only, this value can be set to zero. If the radio contains non-Connect Plus channels that require a TX preamble, it should be set as short as possible. Otherwise, it may adversely affect Connect Plus operation.
38 of 151
MOTOTRBO Connect Plus System Planner 1.0
For Connect Plus digital channels, Compressed UDP Data Header should be disabled (unchecked) For Connect Plus Channels, Data Call Confirmed should be enabled (checked) Due to the Connect Plus Option Board’s role in providing Location services, there are some MOTOTRBO CPS Location parameters that affect non-Connect Plus personalities only. The settings listed below are important for configuring Location updates in other digital modes, but they have no effect on Connect Plus operation: The Persistent LRRP Requests “Save” checkbox does not affect Connect Plus operation. The Persistent LRRP Requests “Delete” checkbox does not affect Connect Plus operation. ARS checkbox. ARS is not used in not used in Connect Plus. This checkbox is grayed out when “Option Board Trunking” is enabled for the digital personality. GPS Revert field. Connect Plus does not use a GPS Revert Channel. Because this setting is tied to the ARS Checkbox, it will be grayed out when “Option Board Trunking” is enabled for the digital personality. The following Connect Plus CPS Settings affect Location Services for the Connect Plus SU: At the present time, there are no programmable settings in Connect Plus CPS specifically for Location Services.
2.7.7 Connect Plus GPS Performance Specifications The Connect Plus is subject to the same performance specifications as other MOTOTRBO digital modes in regards to the following: Cold Start Hot Start Time to First Fix (TTFF) Horizontal Accuracy For more information on these topics, see “Performance Specifications” in Location Services section of [1].
2.7.8 Location Report Rates in Connect Plus Because all Location requests go through the controller in Connect Plus trunking, this additional step will add some additional time for the Location Request-Report process when compared to the best-case scenario for other digital modes. The trade-off is that Connect Plus virtually eliminates collisions for Location Requests and Reports and provides a highly managed environment for
39 of 151
MOTOTRBO Connect Plus System Planner 1.0 channel assignments. Even so, it should be noted that the controller will process all requests on a best effort basis that will be influenced by factors such as channel availability, the number of other calls in process (both voice and data), and the number of requests being processed. Immediate Requests may not always receive an Immediate Report. Periodic reports may not always come at the exact, requested interval. On a “quiet” Connect Plus site, the controller can use every trunk-to timeslot for Location Updates, resulting in a very high update rate. The rate will decline as requests for other types of calls increase.
2.7.9 Location Features not Available in Connect Plus The following Location features are not available in Connect Plus: Emergency Location Update (Triggered Location Update with Emergency Trigger). Emergency is not a feature in the initial Connect Plus release. In other digital modes, a Location application may obtain presence information by subscribing to the MOTOTRBO Presence Notifier or a 3rd Party ARS application. In Connect Plus, a Location application obtains presence information by subscribing to the Presence Notification services of the XRC 9000 controller. This is the only supported presence interface for Connect Plus operation. GPS Revert is not necessary in Connect Plus, and it is not available while operating in a Connect Plus personality. The Location Application should not use the “max-info-age” element in its LRRP Request to the Connect Plus system. This speeds up the Request-Report process because the radio doesn’t have to wait for a fresh data acquisition of GPS data. It will create its report based on its most recent acquisition.
2.8 Connect Plus Over-The-Air File Transfer For certain types of Connect Plus files, the Connect Plus system provides two options for transferring the file to an SU: Connect Plus CPS can be used to transfer the file from a PC to the SU, utilizing the standard MOTOTRBO radio programming cable. This approach, sometimes referred to as “tethered programming”, is the recommended method for initial set-up and programming. It can also be utilized following deployment to the field. The file can be uploaded to the Connect Plus controller, and then transferred over-the-air (OTA) to Connect Plus SU’s. This feature, available only in Connect Plus, can reduce radio down time when the SU needs to be updated with a new file version after it has already been deployed to the field. The following sections explain how OTA File Transfer works in this Connect Plus release. In the future, additional file transfer options may be offered.
2.8.1 Supported File Types The following file types are supported for Connect Plus OTA File Transfer:
40 of 151
MOTOTRBO Connect Plus System Planner 1.0
Connect Plus Network Frequency File Connect Plus Option Board firmware At the current time, other Connect Plus files (such as the Connect Plus codeplug), can only be transferred in the traditional manner, using a programming cable and Connect Plus CPS.
2.8.2 OTA File Transfer Settings for MOTOTRBO CPS Even though OTA File Transfer is only available in Connect Plus mode, there are some MOTORBO CPS settings that are important to its operation. This is because Connect Plus uses MOTOTRBO data transfer as the transport mechanism for file packets. The following MOTOTRBO CPS settings affect Connect Plus OTA File Transfer: The Connect Plus Radio ID is set with MOTOTRBO CPS. Select a Radio ID between 1 and 16776351 that has not been used for any other radio in the Connect Plus network. The Radio ID is used as the Destination ID for OTA File packets sent to this Connect Plus SU. Connect Plus requires that the CAI Network and CAI Group Network settings must be left at the default values. The recommended value for Max TX PDU is 500 bytes or larger. TX Preamble Duration determines the length of the preamble that is sent before IP datagrams transmitted by the SU. If the radio is used for Connect Plus only, this value can be set to zero. If the radio contains non-Connect Plus channels that require a TX preamble, it should be set as short as possible. Otherwise, it may adversely affect Connect Plus operation. For Connect Plus digital channels, Compressed UDP Data Header should be disabled (unchecked) For Connect Plus Channels, Data Call Confirmed should be enabled (checked)
2.8.3 OTA File Transfer Settings for Connect Plus CPS There are several programmable parameters in the Connect Plus codeplug for OTA file transfer. The following parameters are configurable per Connect Plus SU (using Connect Plus CPS). They must be configured prior to field deployment. Enable OTA File Transfer: This setting defaults to off, meaning that OTA File Transfer is disabled and the Connect Plus SU will not acquire any file OTA. Because the radio can miss calls during OTA File Transfer, it may be advisable to leave the feature disabled for some Mission Critical users. When disabled, file transfer can only occur via the traditional method using Connect Plus CPS and a programming cable. When enabled, the Connect Plus SU can acquire a supported file type via OTA File Transfer. OTA Update Upon Completion: When the radio completes OTA file transfer, this setting determines when the radio will update (upgrade) to the newly acquired file. It applies only to file transfers that require a reset to take affect (i.e. Option Board firmware upgrade).
41 of 151
MOTOTRBO Connect Plus System Planner 1.0 When enabled, the Option Board shall upgrade immediately upon completing the OTA File Transfer. If not enabled, the upgrade will be automatically performed the next time the radio is powered-up in an Option Board zone. While the radio is updating (upgrading) to the newly received file, the user will not be able to make or receive calls. Unconfirmed File Transfer Dwell Time: During Unconfirmed File Transfer this value determines how long the radio will remain on the trunk-to timeslot without decoding any valid file packets. If the timer expires and no valid packet is decoded, the radio returns to the Control Channel frequency and starts its “File Transfer Attempt Interval Time”. File Transfer Attempt Interval Time: When the radio has been involved in a File Transfer, and it leaves the trunk-to timeslot with an incomplete file (for any reason), the radio starts the File Transfer Attempt Interval Time. The timer must expire before the radio will automatically attempt to resume the file transfer. A display radio user can request the radio (via the menu) to resume the file transfer prior to expiration of the timer. If the radio is powered down before the timer expires, the timer is set to its full value upon the next power up.
2.8.4 OTA File Transfer Configuration in the XRC 9000 Controller The first step to configuring OTA File Transfer in the XRC 9000 controller is to acquire the file that will be uploaded to the controller for OTA transfer. The file should be placed in a known location on the PC that will be used to upload to the controller. The PC must have the XRC 9000 Network Manager software, and it must be configured to talk to the desired Connect Plus site(s). Once the file is placed in a known location on the PC, the steps are as follows: 1. Launch the Connect Plus Network Manager Connection Tool and connect to the Connect Plus Site. 2. From the Main Menu, select Site Control/Upload/OTA File. This opens the OTA File Upload Screen. 3. Press “File to Send”. This opens a window used to locate the file on the PC. 4. Browse to the directory containing the file for upload, select the file, and press “Open”. 5. Configure the following settings:
Time to Beacon: Determines how long the controller will “beacon” a special control channel message to inform SU’s of file availability. This time must be equal to “Time to Dedicate”. This message should not be confused with the IP Site Connect Beacon, which is not used in Connect Plus. Time to Start: Tells the controller when to start sending the File Beacon message (date and time). The controller also starts the dedicated channel file transfer at the configured date and time11. Enter a date and time by typing over the current information. As a convenience, click the arrow to view a drop-down calendar that can be used to select the desired date. The time can only be entered by typing over the current time.
11
File transfer schedule is based off the controller internal clock, which may not be synchronized with the clock of the PC hosting the Network Manager application. Therefore, the file transfer may start at a time slightly different than expected by the user.
42 of 151
MOTOTRBO Connect Plus System Planner 1.0
OK to Downgrade: When checked, the controller sets a bit in the File Beacon message telling the Connect Plus SU that it is OK to downgrade to this file from a higher version. By default, “OK to Downgrade” is not enabled, and this is usually the recommended setting. Even if the box is checked, the Option Board is coded with certain rules that may not allow a downgrade in some circumstances. Dedicated Channel (checkbox): Check this box to enable a Dedicated Channel file transfer. This is the only type of OTA File Transfer supported in the initial release. During Dedicated Channel transfer, the controller will dedicate a specific repeater and timeslot for unconfirmed file transfer for the period of time specified. The file will be sent on the dedicated timeslot over and over until the “Time to Dedicate” expires. When checked, the software activates the Dedicated Channel options (Repeater Radio ID, Repeater Slot, and Time to Dedicate). Repeater Radio ID: Enter the Radio ID (1-15) of the repeater that will be used for the dedicated channel transfer. Repeater Slot: Enter the Repeater Timeslot (1 or 2) of the trunk-to timeslot that will be used for the dedicated channel transfer. The Control Channel timeslot cannot be used. Time to Dedicate: Determines how long the repeater and timeslot configured above will be used for the dedicated channel file transfer. From “Time to Start” until “Time to Dedicate” expires, the dedicated slot will not be available for regular calls. SU’s may join or leave the dedicated channel transfer at various times (the radio user can cancel out of the transfer). It is recommended that “Time to Dedicate” should be set at least long enough so that the controller can send (at a minimum) three complete iterations of the file. The longer this value is set, the greater the chance that the largest possible number of radios can acquire the file via unconfirmed data transfer. A setting of 65,535 minutes tells the controller that the dedicated channel transfer should never expire. Important: “Time to Beacon” must be equal to “Time to Dedicate”.
6. Press “Upload” to begin uploading the file to the controller. Note: This process must be completed at each site where the file will be available for OTA File Transfer.
2.8.5 Controller File Handling for OTA Transmission After receiving the uploaded file, the controller breaks the file into multiple IP data packets for OTA transmission. The number of data packets depends on the file size. File packets do not have to be collected in order, and the Connect Plus radio will not attempt to use the new information until it has received all file packets and checked the integrity of the received data.
2.8.6 OTA File Transfer: Unconfirmed File Transfer Unconfirmed file transfer is the only type of OTA File Transfer provided in the initial Connect Plus release. It allows many radios to receive file packets at the same time on the same trunk-to timeslot. It is initiated when the Network Administrator uploads a file for OTA Transfer that has been configured with the following attributes (see OTA File Transfer Configuration in the XRC 9000 Controller for more information on these settings): Time to Beacon has been set to indicate how long the Beacon message should be sent to announce file availability.
43 of 151
MOTOTRBO Connect Plus System Planner 1.0 A dedicated repeater and timeslot has been configured for the dedicated channel file transfer. Time to Start has been set to indicate when the controller should start sending the Beacon message on the Control Channel Timeslot and when the controller should start transmitting the file on the dedicated repeater and timeslot. The following steps describe how the unconfirmed OTA File Transfer process works: 1. The SU is idle and monitoring the Control Chanel timeslot. It decodes a File Beacon message announcing file availability. It checks the File Type and version against what it currently has. If the version in the Beacon message is older than what the radio already has, it will NOT proceed to acquire the file unless the “OK to Downgrade” flag is set in the File Beacon message. 2. If the SU determines that it needs the file, it looks to see if the Beacon message gives a dedicated repeater and slot. If so, the SU will automatically move to the dedicated timeslot and start to acquire file packets. 3. On the trunk-to timeslot, the SU begins to acquire and store file packets. Because this is an unconfirmed transfer, possibly involving many radios, the controller does not request or expect OTA acknowledgement for transmitted packets. As long as a display-capable SU remains on the dedicated channel collecting packets, its display toggles between the Selected Contact Name and “File Transfer”. The collection of packets continues until one of the following occurs: a. The radio user cancels the OTA File Transfer. b. The SU collects all file packets. c.
The Time to Dedicate Repeater expires and the File transmission ends.
d. The SU’s “Unconfirmed File Transfer Dwell Time” expires and the SU hasn’t decoded a valid packet 4. When the SU leaves the dedicated timeslot, for any reason, it returns to the Control Channel timeslot. a. If the SU leaves the dedicated timeslot without collecting all needed packets, it starts its configurable “File Transfer Attempt Interval Timer”. The SU will not automatically re-join an ongoing dedicated channel transfer until this timer expires. If the timer expires, and the Beacon message indicates that a dedicated channel transfer is still in progress, the SU will rejoin the transfer exactly as described above. Depending on factors such as signal conditions and how often the radio user wishes to initiate calls, this process may have to be repeated several times before the radio collects all necessary packets. b. If the SU leaves the dedicated timeslot after collecting all necessary packets, it must update (upgrade) to the new file, but not until it has checked to verify the integrity of the received data. Note: If the Dedicated Channel Unconfirmed File Transfer expires before all radios have collected the complete file (display radios have a menu option to show whether the Connect Plus SU has collected all of the file packets), there are two options for completing the file transfer; (a) re-start the Dedicated Channel Unconfirmed File Transfer by re-configuring and re-uploading the desired file,
44 of 151
MOTOTRBO Connect Plus System Planner 1.0 or (b) update the radio(s) with the desired file via the traditional method using a programming cable and MOTOTRBO Connect Plus Option Board CPS.
2.8.7 OTA File Transfer Effects on Call Transmissions At the present time, an individual SU, or a Group of SU’s (a Group ID) cannot be specifically targeted for OTA File Transfer. In the initial Connect Plus release, OTA File Transfer affects any and all registered SU’s unless: OTA File Transfer has is disabled through Connect Plus CPS programming, or OTA File Transfer has been enabled, but the SU does not need the Beaconed file because its current version is more recent and the “OK to downgrade” flag is not set. Because OTA File Transfer can potentially impact all registered SU’s, it is important to understand how OTA file transfer affect’s the SU’s ability to make and receive calls. Receiving Calls: Any time that the SU is acquiring file packets on a trunk-to timeslot, it will not see any call set-up messages that are transmitted on the Control Channel downlink. While this is true for any type of call that is received on a trunk-to timeslot, the duration of a Connect Plus Option Board firmware file transfer means that the SU can be “out of touch” with Control Channel messaging for an extended period of time. During this time, the SU will not receive calls. Initiating Calls: OTA File Transfer will not prevent an SU from initiating a call. To cancel the file transfer and initiate a call, the user must press and release the PTT button. This causes the radio to request a call on the selected Contact Name, and it will also cancel the file transfer for that radio until the process resumes again at a later time. Even though the Connect Plus System allows call initiation during OTA File Transfer, it is important to realize that: The call set-up will not occur as quickly as it does when the SU is idle and monitoring the Control Channel timeslot. The target SU(s) might be engaged in the file transfer also. If so, they will not see the call set-up messages, and will not respond when a timeslot is assigned for the call.
2.8.8 Selecting Optimal Conditions for OTA File Transfer While OTA provides many potential benefits to Connect Plus network management, it is extremely important for the Network Administrator to understand how it affects system and radio operation, so that he/she can select the optimal conditions for scheduling OTA File Transfer. To provide the best opportunity for successful file transfer, and to minimize impact to normal system communications, OTA file transfers should be scheduled to occur during the trunking system’s quiet hours. If possible, the radio should be placed in a stationary location with good reception and reliable power. Note that programming the radio with CPS should not be performed during an ongoing OTA file transfer. The following sections discuss how the radio user and the System Administrator can optimize the conditions for OTA File Transfer. They are recommendations, not requirements.
45 of 151
MOTOTRBO Connect Plus System Planner 1.0 Recommendations for the radio user: Leave radio on. For portable radio, utilize a fresh battery, or place radio in battery charger or use a “battery eliminator”. Verify radio is in a good coverage location. If possible, do not pick-up the radio or make calls during OTA File Transfer. Recommendations for the Network Administrator: When selecting the dedicated repeater and timeslot, consider the following: o
Select a clear frequency that is not prone to interference.
o
If possible, select a repeater that will not have to send Base Station Identification during the File Transfer process.
Dedicate the repeater timeslot for as long as possible. The more times the repeater sends the file, the greater the chance the file will be acquired by the largest possible number of radios. “Time to Begin” should be set for a date and time where the system is as quiet as possible. “Off-hours” transfers provide the best opportunity for success.
2.8.9 Assigning Repeater for OTA File Transfer When using a dedicated channel for unconfirmed file transfer, it is recommended that “Time to Dedicate” should be set at least long enough so that the controller can send (at a minimum) three completion iterations of the file. For this reason, it is helpful to know how long it takes the controller to transmit a single iteration of the file. Because this is related to the file size, it will take much longer to transmit a Connect Plus Option Board firmware file than a Network Frequency File. The following equations can be used to make a rough calculation of how long it will take the controller to transmit a single iteration of a file in unconfirmed file transfer. File size in bytes/180 = number seconds to send the file Number of seconds to send file/60 = number of minutes to send the file When the “Time to Dedicate Repeater” expires, the controller will complete the current file iteration prior to ending the dedicated channel transfer.
46 of 151
MOTOTRBO Connect Plus System Planner 1.0
2.8.10
Special Considerations for the Network Frequency File
Special considerations for the Network Frequency File in OTA file transfer include the following: The Network Frequency File version number (which determines whether or not the SU will acquire an updated Frequency File OTA) is set by the individual that creates the Network Frequency File (using Connect Plus CPS). It is recommended that a single individual, such as the Network Administrator, has the responsibility for creating the Network Frequency File and managing version numbers. When setting a dedicated Repeater & Timeslot for OTA Network Frequency File transfer, Connect Plus recommends that the programmer configure Timeslot 2 of the Control Channel repeater as the dedicated repeater and slot. For further recommendations and other important information about the Network Frequency File, see the section on Network Frequency File.
2.8.11
Radio User Request to Re-join OTA File Transfer
The Connect Plus Utilities Menu can be used to view its “Pending Updates”. A “pending update” is any file that the SU is aware of, and needs, but hasn’t collected all file packets. It is also any file where the SU has received all packets, but has not yet upgraded to the new file. The “pending updates” list shows the file type and version, and the percentage of packets collected so far. It also provides a way for the radio user to request that the SU re-join the Dedicated Channel unconfirmed file transfer, even though the “File Transfer Attempt Interval” has not expired.
2.9 Busy Queue If subscriber makes a Call Request requiring a trunk-to timeslot, the Call Request will be granted if a timeslot is available. Otherwise, the controller shall place the call in the Busy Queue and send the source radio a Busy Queue Grant on the Control Channel timeslot. The controller shall periodically re-send the Busy Queue Grant as long as the call remains in the Busy Queue. The Busy Queue Grant allows the source radio to know that its requested call is still in the queue. If the queued call is a Group Call, the Busy Queue grant also has the effect of inhibiting call requests by other radios on the same Group ID. When a trunk-to timeslot becomes available, the calls are assigned from the Busy Queue according to the following rules: The highest priority call* is assigned to the trunk-to timeslot. For calls of equal priority, voice calls have priority over data calls. For voice calls of equal priority, calls are assigned “first in, first out”. For data calls of equal priority, calls are assigned “first in, first out”. * Every Connect Plus User Record (both the Unit Record and the Group Record) has a programmable priority level, with 2 being the highest programmable priority level and 8 being the lowest programmable priority level. When the controller assigns calls from the Busy Queue, it does so according to the priority levels of the IDs contained in the Call Request. Every Call Request has
47 of 151
MOTOTRBO Connect Plus System Planner 1.0 a Source ID and a Destination ID. The call is assigned from the Busy Queue according to the higher of the two priorities. Site All Call requests are prioritized according to the priority of the Source ID only. Once a call request has been placed in the Busy Queue, the radio will stay in “Busy” mode until the call is assigned, or until the user presses the Busy Queue Cancellation button (if programmed by the radio dealer or system administrator). However, if the radio user doesn’t initiate another call, it is likely that the original call will remain in the Busy Queue and eventually be assigned to a timeslot. When this occurs, it is likely to result in a brief, failed call, but the user will most likely not be aware of such event.
2.10 Network Frequency File The Connect Plus subscriber radio stores frequency information in the Network Frequency File. This file, which is created with Connect Plus CPS, must contain the Network ID, a customersettable version number, and the following information about each repeater in the Connect Plus network. Which site the repeater is located at. The repeater’s Radio ID (1-15). In the Connect Plus system, this equates to the channel (repeater) number. SU TX (Repeater RX) Frequency SU RX (Repeater TX) Frequency The repeater’s Color Code A checkbox to indicate if the repeater is the Control Channel Frequency. Although the software allows the box to be checked for more than repeater per site, in the initial release the Connect Plus Option Board will only search one Control Channel repeater per site. The repeater searched will be the first repeater on the site list that has the “Control Channel” box checked.
2.10.1
Importance of Network Frequency File
The Network Frequency File plays a crucial role in both trunking and roaming. When the Connect Plus is idle and monitoring the control channel, it continually looks for channel assignments on the control channel downlink. Among other things, these messages are used to move radios to trunkto timeslots for Connect Plus calls. The message does not give the actual repeater frequency, because this is too long to be efficiently communicated in a short message. Instead, it gives the Repeater Radio ID (1-15) as programmed with Connect Plus CPS, as well as the assigned timeslot (1 or 2). To determine which frequency it should use, the Connect Plus SU looks up the given Repeater Radio ID on its Network Frequency File table for the registered site. This tells the SU which frequency pair and Color Code it should use when moving to the assigned repeater and timeslot. For information on how the Connect Plus SU uses the Network Frequency File when searching for service (roaming between sites), see the “Frequencies Searched” section. For proper operation, the Connect Plus SU’s Network Frequency File must match the actual network configuration at all times. It is recommended that a single individual, such as the Network
48 of 151
MOTOTRBO Connect Plus System Planner 1.0 Administrator, have the responsibility for creating the Network Frequency File and managing version numbers. There are two ways the SU receives the Network Frequency File. During initial Connect Plus CPS programming, the SU should be loaded with the most recent Network Frequency File. If the Network Frequency File is changed after initial programming, there are two ways to update the file:
2.10.2
o
Load the updated file via the programming cable and Connect Plus CPS.
o
Update the radios via an Over-the-air File (OTA) Transfer. For more information about how the Network Frequency File is sent over-the-air, see the “Connect Plus Over-The-Air File Transfer”, and specifically the “Special Considerations for the Network Frequency File” section.
Changes Impacting the Frequency File
Sometimes it is necessary to make changes to frequency information in the Connect Plus network. This occurs when frequency information changes, repeaters are added or removed, sites are added or removed, Control Channel information changes, Color Code information changes, etc. When this occurs, the Network Frequency File will have to be updated with the new information (and issued a higher version number). When changes such as these occur, the order that things happen is very important. For example, all radios should have the frequency information for a new repeater (via an updated Network Frequency File) before the repeater is brought on line. Recommendations are provided for some of the most common scenarios: The recommend procedure for adding a new repeater to a site is as follows: Determine the frequency information, color code setting, and MOTOTRBO Radio ID (1-15) for the new repeater. Update the Network Frequency File with this information and increment the Network Frequency File version number. Upload the updated Network Frequency File to the site(s) and begin OTA File Transfer. Allow sufficient time for deployed radios to update to the new Network Frequency File. Configure and align the new repeater and connect it to the Ethernet switch shared with the trunking controller. The repeater will establish a link with the controller, after which the controller will begin assigning calls to the new repeater. The recommend procedure for changing the frequency or Color Code configuration of an existing non-Control Channel repeater is as follows: Determine which information needs to be modified. Update the Network Frequency File with this information and increment the Network Frequency File version number.
49 of 151
MOTOTRBO Connect Plus System Planner 1.0 Prior to uploading the Network Frequency File to the network, disable the affected repeater to keep the controller from using it as a trunk-to resource. This can be done by physically disconnecting the repeater from the Ethernet switch. This will terminate communications with the controller, causing the controller to quit assigning calls to the repeater. Upload the updated Network Frequency File to the site(s) and begin OTA File Transfer. Allow sufficient time for deployed radios to update to the new Network Frequency File. Change the repeater configuration to match the revised information in the Network Frequency File, and connect the repeater to the Ethernet switch shared with the trunking controller. The repeater will establish a link with the controller, after which the controller will begin assigning calls to the repeater. The recommend procedure for adding a new site to the network is as follows: Determine the Site Number, Repeater Radio IDs (1-15), frequency information, frequencies, repeater color codes, and control channel information for the new site. Update the Network Frequency File with this information and increment the Network Frequency File version number. Upload the updated Network Frequency File to the network and begin OTA File Transfer. Allow sufficient time for deployed radios to update to the new Network Frequency File. Configure the controller and repeaters for the new site. Connect the repeaters to the controller via the Ethernet switch. Update the network multi-site information (in the other Connect Plus sites) to include the Site Number and IP address of the new controller. In the RF-adjacent sites, add the new site number to the Neighbor Site List. This allows the RF-adjacent controllers to beacon the new Site Number in the Neighbor Site message. When the Option Board has the updated Network Frequency File, and has collected the new Neighbor List information, it will be ready to use the new site.
2.11 Controller Multi-Site Features Multi-Site operation is available as a purchasable, factory-enabled permission in the Connect Plus controller. It can be activated at time of initial purchase, or remotely activated at a later date. When enabled, the controller activates certain parameters pertaining to multi-site operation that are not available single-site operation. The most of important of these settings is the ability to configure a list of networked sites.
2.11.1
Registration & De-Registration in a Multi-Site Environment
When a Connect Plus subscriber registers or de-registers with one of the site controllers, the controller forwards this information to all other site controllers. This allows all controllers to have the same information about which IDs are (or are not) currently registered into the network.
50 of 151
MOTOTRBO Connect Plus System Planner 1.0
2.11.2
Call Processing & Set-up in a Multi-Site Environment
When the controller receives a Call Request, it must know if the Destination ID is registered into the network, and – if so – at which site(s). The controller has this information because a registration or de-registration received by any site controller is forwarded to all other site controllers. It’s quite possible that multiple controllers will have a role in Connect Plus call set-up. Calls to an individual ID can involve up to two sites, the source site and the destination site. Calls to Group IDs will involve every network site where the Group ID is presently registered. Multi-site call set-up is initiated via TCP/IP control messages that are exchanged between the involved sites. A site that receives a voice transmission must duplicate the received UDP/IP voice packets and forward them to every network site where the Destination ID is currently registered. It is possible that multiple radios involved in the same call (but located at different sites) will begin to transmit at the same time, or at nearly the same time. For this reason, the controllers involved in a multi-site voice call follow a key-up arbitration procedure. The arbitration process necessitates a brief (configurable) delay before a controller forwards received voice packets to one of its connected repeaters for OTA transmission, but it greatly increases the chances that the same audio will be heard at each participating site. When a controller has an undelivered text message for an SU, and the controller learns via network messaging that the SU has registered to a different site, the controller will forward the text message to the SU’s new site. The controller at the new site will attempt delivery at the earliest opportunity. When a controller has Location Request for an SU, and the controller learns via network messaging that the SU has registered to a different site, the controller will forward the Location Request to the SU’s new site. For a single request, the new site will transmit the request at the earliest opportunity. For a periodic request, the new site will transmit the first request at the earliest opportunity, and then repeat the request at the requested interval.
2.12 Roam (Site Search) in Connect Plus System The Connect Plus subscriber unit will automatically roam (search for service), and upon locating an acceptable site, will automatically request registration with the Connect Plus site.
2.12.1
Events that Initiate Site Search
The following events cause the subscriber to initiate the search process: Radio is powered-up in a Connect Plus zone. Radio user selects a Connect Plus zone (or changes from one Connect Plus zone to a different Connect Plus zone). Radio is registered to a Connect Plus site, but does not decode a Control Channel message and its programmable, “CSBK Roam Delay Time” expires.
51 of 151
MOTOTRBO Connect Plus System Planner 1.0 Radio is registered to a Connect Plus site, but RSSI from the Control Channel repeater is at or below the programmable “RSSI Minimum” threshold. This causes the SU to start its programmable, “RSSI Roam Delay Timer”. If this timer expires and the Control Channel RSSI has not risen above the “RSSI Minimum”, the SU initiates the search process.
2.12.2
When Connect Plus Radio Will not Initiate Search
The Connect Plus SU will not initiate Search in the following circumstances: The Connect Plus SU will not initiate Search while it is attempting to initiate a call on the Control Channel timeslot. If RF conditions are poor, it is possible that the call attempt will fail – after which the SU may initiate search for one of the previously described reasons. The Connect Plus SU will not initiate Search while it is Busy Queue Wait State on the Control Channel timeslot. The SU’s (non-configurable) Busy Queue Wait timer must first expire. The SU will not initiate Search while participating in a call-in-progress on a trunk-to timeslot. If the SU loses signal from the trunk-to timeslot, it will return to the Control Channel timeslot. If the Control Channel signal does meet the previously discussed requirements, the radio will initiate Search.
2.12.3
Frequencies Searched
The Connect Plus SU stores frequency information in the Network Frequency File. The Network Frequency File is used both for single-site and multi-site networks. For general information about the file and how it is created, see the “Network Frequency File” section. This section will discuss its role in search process only. When the SU is searching for service, it only searches frequencies that are flagged in the Network Frequency File as “Control Channel”. It does not search trunk-to frequencies. The order of search depends on several variables. This includes the following: Preferred Site: For each Connect Plus zone, the SU is configured with a “Preferred Site”. The Control Channel frequency for the “preferred site” receives a heavier weighting in the search algorithm (meaning that it is searched more frequently). The Control Channel for the Preferred Site is searched in the following circumstances: o
After initial Connect Plus CPS programming, it is the first frequency searched when the user first powers-up in (or selects) that Connect Plus zone.
o
It remains the first frequency searched (power up, zone selection, losing signal from a site, etc), if “Preferred Last Registered” has not been enabled via Connect Plus CPS programming for that Connect Plus zone.
o
Even if “Preferred Last Registered” Site has been enabled via Connect Plus CPS programming that Connect Plus zone, the “Preferred Site” is searched more frequently than other sites (except for the Last Registered site).
52 of 151
MOTOTRBO Connect Plus System Planner 1.0
Last Registered: The Connect Plus SU stores the Site Number where it last successfully registered. This information is stored in persistent memory, so that it will be maintained through a power cycle. This Last Registered Site receives a heavier weighting in the search algorithm. This weighting can be increased even further by enabling “Prefer Last Registered” via Connect Plus CPS (a programmable option per Connect Plus zone). When “Prefer Last Registered” is enabled, the Last Registered Site becomes the first site searched upon power up, zone selection, losing signal from a site, etc. Of course, this assumes that radio has successfully registered somewhere. If not, the “Preferred Site” is searched. Neighbor List Collection: When a Connect Plus SU is registered to a site, it collects the “Neighbor List” that is transmitted by the site’s control channel. The Neighbor List consists of up to 5 site numbers for sites that are RF-adjacent to the site transmitting the Neighbor List. This Neighbor List is configured by using the XRC 90000 Network Manager Software. When a Connect Plus SU loses signal from a site, it first searches the “Preferred” or “Last Registered” site (as determined through Connect Plus CPS programming). If an acceptable signal is not found, the SU proceeds to search the Control Channels of the most recently collected Neighbor List. In doing so, the sites are searched in the order that they configured via the Network Manager. The Connect Plus SU can store Neighbor Lists collected from up to 10 different Connect Plus sites. The lists are searched in “last collected, first searched order”. If the SU should ever collect Neighbor Lists from more than 10 different sites, the oldest Neighbor List will “fall out” to make room for the mostrecently collected Neighbor List. An example of a Neighbor List configuration is shown in Figure 2-5. Other Control Channel Frequencies pulled from the Network Frequency File: As the Connect Plus SU searches for service, it will periodically search Control Channel frequencies pulled from the Network Frequency File. Through this process, and the other searches discussed previously, if a search goes on long enough (without locating an acceptable site and signal), the SU will eventually search every Control Channel frequency in the Connect Plus network.
53 of 151
MOTOTRBO Connect Plus System Planner 1.0
Connect Plus Site 3
Connect Plus Site 1 Neighbor List
Neighbor List
Site 2
Site 2 Connect Plus Site 2
Site 4
Site 5 Neighbor List Site 1 Site 3 Site 4 Site 5
Connect Plus Site 4
Connect Plus Site 5
Neighbor List
Neighbor List
Site 1
Site 2
Site 2
Site 3
Figure 2-5 Connect Plus Neighbor List Example
2.12.4
Qualifying Searched Sites
As the Connect Plus SU moves through the frequencies on its search list, it listens to each frequency for the “Roam Dwell Time” as configured via Connect Plus CPS programming. This setting is configurable per Connect Plus zone. Because Control Channels transmit continuously, this is a fairly short timer (240 to 1200 ms). If digital signaling is detected, the radio waits an additional time to identify the site and network (via Connect Plus control channel messaging) and to measure RSSI. If this time expires and the radio has not detected digital signaling, it then proceeds to search the next frequency on the list. It should be noted that the IP Site Connect Beacon message is not used in Connect Plus. The IP Site Beacon Duration should be set to “Disabled” in the CPS codeplug of all Connect Plus repeaters. If digital signaling is detected, the SU will wait on the frequency long enough to determine the Network ID and the Site Number of the Control Channel it is hearing. This information is sent every 120ms on the Control Channel downlink. If the Network ID transmitted by the Control Channel agrees with the Network ID programmed into the SU via Connect Plus CPS, the SU proceeds to measure the Control Channel RSSI. If the RSSI is equal to or greater than the “Preferred RSSI” as programmed for the Connect Plus zone via Connect Plus CPS, the SU will transmit a registration request to the site controller on the Control Channel uplink. Because the Network ID and RSSI are important parts of qualifying a site, they are discussed in greater detail in the sections that follow.
54 of 151
MOTOTRBO Connect Plus System Planner 1.0
2.12.5
Roam Request
“Roam Request” can be enabled via a programmable Connect Plus button press. Roam Request allows the radio user to request the radio to enter “Search” mode and look for another network site, even when the signal from the currently registered site is acceptable according to the currently programmed Roam parameters. When Roam Request is activated, the SU will search all possible sites until an acceptable site is found. In doing so, the radio will not search the current site until all other sites have been exhausted. Roam Request takes precedence over “Site Lock” and “Disable Roam”. If it is important to keep a radio on its registered site, then it’s advisable not to provide the radio user with a means to initiate “Roam Request”.
2.12.6
Radio Operation during Search
A Connect Plus radio cannot make and receive calls unless it registered to a Connect Plus site. When the Connect Plus SU is searching for service, it is not registered with any Connect Plus site. If the user attempts to initiate a call by pressing PTT, the radio will give a denial tone. If the user attempts to initiate a call via the Menu, the display will show “Not Registered”. While the Connect Plus SU is searching, the top LED blinks yellow in a “double flash” pattern. While the Connect Plus SU is searching, display-enabled radios activate the Roaming icon and display the word “Searching”.
2.12.7
Indications of Successful Registration
When a Connect Plus radio successfully registers with a site, it sounds a short registration beep and briefly displays the registered Site Number in the radio display. The LED flashes green while the radio is monitoring the Control Channel downlink. If not currently engaged in another Menu Display, the radio display shows the “Contact Name” for the selected channel knob position (portable) or rocker knob position (mobile).
2.12.8
Reacquiring the Same Site after Period of Fade
When the radio loses acceptable signal from its current site and begins searching, a count down timer is set to the value configured in the “Reacquire Time” setting. This is a programmable Zone parameter with Connect Plus CPS. If during the search process the radio again finds the site it just lost and this timer has not expired and the radio has not attempted to register at another site, the radio returns to the registered state without transmitting a registration request (or sounding the registration beep). If the Reacquire Time has expired, the radio must complete a normal registration before it can use the site. This feature can help reduce registration traffic on the Control Channel and extend portable battery life.
55 of 151
MOTOTRBO Connect Plus System Planner 1.0
2.12.9
Disable Roam
There are some applications in which the system administrator does not want a subscriber unit to roam between Connect Plus sites. Possible examples are when the Connect Plus system consists of only a single site, or when the SU is being used as stationary dispatch radio. In these instances, the desired behavior is for the SU to remain on the “Preferred Site” that has been configured for the selected Connect Plus zone. When “Disable Roam” is enabled with Connect Plus CPS, the radio will search only the Preferred Site. It is important to remember that even when the “Disable Roam” box is checked, the SU may still enter a state where “Searching” will be shown on the display. This occurs prior to registration with the Preferred Site, or when the SU experiences a loss Control Channel messaging and the “CSBK Roam Delay” expires, or if Control Chanel RSSI qualifications are not met. However, in this state, the SU will only be searching for its Preferred Site. It will not search any sites that may have been acquired through a Neighbor Site message or the Network Frequency File. Because “Disable Roam” is configurable for each Connect Plus zone, it is possible to restrict searching to the Preferred Site in some zones, while allowing normal roam functionality in others. It should be noted that “Roam Request” takes precedence over “Disable Roam”. If it is important to keep a radio on its Preferred Site, then it’s advisable not to provide the radio user with a means to initiate “Roam Request”.
2.12.10
Site Lock
In certain situations, the user may have the desire to lock on to a registered site and to prevent the subscriber unit from searching other sites. For example, if the user enters an elevator, the user has knowledge that the radio will have reduced signal strength for a brief period of time. In this scenario, the user may wish to enable Site Lock. Site Lock does not prevent the radio from entering search if the signal from the registered site becomes unacceptable, but it does restrict the radio’s search to the site where the radio was registered at the time Site Lock was engaged. This can help the radio return to the registered state (on the desired site) more quickly when the radio re-enters acceptable coverage. Site Lock can be enabled through a configurable short or long button press. When Site Lock is activated, display radios briefly show the message, “Site Locked”. When Site Lock is de-activated, display radios briefly show the message “Site Unlocked”. Site Lock cannot be activated unless the radio is currently registered to a Connect Plus site. If the user attempts to activate “Site Lock” while in the un-registered state (searching for service), the radio will not activate the feature or display, “Site Locked”. When power is recycled, or when the radio user selects a different Connect Plus zone, the SU automatically returns to the “Site Unlocked” state, which allows the radio to search normally. While the Site Lock feature can be helpful in situations such as the one described in this example, a potential drawback is that the radio user may forget to disable “Site Lock”, thereby preventing the radio from searching other sites in scenarios where this operation would be desirable. It should be noted that “Roam Request” takes precedence over “Site Lock”. If it is important to keep a radio on its current site, then it’s advisable not to provide the radio user with a means to initiate “Roam Request”.
2.12.11
Connect Plus Performance While Roaming
The Connect Plus radio’s ability to automatically search for an acceptable Connect Plus site provides obvious and substantial benefits to the radio user. Even so, it is important to remember that the radio is not registered with any site from the time it initiates Search until it registers with a new site (or re-acquires the previous site). During this time (while the radio is searching), the radio user cannot make or receive calls. For this reason, RSSI thresholds and other Roam settings should be determined with consideration and care. Once the desired settings have been
56 of 151
MOTOTRBO Connect Plus System Planner 1.0 determined, they should not be programmed into large numbers of radios until the desired operation has been confirmed in a smaller set of test radios.
2.12.12
Programmable RSSI Settings
Received Signal Strength Indication (RSSI) is used by the Connect Plus radio to measure Control Channel signal strength. It is determined by measuring the received signal on the Control Channel downlink. RSSI is measured in dBm. Because RSSI is reported using negative number numbers, it essentially uses a “reverse” scale where smaller numbers indicate greater signal strength. Connect Plus CPS provides two configurable RSSI Thresholds (RSSI Preferred and RSSI Minimum) and a programmable timer, the RSSI Wait Time. These programmable parameters are utilized by the Connect SU in the following manner: The Connect Plus SU will not attempt registration with a site unless the Control Channel RSSI is at the “RSSI Preferred” value, or higher, as configured in the selected Zone Parameters with Connect Plus CPS. When the SU is searching and detects a site that meets “RSSI Preferred”, the radio stops its Search and transmits a Registration Request to the site. The Connect Plus SU will not bypass a site that meets “RSSI Preferred” to see if there is a stronger site further down the search list. Once registered to a site, the Connect Plus SU continues to measure the Site’s RSSI every 3 seconds anytime that the SU is idle and monitoring the Control Channel frequency. If the reported RSSI is ever less than or equal to the “RSSI Minimum” as configured in the selected Zone Parameters with Connect Plus CPS, the Connect Plus SU starts the “RSSI Wait Time” as configured in the selected Zone Parameters with Connect Plus CPS. If the RSSI rises above “RSSI Minimum” prior to expiration of this timer, the radio remains on its registered Control Channel and site. If the “RSSI Wait Time” expires, and the reported RSSI is still less than or equal to the “RSSI minimum”, the Connect Plus radio enters search, even if “CSBK Roam Delay Time” has not expired. There are several common site configurations that are employed when installing a two-way radio communication system. 1. Dense Overlapping Coverage (Urban) – This type of RF coverage consists of sites located close to each, which necessitates utilizing different frequencies for the neighboring sites; refer to Figure 2-6. The non-overlapping sites may reuse the frequencies, but must use different color codes to be identified by the subscribers during roaming. A radio user transitions from one site to another within 10-15 minutes.
57 of 151
MOTOTRBO Connect Plus System Planner 1.0
TX = F3 RX = F4 CC = 2
TX = F1 RX = F2 CC = 1
TX = F1 RX = F2 CC = 3
TX = F5 RX = F6 CC = 4
Figure 2-6 Dense Overlapping Coverage (Urban) 2. Isolated Non-Overlapping Coverage (Rural) – This type of coverage is representative for rural communities, where sites are separate by considerable distance thus proving nonoverlapping RF coverage; refer to Figure 2-7. The non-overlapping sites may reuse the frequencies, but must use different color codes to be identified by the subscribers during roaming. A subscriber will only be with coverage of one site at a time. A radio user transitions from one site to another within several hours.
58 of 151
MOTOTRBO Connect Plus System Planner 1.0
TX = F1 RX = F2 CC = 1
TX = F7 RX = F8 CC = 4
TX = F3 RX = F4 CC = 2
TX = F5 RX = F6 CC = 3
Figure 2-7 Isolated Non-Overlapping Coverage (Rural) 3. Corridor Coverage – This type of coverage consists of sites that are placed along various transportation passages, such as roads, train tracks, shore lines, rivers and canals. In such site configuration a pair of adjacent sites overlaps in RF coverage; refer to Figure 2-8. The non-overlapping sites may reuse the frequencies, but must use different color codes to be identified by the subscribers during roaming. A radio user transitions from one site to another within an hour.
59 of 151
MOTOTRBO Connect Plus System Planner 1.0
TX = F1 RX = F2 CC = 1
TX = F3 RX = F4 CC = 2
TX = F1 RX = F2 CC = 2
TX = F3 RX = F4 CC = 4
Figure 2-8 Corridor Coverage 4. Multi-Story Building Coverage – This type of coverage consists of sites that are situated extremely close to each other with short range coverage and overlap across all sites; refer to Figure 2-9. Such coverage is mostly utilized in multi-story buildings, but can be encountered in other man-made structures, such as tunnels, large vessels or underground passageways. Frequency reuse is not common due to the small coverage footprint usually implemented with in-building radiax antenna systems. Users in such RF coverage also often experience quick signal strength drop offs due to the nature of in building coverage. A radio will only be within coverage of one to two sites at a time. The time it takes a radio user to move from the coverage of one site to another is in the range of one minute.
60 of 151
MOTOTRBO Connect Plus System Planner 1.0
TX = F1 RX = F2 CC = 1
TX = F3 RX = F4 CC = 1
TX = F5 RX = F6 CC = 1
TX = F7 RX = F8 CC = 1
Figure 2-9 Multi-Story Coverage Depending on the site configuration, the RSSI Preferred and RSSI Minimum values will be set differently; RSSI Wait Time12 should be set accordingly as well, such that it does not exceed the expected site transition time corresponding to the coverage configuration. For example, if the customer has a “Isolated Non-Overlapping Coverage” the RSSI Preferred and RSSI Minimum can be set to lowest values allowed by Connect Plus CPS (-120dBm). Since there is no overlap, there is no reason for the radio to start roaming until well outside of the coverage range of the Control Channel repeater. For extremely close sites with large overlap and quick signal drop off like the “Multi-Story Coverage”, it might be better to set to these to higher values, so that the radios will search for stronger sites closer to the repeater. However, note that for such configuration the system designer may take the approach of installing a single site where the Control Channel repeater can be placed in the center of the desired coverage (e.g. middle floor). This of course would be possible when 15 repeaters, or in other words 29 channels, can satisfy the customer communication needs. The following table provides the suggested settings for each basic site configuration. Many radio systems will have a combination of site configurations so the system designer will need to take all configurations into consideration and choose an appropriate value.
12
Also refer to CSBK Roam Delay Time.
61 of 151
MOTOTRBO Connect Plus System Planner 1.0
Site Configuration
Recommended RSSI Preferred
Recommended RSSI Minimum
Recommended RSSI Wait Time
% of Outer Range Radio will Scan
Isolated Non-Overlapping Coverage (Rural)
-120 dBm
-120 dBm
120 seconds
Out of Range
Corridor Coverage
-110 dBm
-115 dBm
90 seconds
10 %
Dense Overlapping Coverage (Urban)
-108 dBm
-113 dBm
30 seconds
20 %
Multi-Story Coverage
-102 dBm
-107 dBm
10 seconds
50 %
Table 2-1 Recommended RSSI Settings Note that the listed RSSI settings assume the outbound and inbound RF coverage of the system is balanced. In other words, when a radio is within good outbound coverage of the repeater the radio’s inbound transmission can reach the repeater. Since the roaming algorithm uses the outbound transmission to determine when to roam, having an unbalanced system can cause radios not to roam even though they can no longer reach the repeater. This can lead to radio transmissions that do not reach the repeater and are therefore not repeated. One method to rectify this problem is to lower the output power of the repeater. This decreases the outbound coverage area, but ensures that if a subscriber can hear the repeater well, it can respond successfully. If lowering the output power is not desirable, the RSSI threshold values need to be raised higher (less negative) than the recommended values. This forces the radios to roam to another site within very good RF coverage of another. This value may be different for portables and mobiles since they have different output power and therefore different inbound coverage. Portables may need a higher (less negative) RSSI threshold than mobiles. Also note that there is one set of RSSI values per Connect Plus zone. This means that if one zone has an inbound outbound imbalance and another does not, it may be difficult to find the optimal RSSI settings to accommodate both zones.
2.12.13
CSBK Roam Delay Time
The Connect Plus radio has another configurable timer that affects when the radio starts to Search. It is called the “CSBK Roam Delay Time”, and is programmable per Connect Plus Zone with Connect Plus CPS. This programmable setting determines how long the radio will continue to listen to the current Control Channel when it doesn’t decode any valid Control Channel messages. If the timer expires, and the radio hasn’t decoded a valid message, the radio starts to search, even if “RSSI Wait Time” has not expired.
2.13 Network ID A Connect Plus radio must be programmed with the Network ID that is transmitted by the site controllers in its Connect Plus Network. The radio’s Network ID is entered on the “General Settings” screen in Connect Plus CPS. Defining the Network ID is also part of creating a Network Frequency File. When a Connect Plus SU searches for service, it will not attempt to register with a site until it verifies that the Network ID being transmitted on the Control Channel downlink agrees with the Network ID that was configured into the radio with Connect Plus CPS. This check prevents the SU from accidentally attempting to register with Connect Plus sites that are under different ownership, but located in the same geographical area and using some of the same frequencies and color codes as Control Channels within its own network.
62 of 151
MOTOTRBO Connect Plus System Planner 1.0
The Network ID transmitted on the Control Channel downlink is set by the factory, and is based on information received at time of sale. All Connect Plus controllers under the same ownership are given the same Network ID, unless requested otherwise. Connect Plus controllers under different ownership are typically issued different Network ID. If there are unusual circumstances where controllers under different ownership will be part of the same Connect Plus Network, this information should be communicated to the sales representative at time of purchase since the controllers will need to be issued the same Network ID. If it becomes necessary to change a controller’s Network ID after the controller has been deployed to the field, this can be accomplished remotely provided that the required connections are in place.
2.13.1
Relationship of Network ID to Site Number
Each site controller that will be connected together for the purposes of Wide Area Networking must have the same Network ID, but a unique Site Number. The Connect Plus Site Number is programmable in the controller by using the XRC 9000 Network Manager software. Site Numbers are also important when programming the Connect Plus SU with Connect Plus CPS. Each Connect Plus Zone must be programmed with a “Preferred Site” number. The Site ID is also part of Network Frequency File configuration.
2.14 Programmable Range for Connect Plus IDs The programmable ID range is Connect Plus is slightly less than Digital MOTOTRBO Conventional (which supports entries up to 16776415). In Connect Plus, the highest configurable ID is 16776351. The Connect Plus software will use the same Radio ID that is programmed with MOTOTRBO CPS. Although MOTOTRBO CPS allows the entry of Radio IDs 16776352 through 16776415, these numbers must not be used for Connect Plus radios. If any of these numbers is used as the Radio ID, the SU will not function correctly in the Connect Plus personality until the number is changed to a Radio ID that falls within the allowable Connect Plus range. Connect Plus supports the following ranges: The programmable range for Radio IDs (Unit IDs) is 1-16776351 The programmable range for Group Call IDs and Multigroup Call IDs is 1-16776351. Any number from this range can be used as a regular Group Call contact type, or as a Multigroup Call contact type, but the same number cannot be used for both. The programmable range for Dispatch Call IDs is 1-16776351 Site All Call (voice) uses a fixed ID of 16777215. This cannot be changed by the user. Site All Call (text) uses a fixed ID of 16776415. This cannot be changed by the user.
63 of 151
MOTOTRBO Connect Plus System Planner 1.0
2.15 Features Not Supported in This Connect Plus Release The following is a list of features available in MOTOTRBO digital conventional or Capacity Plus that are not available in this Connect Plus Release. . Automatic Registration Service (ARS). This is not necessary in Connect Plus because registration and de-registration messages are an inherent and integral part of the Connect Plus system. In Connect Plus, registration and de-registration uses Control Channel CSBKs, not IP datagrams. Emergency Alarm Emergency Call Emergency Revert Channel Triggered Location Update with Emergency Trigger Lone Worker Basic Privacy Enhanced Privacy Monitor features. Monitor is not necessary in Connect Plus since the purpose of Monitor is to determine whether a channel is available. The Connect Plus controller is responsible for assigning an available timeslot, or placing the request in the Busy Queue if no timeslot is available. Talkaround mode is not available while operating in a Connect Plus personality, but may be accommodated by configuring the radio with a conventional Talkaround personality. To use this Talkaround personality, it will be necessary change to the zone and channel, thereby leaving the Connect Plus personality. Active Site Roam. This an IP Site Connect term for the Roam mode where the SU moves through its site list and transmits a wake-up message to each frequency on the list. This is not necessary in Connect Plus because Connect Plus Control Channels transmit continuously.
The Connect Plus SU will not scan non-Connect Plus channels. When the Connect Plus SU is successfully registered to a site, it will not scan any Connect Plus site or channel, except for its registered Control Channel timeslot, or its currently assigned trunk-to timeslot. While listening to its registered Control Channel, scan capability is limited to calls targeting the SU’s Unit ID, Registered Group ID, Multigroup ID, and Site All Call ID. Nuisance Delete VOX operation
64 of 151
MOTOTRBO Connect Plus System Planner 1.0 GPS Revert Channel or Data Revert Channel. This strategy is not used in Connect Plus because the controller assigns timeslots for all data calls. Telemetry Raw Data pass-through communications Direct PC to SU connection for data applications (GPS, Text, Telemetry, Raw Data) is not available when selected to a Connect Plus personality. GPS and Text applications interface to the Connect Plus system via an Ethernet connection with the XRC 9000 controller. The “PC Call” contact type is not available in Connect Plus Fragmentation of a Data Packet: The Connect Plus SU does not fragment a data packet before transmitting over the air. Thus, the size of an IP datagram (including IP and UDP headers) should be less than the maximum size of the Packet Data Unit as programmed with MOTOTRBO CPS. Non-Connect Plus Option Board operation. The radio only has one Option Board slot, which is occupied by the Connect Plus Option Board. Therefore, non-Connect Plus applications that require an Option Board are not available. The XRC 9000 is the only controller interface supported in Connect Plus mode. Analog operation: Connect Plus operates in digital mode only. It does not support analog voice, analog MDC features, analog scan, analog repeater interface, etc.
2.16 Connect Plus Voice and Data Privacy Voice and Data Privacy is not available in the initial Connect Plus release. The “Privacy” checkbox in MOTOTRBO CPS must not be enabled for any digital channel that is enabled for Option Board Trunking.
65 of 151
MOTOTRBO Connect Plus System Planner 1.0
2.17 Connect Plus RDAC Interface Repeater Diagnostics and Control (RDAC) software can be used in the Connect Plus system to monitor and control repeaters on a Connect Plus site. The RDAC configuration and capabilities for Connect Plus are similar to IP Site Connect mode. There are several important points to note regarding RDAC operation in a Connect Plus system: When using RDAC with Connect Plus, the RDAC application should be configured for “IP Site Connect Mode”, but there is an important distinction between RDAC operation with an IP Site Connect System and with Connect Plus. In IP Site Connect, an RDAC application can communicate with all repeaters in one IP Site Connect System. Additional RDAC applications are needed to communicate with additional IP Site Connect Systems. In Connect Plus, an RDAC application can communicate with all repeaters in one Connect Plus site. Additional RDAC applications are needed to communicate with additional Connect Plus sites. When configuring the RDAC application, the controller’s IP address and port is set as “Master”. RDAC communicates with the controller in order to obtain IP addresses for the site’s repeaters. Once RDAC has a repeater IP address, it can communicate with that repeater directly. The PC hosting the RDAC application must be on the same Local Area Network (LAN) or Virtual Private Network (VPN) as the controller and the site’s repeaters. The reason is as follows: RDAC communicates with the XRC 9000 and with the site’s repeaters via the IP Site Connect Protocol. The Controller is the IP Site Connect Master and the repeaters and RDAC are IP Site Connect Peers. If IP Site Connect Peers are ever located in different networks, then all peers must address the IP Site Connect Master via its publicly addressable IP, not its local IP address. This even applies to the peers that are in the same LAN as the Master. This requires a router capable of a special feature called “hairpinning”, which turns the messages around to send them back to the IP Site Connect Master (in this case, the XRC 9000 controller). Due to the time sensitive nature of the messaging between the XRC 9000 controller and its peer repeaters, the latency added by this additional routing and the hair-pin address conversion will be detrimental to system performance. For this reason Connect Plus requires all IP Site Connect Peers, including RDAC, to be located in the same Local Area Network (LAN) or Virtual Private Network (VPN) as the XRC 9000 controller acting as IP Site Connect Master. When configuring the RDAC application, set the RDAC ID for a value higher than 15. This assures that there will be no conflict with a Radio ID that might be already programmed into one of the site’s repeaters. (In Connect Plus, each site repeater is programmed for a unique Radio ID between 1 and 15.) The XRC 9000 has a configurable parameter called “RDAC UDP Listen Port”. This field, which appears on the XRC 9000 Network Manager Site Configuration screen, determines which port the controller listens to for incoming messages from the RDAC application. When RDAC sets a repeater for “Disable”, the XRC 9000 controller will not use the repeater for Control Channel signaling or call assignment.
66 of 151
MOTOTRBO Connect Plus System Planner 1.0
2.18 Connect Plus and Application Developer Program (ADP) Motorola offers an Application Developer Program (ADP), which allows accredited third party developers to create customized applications used with specific MOTOTRBO interfaces such as Location Services, Text Messaging, etc. In regards to Connect Plus, these MOTOTRBO interfaces fall into two categories: 1. MOTOTRBO interfaces that are supported with some modifications needed for Connect Plus. 2. MOTOTRBO interfaces not currently supported in Connect Plus. Where an interface is supported in Connect Plus, the third party developer will need to make some modifications for Connect Plus operation (as compared to how the product works in other MOTOTRBO digital modes.) These modifications are necessary due to the Connect Plus system architecture, which is quite different from other MOTOTRBO modes. In other MOTOTRBO modes, a third party application typically resides on a PC that connects to a MOTOTRBO radio via USB. In Connect Plus, third party applications do not speak directly to the Connect Plus SU. Instead, they communicate with the SU via the XRC 9000 controller. The connection between the third party application and the XRC 9000 is via IP. For accredited ADP developers, Motorola provides Application Developer Kit (ADK) documents to describe the protocols used to interface with the MOTOTRBO product. In addition to the applicable MOTOTRBO ADK document(s), a third party developer wishing to develop a product for a supported Connect Plus interface will require an additional document explaining the ADK modifications required for Connect Plus. These modifications are most typically related to message addressing. The following table shows whether specific MOTOTRBO interfaces are currently supported in Connect Plus. Interfaces supported in Connect Plus with some modifications Text Messaging
Interfaces not currently supported in Connect Plus Telemetry
Location Services
IP capable Peripheral
Presence Notifier to Watcher (PN2W)13
Non-IP capable peripheral Raw IP Data pass through
The XNL/XCMP interface is a special case. The XRC 9000 uses this interface to communicate with the MOTOTRBO Repeater, and the Connect Plus Option Board uses this interface to communicate with the MOTOTRBO radio, however Connect Plus does not currently support this interface for third party applications. Because the only Option Board slot is already occupied by the Connect Plus Option Board, the MOTOTRBO Option Board interface is not available to 3rd party developers in Connect Plus mode.
13
In Connect Plus Presence Notification services are provided by the XRC 9000 controller. The Motorola Presence Notifier application is not used or supported.
67 of 151
MOTOTRBO Connect Plus System Planner 1.0
3 Connect Plus System Components and Topologies 3.1 Connect Plus System Components The System Components of a Connect Plus System are similar to those of other digital modes, such as IP Site Connect or Capacity Plus. The reader can refer to the section on System Components of [1] for detailed information on the MOTOTRBO equipment and specifications. The primary differences for Connect Plus System Components are listed immediately below. These differences will be discussed in greater detail in the sections that follow: System Components of Connect Plus that are not used in other MOTOTRBO digital modes: XRC 9000 controller System Components used in other digital modes that are not used in Connect Plus: Radio Control Station as the LRRP and Text Message application interface Text Message terminal connected directly to SU via USB Multi-Channel Device Driver (MCDD)
3.1.1 Fixed End Components 3.1.1.1 XRC 9000 Controller Each Connect Plus site requires an XRC 9000 Controller. Each XRC 9000 controls up to 15 MOTOTRBO repeaters per trunked site. Because this is an IP interface, the XRC 9000 and its connected repeaters could theoretically be in different locations. However, due to the time sensitive nature of the messaging between the controller and the repeaters, the XRC 9000 and its trunked repeaters must be at the same physical location and connected to the same Ethernet switch. Other configurations are neither recommended nor supported. Because the repeaters operate in digital mode, the XRC 9000 can control up to 30 digital channels (timeslots) per Connect Plus site. One of these timeslots must be dedicated for Control Channel signaling. All other timeslots are used by the controller for call assignment. Any timeslot that is not the Control Channel timeslot is a “trunk-to” timeslot. This term is used because the SU moves or “trunks” to the slot after receiving a call assignment message on the Control Channel downlink. The XRC 9000 communicates with its trunked repeaters via the IP Site Connect Protocol. The XRC 9000 is configured as the IP Site Connect Master and requires a static IP address. Its repeaters are configured as IP Site Connect Peers. Repeater IP addresses may be static or assigned via DHCP.
68 of 151
MOTOTRBO Connect Plus System Planner 1.0 XRC 9000 Functions for its Local Site The XRC 9000 acts as the site controller for its co-located repeaters. It communicates with the repeaters via IP in order to: Act as IP Site Connect Master Encode & Decode Control Channel messaging Process registrations and Call Requests Track which RF resources are (and are not) currently available Assign RF resources Maintain a Busy Queue when no RF resources are available Repeat transmitted audio packets on the repeater downlink Receive text messages created by SU’s that are registered to the site. Deliver text messages addressed to SU’s that are registered to the site. Receive Location Requests sent by the Location Server or forwarded from other sites. Deliver Location Requests addressed to SU’s that are registered to the site. Receive Location Reports from SU’s that are registered to the site, and forward the reports to the Location server. Assist repeater with FCC compliance (CWID, Level I and II Monitoring) Track airtime usage other site statistics
XRC 9000 Multisite Functions The ability to operate in a multisite network is a purchasable option for the XRC 9000 controller. If multisite networking is desired, each Connect Plus site requires an XRC 9000 controller, and each XRC 9000 must be enabled for multisite operation. Each XRC 9000 only has direct control over the MOTOTRBO repeaters at its own site location. In multisite operation, the XRC 9000 controllers communicate with one another via IP to facilitate multi-site call set-up and audio routing. TCP/IP is used for call set-up messages. Audio packets are transported via UDP/IP. In a multisite network, the controller has all of the same responsibilities that it has in single site mode, along with several additional functions as listed below: Track registrations and de-registrations throughout the Connect Plus network
69 of 151
MOTOTRBO Connect Plus System Planner 1.0 Based on its list of registered SU’s and Groups, efficiently assign local RF resources for inbound network calls. Facilitate network call set-up Duplicate and forward voice packets to any site where the Target ID is registered Provide voice arbitration in the event of simultaneous or near-simultaneous voice transmissions at multiple Connect Plus sites. When the XRC 9000 receives voice packets from multiple sources for the same call, the controller uses time stamps to decide which voice stream will be transmitted on the repeater downlink under its control. When receiving a Text Message or Location Request for a registered SU from another site, or from a third party application, the XRC 9000 transmits the message or request to the registered SU. When receiving a Text Message or Location Request for an SU that is registered to a different network site, the XRC 9000 routes the message to the site where the Target ID is registered. Send a periodic “Neighbor Site” message to tell SU’s which network site(s) is/are RFadjacent to this one. Provide NTP service to the other site controllers if configured through the Network Manager. For more information on the NTP settings the reader can refer to [4].
XRC 9000 Configuration & Programming The XRC 9000 controller must be configured for proper operation. This configuration can be accomplished either locally or remotely by using the XRC 9000 Network Manager software. The Network Manager is used to: Validate and configure privileges for Connect Plus subscribers Configure site and network parameters Monitor site RF activity in real time Monitor airtime usage and diagnostic information Perform XRC 9000 controller storage maintenance, namely clearing old airtime logs
3.1.1.2 Repeater Operation in Connect Plus The MOTOTRBO repeater interfaces with the XRC 9000 Controller to provide the RF interface for the Connect Plus site. Each XRC 9000 can control up to 15 MOTOTRBO repeaters, for a total of 30 digital channels (timeslots). The repeater must be enabled for digital operation and configured as an IP Site Connect Peer. The XRC 9000 serves as the IP Site Connect Master. For a more thorough discussion on MOTOTRBO CPS programming requirements for the MOTOTRBO repeater, see “Connect Plus System Design Considerations”.
70 of 151
MOTOTRBO Connect Plus System Planner 1.0
Even though the repeater is configured for IP Site Connect, it knows that it is actually part of a Connect Plus Site and not a conventional IP Site Connect System. The repeater knows this via IP messages from the XRC 9000 controller. As a Connect Plus repeater, its operation differs from other digital modes in several ways: In Connect Plus operation, the repeater doesn’t automatically repeat everything it receives on its uplink. Instead, it forwards received transmissions to the XRC 9000 controller. The controller decides whether to route the transmission back to the repeater downlink. The Connect Plus controller only routes “authorized transmissions” back to the repeater downlink. An authorized transmission is one that has been initiated and validated via Connect Plus messaging on the Control Channel timeslot. Because of this, a conventional (non-Connect Plus) SU cannot utilize the repeater as long as the downlink is under Connect Plus control. If a conventional SU (operating in digital mode) attempts to access a Connect Plus repeater, its transmission will be received by the repeater and forwarded to the controller, but the controller will not repeat the transmission on the downlink. This feature prevents unauthorized “pirating” of Connect Plus channels. However, if IP communications between the XRC 9000 controller and the repeater are disrupted for an extended period of time (at least a minute or longer), the repeater will enter “Conventional Fallback Mode”, in which it operates as a digital conventional repeater. In Conventional Fallback Mode, the repeater will automatically repeat the transmissions of a correctly programmed conventional SU. For a more thorough discussion on Connect Plus operation in the presence of failures, see the “Connect Plus System Design Considerations” section. In conventional IP Site Connect, a radio transmission received by one IP Site Connect repeater is not only repeated on its own downlink, it also transmitted by all other IP Site Connect repeaters – regardless of whether any SU is currently present to receive the call. In Connect Plus, each downlink timeslot is controlled independently, thereby allowing for efficient utilization of network RF resources. A Group voice call, for example, will only be heard at sites where a Group member is currently registered. If a Group member is not currently registered, the site is not brought into the call. In conventional IP Site Connect, IP Site Connect functionality can be enabled or disabled per repeater timeslot. The available options are “None”, “Slot 1”, “Slot 1 & 2”, or “Slot 2”. When using the repeater for Connect Plus, the XRC 9000 Controller will assume it has access to both repeater timeslots. Therefore, the Connect Plus repeater must be configured for IP Site Connect on “Slot 1 & 2” with MOTOTRBO CPS. This rule is not enforced by MOTOTRBO CPS, but it is required for proper operation. In other digital modes, the repeater is programmed with a Radio ID in the range of 1 to 16776415. In Connect Plus, each repeater in the Connect Plus site must be programmed with a unique Radio ID in the range of 1 to 15. Repeaters in other Connect Plus sites will use this same range (1-15). This rule is not enforced by MOTOTRBO CPS, but it is required for proper operation. In other digital modes, Base Station Identification (also called CWID) is handled entirely by the repeater. In Connect Plus mode, CWID is handled jointly by the repeater and the XRC 9000 controller. The CWID itself (usually the FCC license call sign) is programmed into the repeater with MOTOTRBO CPS, but the CWID TX Interval is programmed into the controller. When the repeater registers with an IP Site Connect Master identifying itself as the XRC 9000 controller, the repeater knows to ignore the CWID TX Interval programmed with MOTOTRBO CPS. The Controller will tell the repeater when to send CWID. For a
71 of 151
MOTOTRBO Connect Plus System Planner 1.0 more thorough discussion on CWID, see the “Connect Plus System Design Considerations” section. In other digital modes, FCC Type I compliance is handled entirely by the repeater itself, and FCC Type II compliance is handled by the repeater after being initiated by an external input. In Connect Plus mode, the repeater operates in much the same way, but it also takes the additional step of informing the XRC 9000 controller when it has taken itself offline. This is necessary so that the controller will not try to assign calls to the repeater until the repeater reports itself back on-line. In other digital modes, the repeater downlink uses embedded signaling to indicate the status of the repeater timeslots. This embedded signaling rides in more than one part of the transmitted signal. In Connect Plus, some of this embedded signaling is used just as in other digital modes, while other parts of the embedded signaling convey information that is unique to Connect Plus. In Connect Plus mode, the repeater acts as a “conduit” for Connect Plus control messages, but it does not process the messages. The messages are processed by the XRC 9000 controller and the Connect Plus SU. In Connect Plus mode, the XRC 9000 controller provides voice arbitration in the event of simultaneous or near-simultaneous voice transmissions at multiple Connect Plus sites. This differs from conventional IP Site Connect operation, where voice arbitration is done by the repeater itself. In conventional operation, the repeater can be configured with a “zero” Call Hang Time to create a “transmission trunking” environment where each PTT is treated as a brand new call. This configuration is not recommended for Connect Plus because the time required for Control Channel call processing, validation, channel assignment, and synchronization with the assigned timeslot would have to be repeated for each PTT. Connect Plus recommends that Call Hang Time values be set to 3 seconds (or longer) for each call type. Furthermore, the Hang Time value selected for each call type must be programmed the same in all Connect Plus repeaters network-wide. While the software does not enforce this rule, it must be followed for proper operation. For more information on repeater configuration and operation for Connect Plus, see the “Multiple
Digital Repeaters in Connect Plus Mode” section in “Connect Plus System Design Considerations”. 3.1.1.3 Radio Control Station in Connect Plus The Control Station Radio, an important system component in other digital modes, is not necessary in Connect Plus. In other digital modes, a Text Message application or Location application resides on a PC that has a USB connection to a mobile radio, serving as Control Station. The Control Station radio acts as peer to other subscriber units in the field via the Common Air Interface. Connect Plus does not use this architecture. In Connect Plus, the Text Message or Location application resides on a PC that is connected via IP to a XRC 9000 Controller. This can be any Connect Plus controller on the radio network. The controller is the application’s gateway to the Common Air Interface. This architecture provides significant advantages because the XRC 9000 Controller is the system component with
72 of 151
MOTOTRBO Connect Plus System Planner 1.0 the required knowledge to locate the destination SU, identify an available RF resource, and deliver the message to its intended target. Other digital modes utilize Control Stations as the application gateway for GPS Revert or Data Revert Channels. The SU picks which “revert channel” to use based on MOTOTRBO CPS programming. This strategy is not used in Connect Plus. Instead, the XRC 9000 Controller assigns timeslots for all data calls. In doing so, the controller may use any available timeslot.
3.1.1.4 MC1000, MC2000, MC2500 Console in Connect Plus The MC1000, MC2000, MC2500 Consoles are not currently supported in Connect Plus mode.
3.1.2 Mobile Components 3.1.2.1 MOTOTRBO Portable Radio The Connect Plus MOTOTRBO portable is available in two tiers: A keypad radio with display, and A non-keypad radio with no display Connect Plus mode portable radio has slightly different battery life characteristics compared to the radios configured to operate in other MOTOTRBO digital modes due to the presence of the Option Board, which consumes additional power. The following table lists the average battery life at 5/5/90 duty cycle with battery saver disabled; GPS options disabled, no attached accessories, automatic roaming disabled and transmitting at high power. Actual performance may vary by band and usage characteristics.
Battery Type
Battery Life
NiMH 1300 mAh Battery
9.6 Hours
IMPRES Li-ion 2200 mAh Battery
16.0 Hours
Table 3-1 Expected Battery Life For more details on the MOTOTRBO Portable Radio the reader can refer to the MOTOTRBO Portable section in [1].
3.1.2.2 Portable Radio Accessories & Peripherals Interface The configurable pin options provided by MOTOTRBO CPS for pins 17, 19, 20, 21, 22, 24 and 24 are not presently supported in Connect Plus. They currently apply to non-Connect Plus modes only.
73 of 151
MOTOTRBO Connect Plus System Planner 1.0 3.1.2.3 MOTOTRBO Mobile Radio The Connect Plus MOTOTRBO mobile is available in two tiers: A radio with full display, and A radio with numeric display For more details on the MOTOTRBO Mobile Radio the reader can refer to the MOTOTRBO Mobile section in [1].
3.1.2.4 Mobile Radio Front Panel Accessory Interface For description on the radio front panel accessories, the reader can refer to the Front Panel Accessory Interface section for the MOTOTRBO Mobile in [1].
3.1.2.5 Mobile Radio Rear Accessory and Peripherals Interface For description on the radio front panel accessories, the reader can refer to the Rear Accessory and Peripherals Interface section for the MOTOTRBO Mobile in [1].
3.1.2.6 Connect Plus Radio Configuration Requirements Connect Plus uses the same MOTOTRBO portable and mobile radios as other digital modes. However, for Connect Plus operation these devices must meet several additional requirements, which are outlined as follows: The Connect Plus radio requires radio software version R01.06.30 or later. A Motorola Option Board must be installed in the SU. Prior to the installation of Connect Plus software, the radio’s Option Board is referred to as a Generic Option Board (GOB). Following installation of Connect Plus software, the Option Board is referred to as Connect Plus Option Board. In order for the Connect Plus Option Board to enable its OTA interface and “talk” to the XRC 9000 controller, it must first verify that the Connect Plus feature has been enabled in the MOTOTRBO subscriber unit. To program a radio for Connect Plus operation, two different versions of CPS programming software are needed: MOTOTRBO CPS is used to create zones and channels for Connect Plus use. See “Connect Plus System Design Considerations”, for a more detailed discussion of MOTOTRBO CPS programming guidelines. Connect Plus CPS is used for advanced configuration of Connect Plus parameters, including all of the following operations: o
Creating Connect Plus Contacts
74 of 151
MOTOTRBO Connect Plus System Planner 1.0 o
Assigning Channel Selector Knob positions (portable radio) or Channel Rocker positions (mobile radio)
o
Entering Network, Site, & Frequency information
o
Configuring Connect Plus feature options
o
Configuring Connect Plus Menu Operation
3.1.3 User Interface & Ergonomics in Connect Plus 3.1.3.1 User Interface Dependencies Because Connect Plus uses the same radio hardware as other digital modes, the physical buttons used by Connect Plus operation are the same as other digital modes. In some cases, however, these buttons operate differently for Connect Plus. All Connect Plus users should be aware of the following principles: It is quite possible (in fact, it’s likely) that the same programmable button will be used to activate different features, depending on whether the radio is selected to a Connect Plus channel or a nonConnect Plus channel. When selected to a non-Connect Plus channel, a programmable button operates as configured with MOTOTRBO CPS. When selected to a Connect Plus channel, programmable buttons operate as configured with Connect Plus CPS. It is also important to note that Connect Plus is not aware of how a button has been programmed with MOTOTRBO CPS, and may not be aware of its current MOTOTRBO state (activated or deactivated). This can impact Connect Plus operation. For more information, see the following topics under “Connect Plus System Design Considerations”: How MOTOTRBO CPS Button Settings Affect Connect Plus Operation How MOTOTRBO CPS Menu Settings Affect Connect Plus Operation
3.1.3.2 Connect Plus Buttons & Indicators Push-to-Talk Button (PTT): In Connect Plus, if the radio is idle and monitoring the Control Channel timeslot when the user presses PTT, the SU will attempt to start a voice call using the Contact Name that has been programmed for the selected Channel Selector Knob position (portable radio) or Channel Rocker position (mobile radio). The contact name can either be a Group type (Group ID, Multigroup ID, Site All Call Group) or Private Call type. If it is a Group type, the radio attempts to start a Group Call to the programmed ID. If it is a Private Call ID, the radio attempts to start a Private Call to the destination Private ID. The SU sends a Call Request message on the Control Channel uplink. After transmitting the call request, the radio automatically de-keys in order to listen for the controller response. The radio user is usually unaware that the radio has keyed and de-keyed because he/she continues to press PTT while awaiting the talk
75 of 151
MOTOTRBO Connect Plus System Planner 1.0 permit tone. When the user hears the talk permit tone, this indicates that a channel has been granted and the user may begin to speak. If PTT is pressed during a call in progress (during the Call Hang Time), the radio begins transmitting audio to the assigned channel or slot. The call request and set-up procedure does not apply in this case because the trunk-to slot has already been assigned. Note: The Talk Permit tone is a programmable feature. When enabled via Connect Plus CPS (it is enabled by default), it can also be toggled on and off via the radio menu. Because Connect Plus is a trunking system, it is highly recommended to keep the Talk Permit tone enabled at all times. Otherwise, the radio user will not know when (and if) the controller has assigned a timeslot for the radio’s transmission. When the Talk Permit tone is enabled, Connect Plus CPS also provides the ability to enable a “Pre-Tone”. The purpose of the pre-tone (which is disabled by default) is to tell the radio user that the SU is in the process of requesting his/her call. The Pre-Tone will be followed by a Talk Permit tone (if the channel is granted), a busy tone (if the call is placed in the Busy Queue) or a denial tone (if the request is denied for any reason). Channel Selector Knob (portable) or Channel Rocker (mobile): In Connect Plus, each Channel Selector Knob position (for the portable radio) and the first 16 Channel Rocker positions (for the mobile radio) can be mapped to a specific Contact Name & Registration Group via CPS programming. The Contact Name determines what type of voice call is started when PTT is pressed. The Registration Group determines which Group ID the SU registers with when the knob or channel rocker is selected to that position. It is not allowable to assign some Channel Selector Knob (or Channel Rocker) positions to Connect Plus calls, and other positions to non-Connect Plus channels, within the same zone. To make a non-Connect Plus call, the user must change out of the Connect Plus zone, and then select the appropriate non-Connect Plus zone and channel. If the radio user selects an unprogrammed position for the Channel Selector Knob (mobile) or Channel Rocker (portable), the radio sounds a continuous tone and displays, “unprogrammed”. The knob or channel rocker must be moved to a programmed position before the radio will be usable. Programmable Buttons: Connect Plus CPS is used to configure how the radio’s programmable buttons will operate when the radio is selected to a Connect Plus channel. The number of programmable buttons varies according to radio model. For each available button, the short press and long press can be programmed to operate differently. If the radio is used for both Connect Plus and non-Connect Plus channels, then it is important to understand the interactions discussed in “User Interface Dependencies”. Status Indicators: Wherever possible, status indicators (LEDs, display, icons, tones, etc.) work in a similar fashion for both Connect Plus and non-Connect Plus channels. Some differences in operation are inevitable due to the nature of the radio-Option Board interface. Menu System: When the radio is selected to a non-Connect Plus channel, the menu system is under the control of the radio’s main board, and the programmable menu options are configured via MOTOTRBO CPS programming. When the radio is selected to a Connect Plus zone, the menu system is under the control of the Connect Plus Option Board, and the programmable menu options are configured via Connect Plus CPS programming. Wherever possible, Connect Plus attempts to duplicate the Menu structure and available options used on non-Connect Plus channels. Some minor differences are inevitable due to differences in Connect Plus operation and the nature of the radio-Option Board interface. The top-level Menu headings for Connect Plus are: Contacts, Zones, Messages, Call Logs, and Utilities. For details on these menus, see references [2] and [3]. Full keypad: The MOTOTRBO keypad portable with display offers a full numeric keypad for users to manually enter target addresses for system features. This keypad is also used as an alphanumeric keyboard for text messaging. The non-display portable does not come with a keypad. A mobile radio equipped with the standard microphone does not provide a means to compose text messages or manually enter target addresses for call features. As an option, the MOTOTRBO
76 of 151
MOTOTRBO Connect Plus System Planner 1.0 mobile offers an Enhanced Keypad Microphone so that users can compose text messages and manually enter target addresses for call features.
3.1.3.3 Connect Plus Voice Feature Support The following chart illustrates voice feature support for various MOTOTRBO models while selected to a Connect Plus channel. Radio Model
Group Call
Display Portable
Site All Call
Private Call
Yes
Multigroup Call Yes
Yes
Yes
Emergency Call No
Non-Display Portable
Yes
Yes
Yes
Yes14
No
Mobile with full display
Yes
Yes
Yes
Yes
No
Mobile with numeric display
Yes
Yes
Yes
Yes
14
No
To initiate a Multigroup Call, Site All Call, or Private Call the SU must be enabled for the call privilege in the controller’s user database.
3.1.3.4 Connect Plus Command & Control Feature Support The following chart illustrates which MOTOTRBO radio models can initiate various “Command & Control” call features. Radio Model
Radio Check Yes
Call Alert
Radio Enable Yes
Radio Disable
Yes
Remote Monitor Yes
Non-Display Portable
No
Yes15
No
No
No
Mobile with full display
Yes
Yes
Yes
Yes
Yes
Mobile with numeric display
No
No
No
No
Display Portable
Yes
15
Yes
14
For these models Private Call can be initiated by (a) assigning a One-Touch-Call to the Private Call ID or (b) assigning a Channel Selector Knob position (portable radio) or Channel Rocker position (mobile radio) for the destination Private Call ID. Private Call initiation via the Radio Menu is not available. Indicates the call type can only be initiated via a programmable “One Touch Call”. Initiation via the menu is not available. 15
77 of 151
MOTOTRBO Connect Plus System Planner 1.0
To initiate any of these call types, the SU must be enabled for the associated privilege in the controller’s user database.
3.1.3.5 Analog Capability Not Available in Connect Plus Connect Plus is a digital mode. Analog operation is not available while operating on a Connect Plus Channel. To activate analog capability, it is necessary to program the radio with a nonConnect Plus, analog capable, channel. This channel cannot be placed in any Connect Plus zone. It must be placed in a non-Connect Plus zone.
3.1.3.6 Connect Plus GPS Capability Many radio models come equipped with an integrated, internal GPS receiver. Connect Plus supports Location Requests and Reports for radios that are so-equipped. For more information, see Connect Plus Location Services in the System Features section.
3.1.3.7 Connect Plus Text Messaging Compatibility The following chart illustrates Text Message capability for various MOTOTRBO models while selected to a Connect Plus channel. Radio Model
Receive Text Message?
Send Quick Text (programmed) Text Message
Create and send a limited free-form text message Yes
Use a connected PC to create & send a text message
Display Portable
Yes
Yes
Non-Display Portable
No
Yes (if programmed for a One Touch Call)
No
No
Mobile with full display
Yes
Yes
Only if equipped with an optional Enhanced Keypad Microphone
No
Mobile with numeric display
No
Yes (if programmed for a One Touch Call)
No
No
No
If the radio is enabled for the “Route to PC” option with MOTOTRBO CPS, this will affect operation in non-Connect Plus channels only. Connect Plus Text Messages will not be routed to the PC.
3.1.3.8 Connect Plus Telemetry Capability Telemetry is not a currently supported Connect Plus feature.
78 of 151
MOTOTRBO Connect Plus System Planner 1.0
3.1.3.9 Connect Plus Over-The-Air (OTA) File Transfer Capability The following chart illustrates Connect Plus OTA File transfer capability for various models. OTA File Transfer is a Connect Plus feature not available in other digital modes. Radio Model
Receive File via OTA File Transfer (for a supported file type) Yes
Radio user can cancel transfer & start call
Utilities Menu displays “Current” & “Pending” Files
Radio user can initiate OTA File Transfer via Radio Menu
Yes
Yes
Yes
Non-Display Portable
Yes
Yes
No
No
Mobile with full display
Yes
Yes
Yes
Yes
Mobile with numeric display
Yes
Yes
No
No
Display Portable
3.1.4 Connect Plus Data Applications 3.1.4.1 Application Server in Connect Plus In other digital modes, a Data Application (such as a Text Message application or a Location application) resides on a PC that has a USB connection to a mobile radio, serving as Control Station. The Control Station radio acts as peer to other subscriber units in the field via the Common Air Interface. Connect Plus does not use this architecture. In Connect Plus, the Text Message or Location application resides on a PC that is connected via IP to a XRC 9000 Controller. This can be any Connect Plus controller on the radio network. The controller is the application’s gateway to the Common Air Interface. This architecture provides significant advantages because the XRC 9000 Controller is the system component with the required knowledge to locate the destination SU, identify an available RF resource, and deliver the message to its intended target.
3.1.4.2 Connect Plus Presence Notifier Data applications work best when they know whether the Destination Connect Plus SU is currently registered (or not registered) to the Connect Plus network. This knowledge allows the application to operate efficiently and to conserve IP bandwidth. In other MOTOTRBO digital modes, subscriber radios report their presence in the network by using the Automatic Registration Service (ARS) protocol to communicate with the MOTOTRBO Presence Notifier or a third Party ARS application. The Connect Plus SU does not use ARS to report its
79 of 151
MOTOTRBO Connect Plus System Planner 1.0 presence in the network. Instead, Connect Plus uses short messages that are sent on the Control Channel as part of the normal procedure for registering or de-registering with the XRC 9000 Controller. In other MOTOTRBO digital modes, a data application may obtain presence information by subscribing to the MOTOTRBO Presence Notifier or a 3rd Party ARS application. In Connect Plus, a data application may obtain presence information by subscribing to the Connect Plus controller, acting as Presence Notifier. In doing so, the data application utilizes Motorola’s Presence Notifierto-Watcher Interface Specification, with some modifications as specified for Connect Plus. This allows the data application (the “Watcher”) to request presence information for specific SU’s. The XRC 9000 notifies the Watcher when the specified SU registers or de-registers from the Connect Plus network.
3.1.4.3 Multi-Channel Device Driver (MCDD) in Connect Plus The Multi-Channel Device Driver (MCDD) is not used in Connect Plus. In Connect Plus, a data application can send its message to any XRC 9000 controller in the network. The application does not need to be concerned about what site or channel the destination SU is currently using. Tracking the SU between sites is the responsibility of the XRC 9000 controller. If the SU is not registered to the controller that received the message, the controller forwards the message to the controller of the SU’s registered site.
3.1.4.4 Text Message Application, Server & Client in Connect Plus While Connect Plus supports third party text message applications (including server & client operations), the Motorola MOTOTRBO Text Messaging application is not currently supported. To determine whether a specific third party application supports Connect Plus operation, contact the vendor. The vendor can also supply specifications for the computer platform necessary to run the application. For general information about how third party text applications work in Connect Plus, see “Connect Plus Text Messaging” in the System Feature section.
3.1.4.5 Location Tracking Application, Server & Client in Connect Plus While Connect Plus supports third party text Location tracking applications (including server & client operations), the Motorola MotoLocator tracking application is not currently supported. To determine whether a specific third party application supports Connect Plus operation, contact the vendor. The vendor can also supply specifications for the computer platform necessary to run the application. For general information about how third party Location applications work in Connect Plus, see “Connect Plus Location Services” in the System Feature section.
3.2 Connect Plus System Topologies 3.2.1 Direct Mode Direct Mode, where one SU communicates directly to another SU without using a MOTOTRBO repeater, is not available in Connect Plus. A Connect Plus SU can only communicate with other
80 of 151
MOTOTRBO Connect Plus System Planner 1.0 SU’s via MOTOTRBO Repeaters and the XRC 9000 controller. To set-up Direct Mode, it will be necessary to program the SU with at least one non-Connect Plus zone and channel. While the radio is selected to the Direct Mode channel, the SU will not hear any Connect Plus calls. When programming the Direct Mode frequency, do not program any Connect Plus repeater frequency. Otherwise, the Direct Mode transmission may interfere with Connect Plus operation.
3.2.2 Repeater Mode The MOTOTRBO repeater is a required component of the Connect Plus trunking system, as it provides the RF path between the Connect Plus Controller and the Connect Plus SU. Furthermore, Connect Plus SU’s never speak to each other in Direct Mode (while selected to a Connect Plus personality). Connect Plus transmissions pass through one or more MOTOTRBO repeaters and one or more XRC 9000 controllers (depending on whether the SU’s are located at the same site or at different sites). In Connect Plus, the repeater operates in digital mode, thereby providing all of the advantages of digital signaling (two timeslots, error correction, etc.). In addition, Connect Plus offers the additional benefits of trunked operation. In conventional operation, each position on the SU’s Channel Selector Knob (portable radio) or Channel Rocker (mobile radio) is assigned a specific repeater and timeslot via CPS programming. If the repeater timeslot is busy with another call, the radio user is blocked from communicating until the timeslot becomes available. In Connect Plus, the SU makes the Call Request on the Control Channel timeslot, and the controller can assign the call to any available repeater and timeslot in the site. While this requires a dedicated timeslot for Control Channel signaling, it also greatly reduces call blocking. Calls are not blocked until all of the site’s repeaters and timeslots are busy. Even then, the Controller will continue to receive Call Requests and place them in the Busy Queue. When a timeslot becomes available, the controller assigns the highest priority call from the Busy Queue. When priorities are equal, calls are assigned on a firstin, first-out basis. Just as in other MOTOTRBO digital modes, all MOTOTRBO repeaters that have overlapping coverage must be programmed with different frequency pairs so as not to interfere with one another. Frequencies may be re-used when coverage does not overlap. If coverage does not typically overlap, but may in certain conditions (such as when the SU is in a very high place), the re-used frequencies must have different Color Codes. This will not eliminate interference between the two repeaters, but it will help SU’s distinguish between the different repeaters – especially while Roaming. In other digital modes, the MOTOTRBO repeater processes calls without the involvement of any additional device, such as a controller. In Connect Plus, both the MOTOTRBO repeater and the XRC 9000 controller are involved in every Connect Plus call. For more information about how the Connect Plus system uses the MOTOTRBO Repeater and how calls are processed, see the following sections:
Connect Plus System Feature Overview: Connect Plus Features (and its sub-sections) Connect Plus System Feature Overview:
81 of 151
MOTOTRBO Connect Plus System Planner 1.0 Features Not Supported in This Connect Plus Release Connect Plus System Components and Topologies: Repeater Operation in Connect Plus Connect Plus System Design Considerations: Multiple Digital Repeaters in Connect Plus Mode
3.2.3 Topologies of a Connect Plus System Connect Plus system topologies fall into two major categories: Connect Plus Single Site System Connect Plus Multisite Network
3.2.3.1 Connect Plus Single Site System A Connect Plus Single Site System provides multi-channel trunking capability to a single geographical area. The size of the geographical is determined by factors such as: Propagation characteristics of RF band utilized Height of site antenna(s) and repeater power output RF output & antenna efficiency of mobile and/or portable radio devices Type of terrain and other obstructions (buildings, etc) The essential components of a Connect Plus Single Site System are: XRC 9000 Trunking Controller 1-15 MOTOTRBO Repeaters. All repeaters under the control of the same XRC 9000 controller must reside in the same RF frequency band and must all have an identical coverage footprint (both “talk in” and “talk out”). Ethernet Switch to connect XRC 9000 Controller with repeaters Other Site Equipment to include o
RF Equipment such as combiners, RF cables, antenna(s), etc.
o
Power backup for the XRC 9000 controller
o
Power backup for MOTOTRBO Repeaters
MOTOTRBO portable and/or mobile radios (including antennas, microphones, etc). These MOTOTRBO SU’s may be located anywhere within the RF coverage of the Connect Plus site.
82 of 151
MOTOTRBO Connect Plus System Planner 1.0
The optional components of a single-site Connect Plus Single Site System are: PC with Location Tracking application PC with Text Messaging application PC with RDAC application for repeater monitoring and alarm reporting In Connect Plus, the above applications communicate with the Connect Plus System via IP connection to the XRC 9000 controller. The computer hosting the application can be colocated with the controller, or it can be in a different location. If the computer is in a different location, a Backend IP network is needed to connect the XRC 9000 with the PC hosting the application. A Backend network is also needed if the System Administrator wishes to remotely access the Controller via IP using a PC running the XRC 9000 Network Manager software.
3.2.3.2 Connect Plus Multisite Network Connect Plus Multisite Networking is a purchasable option. Multisite Networking refers to the ability to interconnect multiple Connect Plus single-site systems. In the initial release, up to six single-sites can be joined together to form a Connect Plus network. The most common reason for connecting multiple sites is to enlarge the RF coverage available to the Connect Plus SU. Because of this, each Connect Plus site is typically placed in a different geographical area and provides the RF coverage for that area. As the radio user moves from one coverage area to another, the SU is able to automatically “Roam” from one site to another. Whenever the SU registers with a different site, the controller forwards information on the SU’s whereabouts to all other controllers. This allows all network controllers to “track” the SU as it moves it around the network. The registration process not only tells the controller which SU is registering with the site, it also tells the controller which Talk Group the user has selected for communications. When the radio user wishes to communicate with other SU’s, the XRC 9000 controllers will transmit the call at any network site where the Destination ID is currently registered. It should be noted that even in a multisite network, each site is still controlled by its local XRC 9000 Controller. A controller can assign a call to any repeater within its own site, but it cannot assign a call to another site’s repeater without the permission and involvement of that site’s controller. A controller can “trunk” SU’s to any repeater in its own site, but it cannot “trunk” an SU to a repeater in a different site. The SU must “roam” to the new site after it loses signal from the current site. A less common reason for linking multiple Connect Plus sites is to provide communications between MOTOTRBO radios that use different frequency bands. In this case, each frequency band requires its own Connect Plus site. The Connect Plus sites in different frequency bands can be geographically separated or they can be co-located. Because a Connect Plus network is essentially a collection of interconnected single-sites, the list of single-site essential components (from the previous section) also applies to each site in the multisite configuration. In addition to these, multisite operation requires several other “essential” elements. They are listed as follows: Each site requires its own XRC 9000 controller, and each XRC 9000 must be enabled for the purchasable multisite permission.
83 of 151
MOTOTRBO Connect Plus System Planner 1.0 Each controller must be configured with several additional parameters that are not used in the single-site, stand-alone configuration. These parameters tell the controller how to communicate with the other networked controllers, what timer value to use for call arbitration, and they also tell the controller what “Neighbor Site” information should be transmitted over-the-air to the listening SU’s. Because the XRC 9000 controllers communicate via TCP/IP and UDP/IP, there must be a Backend IP Network to connect the different sites. Network IP configurations and bandwidth requirements are discussed in other sections of this System Planner. The optional components of a Connect Plus Multisite Network are very similar to the optional components of a stand-alone single-site: PC with Location Tracking application. It can be connected via IP to any XRC 9000 controller in the network. The connected controller will inspect the incoming messages, and forward them to other site controllers, if necessary. While it’s not required to have multiple Location Tracking applications connected to different sites, there are scenarios where the customer’s requirements may warrant such a configuration. PC with Text Messaging application. It can be connected via IP to any XRC 9000 controller in the network. The connected controller will inspect the incoming messages, and forward them to other site controllers, if necessary. While it’s not required to have multiple Text Messaging applications connected to different sites, there are scenarios where the customer’s requirements may warrant such a configuration. PC with RDAC application for repeater monitoring and alarm reporting. A separate RDAC application is required for each site that will be monitored. These multiple RDAC applications act independently of one another and have no awareness that their connected site is part of a larger network.
3.2.4 Network IP Topologies for Connect Plus System The devices in a Connect Plus network (with the exception of the subscriber radios) communicate with one another via IP messages received on their Ethernet port(s). It follows that these devices will each have an IP address and will be need to be connected via some type of IP network. This section will discuss various IP topologies of the Connect Plus System. The IP network topologies can be divided into two primary configurations: Local Area Network Wide Area Network Some customers will have network topologies that are combinations of these configurations.
3.2.4.1 Local Area Network (LAN) Configuration Customers that have high capacity network connectivity throughout their organization will most likely have a desire to utilize their existing infrastructure for wide area connectivity. Connect Plus supports the following technologies: Private LANs Corporate LANs
84 of 151
MOTOTRBO Connect Plus System Planner 1.0 Private Wireless LANs (e.g. Motorola’s Canopy16 or Point-to-Point (PTP)17, 802.11/Wi-Fi network) Exact configurations of Local Area Networks can vary greatly. As long as the devices are on the same network, or have access to other networks through an internal router or NAT configurations, the Connect Plus system will operate correctly. It is also assumed that in these local configurations that bandwidth is not an issue. The diagram below shows a simple diagram of Connect Plus sites connected through a local area network. Site 1 Local Area Network Controller Repeaters Optional RDAC
Site 6 Local Area Network Controller Repeaters Optional RDAC
Network
Site 2 Local Area Network Controller Repeaters Optional RDAC
Local Area Network Site 5 Local Area Network Controller Repeaters Optional RDAC
Site 3 Local Area Network Controller Repeaters Optional RDAC
Site 4 Local Area Network Controller Repeaters Optional RDAC
Figure 3-1 Connect Plus Sites Connected through LAN
3.2.4.2 Wide Area Network (WAN) Configuration One of the values of Connect Plus is the ability to connect sites over public Internet Service Provider (ISP) links as well as private broadband connections. ISPs provide a range of technologies with varying bandwidth. Connect Plus supports the following technologies (as long as the requirements listed in the backend Network Considerations section are met): Private T1 DSL/ADSL Cable Modem Broadband Wireless Access ISDN Frame Relay 16 17
For more information about Canopy, see Motorola Business Products & Services Point-to-Multipoint site. For more information about PTP, see Motorola Business Products & Services Point-to-Point site.
85 of 151
MOTOTRBO Connect Plus System Planner 1.0
For all the types of network links listed above it is strongly recommended to establish a commercial grade of service with the ISP in order to ensure reliability required for real-time packet based communication systems such as Connect Plus. For discussion on backend network characteristics the reader is encouraged to review section Considerations for the Connect Plus Backend Network. Connect Plus does not support dial-up connections (due to small bandwidth) or Satellite Internet access (due to large delay). When utilizing public internet connections, it is important that the system installer understand the bandwidth and delay that each Connect Plus device requires in order to operate optimally. They must also understand the details (bandwidth and delay) of the network link at each site and between sites. For example, if connecting sites have long distances between them, the delay of the entire link needs to be considered. A Connect Plus site can be (and is suggested to be) behind a router and/or a NAT and/or a firewall. Although not required, it is highly suggested in order to protect against the undesired solicitations common over the public internet. Although Connect Plus should work through most off-the-shelf devices, the following router/NAT/firewalls have been validated with Connect Plus: HP ProCurve 7102dl Secure Router For the first release Connect Plus provides TCP authentication, but no IP encryption features. For customers that are concerned with such privacy matters, and want to protect the system traffic over the IP networks it is recommended to employ a Secure VPN layer. Secure VPN is not a function of the Connect Plus device but rather of the router. It is important to note that VPN does add the need for additional bandwidth and may introduce additional delay. This should be taken into consideration in bandwidth planning. The following Secure VPN router has been validated with Connect Plus: Linksys 4 Port Gigabit Security Router with VPN: Model RVS4000 Each XRC 9000 controller requires a static IPv4 address from the Internet Service Provider. The other Connect Plus controllers utilize this static IPv4 address to establish their link with the wide area system. The diagram below shows a simple diagram of Connect Plus sites connected through a wide area network.
86 of 151
MOTOTRBO Connect Plus System Planner 1.0 Site 1 Local Area Network Controller Repeaters Optional RDAC
Router Site 6 Local Area Network Controller Repeaters Optional RDAC
Network Router
Router
Site 2 Local Area Network Controller Repeaters Optional RDAC
Router
Site 3 Local Area Network Controller Repeaters Optional RDAC
Wide Area Network Site 5 Local Area Network Controller Repeaters Optional RDAC
Router
Router
Site 4 Local Area Network Controller Repeaters Optional RDAC
Figure 3-2 Connect Plus Sites Connected through WAN
3.2.4.3 IP Topologies of a Single Site System An example of a Connect Plus Single Site system configuration is illustrated in Figure 3-3. XRC 9000 Controller and MOTOTRBO Repeaters: Because the XRC 9000 controller and the MOTOTRBO repeaters under its control must be in the same physical location and connected to the Ethernet switch18, these devices will be on the same Local Area Network (LAN). RDAC Application: If RDAC capability is desired for error reporting, each site where this functionality is desired must have its own RDAC application. The PC hosting the RDAC application must be on the same LAN (or VPN) as the controller and the site’s repeaters. The reason is as follows: RDAC communicates with the XRC 9000 and with the site’s repeaters via the IP Site Connect Protocol. The Controller is the IP Site Connect Master. The MOTOTRBO repeaters and the RDAC application are IP Site Connect Peers. If IP Site Connect Peers are ever located in different networks, then all peers must address the IP Site Connect Master via its publicly addressable IP, not its local IP address. This even applies to the peers that are in the same LAN as the Master. This requires a router capable of a special feature called “hair-pinning”, which turns the messages around to send them back to the IP Site Connect Master (in this case, the XRC 9000 controller). Due to the time sensitive nature of the messaging between the XRC 9000 controller and its peer repeaters, the latency added by this additional routing and the hair-pin address conversion 18
Connect Plus has been tested and validated with the HP ProCurve 2510-24 Ethernet switch.
87 of 151
MOTOTRBO Connect Plus System Planner 1.0 will be detrimental to system performance. For this reason Connect Plus requires all IP Site Connect Peers, including RDAC, to be located in the same Local Area Network (LAN) or Virtual Private Network (VPN) as the XRC 9000 controller acting as IP Site Connect Master. Location Tracking Application: If a Location Tracking Application is desired, the PC hosting the application can be located in the same LAN as the XRC 9000 controller, or in a different LAN. Text Messaging Application: If a Text Messaging Application is desired, the PC hosting the application can be located in the same LAN as the XRC 9000 controller, or in a different LAN. XRC 9000 Network Manager Software: A PC hosting the XRC 9000 Network Manager software can connect to XRC 9000 either locally or remotely. For remote connections, the PC hosting the XRC 9000 Network Manager program can be located in the same LAN as the XRC 9000 controller, or in a different LAN.
Text Messaging Application
IP Network (LAN)
Network Manager (Controller configuration & Site/Network Management)
Location Tracking Application
RDAC (Repeater Diagnostics & Control)
Controller
E.SWITCH
RPTR 1 TS 1:1
RPTR 2 TS 1:2
TS 2:1
RPTR ... TS 2:2
RPTR 15 TS 15:1
TS 15:2
Trunk-to Timeslots for voice & IP data calls Control Channel Timeslot (Can be assigned to TS1 of any RPTR)
Figure 3-3 Connect Plus Single Site Configuration
3.2.4.4 IP Topologies of a Multisite Connect Plus Network A multisite Connect Plus Network consists or multiple Connect Plus single-sites that are networked together via an IP backbone. The sites communicate with one another via TCP/IP and UDP/IP. An example of a Connect Plus Multisite system configuration is illustrated in Figure 3-4.
88 of 151
MOTOTRBO Connect Plus System Planner 1.0 XRC 9000 Controller and MOTOTRBO Repeaters: As stated in the previous section, the XRC 9000 controller and its connected site repeaters are always in the same LAN. XRC 9000 Controllers located at different sites: In a multisite network, the repeaters communicate only with their local XRC 9000 controller. They do not exchange messages with controllers or repeaters at other Connect Plus sites. Instead, all network communications are handled by the XRC 9000 controllers. These controllers can all be in the same network, in different networks, or a combination of both. The recommended multisite topology, wherever possible, is that the all XRC 9000 controllers should reside in the same private network or virtual private network (VPN). There are some important reasons for this recommendation: Regardless of what network configuration is utilized, the network links must meet the bandwidth, latency, and jitter requirements discussed in Connect Plus System Design Considerations. In a Private IP Network the amount of IP traffic, network capacity, and message routing is under the control the network owner. Because of this, the private network can be designed to ensure adequate Connect Plus bandwidth and performance. In public networks, capacity, loading and routing tend to be more unpredictable. This makes it more difficult to assure that Connect Plus requirements can be consistently met. In Private or Virtual Private Networks, each XRC 9000 controller can communicate with one another directly, using IP addresses that are known and consistent network wide. This greatly simplifies the required IP set-up, both in the XRC 9000 controllers and in the network’s routers. When the XRC 9000 controllers reside in multiple IP networks, the IP configuration is not as straight-forward. Private networks have advantages in the important area of IP security. Connect Plus supports the ability to work through a Secure VPN (Virtual Private Network). Secure VPN is not a function of the XRC 9000 controller device but rather of the router. It is important to note that VPN does add the need for additional bandwidth and may introduce additional delay. This should be taken into consideration in bandwidth planning. While it is highly desirable to exclusively utilize private IP links, this may not be possible for all customers. Connect Plus has been designed to accommodate different types of network configurations, including the ability to connect sites over public Internet Service Provider (ISP) links. Connect Plus is also designed to work in a mixed IP network environment. Examples of a mixed IP network environment include the following: Some sites reside in a private IP network, while others reside in a public IP network Some sites reside in public IP network “A”, while others reside in public IP network “B” Mixed IP network topologies significantly complicate IP address set-up, port configuration, router configuration, and IP security issues. Regardless of whether Connect Plus sites are linked via private or public connections, the following requirements must be fulfilled for all Connect Plus IP links: Each Connect Plus Controller requires a static IP address. In a public network, the static address is provided by ISP (Internet Service Provider).
89 of 151
MOTOTRBO Connect Plus System Planner 1.0 Regardless of what network configuration is utilized, the network links must meet the bandwidth requirements discussed in Connect Plus System Design Considerations. Connect Plus sites communicate exclusively via TCP/IP and UPD/IP. If a linking technology converts these messages to a different format for transport, they must be converted back to TCP/IP and UDP/IP prior to being delivered to the XRC 9000 Controller at the destination site. If any conversion is done, the process must be completely transparent (invisible) to all XRC 9000 controllers. Furthermore, the conversion process must not prevent the network link(s) from meeting the bandwidth requirements discussed in Connect Plus System Design Considerations. Connect Plus does not support dial-up connections for inter-site messaging (due to small bandwidth) or Satellite Internet access (due to large delay). Network security is an important consideration. In the event that Connect Plus sites will be connected through anything other than a Private Network or Virtual Private Network, a Certified Networking Professional will need to assist the system owner in protecting the radio network from the undesired solicitations common over the public internet.
Connect Plus Site 1
Site 1 RDAC
Connect Plus Site 2
Site 2 RDAC
LAN
LAN
Location Tracking Application Text Messaging Application
LAN
IP Network (WAN)
Connect Plus Site 3
Connect Plus Site 4 LAN
LAN LAN
Network Manager (Controller configuration & Site/Network Management)
Site 3 RDAC
Site 4 RDAC
Figure 3-4 Connect Plus Multisite Configuration
90 of 151
MOTOTRBO Connect Plus System Planner 1.0
3.2.4.5 Other IP Components of the Connect Plus Multisite Network RDAC application: As discussed previously, the RDAC application communicates with only one Connect Plus site and its connected repeaters. A separate RDAC application is required for each site that will be monitored. These multiple RDAC applications act independently of one another and have no awareness that their connected site is part of a larger network. Each RDAC application must reside in the same LAN (or VPN) as its IP Site Connect Master (the XRC 9000 controller) and its IP Site Connect Peers (the MOTOTRBO repeaters under the control of the XRC 9000 Controller.) For more information on the reasons for this requirement, please see the previous section, IP Topologies of a Single Site System. Location Tracking Application: If a Location Tracking application (also known as the LRRP application) is utilized in the Connect Plus multisite network, it can send the Location Request to any Connect Plus site controller. The PC hosting the requesting application can be located in the same IP network as the destination site, or in a different IP network. The XRC 9000 controller that receives the message will inspect the message contents to determine the destination SU. If the SU is registered at a different network site, the XRC 9000 controller will forward the message to the registered site. The registered site, upon receiving the Location Report from the SU, sends it directly to the requesting application. It does not route the report back through the Connect Plus site that received the request. When a Connect Plus controller sends a message to the Location application, the IP address and port used by the controller depends on how the controller is programmed. There are two configuration choices: Method A: Controller is not programmed to use a LRRP Server IP address and port that has been configured into the controller. In this case, the controller sends the Location Report to the source IP address and port extracted from the LRRP Request that prompted the report. Method B: Controller is programmed to use a LRRP Server IP address and port that has been configured into the controller In this case, the controller sends the Location Report to the address and port configured into the controller. This feature is known as LRRP IP Message Forward, also known as the “override” function. Method A is the default Controller operation. It provides more flexibility than Method B because it supports a different Location Tracking application for each SU. However, it can only be used when all network sites have the same perspective back to the requesting application. The following example describes one scenario where all network sites would not share the same perspective. The Location application and Site 1 are both located in the same LAN. The Location application sends a message to Site 1. Site 1 inspects the message and sees that the destination SU is registered at Site 2. Site 1 forwards the message to Site 2, which is located in a different IP network. The forwarded message is wrapped inside of a Connect Plus TCP inter-site message. Site 2 sends the Request to the SU and receives a Location Report. When Site 2 sends the Location report back to the requesting application, it must not use the Source IP address and port extracted from the request because that is the application’s “private IP address” on its LAN, and it will not be correct from the perspective of Site 2. Instead, Site 2 must use the application’s “public IP address” and port. Since this cannot be known by inspecting the contents of the received message, Site 2 must be enabled for “override” and must use its configured “LRRP IP Message Forward” address and port. This is just one example where Method B must be used. Other scenarios could also necessitate this approach. Method B provides less flexibility than Method A because there is just one configurable LRRP Server IP address and port per site. This means that all SU’s must report to the same Location tracking application.
91 of 151
MOTOTRBO Connect Plus System Planner 1.0 Text Message Application: If a Text Message application (also known as the TMS application) is utilized in the Connect Plus multisite network, it can send the TMS message to any Connect Plus site controller. The PC hosting the requesting application can be located in the same IP network as the destination site, or in a different IP network. The XRC 9000 controller that receives the message will inspect the message contents to determine the destination SU. If the SU is registered at a different network site, the XRC 9000 controller will forward the TMS message to the registered site. If the TMS message was a “Simple Text Message”, the site forwards the message to the destination SU. If the TMS message was a “TMS Service Availability” Message, the site stores the information contained in the message on behalf of the destination SU. When a Connect Plus SU wants to send a simple text message to a Dispatch Call ID (which represents a “client” of the TMS application), the SU sends the message to the controller of the site where the SU is registered. The message contains the destination Dispatch Call ID, but it does not contain the IP address of the Text Message application. The SU counts on the controller to forward the message to the correct IP address and port for the TMS application. When the controller forwards to the simple text message to the TMS application, the IP address and port used by the controller depends on how the controller is programmed. There are two configuration choices: Method A: The controller is not programmed to use a TMS Server IP address and port that has been configured into the controller. In this case, the controller sends the simple text message to the source IP address and port extracted from the TMS Service Availability Message, which the controller stored on behalf of the SU. Method B: Controller is programmed to use a TMS Server IP address and port that has been configured into the controller. In this case, the controller sends the simple text message to the address and port configured into the controller. This feature is known as TMS IP Message Forward, also known as the “override” function. Method A is the default Controller operation. It provides more flexibility than Method B because it supports a different TMS application for each SU. However, it can only be used when all network sites have the same perspective back to the TMS application. The following example describes one scenario where all network sites would not share the same perspective. The TMS application and Site 1 are both located in the same LAN. The TMS application sends a TMS Service Availability Message to Site 1. Site 1 inspects the message and sees that the destination SU is registered at Site 2. Site 1 forwards the message to Site 2, which is located in a different IP network. The forwarded message is wrapped inside of a Connect Plus TCP inter-site message. Site 2 stores the information contained in the message on behalf of the destination SU. Sometime later, the SU sends the controller a simple text message which is destined for a Dispatch Call ID. When the controller forwards this simple text message to the TMS application, it must not use the Source IP address and port extracted from the TMS Service Availability Message because that is the application’s “private IP address” on its LAN, and it will not be correct from the perspective of Site 2. Instead, Site 2 must use the application’s “public IP address” and port. Since this cannot be known by inspecting the contents the TMS Service Availability message, Site 2 must be enabled for “override” and must use its configured “TMS IP Message Forward” address and port. This is just one example where Method B must be used. Other scenarios could also necessitate this approach. Method B provides less flexibility than Method A because there is just one configurable TMS Server IP address and port per site. This means that any text message from any SU that is addressed to any Dispatch Call ID will be forwarded to the same TMS server. XRC 9000 Network Manager Software: The XRC 9000 Network Manager software can communicate with any Connect Plus Site, but each instance of the application can only communicate with one site at a time. The connected site can be located in the same IP network as the PC hosting the application, or in a different IP network. In order to connect with the desired site, the Network Manager must be configured to use the destination IP address and port that is correct from the current perspective of the PC hosting the Network Manager program. If the PC is
92 of 151
MOTOTRBO Connect Plus System Planner 1.0 a laptop, this perspective can change as the laptop is carried from one IP network to another. So, depending on its location, the laptop may not always use the same IP address and port to connect to the same site.
4 Connect Plus System Design Considerations 4.1 Migrating to Connect Plus from other MOTOTRBO Digital Modes Migrating to Connect Plus from other MOTOTRBO Digital Modes involves several prerequisites and considerations: Radio firmware must be Release 01.06.30 or newer. Each MOTOTRBO subscriber radio must have a Connect Plus Option Board, or a “Generic Option Board” that can be converted to Connect Plus operation through the installation of Connect Plus firmware. This must occur before the SU can be used for Connect Plus. Each MOTOTRBO subscriber radio must be enabled for the Connect Plus purchasable feature. Each MOTOTRBO subscriber radio must be configured for Connect Plus operation, both with MOTOTRBO CPS and with Connect Plus CPS. Connect Plus does not use Control Station Radios as the air interface for Location Tracking Applications or Text Message Applications. If these radios are no longer needed as a Control Stations for other MOTOTRBO modes, they can be used as Connect Plus mobiles. If desired, the non-Connect Plus zones and channels in the SU can be preserved, but they must be shifted in order so that they do not precede any Connect Plus zone. Guidelines for this procedure are provided in this document. In most cases, the Radio ID used in the previous MOTOTRBO Digital Mode can also be used in Connect Plus. There are two exceptions: o
If the same Radio ID is used in more than subscriber unit, it must be changed to a different Radio ID that is not assigned to any other SU.
o
Radio ID’s 16776352 through 16776415 are not allowable for Connect Plus operation. If the radio’s current Radio ID falls into this range, it must be changed to an unused Radio ID in the allowable Connect Plus range. (1 to 16776351)
The MOTOTRBO Repeater used in the previous digital mode can be used for Connect Plus operation, provided the following conditions have been met: o
The repeater’s software version must be capable of Connect Plus operation.
93 of 151
MOTOTRBO Connect Plus System Planner 1.0 o
Both repeater timeslots will be used for Connect Plus.
o
The repeater will have to be re-configured with MOTOTRBO CPS in order to set several key parameters as required by Connect Plus.
o
The repeater will have to be connected via IP to a Connect Plus XRC 9000 Controller. The repeater must be in the same physical location as the XRC 9000 controller, and must be attached to the same Ethernet switch.
The repeater frequency used in the previous MOTOTRBO digital mode can likely be used for Connect Plus. For more information, see Connect Plus Frequency Licensing Considerations. Once the prerequisite conditions are met, the system can be migrated to Connect Plus operation. Because the radios can be programmed with both Connect Plus and non-Connect Plus modes, the System Administrator has a couple of migration strategies to choose from: Talk Groups and Repeaters can be switched over to Connect Plus in a phased approach, with some Groups and Repeaters being switched to Connect Plus prior to others. The entire system can be switched over to Connect Plus at a specific time and date. Prior to the switch-over, all subscriber units must be enabled and programmed for Connect Plus operation. Regardless of which strategy is chosen, this will have to be communicated to radio users. Each user should be instructed in how to switch the radio to Connect Plus operation (by selecting the Connect Plus zone and channel). Also prior to the switch-over, each user should be trained in how the radio operates in Connect Plus mode.
4.2 Connect Plus Frequency Licensing Considerations 4.2.1 Acquiring Frequencies Frequency Licensing considerations and procedures for Connect Plus are similar to other MOTOTRBO digital modes. The reader can refer the section on Acquiring New Frequencies of [1]. Connect Plus has one additional (and essential) licensing consideration that does not apply to other MOTOTRBO digital modes. In Connect Plus the downlink of the Control Channel timeslot transmits continuously. This minimizes the time the SU spends searching for service, and it allows the system to quickly respond to registrations and call requests. Any interruption to this continuous messaging adversely affects system performance. Because of this requirement, Connect Plus Control Channel frequency pairs require a Protected Service Area. Non-exclusive licenses such as FB2 or FB6 are not suitable for Connect Plus Control Channel operation.
4.2.2 Repeater Continuous Wave Identification (CWID) for Connect Plus The System Administrator should be familiar with the FCC station identification requirements for each licensed frequency. Station Identification is sometimes called “Base Station Identification” (BSI), and other times it is referred to as Continuous Wave Identification (CWID). The latter name
94 of 151
MOTOTRBO Connect Plus System Planner 1.0 is because “CW” is another name for Morse Code, which is used to send the station’s call sign. In this document, BSI and CWID are used interchangeably. Connect Plus enables the license holder to comply with ID requirements by providing a programmable CWID and CWID interval for each Connect Plus repeater. In other digital modes, CWID is handled entirely by the repeater. In Connect Plus mode, CWID is handled jointly by the repeater and the XRC 9000 controller. The CWID itself (usually the FCC license call sign) is programmed into the repeater with MOTOTRBO CPS, but the TX Interval is programmed into the XRC 9000 Controller. When the repeater registers with an IP Site Connect Master identifying itself as the XRC 9000 controller, the repeater knows to ignore the CWID TX Interval programmed with MOTOTRBO CPS. The Controller will tell the repeater when to send CWID. If there is a fault condition such that the repeater cannot transmit CWID for certain period of time, the repeater will inform the XRC 9000 controller of this condition, and the controller will no longer instruct the repeater to send its CWID. An error message describing this fault will be logged into the controller event log, which can be retrieved and viewed with the Network Manager. Whenever possible, CWID should be sent on trunk channel repeaters only. CWID on the Control Channel repeater interrupts Control Channel messaging, and will cause significant operational problems to radios using the site. It should be avoided if at all possible. During CWID the repeater transitions to analog mode and ceases all digital signaling. During Control Channel CWID, the SU cannot register or request calls, and the Control Channel cannot send messages for calls inprogress. Prior to starting CWID on the Control Channel repeater, the controller sends a special message on the Control Channel downlink. Any SU that decodes this message will start a configurable timer called “BSI Wait Time” (configured with MOTOTRBO Connect Plus Option Board CPS). The value programmed for this timer must allow enough time for the repeater to send the CWID and for the Control Channel messaging to resume. SUs that decode the special message will not move to other sites during CWID (provided their timer doesn’t expire), but they will display “Searching” until the CWID finishes and the Control Channel messaging returns. SUs that do not decode this special message will attempt to locate another site during CWID.
4.3 Digital Repeater Loading for Connect Plus Accounting for repeater loading is a critical step in designing a Connect Plus system. Such planning ensures that the designer is able to choose the number of channels required to support the customer’s typical communication needs at the expected level of service. The first step is to estimate how much traffic a single slot (channel) can support. An important distinction in Connect Plus is the fact that it is digital trunking system, which means that the loading estimation models will be different than the other digital modes supported by MOTOTRBO. Since the traffic, consisting of voice, text messages, location updates, and registration requests, is mostly initiated by the end user, it is challenging to predict how often it occurs. Standard usage profiles of existing customers have been created for voice and data services. These profiles act as a baseline for estimating how much traffic a user creates on a system. If the standard profiles do not match your customer’s expected usage, further estimations based on the trend lines need to be considered. After the system is used, and real life usage is identified, further adjustments may be required.
4.3.1 Voice and Data Traffic Profiles The following table outlines the typical user traffic that is based on empirical data. These usage profiles are considered standard and are utilized to estimate the number of users that can be supported per channel. These estimates are depicted on graphs in the in the sections that follow. The same user traffic assumptions have been used for other non-Connect Plus digital configurations as well. The reader can refer to Digital Repeater Loading section in [1] for more details.
95 of 151
MOTOTRBO Connect Plus System Planner 1.0
Profile Name
Traffic Type
Call Description
Traffic Per User Per Hour
Group Voice Call
10 second call, 2 transmissions per call
Individual Voice Call
20 second call, 4 transmissions per call
10%
Group Voice Call
10 second call, 2 transmissions per call
90%
Individual Voice Call
20 second call, 4 transmissions per call
High GPS
Location Updates
2 seconds per transmission
60 GPS Transmissions per User per Hour i.e. 1 Minute Update Period (Cadence)
Low GPS
Location Updates
2 seconds per transmission
6 GPS Transmissions per User per Hour i.e. 10 Minute Update Period (Cadence)
High Text Messaging
Text Messaging
100 characters per message
2.5 Text Messages per User per Hour
Low Text Messaging
Text Messaging
100 characters per message
0.5 Text Messages per User per Hour
90%
High Voice
3.0 Calls per User per Hour
Low Voice
1.0 Calls per User per Hour 10%
Table 4-1 Voice and Data Traffic Profiles
4.3.2 Estimating Loading For Connect Plus The following charts in Figure 4-1 and Figure 4-3 represent loading characteristics of a Connect Plus system based on a certain user experience, for a given number of active (call participants) users, and for different combinations of Voice and Data Profiles as defined in 4.3.1. The charts represent a radio user’s experience in making a call in terms of Grade of Service (GoS). GoS is directly related to the probability of a call getting blocked i.e. probability of all the trunked channels being busy. For example, a GoS of 2% means that 2% of the calls made by the radio users will need to wait in the Busy Queue for a channel to become available. The “channel” in the chart refers to a logical channel (i.e. a timeslot). In Connect Plus, both channels of a repeater are in trunked mode (except for the Control Channel repeater). Therefore, the charts provide the number of users only for an even number of channels. The number of calls handled by a Connect Plus system may vary considerably based upon the number of users and volume of calls. Typical systems are heavily loaded for a few hours in a day. It is recommended that the system be designed with an adequate amount of channel resources to handle both peak and off-peak traffic.
96 of 151
MOTOTRBO Connect Plus System Planner 1.0 The first chart (Figure 4-1) is for High Voice profile (i.e. 3 Calls per User per Hour) with no GPS data, whereas Figure 4-2 illustrates the capacity for Low Voice (i.e. 1 Call per User per Hour) with no GPS traffic. Users vs Num Channels - Voice Only 3 calls per hour per user 28 26
High Voice Profile (2% GoS)
24 22 High Voice Profile (5% GoS)
Number of Channels
20 18
High Voice Profile (8% GoS)
16 14 12 10 8 6 4 2 0 0
200
400
600
800
1000
1200
1400
1600
1800
Number of Users
Figure 4-1 Users vs. Number of Channels for High Voice-Only Traffic
97 of 151
MOTOTRBO Connect Plus System Planner 1.0
Users vs Num Channels - Voice Only 1 calls per hour per user 28 26
Low Voice Profile (2% GoS)
24 22 Low Voice Profile (5% GoS)
Number of Channels
20 18
Low Voice Profile (8% GoS)
16 14 12 10 8 6 4 2 0 0
1000
2000
3000
4000
5000
6000
Number of Users
Figure 4-2 Users vs. Number of Channels for Low Voice-Only Traffic
Figure 4-3 is for mixed voice and GPS data profile. The graph shows High Voice with low GPS data traffic. Since Connect Plus is a trunking system, both voice and GPS data are using the trunked channels. The reader should note the trend indicated in the chart – the number of users does not increase proportionally with the number of channels. The rate increases as the number of channels increase. This is due to the fact that the efficiency of trunking increases with the increase in the number of channels.
98 of 151
MOTOTRBO Connect Plus System Planner 1.0
Users vs Num Channels High Voice Call Rate with Low GPS 28 26
High Voice Low GPS (2% GoS)
24 22
High Voice Low GPS (5% GoS)
Number of Channels
20 18 16
High Voice Low GPS (8% GoS)
14 12 10 8 6 4 2 0 0
100
200
300
400
500
600
700
800
900
1000
Number of Users
Figure 4-3 Users vs. Number of Channels for High Voice & Low GPS Traffic
Figure 4-4 depicts the loading profile for Low Voice call rate with Low GPS updates. Users vs Num Channels Low Voice Call Rate with Low GPS 16 Low Voice Low GPS (2% GoS)
14
Number of Channels
12
Low Voice Low GPS (5% GoS)
10 Low Voice Low GPS (8% GoS)
8
6
4
2
0 0
100
200
300
400
500
600
700
800
900
1000
Number of Users
Figure 4-4 Users vs. Number of Channels for Low Voice & Low GPS Traffic
99 of 151
MOTOTRBO Connect Plus System Planner 1.0 In the case of high GPS data, it is recommended that a Connect Plus system have sufficient trunked channel allocated for Location Updates. The Number of Data Sessions Allowed parameter in the XRC 9000 controller can be set to a higher value to accommodate this type of traffic.
4.3.3 Setting Repeater Hang Times in Connect Plus When Connect Plus radios move to a trunk-to timeslot to participate in a voice call, the Call Hang Time allows an opportunity for talk-back using the same Call ID, without having to return to the Control Channel to request a new call. Besides providing an opportunity for talk-back on the assigned timeslot, the Call Hang Time helps provide continuity to the conversation and prevents the channel from being assigned to another call. The Call Hang Time is programmed into the repeater via MOTOTRBO CPS, and is settable per call type for “Group Call” and “Private Call”. In other digital modes, the repeater can be configured with a “zero” Call Hang Time to create a “transmission trunking” environment where each PTT is treated as a brand new call. This configuration is not recommended for Connect Plus because the time required for Control Channel call processing, validation, channel assignment, and synchronization with the assigned timeslot would have to be repeated for each PTT. Connect Plus recommends that Call Hang Time values be set at 3 seconds (or longer) for each call type. Furthermore, the Hang Time value selected for each call type must be programmed the same in all Connect Plus repeaters network-wide. While the software does not enforce this rule, it must be followed for proper operation.
4.4 Multiple Digital Repeaters in Connect Plus Mode 4.4.1 Configuring Connect Plus Repeaters with MOTOTRBO CPS The MOTOTRBO repeater is a required component of the Connect Plus trunking system, as it provides the RF path between the Connect Plus Controller and the Connect Plus SU. Each XRC 9000 Controller can control up to 15 MOTOTRBO repeaters. The XRC 9000 and its connected repeaters must be in the same physical location, and connected to the same Ethernet switch. The XRC 9000 acts as the IP Site Connect Master and the connected repeaters are configured as IP Site Connect Peers. Before the MOTOTRBO Repeater can operate in a Connect Plus system, it must be configured with MOTOTRBO CPS according to the guidelines provided below. These guidelines do not address every programmable repeater parameter, just the settings that are critical to Connect Plus operation, Prior to configuring the repeater, use MOTOTRO CPS to read the repeater’s codeplug. Then, from the MOTOTRBO CPS Main Menu select “View”, and then select “Expert” from the drop-down View Menu. This will assure that the programmer sees all of the settings discussed in the tables below. MOTOTROBO CPS General Settings screen Settings critical to Connect Plus Operation Setting Radio ID
Notes and Additional Information Each Repeater must be programmed with a unique Radio ID (1-15). Once a Radio ID is used, it cannot be repeated in the same Connect Plus site. However, because Connect Plus restricts all repeater Radio ID’s to the
100 of 151
MOTOTRBO Connect Plus System Planner 1.0 same 15 numbers, they can be re-used at different sites. The Radio ID must match the frequency configuration for this repeater & site in the Connect Plus Network Frequency File. SIT (Subscriber Inactivity Time)
SIT must be equal to or greater than the longest Hang Time value.
Group Hang Time & Private Call Hang Time
Due to the time required to request and set-up a Connect Plus Call, Connect Plus does not recommend or support a value of zero for any Call Hang Time. Connect Plus recommends Hang Time Values be set to at least 3 seconds (or longer). Whatever value is used for the Group Call Hang Time, it must be set the same for all Connect Plus repeaters in all Connect Plus sites. Whatever value is used for the Private Call Hang Time, it must be set the same for all Connect Plus repeaters in all Connect Plus sites. Also, the controller’s “Call Inactivity Timer” must be set at least one second longer than the longest Call Hang Time Value.
CWID
If this repeater must send CWID to satisfy FCC requirements, enter the ID in this field. In Connect Plus, the repeater will ignore the TX Interval programmed with Connect Plus CPS. The TX interval for this repeater must be set in the XRC 9000 controller.
TX Power Settings
Repeater Power Settings should be set the same for all repeaters in the same site. This is because all repeaters in the same site must have the same coverage footprint.
MOTOTROBO CPS Network screen Settings critical to Connect Plus Operation Setting CAI Network
Notes and Additional Information Set to 12 (default setting)
CAI Group Network
Set to 225 (default setting)
Repeater Type
Set to “IP Site Connect Peer”
Beacon Duration
Set to “Disabled”
Master IP
Enter the IP Address of the XRC 9000 Controller
Master UDP Port
Each repeater in the site must be programmed with a unique number for “Master UDP Port”. The number must fall between “First UDP Repeater Listen Report” (a programmable controller parameter) and “First Repeater Listen Port” +14
Ethernet IP
If DHCP is not used, enter the repeater’s Ethernet IP in this field. This must be a unique IP address that is not used for any other device at this, or other sites.
101 of 151
MOTOTRBO Connect Plus System Planner 1.0 MOTOTROBO Channel Screen Settings critical to Connect Plus Operation Setting Color Code
Notes and Additional Information Color Code must match the information for this Radio ID and frequency pair (for this site) in the Network Frequency File.
IP Site Connect
Must be set to “Slot 1 & Slot 2”
Messaging Delay
In conventional IP Site Connect, this sets the repeater’s arbitration timer. In Connect Plus, arbitration is done by the XRC 9000 controller, which has a programmable parameter called “Arbitration Time”. When the repeater is programmed for Connect Plus, leave the Messaging Delay at the default setting of “Normal”.
RSSI Threshold
This threshold is used to measure the maximum interference signal that the repeater will tolerate. If the repeater detects an interfering signal at or above this threshold, it takes itself offline and reports its off-line condition to the XRC 9000 Controller. If the Control Channel repeater were to take itself offline, site operations would be severely impacted. For this reason the interference threshold for the Control Channel repeater should be set quite high (in the range of -80 to -40 dBm). Connect Plus Control Channel frequency pairs require a Protected Service Area. Non-exclusive licenses such as FB2 or FB6 are not suitable for Connect Plus Control Channel operation.
RX Frequency & TX Frequency
Repeater frequencies must be different for each repeater in the site. The frequency information must match the information for this Radio ID and frequency pair (for this site) in the Network Frequency File.
Power Level
Should be set the same for all repeaters in the same site. This is because all repeaters in the same site must have the same coverage footprint.
TOT (Time out Timer)
Must not be set any shorter than the longest TOT in any Connect Plus SU.
4.4.2 Coverage Area of Connect Plus Repeaters in Single site Configuration Trunking is based on the assumption that the SU can communicate with every site repeater just as well as it communicates with the Control Channel repeater. For this reason, all repeaters under the control of the same XRC 9000 controller must reside in the same RF frequency band and must all have an identical coverage footprint (both “talk in” and “talk out”).
4.4.3 Frequencies and Color Codes in a Connect Plus Single Site System Because all of the MOTOTRBO repeaters in the same Connect Plus site have the same coverage footprint, they must be programmed with different frequencies, so as not to interfere with one another. Figure 4-5 shows an example of a Connect Plus Single Site system. All of these frequencies must be in the same RF frequency band. For example, if any site repeater is in the
102 of 151
MOTOTRBO Connect Plus System Planner 1.0 VHF band, then all site repeaters must be VHF also. The Color Codes can be the same, or they can be different. All Repeaters in the same Connect Plus Site Must have different frequencies (but in the same frequency band) Must have same coverage footprint Color Codes can be the same or different
Repeater’s Radio ID = 1
Must be programmed with a Radio ID (1-15) that is unique to this Connect Plus site.
Repeater’s Radio ID = 2
TX=F1
RX=F2
Color Code 0
TX=F3
RX=F4
Color Code 1
TX=F5
RX=F6
Color Code 0
TX=F7
RX=F8
Color Code 1
TX=F9
RX=F10 Color Code 1
Repeater’s Radio ID = 3 Repeater’s Radio ID = 4 Circles represent areas of single repeater RF coverage.
Repeater’s Radio ID = 5
Figure 4-5 Multiple Digital Repeaters in Connect Plus Single Site The following information for each repeater in the Connect Plus network must be programmed into the SU’s Network Frequency File: Which site the repeater is located at. The repeater’s Radio ID (1-15). In the Connect Plus system, this equates to the channel (repeater) number. SU TX (Repeater RX) Frequency SU RX (Repeater TX) Frequency The repeater’s Color Code A checkbox to indicate if the repeater is the Control Channel Frequency. Although the software allows the box to be checked for more than repeater per site, in the initial release the Connect Plus Option Board will only search one Control Channel repeater per site. The repeater searched will be the first repeater on the site list that has the “Control Channel” box checked. For proper operation, the Network Frequency File must match the actual network configuration at all times. If changes are made to any of the information listed above, it will be necessary to provide the SU with an updated version of the Network Frequency File. For more information on the Network Frequency File, and the options for providing the SU with an updated file, see “Network Frequency File” in the System Feature Overview Section.
103 of 151
MOTOTRBO Connect Plus System Planner 1.0
4.4.4 Coverage Area of Connect Plus Repeaters in Multisite Configuration The most common reason for connecting multiple sites is to enlarge the RF coverage available to the Connect Plus SU. Because of this, each Connect Plus site is typically placed in a different geographical area and provides the RF coverage for that area. As the radio user moves from one coverage area to another, the SU is able to automatically “Roam” from one site to another. When there are multiple Connect Plus sites, the ideal topology is for the RF coverage of each Connect Plus site to over-lap slightly with its geographically adjacent neighbor sites. This emulates the “cellular” network design where each site is a “cell” in a network of slightly overlapping cells. This design will provide the most satisfactory operation for automatic Roaming by the Connect Plus SU. It’s possible that circumstances beyond the control of the network designer will necessitate a departure from the ideal topology of slightly overlapping coverage cells. Examples include the following: Rather than providing “slightly overlapping coverage” in all cases, some sites have no overlapping coverage at all. They are separated from other sites by “dead areas”, where there is no coverage at all. Rather than providing “slightly overlapping coverage” in all cases, the coverage areas of some sites may overlap significantly. Some networks may have combinations of different coverage characteristics; slightly overlapping for some sites, no overlap for some sites, significantly overlapping for some sites. Topologies such as these provide greater challenges when configuring the Roam parameters of the Connect Plus SU. For mixed topologies, the Roam settings will be a compromise that provides acceptable (though probably not optimal) Roam operation by the Connect Plus SU. For a detailed discussion on Connect Plus Roaming (also called “Site Search), see the System Feature Overview Section.
4.4.5 Frequencies and Color Codes in a Connect Plus Multisite System Because the most common reason for connecting multiple sites is to enlarge the RF coverage available to the Connect Plus SU, all of the frequencies in a multisite network are typically in the same RF frequency band. Because a single SU operates in just one frequency band, this makes the entire network coverage area accessible to the SU. A less common reason for linking multiple Connect Plus sites is to provide communications between MOTOTRBO radios that use different frequency bands. In this case, each frequency band requires its own Connect Plus site(s), and each SU will only be able to access the site(s) within its own frequency band. While the repeaters in any single Connect Plus site must all use different frequency pairs, frequencies may be re-used at different sites when coverage does not overlap. If coverage does not typically overlap, but may in certain conditions (such as when the SU is in a very high place),
104 of 151
MOTOTRBO Connect Plus System Planner 1.0 the re-used frequencies must have different Color Codes. This will not eliminate interference between the two repeaters, but it will help SU’s distinguish between the different repeaters – especially while Roaming.
Connect Plus Site 1
Connect Plus Site 2
Connect Plus Site 3
Radio ID=1 TX=F1
RX=F2
CC= 0
Radio ID=1 TX=F11
RX=F12
Radio ID=1 TX=F1
RX=F2
CC= 1
Radio ID=2 TX=F3
RX=F4
CC= 1
Radio ID=2 TX=F13
RX=F14
Radio ID=2 TX=F3
RX=F4
CC= 0
Radio ID=3 TX=F5
RX=F6
CC= 0
Radio ID=3 TX=F15
RX=F16
Radio ID=3 TX=F5
RX=F6
CC= 1
Radio ID=4 TX=F7
RX=F8
CC= 1
Radio ID=4 TX=F17
RX=F18
Radio ID=4 TX=F7
RX=F8
CC= 0
Radio ID=5 TX=F9
RX=F10 CC= 1
Radio ID=5 TX=F19
RX=F20
Radio ID=5 TX=F9
RX=F10 CC= 0
Circles represent areas of single repeater RF coverage. CC = Color Code
Figure 4-6 Multiple Digital Repeaters in a Connect Plus Multisite System As stated previously, the Network Frequency File must match the actual network configuration at all times. If changes are made to any of the information listed above, it will be necessary to provide the SU with an updated version of the Network Frequency File. For more information on the Network Frequency File, and the options for providing the SU with an updated file, see “Network Frequency File” in the “Connect Plus System Feature Overview” section.
4.4.6 Considerations for the Connect Plus Backend Network The reader is strongly encouraged to review the section on Consideration for the Backend Network related to IP Site Connect digital mode outlined in [1]. The first characteristic of a backend network required for adequate Connect Plus operations is broadband connectivity with relatively low delay; Connect Plus cannot operate over a dial-up connection or satellite link (due to high delay). The XRC 9000 controller is the master device at the site and it communicates with the collocated repeaters over UDP/IPv4. The XRC 9000 communicates with other site controllers over both UDP/IPv4 and TCP/IPv4 depending on the traffic type. The controller requires a static IP address whereas the repeaters may utilize a DHCP server to acquire an IP address on power up. The dynamic address of a repeater is selected by selecting the DHCP option in the repeater CPS. It is recommended that the lease time of the IPv4 address from the DHCP should be kept as long as possible to minimize the frequency of possible short service disruptions upon IPv4 address renewal. A Connect Plus repeater registers its IPv4 address with the controller during power-on
105 of 151
MOTOTRBO Connect Plus System Planner 1.0 and upon a change in its IPv4 address. The controller maintains a table of IPv4 addresses and port numbers of its collocated repeaters. Furthermore, in a multisite Connect Plus configuration, the controller keeps a table of IPv4 addresses assigned to the controllers located at the other sites to be able to facilitate registration requests, facilitate inter-site call setup, and forward user voice and data traffic to targets registered in different sites. The Connect Plus devices may be installed behind a network firewall. In such case, for successful communication between controllers at different sites, the firewall (router) has to be programmed to forward the Connect Plus inter-site traffic to a pre-defined set of TCP and UDP ports. The reader can refer to [4] to learn the step for configuring the XRC 9000 Controller for multisite operations.
4.4.6.1 Characteristics of Backend Network Besides the requirement for broadband network rates, there are other IP network characteristics that are necessary to meet the customer expectations for clear voice communications, low delay and reliable data calls. These are briefly described below: 1. Delay (Latency) – Network delay for a two-way radio system is defined as time for voice to leave the source repeater and reach the destination repeater. Furthermore, the overall delay is comprised of the following components: a. Propagation delay – caused by the distance an electrical signal must travel on the physical medium of the backend network, such as copper wire, fiber link or backhaul microwave connection. b. Serialization delay – represents the amount of time necessary for the source repeater to actually place a packet byte by byte on its network interface. c. Handling delay – defines the aggregate delay incurred by the intermediary devices that forward a packet through the backend network. Examples of such devices are the XRC 9000 Controller, switches and routers which introduce queuing delays when more packets are transmitted to a network device than the device can handle. The network delay should be considered when setting the programmable “Arbitration Time” setting in the XRC 9000 controller. Upon receiving IP voice packets, the controller waits the arbitration time prior to forwarding the voice packets to the repeater for transmission. In the event of near-simultaneous key-ups at different sites during the same call, arbitration increases the chances that the same audio will be heard at all sites involved in the call. It is strongly recommended that the Connect Plus system not be installed on an IP network inducing a delay higher than 250 ms, although for optimal performance the delay should not exceed 60 ms (see also “Packet Loss” description below). 2. Jitter – Jitter is defined as variation of network delay. The source device is expected to transmit packets at regular interval, which accounts for a network delay as explained above. However, due to inconsistent queuing delays these packets may not arrive at the same interval. Such variation constitutes Jitter. Connect Plus implements a jitter buffer of 60 milliseconds to handle such effects. Any jitter above such levels significantly affects the audio quality. 3. Packet Loss – Packet loss in IP-based networks is both common and expected. To transport voice bursts in timely manner, Connect Plus utilizes UDP/IPv4, which is not a reliable transport mechanism (e.g. confirmed delivery). Therefore, while designing and selecting the backend network it is necessary to keep packet loss to a minimum. The Connect Plus system responds to periodic packet loss by replaying either a special packet (in the case of voice) or the last received packet (in the case of data). In the case of voice,
106 of 151
MOTOTRBO Connect Plus System Planner 1.0 the ongoing call ends if six consecutive packets do not arrive within 60 ms of their expected arrival time. In the case of data, the repeater waits for the expected number of packets (as per the data header) before ending the call.
4.4.6.2 Connect Plus IP Network Bandwidth Considerations Bandwidth is the rate of data transferred to and from a network device, often referred to as the bit rate. Bandwidth is measured in bits per second (bps) or kilobits per second (kbps). When designing a Connect Plus system, it is important to understand the needs of each Connect Plus device, so that the appropriately rated network connection for each site can be chosen. If a customer has high speed network connections between sites, these calculations may not be as important, but if they are working on lower speed public Internet Service Providers (ISPs) it is good practice to understand these values and plan accordingly. If the minimum amount of bandwidth is not available, the end user may experience audio holes or even dropped calls. Data messaging or RDAC commands may not be successful on the first attempt, or may be dropped all together. In general, the quality of service may suffer if substantial bandwidth is not available. Note that for most Internet Service Providers, offer asymmetric broadband channel, such that the uplink bandwidth is lower than the downlink. The downlink bandwidth is usually multiple factors above the uplink bandwidth. Therefore, it is important to understand such differences and account for them when designing a backend network. Some ISPs may advertise a particular bandwidth, but it is important to verify the promised bandwidth is available once the system is installed and during operation. It is also important to note that if the wide area network connection is shared with other services (file transfer, multimedia, web browsing, etc.), then the Connect Plus devices may not have the appropriate bandwidth when required and quality of service may suffer. It is recommended to remove or limit these types of activities. In addition, excessive usage of the RDAC application or the Network Manager’s real-time monitoring features may cause increased strain on the network during times of High Voice activity.
4.4.6.3 Required Bandwidth Calculations (no VPN) Meeting the bandwidth requirements for a single site Connect Plus may not be a challenging task, because the XRC 9000 Controller, the local repeaters and the computers hosting the applications will, most likely, be connected through a modem Ethernet switch, which can manage traffic that is far greater than even a fully loaded system can generate. On the other hand, when designing a multisite system the administrator/dealer should carefully consider the amount of IP data traffic that will flow between the sites based on the number of repeaters, the network location of the machines hosting the user applications (text messaging, location) and those running the diagnostic and fault management tools (RDAC, Network Manager). The following equation should be used to calculate the bandwidth requirements for a Connect Plus site and then added together for sites, which reside behind one wide area connection. BWVC = 15 kbps = Bandwidth required to support Multisite Voice or Data (1 slot) BWMC = 100 kbps = Bandwidth required to support Multisite control messaging
107 of 151
MOTOTRBO Connect Plus System Planner 1.0 BWRD = 55 kbps = Bandwidth required to support RDAC commands19 BWNM = 55 kbps = Bandwidth required to support Network Manager real-time monitoring Number of Multisite sites where call on slot 1 is repeated - 1 Number of Multisite sites where call on slot 2 is repeated - 1
… Number of Multisite sites where call on slot N is repeated - 1 Multisite control messaging for total number of sites - 1
x x x x x
BWVC
kbps =
kbps
BWVC
kbps =
kbps
BWVC
kbps =
kbps
BWVC
kbps =
kbps
BWMC
kbps =
kbps
Network Manager Traffic
BWNM
kbps =
kbps
20
BWRD
kbps =
kbps
RDAC Traffic
+ Required Uplink/Downlink Bandwidth
kbps
Table 4-2 Bandwidth Calculation Matrix To illustrate the use of the above equation on a more complicated Connect Plus system configuration, see the following example system shown in the diagram below. This Multisite system has 3 repeaters per site with 6 sites total; one site has an RDAC and a Network Manager. The routers are not utilizing VPN. We assume all trunk-to timeslots are occupied with multisite calls. Although this is an extreme example (because in Connect Plus all calls do not typically involve every site) usually it provides the system administrator with basic guidelines on bandwidth allocation needs. Note that user data application such as text messaging and location services are excluded from this sample system. If these services are activated then more bandwidth may be warranted. Using the formula shown in Table 4-2, the bandwidth calculations for Site 1 in Figure 4-7 are as follows: Number of Multisite sites where call on slot 1 is repeated - 1 Number of Multisite sites where call on slot 2 is repeated - 1 Number of Multisite sites where call on slot 3 is repeated - 1 Number of Multisite sites where call on slot 4 is repeated - 1 Number of Multisite sites where call on slot 5 is repeated - 1 Multisite control messaging for total number of sites - 1 Network Manager Traffic21 RDAC Traffic22
5 5 5 5 5 5
x x x x x x
15 15 15 15 15 100
kbps = kbps = kbps = kbps = kbps = kbps =
75 75 75 75 75 500 55 0
kbps kbps kbps kbps kbps kbps kbps kbps
930
kbps
+ Required Uplink/Downlink Bandwidth for Site 1
Table 4-3 Example of Bandwidth Calculations for Connect Plus Site
19
When the RDAC instance resides behind a firewall with NAT the RDAC bandwidth requirements should be omitted from the calculation since RDAC application must be on the same Local Area Network (LAN) or Virtual Private Network (VPN) as the controller and the site’s repeaters. 20 The RDAC calculation should be omitted if the hosting PC is behind a NAT router. 21 Data traffic generated by the Network Manager located at Site 3, as shown. 22 No RDAC at Site 1 as shown.
108 of 151
MOTOTRBO Connect Plus System Planner 1.0 Site 6 Site 1
Repeater ID 1
XRC 9000
XRC 9000
Repeater ID 2
Repeater ID 3
CCH SLOT
SLOT 2:1
SLOT 3:1
SLOT 1:2
Repeater 1 SLOT 2:2
SLOT 3:2
Site 5 XRC 9000
Repeater ID 1
Repeater ID 1
CCH SLOT
CCH SLOT
SLOT 1:2
SLOT 1:2
Repeater ID 2
Repeater ID 2
SLOT 2:1
Router
SLOT 2:1 930 kbps
Repeater 1 SLOT 2:2
Repeater 1 SLOT 2:2
Network
930 kbps
930 kbps
Repeater ID 3
Repeater ID 3
SLOT 3:1
SLOT 3:1
SLOT 3:2
SLOT 3:2 1860 kbps
1860 kbps
Local Area Network
Site 2
Router
Wide Area Network
Router
Local Area Network
Site 4 XRC 9000
XRC 9000
Repeater ID 1
CCH SLOT
Repeater ID 1
CCH SLOT
930 kbps
930 kbps
1150 kbps
SLOT 1:2
SLOT 1:2 Repeater ID 2
SLOT 2:1
Repeater ID 2
Router
SLOT 2:1
Repeater 1 SLOT 2:2
Router = Firewall, NAT, or Router RDAC = Remote Diagnostics, Alarm and Control CCH = Control Channel
Repeater 1 SLOT 2:2 Repeater ID 3
SLOT 3:1
Repeater ID 3
SLOT 3:1 SLOT 3:2
Repeater ID 1
SLOT 3:2 XRC 9000
Repeater ID 2
Repeater ID 3
CCH SLOT
SLOT 2:1
SLOT 3:1
SLOT 1:2
Repeater 1 SLOT 2:2
SLOT 3:2
Network Manager
RDAC
Computer
Computer
Site 3
Figure 4-7 Example for Calculating Bandwidth Requirements w/o Secure VPN The calculations assume that only one RDAC command occurs at a time and is not utilized often. If it is expected that multiple RDAC applications will be performing commands on repeaters often and simultaneously, one might wish to increase the bandwidth to support these types of activities. Another assumption is that the Network Manager at Site 3 is monitoring all 6 sites simultaneously. The chart in Figure 4-8 below shows the bandwidth requirements for Connect Plus multisite system with 3, 5, 10, and 15 repeaters per site.
109 of 151
MOTOTRBO Connect Plus System Planner 1.0
Figure 4-8 WAN Bandwidth Requirements for Multisite System (no VPN)
4.4.6.4 Required Bandwidth Calculations with VPN Configuration As mentioned in previous sections, the initial release of Connect Plus provides only limited IP Security. Therefore, if a customer wants to secure the user communication traffic, Connect Plus supports the ability to work through a secure Virtual Private Network (VPN). Secure VPN is not a function of the Connect Plus system, but rather of the router. It is important to note that Secure VPN does add the need for additional bandwidth and may introduce additional delay. This should be taken into account when planning for bandwidth. The following parameters should be used in the previous equation to calculate the bandwidth requirements of each device in the system when secure VPN in the routers is enabled and repeater authentication is disabled. BWVC = 23 kbps = Bandwidth required to support Multisite Voice or Data (1 slot) BWMC = 120 kbps = Bandwidth required to support Multisite control messaging BWRD = 64 kbps = Bandwidth required to support RDAC commands BWNM = 64 kbps = Bandwidth required to support Network Manager real-time monitoring
110 of 151
MOTOTRBO Connect Plus System Planner 1.0 NOTE: The preceding data was compiled using the Linksys EtherFast Cable/DSL VPN Router with four-port switch. Model: BEFVP41. Other routers using different algorithms may yield different results.
4.4.7 Connect Plus IP Network Security Considerations Network security is an important consideration. In the event that Connect Plus sites will be connected through anything other than a Private Network or Virtual Private Network, a Certified Networking Professional will need to assist the system owner in protecting the radio network from the undesired solicitations common over the public internet. It is strongly recommended to employ the secure VPN configuration to provide high level of protection, which includes authentication and encryption. There are a slew of commercially available secure VPN routers that can be utilized to meet the network security needs of most customers. Secure VPN routers can optionally provide confidentiality of all the messages including system messages, control messages (i.e. CSBK), and voice or data headers. A disadvantage of using Secure VPN Routers is that the Connect Plus sites require more inbound and outbound bandwidth from the ISP.
4.4.8 Connect Plus Behaviors in Presence of Failures How the Connect Plus System operates in the presence of failures depends on what type of failure is experienced. Several categories of failure will be briefly discussed: Failure of IP connectivity between Connect Plus Sites: Connect Plus sites send periodic messages (pings) to assess the status of IP links with other sites. These messages allow a site to know when communications have been lost with another site, and when communications have been restored. When connectivity is normal, the XRC 9000 Controllers exchange messages with one another that are designed to “synchronize” SU and Group records, so that each site will have an identical copy of the user database. Because of this, each site can continue to validate registrations and calls, even when cut off from part (or all) of the network due to IP failure. During this time, audio will be heard locally, and packets can still be forwarded to connected sites. Of course, sites that do not have a current IP link cannot transmit the same audio, and it is possible that the same Group ID will have different conversations at different sites if there is no IP link to join the sites together. This will be resolved when IP Connectivity is restored. Failure of the XRC 9000 Controller: If an XRC 9000 failure should cause the Control Channel repeater to stop sending Control Channel messages, the site becomes “invisible” to SU’s until normal operation is restored. SU’s that were registered to the site will enter Search. In a multisite network with overlapping site coverage, it is possible that these radios will detect and register with another Connect Plus site. In that case, the radios can continue to make and receive calls in Connect Plus mode. For the case of a single-site configuration, or a multisite network with no overlapping coverage, the SU will continue to Search indefinitely. For this reason, it may be advisable to program the mobile with a conventional fallback channel as described in the “Connect Plus Failure Preparedness Section”. Failure of the Control Channel Repeater: If a failure of the Control Channel repeater should cause the site to stop sending Control Channel messages, the operation is the virtually the same as described in the previous paragraph.
111 of 151
MOTOTRBO Connect Plus System Planner 1.0 Failure of a trunk-to channel repeater: If a Trunk Channel Repeater fails, the observable effect to Connect Plus operation depends on whether the repeater continues to exchange “keep alive” messages with the Connect Plus controller. If the repeater continues to exchange “keep alive” messages, the XRC 9000 will probably not be aware that the repeater is off-line. The Controller will continue to assign calls to the repeater, but the calls will likely fail. If the repeater does not continue to exchange “keep alive” messages with the XRC 9000, the controller will stop assigning calls to the repeater after a controller timer expires (approximately a minute). This timer is not user adjustable. Until this timer expires, the controller will continue to think the repeater is available. If the controller attempts to assign a call to the repeater before the timer expires, the call will likely fail.
4.4.9 Connect Plus Failure Preparedness The potential failure with the greatest impact to the Connect Plus user is the failure of a Connect Plus site. This can be caused by several factors, including power issues, Controller failure, Control Channel Repeater failure, and so forth. This is especially problematic in single-site configurations, or in multisite configurations with little or no overlapping coverage. As a failure preparedness strategy, the radio programmer can program the SU with one or more conventional fallback channels. If used, the conventional fallback channel(s) must be programmed into the SU with MOTOTRBO CPS. The conventional fallback channel(s) cannot be placed in any Connect Plus zone. The conventional fallback channel(s) must be placed in a non-Connect Plus zone. Since there are numerous fallback configurations, the following questions should be considered when deciding which fallback configuration is most appropriate for the customer’s application: What circumstances should prompt the user to select the conventional fallback channel? (Such as the radio “searching” for a long period of time in area that normally provides good coverage) How should the user select the conventional fallback channel? If the radio has multiple conventional fallback channels, what is the protocol for selecting and trying channels? What circumstances should prompt the user to select the Connect Plus zone and channel again? (Such as hearing an announcement on the conventional fallback channel.) In programming the radio with a conventional fallback channel, there are several frequency and/or repeater options to choose from: Program direct communication on a “talkaround” frequency. This allows communication to continue even if every repeater fails. However, the SU’s must be in close proximity. Program a conventional repeater: o
This can be a special conventional repeater that is always available for this purpose. If the “special” repeater is at the same location as the failed site, it is possible that the failure condition may have impacted this repeater also.
o
This can be one of the repeaters normally used for Connect Plus operations. This strategy will only work if (a) there is not problem with this repeater to begin with
112 of 151
MOTOTRBO Connect Plus System Planner 1.0 and (b) the repeater has entered “Conventional Fallback Mode” due to a disruption of IP messaging with the XRC 9000 Controller.* *Conventional Fall Back Mode: If IP communications between the XRC 9000 controller and the repeater are disrupted for an extended period of time (at least a minute or longer), the repeater will enter “Conventional Fallback Mode”, in which it operates as a digital conventional repeater. In Conventional Fallback Mode, the repeater will automatically repeat the transmissions of a correctly programmed conventional SU. Prior to entering Conventional Fallback Mode, a MOTOTRBO repeater that is peer to an XRC 9000 Controller will not automatically repeat transmissions received on its uplink.
4.5 Connect Plus Data Sub-System Design Considerations As discussed in previous sections, the Text Messaging application server is utilized with Connect Plus to allow Text Messaging client applications to exchange messages with the MOTOTRBO subscribers. Unlike the other MOTOTRBO digital modes the server connects to the XRC 9000 controller via a UDP/IPv4 connection. The same is true for the Location Tracking server. These server applications run on PC machines that require IPv4 address assignments and should be taken into considerations when designing the supporting IP network. Moreover, all the IP-capable data devices can be dispersed across multiple networks some of which are directly connected to the public Internet and others isolated and protected by firewalls. Connect Plus has been architected to operate over such heterogeneous networks.
4.5.1 Connect Plus Example System IP Plan Figure 4-9 shows a hybrid network configuration with 6 sites where sites 1-4, and 5-6 respectively, are placed on private networks, but interconnected through the public Internet and protected with firewalls on each side. The diagram is provided as an example of how port forwarding can be utilized to send messages to multiple site controllers via a single IP address (the network firewall). It should be noted that another approach (which is highly recommended, but not pictured here) would be to place all 6 sites in the same Virtual Private Network (VPN) or closed private network (see “Connect Plus Simplified Example IP Plan”). The VPN approach allows each site controller to be addressed via a unique IP address, thereby eliminating the need for port forwarding. Note that only the controllers (XRC 9000) are shown for each site and the repeaters are omitted for better clarity. For this example, the repeaters should have IP addresses in the following subnets: 10.0.0.X for Sites 1-4 192.168.0.X for Sites 5-6 These IPv4 addresses can either be statically provisioned or acquired through DHCP. The important part is that the controllers are configured with static addresses. Each of the border routers is capable of providing Network Address Translation with port forwarding, such that the IP traffic coming from the public side can reach the target controller via the public address and a predefined port number. Here the firewalls are shown as a logical components rather than physical boxes. It is quite common that the routers themselves function as firewalls.
113 of 151
MOTOTRBO Connect Plus System Planner 1.0 The public IPv4 addresses are just examples of what an ISP will provide when a customer signs up for broadband service. Connect Plus does not currently support addressing sites through DNS domain names, so it is necessary to request public IPv4 addresses from the service provider. Finally, the TMS Server and the LRRP (Location) Server are assigned private IPv4 addresses from their respective private address pools (refer to the diagram).
XRC 9000 Site 1 10.0.0.100
XRC 9000 Site 2 10.0.0.101
XRC 9000 Site 5 192.168.0.1
Public WAN
NAT with Port Forward
NAT with Port Forward
TMS Server 10.0.0.110 Firewall 1 Public: 172.84.67.3 Private: 10.0.0.1 XRC 9000 Site 3 10.0.0.102
LRRP Server 192.168.0.5
Firewall 2 Public: 184.33.21.18 Private: 192.168.0.254
XRC 9000 Site 4 10.0.0.103
XRC 9000 Site 6 192.168.0.2
Figure 4-9 Example System IP Plan The following table is provided for better understanding of IP data flows between the Connect Plus sites. For example, if the controller at Site 4 wants to send packets to the controller at Site 5, it needs to target it through the public IPv4 address 184.33.21.18.
SENDING TO
Site 1 Site 2 Site 3 Site 4 Site 5 Site 6
SENDING FROM XRC 9000 @ Site 1 Site 2 Site 3 Site 4 * 10.0.0.100 10.0.0.100 10.0.0.100 10.0.0.101 * 10.0.0.101 10.0.0.101 10.0.0.102 10.0.0.102 * 10.0.0.102 10.0.0.103 10.0.0.103 10.0.0.103 * 184.33.21.18 184.33.21.18 184.33.21.18 184.33.21.18 184.33.21.18 184.33.21.18 184.33.21.18 184.33.21.18 Table 4-4 IP Address Matrix for the Example System
Site 5 172.84.67.3 172.84.67.3 172.84.67.3 172.84.67.3 * 192.168.0.2
Site 6 172.84.67.3 172.84.67.3 172.84.67.3 172.84.67.3 192.168.0.1 *
4.5.2 Port Assignments and Forwarding Since the single public IPv4 address is in a way “shared” among the devices with private addresses, there has to be a mechanism to distinguish the private destination of the IP datagrams when they are received at the border router (from the public network). A standard method to achieve this is by using a socket, which by definition is a pair of an IP address and port number. Depending on the IP payload, ports can be either TCP or UDP types. Connect Plus utilizes sockets to allow the border router to direct the public IP traffic to the correct target device, such as a controller or an application server. For further information on how to allocate and configure ports for the Connect Plus system the reader can reference [4]. The port assignments provisioned into the XRC 9000 controllers need to be noted by the system administrator and used to configure the NAT router. Most NAT routers
114 of 151
MOTOTRBO Connect Plus System Planner 1.0 allow Port Forwarding configurations for both, single (TCP or UDP) port and a range of port numbers. The table below shows an example of Port Forwarding configuration for the system depicted in Figure 4-9. Here the assumption is that the TCP and UDP port assignments are the same for the external and internal port numbers. In other words, for XRC 9000 Site 1 TCP packets received on socket 172.84.67.3:45001 will be forwarded to 10.0.0.100:45001. Site XRC 9000 Site 1 XRC 9000 Site 2 XRC 9000 Site 3 XRC 9000 Site 4 XRC 9000 Site 5 XRC 9000 Site 6
NAT Public TCP Control Private IP IP Port 10.0.0.100 172.84.67.3 45001 10.0.0.101 172.84.67.3 45002 10.0.0.102 172.84.67.3 45003 10.0.0.103 172.84.67.3 45004 192.168.0.1 184.33.21.18 45005 192.168.0.2 184.33.21.18 45006 Table 4-5 Port Forwarding Example
UDP Voice Port Start 46000 46032 46064 46096 46128 46160
UDP Voice Port End 46031 46063 46095 46127 46159 46191
4.5.3 Connect Plus Simplified Example IP Plan Figure 4-10 presents multisite configuration with 3 Connect Plus sites with 3 repeaters per site, providing 5 trunked channels. The network topology is private LAN/WAN, which does not require any special port forwarding or network address translation. Each XRC 9000 controller can directly communicate with the other site controllers via their configured IP addresses. The reader can refer to Appendix B for more information and another example of private IP network topology.
Site 1
XRC 9000 172.21.1.200
Switch 172.21.1.240
Repeater 1 172.21.1.1
Repeater 2 172.21.1.2
Repeater 3 172.21.1.3
Private LAN/WAN Site 2
Site 3
XRC 9000 172.21.2.200
Switch 172.21.3.240
Switch 172.21.2.240
Repeater 1 172.21.2.1
Repeater 2 172.21.2.2
XRC 9000 172.21.3.200
Repeater 1 172.21.3.1
Repeater 3 172.21.2.3
Figure 4-10 Simplified Example IP Plan
115 of 151
Repeater 2 172.21.3.2
Repeater 3 172.21.3.3
MOTOTRBO Connect Plus System Planner 1.0
4.6 MOTOTRBO CPS Programming Considerations for the Connect Plus SU Connect Plus trunking logic resides in the Connect Plus Option Board, which communicates with main board of the MOTOTRBO radio to facilitate Connect Plus operation. Because the radio and the Option Board both play a part in this process, two different software programs play a role when configuring a Connect Plus Subscriber Unit. MOTOTRBO CPS is used to configure the radio’s main board, while the Option Board is configured with Connect Plus CPS. Although the majority of parameters associated with Connect Plus features are programmed with Connect Plus CPS, the importance of MOTORBO CPS programming cannot be over-stated. The radio must be programmed with MOTOTRBO CPS prior to using Connect Plus CPS to configure the trunking features. When configuring a Connect Plus radio with MOTOTRBO CPS, it is important to follow the guidelines provided in this document to ensure correct operation. If the radio will contain only Connect Plus zones and channels, the MOTOTRBO CPS configuration is fairly straightforward because the programmer will not have to be concerned with screens that only affect non-Connect Plus modes. If the radio will be used for both Connect Plus and nonConnect Plus operation (such as MOTOTRBO analog & digital conventional modes or Capacity Plus), then CPS programming is more involved. The programmer will need to understand which settings affect only the non-Connect Plus modes, and which settings impact all radio modes, including Connect Plus. The first step in configuring the SU is to use MOTOTRBO CPS to read the SU’s codeplug. Then, from the MOTOTRBO CPS Main Menu select “View”, and then select “Expert” from the drop-down View Menu. This will assure that the programmer sees all of the settings discussed in the following sections. The following table provides a brief overview of the inter-relationship between MOTOTRBO CPS and Connect Plus. The headings in the left hand column are the major headings seen on the MOTOTRBO CPS Codeplug tree. If the table indicates that a particular screen is not used in Connect Plus, it can generally be by-passed if the radio is used for Connect Plus only. However, if the same radio is also used for non-Connect Plus modes, those screens should be configured according to the requirements of the non-Connect Plus application. This table provides an overview only. Before programming the radio, the programmer should also read the subsequent sections, which provide more detail on CPS dependencies and critical settings. MOTOTRBO CPS Codeplug Tree General Settings
Impact on Connect Plus Operation Some settings are critical to Connect Plus operation
Accessories
When an accessory supported for Connect Plus operation is utilized, some of these settings impact Connect Plus, as well as other radio modes.
Buttons
Although Connect Plus buttons are programmed with Connect Plus CPS, some specific MOTOTRBO buttons affect Connect Plus operation if a feature is enabled while the radio is selected a non-Connect Plus zone and channel, and then the radio is changed to a Connect Plus zone and channel.
Text Messages
Not used for Connect Plus. Connect Plus Quick Text (preprogrammed) Messages are configured with Connect Plus CPS
116 of 151
MOTOTRBO Connect Plus System Planner 1.0
Telemetry
Not currently supported for Connect Plus
Menu
Although Connect Plus menu operation is programmed with Connect Plus CPS, some specific MOTOTRBO menu options affect Connect Plus operation if a feature is enabled while the radio is selected a non-Connect Plus zone and channel, and then the radio is changed to a Connect Plus zone and channel.
Privacy
Not currently supported for Connect Plus. The Privacy checkbox must not be enabled for Connect Plus channels.
Network Settings
Some settings are critical to Connect Plus operation
Signaling Systems
These settings are not used for Connect Plus. In some cases, Connect Plus CPS has similar parameters.
Contacts
MOTOTRBO CPS contacts are not used for Connect Plus. Connect Plus Contacts are programmed with Connect Plus CPS.
RX Groups Lists
These lists are not used for Connect Plus
Channels
The way that Connect Plus zones and channels are organized with MOTOTRBO CPS is critical to Connect Plus operation. In regards to individual settings on the Channel screen, a few are critical to Connect Plus operation, but most are OK at default values. Many of the individual Channel settings will be overwritten with parameters configured with Connect Plus CPS.
Scan
These settings are not used for Connect Plus
Roam
These settings are not used for Connect Plus. Connect Plus Roam parameters are configured with Connect Plus CPS
Capacity Plus
These settings are not used for Connect Plus
When using MOTOTRBO CPS radio to configure a radio for Connect Plus, the main concerns of the radio programmer are to: Enable the Connect Plus purchasable feature Set the Radio ID Check settings that impact Connect Plus GPS & IP Data Operation. Many are OK are default values. Some may need to be adjusted slightly for optimal for Connect Plus operation Create zones and channels for Connect Plus
117 of 151
MOTOTRBO Connect Plus System Planner 1.0
4.6.1 Enabling the Connect Plus Feature Connect Plus operation is a purchasable feature for the MOTOTRBO radio. The SU can be programmed for Connect Plus prior to enabling the feature, but the Connect Plus Option Board will not enable its over-the-air signaling features until it verifies that the Connect Plus feature has been activated. Prior to feature activation, the Connect Plus SU will not search for service, attempt to register with any site, initiate calls, receive calls, etc. When an “unauthorized” radio is selected to a Connect Plus zone and channel, the LED blinks red and the radio sounds a tone. In addition, a display radio shows a message to inform the radio user that Connect Plus is not authorized. The Connect Plus feature can be purchased through the Motorola Online (MOL) website. The process for purchasing, enabling, and viewing radio features is described in the following MOTOTRBO CPS Help screens: Purchasing Radio Features Activation View MOTOTRBO CPS also provides a wizard to help walk the programmer through the process described in the Help screens listed above. The wizard is activated when choosing any item from the “Features” Menu with MOTOTRBO CPS.
4.6.2 Setting the Connect Plus Radio ID Each radio in the Connect Plus system must have a unique Radio ID, which is configured using MOTORBO CPS. The Radio ID field is located on the General Settings screen. The radio uses the Radio ID as its individual ID for all digital modes. This includes not only Connect Plus, but also digital conventional and Capacity Plus. MOTOTRBO CPS allows entries of 1 to 16776415 for the Radio ID. However, the top 64 numbers in this range (16776352 through 16776415) must not be used as the Radio ID for any Connect Plus radio. The Connect Plus system reserves these numbers for special purposes, so they must not be programmed into any radios. MOTOTRBO CPS will not block entry of these reserved values, so the programmer is responsible for entering a Radio ID that falls within the allowable Connect Plus range of 1-16776351. If the programmer enters any Radio ID higher than 16776351, the SU will not function correctly in the Connect Plus personality until the number is changed to a Radio ID that falls within the Connect Plus range. Once a specific Radio ID is programmed into a Connect Plus SU, it cannot be used for any other Connect Plus SU network-wide. For this reason, it is very important to keep an accurate record of which radios have been assigned which Radio IDs. The programmer should maintain an accurate list that shows both the MOTOTRBO Radio Serial Number and the Radio ID it has been assigned. This information must be entered into the controller database before the radio can be used on the Connect Plus system. The MOTOTRBO Serial Number is displayed on the MOTOTRBO CPS “Device Information” Screen.
118 of 151
MOTOTRBO Connect Plus System Planner 1.0
4.6.3 Other General Settings Critical to Connect Plus Operation After entering the Radio ID, the programmer should check the status of several other configurable parameters on the General Settings screen that impact Connect Plus operation: GPS: Must be enabled for the Connect Plus SU to respond to Location Requests. Private Calls: Must be enabled if this Connect Plus SU should be able initiate Private Calls. TX Preamble Duration: In Connect Plus, the TX Preamble precedes IP data transmissions only. It does not precede Connect Plus CSBKs. If the radio is used for Connect Plus operation only, the TX Preamble should be set to zero. If the radio contains non-Connect Plus channels that require a TX preamble, it should be set as short as possible. Otherwise, it may adversely affect Connect Plus operation. Under “Alerts”, Disable All Tones should not be checked, unless the programmer’s desire is to disable all tones radio-wide, including Connect Plus zones and channels.
4.6.3.1 MOTORBO CPS Button Settings and Connect Plus Operation The General Rules for programmable button operations are as follows: When selected to a non-Connect Plus zone and channel, a programmable button operates as configured with MOTOTRBO CPS. When selected to a Connect Plus zone and channel, programmable buttons operate as configured with Connect Plus CPS. However, some MOTOTRBO CPS programmable buttons merit a special note: If All Alert Tones is turned off while the radio is selected to a non-Connect Plus zone and channel, and then the radio is subsequently turned to a Connect Plus zone and channel, all tones will continue to be disabled, but the Connect Plus Option Board will not be aware of this condition. Enabling the tones while selected to a Connect Plus zone and channel will have no effect until the tones are enabled while the radio is selected to a non-Connect Plus zone and channel. If Keypad Lock is enabled while the radio is selected to a non-Connect Plus zone and channel, it will not be possible to select a Connect Plus zone and channel until Keypad Lock is disabled.
4.6.3.2 MOTORBO CPS Menu Settings and Connect Plus Operation The General Rules for menu operations are as follows: When selected to a non-Connect Plus zone and channel, the Menu operates as configured with MOTOTRBO CPS.
119 of 151
MOTOTRBO Connect Plus System Planner 1.0 When selected to a Connect Plus zone and channel, the Menu operates as configured with Connect Plus CPS. However, some MOTOTRBO CPS programmable Menu options merit a special note: If Tones/Alerts is turned off via the menu while the radio is selected to a non-Connect Plus zone and channel, and then the radio is subsequently turned to a Connect Plus zone and channel, all tones will continue to be disabled, but the Connect Plus Option Board will not be aware of this condition. Enabling the tones while selected to a Connect Plus zone and channel will have no effect until the tones are enabled while the radio is selected to a nonConnect Plus zone and channel. If Keypad Tones is turned off via the menu while the radio is selected to a non-Connect Plus zone and channel, and then the radio is subsequently turned to a Connect Plus zone and channel, Keypad tones will continue to be disabled, but the Connect Plus Option Board will not be aware of this condition. Enabling the keypad tones while selected to a Connect Plus zone and channel will have no effect until the tones are enabled while the radio is selected to a non-Connect Plus zone and channel. If Keypad Lock is enabled via the menu while the radio is selected to a non-Connect Plus zone and channel, it will not be possible to select a Connect Plus zone and channel until Keypad Lock is disabled.. If the LED Indicator is turned off via the menu while the radio is selected to a non-Connect Plus zone and channel, and then the radio is subsequently turned to a Connect Plus zone and channel, then both the LED Indicator and Backlight continue to be disabled, but the Connect Plus Option Board will not be aware of this condition. Toggling the LED Indicator “off” and then back “on” while selected to the Connect Plus channel will re-enable both the LED Indicator the Backlight for Connect Plus.
4.6.4 Network Settings Critical to Connect Plus Operation The following table lists the MOTOTRBO Network Settings that are critical to Connect Plus operation. Network Settings not listed on this table affect Non-Connect Plus channels only. Setting Radio IP
Connect Plus note Radio IP. This is usually left at default setting of 192.168.10.1. Connect Plus will still operate correctly if value is changed.
CAI Network
Must be left at default value of 12
CAI Group Network
Must be left at default value of 225
Maximum Transmit PDU Size
Must be set large enough to accommodate the largest text message or LRRP Report transmitted by the radio while operating in a Connect Plus zone. Recommend setting is 500 bytes or larger.
The Network Screen has several configurable port settings. As a rule, these settings affect nonConnect Plus zones and channels only, unless the programmer mistakenly selects a port number already used by the Connect Plus Option Board. To avoid conflicts with Connect Plus, the programmer must NOT use any of the following ports for these configurable settings; 4061, 4062, 4063, 4004.
120 of 151
MOTOTRBO Connect Plus System Planner 1.0
4.6.5 MOTOTRBO CPS Zone & Channel Configuration for Connect Plus One of the most important aspects of MOTOTRBO CPS configuration for Connect Plus is setting up the zone(s) and channels that will be used by the Connect Plus Option Board. Most applications will require just a single Connect Plus zone with 16 channels enabled for “Option Board” and “Option Board trunking”. This is because the Connect Plus SU can Roam to any site in the Connect Plus network while operating in just one Connect Plus zone. It’s usually not necessary to have more than one Connect Plus zone unless additional zones are needed for a specific reason. The following list provides some examples, but there could be other reasons that also necessitate multiple Connect zones. Radio user needs more than 16 Talk Groups. This would require more than one zone, since each Connect Plus zone supports a maximum of 16 assignable positions on the Channel Selector Knob (portable radio) or Channel Rocker (mobile radio). Connect Plus organizes its Contact list on a per-zone basis, with each Connect Plus zone providing a maximum of 50 contacts. If this number is not sufficient for the radio user; one or more additional zones would be required. In this case, it’s possible that the zones might be programmed identically, except for the Contact list. Radio user with non-display portable or numeric display mobile wishes to initiate many Private Calls. Since these models don’t have a menu, the only way to initiate a Private Call is by assigning a One Touch Call button or assigning a position on the Channel Selector Knob (portable radio) or Channel Rocker (mobile radio) for each destination Private Call ID. Since there are only 16 such assignable positions per zone, this may prompt a need for multiple Connect Plus zones. The following rules must be followed when setting up Connect Plus channels. It is the radio programmer’s responsibility to know these rules and follow them because they are not enforced by the MOTOTRBO CPS software. These rules must be followed exactly in order for Connect Plus to operate properly: Each Connect Plus zone must have 16 identically configured channels that are enabled for both “Option Board” and “Option Board trunking”. These are the only types of channels allowed in a Connect Plus zone. Non-Connect Plus channels (analog conventional, digital conventional, Capacity Plus, “talkaround” channels, etc) are NOT allowed in any Connect Plus zone. Connect Plus supports a maximum of 16 Connect Plus zones per SU. Since each Connect Plus zone must be programmed with 16 identical channels, the maximum number of Connect Plus channels per SU is 16 x 16 (for a total of 256 channels). Connect Plus zones must be at the top of the Channels list. They cannot be preceded by any non-Connect Plus zones. If there are multiple Connect Plus zones, they must be contiguous – starting with the first zone on the Channels list. For example, if the radio has 5 Connect Plus zones, they must be the first 5 zones in the Channel List. Any nonConnect Plus zone must come after these zones in the list. If the radio already has nonConnect Plus zones prior to adding Connect Plus zones, the non-Connect Plus zones will have to be moved so that they follow the Connect Plus zones. This procedure is described later in this document.
121 of 151
MOTOTRBO Connect Plus System Planner 1.0
The steps for creating Connect Plus zones and channels are as follows. Each of these steps will be described in greater detail in subsequent paragraphs. 1. Programmer creates a Connect Plus zone and the first Connect Plus Channel 2. Programmer configures the Connect Plus channel settings 3. Programmer copies & pastes the Connect Plus channel until the Connect Plus zone contains 16 identical channels 4. If radio user needs multiple Connect Plus zones, the programmer copies and pastes the Connect Plus zone until the radio has the desired number of Connect Plus zones. 5. At this point, the Connect Plus zone(s) will be last zone(s) in the Channel List. The final step is to move any non-Connect Plus zones below the Connect Plus zones so that the Connect Plus zones will be first in the list as required. Guidelines for this operation are provided.
4.6.5.1 Creating a Connect Plus Zone and Channel The procedure for creating Connect Plus zones and channels is as follows: In the MOTOTRBO CPS codeplug tree, right click on the “Channels” folder, and then select “Add”, and then “Zone”. Locate the newly created zone folder; it will be at the bottom of the “Channels” list. Right click on the newly created zone folder, and then select, “Add”, and then “Digital Channel”. Locate the newly created channel; it will be located directly underneath the new folder. Click on the newly created channel to open the channel screen in the right-hand pane. Configure the Channel settings as described in the next section.
4.6.5.2 Connect Plus Channel Settings View the settings on the Channel screen in the right-hand pane. Verify that all settings are being displayed by going to Main Menu, and then selecting “View”, followed by “Expert” from the dropdown view menu. The Channel Screen has many settings, but the programmer only needs to be concerned with a few of them. That’s because most of these settings will be overwritten by parameters entered with Connect Plus Board CPS. Settings that must be changed from default values There are three settings that must be changed from the MOTOTRBO default settings for proper Connect Plus Operation.
122 of 151
MOTOTRBO Connect Plus System Planner 1.0 Setting Option Board Checkbox
Connect Plus note Programmer must select (check) this box for Connect Plus operation
Option Board Trunking
Programmer must select (check) this box for Connect Plus operation
Admit Criteria
Change this setting to “Always” for Connect Plus operation. This assures the fastest possible system access times. For Connect Plus, setting the Admit Criteria to “Always” does not mean the radio will always operate impolitely. Connect Plus will still operate “politely” during Connect Plus calls.
All of the other settings should be OK at the default values. Because some of these settings are important to Connect Plus operation, the programmer should check the following parameters and verify that they are set as required by Connect Plus. Settings that should be OK at default values, but should be verified by radio programmer Setting Privacy Checkbox
Connect Plus note This must be disabled (unchecked) for Connect Plus operation
IP Site Connect Checkbox
This must be disabled (unchecked) for Connect Plus operation
Compressed UDP Data Header
This must be disabled (unchecked) for Connect Plus operation
RX Only
This must be disabled (unchecked) for Connect Plus operation. If RX Only is desired, it must be programmed with Connect Plus CPS.
(RX) Reference Frequency
This must be selected to “Default”
(TX) Reference Frequency
This must be selected to “Default”
Contact Name
This must be selected to “None”. This will be set via Connect Plus CPS.
VOX
This must be disabled (unchecked) for Connect Plus operation
TOT (Time Out Timer)
Connect Plus CPS has a settable TOT, which defaults to 60 seconds also. This setting must not be shorter than the Connect Plus CPS value.
TOT Rekey Delay
This must be set to 0 sec
Private Call Confirmed Checkbox
This must be disabled (unchecked) for Connect Plus operation. Connect Plus provides its own confirmation for Private Calls.
Data Call Confirmed Checkbox
This box must be enabled (checked) for Connect Plus operation.
This concludes the set-up for this channel. It may seem unusual not to be concerned with settings such as “Color Code”, “Repeater Timeslot”, “RX Frequency”, and “TX Frequency”, but these settings are configured when building the Network Frequency File with Connect Plus CPS. The next step will be to copy this channel and paste it 15 times to the Connect Plus zone, as described in the following section:
123 of 151
MOTOTRBO Connect Plus System Planner 1.0
4.6.5.3 Verifying Number of Channels in Connect Plus Zone Since Connect Plus requires 16 identically programmed channels in each Connect Plus zone, the easiest way to accomplish this is to create one Connect Plus channel, and then copy and past it 15 times into the Connect Plus zone. In the MOTOTRBO CPS codeplug tree view, right click on the newly created channel, and select “Copy”. In the MOTOTRBO CPS codeplug tree view, right click on the Connect Plus folder and select “Paste”. This will place the copied channel into the folder. The folder should now contain two identically programmed channels. Repeat this process 14 more times At the completion of this process, count the channels in the folder to verify that there are exactly 16.
4.6.5.4 Creating Additional Connect Plus Zones (if necessary) As stated previously, most radio users will only need one Connect Plus zone. However, if more than Connect Plus zone is required, it can be accomplished via a simple “copy” and “paste” approach as described below: In the MOTOTRBO CPS codeplug tree view, right click on the Connect Plus zone folder and choose “copy”. In the MOTOTRBO CPS codeplug tree view, right click on the “Channels” folder and select “Paste”. This will place the copied zone and its 16 identical channels in the “Channels” folder. The radio now has 2 Connect Plus zones, each with 16 identically programmed channels. Repeat this process for each additional Connect Plus zone that is needed, to a maximum of 16 Connect Plus zones. The final step will be to assure that Connect Plus zones are at the top of the Channel list as described in the next section.
4.6.5.5 Connect Plus Zone Placement within the Channel List The last thing to be done is to assure that all Connect Plus zones are at the top of the Channel List. The reason for holding this step until last is that MOTOTRBO CPS automatically places newly created zones as the bottom of the list. For this reason, it makes sense to add all necessary Connect Plus zones prior to rearranging the Channel List. This section provides guidelines for assuring that the Connect Plus zones are at the top of the Channels List.
124 of 151
MOTOTRBO Connect Plus System Planner 1.0 For new “out of the box” radios If a radio is a new, “out of the box” unit, it will likely have one default, non-Connect Plus zone at the top of the list. If the radio is used for Connect Plus only, this default zone may be deleted by selecting the zone and then pressing the delete key. The software will provide a prompt to confirm the deletion. If the new radio will also contain non-Connect Plus zones, the programmer may wish to move this non-Connect Plus zone rather than deleting it. If so, follow the instructions immediately below. For radios with pre-existing Non-Connect Plus zones It is possible that the radio may have pre-existing non-Connect Plus zones which should be retained. This may be case, for example, when a conventional MOTOTRBO radio is converted to Connect Plus, and the programmer desires to retain the conventional channels. If instructions have been followed correctly to this point, all Connect Plus zones will be at the end of the list, which is the opposite of where they must end up (at the top of list). To re-arrange the list order, follow this procedure: 1. Select all of the non-Connect Plus zones that precede the Connect Plus zones. To do this, select each non-Connect Plus zone folder by holding down the “Ctrl” key while clicking the folder. If done correctly, each selected folder title will be highlighted with a blue block. 2. Right click while these folders are selected; choose “Copy” from the right-click menu. 3. Right Click the folder labeled “Channels” at the top of the Channel List. Select “Paste” from the Right Click Menu. 4. This will paste a copy of the selected folders below the Connect Plus folders. At this point, there are two copies of these folders – the originals are still above the Connect Plus folders, and the copies are now below the Connect Plus folders. Verify this before proceeding to the next step. 5. The last step is to delete all non-Connect Plus zone folders that are above the Connect Plus zone folders. This can be done by deleting the non-Connect Plus zone folders one at a time or by dong a multiple select as previously described and then choosing “delete”. In either case the software will provide a prompt to confirm the deletion(s). After following these instructions, all Connect Plus zone folders should be at the top of the Channel List. There will likely be an icon labeled “Channel Pool” that precedes the first Connect Plus folder. This is to be expected. The “Channel Pool” icon can either precede or follow the first Connect Plus folder – either position is OK. Any other position for this icon would be unexpected, and could cause problems for Connect Plus operation. When the programmer has verified that all Connect Plus zones are at the top of the Channel List, then MOTOTRBO CPS programming for Connect Plus is complete. If there is additional programming required for non-Connect Plus operation, it should be finished prior to writing the codeplug to the radio. Once the MOTOTRBO CPS programming is complete, the radio can be programmed with Connect Plus CPS.
125 of 151
MOTOTRBO Connect Plus System Planner 1.0
4.7 Connect Plus Customer Fleetmap Development Customer Fleetmap Development for Connect Plus has many similarities to Fleetmap Development for other MOTOTRBO modes, and many of the same processes and principles apply. The primary differences between Fleetmap Development for Connect Plus and other MOTOTRBO modes are as follows: In conventional modes, a big part of Fleetmap development is deciding which radios and groups get assigned to which repeater and timeslot. This is not a consideration in a trunking system such as Connect Plus, since the controller assigns channels and timeslots from a common pool on an “as needed” basis. In other digital modes, Fleetmap configuration is almost entirely in the subscriber radio (using MOTOTRBO CPS). In Connect Plus, the XRC 9000 Network Manager and Connect Plus CPS both play a part in Fleetmap configuration. While this adds to the complexity of Connect Plus Fleetmap Development when compared with other modes, it also provides increased management capability and a greater degree of control. For example, in Connect Plus feature access (or feature limitations) can be addressed in two places – in the SU and the Controller. For many features, Connect Plus provides separate controls for the ability to initiate or receive a specific call type. The reader can refer to the section “Connect Plus Features” for description on the Connect Plus feature set. For the most part, Connect Plus features are identical or extremely similar to other digital MOTOTRBO modes. Some differences in feature availability that impact Fleetmap Development are that: o
Connect Plus provides some features not available in other digital modes. These include Multigroup Call, the ability to send a Text Message to a Site All Call ID, and Over-the-air (OTA) File Transfer.
o
Connect Plus does not currently provide some features available in other digital modes. These include Emergency Call, Privacy, and Telemetry.
In other MOTOTRBO Digital modes, a big part of Fleetmap Development is assigning GPS Revert Channels and/or Data Revert Channels. This is not a consideration in Connect Plus because the controller assigns channels and timeslots for data calls from the same pool of channels used for voice calls. Connect Plus does not use a Control Station radio as the interface between the Connect Plus System and a Location Tracking Application or a Text Message Application. The XRC 9000 controller fills this role. Scan operates differently in Connect Plus, and doesn’t currently provide any configurable options.
4.7.1 Identifying the Needs of Connect Plus Users Just as in other digital modes, Fleetmap Development begins with identifying who the radio users are, and then identifying the needs of each radio user. Some of the questions that need to be asked include the following:
126 of 151
MOTOTRBO Connect Plus System Planner 1.0 Does the radio user have a “preferred site”? In a single site configuration, the “preferred site” is the radio user’s one and only site. In a multisite network, the “preferred site” is the site the radio user will be closest to the majority of time. The radio can automatically Roam from the “preferred site” to other network sites. Is the radio user a supervisor, or not? This impacts which features and privileges are provided to the radio user. How important is this radio user when compared to other users? This will determine the user’s Priority Level, as configured into the user record in the controller’s user database. Because each Talk Group record also has a configurable priority level, this question must be asked for each Talk Group. What department or work group does the radio user belong to? Individuals with similar responsibilities and interests are typically assigned to the same Talk Group. What other departments or work groups does the radio user need to talk to? This determines which other Talk Groups are programmed into the radio. Do a large number of individuals that span multiple departments and work groups share a common trait (such as belonging to the same company or organization)? If so, all of their radios are typically assigned the same Multigroup ID. Does the radio user have a need to speak with specific individuals? If so, the radio user should have the ability to initiate Private Calls, and the radio should be programmed with the Private Call destination IDs. Does the radio user have a GPS capable radio, and is it desirable to track its location? If so, the system must have a Location Tracking Application. The Location Tracking application must be programmed with the IP address and LRRP Port number of the XRC Controller. The application must also be configured with the user’s Radio ID and the desired location attributes and update interval. Does the radio user have a need to send a text message to a Dispatch PC, or receive a text message from a Dispatch PC? If so, the system must have a Text Message Application. The Text Message application must be programmed with the IP address and TMS Port number for the XRC Controller, and it must also be programmed with the Radio IDs and Group IDs of interest. Both the Text Message Application and Connect Plus SU must be programmed with one or more “Dispatch Call IDs” to represent the Dispatcher Client(s). Is the radio user tasked with responsibility for maintaining the radio system? If so, the radio may be programmed with multiple Connect Plus zones, so that the user can monitor and talk to many Talk Groups. Additionally, the radio user may be given the privilege and ability to make a “Site All Call”, so that information can be communicated quickly to all site users. The process of identifying radio users and their needs should involve the radio users themselves, both at the management and non-management level. It should also be documented in a database or spreadsheet that can be used as a basis for Fleetmap Development. The database or spreadsheet should contain the following information for each radio user: Name Work area (which will be mapped to a radio talkgroup)
127 of 151
MOTOTRBO Connect Plus System Planner 1.0
Radio Model o
Is radio GPS capable? Are location updates desired?
o
Does radio have a display? (Controller will not allow text messages to SU if no display?
Radio Serial Number Radio ID Multigroup ID Other Talk Groups the user will communicate with What Priority is this radio user? Each Connect Plus user record and Group record has a programmable Priority Level, 2-8. Priority 2 is the highest configurable level. Priority Level 8 is the lowest Priority Level. The Controller considers Priority Level when assigning Calls from the Busy Queue. Feature Privileges o
Receive Private Calls?
o
Initiate Private Calls?
o
Initiate Multigroup Call? (voice & text)
o
Initiate Voice Call to Site All Call ID?
o
Send Text Message to Site All Call ID?
o
Initiate Remote Monitor for another SU?
o
Allow Remote Monitor by another SU?
o
Send “Disable Command” to another SU?
o
Receive Disable Command sent by another SU?
o
Send “Enable Command” to another SU?
o
Receive Enable Command sent by another SU?
o
Send Radio Check to another SU?
o
Send Call Alert to another SU?
o
Receive Over-the-Air File Transfer to update Connect Plus Option Board Firmware and Network Frequency File?
As the process evolves, it is not unusual to discover that individuals and needs fall into several general categories. Each of these categories may evolve into its own codeplug template.
128 of 151
MOTOTRBO Connect Plus System Planner 1.0
4.7.2 Important Information about Connect Plus Call Initiation Privileges The XRC 9000 Controller provides several programmable Call Initiation Privileges for each SU record. Once an SU is enabled with a privilege (such as the “Private Call Init” privilege) the XRC 9000 Controller does not maintain a list of which SU’s that specific radio is allowed to call. Which SU’s the radio can call is determined by the following: If Manual Dial is NOT enabled in the radio via Connect Plus CPS, the radio can attempt to call any Private Call ID on its Zone Contact List. If Manual Dial is enabled in the radio via Connect Plus CPS, the radio can attempt to Private Call any Private Call ID entered via the keypad. This essentially means that the SU can attempt to call any Private Call ID network-wide. When the SU attempts to initiate a Private Call, the XRC 9000 Controller will allow the radio to call any SU that has the “Private Call receive” privilege enabled on its user record in the controller database. The same principles also apply to Remote Monitor, Radio Check, Call Alert, Radio Disable, and Radio Enable.
4.7.3 Who will the Connect Plus radio user hear? The Connect Plus radio can receive one call at a time. While the radio is receiving one call (either voice or data), it’s possible that radio will not hear part or all of another call that it would otherwise respond to. Assuming that the Connect Plus radio is idle and monitoring its Control Channel, the SU will respond to any of the following call assignments on a first-come first-served basis. The SU will respond to a call targeting its individual ID. This includes Private Calls, Call Alert, Radio Check, Remote Monitor, Radio Disable, Radio Enable, Text Message to the individual ID, Location Update Request. If it is not desirable for the radio user to receive one of these call types, then the SU record in the controller database should not be configured with the corresponding “receive” privilege. The SU will respond to a call targeting its Selected Group ID. The Selected Group ID is the Group ID currently selected with the Channel Selector Knob (portable radio) or Channel Rocker (mobile radio). Or, if a Private Call ID is currently selected on the Channel Selector Knob or Channel Rocker, the SU will respond to the “Registration Group ID” that has been programmed for that Knob or Channel Rocker position. Call types include voice call to the Group ID or text message to the Group ID. The SU will respond to a call targeting its Multigroup ID. The user’s Multigroup ID is configured in two places; in the subscriber radio and in the user record in the controller database. Call types include voice call to the Multigroup ID or text message to the Multigroup ID.
129 of 151
MOTOTRBO Connect Plus System Planner 1.0 The SU will respond to a call targeting the Site All Call ID. Call types include voice call to the Site All Call Voice ID or text message to the Site All Call Text ID.
4.7.4 Who will the Connect Plus radio user talk to? For the purposes of this discussion, the expression “talk to” will be used in a broad sense to include both voice and data features. Who the Connect Plus radio user can “talk to” is determined by several factors: What privileges are configured into the controller’s user database? Whenever the user record provides a programmable privilege, it always takes precedence over how the radio has been programmed with Connect Plus CPS. For example, the radio may be configured with the Menu option to initiate Remote Monitor. However, if the “Remote Monitor Init” privilege is not enabled on the user record in the controller database, the radio’s request to start a Remote Monitor will be denied. How has the radio been programmed with Connect Plus CPS? SU programming and controller programming should be in synch in regards to the SU’s privileges. It the radio user is not allowed to Remote Monitor other SU’s, then the “Remote Monitor Init” privilege should not be enabled in the controller’s user record and the radio should not be programmed with the Remote Monitor menu option. What Talk Groups have been assigned a position on the Channel Selector Knob (portable radio) or Channel Rocker (mobile radio)? What Multigroup ID has the radio been programmed with? Has the Multigroup ID been assigned a position on the Channel Selector Knob (portable radio) or Channel Rocker (mobile radio)? This is required for the radio to initiate a voice call to the Multigroup ID. Has the user record in the controller database been enabled for the “Multigroup Call Init” privilege? Has the Site All Call voice ID been assigned a position on the Channel Selector Knob (portable radio) or Channel Rocker (mobile radio)? This is required for the radio to initiate a voice call to the Site All Call ID. Has the user record in the controller database been enabled for the “Site All Call Init” privilege? Does the radio have a display? If not, the ability to initiate calls is restricted to calls assigned to a Channel Selector Knob (portable radio) or Channel Rocker (mobile radio) position, or programmed “One Touch Calls”. If the radio does have a display, what Menu options have been configured? This determines which calls can be initiated via the radio menu. Has the radio been programmed with the ability to do One Touch Calls? If so, what call types and Destination IDs have been programmed for the One Touch Call(s)? In Connect Plus, One Touch Call can be used to initiate the following Call Types: o
Private Call (voice call) to a specific Destination ID
o
Call Alert to a specific Destination ID
o
Programmed “Quick Text” Message to a specific Destination ID. The Destination ID can be either an individual (Private Call) ID or a Group ID.
130 of 151
MOTOTRBO Connect Plus System Planner 1.0 Does the radio have a keypad (and therefore the ability to “Manually Dial” an individual ID)? If the radio doesn’t have a keypad, or if it does have a keypad but “Manual Dial” hasn’t been enabled as a Menu option, then the only individual IDs that can be targeted for calls will be those on the radio’s Contact List. Group IDs cannot be entered via Manual Dial.
4.7.5 Assigning Connect Plus Radio IDs Each Connect Plus radio user must be assigned a unique Radio ID between 1 and 16776351. The Radio ID used for each mobile or portable SU must be unique network wide. The only exception to this rule is for repeater Radio IDs. The assignable range for repeater Radio ID’s is 1-15. Each repeater at a site must have a unique Radio ID, but the same Radio ID can (and probably will) be used again for another repeater at a different site. Because such a wide range of assignable Radio ID’s are available for Connect Plus SU’s, the Network Administrator has many possible strategies to choose from when assigning a radio its Radio ID. The following are just some examples: If “Manual Dial” (direct entry from the radio keypad) will be used as a strategy for making individual calls, this would be a good reason for making Radio IDs as short as possible. Radio ID’s may be assigned so that each number in the Radio ID represents something. The first digit may represent the type of radio (mobile vs. portable), the second digit might represent a department, the next three digits might represent the user, and so forth. Radio Users in the same company or department might be assigned from the same contiguous ranges. For example, Department A radios may be assigned from the range of 100 to 199, Department B from 200 to 299, etc. It may be helpful to plan for a relationship between a Group ID and the Radio ID’s of the users of that Group. For example, Talk Group A may use Talk Group 1000 and their Radio ID’s may be assigned from the ranges of 101 to 199. Talk Group B may use Talk Group 2000 and their Radio ID’s may be assigned from the ranges of 201 to 299. While it’s allowable to use the same number as both a Radio ID and Talk Group ID, it isn’t necessary due to the large number of ID’s. Using different numbers for Groups and Radio ID’s can help the radio user and System Administrator differentiate quickly between Group IDs and individual IDs. Some Network Administrators like to match Radio IDs with vehicle numbers. It should be noted that if a single radio user has two radios – both a portable and mobile, for example – the two radios must have different radio ID’s. However, the Network Administrator can plan for a relationship between the two numbers. For example, the mobile radio in “Joe’s” vehicle might be Radio ID 50, while “Joe’s” portable radio is assigned Radio ID 150. The Radio ID is programmed into the SU with MOTOTRBO CPS. See the section, “Setting the Connect Plus Radio ID” for important information on configuring the Connect Plus Radio ID with Connect Plus CPS. Each XRC 9000 Controller in the network must have an identical user record for each Connect Plus Radio ID. Connect Plus helps the Network Administrator fulfill this rule in two ways: Whenever a user record is added to the user database at any Connect Plus site (or an existing record is updated with revised information), the site will automatically forward a
131 of 151
MOTOTRBO Connect Plus System Planner 1.0 copy of the record to other network sites. This is done on a record-by-record basis after the programmer makes the desired changes and then saves the record. If a new Connect Plus site is brought on-line the Network Manager software makes it easy to copy the entire user database from an existing Connect Plus site to the new site.
4.7.6 Assigning Aliases for Connect Plus Radio IDs Connect Plus CPS can be used to assign aliases for Connect Plus Radio IDs. For example, “Fred’s radio” can be programmed to know that “Sue” has Radio ID 250. This is helpful in a couple of ways: When “Fred” wants to make a call to “Sue”, he can simply choose “Sue” from the Contact List. This assumes that Fred’s radio has been programmed with a Private Call Contact for ID 250, and that “Sue” has been entered as the “Contact Name” for the contact record. When “Fred” receives an individual call from “Sue” (or when “Sue” transmits during a Group Call), his display will show “Sue”, rather than Sue’s Radio ID. This assumes that Fred’s radio has been programmed with a Private Call Contact for ID 250, and that “Sue” has been entered as the “Contact Name” for the contact record. While the two features described above are a nice convenience for “Fred”, a word of caution should be mentioned. If something happens to where Radio 250 no longer belongs to Sue, this is a problem because “Fred’s” radio will continue to display ID 250 as “Sue”. Changing the alias on the contact record requires reprogramming the radio using the “tethered” method (computer, Connect Plus CPS software, and programming cable). For this reason, some Network Administrators avoid using a person’s name as the “Contact Name” for a contact record. In place of the individual’s name, they prefer to use a job title, vehicle name or number, etc. Some Network Administrators prefer not to program Private Call contacts at all. In this case, the radio will display the Call ID in place of the alias for incoming transmissions. Also in this case, “Manual Dial” would be the only option for initiating individual call types. The radio requires a keypad to support “Manual Dial”. If Private Call contact records and aliases are used, all radios should be programmed in a consistent manner so that the alias information in “Radio A” will be the same as the alias information in radios “B”, “C” and “D”. It should also be noted that the user record in the Connect Plus controller has a field called “alias”, but this alias is not transmitted over the air and it has no effect on what appears on a radio’s display. The alias on a radio’s display is determined via Contact List programming with Connect Plus CPS.
4.7.7 Assigning Connect Plus Group IDs A Group Call allows multiple radios to participate in the same conversation. Therefore, the organization of Group IDs is one of the most important decisions that will be made during the Fleet Mapping process. In most cases, a Group ID represents a department or work
132 of 151
MOTOTRBO Connect Plus System Planner 1.0 group. However, this merits a note of caution. While every department might desire its own ID for Group communications, this may not be advisable for several reasons: The more different Group IDs that have been assigned to radios, the busier the site and network is likely to be. The more different Group IDs that are programmed into any individual radio, the easier it is for the radio user to get “lost in the radio” and miss important communications because he/she is selected to the wrong group. For this reason, it is advisable for multiple departments or work groups to share a common Group ID wherever possible. The assignable range for Connect Plus Group ID’s is 1 to 16776351. Once a Talk Group ID has been selected for a work group or department, the number should not be assigned to any other Group (or Multigroup) network-wide. While it’s allowable to use the same number as both a Radio ID and Talk Group ID, it isn’t necessary due to the large number of ID’s. Using different numbers for Groups and Radio ID’s can help the radio user and System Administrator differentiate quickly between Group IDs and individual IDs.
4.7.8 Programming Connect Plus Group IDs A Group ID record that matches the Group number selected for the work group or department must be programmed into the XRC 9000 controller. Just as with the individual record for Radio IDs, the controller will automatically send the Group record to all of its connected sites. Additionally, the Group ID must be programmed into the radio of each Group member using Connect Plus CPS. The following bullets describe the required steps: In each Connect Plus zone that requires the Group ID, use Connect Plus CPS to create a “Group Call” contact record with the “Call ID” and the “Contact Name”. The “Contact Name” typically describes the work group or department (such as “shipping” or “security”). After the Group Call Contact Record has been created, it must be assigned to a Channel Selector Knob position (portable radio) or Channel Rocker position (mobile radio), using the Connect Plus CPS Zone Channel Selections Screen. For each position (up to a maximum of 16 positions), there are three programmable fields; “Contact Name”, “Registration Group Name” and the “RX Only” checkbox. The “Contact Name” field is used to program which Group Call will be started when the radio is selected to that position and PTT is pressed. When the “Contact Name” is programmed with a Group Call, the software automatically programs the “Registration Group Name” field with the same Group Call info. The “RX Only” checkbox should be checked if the radio user is allowed to listen to the group only, but is not allowed to transmit.
4.7.9 Making a Group Call To start a call to the Group, the radio user selects the Channel Selector Knob position (portable radio) or Channel Rocker position (mobile radio) that has been programmed for the desired Group. If the knob or channel rocker has been changed from a different position, the radio will automatically re-register with the newly selected Registration Group. Following the registration, the radio user may press PTT to start the call. When the radio sounds the “Talk Permit” tone, a timeslot has been assigned and the user may proceed to talk while pressing PTT. The transmission
133 of 151
MOTOTRBO Connect Plus System Planner 1.0 will be heard at any network site that has at least one radio registered to the Group and where there is an available repeater timeslot for call assignment. When the radio user releases PTT, the repeater starts the Group Call Hang Time. This allows other individuals in the Group to speak without having to initiate a brand new call. Each transmission is identified with two numbers; the Group ID number and the Radio ID of the transmitting radio. The Group ID is what allows multiple radios to hear the same transmission. The Radio ID allows the receiving radios to know which individual within the Group is currently transmitting. It is important to note that Group voice calls cannot be initiated via the radio menu or by pressing a “One Touch Call” button in Connect Plus. In order to start a Group voice call, the user must select the programmed position on the Channel Selector Knob (portable) or Channel Rocker (mobile).
4.7.10
Assigning Connect Plus Multigroup IDs
A Multigroup ID is a special type of Connect Plus Group feature that does not exist in other MOTOTRBO digital modes. Each Connect Plus radio can be programmed with one Multigroup ID. The Multigroup ID is programmed into the radio using the General Settings screen of Connect Plus CPS. This same number must be programmed into the Multigroup ID field of the user record corresponding to the SU in the controller’s user database. Multigroup operation differs from regular Connect Plus Groups in several important ways: The radio user doesn’t need to select the Multigroup in order to hear transmissions on the Multigroup ID. Regardless of which Group is currently selected via the Channel Selector Knob position (portable radio) or Channel Rocker (mobile radio), the radio automatically listens for Multigroup transmissions also. Because a radio’s Multigroup ID is programmed into its unit record in the controller’s database, the Connect Plus radio doesn’t need to register with the Multigroup ID. The radio registers with its selected Group, and the controller automatically registers the radio to both its Selected Group and its Multigroup. This allows the radio user to hear Multigroup transmissions no matter which site he/she is registered to, and no matter which Talk Group is currently selected. If the Multigroup ID happens to also be the selected Group ID, then the radio does register with the Multigroup ID. A radio user requires a programmable privilege to initiate a Multigroup transmission. The “Multigroup Init” privilege is kept on the user record in the controller’s user database. This permission is checked when (a) starting a voice call to the Multigroup ID, and (b) sending a text message to the Multigroup. A Multigroup voice call is a one-way transmission. The repeater starts the Group Hang Time after the transmission, but only the call initiator is allowed to talk during the Group Hang Time. If another radio wishes to transmit on the Multigroup, it will be processed as a new call request, and the call initiator must have the programmable permission. For this reason, the Multigroup is well suited for announcements to large numbers or radios, but it is not designed to be a conversation group. If the system designer/administrator does not want to include an SU in any Multigroup call, then the SU should not be assigned a Multigroup ID.
134 of 151
MOTOTRBO Connect Plus System Planner 1.0 In order for a radio to hear a Multigroup transmission, all of the following requirements must be met: The matching Multigroup ID must be programmed into the subscriber via the Connect Plus CPS General Settings screen. The radio must be registered to the site and monitoring the Control Channel downlink in order to receive the call assignment. If a radio is involved in a previous call on another trunk-to timeslot, it may miss all or part of the Multigroup Call. Deciding which SU’s will share the same Multigroup ID is an important Fleet Mapping decision. Since the Multigroup works best as an announcement group, an important factor is deciding whether a large group of users shares a common interest – such as belonging to the same company or organization. If so, it makes sense to place them in the same Multigroup. The assignable range for Connect Plus Multigroup ID’s is 1 to 16776351. Note that this is the same range used for regular Talk Groups. Any number from this range can be assigned to a regular Talk Group or a Multigroup ID, but not both. Once a number has been used as either a Talk Group or Multigroup, it cannot be used again.
4.7.11
Programming Connect Plus Multigroup IDs
4.7.11.1
Placing Multiple Radio Users in the Same Multigroup
Placing multiple radio users in the same Multigroup is simply a matter of assigning them the same Multigroup ID. To assign a Multigroup ID, use the following steps: Create a Multigroup record for the ID in the controller’s user database. Just as with other subscriber records, the controller will automatically send the Multigroup record to all of its connected sites. Also in the controller user database, program the Multigroup ID into the “Multigroup ID” field on the unit record for each SU that will be a member of the Multigroup. When programming subscriber radios, each radio in the Multigroup should be programmed with this Multigroup ID. The set of radios that is programmed with “Multigroup ID X” should match the set of user records that have been programmed with the same Multigroup ID. A radio doesn’t need to be programmed with a Multigroup contact record in order to receive a Multigroup call. This is because the Multigroup ID is programmed on the Connect Plus CPS General Settings screen. The contact record is required for the following: o
To display a programmable alias for the Multigroup ID.
o
To assign a Channel Selector Knob position (portable radio) or Channel Rocker position (mobile radio) to the Multigroup ID. Assigning a Knob or Rocker position is required to initiate a Multigroup Call, but not to receive a Multigroup Call.
135 of 151
MOTOTRBO Connect Plus System Planner 1.0
4.7.11.2
Programming for Multigroup Call Initiation
To allow a radio user to initiate a Multigroup Call, the following steps are required: In the controller database, check the “Multigroup Init” checkbox on the user record corresponding to the SU that should have the privilege. In each Connect Plus zone that requires call initiation on the Multigroup ID, use Connect Plus CPS to create a “Multigroup Call” contact record with the “Call ID” and the “Contact Name” for the Multigroup. After the Multigroup Call Contact Record has been created, it must be assigned to a Channel Selector Knob position (portable radio) or Channel Rocker position (mobile radio), using the Connect Plus CPS Zone Channel Selections Screen. The procedure for assigning a programmable Knob or Rocker position is the same as described previously for a Group Call, except that the Multigroup ID is assigned as the Contact Name.
4.7.12
Making a Multigroup Call
The procedure for starting a Multigroup Call is the same as for starting a Group Call. Prior to granting the call request the controller will check to see if the initiating radio has the “Multigroup Init” privilege on its unit record in the controller’s user database. When the radio user releases PTT after a Multigroup transmission, the repeater starts the Group Call Hang Time. Unlike other Group Calls, only the call initiator can transmit again during the Call Hang Time. It is important to note that Multigroup calls cannot be initiated via the radio menu or by pressing a “One Touch Call” button. In order to start a Multigroup Call, the user must select the programmed position on the Channel Selector Knob (portable) or Channel Rocker (mobile), and the user record must be configured for the programmable “Multigroup Init” permission in the controller’s user database.
4.7.13
Site All Call ID
The Site All Call ID in Connect Plus is very similar to the All Call ID in other MOTOTRBO digital modes. The word “Site” is added in Connect Plus to emphasize that these transmissions are heard only at the site where the call initiator is located. Unlike other Connect Plus Calls, audio is NOT networked beyond the originating site. In Connect Plus, an authorized user can also send a Site All Call Text Message. The Text Message will only be transmitted at the originating site. It will not be networked to other sites.
4.7.13.1
Site All Call Differences
Site All Call differs from other Connect Plus Groups in several important ways: It is not necessary to create records for the Site All Call in the controller’s user database. This is because the controller is “hard coded” with information about the Site All Call IDs. These records cannot be viewed or edited.
136 of 151
MOTOTRBO Connect Plus System Planner 1.0
o
Site All Call (voice) uses a fixed ID of 16777215. This cannot be changed by the user.
o
Site All Call (text) uses a fixed ID of 16776415. This cannot be changed by the user.
The radio user doesn’t need to select Site All Call in order to hear transmissions on the Site All Call ID. Regardless of which Group is currently selected via the Channel Selector Knob position (portable radio) or Channel Rocker (mobile radio), the radio automatically listens for Site All Call transmissions also. A radio user does not have to register with the Site All Call ID to hear Site All Call transmissions. A radio user requires a programmable privilege to initiate a Site All Call transmission. There are separate permissions for “Site All Call Voice Init” and “Site All Call Text Init”. These permissions are kept on the user record in the controller’s user database. A Site All Call voice call is a one-way transmission. There is no Group Hang Time after a Site All Call transmission. If another radio wishes to transmit on the Site All Call ID, it will be processed as a new call request, and the call initiator must have the programmable permission. Site All Call should only be used for important announcements of interest to all site users. It is not a conversation group. In order for a radio to hear a Site All Call transmission, the radio must be registered to the site and monitoring the Control Channel downlink in order to receive the call assignment. If a radio is involved in a previous call on another trunk-to timeslot, it may miss all or part of the Site All Call. Deciding which individuals can initiate a Site All Call is an important Fleet Mapping decision. In many networks this privilege is only granted to the individual responsible for maintaining the site and/or network. Once a radio user has been granted the permission, he/she should also be educated about how and when to use the Site All Call ID. Because Site All Call transmissions are heard by all idle radios registered to the site, they can be disruptive to normal communications.
4.7.13.2
Enabling Radio to Initiate a Site All Call
To allow a radio user to initiate a Site All Call, the following steps are required: In the controller database, check the “Site All Call Voice Init” and/or the “Site All Call Text Init” checkbox(es) on the user record corresponding to the SU that should have the privilege(s). In each Connect Plus zone that requires call initiation on the Site All Call ID, use Connect Plus CPS to create a “Site All Call” contact record. Note that there are separate record types for “Site All Call Voice” and “Site All Call Text”. Only “Site All Call Voice” can be assigned a position on the Channel Selector Knob (portable radio) or Channel Rocker (mobile radio). After the Site All Call Voice Contact Record has been created, it must be assigned to a Channel Selector Knob position (portable radio) or Channel Rocker position (mobile radio), using the Connect Plus CPS Zone Channel Selections Screen. The procedure for assigning a programmable Knob or Rocker position is the same as described previously for a Group Call, except that the Site All Call Voice Contact is assigned as the Contact Name.
137 of 151
MOTOTRBO Connect Plus System Planner 1.0 Also, when Site All Call Voice is assigned as the Contact Name, any type of Group Record can be assigned as the Registration Group Name. The advantage of assigning a different Group Call as the Registration Group Name is that it allows the radio to also receive calls on that ID while selected to the “Site All Call Voice” position.
4.7.14
Making a Site All Call
The procedure for starting a Site All Call is the same as for starting a Group Call. Prior to granting the call request the controller will check to see if the initiating radio has the “Site All Call Voice Init” privilege on its unit record in the controller’s user database. When the radio user releases PTT after a Site All Call transmission, the repeater does not enter the Call Hang Time. Instead, the call ends immediately and all radios return to the Control Channel timeslot. It is important to note that Site All Call voice calls cannot be initiated via the radio menu or by pressing a “One Touch Call” button. In order to start a voice Site All Call, the user must select the programmed position on the Channel Selector Knob (portable) or Channel Rocker (mobile), and the user record must be configured for the programmable “Site All Call Voice Init” permission in the controller’s user database.
4.7.15
Connect Plus Private Calls
Private Call refers to the ability for one individual radio user to call another individual radio user regardless of whether the units share any common Talk Groups. The voice communication takes place using the Private ID’s (individual Radio ID’s) of the two units. So, the term “Private” means that the call involves two individual ID’s, the source and destination. It does not mean that the voice packets are encrypted in any special way. In other digital modes, Private Calls can be configured as “confirmed” or “unconfirmed” based on MOTOTRBO CPS programming. In Connect Plus, a Private Call always requires a Control Channel acknowledgement from the destination SU before the controller will assign a trunk-to timeslot. In this sense, Connect Plus Private Calls are always confirmed. However, the “Private Call Confirmed” checkbox must not be enabled for any Connect Plus channel via MOTOTRBO CPS. This requirement prevents the participating radios from performing an additional and unnecessary CSBK exchange on the trunk-to timeslot prior to transmitting voice. In Connect Plus, the privilege to “initiate” a Private Call and the privilege to “receive” a Private Call are separate programmable privileges on the unit record in the controller’s user database. One of the most important Fleet Mapping decisions is whether an individual should be given one or both of these privileges. Giving many users the ability to initiate Private Calls is somewhat risky for several reasons: Some radio users may “hide out” in private conversations so as not to be monitored by the supervisor or Group members. In a related issue, a user can miss important Group communications while on a Private Call.
138 of 151
MOTOTRBO Connect Plus System Planner 1.0 If many users make Private Calls, the system will get very busy. This is because each Private Call captures at least one repeater timeslot. If the parties are located at different sites, the Private Call uses a repeater timeslot at each site. On the other hand, if Private Calls are conducted in an educated manner, they can actually save system resources. For example, “Molly” and “Maria” are both members of the “Transportation” Talk Group, which currently has Talk Group members registered to five different sites. Molly needs to discuss some company business with Maria that is otherwise unrelated to the Transportation Talk Group. If Molly were to conduct this conversation on the Transportation Talk Group, the call would use five different repeater timeslots – one at each registered site. However, if Molly makes a Private Call to Maria, she can avoid tying up the Talk Group, and the call will only use a maximum of two repeater timeslots. If Molly and Maria are registered to the same site, the Private Call will only use one repeater timeslot. In order for a Connect Plus Private Call to take place; all of the following must occur: The Source ID must be enabled for the “Private Call Initiation” privilege on its SU Record in the controller database, The Destination ID must be enabled for the “Private Call Receive” privilege on its SU Record in the controller database, The Destination SU must be registered to a network site and not currently busy in a call The Destination SU must acknowledge a Control Channel query before the controller will assign a trunk-to timeslot for the call. This acknowledgement is provided automatically by the destination radio. The radio user is not aware of the incoming Private Call until the trunk-to timeslot is assigned. Private Calls are message trunking. At release of PTT the assigned trunk-to timeslot enters the Private Call Hang Time for a period of time determined through repeater programming. During the Private Call Hang Time, either party may transmit on the same trunk-to timeslot. If the Hang Time expires with no further transmissions the call ends.
4.7.16
Initiating a Private Call in Connect Plus
Just like other MOTOTRBO digital modes, Connect Plus provides several different ways to initiate a Private Call. The number of ways available to any particular individual depends on his/her radio model: Select a Private ID from the Contact List and press PTT. This is the most common way to initiate a Private Call, but it is only available to display radios. Place the radio in “Manual Dial” mode, and then enter the destination Private Call ID via the keypad and press PTT to start the call. This method is only available to display radios with a keypad. After receiving a Call Alert, press PTT while the “ignore?” prompt still shows on the radio display. This will initiate a Private Call to the radio that sent the Call Alert.
139 of 151
MOTOTRBO Connect Plus System Planner 1.0 Initiate a Private Call via a pre-programmed One Touch Call button. This can be used to initiate a Private Call to a specific, pre-configured destination ID. This approach is available to all radios. Initiate a Private Call by assigning a programmable Channel Selector Knob position (portable radio) or Channel Rocker position (mobile radio) to a Private Call ID. Then select the assigned position and press PTT to start the Private Call. This approach is available for all radios, but it is more common for non-display or numeric display radios, which don’t have the option of initiating Private Calls via the Menu. The specific steps for this approach are as follows:
4.7.17
o
In each Connect Plus zone, use Connect Plus CPS to create a “Private Call” Contact record for each Private Call destination ID that will be assigned a Channel Selector Knob position (portable radio) or Channel Rocker position (mobile radio).
o
After a Private Call contact record has been created, it should be assigned to a Channel Selector Knob position (portable radio) or Channel Rocker position (mobile radio) using the Connect Plus CPS Zone Channel Selections Screen. The procedure for assigning a programmable Knob or Rocker position is the same as described previously for a Group Call, except that the destination Private Call ID is assigned as the Contact Name. Also, when a Private Call is assigned as the Contact Name, any type of Group Record can be assigned as the Registration Group Name. The default Registration Group Name in this case is the Site All Call Voice ID, but it is highly recommended to change this to a different Group. In doing so, it is advisable to use a Group that is not the Site All Call Voice ID or the Multigroup ID. The radio will still receive calls on these two ID’s, even they aren’t programmed as the Registration Group. So, it’s to the user’s advantage to program a different Registration Group. If the user were to accidentally leave the Knob or Channel Rocker in this position after the Private Call ends, the user would hear communications on the programmed “Registration Group” (in addition the Multigroup ID and the Site All Call Voice ID).
Configuring Priority Levels in Connect Plus
Every Call Request received by the XRC 9000 controller has a Source ID and a Destination ID. The Source ID tells the controller which SU is initiating the call. The Destination ID tells the controller whether the call is targeted to another SU or to a Group ID. Both the Source ID and the Destination ID have a corresponding record in the controller’s user database, and each of these records has a programmable Priority Level (2-8). Two is highest configurable Priority Level, and 8 is the lowest configurable Priority Level. These Priority Levels come into play when there is no trunk-to timeslot available, and the Controller must place the call into the Busy Queue. When a timeslot becomes available, the Controller assigns the highest priority call from the Busy Queue. In doing so, it considers the Priority Level of both the Source ID and Destination ID. As a general rule, the call is assigned from the Busy Queue according to the higher of the two priorities. Site All Call requests are prioritized according to the priority of the Source ID only. When priority levels are equal, the Controller considers other factors when deciding which call to assign from the Busy Queue: For calls of equal priority, voice calls have priority over data calls. For voice calls of equal priority, calls are assigned “first in, first out”. For data calls of equal priority, calls are assigned “first in, first out”.
140 of 151
MOTOTRBO Connect Plus System Planner 1.0
An important part of Fleet Map Design is determining which Priority Level will be assigned to each radio user and to each Talk Group. The Priority Level will then be configured into the corresponding record in the controller’s user database. One simple approach is to leave every Talk Group record at the default Priority Level of 8 (the lowest Priority). In this approach, all Talk Groups are equal priority. Therefore, Group calls will be assigned from the Busy Queue based on the Priority Level of the Source radio only. Where priorities are equal, the calls will be assigned ”first in, first out”.
4.7.18
Text Messaging Considerations for Fleet Mapping Design
Connect Plus supports Simple Text Messaging as alternative to voice communications, and text messaging capability should be considered during Fleet Map design. The system designer should be familiar with Connect Plus Text Messaging features as discussed in the System Feature Overview Section. In addition, some other Text Message considerations are as follows: While all Connect Plus radio models have voice capability, some Connect Plus radio models have very limited text message capability. Non-display and numeric display radios cannot receive a text message, and they can only send pre-programmed (quick text) messages that are mapped to specific Destination ID via the “One Touch Call” feature. The amount of information that can be carried in a single text message is limited to 138 characters. For text messages to an individual ID, the initiating radio sends the message to the controller, which places the message in the mailbox for the destination SU. The controller will deliver the message to the destination SU at the earliest opportunity, but this is subject to (a) SU availability and (b) timeslot availability. If the SU is not currently registered into the network, the controller will hold the message until the SU registers, or until the message times out. If the text message cannot be delivered prior to the message timeout period (fixed to 168 hours in the initial release), the message will be deleted. Each SU has a mailbox in the XRC 9000 controller, and each SU mailbox can hold 10 undelivered messages. If the controller cannot deliver messages due lack of SU availability (because the SU is not registered into the network, for example), and if the mailbox fills up, the controller will not accept any more messages for the SU. If a radio user tries to initiate a text message to an SU when its controller mailbox is full, the call request is denied due to “Destination Mailbox Full”. Because the controller did not accept the message for delivery, the radio user will have to try again at a later time. The mailbox remains full until messages are removed because they are delivered to the Destination SU, or because the text message times out. To send a Text Message to an individual ID, the radio user can select the destination Private Call ID from the Contact List, or manually dial the Private Call ID (keypad is required for Manual Dial). In order to send a Text Message to a Group ID, the radio must have a Group Call contact record for the destination Group. Direct Dial for Group IDs is not supported. There is no mailbox for text messages addressed to a Group. When the controller receives a text message addressed to a Group ID, the controller will transmit the message at each site where the Group is currently registered. Because there is no OTA
141 of 151
MOTOTRBO Connect Plus System Planner 1.0 acknowledgement for Group Text Messages, this is a “best effort” attempt on the part of the controller. The controller will not know for certain which SU’s did or did not receive the Group Text Message. When a radio receives a text message that was addressed to the Group ID, the radio user will not be aware that it was addressed to a Group and not to the radio’s individual ID. This is also true for other MOTOTRBO digital modes. If the user selects “Reply”, the reply text message will be addressed to the individual ID that was the source of the Group Text Message, it will not be addressed to the Group ID. If a single Group ID includes both display radios and non-display radios (or numeric display radios), voice communications is preferable to text. This is because the non-display and numeric display radios will not be able to display the text messages. If a text message is sent to a Group ID that contains non-display or numeric display radios, all Group radios will move to the trunk-to timeslot, but only the display capable radios will notify the radio user that a Text Message has been received. In order to send a Text Message to a Multigroup ID, the source radio must have the “Multigroup Init” privilege enabled on its user record in the controller’s user database. In order to send a Text Message to the Site All Call Text ID, the source radio must have the “Site All Call Text Init” privilege enabled on its user record in the controller’s user database.
Text Message Subject Line Retention in Connect Plus A third party Text Message Application has the ability to send a Text Message containing a Subject Line to a Connect Plus SU. When the radio user reads the incoming text message, the Subject Line text appears at the beginning of the message and will likely “run-on” with the text following the subject line (in other words, the Subject Line and the following text will not be separated by a space). If the radio user replies to the Text Message, the Subject Line is automatically included in the reply, but the radio user will not see the Subject Line text on his/her screen when composing the reply text message. The maximum length of the radio user’s reply will be 138 characters, minus the number of characters contained in the Subject Line.
4.7.19
Emergency Calls and Connect Plus
Emergency is a future feature for Connect Plus.
4.7.20
Fleet Mapping Considerations for Other Call Features
The system designer should be familiar with the operation of other Connect Plus call features discussed in the System Feature Overview Section. These features include: Remote Monitor Radio Check Call Alert
142 of 151
MOTOTRBO Connect Plus System Planner 1.0
Radio Disable Radio Enable Of the features listed above, only Call Alert can be initiated by a non-display or limited display radio (via a programmed “One Touch Call” button). All other features can only be initiated via the Menu, which requires a display radio. When initiating one of these features via the menu, there are two ways to select the destination ID: 1. Select a Private Call Contact from the Zone Contact List as the Destination ID 2. Enter the Destination Private Call ID via Manual Dial. This requires a radio keypad In most networks, the ability to initiate these features will be limited to supervisor radios. Connect Plus CPS programming and XRC 9000 programming (via the XRC 9000 Network Manager) both play a role when implementing these features: Initiating a Remote Monitor SU Programming (Connect Plus CPS) Enable the Remote Monitor Menu option
Controller programming (XRC 9000 Network Manager) Enable the “Remote Monitor Init” privilege on the SU record corresponding to the initiating radio
Receiving a Remote Monitor SU Programming (Connect Plus CPS) No special programming required
Controller programming (XRC 9000 Network Manager) Enable the “Remote Monitor Receive” privilege on the SU record corresponding to the destination radio
Initiating a Radio Check SU Programming (Connect Plus CPS) Enable the Radio Check Menu option
Controller programming (XRC 9000 Network Manager) Enable the “Radio Check Init” privilege on the SU record corresponding to the initiating radio
Receiving a Radio Check SU Programming (Connect Plus CPS) No special programming required
Controller programming (XRC 9000 Network Manager) No special programming required
Initiating a Call Alert SU Programming (Connect Plus CPS) Enable the Call Alert Menu option
Controller programming (XRC 9000 Network Manager) Enable the “Call Alert Init” privilege on the SU record corresponding to the initiating radio
Receiving a Call Alert
143 of 151
MOTOTRBO Connect Plus System Planner 1.0
SU Programming (Connect Plus CPS) No special programming required
Controller programming (XRC 9000 Network Manager) No special programming required
Disabling another SU SU Programming (Connect Plus CPS) Enable the Radio Disable Menu option
Controller programming (XRC 9000 Network Manager) Enable the “Radio Disable Init” privilege on the SU record corresponding to the initiating radio
Being Disabled by another SU SU Programming (Connect Plus CPS) No special programming required
Controller programming (XRC 9000 Network Manager) Enable the “Radio Disable Receive” privilege on the SU record corresponding to the destination radio. This only applies to a Disable Command sent by another SU. The controller can disable any SU.
Enabling another SU SU Programming (Connect Plus CPS) Enable the Radio Enable Menu option
Controller programming (XRC 9000 Network Manager) Enable the “Radio Enable Init” privilege on the SU record corresponding to the initiating radio
Being Enabled by another SU SU Programming (Connect Plus CPS) No special programming required
Controller programming (XRC 9000 Network Manager) Enable the “Radio Enable Receive” privilege on the SU record corresponding to the destination radio. This only applies to an Enable Command sent by another SU. The controller can enable any SU.
4.7.21 Fleet Mapping Considerations for Over-the-Air File Transfer An important Fleet Mapping decision is whether an SU should be enabled for Over-the-air File Transfer. This is controlled via Connect Plus CPS programming. To enable OTA File Transfer, check the box labeled “Enable OTA File Transfer”. This setting is configurable for each Connect Plus zone. By default, OTA File Transfer is NOT enabled. Prior to enabling OTA File Transfer, the System Administrator should be very familiar with how the feature operates. For more information, see the discussion on OTA File Transfer in the System Feature Overview Section.
144 of 151
MOTOTRBO Connect Plus System Planner 1.0
4.8 Configurable Timers: Connect Plus CPS The following table discusses configurable timers for the Connect Plus Option Board. These timers are configured with Connect Plus Customer Programming Software (Connect Plus CPS). Timer Name Long Press Duration
Description Sets the duration a button is required to be pressed (and held down), for it to be interpreted as a long press.
Notes Set on the “Buttons Screen” and applies to all Connect Plus zones
Menu Hang Time
Sets the amount of time that the radio remains in the menu mode, after which the radio reverts back to the Home screen. If the duration is set to 0, the radio remains infinitely in this mode.
Set on the “Menu Screen” and applies to all Connect Plus zones
PTT Time Out Time
The Time-Out Timer (TOT) is the duration that the radio can continuously transmit before the transmission is automatically terminated by the radio. PTT must be released (and pressed again) before the radio will make another attempt to transmit.
Configurable per Connect Plus zone
Remote Monitor Duration Time
Sets the duration that this radio will automatically transmit with microphone open when it is being remote monitored. The radio user will not be aware that he/she is being monitored. To prevent this radio from being remote monitored, uncheck the “Remote Monitor Receive” checkbox on the User Record in the Connect Plus controller.
Configurable per Connect Plus zone
Unconfirmed File Xfer Dwell Time
During Unconfirmed Over-the-Air File Transfer this value determines how long the radio will remain on the trunk-to timeslot without decoding any valid file packets. If the timer expires and no valid packet is decoded, the radio returns to the Control Channel frequency and starts its “File Transfer Attempt Interval Time”.
Configurable per Connect Plus zone
File Transfer Attempt Interval Time
When the radio has been involved in Over-the-Air File Transfer, and it leaves the trunk-to timeslot with an incomplete file (for any reason), the radio starts the File Transfer Attempt Interval Time. The timer must expire before the radio will attempt to resume the file transfer. If the radio is powered down before the timer expires, the timer is set to its full value upon the next power up.
Configurable per Connect Plus zone
145 of 151
MOTOTRBO Connect Plus System Planner 1.0 CSBK Roam Delay Time
Determines how long the radio will continue to listen to the current Control Channel when it doesn’t decode any valid Control Channel messages. If the timer expires, and the radio hasn’t decoded a valid message, the radio starts to search.
Configurable per Connect Plus zone
Roam Dwell Time
When searching for a site, this is the amount of time the radio remains on each search frequency waiting to detect digital signaling. If digital signaling is detected, the radio waits an additional time to identify the site (via control channel messaging) and measure RSSI. If this time expires and the radio has not detected digital signaling, it then proceeds to search the next frequency on the list.
Configurable per Connect Plus zone
Reacquire Time
When the radio loses acceptable signal from its current site and begins searching, a countdown timer is set to this value. If during the search process the radio again finds the site it just lost and this timer has not expired and the radio has not attempted to register at another site, the radio returns to the registered state without transmitting a registration request to the site. This feature can help reduce registration traffic on the control channel and extend portable battery life.
Configurable per Connect Plus zone
BSI Wait Time
If the radio decodes a control channel message indicating that the control channel repeater is getting ready to start Base Station Identification, the Option Board will wait this amount of time prior to looking for another site (however, the radio will still display “Searching” during BSI transmission). If BSI concludes prior to the expiration of this timer, the Option Board remains with the same site and control channel. Because the repeater reverts to analog mode during BSI, it is important to note that BSI on the control channel repeater will cause significant operational problems to radios using the site and should be avoided if at all possible. During BSI, calls and registration cannot be initiated, and the control channel sends no messages for calls inprogress. If the control channel repeater must do BSI, this value should
Configurable per Connect Plus zone
146 of 151
MOTOTRBO Connect Plus System Planner 1.0 be set to the length of time required to send the Morse Code identification, plus an extra 5 seconds to allow adequate time for the digital-to-analog and analog-to-digital transitions. RSSI Roam Delay Time
The radio starts this timer when the received signal strength from the control channel drops to RSSI minimum or lower. If the signal strength rises above RSSI Minimum before the timer expires, the radio stops the timer. If the timer expires and the received signal strength is still at this value or lower, the radio starts to search.
Configurable per Connect Plus zone
4.9 Configurable Timers: XRC 9000 Network Manager The following table discusses configurable timers for the XRC 9000 Controller. These times are configured with the XRC 9000 Network Manager Software. Timer Name Multisite Ping Interval
Description Defines the ping interval the controller uses to verify the communications link with other network sites. Each site pings only the highernumbered sites at this interval.
Notes Site Configuration Screen
Call Inactivity Time
Defines how long the controller waits to release a trunk-to timeslot for other call assignments if it detects no IP activity on the timeslot and receives no repeater message indicating end of call. This must be set at least 1 second longer than the longest hang time value (i.e. Group Hang Time, Private Call Time) in any peer repeater. This value should be set the same for all controllers in the network.
Site Configuration Screen
Arbitration Time
Upon receiving IP voice packets, the controller waits the arbitration time prior to forwarding the voice packets to the repeater for transmission. In the event of near-simultaneous key-ups at different sites during the same call, arbitration increases the chances that the same audio will be heard at all sites involved in the call. This timer is only available when the XRC 9000 controller is enabled for multisite operation.
Site Configuration Screen
CSBK Call Retry Interval
Determines the interval that must expire before the controller initiates a CSBK Call Retry
Site Configuration Screen
SU Inactivity Time
This timer is set per controller, but it is tracked separately for each registered SU. The Timer is
Site Configuration Screen
147 of 151
MOTOTRBO Connect Plus System Planner 1.0 reset whenever the controller detects a transmission from the SU. This includes registrations, Call Requests, Voice Transmissions, etc. If the timer expires, and the controller shows that the SU is still registered to the site, the Controller will send the SU a “Controller Initiated Radio Check”. If the SU answers the Radio Check, the controller resets the SU Inactivity Time and leaves the unit registered to the site. If the SU does not respond to the Radio Check, the controller will re-send the Radio Check as determined by the “CSBK Call Retry” Parameter. If the SU fails to respond to any of the Radio Checks, the Controller will de-register the SU from the site. This helps conserve resources by detecting which SU’s are no longer available or in range to receive calls. BSI Interval
This timer controls determines how often the repeater will send its Base Station Identification (BSI), which is also called CWID. The ID itself (what the repeater actually sends in Morse Code) is set in the repeater, not in the Controller. It is important to note that BSI (CWID) on the control channel repeater will cause significant operational problems to radios using the site and should be avoided if at all possible.
Time to Beacon
Determines how long the controller will “beacon” a special control channel message to inform SU’s of file availability. This time must be equal to or greater than the “Time to Dedicate”. Anytime that “Time to Dedicate” has expired, but “Time to Beacon” has not, the file is still available – but by request only. A setting of 65,535 minutes tells the controller that the Beacon message should never expire.
Time to Dedicate
Determines how long the repeater and timeslot configured above will be used for the dedicated channel file transfer. During this time, the timeslot cannot be used for other calls. SU’s may join or leave the dedicated channel transfer at various times (the radio user can cancel out of the transfer). A setting of 65,535 minutes tells the controller that the dedicated channel transfer should never expire. Important: “Time to Beacon” must be equal to or greater than the “Time to Dedicate”.
148 of 151
This is settable per repeater. If a repeater should not send CWID, it should not be entered on the repeater list. If it is on the list for some reason, the BSI interval should be set to zero. OTA File Upload Screen
OTA File Upload Screen
MOTOTRBO Connect Plus System Planner 1.0
4.10 Backup Power Source Emergency backup power systems usually consist of two components: an Uninterrupted Power Supply (UPS) and a generator. This section only describes the UPS; the selection of the generator is beyond the scope of this document. A UPS can serve a number of purposes such as filtering out power events, conditioning and providing power if primary power source fails. On the average, the time a UPS is expected to do this is under five minutes which gives enough time to shut down equipment and for the backup power generator to take over the load. Depending on your configuration and needs, the following areas require different emphasis: • Surge Suppression • Power Conditioning • Battery Backup It is required that the XRC 9000 and its supporting network equipment (i.e. router, switches, and repeaters) are backed up by UPS. The XRC 9000 is a 50 W unit. It is recommended to check the power requirements of other devices (such as repeaters and network equipment) when calculating the required capacity of a UPS system. To determine the UPS capacity: 1. List all equipment to be protected by the UPS. 2. Write down the voltage and amperage for each device. 3. Multiply the voltage by the amperage of each device to calculate the Volt/Amps (VA). NOTE: Some equipment may be marked with a power consumption measured in Watts. To convert Watts to VA, simply divide Watts by 0.65 (for a power factor of 0.65), or multiply by 1.54. The power factor refers to the relationship between the apparent power (volt-amps) required by the device and the actual power (watts) produced by the device. 4. Total the VA for all devices you want to protect with the UPS and enter it in the Subtotal field. 5. Multiply the subtotal found in Step 4 by 0.25 and enter it as the Growth Factor field. This number takes into account room for future growth. This growth factor allows for a 5% rate of growth for each year over a five-year period. 6. Add the Growth Factor value to the Subtotal value to get the Required VA. Now you can select the appropriate UPS model by choosing a model that has a VA rating at least as large as the Required VA that you calculated. Standard UPS units for the XRC 9000 Controller and networking equipment are included in the Price Books.
4.11 Grounding and Surge Suppression Proper site grounding and surge suppression are important considerations for safe and reliable operation of the Connect Plus trunking system. Refer to the Motorola Quality Standards Fixed Network Equipment Installation Manual R56 [5] for more details.
149 of 151
MOTOTRBO Connect Plus System Planner 1.0
Appendix A ACK ADK ADSL ARS BSI CAI CPS CSBK CWID DMR DSL ESN ETSI FCC FDMA GPS HTTP IP ISDN ISP LAN LRRP MCDD NAK OTA PDU PTT QoS RDAC RSSI SIT SMTP SU TOT TCP TDMA TMS UDP UPS USB VPN VOX WAN XML
Acronyms
Acknowledgment Application Development Kit Asymmetric Digital Subscriber Line Automatic Registration Service Base Station Identification Common Air Interface Customer Programming Software Control Signaling Block Continuous Wave Identification (same as BSI) Digital Mobile Radio (ETSI standard) Digital Subscriber Line Electronic Serial Number European Telecommunications and Standard Institute Federal Communications Commission Frequency Division Multiple Access Global Positioning System Hyper Text Transport Protocol Internet Protocol Integrated Services Digital Network Internet Service Provider Local Area Network Location Request Response Protocol Multi-Channel Device Driver Negative ACK (acknowledgment) Over the Air Protocol Data Unit Push To Talk Quality of Service Radio Diagnostic and Control Received Signal Strength Indication Subscriber Inactivity Timer Simple Mail Transport Protocol Subscriber Unit Time Out Timer Transmission Control Protocol Time Division Multiple Access Text Messaging Service User Datagram Protocol Uninterrupted Power Supply Universal Serial Bus Virtual Private Network Voice Operated Transmission Wide Area Network Extensible Mark-up Language
150 of 151
MOTOTRBO Connect Plus System Planner 1.0
Appendix B
Sample (Suggested) Network Topology
Figure B 1 shows a multisite configuration with 6 Connect Plus sites with 3 repeaters per site, providing 5 trunked channels. The network topology is private LAN/WAN, which does not require any special port forwarding or network address translation. Each XRC 9000 controller can directly communicate with the other site controllers via their configured IP addresses. The IP addresses are chosen from the private IPv4 address space and can be used with any Connect Plus installation, because IP packets originating from the Connect Plus devices are not routed to the public Internet, and conversely, no device in the public Internet domain can directly send IP packets targeting a device with a private IP address. The setup in Figure B 1 also shows managed network switches with at least 4 ports available for the Connect Plus equipment. Note that although the switches have assigned IP addresses this is not required and the only purpose for such setting is to allow remote IP access to the switch for configuration purposes. The reader should not confuse a switch with a router, which usually is the default IP gateway for the devices that reside on router’s designated subnet.
XRC 9000 10.10.5.200
Site 5
Switch 10.10.5.240*
Repeater 1 10.10.5.1
Site 1
Repeater 2 10.10.5.2
XRC 9000 10.10.1.200
Repeater 2 10.10.1.2
XRC 9000 10.10.4.200
Site 4
Switch 10.10.1.240*
Repeater 1 10.10.1.1
Repeater 3 10.10.5.3
Switch 10.10.4.240*
Repeater 3 10.10.1.3
Repeater 1 10.10.4.1
Repeater 2 10.10.4.2
Repeater 3 10.10.4.3
Private LAN/WAN Site 3 Site 2
XRC 9000 10.10.2.200
Site 6
Switch 10.10.3.240*
Switch 10.10.2.240*
Repeater 1 10.10.2.1
Repeater 2 10.10.2.2
XRC 9000 10.10.6.200
Repeater 3 10.10.2.3
Repeater 1 10.10.3.1
Switch 10.10.6.240* Repeater 1 10.10.6.1
Repeater 2 10.10.6.2
Repeater 3 10.10.6.3
Figure B 1 Sample Network Topology with Private IP Plan
151 of 151
XRC 9000 10.10.3.200
Repeater 2 10.10.3.2
Repeater 3 10.10.3.3