Integration and automation of manufacturing systems
511 50 3MB
English Pages 593 Year 2001
Recommend Papers
![Automation Production Systems and ComputerIntegrated Manufacturing [5 ed.]
9780134605463](https://ebin.pub/img/200x200/automation-production-systems-and-computerintegrated-manufacturing-5nbsped-9780134605463.jpg)
![Automation, production systems, and computer-integrated manufacturing [Fourth edition, fourth impression]
9789332572492, 9789332586062, 9332572496](https://ebin.pub/img/200x200/automation-production-systems-and-computer-integrated-manufacturing-fourth-edition-fourth-impression-9789332572492-9789332586062-9332572496.jpg)
![Automation, production systems, and computer-integrated manufacturing [Fifth edition]
9780133499612, 1292076119, 9781292076119, 0133499618, 9780134605463, 0134605462](https://ebin.pub/img/200x200/automation-production-systems-and-computer-integrated-manufacturing-fifth-edition-9780133499612-1292076119-9781292076119-0133499618-9780134605463-0134605462.jpg)
![Integration of AI-Based Manufacturing and Industrial Engineering Systems with the Internet of Things (Intelligent Manufacturing and Industrial Engineering) [1 ed.]
1032466014, 9781032466019](https://ebin.pub/img/200x200/integration-of-ai-based-manufacturing-and-industrial-engineering-systems-with-the-internet-of-things-intelligent-manufacturing-and-industrial-engineering-1nbsped-1032466014-9781032466019.jpg)

![Flexible Automation and Intelligent Manufacturing: Establishing Bridges for More Sustainable Manufacturing Systems: Proceedings of FAIM 2023, June ... (Lecture Notes in Mechanical Engineering) [1st ed. 2024]
3031382404, 9783031382406](https://ebin.pub/img/200x200/flexible-automation-and-intelligent-manufacturing-establishing-bridges-for-more-sustainable-manufacturing-systems-proceedings-of-faim-2023-june-lecture-notes-in-mechanical-engineering-1st-ed-2024-3031382404-9783031382406.jpg)
![Technical, Economic and Societal Effects of Manufacturing 4.0: Automation, Adaption and Manufacturing in Finland and Beyond [1st ed.]
9783030461027, 9783030461034](https://ebin.pub/img/200x200/technical-economic-and-societal-effects-of-manufacturing-40-automation-adaption-and-manufacturing-in-finland-and-beyond-1st-ed-9783030461027-9783030461034.jpg)


File loading please wait...
Citation preview
page 1
Integration and Automation of Manufacturing Systems by: Hugh Jack
© Copyright 1993-2001, Hugh Jack
page 2
PREFACE 1.
INTEGRATED AND AUTOMATED MANUFACTURING . . . .13 1.1
1.2
1.3
2.
13 13 14 16 17 17 19 22
AN INTRODUCTION TO LINUX/UNIX . . . . . . . . . . . . . . . . . . .23 2.1
2.2
2.3 2.4
2.5 2.6 2.7 2.8
3.
INTRODUCTION 1.1.1 Why Integrate? 1.1.2 Why Automate? THE BIG PICTURE 1.2.1 CAD/CAM? 1.2.2 The Architecture of Integration 1.2.3 General Concepts PRACTICE PROBLEMS
OVERVIEW 2.1.1 What is it? 2.1.2 A (Brief) History 2.1.3 Hardware required and supported 2.1.4 Applications and uses 2.1.5 Advantages and Disadvantages 2.1.6 Getting It 2.1.7 Distributions 2.1.8 Installing USING LINUX 2.2.1 Some Terminology 2.2.2 File and directories 2.2.3 User accounts and root 2.2.4 Processes NETWORKING 2.3.1 Security INTERMEDIATE CONCEPTS 2.4.1 Shells 2.4.2 X-Windows 2.4.3 Configuring 2.4.4 Desktop Tools LABORATORY - A LINUX SERVER TUTORIAL - INSTALLING LINUX TUTORIAL - USING LINUX REFERENCES
23 23 24 25 25 26 26 27 27 28 28 29 31 33 34 35 35 35 36 36 37 37 38 40 41
AN INTRODUCTION TO C/C++ PROGRAMMING . . . . . . . . .43 3.1 3.2 3.3 3.4
INTRODUCTION PROGRAM PARTS CLASSES AND OVERLOADING HOW A ‘C’ COMPILER WORKS
43 44 50 52
page 3
3.5 3.6 3.7
3.8 3.9
3.10 3.11
4.
STRUCTURED ‘C’ CODE COMPILING C PROGRAMS IN LINUX 3.6.1 Makefiles ARCHITECTURE OF ‘C’ PROGRAMS (TOP-DOWN) 3.7.1 How? 3.7.2 Why? CREATING TOP DOWN PROGRAMS CASE STUDY - THE BEAMCAD PROGRAM 3.9.1 Objectives: 3.9.2 Problem Definition: 3.9.3 User Interface: Screen Layout (also see figure): Input: Output: Help: Error Checking: Miscellaneous: 3.9.4 Flow Program: 3.9.5 Expand Program: 3.9.6 Testing and Debugging: 3.9.7 Documentation Users Manual: Programmers Manual: 3.9.8 Listing of BeamCAD Program. PRACTICE PROBLEMS LABORATORY - C PROGRAMMING
53 54 55 56 56 57 58 59 59 59 59 59 60 60 60 61 61 62 62 64 65 65 65 65 66 66
NETWORK COMMUNICATION . . . . . . . . . . . . . . . . . . . . . . . . .68 4.1 4.2
4.3
4.4
INTRODUCTION NETWORKS 4.2.1 Topology 4.2.2 OSI Network Model 4.2.3 Networking Hardware 4.2.4 Control Network Issues 4.2.5 Ethernet 4.2.6 SLIP and PPP INTERNET 4.3.1 Computer Addresses 4.3.2 Computer Ports Mail Transfer Protocols FTP - File Transfer Protocol HTTP - Hypertext Transfer Protocol 4.3.3 Security Firewalls and IP Masquerading FORMATS
68 69 69 71 73 75 76 77 78 79 80 81 81 81 82 84 85
page 4
4.5 4.6 4.7 4.8 4.9
5.
85 87 88 88 89 89 89 89 91 102 103 103 104 105 107
DATABASES . . . . . . . . . . . . . . . . . . . . . . . . . . . . . . . . . . . . . . . .108 5.1 5.2 5.3 5.4
6.
4.4.1 HTML 4.4.2 URLs 4.4.3 Encryption 4.4.4 Clients and Servers 4.4.5 Java 4.4.6 Javascript 4.4.7 CGI NETWORKING IN LINUX 4.5.1 Network Programming in Linux DESIGN CASES SUMMARY PRACTICE PROBLEMS LABORATORY - NETWORKING 4.9.1 Prelab 4.9.2 Laboratory
SQL AND RELATIONAL DATABASES DATABASE ISSUES LABORATORY - SQL FOR DATABASE INTEGRATION LABORATORY - USING C FOR DATABASE CALLS
109 114 114 116
COMMUNICATIONS . . . . . . . . . . . . . . . . . . . . . . . . . . . . . . . . .119 6.1 6.2 6.3 6.4
SERIAL COMMUNICATIONS 119 6.1.1 RS-232 122 SERIAL COMMUNICATIONS UNDER LINUX 125 PARALLEL COMMUNICATIONS 129 LABORATORY - SERIAL INTERFACING AND PROGRAMMING
130 6.5
7.
LABORATORY - STEPPER MOTOR CONTROLLER
130
PROGRAMMABLE LOGIC CONTROLLERS (PLCs) . . . . . . .134 7.1 7.2
7.3
7.4
7.5
BASIC LADDER LOGIC WHAT DOES LADDER LOGIC DO? 7.2.1 Connecting A PLC To A Process 7.2.2 PLC Operation LADDER LOGIC 7.3.1 Relay Terminology 7.3.2 Ladder Logic Inputs 7.3.3 Ladder Logic Outputs LADDER DIAGRAMS 7.4.1 Ladder Logic Design 7.4.2 A More Complicated Example of Design TIMERS/COUNTERS/LATCHES
136 138 139 139 141 144 146 147 147 148 150 151
page 5
7.6 7.7 7.8 7.9 7.10
7.11
7.12
7.13
7.14 7.15 7.16 7.17
7.18
7.19 7.20 7.21
LATCHES TIMERS COUNTERS DESIGN AND SAFETY 7.9.1 FLOW CHARTS SAFETY 7.10.1 Grounding 7.10.2 Programming/Wiring 7.10.3 PLC Safety Rules 7.10.4 Troubleshooting DESIGN CASES 7.11.1 DEADMAN SWITCH 7.11.2 CONVEYOR 7.11.3 ACCEPT/REJECT SORTING 7.11.4 SHEAR PRESS ADDRESSING 7.12.1 Data Files Inputs and Outputs User Numerical Memory Timer Counter Memory PLC Status Bits (for PLC-5s) User Function Memory INSTRUCTION TYPES 7.13.1 Program Control Structures 7.13.2 Branching and Looping Immediate I/O Instructions Fault Detection and Interrupts 7.13.3 Basic Data Handling Move Functions MATH FUNCTIONS LOGICAL FUNCTIONS 7.15.1 Comparison of Values BINARY FUNCTIONS ADVANCED DATA HANDLING 7.17.1 Multiple Data Value Functions 7.17.2 Block Transfer Functions COMPLEX FUNCTIONS 7.18.1 Shift Registers 7.18.2 Stacks 7.18.3 Sequencers ASCII FUNCTIONS DESIGN TECHNIQUES 7.20.1 State Diagrams DESIGN CASES 7.21.1 If-Then
152 153 157 159 160 160 161 162 162 163 164 164 165 165 166 168 169 172 172 172 173 174 174 175 175 179 181 182 182 184 191 191 193 194 195 196 198 198 199 200 202 203 203 206 207
page 6
7.22 7.23
7.24
7.25 7.26 7.27
8.
207 208 209 209 210 211 212 213 216 216 219 221 223 224 227 237 238
PLCS AND NETWORKING . . . . . . . . . . . . . . . . . . . . . . . . . . . .240 8.1
8.2 8.3 8.4 8.5
9.
7.21.2 For-Next 7.21.3 Conveyor IMPLEMENTATION PLC WIRING 7.23.1 SWITCHED INPUTS AND OUTPUTS Input Modules Actuators Output Modules THE PLC ENVIRONMENT 7.24.1 Electrical Wiring Diagrams 7.24.2 Wiring 7.24.3 Shielding and Grounding 7.24.4 PLC Environment 7.24.5 SPECIAL I/O MODULES PRACTICE PROBLEMS REFERENCES LABORATORY - SERIAL INTERFACING TO A PLC
OPEN NETWORK TYPES 8.1.1 Devicenet 8.1.2 CANbus 8.1.3 Controlnet 8.1.4 Profibus PROPRIETARY NETWORKS Data Highway PRACTICE PROBLEMS LABORATORY - DEVICENET TUTORIAL - SOFTPLC AND DEVICENET
240 240 245 246 247 248 248 252 258 258
INDUSTRIAL ROBOTICS . . . . . . . . . . . . . . . . . . . . . . . . . . . . .262 9.1
9.2
9.3 9.4
INTRODUCTION 9.1.1 Basic Terms 9.1.2 Positioning Concepts Accuracy and Repeatability Control Resolution Payload ROBOT TYPES 9.2.1 Basic Robotic Systems 9.2.2 Types of Robots Robotic Arms Autonomous/Mobile Robots Automatic Guided Vehicles (AGVs) MECHANISMS ACTUATORS
262 262 266 266 270 271 276 276 277 277 280 280 281 282
page 7
9.5
9.6 9.7 9.8
10.
283 284 286 286 290 291 296 296
OTHER INDUSTRIAL ROBOTS . . . . . . . . . . . . . . . . . . . . . . . .299 10.1
10.2 10.3 10.4 10.5 10.6 10.7 10.8 10.9
11.
A COMMERCIAL ROBOT 9.5.1 Mitsubishi RV-M1 Manipulator 9.5.2 Movemaster Programs Language Examples 9.5.3 Command Summary PRACTICE PROBLEMS LABORATORY - MITSUBISHI RV-M1 ROBOT TUTORIAL - MITSUBISHI RV-M1
SEIKO RT 3000 MANIPULATOR 10.1.1 DARL Programs Language Examples Commands Summary IBM 7535 MANIPULATOR 10.2.1 AML Programs ASEA IRB-1000 UNIMATION PUMA (360, 550, 560 SERIES) PRACTICE PROBLEMS LABORATORY - SEIKO RT-3000 ROBOT TUTORIAL - SEIKO RT-3000 ROBOT LABORATORY - ASEA IRB-1000 ROBOT TUTORIAL - ASEA IRB-1000 ROBOT
299 300 301 305 308 312 317 319 320 330 331 332 332
ROBOT APPLICATIONS . . . . . . . . . . . . . . . . . . . . . . . . . . . . . .333
11.1
11.2 11.3 11.4 11.5 11.6
11.0.1 Overview 11.0.2 Spray Painting and Finishing 11.0.3 Welding 11.0.4 Assembly 11.0.5 Belt Based Material Transfer END OF ARM TOOLING (EOAT) 11.1.1 EOAT Design 11.1.2 Gripper Mechanisms Vacuum grippers 11.1.3 Magnetic Grippers Adhesive Grippers 11.1.4 Expanding Grippers 11.1.5 Other Types Of Grippers ADVANCED TOPICS 11.2.1 Simulation/Off-line Programming INTERFACING PRACTICE PROBLEMS LABORATORY - ROBOT INTERFACING LABORATORY - ROBOT WORKCELL INTEGRATION
333 335 335 336 336 337 337 340 342 344 345 345 346 347 347 348 348 350 351
page 8
12.
SPATIAL KINEMATICS . . . . . . . . . . . . . . . . . . . . . . . . . . . . . . .352 12.1 12.2
12.3
12.4
12.5 12.6
13.
352 353 354 359 361 363 364 366 366 369 370 370 371 372 372 375 375 376
MOTION CONTROL . . . . . . . . . . . . . . . . . . . . . . . . . . . . . . . . . .390 13.1
13.2
13.3 13.4
14.
BASICS 12.1.1 Degrees of Freedom HOMOGENEOUS MATRICES 12.2.1 Denavit-Hartenberg Transformation (D-H) 12.2.2 Orientation 12.2.3 Inverse Kinematics 12.2.4 The Jacobian SPATIAL DYNAMICS 12.3.1 Moments of Inertia About Arbitrary Axes 12.3.2 Euler’s Equations of Motion 12.3.3 Impulses and Momentum Linear Momentum Angular Momentum DYNAMICS FOR KINEMATICS CHAINS 12.4.1 Euler-Lagrange 12.4.2 Newton-Euler REFERENCES PRACTICE PROBLEMS
KINEMATICS 390 13.1.1 Basic Terms 390 13.1.2 Kinematics 391 Geometry Methods for Forward Kinematics 392 Geometry Methods for Inverse Kinematics 393 13.1.3 Modeling the Robot 394 PATH PLANNING 395 13.2.1 Slew Motion 395 Joint Interpolated Motion 397 Straight-line motion 397 13.2.2 Computer Control of Robot Paths (Incremental Interpolation)400 PRACTICE PROBLEMS 403 LABORATORY - AXIS AND MOTION CONTROL 408
CNC MACHINES . . . . . . . . . . . . . . . . . . . . . . . . . . . . . . . . . . . . .409 14.1 14.2
14.3
MACHINE AXES NUMERICAL CONTROL (NC) 14.2.1 NC Tapes 14.2.2 Computer Numerical Control (CNC) 14.2.3 Direct/Distributed Numerical Control (DNC) EXAMPLES OF EQUIPMENT 14.3.1 EMCO PC Turn 50 14.3.2 Light Machines Corp. proLIGHT Mill
409 409 410 411 412 414 414 415
page 9
DeBoer)
14.4 14.5 14.6 418
PRACTICE PROBLEMS 417 TUTORIAL - EMCO MAIER PCTURN 50 LATHE (OLD) 417 TUTORIAL - PC TURN 50 LATHE DOCUMENTATION: (By Jonathan 14.6.1
15.
G-CODES APT PROPRIETARY NC CODES GRAPHICAL PART PROGRAMMING NC CUTTER PATHS NC CONTROLLERS PRACTICE PROBLEMS LABORATORY - CNC INTEGRATION
428 436 440 441 442 444 445 446
DATA AQUISITION . . . . . . . . . . . . . . . . . . . . . . . . . . . . . . . . . .448 16.1 16.2 16.3 16.4 16.5 16.6 16.7 16.8 16.9 16.10
17.
424
CNC PROGRAMMING . . . . . . . . . . . . . . . . . . . . . . . . . . . . . . . .426 15.1 15.2 15.3 15.4 15.5 15.6 15.7 15.8
16.
LABORATORY - CNC MACHINING
INTRODUCTION ANALOG INPUTS ANALOG OUTPUTS REAL-TIME PROCESSING DISCRETE IO COUNTERS AND TIMERS ACCESSING DAQ CARDS FROM LINUX SUMMARY PRACTICE PROBLEMS LABORATORY - INTERFACING TO A DAQ CARD
448 449 455 458 459 459 459 476 476 478
VISIONS SYSTEMS . . . . . . . . . . . . . . . . . . . . . . . . . . . . . . . . . .479 17.1 17.2 17.3 17.4 17.5 17.6 17.7 17.8 17.9 17.10
OVERVIEW APPLICATIONS LIGHTING AND SCENE CAMERAS FRAME GRABBER IMAGE PREPROCESSING FILTERING 17.7.1 Thresholding EDGE DETECTION SEGMENTATION 17.9.1 Segment Mass Properties RECOGNITION 17.10.1 Form Fitting 17.10.2 Decision Trees
479 480 481 482 486 486 487 487 487 488 490 491 491 492
page 10
17.11 17.12 17.13
18.
19.5
19.6 19.7
502 502 514 516 516
INTRODUCTION VIBRATORY FEEDERS PRACTICE QUESTIONS LABORATORY - MATERIAL HANDLING SYSTEM 19.4.1 System Assembly and Simple Controls AN EXAMPLE OF AN FMS CELL 19.5.1 Overview 19.5.2 Workcell Specifications 19.5.3 Operation of The Cell THE NEED FOR CONCURRENT PROCESSING PRACTICE PROBLEMS
518 520 521 521 521 523 523 525 526 534 536
PETRI NETS . . . . . . . . . . . . . . . . . . . . . . . . . . . . . . . . . . . . . . . . .537 20.1 20.2 20.3 20.4
20.5 20.6 20.7 20.8
21.
CORPORATE STRUCTURES CORPORATE COMMUNICATIONS COMPUTER CONTROLLED BATCH PROCESSES PRACTICE PROBLEMS LABORATORY - WORKCELL INTEGRATION
MATERIAL HANDLING . . . . . . . . . . . . . . . . . . . . . . . . . . . . . .518 19.1 19.2 19.3 19.4
20.
494 499 500
INTEGRATION ISSUES . . . . . . . . . . . . . . . . . . . . . . . . . . . . . . .502 18.1 18.2 18.3 18.4 18.5
19.
PRACTICE PROBLEMS TUTORIAL - LABVIEW BASED IMAQ VISION LABORATORY - VISION SYSTEMS FOR INSPECTION
INTRODUCTION A BRIEF OUTLINE OF PETRI NET THEORY MORE REVIEW USING THE SUBROUTINES 20.4.1 Basic Petri Net Simulation 20.4.2 Transitions With Inhibiting Inputs 20.4.3 An Exclusive OR Transition: 20.4.4 Colored Tokens 20.4.5 RELATIONAL NETS C++ SOFTWARE IMPLEMENTATION FOR A PLC PRACTICE PROBLEMS REFERENCES
537 537 540 548 548 550 552 555 557 558 559 564 565
PRODUCTION PLANNING AND CONTROL . . . . . . . . . . . . .566 21.1 21.2
OVERVIEW SCHEDULING 21.2.1 Material Requirements Planning (MRP) 21.2.2 Capacity Planning
566 567 567 569
page 11
21.3
22.
570 570 571
SIMULATION . . . . . . . . . . . . . . . . . . . . . . . . . . . . . . . . . . . . . . .572 22.1 22.2 22.3 22.4 22.5
23.
SHOP FLOOR CONTROL 21.3.1 Shop Floor Scheduling - Priority Scheduling 21.3.2 Shop Floor Monitoring
MODEL BUILDING ANALYSIS DESIGN OF EXPERIMENTS RUNNING THE SIMULATION DECISION MAKING STRATEGY
573 575 576 579 579
PLANNING AND ANALYSIS . . . . . . . . . . . . . . . . . . . . . . . . . .581 23.1 23.2
FACTORS TO CONSIDER PROJECT COST ACCOUNTING
581 583
24.
REFERENCES . . . . . . . . . . . . . . . . . . . . . . . . . . . . . . . . . . . . . . .587
25.
APPENDIX A - PROJECTS . . . . . . . . . . . . . . . . . . . . . . . . . . . . .588 25.1 25.2
26.
TOPIC SELECTION 25.1.1 Previous Project Topics CURRENT PROJECT DESCRIPTIONS
588 588 590
APPENDIX B - COMMON REFERENCES . . . . . . . . . . . . . . . .591 26.1 26.2
JIC ELECTRICAL SYMBOLS NEMA ENCLOSURES
591 592
page 12
PREFACE I have been involved in teaching laboratory based integrated manufacturing courses since 1993. Over that time I have used many textbooks, but I have always been unsatisfied with their technical depth. To offset this I had to supply supplemental materials. These supplemental materials have evolved into this book.
This book is designed to focus on topics relevant to the modern manufacturer, while avoiding topics that are more research oriented. This allows the chapters to focus on the applicable theory for the integrated systems, and then discuss implementation.
Many of the chapters of this book use the Linux operating system. Some might argue that Microsoft products are more pervasive, and so should be emphasized, but I disagree with this. It is much easier to implement a complex system in Linux, and once implemented the system is more reliable, secure and easier to maintain. In addition the Microsoft operating system is designed with a model that focuses on entertainment and office use and is incompatible with the needs of manufacturing professionals. Most notably there is a constant pressure to upgrade every 2-3 years adding a burden.
The reader is expected to have some knowledge of C, or C++ programming, although a review chapter is provided. When possible a programming example is supplied to allow the reader to develop their own programs for integration and automation.
page 13
1. INTEGRATED AND AUTOMATED MANUFACTURING Integrated manufacturing uses computers to connect physically separated processes. When integrated, the processes can share information and initiate actions. This allows decisions to be made faster and with fewer errors. Automation allows manufacturing processes to be run automatically, without requiring intervention.
This chapter will discuss how these systems fit into manufacturing, and what role they play.
1.1 INTRODUCTION An integrated system requires that there be two or more computers connected to pass information. A simple example is a robot controller and a programmable logic controller working together in a single machine. A complex example is an entire manufacturing plant with hundreds of workstations connected to a central database. The database is used to distribute work instructions, job routing data and to store quality control test results. In all cases the major issue is connecting devices for the purposes of transmitting data.
• Automated equipment and systems don’t require human effort or direction. Although this does not require a computer based solution
• Automated systems benefit from some level of integration
1.1.1 Why Integrate? There is a tendency to look at computer based solutions as inherently superior. This is an assumption that an engineer cannot afford to entertain. Some of the factors that justify an inte-
page 14
grated system are listed below. • a large organization where interdepartmental communication is a problem • the need to monitor processes • Things to Avoid when making a decision for integration and automation, - ignore impact on upstream and downstream operations - allow the system to become the driving force in strategy - believe the vendor will solve the problem - base decisions solely on financials - ignore employee input to the process - try to implement all at once (if possible) • Justification of integration and automation, - consider “BIG” picture - determine key problems that must be solved - highlight areas that will be impacted in enterprise - determine kind of flexibility needed - determine what kind of integration to use - look at FMS impacts - consider implementation cost based on above • Factors to consider in integration decision, - volume of product - previous experience of company with FMS - product mix - scheduling / production mixes - extent of information system usage in organization (eg. MRP) - use of CAD/CAM at the front end. - availability of process planning and process data * Process planning is only part of CIM, and cannot stand alone.
1.1.2 Why Automate? • Why ? - In many cases there are valid reasons for assisting humans - tedious work -- consistency required - dangerous - tasks are beyond normal human abilities (e.g., weight, time, size, etc) - economics
page 15
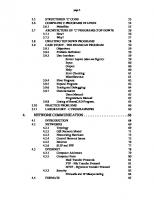
• When?
hard automation unit cost robotic assembly
manual assembly
manual
flexible fixed constant production volumes Figure 1.1 - Automation Tradeoffs
• Advantages of Automated Manufacturing, - improved work flow - reduced handling - simplification of production - reduced lead time - increased moral in workers (after a wise implementation) - more responsive to quality, and other problems - etc. • Various measures of flexibility, - Able to deal with slightly, or greatly mixed parts. - Variations allowed in parts mix - Routing flexibility to alternate machines - Volume flexibility - Design change flexibility
page 16
1.2 THE BIG PICTURE How Computers Can Be Used in an Automated Manufacturing System
CAD
CAPP
PPC
CAM
CAE
• Some Acronyms
CAD - Computer Aided/Automated Design - Design geometry, dimensions, etc. CAE - Analysis of the design done in the CAD system for stresses, flows, etc. (often described as part of CAD) CAM - Computer Aided/Automated Manufacturing - is the use of computers to select, setup, schedule, and drive manufacturing processes. CAPP - Computer Aided Process Planning - is used for converting a design to a set of processes for production, machine selection, tool selection, etc. PPC - Production Planning and Control - also known as scheduling. Up to this stage each process is dealt with separately. Here they are mixed with other products, as required by customer demand, and subject to limited availability of manufacturing resources. Factory Control - On a minute by minute basis this will split up schedules into their required parts, and deal with mixed processes on a factory wide basis. (This is very factory specific, and is often software written for particular facilities) An example system would track car color and options on an assembly line. Workcell Control - At this system level computers deal with coordination of a number of machines. The most common example is a PLC that runs material handling sys-
page 17
tems, as well as interlocks with NC machines. Machine Control - Low level process control that deals with turning motors on/off, regulating speeds, etc., to perform a single process. This is often done by the manufacturers of industrial machinery.
1.2.1 CAD/CAM? • A common part of an integrated system
• In CAD we design product geometries, do analysis (also called CAE), and produce final documentation.
• In CAM, parts are planned for manufacturing (eg. generating NC code), and then manufactured with the aid of computers.
• CAD/CAM tends to provide solutions to existing problems. For example, analysis of a part under stress is much easier to do with FEM, than by equations, or by building prototypes.
• CAD/CAM systems are easy to mix with humans.
• This technology is proven, and has been a success for many companies.
• There is no ‘ONE WAY’ of describing CAD/CAM. It is a collection of technologies which can be run independently, or connected. If connected they are commonly referred to as CIM
1.2.2 The Architecture of Integration • integrated manufacturing systems are built with generic components such as,
page 18
- Computing Hardware - Application Software - Database Software - Network Hardware - Automated Machinery • Typical applications found in an integrated environment include, - Customer Order Entry - Computer Aided Design (CAD) / Computer Aided Engineering (CAE) - Computer Aided Process Planning (CAPP) - Materials (e.g., MRP-II) - Production Planning and Control (Scheduling) - Shop Floor Control (e.g., FMS) • The automated machines used include, - NC machines - PLCs - Robotics - Material Handling / Transport - Machines - Manual / Automated Assembly Cells - Computers - Controllers - Software - Networks - Interfacing - Monitoring equipment • On the shop floor computers provide essential support in a workcell for, - CNC - Computer Numerical Control - DNC - Direct Numerical Control of all the machine tools in the FMS. Both CNC and DNC functions can be incorporated into a single FMS. - Computer control of the materials handling system - Monitoring - collection of production related data such as piece counts, tool changes, and machine utilization - Supervisory control - functions related to production control, traffic control, tool control, and so on.
page 19
1.2.3 General Concepts • Manufacturing requires computers for two functions, - Information Processing - This is characterized by programs that can operate in a batch mode. - Control - These programs must analyze sensory information, and control devices while observing time constraints. • An integrated system is made up of Interfaced and Networked Computers. The general structure is hierarchical,
Corporate
Mainframes
Plant Plant Floor Process Control
Micro-computers
• The plant computers tend to drive the orders in the factory.
• The plant floor computers focus on departmental control. In particular, - synchronization of processes. - downloading data, programs, etc., for process control. - analysis of results (e.g., inspection results). • Process control computers are local to machines to control the specifics of the individual processes. Some of their attributes are, - program storage and execution (e.g., NC Code), - sensor analysis, - actuator control, - process modeling, - observe time constraints (real time control). • The diagram shows how the characteristics of the computers must change as different functions are handled.
page 20
More Complex Computations
Faster Response Times
• To perform information processing and control functions, each computer requires connections, - Stand alone - No connections to other computers, often requires a user interface. - Interfaced - Uses a single connection between two computers. This is characterized by serial interfaces such as RS-232 and RS-422. - Networked - A single connection allows connections to more than one other computer. May also have shared files and databases. • Types of common interfaces, - RS-232 (and other RS standards) are usually run at speeds of 2400 to 9600 baud, but they are very dependable. • Types of Common Networks, - IEEE-488 connects a small number of computers (up to 32) at speeds from .5 Mbits/sec to 8 Mbits/sec. The devices must all be with a few meters of one another. - Ethernet - connects a large number of computers (up to 1024) at speeds of up to 10 Mbits/sec., covering distances of km. These networks are LAN’s, but bridges may be used to connect them to other LAN’s to make aWAN. • Types of Modern Computers, - Mainframes - Used for a high throughput of data (from disks and programs). These are ideal for large business applications with multiple users, running many programs at once. - Workstations (replacing Mini Computers) - have multiprocessing abilities of Mainframe, but are not suited to a limited number of users. - Micro-processors, small computers with simple operating systems (like PC’s with msdos) well suited to control. Most computerized machines use a micro-processor
Output from cell
Input to cell
Process Plans
Planning Algorithm
Planning
Control
Status Database
Error Detection & Recovery
Next action
Detail of Workstation Controller
Deadlock Detection & Avoidance
Expert Scheduling System
Simulation
Scheduling
Control Logic
From equipment
To equipment
page 21
architecture.
• A Graphical Depiction of a Workstation Controller
page 22
1.3 PRACTICE PROBLEMS 1. What is concurrent (parallel) processing and why is it important for workcell control? (ans. to allow equipment to do other tasks while one machine is processing)
2. What is meant by the term “Device Driver”? (ans. a piece of hardware that allows a connections to a specific piece of hardware)
3. CAD and CAM are, a) Integrated production technologies. b) The best approaches to manufacturing. c) Part of CIM. d) None of the above. (ans. c)
4. FMS systems are, a) faster than robots. b) a good replacement for manual labor. c) both a) and b) d) none of the above. (ans. d)
page 23
2. AN INTRODUCTION TO LINUX/UNIX 2.1 OVERVIEW Linux is a free UNIX clone that was developed by volunteers around the world. Although Linux is almost a decade old, it went largely unnoticed by the general public until a couple of years ago. Since then it has become very popular with individual users, universities and large corporations. For example, IBM has made it a major part of their business strategy for server hardware. Many software companies already offer Linux versions of their software, including products such as Oracle, Labview and MSC Nastran. Other companies have developed embedded applications using Linux. Currently Linux can be found in devices as small as a wristwatch [1] and as large as a Beowulf class supercomputer [2]. The popularity of Linux is based on three factors: - costs are lower because the software is free and it runs well on less expensive hardware. - it has more software, capabilities, and features than other operating systems. - the source code is open, so users can customize the operating system to meet their needs. This chapter will present the Linux operating system in general, and its current status in computing.
2.1.1 What is it? Linux is an open source operating system. It is open because users and developers can use the source code any way they want. This allows anyone to customize it, improve it and add desired features. As a result Linux is dynamic, evolving to respond to the desires and needs of the users. In contrast, closed operating systems are developed by a single corporation using static snapshots of market models and profit driven constraints.
Linux is free. This allows companies to use it without adding cost to products. It also allows people to trade it freely. And, with the profit motive gone, developers have a heightened sense of
page 24
community interest. The Linux community has developed a tremendous spirit because of these core development concepts.
2.1.2 A (Brief) History Linux has existed since the early 1990s [3], but it grew out of previous developments in computing [4]. It was originally developed to be a Unix clone that would run on low cost computer hardware. Unix was developed in the 1970s. Through the 1970s and early 1980s it was used on large computers in companies and universities. During this time many refinements and enhancements were made. By the mid 1980s Unix was being used on many lower priced computers. By the end of the 1980s most universities were making use of Unix computers in computer science and engineering programs. This created a wealth of graduates who understood what they could expect from a mature operating system. But, it also created a demand to be able to do high level work at home on low priced machines.
Early in the 1990s Linux started as a project to create a Unix clone that would run on a personal computer. This project gained momentum quickly and by the mid 1990s it was ready for users. The first groups to adopt it were hobbyists, academics and internet services. At this time the general public was generally unaware of Linux but by the end of the 1990s it was beginning to enter the public sphere. By 2000 it had entered the popular press, and it was cited as a major threat to at least one existing operating system vendor. Now, it is available off-the-shelf in software and book stores.
1970s- Unix developed at AT&T labs by Ken Thompson and Dennis Ritchie 1980s- Unix became popular on high end computers - The Unix platform is refined and matures - Some versions of Unix were available for PCs - most notably QNX 1990s- Linus Torvalds begins working on a free Unix clone for PCs in 1991 - Others join the project it gets the name ‘Linux’ - By 1993 Linux begins to enter the mainstream of computer users - Linux machines constitute a large number of servers on the Internet - Many large companies begin to support Linux - e.g. Dell, IBM
page 25
2000s- Home and office users are supported with free office software - Linux is available in consumer products, such as Tivo recorders
2.1.3 Hardware required and supported Modern computers have ample power for most computer applications. This is more true for Linux. At present there are versions of linux that will run on any platform from an IBM mainframe computer to a Palm Pilot. The smallest Linux installations can fit on a single floppy disk, and run on a diskless computer with a few MB of memory. On the other end of the spectrum, Linux will run on most high end computer systems. An average user would expect reasonable performance on a computer with an old Pentium 100 processor, 64MB of memory, and 2 GB of disk space. On newer computers the performance of the operating system is extremely fast. The list below gives some idea of the capabilities, but complete lists of supported hardware are available [5].
CPU- Intel family and clones, down to ‘386 processors - Macintosh (Motorola) - Others: Alpha, MIPS, Sparc, etc. Memory- 16MB is a good minimum, 64MB is recommended Disk- 200MB is a minimum, 2GB is recommended Screen- Any size Network- Any type Others- Most PC hardware is supported - or will be soon
2.1.4 Applications and uses By itself an operating system is somewhat useless, software applications are added to give desired functionality. Some of the common applications that a computer might be used for are listed below. Linux will support all of these applications, and more, with the right software [6].
Office - word processing, spreadsheets, etc.
page 26
Web and Internet Servers - host web sites Server - databases and other institutional functions Embedded - inside devices such as Tivo TV recorders PDAs - an operating system for small handheld computers Development - software authoring
2.1.5 Advantages and Disadvantages A partial list of advantages and disadvantages is given below. The cost, stability and open nature of the system have been winning over a large number of corporate adopters. But, adoption has been slowed by people who don’t understand the nature of free software or have a perception that it is difficult to use. In some cases there are also some software packages that are not available for Linux, and won’t run under simulators [22] - the most notable of these applications are first person shooting games.
Advantages: Free - paying for it is optional Open - the source code is available and can be changed Goodwill - developers and users are very helpful Faster - it doesn’t require newer hardware, extra memory and larger disks Stable - it is very uncommon for Linux to crash (no blue screens) Flexibility - more capabilities and features Complete - all of the software is available and open - no ‘extra’ software to buy Security - very secure - unauthorized users can’t change machine settings Simplicity - point and click configuration Disadvantages: Compatibility - some programs will not run under simulators Misunderstanding - some people believe ‘you get what you pay for’
2.1.6 Getting It There are multiple distributions of Linux. While these all contain the Linux Kernel, they often include different pieces of software, and installation processes vary somewhat. The basic
page 27
licensing agreement that Linux is distributed under requires that even if it is sold for a fee, it must be made available at no cost and it may also be copied freely by the user. As a result you can often download these distributions over the network at no cost [12][13]. The total download size can be up to 600MB. An alternative is to buy a distribution (the typical cost is $30) which includes a floppy disk, a CD-ROM and a brief manual. These can be found at any store that sells software. Sometimes the distribution will have a higher cost for ‘deluxe’ versions - this more costly package often includes telephone support.
2.1.7 Distributions In total there are hundreds of Linux distributions. Many of these are specialized for features such as embedded systems, foreign languages, internet servers and security. The list below is for user-friendly installation and usage. The most successful of these distributions is Redhat. Some distributions, such as Mandrake, are based on the Redhat distribution, but with enhancements.
Redhat - the original consumer friendly Linux [7] Mandrake - a Redhat derivative [8] Caldera - another well established distribution [9] Debian - a release that focuses on stability [10] SuSe - yet another distribution [11]
2.1.8 Installing Each distribution of Linux will have a slightly different installation procedure, but they all follow the basic steps below. The total time to install Linux will between one to two hours. Users with a high level of knowledge can opt to do advanced setup, and new users will have the option of letting the system suggest installation options.
1. Turn off the computer.
page 28
2. Insert a provided floppy disk (you can also boot from a CD on newer computers) 3. Turn the computer on, it will start to load Linux 4. You will be asked some questions about the type of installation you want 5. Linux will format the disks, and start to load the software 6. While it is loading you will be able to set times, dates and passwords 7. You be asked to set up the graphics for the window manager 8. When the installation is done the computer will reboot, and you will be ready to use it
2.2 USING LINUX This section is a brief overview of the Linux operating system. The intention is to overview the basic components in the operating system. An administrator can manage the operating system using the graphical user interface (GUI), or using typed commands. New users often prefer to use the system using the GUI. Advanced users often prefer to use commands to administer the system, they are often faster and more reliable.
Commands can be typed in a command window. Typed commands are case sensitive, and most commands are lower case. Spaces are used to delimit (separate) commands and arguments, so they should also be used when typing. Linux allows users to perform some very sophisticated operations with a single command. But, while learning this should not pose a problem, unless logged in as root. While learning the user is encouraged to use a normal user account so that accidental damage to the system can be minimized.
2.2.1 Some Terminology The terms below are some of the keywords that are unique to Linux. These will appear during the installation, or during common usage of the system.
booting When a Linux computer starts it checks the hardware, and then starts software. The process of booting takes less than a minute in most cases
page 29
kernelThe core of the operating system that talks to all hardware and programs shellA windows that allows you to type commands permissionsControl who can change what GNU(Gnu’s Not Unix) A group that develops free software comprising a large portion of Linux rootThis is the user name of the system administrator
2.2.2 File and directories The directory and file structure of Linux is hierarchical, much like other popular operating systems. The main directory for the system is call root and is indicated with a single slash ‘/’. There are a number of subdirectories listed below that are used for storing system files, user files, temporary files and configuration files. A sample of the standard directories are shown below, and can be viewed with a file manager, or with keyboard commands. If other disks are used, such as a CDROM, or floppy disk, they are mounted under the root directory. (i.e., there are no ‘C’, ‘A’ or other drives, they are all under ‘/’.) (Note: the UNIX slash is ‘/’, not the ‘\’ used on DOS.)
/ home jackh
bin
lib
....etc....
davisa bin
public_html
A list of some of the more important directories follows with a brief description of each. Most users have their home directories under the ’/home’ directory. Most of the other directories are of interest to the system administrator.
/etc - device and software configuration files are kept here /tmp - temporary files are created here
page 30
/home - user directories are kept here /var - this is a place for log files, mail storage, etc. /usr - software is installed under this directory /dev - where devices are kept - they are accessed like files /bin - some of the programs are kept in this directory Every file and directory has a unique name which can be used to refer to it. Sometimes it is useful to be able to refer to groups of files without typing the name of each one. Wildcard allow file and directory names to be matched to patterns. The list below shows some of the wildcards commonly used.
*Any string ?Any Character ..The directory above .this directory ~your home directory Some examples of filenames with wildcards, and files they would match are shown below.
Ad*Advertise Advent.not Ad Ad?Ad. Ade Ad?.?Ade.d ??e.*ape.exe eee.thisisanother ../hi.*hi.there (in directory above) ~/*.therehi.there (in your home directory) Filenames can contain numbers, letters and a few other symbols, but care should be used to avoid symbols that also have meaning to Linux, such as the asterisk ’*’. File names that begin with a period ’.’ are system files that are normally hidden. For example, most users will have a file in their home directories called ’.profile’ or ’.login’. These are used when a user logs.
Some of the standard Linux commands for files and directories are listed below. Most of the file and directory names can be used with wildcards.
cd newdir change directory to ’newdir’ pwd show present working directory ls list the files in the current directory
page 31
ls -la list the files in the current directory in full form ls files list files that match the ’files’ rm files removes the named ’files’ rm * removes all the files in the current directory (use with care) rm /* removes all of the files in the computer (only do this if you are insane) mkdir namemake a directory ’name’ rmdir nameremove a directory ’name’ mv from tomove a file/directory ’from’ an old name ’to’ a new name cp from to copy a file ’from’ the an old name ’to’ a new name more file type out the contents of ’file’ on page at a time cat file type out the contents of ’file’ vi file a text editor for ’file’ (some commands given below) ‘dd’ - cut a line (command mode) ’p’ - paste a line below the current line (command mode) ‘x’ - delete a character (command mode) ‘r’ - replace a character (command mode) ‘R’ - replace a string (command mode -> edit mode) ‘a’ - append to a line (command mode -> edit mode) ‘i’ - insert a string (command mode -> edit mode) ‘:w’ - write to a file (command mode) ‘:q’ - quit from a file (command mode) ESC - move from edit to command mode cursor key - move the cursor du check the disk usage of the current directory du ~ check the disk usage of your home directory df check total disk space available sort this will sort the contents of a file ln -s to from create a symbolic link ’from’ a name ’to’ a file grep thing filessearch ’files’ for the string ’thing’ compress file compress a ’file’ uncompress file uncompress a ’file’
2.2.3 User accounts and root Linux follows very strict conventions for file and directory permissions. These require that each file and directory be given specific permissions for public reading, writing and execution. Each user is given their own account with a password, so that access to the system is controlled. Only the root user can access all files and directories on the system. Other users are limited to files they own, or files that have been marked public. Typically the root user is only used for adminis-
page 32
tration, and normal users use non-root accounts. This generally keeps the system safe from careless damage, and security breaches. Each user has their own home directory, normally in the ‘/ home’ directory. The permissions for files and directories are set so that the user has complete control over that directory.
The permissions for files can be seen by doing a directory listing with ’ls -la’. This will show flags something like ’-rwxrwxrwx jackh
user’ for a file that everybody can read ’r’, write ’w’
or execute ’x’. The leftmost ’rxw’ is for the user ’jackh’, the second ’rwx’ is for the group ’user’ and the rightmost ’rwx’ is for everybody on the system. So if the permissions were ’-rwxr--r--’ everybody on the system can read the file, but only the owner can write and execute it.
For security reasons, write permissions for files are normally only allowed for the owner, but read permissions are normally given to all. Execute permissions are normally set for all users when the file can be executed, such as a program. Sometimes more than one user wants to have access to a file, but there are reasons to not permit permission to everybody. In this case a group can be created and given permission to use a file.
Commands that are oriented to users and permissions follow.
passwd user change the password for a user chmod flags files change the permission ’flags’ for ’files’ chown user files change the owner of ’files’ to ’user’ finger user give information about a ’user’ who look at who is logged into your machine last a list of the last users logged in whoami give your current user name su - name change to a different user chgrp group files add a ’group’ to a file Most of the user information is stored in the ’/etc’ directory. For example, user account information is stored in the ’passwd’ file. User passwords are stored in the ’shadow’ file. Group information is stored in the ’groups’ file. It is possible to add users to the system by editing these files, but there are commands that make it easier to update and maintain these files.
page 33
The ’passwd’ command is used to change user passwords. In general passwords are the main line of defense against unwanted intruders. Most systems will do simple password checks when passwords are entered. In general, if a password can’t be found in a dictionary or index of a book it will generally be safer.
2.2.4 Processes At any one time there are multiple programs (processes) running on a Linux computer. When you run a program it becomes another process also running on the computer. Each process is given it’s own unique process ID number (PID). Each process is given it’s own private memory space, and allowed to run for a fraction of a second every second.
The list of commands below allow the processes in the computer to be seen. They also allow the general state of the machine to be determined.
ps -aux Print a list of processes running on the computer kill -9 pid Kill a process with ’pid’ running on the computer (uses the PID # from ps -ef) passwd userChange the password of a ’user’ date print system date and time who show who is logged into the machine exit this will logout a user fg bring background processes to the foreground bg send a stopped process to the background Chitting this key sequence will kill a running process Zhitting this key sequence will stop a running process, but not kill it command &any command followed by an ’&’ ampersand will be run in the background Simple commands can be combined together with pipes to make more complicated functions. An example is ’ls | more’. By itself ’ls’ will list all the files in a directory. ’more’ is normally used to print out text files. But in this case the output of ’ls’ is passed (piped) through ’more’ so that it only prints one screen at a time. Multiple commands can be combined on a single command line by separating them with a colon ’:’. For example the command ’ls ; ls ..’ would list the contents of the current directory, then the parent directory.
page 34
Output from functions can be redirected to files instead of the screen. For example ’ls > temp’ will take the normal output from the ’ls’ function, and write it into a textfile called ’temp’. Input to functions can be directed into a program. For example ’sort < temp’ will make the file ’temp’ the input to the sort command.
Simple batch files can be created by putting a list of commands in a normal text file. The file can then be made executable using the command ’chmod 755 filename’. The program can then be run using ’./filename’.
2.3 NETWORKING Networks are a key component of Linux operating systems. Each computer on a network may have a name, such as ’claymore.engineer.gvsu.edu’, but each computer must have a number, such as ’148.61.104.215’. You can log into other Linux and Unix machines with commands such as ‘telnet claymore.engineer.gvsu.edu’, ’telnet 148.61.104.215’ or ‘rlogin claymore.engineer.gvsu.edu’. This allows you to sit at one machine, and use many others, even around the world.
You can also access other computers with public access directories using the ‘ftp’ command. For example try ‘ftp ftp4.netscape.com’. This will connect you to a computer some place in the U.S. When it asks you for your ‘login name’ type ‘anonymous’. When it asks for a ‘password’, enter your name. You may now move around using ls, pwd, cd, etc. If you want to get a file from some directory, type ‘binary’, then type ‘get filename’, or ’get filenames’. ‘quit’ ends everything. If you log into a machine with FTP and you have write permissions you can also write files to the machine using ’put filename’ or ’mput filenames’. If you use FTP to log into a computer that you have account on you will be able to move outside of the limited ftp directories.
page 35
2.3.1 Security Security is not a significant problem for a computer that is not connected to a network, and passwords will protect it from ‘honest thieves’. When connected to a network there is potential for security problems. These problems become more serious when the computer is connected to the network 24 hours a day. General rules to keep a computer safe (this applies to non-Linux computers also) are:
keep user passwords safe - these can be the start of a security breach protect the root password - loosing this throws the system wide open shut down unneeded programs - network programs sometime have bugs that open doors apply patches - software updates help close security holes
2.4 INTERMEDIATE CONCEPTS Above the basic features of the Linux system are a number of more advanced features and commands. Some of these are listed below.
pine a simple interface for mail usage mail a somewhat bothersome mail tool (see pine). man func bring up a manual page for ’func’ man -k stringbrings up information on ’string’ tar -xvf file.tar extract files from an archive file ’file.tar’ tar cvf - files > file.tar put ’files’ into an archive file ’file.tar’
2.4.1 Shells When one logs into a Linux system, you are actually running a program (shell) this is in some ways similar to DOS. In the standard shell you are given a prompt, where you type your command. If it is not a built-in command, it searches on the disk according to a user-specified search path, for an executable program of that name. Almost all commands are programs that are run in
page 36
this manner. There are also executable shell scripts, similar to command files on DOS. Linux is limited to running a program of a size equal to the sum of its memory, and swap space. As the system is multi-tasking, any program (or part thereof) that is not currently being run when extra memory is required, is swapped (moved) out to the disk, until it is ready to run again.
In shells there are environment variables set. Some of the commands that can be used to view these are shown below. They can be set by editing the appropriate text files.
alias prints a list of command aliases printenv prints a list of the environment variables set prints a list of the environment variables
2.4.2 X-Windows The GUI in Linux is actually two programs working together. The basic program is called X windows, and it provides basic connection to the screen, mouse, keyboard and sound card. The look-and-feel of the GUI is provided by the window manager. One simple window manager is called ‘fvwm’ and it can behave like Windows 95/98. Newer window managers include Gnome and KDE. While these both provide similar capabilities and features, most users develop personal preferences for a single window manager.
2.4.3 Configuring Devices and settings can be configured under X-windows using graphical tools. Settings can also be configured with text files, but this is not necessary. Examples of settings that the user or root might want to change are: Modem properties for internet connection Network card properties for connection to a LAN Printer type and location
page 37
Customize the windows settings and behavior Sound card settings and sounds for Window events
2.4.4 Desktop Tools Most users focus less on the Operating System, and more on the programs that it will run. The task list below includes many of the applications that would be desired by the average user. Most of the listed applications are free, with the exception of the games. Many of these packages are a standard part of Linux distributions.
• Office Software - these include spreadsheets, word processors, presentation software, drawing tools, database tools, 3D graphics tools Star Office [14] KOffice [15] • File and Internet Browsers Netscape - allows browsing of the internet [16] Files - there are many file viewers that ease directory browsing Eazel - allows active directory browsing [17] • Administration and Utilities Apache - the most popular web server program [18] Postgres and MySQL - Database programs [19] [20] Replace a microsoft networking server [21] DOS/Windows Simulator VMWare [22] • Entertainment Audio and video Tools (GIMP - similar to photoshop) Games (Quake, Doom, SimCity)
2.5 LABORATORY - A LINUX SERVER Purpose: To set up a Linux server that can be used for controlling automation. Overview: At the core of every integrated manufacturing system is a server. A server is a computer, running a networked operating system that can connect to many other computers.
page 38
The function of a server is to communicate information between different devices on the factory floor. The most important part of a server is the operating system. Mature operating systems such as Unix and Linux are well established, while newcomers, such as Windows NT are trying to establish themselves.
Pre-Lab: 1. Go to the web site www.linux.org and read about Linux. 2. Go to the RedHat Linux site and read the installation instructions. (www.redhat.com) In-Lab: 1. Locate a computer to use. Install Linux using the following instructions. 2. After the installation is done and the computer has been rebooted go through the following Linux tutorial. 3. If you need more practice with linux try another basic user tutorial (www.linux.org). 4. Update the main webpage on the machine, and create a web page for yourself also in your own public_html directory. Submit (individually): 1. Have the machine up and running properly, including X-windows. 2. Have a running web server with a main web page, and for you.
2.6 TUTORIAL - INSTALLING LINUX This section outlines the steps and choices that were used while installing Redhat 7.0. You can also refer to other installation guides (www.redhat.com) in the event of problems. 1. Open the computer to determine the following information. - video card type and memory - network card type - mouse type 2. Insert the distribution floppy disk and CD and turn on the computer. The computer will start to boot automatically. After some time a graphical interface should appear and you will be asked questions. 3. The choices that I made follow in sequence. You should adapt these to the computer you have. The settings I expect you will need to change are marked with an asterisk ’*’. Language selection - English Keyboard - Generic 101-key PC - US English - Enable dead keys
page 39
*Mouse - Microsoft Intellimouse Install Options - Custom System Partitioning - using disk druid Delete all disk partitions *Add a partition - mount ’/’, size 1500MB, partition type Linux Native *Add a partition - partition type Linux Swap, size remaining about 50MB Formating - ’/dev/hda1 /’ Lilo Configuration - "Create Boot Disk" selected Install Lilo on ’/dev/hda MBR’ - did not use linear mode - no kernel parameters - left the rest as is Network - configured with "DHCP", "activate on boot" Timezone - "Detroit" Account Configuration - entered a root password *- added a user account for myself ’jackh’ Authentication Configuration - left all as is Selecting Package Groups - the following list were the only ones chosen Printer Support X Window System Gnome KDE Mail/WWW/News Tools DOS/Windows Connectivity Graphics Manipulation Games Multimedia Support Networked Workstation Dialup Workstation Web Server SQL Server Network Management Workstation Authoring/Publishing Development Kernel Development Utilities X Configuration *- Generic High Freq. SVGA 1024x768 @ 70Hz *- ATI Mach 64, 1MB memory - don’t set ’use graphical login’ 4. Installation will start and it takes about 30-60 minutes. 5. When done you will be prompted to put a formatted floppy disk in the drive and create a boot disk. This is good for emergencies and is highly encouraged. Don’t forget to label the disk. 6. When prompted reboot the system. Don’t forget to remove the floppy and CDROM.
page 40
7. Once the system has rebooted, login as root. Start XWindows using ’startx’. 8. If you reach this point you have completed the installation successfully.
2.7 TUTORIAL - USING LINUX 1. Login with your username and password. Later you can logout with ’logout’ or ’exit’. (Note: you can also use ’shutdown -h now’ to stop the machine.) 2. After you have logged in you should see a flashing cursor. Type ’startx’ to start the Xwindows GUI. This will take some time, but when done you will have a windowed interface. 3. First we want to open a command window. Point to the bottom of the screen and locate the icon that looks like a computer screen. Click on it once with the left mouse button. A command window will pop up on the screen. Click on the border of the window, the keyboard will then be focused on the window, and commands will work there. 4. Enter the commands below in order and observe the results. They should allow you to move around directories and see the files listed there. Some of the options will change how you see the files. ls ls -l ls -la ls -lar ls -lat ls -lart pwd cd .. ; ls -la cd ~ 5. Use the manuals to find other options for the ‘ls’ command with ‘man ls’. 6. Explore the hard drive to find what is there. The following directories are particularly important. /etc - the machine configuration and boot files /opt - some packages will be installed here /bin and /usr/bin - executable files /sbin and /usr/sbin - executable files for the root user and system /usr/doc - help files /home - use directories are here /mnt - mounted disk drives are attached here /proc - system status is kept here /var/log - system log files are kept here /tmp - temporary files are stored here 7. Change to the directory ’/etc’, and look at the contents of the file ’fstab’ with the command ’more fstab’. This file contains a list of the disk drives in the computer. You can find more information about it with ’man fstab’.
page 41
8. Return to your own directory and create a subdirectory called public_html with the command ’mkdir public_html’. Change to that directory and create a new file using the vi editor with ’vi index.html’. Enter the following text into that file. The editor has two modes. In command mode each key will cause an action. In edit mode each key is added to the text. Hitting ’ESC’ at any time puts the editor back into command mode. To move into edit mode hit ’i’ then start typing text. To erase a single character hit ’x’. When you are done editing the program use ’:wq:’ to save the file and quit. Refer to the previous section in the text more details on the commands.
Hi
9. When done save and quit the editor. Make sure the permissions of your file and the ’public_html’ directory are correct with the command ’chmod 755 index.html ~/ public_html ~’. 10. Use netscape to look at you web page and see if it is there. You can do this using ’netscape &’. You can see the file by opening it. You should also be able to see the file by typing ’http://127.0.0.1/~YOURNAME’, where ’YOURNAME’ is you user ID. 11. Look at the list of processes running on the computer with ’ps -aux’. Notice that the columns indicate what is running, the status of the process, etc. You can get more information about this using ’man ps’ 12. Log into claymore using ’telnet claymore.engineer.gvsu.edu’ or ’telnet 148.61.104.215’. use ’ls’ to look at the files in your directory. When done looking around your account use ’exit’ to logout. 13. Now, look at some of the programs in the Window manager.
2.8 REFERENCES [1] http://www.ibm.com [2] http://www.beowulf.org, “The Beowulf Project”. [3] Hasan, R., “History of Linux”, http://ragib.hypermart.net/linux. [4] Polsson, K., “Chronology of Personal Computers”, http://www.islandnet.com/~kpolsson/complist [5] http://www.linux.org/hardware/index.html, “Linux Friendly Hardware” [6] http://www.linux.org/apps/index.html, “Applications” [7] http://www.redhat.com [8] http://www.mandrake.org [9] http://www.caldera.com [10] http://www.debian.com [11] http://www.suse.com [12] http://www.sunsite.unc.edu [13] http://www.linux.com [14] http://www.staroffice.com [15] http://www.koffice.kde.org [16] http://www.netscape.com
page 42
[17] http://www.eazel.com [18] http://www.apache.org [19] http://www.postgresql.org [20] http://www.mysql.com [21] http://www.samba.org [22] http://www.vmware.com
page 43
3. AN INTRODUCTION TO C/C++ PROGRAMMING
3.1 INTRODUCTION The C programming language was developed at Bell Laboratories in the Early 1970’s. The language was intended to provide a high level framework for data and functions while allowing highly efficient programs. By the 1980s the language had entered widespread usage and was in use for the development of many high level programs. By the 1990s most new software projects were written in C. Some of the advantages of C are listed below.
• Machine Portable, which means that it requires only small changes to run on other computers. • Very Fast, almost as fast as assembly language. • Emphasizes structured programming, by focusing on functions and subroutines. • You may easily customize ’C’ to your own needs. • Suited to Large and Complex Programs. • Very Flexible, allows you to create your own functions. More recently C++ was developed to add object-oriented capabilities to C. In simple terms the object oriented extensions allow data and functions to be combined together. In general the advantages that C++ add over C are those listed below. In general, any C program can be compiled with C++, while C++ programs will often not compile with a C compiler. • Reusable source code can reduce duplication • Encapsulation of data and functions reduces errors • It is easy to interchange software modules
ASIDE: The expression object-oriented has been misused recently. This was a particular problem with those marketing software. In truth, these techniques are mainly of use only to the programmer. From the users perspective, they will be unaware of whether the souce code of the program is object-oriented or not.
page 44
This chapter will act as a basic introduction or review of C and C++ programming. C programming is discussed first to lay the foundations, and this is followed with a discussion of C++ programming extensions. The end of the chapter discusses structured program design techniques. If you are already fluent in C and C++ I suggest you skip this chapter.
3.2 PROGRAM PARTS C programs are basically simple text programs that follow a general set of rules (syntax). Figure 3.1 shows the classic beginners program that will add two numbers and print the result. The first line in this example is a comment. Comments are between ’/*’ and ’*/’ can stretch over many lines. Comments can also be the end of a line if they follow ’//’. The ’main()’ program declaration indicates where the program starts. The left and right curly brackets ’{’ and ’}’ are used to group together a set of program statements, in this case the program. Notice that the program statements are indented to indicate how they are grouped. This is a very valuable structuring technique that makes the programs much easier to read.
/* A simple program to add two numbers and print the results */ main() { int x, y = 2, z; // define three variables and give one a value x = 3; // give another variable a value z = x + y; // add the two variables printf(“%d + %d = %d\n”, x, y, z); // print the results }
Results (output): 3+2=5
Figure 3.1 - A Program to Add Two Numbers (and results)
The program begins with the definition of three variables, ’x’, ’y’ and ’z’. All three are defined to be ’int’ integers and the value of ’y’ is set to ’2’. The statement is terminated with a
page 45
semicolon to separate it from the next statement. The next line assigns a value of ’3’ to ’x’. The following line adds the values of ’x’ and ’y’ and assigns the value to ’z’. The last statement in the program, ’printf’, prints the values with a format statement. The first string in the command is a format string. In the string a ’%d’ indicates an integer, and ’\n’ indicates an end of line. The remaining characters in the format string are printed as shown. The format string is followed by the variables in the format string, in the same sequence. The result of the program shown that when it is run it prints ’3 + 2 = 5’.
Some of the general rules that are worth noting are listed below. • lower/UPPER case is crucial, and can never be ignored. • Statements can be on one or more lines but must be separated by semi-colons ‘;’. • Statements consist of one operation, or a set of statements between curly brackets {, } • There are no line numbers. • Lines may be of any length. The data types for C are listed below with typical data sizes. Sometimes these sizes may be larger or smaller. Their behavior of ’char’, ’short’, ’int’ and ’long’ can be modified when preceded with ’unsigned’. For example an integer ’x’ defined with ’int x;’ could have a value from 32768 to 32767, but if defined with ’unsigned int x;’ it can have a value from 0 to 65535. char (1 byte ascii character), short (1 byte signed integer), int (2 byte signed integer), long (4 byte signed integer), float (4 byte floating point IEEE standard), double (8 byte floating point IEEE standard). Beginners will often write a program in a single ’main’ function. As the program becomes more complex it is useful to break the program into smaller functions. This makes it easier to write and read. Figure 3.2 contains an example program that uses subroutines to perform the same function as the program in Figure 3.1. As before the ’main()’ program function is the starting point for program execution. The subroutine ’add’ is defined after ’main’, so a function prototype is required before. A prototype just indicates the values that are passed, and the function return type. In this example the values 3 and 2 are passed to the ’add’ function. In the add function these values are then put into ’a’ and ’b’. The values are then added and assigned to ’c’. The value of ’c’
page 46
is then returned to the main function where it is assigned to ’z’.
/* A simple program to add two numbers and print the results */ int add(int, int); /* Declare a integer function called ‘add’ */ main() { int x = 3, y = 2, z; /* define three variables and give values */ z = add(x, y); /* pass the two values to ‘add’ and get the sum*/ printf(“%d + %d = %d\n”, x, y, z); /*print the results */ } int add(int a, int b) { /* define function and variable list */ int c; /* define a work integer */ c = a + b; /* add the numbers */ return(c); /* Return the number to the calling program */ }
Figure 3.2 - Program to add numbers with a function:
Every variable has a scope. This determines which functions are able to use that variable. If a variable is global, then it may be used by any function. These can be modified by the addition of static, extern and auto. If a variable is defined in a function, then it will be local to that function, and is not used by any other function. If the variable needs to be initialized every time the subroutine is called, this is an auto type. static variables can be used for a variable that must keep the value it had the last time the function was called. Using extern will allow the variable types from other parts of the program to be used in a function.
/* A simple program to add two numbers and print the results */ int x = 3, /* Define global x and y values */ y = 2, add(); /* Declare an integer function called ‘add’ */ main() { printf(“%d + %d = %d\n”, x, y, add()); /*print the results */ } int add() { /* define function */ return(x + y); /* Return the sum to the calling program */ }
Figure 3.3 - Program example using global variables:
page 47
Other variable types of variables are union, enum and struct. Some basic control flow statements are while(), do-while(), for(), switch(), and if(). A couple of example programs are given below which demonstrate all the ’C’ flow statements.
/* A simple program to print numbers from 1 to 5*/ main() { int i; for(i = 1; i result(); B->result(); }
PROGRAM OUTPUT: The result is 3 The result is 5 Figure 3.12 - Another Class Example
3.4 HOW A ‘C’ COMPILER WORKS A ‘C’ compiler has three basic components: Preprocessor, First and Second Pass Compiler, and Linker.
page 53
Source code “filename.c”
The Preprocessor
#include files (like “stdio.h”)
Will remove comments, replace strings which have a defined value, include programs, and remove unneeded characters.
ASCII Text Code The First and Second Pass The compiler will parse the program and check the syntax. TheSecond Pass produces some simple machine language, which performs the basic functions of the program.
Object Code (*.o) The Linker
Library files (*.so)
The compiler will combine the basic machine language from the first pass and combine it with the pieces of machine language in the compiler libraries. An optimization operation may be used to reduce execution time.
Executable Code (*.exe) Figure 3.13 - How Programs Are Compiled
3.5 STRUCTURED ‘C’ CODE
page 54
• A key to well designed and understandable programs.
• Use indents, spaces and blank lines, to make the program look less cluttered, and give it a block style.
• Comments are essential to clarify various program parts.
• Descriptive variable names, and defined constants make the purpose of the variable obvious.
• All declarations for the program should be made at the top of the program listing.
A Sample of a Bad Program Structure: main(){int i;for(;i 2){ end_read_connection(); } deinit_read(); } } else if (type == _WRITE){ } }
int network_io::set_remote_host(char *_host_name, int host_socket){ static int error; static int nm_a, nm_b, nm_c, nm_d; struct hostent*hp; unsigned charaddress[4]; error = NO_ERROR; strcpy(host_name, _host_name); host_socket_number = host_socket; // Set up server descriptor, get host reference and error trap write_connection.sin_family = AF_INET; if((host_name[0] > ’9’) ||(host_name[0]h_addr,
page 93
(char *)&(write_connection.sin_addr), hp->h_length); } else { error_log(MINOR, "ERROR: unknown network host"); error = ERROR; } return error; }
int network_io::set_local_host(int socket_num){ static int error; error = NO_ERROR; socket_number = socket_num; return error; }
int network_io::writer(char *string){ static int error; error = NO_ERROR; // Open a new socket for the write, and check for errors. error = init_write(); if(error == NO_ERROR) error = open_write_connection(); if(error == NO_ERROR) error = write_to_connection(string); if(error == NO_ERROR) error = end_write_connection(); if(deinit_write() == ERROR) error = ERROR; return(error); }
int network_io::reader(char *buf, int length){ static interror; // Error return variable error = NO_ERROR; // Wait for a socket connection request, then get its reference. buf[0] = 0; if(wait_read_connection() == NO_ERROR){ if(read_from_connection(buf, length) == ERROR){ } // Close socket connection to remote write client. end_read_connection(); } return(error); }
int network_io::init_write(){ static int error; struct hostent *gethostbyname(); error = NO_ERROR; /* Open a new socket for the write, and check for errors. */ if((rw_socket = socket(AF_INET, SOCK_STREAM, 0)) >= 0){
page 94
write_connection.sin_port = htons(host_socket_number); } else { error_log(MINOR, "ERROR: opening stream socket"); error = ERROR; } return error; }
int network_io::open_write_connection(){ static int error; error = NO_ERROR; if(connect(rw_socket, (struct sockaddr *) &(write_connection), sizeof(write_connection)) < 0){ error = ERROR; error_log(MINOR, "ERROR: Connecting stream Socket"); } return error; }
int network_io::write_to_connection(char *text){ static int error; error = NO_ERROR; if(write(rw_socket, text, strlen(text) /* +1 */) < 0){ error_log(MINOR, "ERROR: writing on stream socket"); error = ERROR; } return error; }
int network_io::write_stuff_done(){ int error; error = NO_ERROR; return error; }
int network_io::check_connection(){ int error; int count; struct pollfd ufds; error = NO_ERROR; ufds.fd = rw_socket; ufds.events = POLLOUT | POLLIN | POLLPRI | POLLERR | POLLHUP | POLLNVAL; count = poll(&ufds, 1, 0); if((ufds.revents & 16) != 0) error = ERROR; return error; }
int network_io::end_write_connection(){ static int error; error = NO_ERROR;
page 95
return error; }
int network_io::deinit_write(){ static int error; error = NO_ERROR; close(rw_socket); rw_socket = ANY; return error; }
int network_io::init_read(){ static int error; // low level socket number unsigned length; // temporary work variable static struct sockaddr_inserver; // read socket descriptor static struct hostent*hp; char text[100]; // Open internet socket, and check for error. error = ERROR; gethostname(text, 100); /* who are we? */ hp = gethostbyname(text); if((hp != NULL) && (read_socket = socket(AF_INET, SOCK_STREAM, 0)) >= 0){ // Set up server descriptor for binding name. memset(&server, 0, sizeof(struct sockaddr_in)); server.sin_family = hp->h_addrtype; server.sin_port = htons(socket_number); // Bind the socket, and check for error. level = 1; int flag = 1; setsockopt(read_socket, SOL_SOCKET, SO_REUSEADDR, (char *)&flag, sizeof(int)); if(bind(read_socket, (struct sockaddr *)&server, sizeof(struct sockaddr_in)) >= 0){ // Check for valid socket binding length = sizeof(server); if(getsockname(read_socket, (struct sockaddr *)&server, &length) >= 0){ error = NO_ERROR; // Set up variables for success // Zero because anything higher would allow // messages to arrive out of sequence. listen(read_socket, 0); } else { error_log(MINOR, "ERROR: getting socket name"); } } else { error_log(MINOR, "ERROR: binding stream socket"); } } else { error_log(MINOR, "ERROR: opening stream socket"); } return(error); }
int network_io::read_stuff_waiting(){ int error, count; struct pollfd ufds;
page 96
error = ERROR; ufds.fd = read_socket; ufds.events = POLLIN | POLLPRI | POLLOUT; count = poll(&ufds, 1, 0); if((ufds.revents & 1) > 0){ error = NO_ERROR; } return error; }
int network_io::wait_read_connection(){ static int error; unsigned size; static struct sockaddr addr; error = NO_ERROR; size = sizeof(struct sockaddr); fcntl(read_socket, F_SETFL, O_NONBLOCK); rw_socket = accept(read_socket, &addr, &size); level = 2; if(rw_socket < 0){ error = ERROR; // error_log("ERROR: warning:accept"); } return error; }
int network_io::read_from_connection(char *buf, int length){ int error; int len; error = NO_ERROR; // Empty input buffer buf[0] = 0; // Read string into buffer from socket fcntl(rw_socket, F_SETFL, O_NONBLOCK); len = read(rw_socket, buf, length); if(len < 0){ // error_log("ERROR: reading stream message"); // error = ERROR; if(errno != 11){ printf("errno=%d ", errno); } } else { buf[len] = 0; } return error; }
int network_io::end_read_connection(){ int error; int a; error = NO_ERROR; a = close(rw_socket); level = 1;
page 97
return error; }
int network_io::deinit_read(){ int error; int a; error = NO_ERROR; a = close(read_socket); level = 0; return error; }
char *network_io::get_address(){ static char work[MAXIMUM_HOST_NAME_LENGTH]; struct sockaddr_inaddress; int i, addr[4]; long int_address; #ifndef SGI // Sun Version get_myaddress(&address); int_address = address.sin_addr.s_addr; #else // SGI Version int_address = gethostid(); #endif // SUN & SGI version for(i = 0; i < 4; i++){ addr[i]=int_address & 0xFF; int_address >>= 8; } #ifdef OTHER_UNIX sprintf(work, "%d.%d.%d.%d", (int)addr[3], (int)addr[2], (int)addr[1], (int)addr[0]); #else // This is for linux sprintf(work, "%d.%d.%d.%d", (int)addr[0], (int)addr[1], (int)addr[2], (int)addr[3]); #endif return work; }
char *network_io::get_remote_client(){ staticchar work[100]; struct sockaddr address; socklen_t len; len = sizeof(address); if(getpeername(rw_socket, &address, &len) == 0){ sprintf(work, "%u.%u.%u.%u", address.sa_data[2], address.sa_data[3], address.sa_data[4], address.sa_data[5]); // printf("Got address [%s]\n", work); //strcpy(work, address); } else { strcpy(work, "unknown network address"); } return work; }
page 98
Listing X.2 - network_io.h #ifndef _NETWORK_IO #define _NETWORK_IO
#include #include #include #include #include #include
#define ANY
0
// Indicates no socket number prechosen
#define MAXIMUM_HOST_NAME_LENGTH100 class network_io{ public: int socket_number; int rw_socket; // int read_connection; char host_name[MAXIMUM_HOST_NAME_LENGTH]; int host_socket_number; int read_socket; struct sockaddr_inwrite_connection; // char incoming_string[MAXIMUM_STRING_SIZE]; int int #define #define
};
int int int int int int int // int int int int int int // int int int int int int char*
type; level; _READ 200 _WRITE 201 network_io(); ~network_io(); set_remote_host(char*, int); set_local_host(int); reader(char*, int); writer(char*); init_write(); open_write_connection(); write_to_connection(char*); write_to_read_connection(char*); end_write_connection(); deinit_write(); init_read(); wait_read_connection(); read_from_connection(char*, int); read_from_write_connection(char*, int); end_read_connection(); deinit_read(); read_stuff_waiting(); write_stuff_done(); check_connection(); get_remote_client();
char
*get_address();
page 99
#endif
Listing X.3 - network.cpp
#include "../network_io/network_io.h" #include
network_io *network; int mode; char *params; char received_temp[200]; int connect_flag; time_t now_time; time_t last_time; int timeout;
int main(){ timeout = 5;
// the default timeout
return 1; }
int deinit(){ int
error;
error = NO_ERROR; if(network != NULL) delete network; return error; }
int process_command(); int check_network();
int step(){ int
error;
error = NO_ERROR; error = check_network(); if(error == NO_ERROR) error = process_command(); return error; }
int check_network(){ int error; error = NO_ERROR; if(*state == WAITINGFORCONNECTION){ if(connect_flag == TRUE){
page 100
if(mode == LISTENER){ if(network->wait_read_connection() == NO_ERROR){ char text[200]; *state = CONNECTIONESTABLISHED; *received_flag = FALSE; *send_flag = FALSE; sprintf(text, "Got a connection from %s", network>get_remote_client()); error_log(WARNING, text); time(&last_time); } } else if(mode == TALKER){ if(network->open_write_connection() == NO_ERROR){ *state = CONNECTIONESTABLISHED; *received_flag = FALSE; *send_flag = FALSE; time(&last_time); } } } } else if(*state == CONNECTIONESTABLISHED){ if(*send_flag == TRUE){ network->write_to_connection(send_buf); // printf("Sending String [%s]\n", send_buf); send_buf[0] = 0; *send_flag = FALSE; // time(&last_time); // You can keep the connection alive by writing // but this doesn’t guarantee that the remote client is still there } if(*received_flag == FALSE){ if(network->read_from_connection(received_temp, 199) != ERROR){ if(strlen(received_temp) > 0){ strcpy(received, received_temp); *received_flag = TRUE; time(&last_time); // printf("Got String [%s]\n", received); } } } time(&now_time); if((network->check_connection() == ERROR) || ((mode == LISTENER) && (difftime(now_time, last_time) > timeout))){ if(mode == LISTENER){ network->end_read_connection(); } else if(mode == TALKER){ network->end_write_connection(); } *state = WAITINGFORCONNECTION; connect_flag = FALSE; } } return error; }
int process_command(){ int error; int i, len; int port; error = NO_ERROR; if(*change_lock == TRUE){ if(*command == INITIALIZE){
page 101
if(*state == NOTINITIALIZED){ if(mode == LISTENER){ port = atoi(params); if(port > 0){ network = new network_io(); network->set_local_host(port); network->init_read(); //now ready to listen *state = WAITINGFORCONNECTION; connect_flag = FALSE; } else { error_log(MINOR, "Parameter did not hold a valid port"); *error_flag = ERROR; } } else if(mode == TALKER){ len = strlen(params); for(i = 0; i < len; i++){ if(params[i] == ’:’){ params[i] = 0; port = atoi(&(params[i+1])); break; } } if((i < len) && (port > 0)){ network = new network_io(); network->set_remote_host(params, port); network->init_write(); *state = WAITINGFORCONNECTION; connect_flag = FALSE; } else { error_log(MINOR, "Address string was not properly formed"); *error_flag = ERROR; } } else { error_log(MINOR, "ERROR: Mode not defined yet"); *error_flag = ERROR; } } else { error_log(MINOR, "Network talker initialize command in wrong state"); *error_flag = ERROR; } } else if(*command == CONNECT){ if(*state == WAITINGFORCONNECTION){ connect_flag = TRUE; } } else if(*command == DISCONNECT){ if(*state == CONNECTIONESTABLISHED){ if(mode == TALKER){ network->end_write_connection(); } else if (mode == LISTENER){ network->end_read_connection(); } *state = WAITINGFORCONNECTION; connect_flag = FALSE; } else { error_log(MINOR, "Cannot disconnect network unless connected"); *error_flag = ERROR; } } else if(*command == UNINITIALIZE){ if(*state == WAITINGFORCONNECTION){ if(mode == TALKER){
page 102
network->deinit_write(); } else if (mode == LISTENER){ network->deinit_read(); } delete network; network = NULL; *state = NOTINITIALIZED; } else { error_log(MINOR, "Cannot uninitialize network unless waitingforconnection"); *error_flag = ERROR; } } else if(*command == SET){ if(*operand1 == MODE){ if(*state == NOTINITIALIZED){ mode = *operand2; } else { error_log(MINOR, "Can’t set network mode after initialization"); *error_flag = ERROR; } } else if(*operand1 == PARAM){ if(*state == NOTINITIALIZED){ if(params != NULL) delete params; params = new char[strlen(operand3)+1]; strcpy(params, operand3); } else { error_log(MINOR, "Can’t set network parameters, in wrong state"); *error_flag = ERROR; } } else if(*operand1 == TIMEOUT){ timeout = *operand2; } else { error_log(MINOR, "Network SET type not recognized"); *change_lock = FALSE; *error_flag = ERROR; } } else { error_log(MINOR, "Network command not recognized"); *error_flag = ERROR; } } *change_lock = FALSE; return error; }
4.6 DESIGN CASES Consider the case of the network
page 103
4.7 SUMMARY • Networks come in a variety of topologies, but buses are most common on factory floors. • The OSI model can help when describing network related hardware and software. • Networks can be connected with a variety of routers, bridges, gateways, etc. • Ethernet is common, and can be used for high speed communication. • The internet can be use to monitor and control shop floor activities.
4.8 PRACTICE PROBLEMS 1. Explain why networks are important in manufacturing controls. (ans. These networks allow us to pass data between devices so that individually controlled systems can be integrated into a more complex manufacturing facility. An example might be a serial connection to a PLC so that SPC data can be collected as product is made, or recipes downloaded as they are needed.) 2. Is the OSI model able to describe all networked systems? (ans. The OSI model is just a model, so it can be used to describe parts of systems, and what their functions are. When used to describe actual networking hardware and software, the parts may only apply to one or two layers. Some parts may implement all of the layers in the model.) 3. What are the different methods for resolving collisions on a bus network? (ans. When more than one client tries to start talking simultaneously on a bus network they interfere, this is called a collision. When this occurs they both stop, and will wait a period of time before starting again. If they both wait different amounts of time the next one to start talking will get priority, and the other will have to wait. With CSMA/CD the clients wait a random amount of time. With CSMA/BA the clients wait based upon their network address, so their priority is related to their network address. Other networking methods prevent collisions by limiting communications. Master-slave networks require that client do not less talk, unless they are responding to a request from a master machine. Token passing only permits the holder of the token to talk.)
page 104
4.9 LABORATORY - NETWORKING Purpose: To expose you to the architecture and components of a modern computer network. Objectives: To be able to set up a switch and computers to communicate over an Intranet network. Background: Computers can be connected via a network. At a minimum this requires a network card in at least two computers and a connecting cable between them. These computers can then pass packets of information back and forth for basic communication. This type of connection is commonly used by people playing games such as Quake at home. A more mature network, like that found in a factory, must be more sophistocated. The most fundamental concept in a network is the data packets and the protocol for exchanging them. The current Internet protocol is called IPV4 (this will be replaced by IPV6 in the near future). In this protocol each client on a network has a 4 byte (0-255) address, normally shown in the form ‘aaa.bbb.ccc.ddd’. In our case the university is a ‘class B’, so it owns all addresses that start with ‘148.61.ccc.ddd’. Most engineering students use a ‘class C’ network with the addresses ‘148.61.104.ddd’. In theory there are up to 256 clients on the engineering network. In practice some of these addresses are used for network housekeeping. For example the following addresses are used, 148.61.104.1 - this is the router/switch to other networks 148.61.104.254 - this is the gateway to other networks If a network address is not used, it can be used by a normal network device, such as a computer or printer. There are two ways to assign these statically or dynamically. In a static connection the address can only be used by one machine. In a dynamic connection the addresses are assigned and release semi-randomly to network clients as the connect and disconnect from the network. Static IP addresses are primarily designed for computers that are always on, and are acting as servers on the network. Dynamic IP addresses are primarily used for computers that are only clients on the network. Some examples of static IP addresses on the network are: 148.61.104.215 - claymore.engineer.gvsu.edu 148.61.104.226 - excalibur.engineer.gvsu.edu 148.61.104.??? - falcon.engineer.gvsu.edu etc.. Most computers on the network are named, such as ‘gvsu.edu’. When a user enters this name into the computer, it must be converted to a network number. This is done by a ‘domain name server’ (DNS). There are two DNS servers at GVSU (148.61.1.10 and 148.61.1.15). These servers keep all of the names for computers at GVSU, and also provide links to computers at other sites so that their names and numbers can
page 105
also be searched. Although the engineering student network is ‘148.61.104.ddd’, it is actually a collection of smaller networks (sub-nets). The smaller networks are connected together with network devices called switches/hubs/routers. These are basically small computers with multiple network connections (often 24). Each computer is connected to the hub. The hub then looks at each network packet coming from a computer. If it is going to another computer connected to the same hub, it will be sent there directly. Otherwise it is sent ‘up-stream’ to a router that will send it to another sub-net if it is available, or up upstream again. In our lab we will use a Linksys 10/100 Managed 24-Port GigaSwitch (EG24M). The Switch in the lab is used to connect computers together, and connect to a network gateway. .... The server for the lab is..... Network Components: Lab Server - Claymore Dell Poweredge 1300 Server Intel Pro/100 network card (internet side) 3Com 590 network card (infranet side) Adaptec SCSI card 2940U2W (2 cards) for SCSI hard disks Tape drive Uninterruptable Power Supply - APC Smart-UPS 120V OL103 Firewall....
4.9.1 Prelab 1. Find and read the user manual for the Linksys 10/100 Managed 24-Port GigaSwitch (EG24M). http://www.linksys.com 2. At a windows computer look at the settings for the network. On windows 9x this is done with ’winipcfg’, on windows nt use the network settings. Look at the options available, copy out the settings to hand in. After that use the following instructions, and describe what each is doing. nslookup claymore.engineer.gvsu.edu ping claymore.engineer.gvsu.edu ping 148.61.104.215 tracert claymore.engineer.gvsu.edu tracert gvsu.edu tracert www.umich.edu route netstat
page 106
netstat -a 3. Open a Dos window and type ‘telnet river.it.gvsu.edu 25’. this will connect you to the main student computer. But instead of the normal main door, you are talking to a program that delivers mail. Type the following to send an email message.
ehlo northpole.com mail from: santa rcpt to: jackh data Subject: Bogus mail this is mail that is not really from santa .
4. Go to the web site ’www.arin.net’ and look up some machine names there under the ’whois’ link. Determine who owns the student network, i.e., 148.61.104. 5. While looking at a home page in Netscape select ‘View - Page Source’. You will see a window that includes the actual HTML file - This file was interpreted by Netscape to make the page you saw previously. Look through the file to see if you can find any text that was on the original page. 6. In Netscape ask for the location ‘ftp://sunsite.unc.edu’ This will connect you via ftp the same way as with the windows and the dos software. 7. In netscape type in ‘mailto:[email protected]’ (Note: If the mail server information and a user account is not setup an error window will appear.). After you are done try ‘news:gvsu’. 8. Using Netscape try to access the IP number of the machine beside you. You will get a message that says the connection was refused. This is because the machine is a client. You have already been using servers to get web pages. 9. When we ask for a computer by name, your computer must find the number. It does this using a DNS (Domain Name Server). On campus we have two ‘148.61.1.10’ and ‘148.61.1.15’. In a Linux machine type in the following commands and determine what they have done. You can get access to a linux machine from a windows machine by typing ’telnet claymore.engi-
page 107
neer.gvsu.edu’.
nslookup server 148.61.1.10 set type=any ls -d engineer.gvsu.edu > temp.txt exit more temp.txt
4.9.2 Laboratory 1. Connect to the Linksys switch with a serial port connection. Although we could, we will not do this to increase the security of the switch. A serial connection requires physical access, which makes it much more difficult for an anonymous security intrusion. 2. Configure your computer to be a static client on the lab TCP/IP network. 3. Write two C++ program using the provided library functions. One program should listen on network socket 1900. When a connection is made it should open the connection, and echo all input that is receive. A second program will allow a user to connect to a remote network program and send and receive strings.
page 108
5. DATABASES Databases are used to store various types of information in a manufacturing enterprise. For example, consider an inventory tracking system. A simple database might contain a simple list of purchased parts. Each part is a line in a database table, as shown in figure X.1. If a new inventory item is added, a new row is added to the table. If parts are added or removed to the inventory, the quantity value for one of the rows is changed. The total inventory cost can be calculated by multiplying the quantity and part costs together, and summing these for all rows. The tables are often designed to suit the way a particular business runs.
Number
Part
Quantity
Cost
Location
003450
1/2" Hex Nut
35
$0.023
Bin 5-42
003573
1/2" Hex Bolt
2467
$0.035
Bin 5-63
002365
5/8" Washer
395
$0.009
Bin 7-32
Figure X.1 - A Simple Inventory Table
A more complex database will be made up of many tables that relate items together. For example a more complex database might have separate tables for customer data, supplier data, purchased inventory, work in process, finished inventory, etc. The purchased inventory table might refer to a supplier number that identifies a supplier in the supplier table. The formal name for a database that uses related tables of information is ’relational’.
page 109
In modern applications a database (server) will run on one computer, but be shared by many other computers (clients) that access it through networks. Client programs might be highly variable. For example a worker on the shop floor may only be able to view order information. A shop floor supervisor might be able to change order status, personnel tables. A salesperson might be able to enter new orders, and check on order status. It is also possible to access the database directly and make special inquiries using a special command language called Structured Query Language (SQL).
In summary, database allow information to be; - stored and managed in a central location - shared with many other computers - structured and accessed quickly - searched for patterns and matches
5.1 SQL AND RELATIONAL DATABASES Structured Query Language (SQL) was developed to provide a common interface language for accessing relational databases. The key concept behind relational databases is that all information is stored in tables. The example in Figure X.2 illustrates a customer order tracking system that uses three tables. Consider the first table called ’Orders’, it contains four rows, each with an order number. The first three rows are for the same order, and order number. In this case all three entries are also for the same customer, but it involves three different parts. The entries in the ’customer_id’ and ’part_id’ columns can be used to lookup more information from the two other tables.
page 110
Orders
Customers
Parts
order_number
customer_id
part_id
quantity
00103 00103 00103 00134
002 002 002 001
0001 0000 0002 0002
1 1 1 50
customer_id
name
000 001 002
ACME Dastardly Gadgets Widgets Inc. I.M. Reech and Co.
part_id description
location
0000 0001 0002
bin 5-4 bin 2-3 bin 8-2
cylinder valve hose
Figure X.2 - An Order Tracking Database
The tables in Figure X.2 can be created using the SQL commands in Figure X.3. One command is needed for each table. Each command starts with ’CREATE TABLE’ followed by the name of the table. After this the columns of the table are defined. In the case of the ’Orders’ table there are four columns. Each column is given a unique name, and a data type is defined. Once these commands have been used the tables will exist, but be empty with no data in them.
page 111
CREATE TABLE Orders ( order_number INTEGER, customer_id INTEGER, part_id INTEGER, quantity INTEGER ) CREATE TABLE Customers ( customer_id INTEGER, name CHAR(50) ) CREATE TABLE Parts ( part_id INTEGER, description CHAR(20), location CHAR(25) )
The queries can also be combined onto a single line. CREATE TABLE CUSTOMERS (customer_id INTEGER, name CHAR(50))
Figure X.3 - The SQL Commands to Create the Tables in Figure X.2
Figure X.4 shows SQL commands to enter data into the tables. In all cases these statements begin with ’INSERT INTO’, followed by the table name. After that the data fields to fill are named, followed by the actual values to insert. The column names are provided so that the values can be supplied in a different order, or omitted altogether. In this example all of the values are provided for all ’INSERT INTO’ statement, but this is not necessary.
page 112
INSERT INTO Orders (order_number, customer_id, part_id, quantity) VALUES (00103, 002, 0001, 1) INSERT INTO Orders (order_number, customer_id, part_id, quantity) VALUES (00103, 002, 0000, 1) INSERT INTO Orders (order_number, customer_id, part_id, quantity) VALUES (00103, 002, 0002, 1) INSERT INTO Orders (order_number, customer_id, part_id, quantity) VALUES (00134, 001, 0002, 50) INSERT INTO Customers (customer_id, name) VALUES (000, ’ACME Dastardly Gadgets’) INSERT INTO Customers (customer_id, name) VALUES (001, ’Widgets Inc.’) INSERT INTO Customers (customer_id, name) VALUES (002, ’I.M. Reech and Co.’) INSERT INTO Parts (part_id, description, location) VALUES (0000, ’cylinder’, ’bin 5-4’) INSERT INTO Parts (part_id, description, location) VALUES (0001, ’valve’, ’bin 2-3’) INSERT INTO Parts (part_id, description, location) VALUES (0002, ’hose’, ’bin 8-2’)
Figure X.4 - Entering Data Into The Tables
Once data has been entered into the database it can be recalled using a simple ’SELECT’ statement. In the first example the ’*’ indicates to select all data values ’FROM’ the ’Customers’ table. The second example shows only listing the ’name’ values from the ’Customers’ table. Finally the third example shows the listing of ’order_numbers’ from the ’Orders’ table where the ’quantity’ of parts is greater than 10.
page 113
SELECT * FROM Customers Customerscustomer_idname 000 ACME Dastardly Gadgets 001 Widgets Inc. 002 I.M. Reech and Co. SELECT name FROM Customers Customersname ACME Dastardly Gadgets Widgets Inc. I.M. Reech and Co. SELECT order_number FROM Orders WHERE quantity > 10 Orders order_number 00134
Figure X.5 - Simple Database Query Examples
It is possible to make database queries where the results are merged from many different tables. The example in Figure X.6 shows a query that is to list values for ’order_number’, ’name’, ’description’ and ’location’. These are to be merged from three tables ’Orders’, or ’O’, Customers, or ’C’, and ’Parts’, or ’P’. Finally, the conditions for a match follow the ’WHERE’ statement. The conditions are the ’customer_id’ field in the ’Customer’ and ’Order’ tables must match., and the ’part_id’ field must match in the ’Order’ and ’Part’ tables.
page 114
Select order_number, name, description, location FROM Orders O, Customers C, Parts P WHERE O.customer_id = C.customer_id, O.part_id = P.part_id Ordersorder_numbername descriptionlocation I.M. Reech and Co.valvebin 2-3 00103 00103 I.M. Reech and Co.cylinderbin 5-4 00103 I.M. Reech and Co.hosebin 8-2 00134 Widgets Inc.hose bin 8-2
Figure X.6 - A More Advanced Query
The SQL queries are easily used when interacting with a command interface. Although, it is more common for these commands to be used from within computer programs that call the database to make automatic queries.
5.2 DATABASE ISSUES • Databases handle problems of, - data locking (only allow one user to modify at once) - data sharing (other users can view) - searching - etc • Database design - first order normal, etc. - flexibility - verification
5.3 LABORATORY - SQL FOR DATABASE INTEGRATION
page 115
Purpose: To learn the basic command language, SQL, that is used to interact with relational databases. Overview: Databases store information in tables. The users can use or manipulate this data to suit other purposes. The fundamental language for interacting with the databases is SQL. This lab will offer a simple introduction, and then go on to interface with the database using C programs in the following lab. Pre-Lab: Read the SQL and database material. In-Lab: First Time Installation: 1. Check to see if the database is installed. One way to do this is to look for the database server using ’which postmaster’. If it is not installed it can be installed from the Redhat distribution CD, or by downloading it from www.postgresql.org. 2. Log in as root with ’su - root’ and edit the file ’/var/lib/pgsql/.bashrc’ to include the following lines. (Note: the .bashrc file may not exist, but it will be created by the editor.) PGLIB=/usr/lib/pgsql PGDATA=/usr/lib/pgsql/data export PGLIB PGDATA 3. Change the ownership of the postgres directory to the user postgres with the command ’chown postgres /usr/lib/pgsql’. 4. Log in as the user ’postgres’ - An account called ’postgres’ is normally defined in most modern Linux distributions, but the account password is disabled. To log in the first time you must be logged in as root, then log in as postgres with ’su postgres’. At this point you can change the password so you can log in directly as postgres in the future with ’passwd postgres’. Verify that you are logged in as postgres before continuing with ’whoami’. 5. Set up the databases with the command ’initdb’. This will set up all of the needed files and directories. 6. At this point the database should be ready for use, but the database server is not running. It can be started with ’postmaster &’. 7. Use ‘createuser ’ to add yourself as a valid database user. Answer ‘y’es when asked if you are allowed to create databases. And answer ‘y’es when asked if you can create new users. These choices will allow you full control over the database. Note: ‘destroyuser ’ can be used if you need to remove a user. 8. Log out from the postgres account with ’exit’. Before Use: 1. Start the database when logged in as root with ’postmaster &’. This should start the database server. You can check to see if it is accepting connections with the
page 116
command ’netstat -a | grep postmaster’. If the postmaster program is listed the database is ready for use. 2. The database can also be set up to run automatically each time the computer is rebooted by adding it to the ’system V’ initialization list. But, this step is not necessary unless setting up a permanent database. Creating and Using a New Database 1. Create a new database with ‘createdb test’. 2. Connect to the database with ‘psql test’. This is a simple program that allows interaction with the database using typed commands. Type ‘\h’ to see a list of commands. 3. Create a new database table using the SQL command below. This program requires that you end each line with a ‘\g’. CREATE TABLE grades (name CHAR(10), grade CHAR(3), year INT)\g 6. Display the table (it is empty) with the command below. Note: upper and lower case values are used to make the SQL commands stand out. SELECT * FROM grade 7.Add data with the commands below. After adding each datapoint, print out the table values. (Note: using the up and down cursor keys will allow you to recall previously entered commands.) INSERT INTO grades (name, grade, year) VALUES (‘egr 101’, ‘D’, 1997) INSERT INTO grades (name, year, grade) VALUES (‘egr 101’, 1998, ‘B+’) INSERT INTO grades (name, grade, year) VALUES (‘egr 103’, ‘A’, 1999) INSERT INTO grades (name, grade, year) VALUES (‘egr 209’, ‘B+’, 1999) INSERT INTO grades (name, year) VALUES (‘egr 226’, 1999) INSERT INTO grades (year) VALUES (2000) 8. Follow the tutorials in the ‘/usr/share/doc/postgres*’ directory. 9. Develop a database (of your own design) that will keep customer information, and inventory levels. Submit (individually): 1. A completed customer information database.
5.4 LABORATORY - USING C FOR DATABASE CALLS Purpose: To access a database using a simple C program. Overview: The program listing in Figure X.8 can be used to access the Postgres database. It uses a database access library called ’libpq’. This library of functions allows SQL database queries. The results of the query can then be easily retrieved.
page 117
In this example the program begins with an attempt to connect to the database using the function ’PQconnectdb’, and the status of the connection is then checked using ’PQstatus’. An SQL query is passed to the database using the ’PQexec’ command, and the results are returned into the ’PGresult’ structured called ’res’ in this example. The results can be checked using ’PQresultStatus’, and retrieved using the ’PQgetvalue’ function. The ’PQntuples’ function returns the number of matching results. After each query the results structure should be released using ’PQclear’, and when all database access is complete the connection to the database should be terminated with ’PQfinish’. #include #include #include int main(){ char char PGconn PGresult int
grade[3]; query_string[256]; *conn; *res; i;
conn = PQconnectdb("dbname=test"); if(PQstatus(conn) != CONNECTION_BAD){ printf("Enter a grade: "); scanf("%2s", grade); sprintf(query_string, "SELECT name FROM grades WHERE grade = ’%s’", grade); res = PQexec(conn, query_string); if(PQresultStatus(res) == PGRES_TUPLES_OK){ int i; for(i = 0; i < PQntuples(res); i++) printf("name = %s \n", PQgetvalue(res, i, 0)); } else { printf("The query failed \n"); } PQclear(res); PQfinish(conn); } else { printf("Could not open the database \n"); } return 0; }
Figure X.8 - C Program for Database Access (dbtest.c)
all: dbtest CC = gcc CFLAGS = -Wall LIBS = -lpq dbtest: dbtest.c $(CC) $(CFLAGS) dbtest.c -o dbtest $(LIBS)
Figure X.9 - Makefile for Database Program
page 118
Pre-Lab: 1. Examine the database program in the Overview section. In-Lab: 1. Enter the program and makefile given in the Overview section. Use ’make’ to compile the program, and run it to verify that it does access the database. 2. Write a program that allows jobs to be entered into the customer information database created in the previous laboratory. Submit (individually): 1. The C program to access the customer information database.
page 119
6. COMMUNICATIONS When multiple computers are used in a manufacturing facility they need to communicate. One means of achieving this is to use a network to connect many peers. Another approach is to use dedicated communication lines to directly connect two peers. The two main methods for communication are serial and parallel. In serial communications the data is broken down as single bits that are sent one at a time. In parallel communications multiple bits are sent at the same time.
6.1 SERIAL COMMUNICATIONS Serial communications send a single bit at a time between computers. This only requires a single communication channel, as opposed to 8 channels to send a byte. With only one channel the costs are lower, but the communication rates are slower. The communication channels are often wire based, but they may also be optical and radio. Figure 22.2 shows some of the standard electrical connections. RS-232c is the most common standard that is based on a voltage level change. At the sending computer an input will either be true or false. The ’line driver’ will convert a false value ’in’ to a ’Txd’ voltage between +3V to +15V, true will be between -3V to -15V. A cable connects the ’Txd’ and ’com’ on the sending computer to the ’Rxd’ and ’com’ inputs on the receiving computer. The receiver converts the positive and negative voltages back to logic voltage levels in the receiving computer. The cable length is limited to 50 feet to reduce the effects of electrical noise. When RS-232 is used on the factory floor, care is required to reduce the effects of electrical noise - careful grounding and shielded cables are often used.
page 120
50 ft RS-232c
Txd
Rxd
In
Out com
3000 ft RS-422a In
Out
3000 ft RS-423a In
Out
Figure 22.2 - Serial Data Standards The RS-422a cable uses a 20 mA current loop instead of voltage levels. This makes the systems more immune to electrical noise, so the cable can be up to 3000 feet long. The RS-423a standard uses a differential voltage level across two lines, also making the system more immune to electrical noise, thus allowing longer cables. To provide serial communication in two directions these circuits must be connected in both directions.
To transmit data, the sequence of bits follows a pattern, like that shown in Figure 22.3. The
page 121
transmission starts at the left hand side. Each bit will be true or false for a fixed period of time, determined by the transmission speed. A typical data byte looks like the one below. The voltage/current on the line is made true or false. The width of the bits determines the possible bits per second (bps). The value shown before is used to transmit a single byte. Between bytes, and when the line is idle, the ’Txd’ is kept true, this helps the receiver detect when a sender is present. A single start bit is sent by making the ’Txd’ false. In this example the next eight bits are the transmitted data, a byte with the value 17. The data is followed by a parity bit that can be used to check the byte. In this example there are two data bits set, and even parity is being used, so the parity bit is set. The parity bit is followed by two stop bits to help separate this byte from the next one.
true false
before
start
data
parity
stop
idle
Descriptions: before - this is a period where no bit is being sent and the line is true. start - a single bit to help get the systems synchronized. data - this could be 7 or 8 bits, but is almost always 8 now. The value shown here is a byte with the binary value 00010010 (the least significant bit is sent first). parity - this lets us check to see if the byte was sent properly. The most common choices here are no parity bit, an even parity bit, or an odd parity bit. In this case there are two bits set in the data byte. If we are using even parity the bit would be true. If we are using odd parity the bit would be false. stop - the stop bits allow a pause at the end of the data. One or two stop bits can be used. idle - a period of time where the line is true before the next byte. Figure 22.3 - A Serial Data Byte Some of the byte settings are optional, such as the number of data bits (7 or 8), the parity bit (none, even or odd) and the number of stop bits (1 or 2). The sending and receiving computers must know what these settings are to properly receive and decode the data. Most computers send
page 122
the data asynchronously, meaning that the data could be sent at any time, without warning. This makes the bit settings more important.
Another method used to detect data errors is half-duplex and full-duplex transmission. In half-duplex transmission the data is only sent in one direction. But, in full-duplex transmission a copy of any byte received is sent back to the sender to verify that it was sent and received correctly. (Note: if you type and nothing shows up on a screen, or characters show up twice you may have to change the half/full duplex setting.)
The transmission speed is the maximum number of bits that can be sent per second. The units for this is ’baud’. The baud rate includes the start, parity and stop bits. For example a 9600 baud 9600 transmission of the data in Figure 22.3 would transfer up to ----------------------------------bytes each - = 800 (1 + 8 + 1 + 2) second. Lower baud rates are 120, 300, 1.2K, 2.4K and 9.6K. Higher speeds are 19.2K, 28.8K and 33.3K. (Note: When this is set improperly you will get many transmission errors, or ’garbage’ on your screen.)
Serial lines have become one of the most common methods for transmitting data to instruments: most personal computers have two serial ports. The previous discussion of serial communications techniques also applies to devices such as modems.
6.1.1 RS-232 The RS-232c standard is based on a low/false voltage between +3 to +15V, and an high/true voltage between -3 to -15V (+/-12V is commonly used). Figure 22.4 shows some of the common connection schemes. In all methods the ’txd’ and ’rxd’ lines are crossed so that the sending ’txd’ outputs are into the listening ’rxd’ inputs when communicating between computers. When communicating with a communication device (modem), these lines are not crossed. In the ’modem’ connection the ’dsr’ and ’dtr’ lines are used to control the flow of data. In the ’computer’ the ’cts’
page 123
and ’rts’ lines are connected. These lines are all used for handshaking, to control the flow of data from sender to receiver. The ’null-modem’ configuration simplifies the handshaking between computers. The three wire configuration is a crude way to connect to devices, and data can be lost.
Modem
Computer
Null-Modem
Three wire
Computer
Computer A
Computer A
Computer A
com txd rxd dsr dtr
com txd rxd dsr dtr
com txd rxd cts rts
com txd rxd cts rts
com txd rxd dsr dtr cts rts
com txd rxd dsr dtr cts rts
com txd rxd cts rts
com txd rxd cts rts
Modem
Computer B
Computer B
Computer B
Figure 22.4 - Common RS-232 Connection Schemes Common connectors for serial communications are shown in Figure 22.5. These connectors are either male (with pins) or female (with holes), and often use the assigned pins shown. The DB-9 connector is more common now, but the DB-25 connector is still in use. In any connection the ’RXD’ and ’TXD’ pins must be used to transmit and receive data. The ’COM’ must be connected to give a common voltage reference. All of the remaining pins are used for ’handshaking’.
page 124
DB-25 1
2 3 4 5 6 7 8 9 10 11 12 13 14 15 16 17 18 19 20 21 22 23 24 25
Commonly used pins 1 - GND (chassis ground) 2 - TXD (transmit data) 3 - RXD (receive data) 4 - RTS (request to send) 5 - CTS (clear to send) 6 - DSR (data set ready) 7 - COM (common) 8 - DCD (Data Carrier Detect) 20 - DTR (data terminal ready) Other pins 9 - Positive Voltage 10 - Negative Voltage 11 - not used 12 - Secondary Received Line Signal Detector 13 - Secondary Clear to Send 14 - Secondary Transmitted Data 15 - Transmission Signal Element Timing (DCE) 16 - Secondary Received Data 17 - Receiver Signal Element Timing (DCE) 18 - not used 19 - Secondary Request to Send 21 - Signal Quality Detector 22 - Ring Indicator (RI) 23 - Data Signal Rate Selector (DTE/DCE) 24 - Transmit Signal Element Timing (DTE) 25 - Busy
DB-9 1
2 6
3 7
4 8
5 9
1 - DCD 2 - RXD 3 - TXD 4 - DTR 5 - COM 6 - DSR 7 - RTS 8 - CTS 9 - RI
Note: these connectors often have very small numbers printed on them to help you identify the pins.
Figure 22.5 - Typical RS-232 Pin Assignments and Names The ’handshaking’ lines are to be used to detect the status of the sender and receiver, and to regulate the flow of data. It would be unusual for most of these pins to be connected in any one application. The most common pins are provided on the DB-9 connector, and are also described below. TXD/RXD - (transmit data, receive data) - data lines DCD - (data carrier detect) - this indicates when a remote device is present RI - (ring indicator) - this is used by modems to indicate when a connection is about to be
page 125
made. CTS/RTS - (clear to send, ready to send) DSR/DTR - (data set ready, data terminal ready) these handshaking lines indicate when the remote machine is ready to receive data. COM - a common ground to provide a common reference voltage for the TXD and RXD. When a computer is ready to receive data it will set the "CTS" bit, the remote machine will notice this on the ’RTS’ pin. The ’DSR’ pin is similar in that it indicates the modem is ready to transmit data. ’XON’ and ’XOFF’ characters are used for a software only flow control scheme.
6.2 SERIAL COMMUNICATIONS UNDER LINUX In Linux serial communications is similar to normal file access. The file names used to access these ports are in the ’dev’ directory. The ’com1’ port is called ’ttyS0’, and the ’com2’ port is called ’ttyS1’.
#ifndef __SERIAL #define __SERIAL #define ERROR -1 #define NO_ERROR 0 class serial_io { protected: public: int fd; /* File Descriptor Global Variable */ serial_io(char*); ~serial_io(); int decode_param(char*); int writer(char*); int reader(char*, int); }; #endif
Figure X.10 - The Header File (serial_io.h)
#include
page 126
#include #include #include #include #include #include #include
#include "serial_io.h"
char int int int int
*param_file_name; param_baud; param_parity;// not implemented yet param_size; param_flow; // not implemented yet
serial_io::serial_io(char *args){ struct termios options; int error; int i; param_file_name = NULL; param_baud = B9600;// set defaults param_size = CS8; char temp[200]; int len, last, cnt; error = NO_ERROR; strcpy(temp, args); len = strlen(args); last = 0; cnt = 0; for(i = 0; (i < len) && (error == NO_ERROR); i++){ if(temp[i] == ’,’){ temp[i] = 0; error = decode_param(&(temp[last])); cnt++; last = i + 1; } else if(i == (len-1)){ error = decode_param(&(temp[last])); cnt++; } } if((error == NO_ERROR) && (param_file_name != NULL)){ if((fd = open(param_file_name /*args[0] port "/dev/ttyS0"*/, O_RDWR | O_NOCTTY | O_NDELAY)) < 0){ printf("Unable to open serial port\n"); fd = -1; } else { fcntl(fd, F_SETFL, FNDELAY); /* Configure port reading */ tcgetattr(fd, &options); /* Get the current options for the port */ cfsetispeed(&options, param_baud); cfsetospeed(&options, param_baud);
/* Set the baud */
options.c_cflag |= (CLOCAL | CREAD); // enable receiver and set local mode
page 127
options.c_cflag &= ~PARENB; // Mask the character size to 8 bits, no parity options.c_cflag &= ~CSTOPB; options.c_cflag &= ~CSIZE; // set data size options.c_cflag |= param_size; // set number of data bits //
options.c_cflag &= ~CRTSCTS; // Disable hardware flow control options.c_lflag &= ~(ICANON | ECHO | ISIG); // process as raw input options.c_oflag |= OPOST;
//
// Update settings tcsetattr(fd, TCSANOW, &options); } } else { fd = -1; } }
serial_io::~serial_io(void) { close(fd); fd = -1; if(param_file_name != NULL) delete param_file_name; }
int serial_io::decode_param(char*parameter){ int error; int temp; error = NO_ERROR; if(parameter[0] == ’F’){ if(param_file_name != NULL) delete param_file_name; param_file_name = new char[strlen(parameter)]; strcpy(param_file_name, &(parameter[1])); } else if(parameter[0] == ’B’){ temp = atoi(&(parameter[1])); if(temp == 9600) param_baud = B9600; if(temp == 2400) param_baud = B2400; if(temp == 1200) param_baud = B1200; } else if(parameter[0] == ’D’){ temp = atoi(&(parameter[1])); if(temp == 8) param_size = CS8; if(temp == 7) param_size = CS7; } else { printf("Did not recognize serial argument type - ignoring\n"); } return error; }
int serial_io::reader(char *text, int max){ int char_read, error, i, j; error = ERROR; if(fd >= 0){
page 128
char_read = read(fd, text, max-1); if (char_read > 0){ text[char_read] = 0; error = NO_ERROR; for(i = 0; i < char_read;){ if((text[i] == 10 /*CR*/) || (text[i] == ’\n’)){ for(j = i+1; j = 0){ length = strlen(text); for(count = 0; count < length; count++){ write(fd, &(text[count]), 1); } } else { printf("Serial port not initialized\n"); error = ERROR; } return error; }
Figure X.11 - Serial Communication Drivers (serial_io.c)
#include "serial_io.h" main(){ serial_io char char int char
*serial; in[100]; sent[107]; flag = 0; out[100];
page 129
serial = new serial_io("B9600,F/dev/ttyS0"); while(flag == 0){ if(serial->reader(in, 100) != ERROR){ if(strlen(in) > 0){ printf("Got String: %s", in); sprintf(out, "ECHO: %s\n", in); printf("Sending String: %s", out); serial->writer(out); } } } delete serial; }
Figure X.12 - A Serial Communication Program (serial.c)
These programs can be compiled with the makefile in Figure X.13.
all: CC=g++ CFLAGS= serial: serial_io.o:
serial
serial.c serial_io.o $(CC) $(CFLAGS) serial.c -o serial serial_io.o serial_io.c serial_io.h $(CC) $(CFLAGS) -c serial_io.c
Figure X.13 - A Makefile
6.3 PARALLEL COMMUNICATIONS Parallel data transmission will transmit multiple bits at the same time over multiple wires. This does allow faster data transmission rates, but the connectors and cables become much larger, more expensive and less flexible. These interfaces still use handshaking to control data flow.
These interfaces are common for computer printer cables and short interface cables, but they are uncommon on PLCs. A list of common interfaces follows. Centronics printer interface - These are the common printer interface used on most personal computers. It was made popular by the now defunct Centronics printer company.
page 130
GPIB/IEEE-488 - (General Purpose Instruments Bus) This bus was developed by Hewlett Packard Inc. for connecting instruments. It is still available as an option on many new instruments.
6.4 LABORATORY - SERIAL INTERFACING AND PROGRAMMING Purpose: To achieve a basic understanding of the serial communication hardware and software. Overview: Please review the chapter Pre-Lab: 1. Enter the C++ code found in the chapter. In-Lab: 1. Set up two computers beside each other, at least one should be a Linux computer. 2. Select the right connectors for the serial ports (9 or 25 pin, and male or female) on the computers and build a null modem RS-232 cable to connect the two computers. 3. Start a serial communication program on both of the computers, and establish communications - this will require you to change communication settings. 3a. (Linux) You may use ’minicom’, you will have to be logged in as root, or change the settings for the serial port with ’chmod 666 /dev/ttyS0’ or ’chmod 666 /dev/ttyS1’. 3b. (Windows) Use the hyperterm program ’hypertrm.exe’. When prompted for connection information select ’cancel’. 4. Enter and run the C++ program to echo serial data. 5. Modify the number guess game developed in a previous lab to operate over the serial port. Submit (individually): 1. The source code listings for the game running on the serial port.
6.5 LABORATORY - STEPPER MOTOR CONTROLLER Purpose: To use a serial interface to communicate with a stepper motor controller. Overview:
page 131
A stepper motor is unlike other motors. When a voltage is applied the motor does not turn continuously, it only moves a small increment. There are normally a set of four or more inputs. When these are turned on-off in a set pattern the motor shaft will rotate forward or backwards. A typical stepper motor might have 200 steps per revolution, or steps of 1.8 degrees. These motors often require somewhat sophisticated controllers. One type of controller is called an indexer. It can be given commands to move the motor, and then it takes care of pulsing the motor outputs to drive the motion. The stepper motor controllers to be used in this laboratory are integrated into the turntables in the material handling system. The controller is integrated into the turntable stations so that it can rotate the turntable up to 360 degrees with a stepped motor, eject a cart using two outputs to solenoid valves, and detect a cart present with a diffuse photoelectric sensor. The controller has an RS-422 port that can be used to communicate, and load programs. This will be connected to an RS-232C port using a special interface cable that converts the current loop to voltage values. The communication settings for the turntables are 9600 baud, 8 data bits, no parity, 1 stop bits, no flow control. The programming commands for the controller are summarized below. DCB-241 Commands abort @ soft stop C reset + move in positive direction - move in negative direction [ read nonvolatile memory ] read hardware limits \ write to nonvolatile memory ^ read moving status A port read/write B jog speed C restore D divide step rates E enable auto power off F find home
G go from address I initial velocity K ramp slope L loop on port M move at constant speed O set origin P program mode Q query program R index to target position S store parameters T set trip point V slew velocity W wait X examine parameters Z display position
Figure X.14 - Stepper Motor Control Board Commands (DCB-241) When writing programs command lines can be up to 15 characters long, including spaces. Spaces are used to separate commands and arguments. Characters used in programs can be either upper or lower case. A sample program is given below.
page 132
Pre-Lab: 1. Go to the web site www.stepcontrol.com and look at the product documents for the DCB-241 stepper driver. In-Lab: 1. Use a terminal program to communicate with the stepper motor controller. You will need a special communication cable, and the boxes can be opened with a flat bladed screwdriver. Plug the communication cable into the lower connector. (Note: if the unit already has power don’t touch the exposed 120Vac power on the power supply.) Connect an air supply and power to the unit. (Note: don’t forget to turn on the power on the front of the cabinet.) 2. Use the following commands (in sequence) to verify that the turntable is operating properly, and to explore basic commands. (Note: comments are provided for understanding, but should not be entered into the controller.) C -- this should reset the unit -- this should print out the line ’V2.03’, if not there are problems -- this should print ’#’ Z -- read the current position O -- set the current position as the origin Z -- print the current position R1000 -- this should rotate the turntable Z -- should now be 1000 R-1000 -- this should rotate the turntable the other way Z -- should be zero again A8 - kicks the cart one way (notice the lights on the solenoids) A16 - kicks the cart the other way A0 - turns off all solenoids ] -- this will check the input ports, bits 7 and 8 are for the cart present detectors 3. Enter the following program so that the turntable operates automatically. The list below also includes the commands to download and enter the program. Again comments should not be entered, and line numbers are automatically generated. When the program has been entered it can be run with the command ’G0’. P0 -- put the controller in programming mode and start the program at location ’0’ 0 O0 -- set the current position to the origin with a value of 0 4 R10000 -- more the controller 10000 steps in the positive direction 8 W0 -- wait until ’0’ ms after the motion is complete 11 R-10000 -- move 10000 steps in the opposite direction 15 W100 -- wait until ’100’ ms after the motion is complete 18 J 4 3 -- jump to address ’4’ four (3+1) times, a basic for loop (you may need to change ’4’ if your line numbers don’t match) 22 A8 -- eject the cart 24 W1000 - wait for 1 second 27 A0 - shut off the solenoid valve 29 P0 -- the end of the program 4. Write a C++ program to communicate with the stepper motor controller over RS-232. It
page 133
should allow the user to enter a motor position from the keyboard, and the controller should automatically move. Submit (individually): 1. The source code listings for the motor control program.
page 134
7. PROGRAMMABLE LOGIC CONTROLLERS (PLCs)
• CONTROL - Using artificial means to manipulate the world with a particular goal.
• System types,
• Continuous - The values to be controlled change smoothly. e.g. the speed of a car as the gas pedal is pushed • Logical - The values to be controlled are easily described as on-off. e.g. The car motor is on-off (like basic pneumatics). Note: All systems are continuous but they can be treated as logical for simplicity. • Logical control types,
• Conditional - A control decision is made by looking at current conditions only. e.g. A car engine may turn on only when the key is in the ignition and the transmission is in park. • Sequential - The controller must keep track of things that change and/or know the time and/or how long since something happened. e.g. A car with a diesel engine must wait 30 seconds after the glow plug has been active before the engine may start. Note: We can often turn a sequential problem into a conditional by adding more sensors.
page 135
CONTROL
CONTINUOUS
LINEAR
LOGICAL
NON_LINEAR
CONDITIONAL
e.g. MRAC e.g. PID
BOOLEAN
SEQUENTIAL EVENT BASED TEMPORAL
e.g. COUNTERS e.g. FUZZY LOGIC EXPERT SYSTEMS e.g. TIMERS
Examples:
continuous:
logical: conditional:
sequential:
mixed (continuous and logical) systems:
• A Programmable Logic Controller (PLC) is an input/output processing computer.
page 136
• Advantages of PLCs are:
- cost effective for complex systems - flexible (easy to add new timers/counters, etc) - computational abilities - trouble shooting aids - reliable - easy to add new components • Ladder logic was originally introduced to mimic relay logic.
7.1 BASIC LADDER LOGIC
• The PLC can be programmed like other computers using specialized “languages.”
- Ladder Logic - a programming technique using a ladder-like structure. It was originally adopted because of its similarity to relay logic diagrams to ease its acceptance in manufacturing facilities. The ladder approach is somewhat limited by the lack of loops, etc. (although this is changing).
page 137
OUTPUTS
HOT
NEUTRAL INPUTS
POWER NEEDS TO FLOW THROUGH THE INPUTS TO THE OUTPUTS
- Mnemonic - instructions and opcodes, similar to assembly language. It is more involved to program, but also more flexible than ladder logic. This will be used with the hand held programmers.
page 138
e.g. for an Omron PLC
00000 00001 00002 00003 00004 00005 00006
LDI AND LD AND ORB OUT END
A B C D
the mnemonic code is equivalent to the ladder logic below
E
A
B
C
D
E
END
• There are other methods that are not as common,
- sequential function charts/petri nets - state space diagrams - etc.
7.2 WHAT DOES LADDER LOGIC DO?
page 139
7.2.1 Connecting A PLC To A Process
PROCESS
Connections to Actuators
Feedback from sensors/switches PLC
• The PLC continuously scans the inputs and changes the outputs.
• The process can be anything - a large press, a car, a security door, a blast furnace, etc.
• As inputs change (e.g. a start button), the outputs will be changed. This will cause the process to change and new inputs to the PLC will be received.
PLC program changes outputs by examining inputs
Set new outputs
THE CONTROL LOOP read inputs
process changes and PLC pauses while it checks its own operation
7.2.2 PLC Operation • Remember: The PLC is a computer. Computers have basic components, as shown below:
page 140
Keyboard Input
SVGA Screen Output 80586 CPU
Serial Mouse Input
133/200 MHz Light output
2.1GB Disk Storage
32MB Memory Storage
• In fact the computer above looks more like the one below:
inputs
Keyboard
input memory
computer
outputs
Input Chip CPU ‘586
Mouse
output memory
Screen memory chips
monitor
Serial Input Chip digital output chip
LED display
Flow of Information Disk Controller
Memory Chips Disk storage
• Notice that in this computer, outputs aren’t connected to the CPU directly.
• A PLC will scan a copy of all inputs into memory. After this, the ladder logic program is run once and it creates a temporary table of all outputs in memory. This table is then written to the
page 141
outputs after the ladder logic program is done. This continues indefinitely while the PLC is running.
• PLC operation can be shown with a time-line -
Self input logic output test scan solve scan
0
Self input logic output test scan solve scan
Self input logic test scan solve
ranges from 1 to 100 ms
time
PLC turns on
SELF TEST - Checks to see if all cards error free, resets watch-dog timer, etc. (A watchdog timer will cause an error, and shut down the PLC if not reset within a short period of time - this would indicate that the ladder logic is not being scanned normally). INPUT SCAN - Reads input values from the chips in the input cards and copies their values to memory. This makes the PLC operation faster and avoids cases where an input changes from the start to the end of the program (e.g., an emergency stop). There are special PLC functions that read the inputs directly and avoid the input tables. LOGIC SOLVE/SCAN - Based on the input table in memory, the program is executed one step at a time, and outputs are updated. This is the focus of the later sections. OUTPUT SCAN - The output table is copied from memory to the output chips. These chips then drive the output devices.
7.3 LADDER LOGIC • Ladder logic has been developed to mimic relay logic - to make the computer more acceptable to companies and employees.
• Original efforts resisted the use of computers because they required new skills and approaches, but the use of ladder logic allowed a much smaller paradigm shift.
page 142
• Original relay ladder logic diagrams show how to hook-up inputs to run outputs.
Relay - An input coil uses a voltage/current to create a magnetic field. As the coil becomes magnetic it pulls a metal switch (or reed) towards it and makes an electrical contact. The contact that closes when the coil is energized is normally open. There is a contact that the reed touches without the coil energized is called the normally closed contact. Relays are used to let one power source close a switch for another (often high current) power source while keeping them isolated.
input coil
normally closed
normally open
Schematic - The drawing below shows the relay above in a symbolic form. OR
page 143
A Circuit - A mix of inputs and outputs allows logical selection of a device. 115VAC wall plug
relay logic
input (normally closed)
output (normally open) input (normally open)
ladder logic
• We can then imaging this in context of a PLC. (this idea was suggested by Walt Siedelman of Ackerman Electric)
page 144
push buttons
power supply +24V com.
PLC
inputs
ladder logic
outputs
115Vac AC power neut.
7.3.1 Relay Terminology • Contactor - special relays for switching of large loads.
page 145
• Motor Starter - Basically a contactor in series with an overload relay to cut off when too much current is drawn.
• Rated Voltage - Suggested operation voltage. Lower levels can result in failure to operate: voltages above shorten life.
• Rated Current - The maximum current before contact damage occurs (welding or melting).
• DC relays require special arc suppression. AC relays have a zero crossing to reduce relay arc problems.
• AC relays require a shading pole to maintain contact. If a DC relay is used with AC power on the coil, it clicks on-and-off at the frequency of the AC (also known as chattering).
page 146
7.3.2 Ladder Logic Inputs • Contact coils are used to connect the PLC power lines to drive the outputs.
• The inputs can come from electrical inputs or memory locations.
Normally open, an active input will close the contact and allow power to flow.
Normally closed, power flows when the input is not active.
• Note: if we are using normally closed contacts in our ladder logic, this is independent of what the actual device is. The choice between normally open or closed is based on what is logically needed, and not the physical device.
• For the Micrologix PLCs the inputs are labelled ‘I:0.0/x’ where x is the input number 0 to 9.
page 147
7.3.3 Ladder Logic Outputs • The outputs allow switches to close that supply or cut-off power to control devices.
• Ladder logic indicates what to do with the output, regardless of what is hooked up -- The programmer and electrician that connect the PLC are responsible for that.
• Outputs can go to electrical outputs, or to memory.
• Output symbols -
When power is applied (on) the output is activated
When power is not applied (off) the output is activated
• We can relate these to actual outputs using numbers (look for these on the front of the PLC).
• For the Micrologix PLCs the outputs are labelled ‘O:0.0/x’ where x is the output number 0 to 5.
7.4 LADDER DIAGRAMS • These diagrams are read from left to right, top to bottom.
• For the ladder logic below the sequence of operations would be B1, B2 on the top first, then
page 148
the bottom. This would be followed by T1, then F1.
B2
B1
B1
T1
F1
B2
• Power flow can be used to consider how ladder diagrams work. Power must be able to flow from the left to the right.
7.4.1 Ladder Logic Design eg. Burglar Alarm 1. If alarm is on, check sensors. 2. If window/door sensor is broken (turns off), sound alarm and turn on lights. 3. If motion sensor goes on (detects thief), sound alarm and turn on lights.
A = Alarm and lights switch (1 = on) W = Window/Door sensor (1 = OK) M = Motion Sensor (0 = OK) S = Alarm Active switch (1 = on)
page 149
We can do this with ladder logic M W
S
A
S
We can also draw an electronic circuit for this -
W
W
(S*W) (S*W)+(S*M)
S
A
M
(S*M)
We can also simplify both the circuit and the ladder M
S
A
W
W M S
W
(M+W)
S * (M+W) = (S*W)+(S*M) A
page 150
7.4.2 A More Complicated Example of Design
D E C A F
B The gates can be purchased for about $0.25 each in bulk. D
C
B
E
A
Inputs and outputs are typically 5V.
An inexpensive PLC is worth at least a few hundred dollars.
C F
Consider the cost trade-off! Why are gates not used more often?
C
D E F C B
A
D E F
C
B
A
Simplified
page 151
7.5 TIMERS/COUNTERS/LATCHES • There are some devices and concepts that are temporal/sequential (time based) or sequential. This means that they keep track of events over time, as opposed to conditional logic that decides based on instantaneous conditions. e.g. A light activating push button push button +V light On/Off Push Button
button pushed here
button released here
simple light
(Conditional Control)
toggled light
(Temporal Control) time
Note: As we follow this graph from left to right we are going through time. When the line moves up (on) or down (off) we can see how inputs and outputs
• Controls that have states or time dependence will require temporal controls (also known as sequential).
• Some devices that are temporal are:
Flip-Flops - These can be latched on or off. Latches - Will stay on until reset (Similar to flip-flops) Counters - Keeps a count of events Timers - Allows inputs and outputs to be delayed or prolonged be a known amount
page 152
7.6 LATCHES - Will stay on when set, until unlatched. D
A L
C
A
B
U
D
• We can show how these latches respond with a simple diagram.
A B C D
• As an example consider the ladder logic:
page 153
A
X
A
Y
B
Y
A
Note: this effects of this rung are overwritten by the rung below.
B
L
U
Z
Z
A B X Y Z
• In most PLCs, latches will keep their last state even when the PLC is turned off and back on.
(Note: In some other PLCs latches are only used for keeping the state of the PLC when it was turned off, they don’t ‘stick’ on or off)
7.7 TIMERS • We use timers to do some or all of the following:
page 154
- Delay turning on - Delay turning off - Accumulate time passed (retentive)
e.g. An On Timer (TON) TON A
Timer T4:0 Time Base 1.0 Preset 4 Accum. 0
(DN) (EN)
A T4:0 EN T4:0 DN
4
3 T4:0 Accum. 0
2
0 3
6
9
13 14
17
19
page 155
e.g. A Retentive On Timer (RTO) RTO A
Timer T4:0 Time Base 1.0 Preset 4 Accum. 0
(DN) (EN)
A T4:0 EN T4:0 DN
4
3 T4:0 Accum. 0
0 3
6
9
10
14
17
19
page 156
e.g. An Off Timer (TOF) TOF A
Timer T4:0 Time Base 0.01 Preset 350 Accum. 0
(DN) (EN)
A T4:0 EN T4:0 DN
3.5
3 T4:0 Accum. 0
0 3
6
9.5 10
16
18
20
page 157
e.g. A Retentive Off Timer (RTF) RTF A
Timer T4:0 Time Base 0.01 Preset 350 Accum. 0
(DN) (EN)
A T4:0 EN T4:0 DN
T4:0 Accum. 0
3
6
10
16
18
20
• When using timers (especially retentive) we must reset values when done. The (RES) instruction does this.
7.8 COUNTERS • Count up/count down counters will track input events.
page 158
• An allen Bradley PLC-5 counter is shown below a count up counter CTU A counter C5:0 Preset 4 Accum. 2
(EN) (DN)
1. Each time A turns on (then off), the accumulated value increases (here from 2to3, then 3to4, and so on) 2. When the accumulated value reaches the preset value, the ‘DN’ flag is set. C5:0 DN 3. We can set the accumulated value to zero with. C5:0 RES
• Count down counters are similar.
• Consider the example below,
page 159
I:0.0/0
I:0.0/1
CTU counter C5:0 Preset 4 Accum. 2
CTD counter C5:0 Preset 4 Accum. 2
I:0.0/2
C5:0 RES
C5:0/DN
O:0.0/0
I:0.0/0 I:0.0/1 I:0.0/2 C5:0/DN O:0.0/0
7.9 DESIGN AND SAFETY
(EN) (DN)
(EN) (DN)
page 160
7.9.1 FLOW CHARTS • Good when the PLC only does one thing at a time in a predictable sequence.
• The real advantage is in modeling the process in an orderly manner.
START
Reset all values off
start button pushed?
no
yes Open inlet valve Close outlet valve
yes Is tank full? no
stop button pushed? no
7.10 SAFETY
yes
Open outlet valve Close inlet valve
page 161
7.10.1 Grounding • The case of an object should be tied to ground to give current a path to follow in the case of a fault that energizes the case. (Note: fuses or breakers will cut off the power, but the fault will be on for long enough to be fatal.)
e.g., wire break off and touches case
Current can flow two ways, but most will follow the path of least resistance. Good grounding will keep the worker relatively safe in the case of faults.
• Step potential is another problem. Electron waves from a fault travel out in a radial direction through the ground. If a worker has two feet on the ground at different radial distances, there will be a potential difference between the feet that will cause a current to flow through the legs. If there is a fault, don’t run/walk away/towards.
• Always ground systems first before applying power. (The first time a system is activated it will have a higher chance of failure.)
• Safe current levels are listed below [ref hydro handbooks], but be aware that in certain circumstances very low currents can kill. When in doubt, take no chances.
page 162
current in body (mA) 0-1 1-5 10-20 20-50 50-100 100-300 300+
effect negligible uncomfortable possibility for harm muscles contract pain, fainting, physical injuries heart fibrillates burns, breathing stops, etc.
7.10.2 Programming/Wiring • Fail-safe wiring should be used so that if wires are cut or connections fail, the equipment should turn off. For example, if a normally closed stop button is used and the connector is broken off, it will cause the machine to stop, as if the stop button has been pressed and broken the connection.
• Programs should be designed so that they check for problems and shut down in safe ways. Some PLC’s also have power interruption sensors; use these whenever danger is present.
• Proper programming techniques will help detect possible problems on paper instead of in operation.
7.10.3 PLC Safety Rules • Use a fail-safe design.
• Make the program inaccessible to unauthorized persons.
• Use predictable, non-configurable programs.
• Use redundancy in hardware.
page 163
• Directly connect emergency stops to the PLC, or the main power supply.
• Check for system OK at start-up.
• Provide training for new users and engineers to reduce careless and uninformed mistakes.
• Use PLC built in functions for error and failure detection.
7.10.4 Troubleshooting 1. Look at the process and see if it is in a normal state. i.e. no jammed actuators, broken parts, etc. If there are visible problems, fix them and restart the process. 2. Look at the PLC to see which error lights are on. Each PLC vendor will provide documents that indicate which problems correspond to the error lights. Common error lights are given below. If any off the warning lights are on, look for electrical supply problems to the PLC.
HALT - something has stopped the CPU RUN - the PLC thinks it is OK (and probably is) ERROR - a physical problem has occurred with the PLC 3. Check indicator lights on I/O cards to see if they match the system. i.e., look at sensors that are on/off, and actuators on/off, check to see that the lights on the PLC I/O cards agree. If any of the light disagree with the physical reality, then interface electronics/mechanics need inspection. 4. Turn the PLC off and on again. If this fixes the problem it could be a programming mistake, or a grounding problem. Programming mistakes often happen the same way each time. Grounding problems are often random, and have no pattern. 5. Consult the manuals or use software if available. If no obvious problems exist, the problem is not simple and requires a technically skilled approach. 6. If all else fails call the vendor (or the contractor) for help.
page 164
7.11 DESIGN CASES
7.11.1 DEADMAN SWITCH A motor will be controlled by two switches. The Go switch will start the motor and the Stop switch will stop it. If the Stop switch was used to stop the motor, the Go switch must be thrown twice to start the motor. When the motor is active a light should be turned on. The Stop switch will be wired as normally closed.
Motor
Go
C5:0/DN
Motor
Stop
Motor
Stop
C5:0
RES
C5:0 CTU Preset 2 Accum. 1 Motor
Light
Consider: - what will happen if stop is pushed and the motor is not running?
page 165
7.11.2 CONVEYOR A conveyor is run by switching on or off a motor. We are positioning parts on the conveyor with an optical detector. When the optical sensor goes on, we want to wait 1.5 seconds, and then stop the conveyor. After a delay of 2 seconds the conveyor will start again. We need to use a start and stop button - a light should be on when the system is active.
Go
Stop
Light
Light Part Detect
T4:0 TON Time base: 0.01 Preset 150
T4:0/DN
T4:1 TON Time base: 1.0 Preset 2
T4:0/DN
Light
T4:1/DN T4:1/DN - what is assumed about part arrival and departure?
7.11.3 ACCEPT/REJECT SORTING
Motor T4:0
RES
T4:1
RES
page 166
For the conveyor in the last case we will add a sorting system. Gages have been attached that indicate good or bad. If the part is good, it continues on. If the part is bad, we do not want to delay for 2 seconds, but instead actuate a pneumatic cylinder.
Go
Stop
Light
Light Part Detect
T4:0 TON Time base: 0.01 Preset 150
T4:0/DN
Part Good
T4:1 TON Time base: 1.0 Preset 2
T4:0/DN
Part Good
T4:2 TON Time base: 0.01 Preset 50
T4:1/EN
Light
T4:2/EN T4:1/DN
Motor Cylinder T4:0
RES
T4:1
RES
T4:2
RES
T4:2/DN T4:1/DN T4:2/DN
7.11.4 SHEAR PRESS The basic requirements are,
page 167
1. A toggle start switch (TS1) and a limit switch on a safety gate (LS1) must both be on before a solenoid (SOL1) can be energized to extend a stamping cylinder to the top of a part. 2. While the stamping solenoid is energized, it must remain energized until a limit switch (LS2) is activated. This second limit switch indicates the end of a stroke. At this point the solenoid should be de-energized, thus retracting the cylinder. 3. When the cylinder is fully retracted a limit switch (LS3) is activated. The cycle may not begin again until this limit switch is active. 4. A cycle counter should also be included to allow counts of parts produced. When this value exceeds 5000 the machine should shut down and a light lit up. 5. A safety check should be included. If the cylinder solenoid has been on for more than 5 seconds, it suggests that the cylinder is jammed or the machine has a fault. If this is the case, the machine should be shut down and a maintenance light turned on.
page 168
TS1
LS1
LS3
C5:0/DN SOL1
L
SOL1
U
LS2 T4:0/DN SOL1
C5:0 CTU Preset 5000 Accum. 0
SOL1
T4:0 RTO Time base: 1.0 Preset 5
T4:0/DN
LIGHT L
C5:0/DN RESET
T4:0
RES
- what do we need to do when the machine is reset?
7.12 ADDRESSING • To use advanced data functions in a PLC, we must first understand the structure of the data
page 169
in the PLC memory.
• There are two types of memory used in a PLC-5.
Program Files - these are a collection of 1000 slots to store up to 1000 programs. The main program will be stored in program file 2. SFC programs must be in file 1, and file 0 is used for program and password information. All other program files from 3 to 999 can be used for ‘subroutines’. Data Files - This is where the variable data is stored that the PLC programs operate on. This is quite complicated, so a detailed explanation follows.
7.12.1 Data Files • In brief PLC memory works like the memories in a pocket calculator. The values below are for a PLC-5, although most Allen-Bradley PLCs have a similar structure.
page 170
For Allen-Bradley PLC-5 Rack I/O slot number in rack Interface to outside world
Fixed types of Data files
O:000 I: S2: B3: T4: C5: R6: N7: F8:
outputs inputs processor status bits in words timers counters control words integer numbers floating point numbers
Other files 9-999 can be created and and used. The user defined data files can have different data types.
• These memory locations are typically word oriented (16 bits, or 2 bytes). This includes the bit memory. But the T4, C5, R6 data files are all three words long.
• All values are stored and used as integers (except when specified, eg. floating point). When integers are stored in binary format 2’s complements are used to allow negative numbers. BCD values are also used.
• There are a number of ways the PLC memory can be addressed,
bit - individual bits in memory can be accessed - this is like addressing a single output as a data bit I:000/02 - the third input bit from input card I:000 B3:3 - a bit in memory
word/integer - 16 bits can be manipulated as a group
page 171
N7:8 - an integer from memory I:000 - an integer with all input values from an input card
data value - an actual data value can be provided 8 - an integer 8.5 - a floating point number
file level - an array of data values can be manipulated and operated on as a group #F8:5 - indicates a group of values starting at F8:5 #N7:0 - indicates a group of values starting at I7:0
indirect - another memory location can be used in the description of a location. I:000/[N7:2] -If the integer memory N7:2 location contains 5 this will become I:000/ I:[N7:1]/03 -If the integer memory location contains 2 this will become I:002/03 #I:[N7:1] -If the integer memory location contains 2 the file will start at I:002
expression - a text string that describes a complex operation “sin(F8:3) + 1.3” - a simple calculation • For the user assigned data files from 9 to 999 different data types can be assigned. These can be one of the data types already discussed, or another data type.
A - ASCII B - bit BT - block transfer C - counter D - BCD F - floating point MG - message N - integer (signed, unsigned, 2s compliment, BCD) PD - PID controller R - control SC - SFC status
page 172
ST - ASCII string T - timer
7.12.1.1 - Inputs and Outputs • Recall that the inputs and outputs use octal for specific bits. This means that the sequence of output bits is 00, 01, 02, 03, 04, 05, 06, 07, 10, 11, 12, 13, 14, 15, 16, 17
7.12.1.2 - User Numerical Memory • Bit data file B3 is well suited to use of single bits. the data is stored as words and this allows two different ways to access the same bit.
B3:0/0 = B3/0 B3:0/10 = B3/10 B3:1/0 = B3/16 B3:1/5 = B3/21 B3:2/0 = B3/32 etc... • The integer file N7 stores words in 2’s complement form. This allows values from -32768 to 32767. These values can be addressed as whole words, and individual bits can also be changed.
• The floating point file F8 will store floating point numbers that can only be used by floating point functions. The structure of these numbers does not allow bit access.
7.12.1.3 - Timer Counter Memory • Timer T4 values are addressed using the number of the timers, and an associated data type. For example the accumulator value of timer 3 is T4:3.ACC or T4:3/ACC.
EN - timer enabled bit
page 173
TT - timer timing bit DN - timer done bit PRE - preset word ACC - accumulated time word • Counter C5 values are addressed using the number of the counters, and an associated data type. For example the accumulator value of counter 3 is C5:3.ACC or C5:3/ACC.
CU - count up bit CD - count down bit DN - counter done bit OV - overflow bit UN - underflow bit PRE - preset word ACC - accumulated count word
7.12.1.4 - PLC Status Bits (for PLC-5s) • Some of the more commonly useful status bits in data file S2 are given below. Full listings are given in the manuals.
S2:0/0 carry in math operation S2:0/1 overflow in math operation S2:0/2 zero in math operation S2:0/3 sign in math operation S2:1/14 first scan of program file S2:8 the scan time (ms) S2:18 year S2:19 month S2:20 day S2:21 hour S2:22 minute S2:23 second S2:28 watchdog setpoint S2:29 fault routine file umber S2:30 STI (selectable timed interrupt) setpoint S2:31 STI file number
page 174
S2:46-S2:54,S2:55-S2:56 PII (Programmable Input Interrupt) settings S2:55 STI last scan time (ms) S2:77 communication scan time (ms)
7.12.1.5 - User Function Memory • Control file R6 is used by various functions to track progress. Values that are available are, listed below. The use of these bits is specific to the function using the control location.
EN - enable bit EU - enable unload DN - done bit EM - empty bit ER - error bit UL - unload bit IN - inhibit bit FD - found bit LEN - length word POS - position word
7.13 INSTRUCTION TYPES • There are basic categories of instructions,
Basic (discussed before) - relay instructions - timer instructions - counter instructions Program Control - branching/looping - immediate inputs/outputs - fault/interrupt detection Basic Data Handling - moves
page 175
- computation instructions - boolean instructions - conversion Logical - comparisons Advanced Data Handling - file instructions - shift registers/stacks Complex - PID - communications - high speed counters - ASCII string functions • The reader should be aware that some functions are positive edge triggered (i.e. they only work the scan is active). while most are active any time the input is active. Some examples of edge triggered and non-edge triggered functions are listed below,
Edge Triggered CTU, CTD Non-edge triggered TON, TRO, TOF, ADD, MUL, etc.
7.13.1 Program Control Structures • These change the flow of execution of the ladder logic.
7.13.2 Branching and Looping • These functions allow control found in languages like Fortran
IF-THEN is like MCR (Master Control Reset) GOTO is like JMP (Jump)
page 176
SUBROUTINES is like Program Files • MCR blocks have been used earlier, but they are worth mentioning again.
MCR A MCR If A is true then the MCR will cause the ladder in between to be executed. If A is false it is skipped. MCR
• Block of ladder logic can be bypassed using a jump statment.
JMP A
B JMP 01
If A and B are true, the program will jump to LBL:01 to be executed. If A or B is false it is skipped. LBL 01
• Subroutines allow reusable programs to be written and called as needed. They are different from jump statements because they are not part of the main program (they are other program files), and arguments can be passed and returned.
page 177
SUBROUTINES/PROGRAM FILES A program file 2
JSR (Jump subroutine) Program File 3 Input par N7:0 Input par 123 Return par N7:1
A separate ladder logic program is stored in program file 3. This feature allows the user to create their own ‘functions’. In this case if A is true, then the program below will be executed and then when done the ladder scan will continue after the subroutine instruction. The number of data values passed and returned is variable. SBR (subroutine arguments) Input par N10:0
program file 3
If B is true the subroutine will return and the values listed will be returned to the return par. For this example the value that is in N10:1 will eventually end up in N7:1
B
RET Return par N10:1
• For next loops can also be done to repeat blocks of ladder logic inside a single scan. Care must be used for this instruction so that the ladder logic does not get caught in an infinite, or long loop - if this happens the PLC will experience a fault and halt.
page 178
A
FOR label number 0 index N7:0 initial value 0 terminal value 9 step size 1 ADD Source A 1 Source B N7:1 Dest N7:1 NXT label number 0
Note: if A is true then the loop will repeat 10 times, and the value of N7:1 will be incresed by 10. If A is not true, then the ADD function will only be executed once and N7:1 will increase in value by 1.
• Ladder logic programs always have an end statement, but it is often taken for granted and ignored. Most modern software automatically inserts this. Some PLCs will experience faults if this is not present.
A
B
C
END When the end (or End Of File) is encountered the PLC will stop scanning the ladder, and start updating the outputs. This will not be true if it is a subroutine or a step in an SFC.
page 179
• There is also a temporary end (TND) that for a single ladder scan will skip the remaining portion of a program.
• A one shot contact can be used to turn on a ladder run for a single scan. When the run has a positive rising edge the oneshot will turn on the run for a single scan. Bit ‘B3:0’ is used here to track to rung status.
A
B3:0 ONS
A
B
7.13.2.1 - Immediate I/O Instructions
B
page 180
• The normal operation of the PLC is
fast [input scan]
slow [ladder logic is checked]
fast [outputs updated]
Input values read
outputs are updated in memory only as ladder logic scanned
Output values are changed to match values in memory
• This approach avoids problems caused by logic setting and resetting outputs before done.
• If we have a problem we may want to update an output immediately, and not wait for the PLC to complete its scan of the ladder logic. To do this we use immediate inputs and outputs.
page 181
e.g. Check for nuclear reactor overheat I:001/03 overheat sensor O:010/01 reactor shutdown I:001 IIN I:001/03
O:010/01
O:010 IOT These added statements can allow the ladder logic to examine a critical input, and adjust a critical output many times during the execution of ladder logic that might take too long for safety.
7.13.2.2 - Fault Detection and Interrupts • The PLC can be set up to run programs automatically. This is normally done for a few reasons,
- to deal with errors that occur (eg. divide by zero) - to run a program at a regular timed interval (eg. SPC calculations) - to respond when a long instruction is complete (eg. analog input) - when a certain input changed (eg. panic button) • Two types of errors will occur - terminal (critical) and warnings (non-critical). A critical failure will normally stop the PLC.
• In some applications faults and failures must be dealt with in logic if possible, if not the system must be shut down.
page 182
• There are some memory locations that store indications of warning and fatal errors that have occurred. The routine in program file [S:29] needs to be able to detect and clear the fault.
S:29 - program file number to run when a fault occurs • To set a timed interrupt we will set values in the status memory as indicated below. The program in file [S:31] will be run every [S:30]ms.
S:30 - timed delay between program execution - an integer number of ms S:31 - the program number to be run • To cause an interrupt when a bit changes the following bits can be set.
S:46 - the program file to run when the input bit changes S:47 - the rack and group number (eg. if in the main rack it is 000) S:48 - mask for the input address (eg. 0000000000000100 watches 02) S:49 - for positive edge triggered =1 for negative edge triggered = 0 S:50 - the number of counts before the interrupt occurs 1 = always up to 32767
7.13.3 Basic Data Handling • Some handy functions found in PLC-5’s (similar functions are available in other PLC’s)
7.13.3.1 - Move Functions • There are two types of move functions,
MOV(value,destination) - moves a value to a memory location MVM(value,mask,destination) - moves a value to a memory location, but with a mask to select specific bits. • The following function moves data values between memory locations. The following example moves a floating point number from floating point memory 7 to 23
page 183
MOV Source F8:07 Destination F8:23
• The following example moves a floating point number from floating point memory F8:7 to integer memory N7:23
MOV Source F8:07 Destination N7:23
• The following example puts an integer value 123 in integer memory N7:23
MOV Source 123 Destination N7:23
• A more complex example of the move functions follows,
page 184
MOV source 130 dest N7:0 MOV source N7:1 dest N7:2 MVM source N7:3 mask N7:4 dest N7:5 before (binary) N7:0 N7:1 N7:2 N7:3 N7:4 N7:5
0000000000000000 1101101101010111 0000000000000000 1101100010111011 1010101010101010 0000000000000000
after (binary) N7:0 N7:1 N7:2 N7:3 N7:4 N7:5
0000000010000010 1101101101010111 1101101101010111 1101100010111011 1010101010101010 1000100010101010
7.14 MATH FUNCTIONS • These functions use values in memory, and store the results back in memory (Note: these functions do not use variables like normal programming languages.)
• Math functions are quite similar. The following example adds the integer and floating point number and puts the results in ‘F8:36’.
page 185
ADD source A N7:04 source B F8:35 destination F8:36
• Basic PLC-5 math functions include,
ADD(value,value,destination) - add two values SUB(value,value,destination) - subtract MUL(value,value,destination) - multiply DIV(value,value,destination) - divide NEG(value,destination) - reverse sign from positive/negative CLR(value) - clear the memory location • Consider the example below,
page 186
ADD source A N7:0 source B N7:1 dest. N7:2 ADD source A 1 source B N7:3 dest. N7:3 SUB source A N7:1 source B N7:2 dest. N7:4 MULT source A N7:0 source B N7:1 dest. N7:5 DIV source A N7:1 source B N7:0 dest. N7:6 NEG source A N7:4 dest. N7:7 CLR dest. N7:8 DIV source A F8:1 source B F8:0 dest. F8:2 DIV source A N7:1 source B N7:0 dest. F8:3
• As an exercise, try the calculation below with ladder logic,
addr.
before
after
N7:0 N7:1 N7:2 N7:3 N7:4 N7:5 N7:6 N7:7 N7:8
10 25 0 0 0 0 0 0 100
10 25 35 1 -10 250 2 10 0
F8:0 F8:1 F8:2 F8:3
10.0 25.0 0 0
10.0 25.0 2.5 2.0
Note: integer values are limited to ranges between 32768 and 32767, and there are no fractions.
page 187
N7:2 = -(5 - N7:0 / N7:1)
• Some intermediate math functions include,
CPT(destination,expression) - does a calculation ACS(value,destination) - inverse cosine COS(value,destination) - cosine ASN(value,destination) - inverse sine SIN(value,destination) - sine ATN(value,destination) - inverse tangent TAN(value,destination) - tangent XPY(value,value,destination) - X to the power of Y LN(value,destination) - natural log LOG(value,destination) - base 10 log SQR(value,destination) - square root • Examples of some of these functions are given below.
page 188
given A =
C
ln B + e acos ( D )
assign A = F8:0 B = F8:1 C = F8:2 D = F8:3 LN SourceA F8:1 Dest. F8:4 XPY SourceA 2.718 SourceB F8:2 Dest F8:5 ACS SourceA F8:3 Dest. F8:6 MUL SourceA F8:5 SourceB F8:6 Dest F8:7 ADD SourceA F8:4 SourceB F8:7 Dest F8:7 SQR SourceA F8:7 Dest. F8:0
page 189
It can also be done with a compute expression CPT Dest. F8:0 Expression SQR(LN(F8:1)+XPY(2.718,F8:2)*ACS(F8:3))
• For practice implement the following function,
+ log ( y ) x = atan y y----------------------- y + 1
• Some functions are well suited to statistics.
AVE(start value,destination,control,length) - average of values STD(start value,destination,control,length) - standard deviation of values SRT(start value,control,length) - sort a list of values • Examples of these functions are given below.
page 190
AVE File #F8:0 Dest F8:4 Control R6:1 length 4 position 0
STD File #F8:0 Dest F8:5 Control R6:2 length 4 position 0
Addr.
before
after
F8:0 F8:1 F8:2 F8:3 F8:4 F8:5
3 1 2 4 0 0
1 2 3 4 2.5 1.29
SRT File #F8:0 Control R6:3 length 4 position 0
• There are also functions for basic data conversion.
TOD(value,destination) - convert from BCD to binary FRD(value,destination) - convert from binary to BCD DEG(value,destination) - convert from radians to degrees RAD(value,destination) - convert from degrees to radians • Examples of these functions are given below.
page 191
FRD Source A D9:0 Dest. N7:0 TOD Source A N7:1 Dest. D9:1 DEG Source A F8:0 Dest. F8:2 RAD Source A F8:1 Dest. F8:3 Addr.
before
after
N7:0 N7:1 F8:0 F8:1 F8:2 F8:3 D9:0 D9:1
0000000000000000 0000001000100100 3.141 45 0 0 0000 0000 0000 0000 0001 0111 1001 0011
0000011100000001 0000001000100100 3.141 45 180 0.785 0000 0101 0100 1000 0001 0111 1001 0011
7.15 LOGICAL FUNCTIONS
7.15.1 Comparison of Values
page 192
• These functions act like input contacts. The equivalent to these functions are if-then statements in traditional programming languages.
• Basic comparison functions in a PLC-5 include,
CMP(expression) - compares two values for equality EQU(value,value) - equal NEQ(value,value) - not equal LES(value,value) - less than LEQ(value,value) - less than or equal GRT(value,value) - greater than GEQ(value,value) - greater than or equal • The comparison function below compares values at locations A and B. If they are not equal, the output is true. The use of the other comparison functions is identical.
OR
NEQ A N7:03 B N7:02
O:012
CMP expression N7:03 N7:02
O:012
04
04
• More advanced comparison functions in a PLC-5 include,
MEQ(value,mask,threshold) - compare for equality using a mask LIM(low limit,value,high limit) - check for a value between limits • Examples of these functions are shown below.
page 193
LIM low limit N7:0 test value N7:1 high limit N7:2
N7:4/0
LIM low limit N7:2 test value N7:1 high limit N7:0
N7:4/1
LIM low limit N7:2 test value N7:3 high limit N7:0
N7:4/2
MEQ source N7:0 mask N7:1 compare N7:2
N7:4/3
Addr.
after (decimal)
after (binary)
N7:0 N7:1 N7:2 N7:3 N7:4
1 5 11 15
0000000000000001 0000000000000101 0000000000001011 0000000000001111 0000000000001101
7.16 BINARY FUNCTIONS • These functions allow Boolean operations on numbers and values in the PLC memory.
• Binary functions are also available for,
page 194
AND(value,value,destination) - Binary and function OR(value,value,destination) - Binary or function NOT(value,value,destination) - Binary not function XOR(value,value,destination) - Binary exclusive or function • Examples of the functions are,
AND source A N7:0 source B N7:1 dest. N7:2 OR source A N7:0 source B N7:1 dest. N7:3 XOR source A N7:0 source B N7:1 dest. N7:4 NOT source A N7:0 dest. N7:5
after
addr. N7:0 N7:1 N7:2 N7:3 N7:4 N7:5
data (binary) 0011010111011011 1010010011101010 1010010011001010 1011010111111011 1001000100110001 1100101000100100
7.17 ADVANCED DATA HANDLING
page 195
7.17.1 Multiple Data Value Functions • We can also deal with large ‘chunks’ of memory at once. These will not be covered, but are available in texts. Some functions include,
- move/copy memory blocks - add/subtract/multiply/divide/and/or/eor/not/etc blocks of memory • These functions are similar to single value functions, but they also include some matrix operations. For a PLC-5 a matrix, or block of memory is also known as an array.
• The basic functions are,
FAL(control,length,mode,destination,expression) - will perform basic math operations to multiple values. FSC(control,length,mode,expression) - will do a comparison to multiple values COP(start value,destination,length) - copies a block of values FLL(value,destination,length) - copies a single value to a block of memory • These functions are done on a PLC-5 using file commands. Typical operations include
file to file - copy an array of memory from one location to another. element to file - one value is copied to a block of memory file to element - can convert between data types file add - add arrays file subtract - subtract arrays file multiply - multiply arrays file divide - divide an array by a value convert to/from BCD AND/OR/XOR/NOT - perform binary functions. • Examples of these functions are shown below.
page 196
FAL Control R6:0 length 5 position 0 Mode all Destination #N7:5 Expression #N7:0 + 5
file to file
FAL Control R6:0 length 5 position 0 Mode incremental Destination #N7:5 Expression N7:0 + 5
element to file file to element
FAL Control R6:0 length 5 position 0 Mode incremental Destination N7:5 Expression #N7:0 + 5
file to element
• a useful function not implemented on PLC-5 processors is a memory exchange.
7.17.2 Block Transfer Functions • Certain PLC cards only have a single address (eg. O:001 or I:001) but multiple data values need to be read or written to it. To do this the block transfer functions are used.
• These will be used in the labs for analog input/output cards.
page 197
• These functions will take more than a single scan, and so once activated they will require a delay until they finish.
• To use the write functions we set up a block of memory, the function shows this starting at N9:0, and it is 10 words long (this is determined by the special purpose card). The block transfer function also needs a control block of memory, this is BT10:1
BT10:1/EN
Advance
Block Transfer Write Module Type Example Output Card Rack 00 Group 3 Module 0 Control Block BT10:1 Data File N9:0 Length 10 Continuous No
• To read values we use a similar method. In the example below 9 values will be read from the card and be placed in memory locations from N9:4 to N9:11.
BT10:0/15
read
BTR Rack: 00 Group: 0 Module: 0 BT Array: BT10:0 Data File: N9:4 Length: 9 Continuous: no
page 198
7.18 COMPLEX FUNCTIONS
7.18.1 Shift Registers • The values can be shifted left or right with the following functions.
BSL - shifts left from the LSB to the MSB. The LSB must be supplied BSR - similar to the BSL, except the bit is input to the MSB and shifted to the LSB • These use bit memory blocks of variable length.
• An example of a shift register is given below. In this case it is taking the value of bit B3:1/0 and putting it in the control word bit R6:2/UL. It then shifts the bits once to the right, B3:1/0 = B3:1/1 then B3:1/1 = B3:1/2 then B3:1/2 = B3:1/3 then B3:1/3 = B3:1/4. Then the input bit is put into the most significant bit B3:1/4 = I:000/00.
bits shift right B3:1
MSB 0 0 0 0 0 0 0 0 0 0 0 0 0 0 0 0 LSB 15 00 I:000/00
5
BSR File B3:1 Control R6:2 Bit address I:000/00 Length 5
• There are other types of shift registers not implemented in PLC-5s.
R6:2/UL
page 199
Arithmetic Shift Left (ASL) carry msb 0
0
lsb 0
0
0
0
0
0
0
0
0
0
0
0
0
0
0
0
0
0
0 0 0 carry 0
0
0
0
0
0
0 0 0 carry
0
0
Arithmetic Shift Right (ASR) 0
0
carry 0
Rotate Left (ROL)
Rotate Right (ROR)
0
7.18.2 Stacks • We can also use stack type commands. These allow values to be stored in a ‘pile’. This allows us to write programs that will accumulate values that can be used later, or in sequence.
• The basic concept of a FIFO stack is that the first element in is the first element out.
• The PLC-5 commands are FFL to load the stack, and FFU to unload it.
• The example below shows two instructions to load and unload the stack. The first time FFL is activated it will grab all of the bits from the input card I:001 and store them on the stack, at N7:0. The next value would be at N7:1, and so on until the stack length is met. When FFU is used the value at N7:0 will be moved to set all of the bits on the output card O:003 and the values on
page 200
the stack will be shifted up so that the value previously in N7:1 is now in N7:0, etc. (note: the source and destination do not need to be inputs and outputs)
A
FFL source I:001 FIFO N7:0 Control R6:0 length 5 position 0
B FFU FIFO N7:0 destination O:003 Control R6:0 length 5 position 0
• A Last-In-First-Out stack can also be used with the LFL/LFU functions.
7.18.3 Sequencers • Basically, sequencers are a method for using predetermined patterns to drive a process
• These were originally based on motor driven rotating cams that made and broke switches. When a number of these cams were put together, they would be equivalent to a binary number, and could control multiple system variables.
page 201
As it rotates it makes contact with none, one, or two terminals, as determined by the depressions and rises in the rotating cam.
• A sequencer can keep a set of values in memory and move these to memory locations (such as an output card) when directed.
• These are well suited to state diagrams/processes with a single flow of execution (like traffic lights)
• The commands are,
SQO(start,mask,source,destination,control,length) - sequencer output from table to memory address SQI(start,mask,source,control,length) - sequencer input from memory address to table SQL(start,source,control,length) - sequencer load to set up the sequencer parameters • An example of a sequencer is given below for traffic light control. The light patterns are stored in memory (entered manually by the programmer). These are then moved out to the output card as the function is activated. The mask (003F = 0000000000111111) is used so that only the 6 LSB are changed.
page 202
SQO File B3:0 Mask 003F Destination O:000 Control R6:0 Length 4 Position 0
B3:0
B3:3
0 0 0 0
0 0 0 0
0 0 0 0
0 0 0 0
0 0 0 0
0 0 0 0
0 0 0 0
0 0 0 0
0 0 0 0
0 0 0 0
0 0 1 0
0 0 0 1
1 1 0 0
1 0 0 0
0 1 0 0
0 0 1 1
NS - red NS - yellow NS - green EW - red EW - yellow EW - green
7.19 ASCII FUNCTIONS • ASCII functions can be used to interpret and manipulate strings in PLCs.
• These functions include,
ABL(channel, control, )- reports the number of ASCII characters including line endings ACB(channel, control, ) - reports the numbers of ASCII characters in buffer ACI(string, dest) - convert ASCII string to integer ACN(string, string,dest) - concatenate strings AEX(string, start, length, dest) - this will cut a segment of a string out of a larger string AIC(integer, string) - convert an integer to a string AHL(channel, mask, mask, control) - does data handshaking ARD(channel, dest, control, length) - will get characters from the ASCII
page 203
buffer ARL(channel, dest, control, length) - will get characters from an ASCII buffer ASC(string, start, string, result) - this will look for one string inside another AWT(channel, string, control, length) - will write characters to an ASCII output • An example of this function is given below,
• Try the problem below,
Add the following numbers and store the results in ST10:2 ST10:0 “100” ST10:1 “10” ST10:2
7.20 DESIGN TECHNIQUES
7.20.1 State Diagrams • We can implement state diagrams seen in earlier sections using many of the advanced func-
page 204
tion discussed in this section.
• Most PLCs allow multiple programs that may be used as subroutines. We could implement a block logic method using subroutine programs.
• Consider the state diagram below and implement it in ladder logic. You should anticipate what will happen if both A and C are pushed at the same time.
STA
B
STC
D
A
C STB
first scan
page 205
PROGRAM 2 first scan
STA
STB
STC
JSR program 3 JSR program 4 JSR program 5
L
STB
U
STA
U
STC
page 206
PROGRAM 3 B
PROGRAM 4 C
U
STA
L
STB
U
L A
STB
STC
C U
L
STB
STA
PROGRAM 5 D
U
L
MCR
7.21 DESIGN CASES
STC
STB
page 207
7.21.1 If-Then • If-then can be implemented different ways, as a simple jump, or as a subroutine call.
A
JMP LBL 01
IF (A) THEN GOTO (01) 01 LBL
A
JSR FILE 3
IF (A) THEN {...... }
7.21.2 For-Next • For-next can be implemented as shown below, but recall that PLC programs do not execute one line at a time.
page 208
LIM N7:0 min 1 max 10
MCR
for i = 1 to 10 next i
ADD source A: N7:0 source B: 1 Dest.: N7:0 MCR
• A For/Next function is also available in the PLC.
• A do-while can be done as a simple variation of this.
7.21.3 Conveyor • Consider a conveyor where parts enter on one end. they will be checked to be in a left or right orientation with a vision system. If neither left nor right is found, he part will be placed in a reject bin. The conveyor layout is shown below.
page 209
vision
left
right
reject
part movement along conveyor
conveyor location sensor
7.22 IMPLEMENTATION
7.23 PLC WIRING • Many configurations and packages are available. But essential components are:
power supply - Provides voltage/current to drive the electronics (often5V, +/ - 12V, +/- 24V) CPU - Where ladder logic is stored and processed; the main control is executed here. I/O (Input/Output) - A number of input/output terminals to connect to the actual system Indicator lights - Indicate mode/power and status. These are essential when diagnosing problems. • Common Configurations:
Rack/Chassis - A rack or number of racks are used to put PLC cards into. These are easy to change, and expand. Shoebox - A compact, all-in-one unit (about the size of a shoebox) that has limited expansion capabilities. Lower cost and compactness make these ideal for small applications. • Criteria for evaluation:
page 210
Rack, shoebox or micro # of inputs/outputs (digital) Memory - often 1K and up. Need is dictated by size of ladder logic program. A ladder element will take only a few bytes and will be specified in manufacturers documentation. # of I/O modules - When doing some exotic applications, a large number of special add-on cards may be required. Scan Time - The time to execute ladder logic elements. Big programs or faster processes will require shorter scan times. The shorter the scan time, the higher the cost. Typical values for this are 1 microsecond per simple ladder instruction. Communications - Serial and networked connections allow the PLC to be programmed and talk to other PLCs. The needs are determined by the application.
7.23.1 SWITCHED INPUTS AND OUTPUTS The Obvious:
A PLC is just a computer. We must get information in so that it may make decisions and have outputs so that it can make things happen. Inputs:
Switches - Contact, deadman, etc. all allow a voltage to be applied or removed from an input. Relays - Used to isolate high voltages from the PLC inputs, these act as switches. Encoder - Can keep track of positions. etc.
page 211
PLC Input Card 24V AC
e.g. normally open push-button 24 V AC Power Supply
00 01 02 03 04
Normally open temperature switch (See appendix in textbook for more symbols) I:0.3 Push Button
05 06 07 GND
01 I:0.3 Temperature Sensor
it is in rack 0 I/O Group 3
03
7.23.1.1 - Input Modules • Input modules typically accept various inputs depending upon specified values.
• Typical input voltages are:
12-24 VDC 100-120 VAC 200-240 VAC 12-24 VAC/DC 24 VAC • DC voltages are usually lower and, therefore, safer (i.e., 12-24V)
page 212
• DC inputs are very fast. AC inputs require a longer time (e.g., a 60Hz wave would require 1/60sec for reasonable recognition).
• DC voltages are flexible being able to connect to greater varieties of electrical systems.
• DC input cards typically have more inputs.
• AC signals are more immune to noise than DC, so they are suited to long distances and noisy (magnetic) environments.
• AC signals are very common in many existing automation devices.
7.23.1.2 - Actuators • Inductive loads - Inductance is caused by a coil building up a magnetic field. When a voltage is removed from the coil, the field starts to collapse. As it does this, the magnetic field is changed back to current/voltage. If this change is too sudden, a large voltage spike is created. One way to overcome this is by adding a surge suppressor. One type of design was suggested by Steel McCreery of Omron Canada Ltd.
page 213
inductive load VDC+/VAC
output
Uncompensated VDC-/COM.
common Control Relay (PLC)
Power supply inductive load L
output C common Relay or Triac
R
VAC + Vs -
Compensating for AC loads
COM.
Power supply R = Vs(.5 to 1) ohms C = (.5 to 1)/Adc (microfarads) Vcapacitor = 2(Vswitching) + (200 to 300) V Adc is the rated amperage of the load Vs is the voltage of the load/power supply Vswitching may be up to 10 time Vs inductive load
output
common Relay or Transistor
+
Compensating for DC loads
Power supply
7.23.1.3 - Output Modules • Typical Outputs
Motors - Motors often have their own controllers, or relays because of the high current they require. Lights - Lights can often be powered directly from PLC output boards, etc. • WARNING - ALWAYS CHECK RATED VOLTAGES AND CURRENTS FOR PLC’s AND NEVER EXCEED!
page 214
24 V DC Output Card
120 V AC Power Supply COM.
00 01
Relay
02 03 Motor
04 05
24 V lamp
06 +24 V DC Power Supply GND
07 COM in rack 01 I/O group 2 O:1.2
Motor 03 O:1.2
Lamp 07
page 215
e.g. output example with dry (relay) contacts 120 V AC/DC Output Card
24 V DC Power Supply
00
120 V AC Power Supply
01 02 03 Relay
04 05 06
Motor
07 in rack 01 I/O group 2
24 V lamp
O:0.2 Motor 03 O:0.2
Lamp 07
• Typical outputs operate in one of two ways:
Dry contacts - A separate relay is dedicated to each output. This allows mixed voltages (AC or DC and voltage levels up to the maximum) as well as isolated outputs to protect other outputs and the PLC. Response times are often greater than 10ms. This method is the least sensitive to
page 216
voltage variations and spikes. Switched outputs - A voltage is supplied to the PLC card and the card switches it to different outputs using solid state circuitry (transistors, triacs, etc.) Triacs are well suited to AC devices requiring less than an amp. They are sensitive to power spikes and might inadvertently turn on when there are transient voltage spikes. A resistor may need to be put in parallel with a load to ensure enough current is drawn to turn on the triac. The resistor size can be determined by PLC output card
I = leakage current (mA) Vac
load PLC controlled
Von
TRIAC
power supply
R neut. R < Von/I
Transistor outputs use NPN or PNP transistors up to 1A typically. Their response time is well under 1ms.
7.24 THE PLC ENVIRONMENT 7.24.1 Electrical Wiring Diagrams • PLC’s are generally used to control the supply of power to a system. As a result, a brief examination of electrical supply wiring diagrams is worthwhile.
• Generally electrical diagrams contain very basic circuit elements, such as relays, transformers, motors, fuses, lights, etc.
• Within these systems there is often a mix of AC and DC power. 3 phase AC power is what is delivered universally by electric utilities, so the wiring diagrams focus on AC circuits.
page 217
• A relay diagram for a simple motor with a seal in circuit might look like the one shown below,: terminals
power interrupter
motor starter M
L1 M
motor 3 phase AC
L2 M L3
step down transformer
start stop M M
• The circuit designed for the motor controller must be laid out so that it may be installed in
page 218
an insulated cabinet. In the figure below, each box could be a purchased module(s).
Main Breaker
Contactors Transformer
Start
Stop
Overload
Terminal Block
A physical layout for the control cabinet
• After the Layout for the cabinet is determined, the wire paths must be determined. The figure below lays out the wire paths and modules to be used.
L3
L2
L1
page 219
start
stop
3 phase AC
motor 3 phase AC
7.24.2 Wiring • Discrete inputs - If a group of input voltages are the same, they can be grouped together. An
page 220
example of this is shown below: PLC Input +
I0 I1
24VDC
I2 I3 -
COM.
• If the input voltages are different and/or come from different sources, the user might use isolated inputs.
PLC Input Card
24VAC
I0
COM
N0 + 24VDC
-
I1 N1 I2
+
N2
12VDC -
• Analog Inputs - The continuous nature of these inputs makes them very sensitive to noise. More is discussed in the next section, and an example is given below:
page 221
A shield is a metal sheath that surrounds the wires
Analog Input
Analog voltage source +
IN1 REF1
-
SHLD
7.24.3 Shielding and Grounding • In any sort of control system, wire still carries most inputs/outputs/communications
• We transmit signals along wires by pushing/pulling electrons in one end of the metal wires. Based upon the push/pull that shows up at the other end, we determine the input/output/communications. *** The key idea is that a signal propagates along the wire.
• There are two problems that occur in these systems.
1. Different power sources in the same system can cause different power supply voltages at opposite ends of a wire. As a result, a current will flow and an unwanted voltage appears. This can destroy components and create false signal levels. 2. Magnetic fields crossing the long conductors or in conductor loops can induce currents, destroy equipment, give false readings, or add unwanted noise to analog data signals. • General design points
- Choose a good shielding cabinet - Avoid “noisy” equipment when possible
page 222
- Separate voltage levels, and AC/DC wires from each other when possible. • typical sources of grounding problems are:
- Electrostatic - Magnetic - Electromagnetic - Resistance coupled circuits - Ground loops
• Shielded wire is one good approach to reducing electrostatic/magnetic interference. The conductors are housed in a conducting jacket or the circuitry in housed in a conducting metal cabinet.
• Resistance coupled devices can have interference through a common power source, such as power spikes or brownouts caused by other devices in a factory.
• Ground loops are caused when too many separate connections to ground are made creating loops of wire that become excellent receivers for magnetic interference that induces differences in voltage between grounds on different machines. The common solution is to use a common ground bar.
page 223
Preferred
device A
ground loop #1
device A
+V power supply
ground loop #2
-V gnd
device B
+V gnd -V
device B
power supply
7.24.4 PLC Environment • Care must be taken to avoid certain environmental factors.
Dirt - dust and grime can enter the PLC through air ventilation ducts. As dirt clogs internal circuitry and external circuitry, it can effect operation. A storage cabinet such as Nema 4 or 12 can help protect the PLC. Humidity - Humidity is not a problem with the modern plastic construction materials. But if the humidity condenses, the water can cause corrosion, conduct current, etc. Condensation should be avoided at all costs. Temperature - The semiconductor chips in the PLC have operating ranges where they are operational. As the temperature is moved out of this range, they will not operate properly and the PLC will shut down. Ambient heat generated in the PLC will help keep the PLC operational at lower temperatures (generally to 0°C). The upper range for the devices is about 60°C, which is generally sufficient for sealed cabinets, but warm temperatures, or other heat sources (e.g. direct irradiation from the sun) can raise the temperature above acceptable limits. In
page 224
extreme conditions, heating or cooling units may be required. (This includes “cold-starts” for PLCs before their semiconductors heat up). Shock and Vibration - The nature of most industrial equipment is to apply energy to exact changes. As this energy is applied, there are shocks and vibrations induced. Both will travel through solid materials with ease. While PLCs are designed to withstand a great deal of shock and vibration, special elastomer/sprung or other mounting equipment may be required. Also note that careful consideration of vibration is also required when wiring. - Interference - Discussed in shielding and grounding. - Power - Power will fluctuate in the factory as large equipment is turned on and off. To avoid this various options are available. Use an isolation transformer. A UPS (Uninterruptable Power Supply) is also becoming an inexpensive option and are widely available for personal computers.
7.24.5 SPECIAL I/O MODULES • Counters
• each card will have 1 to 16 counters generally. • typical sample speeds 200KHz • often allow count up/down • the counter can be set to zero, or up/down, or gating can occur with an external input. • High Speed Counter - When pulses are too fast to be counted during normal PLC ladder scans, a special counter can be used that will keep track of the pulses.
• Position controller - A card that will drive a motor (servo motor or stepper motor), and use feedback of the motor position to increase accuracy (feedback is optional with stepper motors).
• PID modules - For continuous systems, for example motor speed. • There are 2 types of PID modules. In the first, the CPU does the calculation; in the second, a second controller card does the calculation.
page 225
- When the CPU does the calculation, the PID loop is slower. - When a specialized card controls the PID loop, it is faster, but it costs more. • Typical applications - positioning workpieces. • Thermocouple - Thermocouples can be used to measure temperature, but these low voltage devices require sensitive electronics to get accurate temperature readings.
• Analog Input/Output - These cards measure voltages in various ranges and allow monitoring of continuous processes. These cards can also output analog voltages to help control external processes, etc.
• Programmers - There are a few basic types of programmers in use. These tend to fall into 3 categories:
1. Hand held units (or integrated) - They allow programming of PLC using a calculator type interface. And is often done using mnemonics. 2. Specialized programming units - Effectively these are portable computers that allows graphical editing of the ladder logic, and fast uploading/ downloading/monitoring of the PLC. 3. PLC Software for Personal Computers - They are similar to the specialized programming units, but the software runs on a multi-use, user supplied computer. This approach is typically preferred over 2. • Man Machine Interface (MMI) - The user can use,
• touch screens • screen and buttons • LCD/LED and buttons • keypad to talk to PLC • PLC CPU’s - A wide variety of CPU’s are available and can often be used interchangeably in the rack systems. The basic formula is price/performance. The table below compares a few CPU units in various criteria.
page 226
PLC
Siemens S5-90U
Allen-Bradley Siemens MicroLogix S5-115U (CPU 944)
Allen-Bradley AEG SLC 5/04 PC-A984-145
4
4
96
64
8
1 = 3). We will assume that we are using a venturi valve to generate the suction, so a pressure differential of 3psi is reasonable. ( W )FS = PA min lb- A 1lb3 = 3 -----2 min in A min = 1in
2 2
d min A min ≤ π --------2 d min 2 2 1in ≤ π --------2 d min = 1.13in
Based on this calculation I would select a suction cup that is 1.25” or 1.5” dia.
page 325
ans. c)
Start
reset pallet values
no
start button pushed? yes pick up small box
index pallet
move above box no is box full?
no
stop pushed?
yes turn off conveyor turn on light
reset button?
no
yes
12. Repeat the previous problem for the Seiko RT-3000 robot.
yes
page 326
ans. a) First, we need to convert the given dimensions to mm. small boxes = 127x101.6x25.4mm large boxes = 508x203.2x76.2mm Next, we need to overlay these on the robot workspace. In this case there is abundant space and can be done by inspection. ( 0, 500, 0 ) y
A photo sensor D
x
127/2mm
( – 500, 0, 0 )
B C
A = (0, 500-101.6/2, 0) = (0, 449.2, 0) B = (-350, -1.5*127, 0) = (-350, -190.5, 0) C = (-350 + 101.6, -1.5*127, 0) = (-248.4, -190.5, 0) D = (-350, 1.5*127, 0) = (-350, 190.5, 0)
page 327
ans. b) For this application, vacuum grippers should work effectively because the mass is light, and the boxes should have clean cardboard faces. Because the application has been designed to lift the boxes in the centers, we should be able to use a single suction cup, but a large factor of safety will be used to compensate (>= 3). We will assume that we are using a venturi valve to generate the suction, so a pressure differential of 3psi is reasonable. ( W )FS = PA min lb- A 1lb3 = 3 -----2 min in A min = 1in
2 2
d min A min ≤ π --------2 d min 2 2 1in ≤ π --------2 d min = 1.13in
Based on this calculation I would select a suction cup that is 1.25” or 1.5” dia.
page 328
ans. c)
Start
reset pallet values
no
start button pushed? yes pick up small box
index pallet
move above box no is box full?
no
yes turn off conveyor turn on light
reset button? yes
no
stop pushed?
yes
page 329
ans.
10 R = 3: C = 4: H = 0 ‘ define rows and column variables 20 SPEED 100 ‘ set the robot speed 30 T1 = 0. 449.2 0. 0. ‘ set point A 40 T2 = -350. 449.2 -190.5 0. ‘ set point B 50 T3 = -248.4 449.2 -190.5 0. ‘ set point C 60 T4 = -350. 449.2 190.5 0. ‘ set point D 70 T5 = 0. 0. -50. 0. ‘ a displacement to the conveyor height 80 T6 = 0. 0. -100.4 0. ‘ a displacement to the bottom layer of the large box 90 T7 = 0. 0. -75. 0. ‘ a displacement to the top layer of the large box 100 DEF PA2(4,2) T1 T2 T3 ‘ define pallet 110 WAIT +IE1 ‘ wait for external input #1 to go on, this is the start button 120 FOR H = 0 TO 1 ‘ set box layers 130 FOR I = 0 TO R-1 ‘ loop for rows 140 FOR J = 0 TO C-1 ‘ loop for columns 150 OUTPUT +OE1 ‘ turn on external output #1, this is the conveyor 160 MOVE T1 ‘ move to the conveyor pickup point 170 WAIT +IE2 ‘ wait for the input from the optical sensor to go on 180 OUTPUT -OE1 ‘ turn off the conveyor 190 MOVE T1 + T5 ‘ move to pick up box 200 OUTPUT +OG1 ‘ turn on suction cup on gripper 210 MOVE T1 ‘ pick up the box 220 MOVE PA2(I, J) ‘ move to the pallet position in the large box 230 IF H = 1 THEN GOTO 260 ‘ jump if on the top layer 240 MOVE PA2(I, J) + T6 ‘ move to the bottom layer of the box 250 GOTO 270 260 MOVE PA2(I, J) + T7 ‘ move to the bottom layer of the box 270 OUTPUT -OG1 ‘ turn off the suction cup 280 MOVE PA2(I, J) ‘ move out of box 290 IF NOT IE3 THEN GOTO 310 300 WAIT +IE1 ‘ wait for the start button 310 NEXT J: NEXT I: NEXT H ‘ end of the loops 320 OUTPUT +OE2 ‘ turn on box full light 330 WAIT +IE4 ‘ wait for the reset button 340 GOTO 110 ‘ go back to start anew
14. The IBM 7535 robot arm moves its TCP to point (-450, 250)mm at speeds programmed by ‘payload(5)’ and decelerates from the resultant speed to zero in 0.5 seconds. The tool has a
page 330
mass of 1.5 kg with its center of gravity at 3cm from the TCP and transfers a mass of 4kg with its C.G. at 5cm from the TCP. a) determine the inertia torque about the theta1 axis showing all correct units b) compare the value in a) with a maximum inertia torque estimated from decelerating a 6kg mass from 1100mm/s to zero in 0.5 sec. c) Estimate the combined error at the CG of the load due to theta1 and theta 2 resolution
10.6 LABORATORY - SEIKO RT-3000 ROBOT Purpose: Introduction to the Seiko RT-3000 robot and programming methods. Overview: This laboratory will involve a basic tutorial on the use of the robot, including safety. The students will have prepared a program for the robot ahead of class. During the laboratory the robot will be programmed and tested using the prepared programs. A simple accuracy and repeatability test will be conducted. Pre-Lab: 1. Use Netscape Communicator to access the robots in the laboratory, explore the site. 2. Review the note section on the Seiko RT-3000. After this use the on-line robot to write a simple test program. 3. Write a program to pick up pop cans at one point, and put them down at another point. This program should repeat five times in a row. Test the program on the robot. In-Lab: 1. Examine the robot and all associated cables, including the pneumatics. Make sure the settings match the manual specifications. 2. Examine the buttons on the front and connectors on the back of the controller box. Match these up to the input/output points. Determine if these are TTL, sourcing, or some other type. 3. Turn on the robot and use the teach pendant, with the commands below, to control the robot. 4. Turn the robot controller off, connect it to a computer, and then turn it back on. Turn the servo power on and then type in the command home. The robot will move and find its reference position. You may then type in commands at the prompt.
page 331
5. Program some points using the ‘here’ command. (refer to manual). 6. Enter the simple program below to move between the programmed points. Add in commands that will open and close the gripper. 7. Add lines the the program that will turn on/off outputs and examine inputs. Use the appropriate electrical equipment to test the new parts of the program. 8. Enter and test your prelab program with no parts present. Set up the parts and run the program again. Cooperate with the other group and add a part present sensor to the part pickup point, connect it to the robot, and add a line to the program to wait for the part. 9. Move to the other robot and complete the other part of the first step. 10. For the robot you are currently using, put the robot in an extended position (tool far away from the base). Set up a dial gauge indicator so that it touches a solid point on the tool. Set the gauge so that it reads zero. Move the robot away and back to the same position, and read the value from the dial gauge indicator. Repeat this process to get 10 readings. 11. Position the robot so that the tool is in the middle of the workspace. Take similar measurements to those in step 3. Submit (individually): 1. A copy of your prelab program. 2. A copy of the final program with the part detector sensor. 3. Statistical estimates of repeatability for both positions.
10.7 TUTORIAL - SEIKO RT-3000 ROBOT 1. Look at the robot and controller. Indentify the controller, teach pendant (programming terminal) and robot. 2. Turn on the robot power and look at the programming terminal. There should be a message that says " ". If there are any error messages inform the instructor. 3. Turn on the servo motor power by pressing the ’Servo ON’ button on the front of the controller. After this the robot can be moved to the home position with the ’HOME’ command. After the robot goes through the startup procedure it will be ready for use. 4. The robor joints can be moved with the arrows on the right side of the keyboard. Move each joint and observe the range of motion. 5.
page 332
10.8 LABORATORY - ASEA IRB-1000 ROBOT Purpose: Introduction to robots and programming methods. Overview:
Pre-Lab:
In-Lab:
Submit:
10.9 TUTORIAL - ASEA IRB-1000 ROBOT 1. Look at the robot and controller. Indentify the controller, teach pendant (programming terminal) and robot. 2.
page 333
11. ROBOT APPLICATIONS The nice definition of a robot by the Robot Institute of America is “A robot is a reprogrammable multifunctional manipulator designed to move material, parts, tools, or specialized devices through variable programmed motions for the performance of a variety of tasks”. The not-so-nice definition is "Robots are one armed, blind, stupid, deaf, mute, and cannot feel and understand what they are doing".
11.0.1 Overview • Unlike many machines, robots are easy to imagine performing tasks, because of their similarity to the human form. This has caused many companies to adopt robots without properly assessing what their strengths and weaknesses are.
• The early days of experimentation lead to many failed applications, as well as some notable successes.
• A useful dichotomy is, Point-to-Point - A robot that typically only has 2 (or very few) possible positions. These are good for pick and place type operations, and they are often constructed with pneumatic cylinders. Manipulation - A robot that assembles, or moves parts requires good end of path motion, but does not require as much accuracy in the middle of the path. A higher speed between path endpoints is often desired. Path Tracking - When arc welding, gluing, etc. the robot must follow a path with high accuracy, and constant speed. This often results in slower motion, and more sophisticated control software. Operating - The robot will be expected to apply forces to perform work at the end of the tool, such as doing press fits. While the demands for these robots is essentially the same, they must be capable of handling the higher forces required when in working contact with the work. Telerobotics - Acts as a remote extension of human control, often for safety or miniaturization purposes. In these cases the robots often mimic the human form, and provide some forms of physical feedback. Services - mail delivery, vacuuming, etc.
page 334
Biomedical - prosthetic and orthotic devices. • The number of degrees of freedom of the robot should be matched to the tasks.
• Note: 5 d.o.f. robots will allow the tool to reach all points in space if the tool has an axis of symmetry. For example, a welding torch flame has a symmetrical axis.
• Some commercial applications that have been done with robots are, - die casting - used for unloading parts from dies, quenching parts, and trimming them with a trim press. The robot may also be used to put inserts into the die. - spot welding - spot welding electrodes are clamped in place, and the weld is made. The robot allows many welds to be done. - arc welding- continuous path robots are used to slowly track a path with a continuous rate, and with control of welding parameters. - investment casting - robots can be used in the pick and place operations involved in making the molds. - forging- a robot can be used to precisely position the work under the impact hammer, freeing a worker from the handling hot heavy work pieces. - press work- the robot handles loading parts into the press, and removing the resulting work pieces. - spray painting- a very popular application in which the robot sweeps the paint head across the surface to deposit a spray. This process has been coupled with electrostatics to improve efficiency and distribution. - plastic molding - they can be used for loading the hoppers, and unloading the parts. This is most effective when the parts are hard to handle. - foundry process- robots can be used for ladling materials, and preparation of molds. - machine tools- robots can be used for loading and unloading machine tools, and material transfer systems. - heat treatment process - parts can be loaded into the ovens, unloaded from the ovens, quenched and dried by robots. - metal deburring - continuous path robots can be used to track rough edges with a compliant tool design. - palletizing process - parts can be placed in boxes, or on skids in preparation for shipping. Most robots have program commands to support this. - brick manufacture - a robot can be used for loading and unloading a kiln, and stacking bricks for shipping. - glass manufacture - a robot can handle the breakable glass with a wide EOAT that prevents sagging, etc. The robot can also be used for grinding edges.
page 335
11.0.2 Spray Painting and Finishing • Air spraying - air under pressure causes the paint to atomize and be propelled to the article to be painted
• Airless spraying - finishing materials, such as paint, are sprayed under considerable hydraulic pressure through a fixed orifice, which causes the paint to be atomized directly without the need for air.
• Electrostatic spraying - Atomized particles (paint or powder droplets) are electrostatically charged. These are attracted to the object being sprayed by the applied electrostatic field. Considerable material savings are achieved since very little of the sprayed material bypasses the object and is lost. Objects being sprayed are kept at a ground potential to achieve a large electrostatic field.
• Heating of materials - paint decreases in viscosity when heated and can be sprayed with lower pressures. Less solvent is required and there is less overspray of paint. Heating may be used with any of the preceding systems
• Air spraying and electrostatic spraying are the most common methods of application for paints, enamels, powders, and sound absorbing coatings.
11.0.3 Welding • These tasks are characterized by the need for, - smooth motion - conformity to specified paths - consistent tool speed
page 336
11.0.4 Assembly • General concepts are, • one or more robots • each robot may perform a variety of sub-assemblies • requires a conveyor and inspection station • A host computer must synchronize robot actions • A bad part rejection function should be available • An organized output should be used, e.g. pallets, or shipping crates. • These tasks are common, but face stiff competition from fixed automation and manual labor.
11.0.5 Belt Based Material Transfer • When a robot is used in a workcell, the raw part is delivered in, worked on, and then moved out. This can be done using moving belts, etc.
• Parts are placed directly on the belt, or placed on pallets first.
• Belts can travel in straight paths, or in curved paths if flexible belt link designs are used.
• If straight belts are used, transfer points can be used at the end to change part/pallet direction
• When pallets are used, there is a fixture on top designed to hold the part in an accurate position so that robots and other equipment will be able to locate the part within some tolerance.
• Vision systems may be necessary if part orientation cannot be fixed.
page 337
11.1 END OF ARM TOOLING (EOAT) • The best known universal gripper - the human hand
• Useful classifications are, - Grippers - multiple/single - internal/external - Tools - compliant - contact - non-contact • End of arm tooling is typically purchased separately, or custom built.
11.1.1 EOAT Design • Typical factors to be considered are, Workpiece to be handled part dimensions mass pre- and post- processing geometry geometrical tolerances potential for part damage Actuators mechanical vacuum magnet etc. Power source of EOAT electrical pneumatic hydraulic mechanical Range of gripping force object mass friction or nested grip coefficient of friction between gripper and part maximum accelerations during motion
page 338
Positioning gripper length robot accuracy and repeatability part tolerances Maintenance number of cycles required use of separate wear components design for maintainability Environment temperature humidity dirt, corrosives, etc. Temperature protection heat shields longer fingers separate cooling system heat resistant materials Materials strong, rigid, durable fatigue strength cost and ease of fabrication coefficient of friction suitable for environment Other points interchangeable fingers design standards use of mounting plate on robot gripper flexible enough to accommodate product design change • The typical design criteria are, - low weight to allow larger payload, increase accelerations, decrease cycle time - minimum dimensions set by size of workpiece, and work area clearances - widest range of parts accommodated using inserts, and adjustable motions - rigidity to maintain robot accuracy and reduce vibrations - maximum force applied for safety, and to prevent damage to the work - power source should be readily available from the robot, or nearby - maintenance should be easy and fast - safety dictates that the work shouldn’t drop when the power fails
• Other advanced design points, - ensure that part centroid is centered close to the robot to reduce inertial effects. Worst case make sure that it is between the points of contact.
page 339
Part
robot arm Gripper Better - less chance of slippage
- holding pressures/forces/etc are hard to control, try to hold parts with features or shapes
robot arm Part Gripper part will be more stable, and well located
- compliance can help guide work into out-of-alignment conditions. - sensors in the EOAT can check for parts not in the gripper, etc. - the gripper should tolerate variance in work position with part alignment features - gripper changers can be used to make a robot multifunctional - multiple EOAT heads allow one robot to perform many different tasks without an EOAT change. - *** Don’t try to mimic human behavior. - design for quick removal or interchange of tooling by requiring a small number of tools (wrenches, screwdrivers, etc). - provide dowels, slots, and other features to lead to fast alignment when changing grippers. - use the same fasteners when possible. - eliminate sharp corners/edges to reduce wear on hoses, wires, etc. - allow enough slack and flexibility in cables for full range of motion. - use lightweight materials, and drill out frames when possible. - use hard coatings, or hardened inserts to protect soft gripper materials. - examine alternatives when designing EOAT.
page 340
- the EOAT should be recognized as a potential bottleneck, and given extra design effort. - use shear pins, and other devices to protect the more expensive components. - consider dirt, and use sealed bearings where possible. - move as much weight away from the tip of the gripper towards the robot.
11.1.2 Gripper Mechanisms • A gripper is specifically EOAT that uses a mechanical mechanism and actuator to grasp a part with gripping surfaces (aka fingers)
• Quite often gripper mechanisms can be purchases, and customized fingers attached.
• Fingers are designed to, 1. Physically mate with the part for a good grip 2. Apply enough force to the part to prevent slipping
µn f F g = wgS
µ = coeff. of friction between part and gripper nf = number of contacting fingers F g = gripper force w = weight of part g = gravity S = factor of safety (for basic applications 2 to 3 should be the absolute minimum, but high speed applications will require more force to resist inertial forces)
• Movements of the fingers - pivoting (often uses pivotal linkages) - linear or translational movement (often uses linear bearings and actuators) • Typical mechanisms - linkage actuation - gear and rack - cam
page 341
- screw - rope and pulley - miscellaneous - eg. bladder, diaphragm
Two Finger Gripper - as the pneumatic cylinder is actuated, the fingers move together and apart.
Parallel finger actuator - as the cylinder is actuated, the fingers move together and apart in parallel.
page 342
Two Fingered Pneumatic Actuated - as the cylinder is actuated, it translates to the fingers opening or closing. The extra links help increase holding force.
Two Finger Internal Gripper - as the cylinder is actuated, the fingers move outward.
11.1.2.1 - Vacuum grippers • Suction cups can be used to grip large flat surfaces. The cups are, - typically made of soft rubber or plastic - typically round, or oval shapes • A piston operated vacuum pump (can give a high vacuum), or a venturi valve (simpler) can
page 343
be used to generate the vacuum.
• The surfaces should be large, smooth, clean.
• The force of a suction cup depends on the effective area of the vacuum and the difference in the vacuum, and air pressures.
F = PA
F = maximum gripping force P = difference between vacuum and air pressure A = total effective area of the vacuum
• e.g.
We have a suction cup gripper with two 5”diameter cups that is to be used to lift 1/4” steel plates cut to 2’ by 3’. How much vacuum pressure must be applied to just hold the plates? Suggest a realistic value. lb- 1 w = 0.28 -------- ( in ) × 24 ( in ) × 36 ( in ) = 60.48 ( lb ) 3 4 in 2 2 2 A = 2 π 5--- = 2 [ 19.63 ( in ) ] = 39.26 ( in ) 2 Minimum to hold plate 60.48 ( lb )w = 1.54 ( psi ) P = ---- = ------------------------2 A 39.26 ( in ) Assume low moving speed for robot, use factor of safety = 2.0 P S = 2.0 × P = 3.08 ( psi ) Note: this is much less than atmospheric pressure (15 psi), therefore it is realistic.
page 344
• Advantages, - requires only one surface of a part to grasp - a uniform pressure can be distributed over some area, instead of concentrated on a point - the gripper is light weight - many different types of materials can be used • Disadvantages, - the maximum force is limited by the size of the suction cups - positioning may be somewhat inaccurate - time may be needed for the vacuum in the cup to build up
11.1.3 Magnetic Grippers • Can be used with ferrous materials
• Electromagnets, - easy to control, requires a power supply, and a controller - polarity can be reversed on the magnet when it is put down to reverse residual magnetism • Permanent magnets, - external power is not required - a mechanism is required to separate parts from the magnet when releasing - good for environments that are sensitive to sparks • Advantages, - variation in part size can be tolerated - ability to handle metal parts with holes - pickup times fast - requires only one surface for gripping - can pick up the top sheet from a stack • Disadvantages, - residual magnetism that remains in the workpiece - possible side slippage
page 345
11.1.3.1 - Adhesive Grippers • Can handle fabrics and other lightweight materials
• These grippers are basically a sticky surface on the end of the robot
• As the adhesive gripper is repeatedly used, it loses stickiness, but a tape roll can be used to refresh the sticky surface.
11.1.4 Expanding Grippers • Some parts have hollow cavities that can be used to advantage when grasping.
• A bladder can be inserted into a part, and then inflated. This forms a friction seal between the two, and allows manipulation. When done the pressure is released, and the part freed.
page 346
• Expanding grippers can also be used when gripping externally.
bladders inflate inwards
11.1.5 Other Types Of Grippers • Most grippers for manipulation are sold with mounts so that fingers may be removed, and replaced.
page 347
• Gripper fingers can be designed to reduce problems when grasping.
Self Aligning Finger Pads - small rocking pads are placed on the end fingers, these are also covered with a high friction material, such as rubber. These allow some locational inaccuracy when grasping parts.
Multiple Part Gripper - the gripper has a number of holes cut for different parts. In this case the gripper can hold three different radii, and the rubber lining will help hole the part.
11.2 ADVANCED TOPICS
11.2.1 Simulation/Off-line Programming • How a robot interacts with the environment makes it difficult to program off-line. To do this successfully, a complete simulation of the robot workspace is required.
• One excellent example of a simulation package is CIMStation by Silma. It allows full construction of the robots workspace, and subsequent testing.
page 348
• Examples of simulated operation in CIMStation are, - painting - NC code verification - tool and fixture simulation - Design For Manufacturing - process planning - composite tape layup - composite filament layup - spot welding - arc welding - material/work manipulation - collision detection - deburring - inspection - kinematic and dynamic simulation - controller simulation • The simulators available for the robots in the lab allow off-line programming and simulations.
11.3 INTERFACING - TTL IO - sourcing/sinking - serial communications
11.4 PRACTICE PROBLEMS
page 349
7. Suggest a type of robot suitable for the following tasks. Briefly explain your suggestion. a) placing pallets on rack shelving ans. cartesian - well suited to cartesian layout of shelves. b) electronics assembly ans. scara - will work on a flat table well. c) loading and unloading parts from an NC mill ans. articulated - can easily move around obstructions.
8. Suggest a type of robot suitable for the following tasks. Briefly explain your suggestion. a) a gas pump robot for placing the gas nozzle into the fuel tank. b) for drilling holes in a printed circuit board. c) to vacuum a hotel.
3. We plan to use a pneumatic gripper to pick up a 4 by 8 sheet of glass weighing 40 lbs. Suggest a gripper layout and dimensions of the cups. State any assumptions.
ans.
For stability we want to set up an array of cups. A set of 3 or 4 would be reasonable to help support the sheet. - I will pick 4. Now, the diameter of the cup should be determined. We will assume that the vacuum pressure will be 5 psi below atmosphere, and we will use a factor of safety of 2. 2
FS ( L ) = Nπr P 2
2 ( 40lb ) = 4πr 5psi 4 --- = r 2 π
r > 1.128in
4. A vacuum pump to be used in a robot vacuum gripper application is capable of drawing a
page 350
negative pressure of 4.0 psi compared to atmospheric. The gripper is to be used for lifting stainless steel plates, each plate having dimensions of 15” by 35”, and weighing 52 lbs. Determine the diameter of the suction cups to be used for the gripper if it is decided to use two cups for greater stability. A factor of safety of 1.5 should be used in the computations.
5. Consider the following gripper design problems. a) We plan to use a friction gripper to pick up a 50 lb iron plate. Suggest a gripper design and specify the force required. b) Design an end effector, and describe the path planning approach for a robot unloading satellites from the space shuttle.
11.5 LABORATORY - ROBOT INTERFACING Purpose: Basic robot interfacing Overview: Pre-Lab (individual): 1. Develop a program that will put down and pick up balls at two different point for both robots. 2. Test both programs on-line. 3. Plan for a mode of robot operation either one robot can deposit a ball in a center pickup point, or at their own private pickup points. (Only a single ball will be used) Each robot will have a button connected to it. If the robot button and the other robot has the button, the robot will request the ball from other robot (using an I/O line). A list of the inputs and outputs is given below. Develop a simple diagram showing outputs and inputs to connect two robots and sensors. Develop a state diagram for the operation of both robots. Rewrite the robot programs from step 1 so that they will use the inputs. input #1 ball in my private point input #2 other robot wants ball input #3 ball request button output #1 request ball from other robot In-Lab (groups of 4):
page 351
1. The instructor will discuss interfacing issues. 2. Each group should do each of the three parts below in turn. 1a. Test programs on the RV-M1, and add grippers/fixtures as required 1b. Test programs on the RT-3000, and add grippers/fixtures as required 1c. Connect and test the wiring for each of the robots and the interface 2. Integrate all of the equipment for the final task. Submit: 1. Individually developed programs for the robots. 2. Group programs for the robots and PLC.
11.6 LABORATORY - ROBOT WORKCELL INTEGRATION Purpose: Interfacing robots to workcells using PLCs. Overview: Pre-Lab (individual): 1. Develop a program that will draw a square on both robots, and test them on-line. 2. Develop a program that will draw a circle on both robots, and test them on-line. 3. Develop ladder logic for a micrologix that will watch for inputs from both robots. The two inputs will indicate when either of the robot is using the drawing paper. The PLC will also have outputs connected to both robots. Each robot will have two inputs. One input will cause a circle to be drawn, the other will cause the square to be drawn. The PLC will use inputs from push-button switches to indicate when a circle or square is to be drawn. The ladder logic should share the work between the robots. 4. Combine and modify the robot programs so that they will interface to the PLC program. In-Lab (groups of 3): 1. Each group should do one of the tasks below, 1a. Enter and test the program on the RT-3000 robot. Use a voltage source to test the program. 1b. Enter and test the program on the RV-M1 robot. Use a voltage source to test the program. 1c. Enter and test the program on the micrologix. 2. Rotate between the stations until you have done all three modules. 3. Connect the PLC and two robots electrically, and enter and test the programs. Submit: 1. Individually developed programs for the robots and PLC. 2. Group programs for the robots and PLC.
page 352
12. SPATIAL KINEMATICS • Basically mechanisms that are 3D (not planar).
12.1 BASICS • When we deal with geometries in two dimensions we have three position variables (dof) for each rigid body (two for position, one for orientation).
• When a problem is expanded to three dimensions we then have six position variables (dof) for a rigid body (three for position, and three for orientation).
• These added degrees of freedom expand the complexity of the problem solutions. There are a few potential approaches, - look for regularities that simplify the problem (scalar) - vector based approaches (positions) - matrix based approaches (positions and orientations) • Consider the example of the spherical joint - all of the axes of rotation coincide.
page 353
12.1.1 Degrees of Freedom • The scalar and vector approaches are easily extended to 3D problems. One significant difference is that the polar notations are no longer available for use.
• We can determine the number of degrees of freedom using a simple relationship that is an extension of the Kutzbach criteria,
page 354
m = 6 ( n – 1 ) – 5j 1 – 4j 2 – 3j 3 – 2j 4 – j 5 where, m = mobility of the mechanism (d.o.f.) n = number of links j 1, j 2, … = the number of joints with 1, 2, ... dof respectively
• Consider the number of degrees of freedom in the linkage below,
y C
3” D
A
B 6”
E
40” x
10” z
12.2 HOMOGENEOUS MATRICES • This method still uses geometry to determine the position of the robot, but it is put into an ordered method using matrices.
page 355
• Consider the planar robot below,
0.2m 1m
TCP (xT, yT)
θ2 (x1,y1)
1m
θ1 (xb, yb)
• The basic approach to this method is, 1. On the base, each joint, and the tool of the robot, attach a reference frame (most often xy-z). Note that the last point is labels ‘T’ for tool. This will be a convention that I will generally follow. θ2 F2 F1 z
T 0, 1
y
z
y
y FT xz
x
x T 2, T T 1, 2
θ1
y F0 z
x
2. Determine a transformation matrix to map between each frame. It is important to do this
page 356
by assuming the joints are in their 0 joint positions. Put the joint positions in as variables.
T 1, 2 =
T 0, 1 =
1 trans ( ∆x, ∆y, ∆z ) = 0 0 0
T 2, T =
0 1 0 0
0 0 1 0
∆x ∆y ∆z 1
1 0 0 0 rot ( x, θ ) = 0 cos θ sin θ 0 0 – sin θ cos θ 0 0 0 0 1
rot ( y, θ ) =
cos θ 0 sin θ 0
0 – sin θ 0 1 0 0 0 cos θ 0 0 0 1
cos θ sin θ 0 0 rot ( z, θ ) = – sin θ cos θ 0 0 0 0 10 0 0 01
page 357
ASIDE: The structure of these matrices describe the position (P) and orientation of the x (N), y (O), z (A), axes. y (O)
NX OX AX PX NY OY AY PY NZ OZ AZ PZ 0
0
0
P
x (N)
1 z (A)
T 0, 1
cos θ 1 sin θ 1 0 0 1 = – sin θ 1 cos θ 1 0 0 0 0 0 10 0 0 0 01 0
0 1 0 0
0 0 1 0
1 0 = rot ( z, θ )trans ( 1, 0, 0 ) 1 0 1
T 1, 2
cos θ 2 sin θ 2 0 0 1 = – sin θ 2 cos θ 2 0 0 0 0 0 10 0 0 0 01 0
0 1 0 0
0 0 1 0
1 0 = rot ( z, θ )trans ( 1, 0, 0 ) 2 0 1
T 2, T
1 = 0 0 0
0 1 0 0
0 0 1 0
0.2 0 = trans ( 0.2, 0, 0 ) 0 1
3. Multiply the frames to get a complete transformation matrix.
page 358
T 0, T = T 0, 1 T 1, 2 T 2, T
T 0, T
cos θ 1 sin θ 1 0 0 1 = – sin θ 1 cos θ 1 0 0 0 0 0 10 0 0 0 01 0
0 1 0 0
0 0 1 0
1 cos θ 2 sin θ2 0 0 0 – sin θ 2 cos θ 2 0 0 0 0 0 10 1 0 0 01
1 0 0 0
0 1 0 0
0 0 1 0
1 0 0 1
T 0, T
cos θ 1 sin θ 1 0 0 1 = – sin θ 1 cos θ1 0 0 0 0 0 10 0 0 0 01 0
0 1 0 0
0 0 1 0
1 cos θ 2 sin θ 2 0 0 0 – sin θ2 cos θ 2 0 0 0 0 0 10 1 0 0 01
1 0 0 0
0 1 0 0
0 0 1 0
1.2 0 0 1
T 0, T
cos θ 1 sin θ1 0 0 1 = – sin θ 1 cos θ 1 0 0 0 0 0 10 0 0 0 01 0
0 1 0 0
0 0 1 0
1 cos θ 2 sin θ 2 0 1.2 cos θ 2 0 – sin θ 2 cos θ 2 0 – 1.2 sin θ 2 0 0 0 1 0 1 0 0 0 1
cos θ 1 sin θ 1 0 0
1 0 0 0
0 1 0 0
0 0 1 0
0.2 0 0 1
cos θ 2 sin θ 2 0 1.2 cos θ2 + 1
T 0, T = – sin θ 1 cos θ1 0 0 – sin θ 2 cos θ 2 0 – 1.2 sin θ 2 0 0 10 0 0 1 0 0 0 01 0 0 0 1 complete the multiplication and simplify to get...... Orientation
Position
cos ( θ 1 + θ2 ) sin ( θ 1 + θ 2 ) 0 cos θ 1 + 1.2 cos ( θ 1 + θ 2 ) T 0, T = – sin ( θ1 + θ 2 ) cos ( θ 1 + θ 2 ) 0 sin θ 1 + 1.2 sin ( θ 1 + θ 2 ) 0 0 1 0 0 0 0 1
• The position and orientation can be read directly from the homogenous transformation matrix as indicated above.
page 359
• To reverse the transform, we only need to invert the transform matrix - this is a direct result of the loop equation.
T 0, 1 T 1, 2 T 2, T T T, 0 = I where, I = Identity matrix We can manipulate the equation, ∴T 0, T T T, 0 = I ∴T T, 0 = ( T 0, T )
–1
12.2.1 Denavit-Hartenberg Transformation (D-H) • Designed as more specialized transforms for robots (based on homogenous transforms)
• Zi-1 axis along motion of ith joint
• Xi axis normal to Zi-1 axis, and points away from it.
• Basic transform is, 1. rotate about Zi-1 by thetai (joint angle) 2. translate along Zi-1 by di (link offset) 3. translate along Xi by ai (link length) 4. rotate about Xi by alphai (link twist)
page 360
T i – 1, i = rot ( z i – 1, θ i )trans ( 0, 0, d i )trans ( a i, 0, 0 )rot ( x i, α i ) cos θ i cos α i sin θ i sin α i sin θ i a i cos θ i T i – 1, i =
sin θ i cos α i cos θ i – sin α i cos θ i a i sin θ i 0
sin αi
cos α i
di
0
0
0
1
zi
zi
Robot Base
αi + 1
xi zi + 1 yi
xi + 1
yi + 1 di + 1
xi
θi + 1
ai + 1
• We can see how the D-H representation is applied using the two link manipulator from before
page 361
cos θ 1 – sin θ 1 0 cos θ 1 sin θ1 cos θ 1 0 sin θ1
T 0, 1 =
0 0
0 0
1 0
0 1
cos θ 2 – sin θ 2 0 cos θ 2 sin θ2 cos θ 2 0 sin θ2
T 1, 2 =
0 0
T 2, T
1 = 0 0 0
0 0
0 1 0 0
0 0 1 0
0.2 0 0 1
1 0
0 1
θi di ai αi
= = = =
θ1 0 1 0
θi di ai αi
= = = =
θ2 0 1 0
θi = 0 di = 0 a i = 0.2 αi = 0
T 0, T = T 0, 1 T 1, 2 T 2, T
T 0, T =
cos θ 1 – sin θ 1 0 cos θ 1 cos θ2 – sin θ 2 0 cos θ2 1 sin θ 1 cos θ 1 0 sin θ 1 sin θ 2 cos θ2 0 sin θ 2 0 0 0 0 1 0 0 0 1 0 0 0 0 0 1 0 0 0 1
0 1 0 0
0 0 1 0
cos ( θ 1 + θ 2 ) sin ( θ 1 + θ 2 ) 0 cos θ 1 + 1.2 cos ( θ 1 + θ2 ) T 0, T = – sin ( θ1 + θ 2 ) cos ( θ 1 + θ 2 ) 0 sin θ 1 + 1.2 sin ( θ 1 + θ 2 ) 0 0 1 0 0 0 0 1
12.2.2 Orientation • The Euler angles are a very common way to represent orientation in 3-space.
0.2 0 0 1
page 362
• The main problem in representing orientation is that the angles of rotation must be applied one at a time, and by changing the sequence we will change the final orientation. In other words the three angles will not give a unique solution unless applied in the same sequence every time.
• By fixing a set of angles by convention we can then use the three angles by themselves to define an orientation.
• The convention described here is the Euler angles.
• The sequence of orientation is,
In order, rot ( θ ), rot ( φ ), rot ( ψ ) where, θ = rotation about z axis φ = rotation about new x axis ψ = rotation about new z axis
• Therefore to reorient a point in space we can apply the following matrix, to the position vectors, or axes vectors, (there will be more on these matrices shortly)
R x'
cos θ sin θ 0 R x 0 cos ψ sin ψ 0 1 0 R y' = – sin ψ cos ψ 0 0 cos φ sin φ – sin θ cos θ 0 R y 0 0 1 Rz 0 0 1 0 – sin φ cos φ R z' R x'
( cos θ cos ψ – sin θ cos φ sin ψ ) ( sin θ cos ψ + cos θ cos φ sin ψ ) ( sin φ sin ψ ) R x R y' = ( – cos θ sin ψ – sin θ cos φ cos ψ ) ( – sin θ sin ψ + cos θ cos φ cos ψ ) ( sin φ cos ψ ) R y ( sin θ sin φ ) ( – cos θ sin φ ) ( cos φ ) R z' Rz
page 363
• We can find these angles given a set of axis before and after.
1 x0 = 0 0
0.71 x 1 = 0.71 0
y0 =
y1 =
12.2.3 Inverse Kinematics • Basically we can find the joint angles for the robot based on the position of the end effector.
• This is not a simple problem, and there are few reliable methods. This is partly caused by the non-unique nature of the problem. At best there are typically multiple, if not infinite numbers of equivalent solutions. The 2 dof robot seen before has two possible solutions.
• We can do simple inverse kinematics with trigonometry.
• If we have more complicated problems, we may try to solve the problem by examining the transform matrix,
page 364
cos ( θ 1 + θ 2 ) sin ( θ 1 + θ 2 ) 0 cos θ 1 + 1.2 cos ( θ 1 + θ 2 ) T 0, T = – sin ( θ 1 + θ 2 ) cos ( θ 1 + θ 2 ) 0 sin θ 1 + 1.2 sin ( θ1 + θ 2 ) 0 0 1 0 0 0 0 1 Separate positions and simplify, x T = cos θ 1 + 1.2 cos ( θ 1 + θ 2 ) x T – cos θ 1 ∴------------------------= cos ( θ 1 + θ 2 ) 1.2 y T = sin θ 1 + 1.2 sin ( θ1 + θ 2 ) y T – sin θ 1 ∴-----------------------= sin ( θ1 + θ 2 ) 1.2 Combine the two to eliminate the compound angles, 2
1 = ( cos ( θ1 + θ 2 ) ) + ( sin ( θ 1 + θ 2 ) )
2
x T – cos θ 1 2 y T – sin θ1 2 ------------------------ ∴1 = ------------------------ + 1.2 1.2 2
2
2
∴1.44 = x T – 2x T cos θ 1 + ( cos θ 1 ) + y T – 2y T sin θ 1 + ( sin θ 1 ) 2
2
2
2
∴( 0.44 – x T – x T ) = – 2x T cos θ 1 – 2y T sin θ 1 0.44 – x T – x T - = ( x T cos θ 1 + y T sin θ1 ) ∴ -------------------------------–2 ETC.....
12.2.4 The Jacobian
2
page 365
• A matrix of partial derivatives that relate the velocity of the joints, to the velocity of the tool.
∂x T ∂x T ∂x T d --------------- ------------ x ∂θ ∂θ 2 ∂θ 3 1 dt T ∂y ∂y ∂y d ----- y = --------T --------T --------T ∂θ 1 ∂θ 2 ∂θ 3 dt T d- z ∂z ∂z ∂z -----------T --------T --------T dt T ∂θ 1 ∂θ 2 ∂θ 3
d- θ d- θ ------dt 1 dt 1 d d ----- θ = J ----θ dt 2 dt 2 d- θ d- θ ------dt 3 dt 3
• The inverse Jacobian is used for motion control
J
–1
· θ1 x· T y· T = θ· 2 · z· T θ3
• Find the Jacobian and inverse Jacobian for the 2 dof robot. θ2 F2 F1 z
T 0, 1
y
z
θ1
F0 z
x
y FT xz
x T 2, T T 1, 2
y
y
x
page 366
Find the Jacobian matrix for the matrix given below. This will give a matrix that relates tool velocity to joint velocities.The joint angles are 30° and 20° for joints 1 and 2, find the joint velocities if the tool velocity is 0.05 m/s cos ( θ 1 + θ 2 ) sin ( θ 1 + θ2 ) 0 cos θ1 + 1.2 cos ( θ1 + θ 2 ) T 0, T = – sin ( θ 1 + θ 2 ) cos ( θ 1 + θ 2 ) 0 sin θ1 + 1.2 sin ( θ 1 + θ 2 ) 0 0 1 0 0 0 0 1
12.3 SPATIAL DYNAMICS • The basic principles of planar dynamics are expanded up for 3D spatial problems. The added dimension adds some complexity that should be addressed.
12.3.1 Moments of Inertia About Arbitrary Axes • Moments of Inertia are normally found for a single axis of rotation. When the object is
page 367
rotating about another axis, we must recalculate the moments of inertia.
• If we take the moments of inertia for the original axes, and project these values onto new vectors, we can get new values,
We start by defining the vector equivalencies for rotated axes, R' = R = iR x + jR y + kR z = i'R' x + j'R' y + k'R' k We can project this vector to the other set of axes, R' x = ( i' ) • ( iR x + jR y + kRk ) = Rx cos θ i'i + Ry cos θ i'j + R z cos θ i'k R' y = ( j' ) • ( iR x + jR y + kRk ) = Rx cos θ j'i + Ry cos θ j'j + R z cos θ j'k R' z = ( k' ) • ( iR x + jRy + kR k ) = R x cos θ k'i + R y cos θ k'j + R z cos θk'k Next we integrate for moment of inertia for the shifted x axis, I x'x' = ∴ = ∴ =
∫ ( i' × R'x ) • ( i' × R'x ) dm 2 ( R cos θ + R cos θ + R cos θ ) dm x i'i y i'j z i'k ∫ ∫ ( Rx cos θi'i )
2
2
2
+ ( R y cos θ i'j ) + ( R z cos θ i'k ) + 2 ( R x cos θ i'i R y cos θ i'j ) +
2 ( R x cos θi'i ( R z cos θ i'k ) ) + 2 ( Ry cos θ i'j ( R z cos θ i'k ) )dm 2
2
2
2
2
2
2
2
2
∴I x'x' = I xx ( cos θ i'i ) + I yy ( cos θi'j ) + I zz ( cos θ i'k ) + 2I xy ( cos θ i'i cos θi'j ) + 2I xz ( cos θ i'i cos θi'k ) + 2I yz ( cos θ i'j cos θ i'k ) Similarly for the shifted y and z axes, ∴I y'y' = I xx ( cos θ j'i ) + I yy ( cos θj'j ) + I zz ( cos θ j'k ) + 2I xy ( cos θ j'i cos θj'j ) + 2I xz ( cos θ j'i cos θj'k ) + 2I yz ( cos θ j'j cos θ j'k ) ∴I z'z' = I xx ( cos θk'i ) + I yy ( cos θ k'j ) + I zz ( cos θ k'k ) + 2I xy ( cos θ k'i cos θ k'j ) + 2I xz ( cos θ k'i cos θ k'k ) + 2I yz ( cos θ k'j cos θ k'k ) Next we integrate for the product of inertia for the shifted x and y axis, I x'y' =
∫ ( i' × R'x ) • ( i' × R'y ) dm
page 368
This will lead to, I x'y' = I xx ( – cos θ i'i cos θ j'i ) + I yy ( cos θ i'j cos θ j'j ) + I zz ( – cos θ i'k cos θ j'k ) + I xy ( cos θ i'i cos θj'j + cos θ i'j cos θ j'i ) + I yz ( cos θ i'j cos θ j'k + cos θ i'k cos θ j'j ) + I xz ( cos θ i'k cos θ j'i + cos θi'i cos θ j'k ) I y'z' = I xx ( – cos θ j'i cos θ k'i ) + I yy ( cos θ j'j cos θ k'j ) + I zz ( – cos θ j'k cos θ k'k ) + I xy ( cos θj'i cos θ k'j + cos θ j'j cos θ k'i ) + I yz ( cos θ j'j cos θ k'k + cos θ j'k cos θ k'j ) + I xz ( cos θ j'k cos θk'i + cos θ j'i cos θ k'k ) I x'y' = I xx ( – cos θ k'i cos θ i'i ) + I yy ( cos θ k'j cos θ i'j ) + I zz ( – cos θ k'k cos θ i'k ) + I xy ( cos θk'i cos θ i'j + cos θ k'j cos θ i'i ) + I yz ( cos θ k'j cos θi'k + cos θ k'k cos θ i'j ) + I xz ( cos θ k'k cos θ i'i + cos θ k'i cos θ i'k )
We can define the new coordinate system in terms of translated axes, R x'' = R x' + d x'
R y'' = R y' + d y'
R z'' = R z' + d z'
This can be integrated for the shifted x axis, I x''x'' = ∴ = ∴ =
2
2
2
2
∫ ( Ry'' + Rz'' ) dm = ∫ ( ( Ry' + dy' ) + ( Rz' + dz' ) ) dm 2 2 2 2 ( R ' + 2R 'd ' + d ' + R ' + 2R 'd ' + d ' ) dm y y y y z z z z ∫ ∫ ( Ry'
2
2
2
2
+ R z' ) dm + ∫ ( 2R y'd y' ) dm + ∫ ( 2R z'd z' ) dm + ∫ ( d y' + d z' ) dm 2
2
∴ = I y'z' + 2mRM y' d y' + 2mRM z' d z' + ( d y' + d z' )m
page 369
This eventually leads to, 2
2
2
2
2
2
I x''x'' = I x'x' + 2mR M y' d y' + 2mR M z' d z' + m ( dy' ) + m ( d z' ) I y''y'' = I y'y' + 2mR M x' d x' + 2mR M z' d z' + m ( dx' ) + m ( d z' ) I z''z'' = I z'z' + 2mRMx' d x' + 2mRMy' d y' + m ( d x' ) + m ( dy' ) I x''y'' = I x'y' + 2mR M x' d y' + 2mR M y' dx' + md x' d y' I y''z'' = I y'z' + 2mR My' d z' + 2mRMz' d y' + md y' d z' I x''z'' = I x'z' + 2mR Mx' d z' + 2mRMz' d x' + md x' d z'
12.3.2 Euler’s Equations of Motion • We can use Euler’s equations of motion to determine moments produced by angular velocities and accelerations.
∑ MM
ij x
= I Mxx αx – ( I Myy – I Mzz )ω y ω z
∑ MM
ij y
= I Myy αy – ( I Mxx – I Mzz )ω x ω z
∑ MM
ijz
= I Mzz α z – ( I Mxx – I Myy )ω x ω y
• These can be used to examine rotating three dimensional masses. Consider the following,
page 370
F
The disk and shaft shown are rotated at 2000 rpm, and there is an angular acceleration
2”
6”
of 20 rev/(sec.sec.). The steel part is held in a cantilevered bearing that can be approximated 1”
8”
8”
with the forces shown. F
1”
12.3.3 Impulses and Momentum • Momentum is a convenient alternative to energy in analysis of systems.
12.3.3.1 - Linear Momentum • momentum is defined as,
page 371
t2
t2
∫ F ( t ) dt
=
t1
∫ mA ( t ) dt
= mV ( t 2 ) – mV ( t 1 ) = L ( t )
t1
Impulse
Momentum
• If no external forces are applied, momentum remains constant (is conserved). In this case L is a constant.
• An impulse is a force applied that will change momentum.
12.3.3.2 - Angular Momentum • Angular momentum is for rotating objects. The rotation about some center tends to make these equations a bit more complicated than linear momentum.
• We can start to find this as a velocity times a distance of rotation, and this will lead to the eventual relationships,
∑ MM
x
∑ MM ∑ MM
= I Mxx α x – I Mxy αy – I Mxz α z + ω y H z – ω z H y
y
= – I Myx α x + I Myy α y – I Myz α z + ω z H x – ω x H z
z
= – I Mxzx α x – I Mzy α y + I Mzz αz + ω x H y – ω y H x
• These equations show the angular momentum H, along with other familiar terms.
page 372
12.4 DYNAMICS FOR KINEMATICS CHAINS • There are a variety of common methods, - Euler-Lagrange - energy based - Newton-Euler - D’Alembert’s equations
12.4.1 Euler-Lagrange • This method uses a Lagrangian energy operator to calculate torques
L i ( θ i, ω i ) = K i – P i
L ( θ, ω ) =
d- ∂ L ∂ L = Q ---i– i dt ∂ ω i ∂ θ i i where, L = lagrangian K = kinetic energy of link ‘i’ P = potential energy of link ‘i’ Q = forces and torques
• For a typical link,
∑ Ki – ∑ Pi
page 373
T
mi V Ci V Ci T K i = ----------------------- + ω i I i ω i 2 where, m = mass of link i V = velocity of center of mass of link i omega = angular velocity of link i I = mass moment of inertia of link i T
P i = m i g R Ci where, g = gravity vector R = displacement from base of robot to center of mass of link
• If we have used matrices to formulate the problem, we use the Jacobian to find velocities.
V Ci ωi
= J ( θ )ω
• Consider the example below,
page 374
0.2m 1m
θ2
TCP (xT, yT)
1m
θ1 (xb, yb)
M links = 5kg
I links = 10
M tool = 0.5kg
I tool = 1
page 375
12.4.2 Newton-Euler • We can sum forces and moments, and then solve the equations in a given sequence.
∑ Fi – mi Ai
= 0
∑ Mi – Ii ( αi + ωi ) 2
= 0
• These equations can be written in vector form,
f i – 1 – fi + mi g – mi Ai = 0 where, f = forces between link i and i+1 A = acceleration of center of mass of link i n i – 1 – n i + r i, Ci × f i – r i – 1, Ci × f i – 1 – I i α i – ω i × ( I i × ω i ) = 0 where, f = forces between link i and i+1 A = acceleration of center of mass of link i
• To do these calculations start at the base, and calculate the kinematics up to the end of the manipulator (joint positions, velocities and accelerations). Then work back from the end and find forces and moments.
12.5 REFERENCES Erdman, A.G. and Sandor, G.N., Mechanism Design Analysis and Synthesis, Vol. 1, 3rd Edi-
page 376
tion, Prentice Hall, 1997.
Fu, Gonzalez, and Lee,
Shigley, J.E., Uicker, J.J., “Theory of Machines and Mechanisms, Second Edition, McGrawHill, 1995.
12.6 PRACTICE PROBLEMS 1. For the Stanford arm below, θ1
TOP VIEW
FRONT VIEW
r TCP θ2 d1 y z
(0,0,0) x
a) list the D-H parameters (Hint: extra “dummy” joints may be required) b) Find the forward kinematics using homogenous matrices. c) Find the Jacobian matrix for the arm. d) If the arm is at θ1 = 45 degrees, θ2 = 45 degrees, r = 0.5m, find the speed of the TCP if the joint velocities are θ’1 = 1 degree/sec, θ’2 = 10 degrees/sec, and r’ = 0.01 m/ sec.
page 377
3. Robotics and Automated Manipulators (RAM) has consulted you about a new robotic manipulator. This work will include kinematic analysis, gears, and the tool. The robot is pictured below. The robot is shown on the next page in the undeformed position. The tool is a gripper (finger) type mechanism.
Tool
The robot is drawn below in the undeformed position. The three positioning joints are shown, and a frame at the base and tool are also shown.
page 378
θ1 x0
yT
a z0
zT θ2 zT yT
c
b y0
xT
r xT
y z0 0
x0
The tool is a basic gripper mechanism, and is shown as a planar mechanism below. As the cylinder moves to the left the fingers close.
f Finger d
Pneumatic cylinder
e g
a) The first thing you do is determine what sequence of rotations and translations are needed to find the tool position relative to the base position.
page 379
b) As normal, you decide to relate a cartesian (x-y) velocity of the gripper to joint velocities. Set up the calculation steps needed to do this based on the results in question #1. c) To drive the revolute joints RAM has already selected two similar motors that have a maximum velocity. You decide to use the equations in question #2, with maximum specified tool velocities to find maximum joint velocities. Assume that helical gears are to be used to drive the revolute joints, specify the basic dimensions (such as base circle dia.). List the steps to develop the geometry of the gears, including equations. d) The gripper fingers may close quickly, and as a result a dynamic analysis is deemed necessary. List the steps required to do an analysis (including equations) to find the dynamic forces on the fingers. e) The idea of using a cam as an alternate mechanism is being considered. Develop a design that is equivalent to the previous design. Sketch the mechanism and a detailed displacement graph of the cam. f) The sliding joint ‘r’ has not been designed yet. RAM wants to drive the linear motion, without using a cylinder. Suggest a reasonable design, and sketch.
4. For an articulated robot, find the forward, and inverse kinematics using geometry, homogenous matrices, and Denavit-Hartenberg transformations.
5. Assign Denavit-Hartenberg link parameters to an articulated robot.
page 380
6. For the Stanford arm below, θ1
TOP VIEW
FRONT VIEW
r TCP θ2 d1 y z
(0,0,0) x
a) list the D-H parameters (Hint: extra “dummy” joints may be required) b) Find the forward kinematics using homogenous matrices. c) Find the Jacobian matrix for the arm. d) If the arm is at θ1 = 45 degrees, θ2 = 45 degrees, r = 0.5m, find the speed of the TCP if the joint velocities are θ’1 = 1 degree/sec, θ’2 = 10 degrees/sec, and r’ = 0.01 m/ sec. 7. Consider the forward kinematic transformation of the two link manipulator below. Given the position of the joints, and the lengths of the links, determine the location of the tool centre point using a) basic geometry, b) homogenous transforms, and c) Denavit-Hartenberg transformations.
page 381
Pw(x, y)
L2 = 10”
theta2 = 45 deg.
L1 = 12”
y
theta1 = 30 deg.
x
a) For the robot described in question 1 determine the inverse kinematics for the robot. (i.e., given the position of the tool, determine the joint angles of the robot.) Keep in mind that in this case the solution will have two different cases. Determine two different sets of joint angles required to position the TCP at x=5”, y=6”.
b) For the inverse kinematics of question #2, what conditions would indicate the robot position is unreachable? Are there any other cases that are indeterminate?
8 Find the dynamic forces in the system below,
page 382
y
AB rotates 20rad/s c.c.w. in the xy plane, there are ball joints at B and C, and the collar at D slides along the prismatic shaft. What are the positions, velocities and accelerations of the links?
C
3” D
A
B 6”
E 10”
z
9. Examine the robot figure below and,
a) assign frames to the appropriate joints.
40” x
page 383
x
z
L4 y θ1
y l2
l3 L1 x z
page 384
x
ANS.
z FT y
y F3 x z y F1
x
y y
x
z
z
F0
x
z
b) list the transformations for the forward kinematics.
ans.
T 0, 1 = trans ( 0, L 1, 0 ) T 1, 2 = trans ( l 2, 0, 0 )rot ( z, 90° ) T 2, 3 = trans ( l 3, 0, 0 )rot ( z, – 90° + θ 1 ) T 3, T = trans ( L 4, 0, 0 )rot ( z, 90° )rot ( x, 90° )
c) expand the transformations to matrices (do not multiply).
F2
page 385
ans. T 0, 1 =
10 0 0 0 1 0 L1 00 1 0 00 0 1 1 0 0 l2
T 1, 2
cos 90° sin 90° 0 0 = 0 1 0 0 – sin 90° cos 90° 0 0 0 0 1 0 00 1 0 0 0 0 1 00 0 1 1 0 0 l3
cos ( – 90° + θ 1 ) sin ( – 90° + θ1 ) 0 0
T 2, 3 = 0 1 0 0 – sin ( – 90° + θ1 ) cos ( – 90° + θ 1 ) 0 0 0 0 1 0 0 0 1 0 0 0 0 1 0 0 0 1 1 0 0 L4 T 3, T = 0 1 0 0 0 0 1 0 0 0 0 1
cos 90° sin 90° 0 0 – sin 90° cos 90° 0 0 0 0 1 0 0 0 0 1
1 0 0 0 0 cos 90° sin 90° 0 0 – sin 90° cos 90° 0 0 0 0 1
10. Given the transformation matrix below for a polar robot,
T 0, T
cos ( θ ) sin ( θ ) = – sin ( θ ) cos ( θ ) 0 0 0 0
a) find the Jacobian matrix.
0 r cos ( θ ) 0 r sin ( θ ) 1 0 0 1
page 386
ans.
d- x ∂x ∂x ---dt = ∂ r ∂ θ d ∂y ∂y ----- y dt ∂r ∂θ
d- r ---dt = d ----- θ dt
d- r ---cos ( θ ) – r sin ( θ ) dt d sin ( θ ) r cos ( θ ) ----θ dt
b) Given the joint positions, find the forward and inverse Jacobian matrices. θ = 30°
ans.
cos ( 30° ) – 3 sin ( 30° ) = 0.866 –1.5 sin ( 30° ) 3 cos ( 30° ) 0.5 2.598
J =
J
–1
r = 3in
=
0.866 0.5 – 0.167 0.289
c) If we are at the position below, and want to move the tool at the given speed, what joint velocities are required?
d- x = – 1 in -------s dt
ans.
d- y = 2 in -------s dt
d ----- r dt = 0.866 0.5 – 1 = 0.134 d – 0.167 0.289 2 0.745 ----- θ dt
11. Examine the robot figure below and, a) assign frames to the appropriate joints.
page 387
θ1 x0
xT
a z0
zT θ2
yT
yT zT xT
c
b y0
r
x0
y z0 0
b) list the transformations for the forward kinematics. c) expand the transformations to matrices (do not multiply).
12. Given the transformation matrix below for a polar robot, cos ( θ 1 + θ2 ) sin ( θ 1 + θ 2 ) 0 cos θ 1 + 1.2 cos ( θ 1 + θ 2 ) T 0, T = – sin ( θ 1 + θ 2 ) cos ( θ 1 + θ 2 ) 0 sin θ 1 + 1.2 sin ( θ 1 + θ 2 ) 0 0 1 0 0 0 0 1 a) find the Jacobian matrix. b) Given the joint positions, find the forward and inverse Jacobian matrices. θ 1 = 30°
θ1 = 40°
c) If we are at the position below, and want to move the tool at the given speed, what joint velocities are required?
page 388
d ----- x = – 1 in ----dt s
d- y = 2 in -------s dt
13. Find the forward kinematics for the robots below using homogeneous and DenavitHartenberg matrices.
y
y
y
x
x
y
x
y
x
x
14. Use the equations below to find the inverse Jacobian. Use the inverse Jacobian to find the joint velocities required at t=0.5s. x = 4 cos ( θ 1 ) + 6 cos ( θ1 + θ 2 ) in. y = 4 sin ( θ1 ) + 6 sin ( θ 1 + θ 2 ) in.
page 389
ANS.
First, find tool and joint positions, 3 2 P ( 0.5 ) = 3 + ( – 2t + 3t ) 5 = 5.5 5 2 6
r =
2
5.5 + 6
2
6 - α = atan -----5.5
2
2
2
· r = 4 + 6 – 2 ( 4 ) ( 6 ) cos ( 180 – θ 2 )
r – (4 + 6 ) · ∴θ 2 = 180 – acos --------------------------------- –2 ( 4 ) ( 6 )
sin ( 180 – θ 2 ) sin ( θ 1 – α ) --------------------------- = -------------------------------r 6
6 sin ( 180 – θ 2 ) · ∴θ 1 = asin ----------------------------------- +α r
2
2
2
Next, the Jacobian, J =
– 4 sin ( θ 1 ) – 6 sin ( θ 1 + θ 2 ) – 6 sin ( θ 1 + θ 2 ) 4 cos ( θ 1 ) + 6 cos ( θ1 + θ 2 ) 6 cos ( θ1 + θ 2 )
Substitute and solve –1 d θ ----- 1 = J 7.5 dt θ 3 2
page 390
13. MOTION CONTROL
13.1 KINEMATICS • A robot must be able to map between things that it can control, such as joint angles, to the position of the tool in space.
• Describing the position of the robot in terms of joint positions/angles is Joint Space.
• Real space is often described with a number of coordinate systems, - cartesian - polar - spherical • Positions can also be specified with respect to the robot base (Robot Coordinates), or globally (World Coordinates).
13.1.1 Basic Terms
link/joint coordinates tool coordinates
base coordinates
• Robot base coordinates don’t move and are often used to specify robot tool position and orientation. (centre of the robots world)
page 391
• Link/Joint Coordinates - specify where joints, endpoints or centers are located.
• Tool coordinates - determine where the tool is and what orientation it is in.
• World Coordinates - relates various robots to other robots and devices.
• Coordinate transformation - Can map from one set of coordinates to another. Most common method is matrix based. One special case of this is the Denavit-Hartenrberg transformation.
13.1.2 Kinematics 0.2m 1m
theta2
1m
(x1,y1)
TCP (xT, yT)
Note: When defining angles is is more convenient to indicate the positive direc-
theta1 (xb, yb)
tion and origin (as shown with the solid line for ‘theta 2’). With more classical sketching we would use the dashed line,
• Forward kinematics involves finding the endpoint of the robot (xT, yT) given the joint coordinates (theta1, theta2)
• There a number of simple methods for finding these transformations,
page 392
- basic geometry - transformation matrices - Denavit-Hartenberg transformations
13.1.2.1 - Geometry Methods for Forward Kinematics • For simple manipulators (especially planar ones) this method is often very fast and efficient.
• The method uses basic trigonometry, and geometry relationships.
• To find the location of the robot above, we can see by inspection,
page 393
x T = x b + l 1 cos θ 1 + ( l 2 + 0.2 ) cos ( θ 1 + θ 2 ) y T = y b + l 1 sin θ 1 + ( l 2 + 0.2 ) sin ( θ1 + θ 2 ) often set to zero The general form of the operation is as below, ( θ 1, θ 2, … ) → ( x T, y T, z T, θ Tx, θT y, θ Tz ) ASIDE: later we will see that the opposite operation maps from tool coordinates, and is called the inverse kinematics. ( θ 1, θ 2, … ) ← ( x T, y T, z T, θT x, θ Ty, θ Tz ) Also note that the orientation of the tool is included, as well as position, therefore for the example, θ Tx = 0 θTy = 0 θ Tz = θ1 + θ 2
• The problem with geometrical methods are that they become difficult to manage when more complex robots are considered. This problem is overcome with systematic methods.
13.1.2.2 - Geometry Methods for Inverse Kinematics • To find the location of the robot above, we can see by inspection,
page 394
Inverse kinematics maps from the tool coordinates to the joint coordinates.
( θ 1, θ 2, … ) ← ( x T, y T, z T, θT x, θ T y, θ Tz )
• Mathematically this calculation is difficult, and there are often multiple solutions.
13.1.3 Modeling the Robot • If modeling only one link in motion, the model of the robot can treat all the links as a single moving rigid body,
page 395
θ, ω, α
CG, M, J
• If multiple joints move at the same time, the model becomes non-linear, in this case there are two approaches taken, 1. Develop a full non-linear controller (can be very complicated). 2. Develop linear approximations of the model/control system in the middle of the normal workspace.
13.2 PATH PLANNING • Basic - “While moving the robot arm from point A to B, or along a continuous path, the choices are infinite, with significant differences between methods used.”
13.2.1 Slew Motion • The simplest form of motion. As the robot moves from point A to point B, each axis of the manipulator travels as quickly as possible from its initial position to its final position. All axis begin moving at the same time, but each axis ends it motion in a length of time that is proportional to the product of its distance moved and its top speed (allowing for acceleration and deceleration)
• Note: slew motion usually results in unnecessary wear on the joints and often leads to unan-
page 396
ticipated results in the path taken by the manipulator.
• Example - A three axis manipulator with revolute joints starts with joint angles (40, 80, 40)degrees, and must move to (120, 0, 0)degrees. Assume that the joints have maximum absolute accelerations/decelerations of (50, 100, 150) degrees/sec/sec, and the maximum velocities of (20, 40, 50) degrees/sec. Using slew motion, what is the travel time for each joint?
Joint angle (degrees) 180 90 time(sec) θ3 -90
θ2
θ1
Joint velocity (degrees/sec) ω max
αmax
t acc
t max
t dec
page 397
The area under the velocity curve is the distance (angle in this case) travelled. First we can determine the distance covered during acceleration, and deceleration and the time during acceleration, and deceleration. ω max 20 40 50 t acc = t dec = ------------ = ------, ---------, ------- 50 100 150- = ( 0.4, 0.4, 0.333 )sec. αmax t acc ω max.vel. ( 20 ) ( 40 ) ( 50 ) - = 0.4 ------------------, 0.4 ------------------, 0.333 ------------------------ = ( 4, 8, 8.33 )deg. θ acc. = θdec. = -------------------------- 2 2 2 2 The next step is to examine the moves specified, θ move = θ end – θ start = ( 120 – 40, 0 – 80, 0 – ( – 40 ) ) = ( 80, – 80, 40 )deg. Remove the angles covered during accel./deccel., and find the travel time at maximum velocity. θ move – 2θ acc 80 – 2 ( 4 ) 80 – 2 ( 8 ) 40 – 2 ( 8.333 ) - = ---------------------t max = ----------------------------------, -----------------------, -------------------------------- ω max 20 40 50 t max = ( 3.6, 1.6, 0.46668 )sec. t total = t acc + t max + t dec = ( 4.4, 2.4, 1.13 )s
Note: below zero the speeds will never reach maximum velocity before starting to decelerate.
13.2.1.1 - Joint Interpolated Motion • Similar to slew motion, except all joints start, and stop at the same time. In the last example for slew motion, all of the joints would have moved until all stopping simultaneously at 4.4 seconds.
• This method only demands needed speeds to accomplish movements in least times.
13.2.1.2 - Straight-line motion
page 398
• In this method the tool of the robot travels in a straight line between the start and stop points. This can be difficult, and lead to rather erratic motions when the boundaries of the workspace are approached.
• NOTE: straight-line paths are the only paths that will try to move the tool straight through space, all others will move the tool in a curved path.
• The basic method is, 1. Develop a set of points from the start and stop points that minimize acceleration. 2. Do the inverse kinematics to find the joint angles of the robot at the specified points. • Consider the example below,
page 399
Given, P 0 = ( 5, 5, 5 )in.
P 1 = ( – 5, – 5 , 5 ) d- P = ( 0, 0, 0 ) ---dt 1
d- P = ( 0, 0, 0 ) ---dt 0
t0 = 0
t1 = 2
Model the path with a function that allows acceleration/deceleration, in this case a third order polynomial will be used. The equation will be parameterized for simplicity (i.e., s = [0,1], where s=0 is the path start, and s=1 is the path end). P ( t ) = P0 + ( P1 – P 0 )s ( t ) s ( t0 ) = 0
d- s ( t ) = 0 ---dt 0
s ( t1 ) = 1 3
d- s ( t ) = 0 ---dt 1
2
d- s ( t ) = 3At 2 + 2Bt + C ---dt Next, numerical values will be entered to find equation values
s ( t ) = At + Bt + Ct + D
3
2
3
2
s(0) = A(0) + B(0 ) + C(0) + D = 0 s(2) = A(2) + B(2 ) + C(2) + D = 1
∴D = 0 ∴8A + 4B = 1
d ----- s ( 0 ) = 3A ( 0 ) + 2B ( 0 ) + C = 0 dt
∴C = 0
d ----- s ( 2 ) = 3A ( 2 ) + 2B ( 2 ) + C = 0 dt
3 ∴ – --- A = B 2
3 8A + 4 – --- A = 1 2
1 ∴A = --2
This can now be put in the final form, 3
t 2 P ( t ) = P 0 + ( P 1 – P 0 ) ---- – 3--- t 2 4
3 ∴B = – --4
page 400
13.2.2 Computer Control of Robot Paths (Incremental Interpolation) • Path Planning is a simple process where the path planning methods described before (such as straight line motion) are used before the movement begins, and then a simple real-time lookup table is used.
• The path planner puts all of the values in a trajectory table.
• The on-line path controller will look up values from the trajectory table at predetermined time, and use these as setpoints for the controller.
• The effect of the two tier structure is that the robot is always shooting for the next closest ‘knot-point’ along the path.
page 401
Desired configuration Current Configuration
Off-line path planning
Trajectory table
Kinematic Transforms
Set point table
Done before motion begins Done during motion, and all other times Time based interrupt routine Interrupt Clock
Servo motor routine runs for each axis
Choose new point from trajectory table Read θ desired
Set-point table
θ desired
Return
Compute error
Output actuator signal
• The above scheme leads to errors between the planned, and actual path, and lurches occur when the new setpoints are updated for each servo motor.
page 402
speed actual position trajectory table
time trajectory table time step
position
required actual
time
• The quantization of the desired position requires a decision of what value to use, and this value is fixed for a finite time.
• The result is that the path will tend to look somewhat bumpy,
page 403
The desired path tends to deviate from the points in the trajectory In this case an table, and the tool tends to follow a path like extra step is that pictured below. Moreover this scheme added to will lead to uneven acceleration over knot 5 end compensate for the path segments the position errors knot 4 knot 3 Path segments
knot 1
knot 2
start
**Note: this occurs with straight-line motion also
13.3 PRACTICE PROBLEMS 1. a) A stepping motor is to be used to actuate one joint of a robot arm in a light duty pick and place application. The step angle of the motor is 10 degrees. For each pulse received from the pulse train source the motor rotates through a distance of one step angle. i) What is the resolution of the stepper motor? ii) Relate this value to the definitions of control resolution, spatial resolution, and accuracy, as discussed in class. b) Solve part a) under the condition that the three joints move at different rotational velocities. The first joint moves at 10 degrees/sec., the second joint moves at 25 degrees/sec, and the third joint moves at 30°/sec.
2. A stepping motor is to be used to drive each of the three linear axes of a cartesian coordinate robot. The motor output shaft will be connected to a screw thread with a screw pitch of 0.125”. It is desired that the control resolution of each of the axes be 0.025” a) to achieve this control resolution how many step angles are required on the stepper motor?
page 404
b) What is the corresponding step angle? c) Determine the pulse rate that will be required to drive a given joint at a velocity of 3.0”/ sec.
3. For the stepper motor of question 6, a pulse train is to be generated by the robot controller. a) How many pulses are required to rotate the motor through three complete revolutions? b) If it is desired to rotate the motor at a speed of 25 rev/min, what pulse rate must be generated by the robot controller?
4. A stepping motor is to be used to actuate one joint of a robot arm in a light duty pick and place application. The step angle of the motor is 10 degrees. For each pulse received from the pulse train source the motor rotates through a distance of one step angle. a) What is the resolution of the stepper motor? b) Relate this value to the definitions of control resolution, spatial resolution, and accuracy, as discussed in class.
5. Find the forward kinematics for the robots below using geometry methods.
y
y
y
x
x
y
x
y
x
x
6. Consider the forward kinematic transformation of the two link manipulator below.
page 405
Pw(x, y)
L2 = 10”
theta2 = 45 deg.
L1 = 12”
y
theta1 = 30 deg.
x
a) Given the position of the joints, and the lengths of the links, determine the location of the tool centre point using basic geometry. b) Determine the inverse kinematics for the robot. (i.e., given the position of the tool, determine the joint angles of the robot.) Keep in mind that in this case the solution will have two different cases. c) Determine two different sets of joint angles required to position the TCP at x=5”, y=6”. d) What mathematical conditions would indicate the robot position is unreachable? Are there any other cases that are indeterminate?
7. Find a smooth path for a robot joint that will turn from θ= 75° to θ = -35° in 10 seconds. Do this by developing an equation then calculating points every 1.0 seconds along the path for a total motion time of 10 seconds.
page 406
ans.
3
2
θ ( t ) = At + Bt + Ct + D
θ ( 0 ) = 75
θ ( 10 ) = – 35
d- θ ( t ) = 3At 2 + 2Bt + C ---dt
d- θ ( 0 ) = 0 ---dt
d- θ ( 10 ) = 0 ---dt
Solving 3
2
75 = A ( 0 ) + B ( 0 ) + C ( 0 ) + D 3
2
– 35 = A ( 10 ) + B ( 10 ) + C ( 10 ) + D 2
0 = 3A ( 0 ) + 2B ( 0 ) + C 2
0 = 3A ( 10 ) + 2B ( 10 ) + C For A, B, C, D we get 3
2
θ ( t ) = ( 0.22 )t + ( – 3.3 )t + ( 75 ) t (sec)
theta(t)
0 1 2 3 4 5 6 7 8 9 10
75 71.92 63.56 51.24 36.28 20 3.72 -11.24 -23.56 -31.92 -35
8. A jointed arm robot has three rotary joints, and is required to move all three axes so that the first joint is rotated through 50 degrees; the second joint is rotated through 90 degrees, and the third joint is rotated through 25 degrees. Maximum speed of any of these rotational joints is 10 degrees/sec. Ignore effects of acceleration and deceleration and, a) determine the time required to move each joint if slew motion (joint motion is independent of all other joints) is used.
page 407
b) determine the time required to move the arm to a desired position and the rotational velocity of each joint, if joint interpolated motion (all joints start and stop simultaneously) is used. c) Solve question 4 under the condition that the three joints move at different rotational velocities. The first joint moves at 10 degrees/sec., the second joint moves at 25 degrees/sec, and the third joint moves at 30°/sec.
9. Consider the following motion planning problem. a) A jointed arm robot has three rotary joints, and is required to move all three axes so that the first joint is rotated through 50 degrees; the second joint is rotated through 90 degrees, and the third joint is rotated through 25 degrees. Maximum speed of any of these rotational joints is 10 degrees/sec. Ignore effects of acceleration and deceleration and, b) determine the time required to move each joint if slew motion (joint motion is independent of all other joints) is used. c) determine the time required to move the arm to a desired position and the rotational velocity of each joint, if joint interpolated motion (all joints start and stop simultaneously) is used.
10. We are designing motion algorithms for a 2 degree of freedom robot. To do this we are developing sample calculations to explore the basic process.
a) We want to move the tool in a straight line through space from (3”, 5”) to (8”, 7”). Develop equations that will give a motion that starts and stops smoothly. The motion should be complete in 1 second.
ANS.
3 2 P ( t ) = 3 + ( – 2t + 3t ) 5 5 2
b) Find the velocity of the tool at t=0.5 seconds.
ANS.
d ----- P ( t ) = 7.5 dt 3
page 408
c) Plot out the tool position, joint positions and velocities as functions of time.
11. Why do robots not follow exact mathematical paths?
12. We are designing motion algorithms for a 2 degree of freedom robot. To do this we are developing sample calculations to explore the basic process. We want to move the tool in a straight line through space from (8”, 7”) to (3”, 5”). Develop equations that will give a motion that starts and stops smoothly. The motion should be complete in 2 seconds. Show all derivations.
13.
13.4 LABORATORY - AXIS AND MOTION CONTROL
Purpose: To . Overview: . Pre-Lab: To be determined. In-Lab: 1. To be determined. Submit (individually): 1. To be determined.
page 409
14. CNC MACHINES • Computer Numerical Control machines use a computer to guide a process that might otherwise be done manually.
14.1 MACHINE AXES
14.2 NUMERICAL CONTROL (NC) • The use of numerical data to drive a machine for processes such as, - milling - turning - drilling - grinding - shot peening - tube bending - flame cutting - automated knitting machines - automatic riveting - etc. • Basic components of NC systems, - program - controller unit - machine tool • Most suited to, - parts are processed frequently in small lot sizes - complex part geometry - close tolerances on workpart - many operations on part in processing - large amounts of metal to be removed - engineering design will possibly change - parts that are too expensive for mistakes
page 410
• The methods for developing NC programs include, - manual part programming - computer-assisted part programming - computer generated programs • The manual and computer aided methods use various NC programming languages, - APT (Automatically Programmed Tools) - AUTOSPOT (Automatic System for Positioning Tools) - SPLIT (Sundstrand Processing Language Internally Translated) - COMPACT II - ADAPT (ADaptation of APT) - EXAPT (Extended Subset of APT) - UNIAPT • These languages are used by a parts programmer to define the motion of the cutting tool.
• The languages may be preprocessed, and then used for a number of various control types, such as, - punched paper tape - Computer Numerical Control (CNC) - Direct Numerical Control (DNC) • The automatic methods work with geometry created in a CAD program.
14.2.1 NC Tapes • NC Programs are preprocessed on computers, and punched onto paper or mylar tapes.
• Simple NC machines can use a tape reader to direct the machine.
• Problems, - required storage, transportation, and manual loading of NC tapes - has to reread the tape for each new part - tapes tend to wear, and become dirty, thus causing misreadings
page 411
- the readers are slow, and can cause ‘dwell marks’ on complex pieces - the mechanical parts in the readers reduced reliability - testing had to be done on the NC machine - no program editing abilities (increased lead time) • The end of tapes was the result of two competing developments - DNC used remote computers to replace tape readers, these were displaced in most cases by CNC - CNC allowed the use of a local computer to overcome problems with tapes, and the problems with distant computers. While CNC was used to enhance tapes for a while, they eventually allowed the use of other storage media, and currently program transfer media are not required.
14.2.2 Computer Numerical Control (CNC) • A computer controller is used to drive an NC machine directly.
• Characteristics are, - controls a single machine - located very close to machine tool - allows storage/retrieval/entry of NC programs without preprocessing of NC code • Advantages of CNC, - program is only entered into memory once, so it is more reliable - the programs can be tested and altered at the machine - increased flexibility and control options on the local computer - easy to integrate into FMS systems • The Background, - the problems with NC tapes were approached using DNC networks - the communication problems with DNC systems became obvious, and local computers were added to act as tape readers which would read tapes once, and play them back to the NC machine indefinitely - CNC controllers began using other storage media like magnetic tapes, and floppy disks - CNC now offers features like, - local programming, - communication over interfaces, - hard disk storage, - program simulation
page 412
- etc. • ASIDE: Direct Numerical Control is similar to CNC, except a remote computer is used to control a number of machines. This gives the advantage of more computer power. This approach is no longer popular, as the dropping cost of computers offsets any advantages.
• Some companies use proprietary NC Languages, such as the example of DYNA Mill NC code shown later
• These machines are often programmed by downloading NC code from a computer, or manually programming the controller computer.
• Future trends involve, - adaptive feed rates to increase speeds as the metal removal rate varies - tool wear detection -
14.2.3 Direct/Distributed Numerical Control (DNC) • Uses a few methods, - the oldest methods used modems, and a mainframe which emulated a tape reader, to control the NC machine (no storage) - a more recent advance used a local computer which acts as a storage buffer. Programs are downloaded from the main DNC computer, and then the local controller feeds instructions to the hardwired NC machine, as if they have been read from tape. - the newer methods use a central computer which communicates with local CNC computers (also called Direct Numerical Control) • DNC controllers came before CNC machines, but as computer technology improved it became practical to place a computer beside the NC machine, and DNC changed in form.
• Characteristics of modern DNC systems are, - uses a server (with large storage capacity) to store a large number of part programs
page 413
- the server will download part programs on demand to local machines - may have abilities to, - display and edit part programs - transmit operator instructions and other data needed at the machines - collect and process machine status information for management purposes • Advantages are, - eliminates the need for NC tapes (the advantages are obvious) - design changes are immediate - NC programs may be edited quickly - can be used to support an FMS system - increase efficiency of individual machine tools - more shop up-time than with stand alone machines - simplifies implementation of group technology, computer aided process planning, and other CIM concepts - reduces peripheral costs with NC tapes • A Brief History, • Mid 60’s - concept proved by Cincinnati Milacron and G.E. - telephone links used to send instructions from large computers to hard wired NC machines. Basically replaced a tape reader. • 1970 - several commercial DNC systems announced. • Mid 70’s - Aerospace companies used DNC because of the large number of distributed machines in their facilities. • Initial resistance to DNC technology was (previously) based on, - high cost of computer hardware - the number of machines which could be controlled by one computer was limited - computer software was limited for maintenance, scheduling, control, and data collection - a backup computer was usually required - was hard to justify on the basis of downloading parts programs • when downloading programs there are two popular opinions, - a program should only be downloaded in part, this accommodates easy engineering changes in a real-time environment. - many programs should be downloaded to the local controller to provide protection against system failure, and eliminating the cost of real-time response in the DNC central computer.
page 414
14.3 EXAMPLES OF EQUIPMENT • The number of NC machines available commercially will be well into the thousands.
14.3.1 EMCO PC Turn 50 • This is a small desktop lathe capable of turning parts in metal.
• The basic physical specifications are,
Cutting Volume
radial travel 48mm rad. axial travel 228mm
Max. Holding Volume
radial 30-65mm axial 300mm 12mm by 12mm
Max. Tool Size
max 80mm dia.
Chuck
130-3000 rpm
Spindle
0.001mm
Resolution
0-750 mm/min
Feed
zcxyu 005 GOY -.625 006 GOZ -.125 007 GRa -180 008 ZERO AT 009 X .634 010 Y .5 011 GOr .125 012 a 90 013 GRa -30 014 > REF COODS 015 ZERO AT 016 X 1.50 017 Y 0 018 GOr .125 019 a 60 020 GRa -60 021 > REF COODS 022 ZERO AT 023 X 1.5 024 Y -0.3 025 GOr .125 026 a 0 027 GRa -90 028 GRX -1.3 029 END
Start Program in inches Set Tool Diameter Set Feed Rates Set Absolute Zero Position Move to Start Position A
B 2.00”
B
30°
Y
C
X
D 0.50”
A E F 0.20”R
D
E F End Program
15.4 GRAPHICAL PART PROGRAMMING • Basically,
0.50”
C
Z
page 442
1. Part geometry is entered in 2D or 3D. 2. Tool geometry and machine tool type are entered. 3. Speeds and feeds are entered or calculated based on tool and work material. 4. Inside/outside of geometry, and initial stock sizes are selected. 5. Cutter paths are generated. 6. Cutter paths are converted to a machine specific language (eg, G-codes). • These programs are usually built into better CAD systems or are available as stand alone software
• Some machine tools have these programmers built into the controller.
15.5 NC CUTTER PATHS • When we have simple features, paths are easy to generate. These features include, - steps - pockets - holes - etc. • Typically paths for these will repeat as shown below,
page 443
• For complex surfaces we want to contour appropriately. These surfaces will almost always be represented with spline patches.
• Recall that a spline patch can be represented parametrically
page 444
(u=0,v=1)
(u=1,v=1) xp
p ( u, v ) = y p zp
(u=0,v=0)
(u=1,v=0)
• A simple algorithm to cut the surface is shown below.
dirn_flag = 1; a direction flag n=10 ; number of passes to cut the surface step=1.0/n ; step sizes for u and v directions start=step/2 ; the start offset in the u and v directions [xp,yp,zp] = p(start,start) ; calculate the start position print(“G00 X”,xp,” Y”,yp,” Z”,zp+0.2) ; move the tool to above the start position for i=0 to (n-1) ; will increment in the u direction for j=0 to (n-1) ; will increment in the v direction ; calculate next point if dirn_flag=-1 then [xp,yp,zp]=p(start+i*step,start+j*step) if dirn_flag=1 then [xp,yp,zp]=p(start+i*step,start+(n-j)*step) print(“G01 X”,xp,” Y”,yp,” Z”,zp) ; instruction to cut to next point next j ; make next step in v direction until done dirn_flag = -dirn_flag ; reverse direction to cut in opposite direction next i ; move to next cut line in the u direction print(“G00 Z”,zp+0.2) ; move the tool to above the end position
15.6 NC CONTROLLERS • NC control programs are essentially quite simple. The source code for a basic controller is given below.
page 445
********** Add in C-code for AMP project
15.7 PRACTICE PROBLEMS 1. Examine the part below. It is set up so that the origin is at the bottom left. The cutting tool has a diameter of 1/2”, and the material is 1/8” thick.
T
R2.000”
2.500”
2.000” 5.500”
2.000”
a) Write the equations needed to find the tangency point on the top left of the piece.
ans.
2
2
( x T – 5.5 ) + ( y T – 4.5 ) = 2 L AT =
2
2
xT + yT =
2
2
2
2 2
2 + ( 5.5 + 4.5 )
b) Develop an NC program to mill the part. The program should be complete and include all instructions required. If necessary, assume a location for the tangency point.
page 446
N10 G70 G90 T01 M06
ans.
N20 F20 S2000 M03 N30 G00 X-0.0 Y-0.25 N40 G01 Z-0.25 N50 G01 X5.75 N60 G01 Y1.75 N70 G01 X7.75 N80 G01 Y4.5
2. Examine the part below. It is set up so that the origin is at the bottom left corner. The cutting tool has a diameter of 1/2”, and the material is 1/8” thick. Develop an NC program to mill the part. The program should be complete and include all instructions required.
R2.000”
T
2.500”
2.000” 5.500”
2.000”
3.
15.8 LABORATORY - CNC INTEGRATION Purpose:
page 447
Integration of CNC equipment. Overview: Students will develop programs to load and unload the NC machines with robots, and then produce parts. Pre-Lab: 1. Use your NC programming software to generate an NC program to cut the top 1/2” of a 3” radius ball on the mill. Test the program on-line. 2. Use the NC generation software to cut a 1/4” deep, 2”long oval into the surface of a 1” brass bar. Test the program on-line. 3. Simulate both programs before arriving at the laboratory. 4. Develop a robot program to load/unload the NC mill with the RV-M1. Test the program on-line 5. Develop a program for the RT-3000 to load/unload the lathe. Test the program on-line. In-Lab: 1. In the lab test the programs on the different devices in groups of 3 2. One group of (6?) should connect the RV-M1 to the Mill, and the other group should connect the RT-3000 to the lathe. 3. The groups that did the connection should split into smaller groups and modify the programs on the robots and NC machines. Submit: 1. Your individual NC and robot programs. 2. The final group NC and robot programs.
page 448
16. DATA AQUISITION 16.1 INTRODUCTION An analog value is continuous, not discrete, as shown in figure 17.1. In the previous chapters, techniques were discussed for designing logical control systems that had inputs and outputs that could only be on or off. These systems are less common than the logical control systems, but they are very important. In this chapter we will examine analog inputs and outputs so that we may design continuous control systems in a later chapter.
Voltage logical continuous t Figure 17.1 - Logical and Continuous Values Typical analog inputs and outputs for PLCs are listed below. Actuators and sensors that can be used with analog inputs and outputs will be discussed in later chapters. Inputs: • oven temperature • fluid pressure • fluid flow rate Outputs: • fluid valve position • motor position • motor velocity This chapter will focus on the general principles behind digital-to-analog (D/A) and analogto-digital (A/D) conversion. The chapter will show how to output and input analog values with a PLC.
page 449
16.2 ANALOG INPUTS To input an analog voltage (into a PLC or any other computer) the continuous voltage value must be ’sampled’ and then converted to a numerical value by an A/D converter. Figure 17.2 shows a continuous voltage changing over time. There are three samples shown on the figure. The process of sampling the data is not instantaneous, so each sample has a start and stop time. The time required to acquire the sample is called the ’sampling time’. A/D converters can only acquire a limited number of samples per second. The time between samples is called the sampling period ’T’, and the inverse of the sampling period is the sampling frequency (also called sampling rate). The sampling time is often much smaller than the sampling period. The sampling frequency is specified when buying hardware, but for a PLC a maximum sampling rate might be 20Hz.
Voltage is sampled during these time periods voltage
time T = (Sampling Frequency)-1
Sampling time
Figure 17.2 - Sampling an Analog Voltage A more realistic drawing of sampled data is shown in Figure 17.3. This data is noisier, and even between the start and end of the data sample there is a significant change in the voltage value. The data value sampled will be somewhere between the voltage at the start and end of the sample. The maximum (Vmax) and minimum (Vmin) voltages are a function of the control hard-
page 450
ware. These are often specified when purchasing hardware, but reasonable ranges are; 0V to 5V 0V to 10V -5V to 5V -10V to 10V The number of bits of the A/D converter is the number of bits in the result word. If the A/D converter is ’8 bit’ then the result can read up to 256 different voltage levels. Most A/D converters have 12 bits, 16 bit converters are used for precision measurements.
V(t) V max
V ( t2 )
V ( t1 )
V min t τ t1 t2 where, V ( t ) = the actual voltage over time τ = sample interval for A/D converter t = time t 1, t 2 = time at start,end of sample V ( t 1 ), V ( t 2 ) = voltage at start, end of sample V min, V max = input voltage range of A/D converter N = number of bits in the A/D converter Figure 17.3 - Parameters for an A/D Conversion The parameters defined in Figure 17.3 can be used to calculate values for A/D converters.
page 451
These equations are summarized in Figure 17.4. Equation 17.1 relates the number of bits of an A/ D converter to the resolution. Equation 17.2 gives the error that can be expected with an A/D converter given the range between the minimum and maximum voltages, and the resolution (this is commonly called the quantization error). Equation 17.3 relates the voltage range and resolution to the voltage input to estimate the integer that the A/D converter will record. Finally, equation 17.4 allows a conversion between the integer value from the A/D converter, and a voltage in the computer.
R = 2
N
(17.1)
V max – V min - V ERROR = ---------------------------2R
(17.2)
V in – V min - R V I = INT ---------------------------V max – V min
(17.3)
V V C = -----I ( V max – V min ) + V min R
(17.4)
where, R = resolution of A/D converter V I = the integer value representing the input voltage V C = the voltage calculated from the integer value V ERROR = the maximum quantization error Figure 17.4 - A/D Converter Equations Consider a simple example, a 10 bit A/D converter can read voltages between -10V and 10V. This gives a resolution of 1024, where 0 is -10V and 1023 is +10V. Because there are only 1024 steps there is a maximum error of ±9.8mV. If a voltage of 4.564V is input into the PLC, the A/D converter converts the voltage to an integer value of 746. When we convert this back to a voltage the result is 4.570V. The resulting quantization error is 4.570V-4.564V=+0.006V. This error can be reduced by selecting an A/D converter with more bits. Each bit halves the quantization error.
page 452
Given, N = 10 V max = 10V V min = – 10V V in = 4.564V Calculate, R = 2
N
= 1024
V max – V min - = 0.0098V V ERROR = ---------------------------2R V in – V min - R = 746 V I = INT ---------------------------V max – V min V V C = -----I ( V max – Vmin ) + V min = 4.570V R Figure 17.5 - Sample Calculation of A/D Values If the voltage being sampled is changing too fast we may get false readings, as shown in Figure 17.6. In the upper graph the waveform completes seven cycles, and 9 samples are taken. The bottom graph plots out the values read. The sampling frequency was too low, so the signal read appears to be different that it actually is, this is called aliasing.
page 453
Figure 17.6 - Low Sampling Frequencies Cause Aliasing The Nyquist criterion specifies that sampling frequencies should be at least twice the frequency of the signal being measured, otherwise aliasing will occur. The example in Figure 17.6 violated this principle, so the signal was aliased. If this happens in real applications the process will appear to operate erratically. In practice the sample frequency should be 4 or more times faster than the system frequency. f AD > 2f signal
where,
f AD = sampling frequency f signal = maximum frequency of the input
There are other practical details that should be considered when designing applications with analog inputs; • Noise - Since the sampling window for a signal is short, noise will have added effect on the signal read. For example, a momentary voltage spike might result in a higher than normal reading. Shielded data cables are commonly used to reduce the noise levels. • Delay - When the sample is requested, a short period of time passes before the final sample value is obtained. • Multiplexing - Most analog input cards allow multiple inputs. These may share the A/D converter using a technique called multiplexing. If there are 4 channels using an A/
page 454
D converter with a maximum sampling rate of 100Hz, the maximum sampling rate per channel is 25Hz. • Signal Conditioners - Signal conditioners are used to amplify, or filter signals coming from transducers, before they are read by the A/D converter. • Resistance - A/D converters normally have high input impedance (resistance), so they affect circuits they are measuring. • Single Ended Inputs - Voltage inputs to a PLC can use a single common for multiple inputs, these types of inputs are called ’single’ ended inputs. These tend to be more prone to noise. • Double Ended Inputs - Each double ended input has its own common. This reduces problems with electrical noise, but also tends to reduce the number of inputs by half.
page 455
ASIDE: This device is an 8 bit A/D converter. The main concept behind this is the successive approximation logic. Once the reset is toggled the converter will start by setting the most significant bit of the 8 bit number. This will be converted to a voltage ‘Ve’ that is a function of the ‘+/-Vref’ values. The value of ‘Ve’ is compared to ‘Vin’ and a simple logic check determines which is larger. If the value of ‘Ve’ is larger the bit is turned off. The logic then repeats similar steps from the most to least significant bits. Once the last bit has been set on/off and checked the conversion will be complete, and a done bit can be set to indicate a valid conversion value. Vin above (+ve) or below (-ve) Ve Vin
+ -
+Vref
clock
successive approximation logic
8
D to A converter
Ve
reset
done
8
-Vref
data out
Quite often an A/D converter will multiplex between various inputs. As it switches the voltage will be sampled by a ‘sample and hold circuit’. This will then be converted to a digital value. The sample and hold circuits can be used before the multiplexer to collect data values at the same instant in time. Figure 17.7 - A Successive Approximation A/D Converter
16.3 ANALOG OUTPUTS Analog outputs are much simpler than analog inputs. To set an analog output an integer is converted to a voltage. This process is very fast, and does not experience the timing problems
page 456
with analog inputs. But, analog outputs are subject to quantization errors. Figure 17.11 gives a summary of the important relationships. These relationships are almost identical to those of the A/ D converter.
R = 2
N
(17.5)
V max – V min - V ERROR = ---------------------------2R
(17.6)
V desired – V min R VI = INT ---------------------------------- V max – V min
(17.7)
V V output = -----I ( V max – V min ) + V min (17.8) R where, R = resolution of A/D converter V ERROR = the maximum quantization error V I = the integer value representing the desired voltage V output = the voltage output using the integer value Figure 17.11 - Analog Output Relationships Assume we are using an 8 bit D/A converter that outputs values between 0V and 10V. We have a resolution of 256, where 0 results in an output of 0V and 255 results in 10V. The quantization error will be 20mV. If we want to output a voltage of 6.234V, we would specify an output integer of 160, this would result in an output voltage of 6.250V. The quantization error would be 6.250V-6.234V=0.016V.
page 457
Given, N = 8 V max = 10V V min = 0V V desired = 6.234V Calculate, R = 2
N
= 256
V max – V min - = 0.020V V ERROR = ---------------------------2R V in – V min - R = 160 V I = INT ---------------------------V max – V min V V C = -----I ( V max – Vmin ) + V min = 6.250V R
The current output from a D/A converter is normally limited to a small value, typically less than 20mA. This is enough for instrumentation, but for high current loads, such as motors, a current amplifier is needed. This type of interface will be discussed later. If the current limit is exceeded for 5V output, the voltage will decrease (so don’t exceed the rated voltage). If the current limit is exceeded for long periods of time the D/A output may be damaged.
page 458
ASIDE: 5KΩ MSB bit 3
bit 2
10KΩ
20KΩ
V– V
+
V ss
+ 0
Computer bit 1
+ Vo
40KΩ -
LSB bit 0
80KΩ
First we write the obvious, V
+
= 0 = V–
Next, sum the currents into the inverting input as a function of the output voltage and the input voltages from the computer, Vb3 V b2 Vb1 V b0 Vo -------------- + -------------- + -------------- + -------------- = ----------5KΩ 10KΩ 20KΩ 40KΩ 80KΩ ∴V o = 0.5V b3 + 0.25V b2 + 0.125V b1 + 0.0625Vb 0 Consider an example where the binary output is 1110, with 5V for on, ∴V o = 0.5 ( 5V ) + 0.25 ( 5V ) + 0.125 ( 5V ) + 0.625 ( 0V ) = 4.375V Figure 17.12 - A Digital-To-Analog Converter
16.4 REAL-TIME PROCESSING Any computer running a process should use a real-time operating system. The purpose of a real-time operating system is primarily to ensure that a process runs within a specified time interval, normally a small fraction of a system. This capability is often not a common part of most
page 459
operating systems, but it is relatively easy to add. When it is not a real-time process, it common for another process to monopolize the processor and cause erratic delays. When this happens the control program may not respond to a control event for a second or more. This would generally be a bad thing in a time critical system.
- need to be able to specify how often a process runs.
- RTLinux
- system clock for slower processes.
16.5 DISCRETE IO
16.6 COUNTERS AND TIMERS
16.7 ACCESSING DAQ CARDS FROM LINUX
Listing 16.1 - DAS08 Driver Header File (das08_io.h)
#include "../include/global.h"
#ifndef _DAS08__ #define _DAS08__
page 460
#define
CARDBASE 0x300
#define ADCHIGH #define ADCLOW
0 1
// AD Data Registers
/* A/D Status and Control Register */ #define ADCSTATUS2 /* Auxiliary port on analog bus */ #define PORTAUX 2 /* Programmable Gain Register */ #define GAIN 3 /* Counter Load & Read Registers */ #define LOADREAD14 #define LOADREAD25 #define LOADREAD36 #define CCONFIGPORT7// Counter Control Register /* D/A 0 Control Registers */ #define DAC0LOW 8 #define DAC0HIGH9 /* D/A 1 Control Registers */ #define DAC1LOW 10 #define DAC1HIGH11 /* 82C55 Digital I/O Registers */ #define PORTA 12 #define PORTB 13 #define PORTC 14 #define PORTCL 12345 /* real port is 0x30e bits 0-3 */ #define PORTCH 6789 /* real port is 0x30e bits 4-7 */ /* 82C55 Control Register */ #define DCONFIGPORT15 #define #define #define #define #define #define #define #define
DIGITALOUT 1 DIGITALIN 2 HIGHONLASTCOUNT 0 ONESHOT 1 RATEGENERATOR2 SQUAREWAVE3 SOFTWARESTROBE4 HARDWARESTROBE5
/* Range Codes */ #define BIP10VOLTS0x08 #define BIP5VOLTS0x00 #define BIP2PT5VOLTS0x02 #define BIP1PT25VOLTS0x04 #define BIPPT625VOLTS0x06 #define UNI10VOLTS0x01 #define UNI5VOLTS0x03 #define UNI2PT5VOLTS0x05 #define UNI1PT25VOLTS0x07
class das08{ protected: public: int
base;
// card setup information
page 461
int int
chan0; chan1;
int int int int
portA; portB; portCL; portCH;
int int int int int int int int int int int int int int int int
*data_portA;// hooks to global values *data_portB; *data_portCL; *data_portCH; *data_portXI; *data_portXO; *data_AI0; *data_AI1; *data_AI2; *data_AI3; *data_AI4; *data_AI5; *data_AI6; *data_AI7; *data_AO0; *data_AO1;
// port data directions
das08(); ~das08(); int int int int int int int int int
configure(char*); connect(); scan(); disconnect(); DConfigPort(int, int); DIn(int, int*); DBitIn(int, int, int*); DOut(int, int); DBitOut(int, int, int);
int int int
C8254Config(int, int); CLoad(int, int); CIn(int, int*);
int int
AIn(int, int*); AOut(int, int);
}; #endif
Listing 16.2 - DAS08 Driver File (das08_io.cpp)
#include #include #include #include #include #include #include
page 462
#include #include #include #include #include #include #include #include
#include "das08_io.h" #include "../include/process.h"
int
bits[]={0x01, 0x02, 0x04, 0x08, 0x10, 0x20, 0x40, 0x80};
das08::das08(){ base = CARDBASE;// default cardbase chan0 = BIP10VOLTS;// default AD ranges chan1 = BIP10VOLTS; portA = DIGITALIN; portB = DIGITALIN; portCH = DIGITALIN; portCL = DIGITALIN; }
das08::~das08(){ }
int das08::configure(char *file_name){ int error; FILE *fp_in; char params[200]; error = NO_ERROR; if((fp_in = fopen(file_name, "r")) != NULL){ fgets(params, 200, fp_in); while(feof(fp_in) == 0){ if((params[0] != ’#’) && (strlen(params) > 3)){ if(params[0] == ’B’){ base = atoi(&(params[1])); } else if(strncmp("A0", params, 2) == 0){ if(strncmp("BIP10VOLTS", &(params[2]), 10) == 0){ chan0 = BIP10VOLTS; } else if(strncmp("BIP5VOLTS", &(params[2]), 9) == 0){ chan0 = BIP5VOLTS; } else if(strncmp("BIP2PT5VOLTS", &(params[2]), 12) == 0){ chan0 = BIP2PT5VOLTS; } else if(strncmp("BIP1PT25VOLTS", &(params[2]), 13) == 0){ chan0 = BIP1PT25VOLTS; } else if(strncmp("BIPPT625VOLTS", &(params[2]), 13) == 0){ chan0 = BIPPT625VOLTS; } else if(strncmp("UNI10VOLTS", &(params[2]), 10) == 0){ chan0 = UNI10VOLTS; } else if(strncmp("UNI5VOLTS", &(params[2]), 9) == 0){ chan0 = UNI5VOLTS; } else if(strncmp("UNI2PT5VOLTS", &(params[2]), 12) == 0){ chan0 = UNI2PT5VOLTS; } else if(strncmp("UNI1PT25VOLTS", &(params[2]), 13) == 0){ chan0 = UNI1PT25VOLTS;
page 463
} else { error_log(MINOR, "Unrecognized DAS08 analog A0 output range"); error = ERROR; } } else if(strncmp("A1", params, 2) == 0){ if(strncmp("BIP10VOLTS", &(params[2]), 10) == 0){ chan1 = BIP10VOLTS; } else if(strncmp("BIP5VOLTS", &(params[2]), 9) == 0){ chan1 = BIP5VOLTS; } else if(strncmp("BIP2PT5VOLTS", &(params[2]), 12) == 0){ chan1 = BIP2PT5VOLTS; } else if(strncmp("BIP1PT25VOLTS", &(params[2]), 13) == 0){ chan1 = BIP1PT25VOLTS; } else if(strncmp("BIPPT625VOLTS", &(params[2]), 13) == 0){ chan1 = BIPPT625VOLTS; } else if(strncmp("UNI10VOLTS", &(params[2]), 10) == 0){ chan1 = UNI10VOLTS; } else if(strncmp("UNI5VOLTS", &(params[2]), 9) == 0){ chan1 = UNI5VOLTS; } else if(strncmp("UNI2PT5VOLTS", &(params[2]), 12) == 0){ chan1 = UNI2PT5VOLTS; } else if(strncmp("UNI1PT25VOLTS", &(params[2]), 13) == 0){ chan1 = UNI1PT25VOLTS; } else { error_log(MINOR, "Unrecognized DAS08 analog A1 output range"); error = ERROR; } } else if(strncmp("PAI", params, 3) == 0){ portA = DIGITALIN; } else if(strncmp("PAO", params, 3) == 0){ portA = DIGITALOUT; } else if(strncmp("PBI", params, 3) == 0){ portB = DIGITALIN; } else if(strncmp("PBO", params, 3) == 0){ portB = DIGITALOUT; } else if(strncmp("PCLI", params, 4) == 0){ portCL = DIGITALIN; } else if(strncmp("PCLO", params, 4) == 0){ portCL = DIGITALOUT; } else if(strncmp("PCHI", params, 4) == 0){ portCH = DIGITALIN; } else if(strncmp("PCHO", params, 4) == 0){ portCH = DIGITALOUT; } else { error_log(MINOR, "DAS08 argument not recognized"); error = ERROR; } } fgets(params, 200, fp_in); } fclose(fp_in); } return error; }
int das08::connect(){ int error; error = NO_ERROR; if(ioperm(base, 16, 1) == 0){
page 464
DConfigPort(PORTA, portA); DConfigPort(PORTB, portB); DConfigPort(PORTCL, portCL); DConfigPort(PORTCH, portCH); } else { error = ERROR; error_log(MINOR, "Could not connect to DAS08 board - memory is probably in use"); } return error; }
int das08::scan(){ int error; error = NO_ERROR; // update digital ports if(portA == DIGITALIN){DIn(PORTA, data_portA); } else {DOut(PORTA, data_portA[0]);} if(portB == DIGITALIN){DIn(PORTB, data_portB); } else {DOut(PORTB, data_portB[0]);} if(portCL == DIGITALIN){DIn(PORTCL, data_portCL); } else {DOut(PORTCL, data_portCL[0]);} if(portCH == DIGITALIN){DIn(PORTCH, data_portCH); } else {DOut(PORTCH, data_portCH[0]);} DOut(PORTAUX, data_portXO[0]); DIn(PORTAUX, data_portXI);
// Update analog inputs AIn(0, data_AI0); AIn(1, data_AI1); AIn(2, data_AI2); AIn(3, data_AI3); AIn(4, data_AI4); AIn(5, data_AI5); AIn(6, data_AI6); AIn(7, data_AI7); // Update analog outputs AOut(0, data_AO0[0]); AOut(1, data_AO1[0]); return error; }
int das08::disconnect(){ int error; error = NO_ERROR; if(ioperm(base, 16, 0) != 0){ error = ERROR; error_log(MINOR, "Could not release the DAS08 board - memory is probably in use"); } return error; }
int das08::DConfigPort(int Port, int Direction){
page 465
// // // // // int
This command configures a port as an input or output. The Direction field can be either DIGITALIN or DIGITALOUT depending on whether the port is to be configured as an input or output. Valid ports are PORTA, PORTB, PORTCL and PORTCH. Direction bit can be either DIGITALIN or DIGITALOUT. error, mask, OldByte, NewByte;
//printf("Configuring port %d with direction %d \n", Port, Direction); error = NO_ERROR; OldByte = inb(DCONFIGPORT + base); /*read the current register*/ if(Direction == DIGITALIN){ /* determine mask for DIGITALIN */ if(Port == PORTA){ mask = 0x10; } else if(Port == PORTB){ mask = 0x02; } else if(Port == PORTC){ mask = 0x09; } else if(Port == PORTCL){ mask = 0x01; Port = PORTC; } else if(Port == PORTCH){ mask = 0x08; Port = PORTC; } else { error_log(MINOR, "Digital port must be PORTA, PORTB, PORTC, PORTCL or PORTCH"); error = ERROR; mask = 0; } NewByte = OldByte | mask; /* new data for register */ } else if(Direction == DIGITALOUT){ /* determine mask for DIGITALOUT */ if(Port == PORTA){ mask = 0xef; } else if(Port == PORTB){ mask = 0xfd; } else if(Port == PORTC){ mask = 0xf6; } else if(Port == PORTCL){ mask = 0xfe; Port = PORTC; } else if(Port == PORTCH){ mask = 0xf7; Port = PORTC; } else { error_log(MINOR, "Digital port must be PORTA, PORTB, PORTC, PORTCL or PORTCH"); error = ERROR; } NewByte = OldByte & mask; /* new value for register */ } else { error_log(MINOR, "Direction must be set to DIGITALIN or DIGITALOUT"); error = ERROR; } if(error == NO_ERROR){ //printf("port thingy %d %d \n", NewByte, DCONFIGPORT); outb(NewByte, DCONFIGPORT + base); /* write config data to register */ } return error; /* no errors detected */ }
int das08::DBitIn(int Port, int BitNum, int *BitData){ // This function determines whether a bit within the // requested port is set. The value (1 or 0) is returned // in the variable pointer sent to the function. Port may // be PORTA, PORTB, PORTCL or PORTCH. BitNum must be in the // range 0-7. int error, mask = 0, data; error = NO_ERROR; if((Port == PORTCL) || (Port == PORTCH)){ data = inb(PORTC + base); } else { data = inb(Port + base);} //printf("GOT %d %d %d %d \n", Port, data, BitNum, BitData[0]);
page 466
if((Port == PORTA) || (Port == PORTB) || (Port == PORTC)){ if((BitNum >= 0) && (BitNum = 0) && (BitNum = 4) && (BitNum 255) || (ByteValue < 0)){ error = ERROR; } //printf("Writing byte %d to port %d\n", ByteValue, Port); if(error == NO_ERROR){ if(Port == PORTCL){ outb((ByteValue & 0x0f), PORTC + base); } else if(Port == PORTCH){ outb((ByteValue & 0xf0), PORTC + base); } else { outb(ByteValue, Port + base); /* write the port data */ } } return error; /* no errors detected */ }
int das08::C8254Config(int CounterNum, int Config){ int error, NewByte, // TempByte, BCD, mask, counter; // int temp; error = NO_ERROR; /* BCD = 0xfe - 16-bit binary count BCD = 0xf1 - 4 decade Binary Coded Decimal */ BCD = 0xfe; switch (Config){ case HIGHONLASTCOUNT:mask = 0xf1; break; case ONESHOT: mask = 0xf3; break; case RATEGENERATOR:mask = 0xf5; break; case SQUAREWAVE: mask = 0xf7; break; case SOFTWARESTROBE:mask = 0xf9; break; case HARDWARESTROBE:mask = 0xfb; break; default: error = ERROR;; break; } switch (CounterNum){
page 469
case 1: counter = 0x3f; case 2: counter = 0x7f; case 3: counter = 0xbf; default: error = ERROR;
break; break; break; break;
} if(error == NO_ERROR){ NewByte = (BCD & mask) & counter; //printf("The value of TempByte & mask is --> %x.\n", NewByte); outb(NewByte, CCONFIGPORT + base); } return error; }
int das08::CLoad(int CounterNum, int value) { char LoadValue[6]; int error; int TempByte, TempByte1, Register, CounterMask; int WriteLowByteMask1 = 0x20;/* RL1 | */ int WriteLowByteMask2 = 0xef;/* RL0 & */ int WriteHighByteMask1 = 0xdf;/* RL1 & */ int WriteHighByteMask2 = 0x10;/* RL0 | */ char LowByte[5]; char HighByte[5]; long HighByteValue, LowByteValue; int test; error = NO_ERROR; switch (CounterNum){ case 1: Register case 2: Register case 3: Register default: error = } HighByte[0] HighByte[1] HighByte[2] HighByte[3] LowByte[0] LowByte[1] LowByte[2] LowByte[3]
= = = = = = = =
= LOADREAD1; CounterMask = 0x3f; break; = LOADREAD2; CounterMask = 0x7f; break; = LOADREAD3; CounterMask = 0xbf; break; ERROR; break;
LoadValue[0]; LoadValue[1]; LoadValue[2]; LoadValue[3]; ’0’; ’x’; LoadValue[4]; LoadValue[5];
if(error == NO_ERROR){ HighByteValue = (int)strtol(HighByte, NULL, 0); LowByteValue = (int)strtol(LowByte, NULL, 0); TempByte = (CounterMask | WriteLowByteMask1) & WriteLowByteMask2; TempByte1 = TempByte & 0xf0; //printf("The value in config low is --> %x.\n", TempByte1); outb(TempByte1, CCONFIGPORT + base); outb(LowByteValue, Register + base); //printf("The register chosen is --> %x.\n", Register); test = inb(Register + base); //printf("The value read in counter low is --> %x.\n", test); TempByte = (0x30 & WriteHighByteMask1) | WriteHighByteMask2; //printf("The value in config high is --> %x.\n", TempByte); outb(TempByte, CCONFIGPORT + base); outb(HighByteValue, Register + base); outb(TempByte, CCONFIGPORT + base); test = inb(Register + base);
page 470
//printf("The value in counter high is --> %x.\n", test); } return error; }
int das08::CIn(int CounterNum, int *CountValue){ int error; int TempByte, Register; int ReadLowByteMask1 = 0x20;/* RL1 | */ int ReadLowByteMask2 = 0xef;/* RL0 & */ int ReadHighByteMask1 = 0xdf;/* RL1 & */ int ReadHighByteMask2 = 0x10;/* RL0 | */ int CountValue1, CountValue2; error = NO_ERROR; switch (CounterNum){ case 1: Register case 2: Register case 3: Register default: error = }
= LOADREAD1; break; = LOADREAD2; break; = LOADREAD3; break; ERROR; break;
if(error == NO_ERROR){ TempByte = (0x3f | ReadLowByteMask1) & ReadLowByteMask2; outb(TempByte, CCONFIGPORT + base); CountValue1 = inb(Register + base); //printf("The low value is --> %x.\n", CountValue1); TempByte = (0x3f & ReadHighByteMask1) | ReadHighByteMask2; outb(TempByte, CCONFIGPORT + base); CountValue2 = inb(Register + base); //printf("The high value is --> %x.\n", CountValue2); } return error; }
int das08::AIn(int ADChannel, int *Value){ // This function requires three arguments to perform the // analog to digital conversion. ADChannel must be in the // range 0-7 and Range must be a valid range code // i.e. BIP5VOLTS. The value of the conversion will be // returned to the address specificed through the pointer // variable. This value will be in the range 0-4095. int error; int value1, value2, value3, curr_status, new_status, ADbusy; int ADCmask1, ADCmask2; int ADValue_low, ADValue_low1, ADValue_low2, ADValue_high; int EOC = 1; error = NO_ERROR; curr_status = inb(ADCSTATUS + base); /* current value in status */ switch(ADChannel){ case 0:ADCmask1 case 1:ADCmask1 case 2:ADCmask1 case 3:ADCmask1 case 4:ADCmask1 case 5:ADCmask1
= = = = = =
0xf8;ADCmask2 0xf9;ADCmask2 0xfa;ADCmask2 0xfb;ADCmask2 0xfc;ADCmask2 0xfd;ADCmask2
= = = = = =
0x00;break; 0x01;break; 0x02;break; 0x03;break; 0x04;break; 0x05;break;
page 471
case 6:ADCmask1 = 0xfe;ADCmask2 = 0x06;break; case 7:ADCmask1 = 0xff;ADCmask2 = 0x07;break; default:error = ERROR;; break; /* error */ } if(error == NO_ERROR){ outb(chan0, GAIN + base); /* set the gain/range value */ new_status = (curr_status & ADCmask1) | ADCmask2; outb(new_status, ADCSTATUS + base); /* set the channel number */ outb(0x00, ADCLOW + base); /* start a 12 bit A/D conversion */ } while((error == NO_ERROR) && (EOC == 1)){ /* check for end of conversion */ ADbusy = inb(ADCSTATUS + base); /* read status register */ if(ADbusy >= 128){ EOC = 1; /* A/D still converting */ } else { EOC = 0; /* A/D done converting */ } } if(error == NO_ERROR){ ADValue_low = inb(ADCLOW + base); /* get the lower eight bits */ ADValue_high = inb(ADCHIGH + base); /* get the upper four bits */ switch(ADValue_high){ case 0x00:value1 = 0;break; case 0x80:value1 = 1;break; case 0x40:value1 = 2;break; case 0xc0:value1 = 3;break; case 0x20:value1 = 4;break; case 0xa0:value1 = 5;break; case 0x60:value1 = 6;break; case 0xe0:value1 = 7;break; case 0x10:value1 = 8;break; case 0x90:value1 = 9;break; case 0x50:value1 = 10;break; case 0xd0:value1 = 11;break; case 0x30:value1 = 12;break; case 0xb0:value1 = 13;break; case 0x70:value1 = 14;break; case 0xf0:value1 = 15;break; default:error = ERROR;break; } ADValue_low1 = (ADValue_low & 0x0f); /* mask off bits 4-7 */ switch(ADValue_low1){ case 0x00:value2 = 0;break; case 0x01:value2 = 16;break; case 0x02:value2 = 32;break; case 0x03:value2 = 48;break; case 0x04:value2 = 64;break; case 0x05:value2 = 80;break; case 0x06:value2 = 96;break; case 0x07:value2 = 112;break; case 0x08:value2 = 128;break; case 0x09:value2 = 144;break; case 0x0a:value2 = 160;break; case 0x0b:value2 = 176;break; case 0x0c:value2 = 192;break; case 0x0d:value2 = 208;break; case 0x0e:value2 = 224;break; case 0x0f:value2 = 240;break; default:error = ERROR;break; }
page 472
ADValue_low2 = (ADValue_low & 0xf0); /* mask off bits 0-3 */ switch(ADValue_low2){ case 0x00:value3 = 0;break; case 0x10:value3 = 256;break; case 0x20:value3 = 512;break; case 0x30:value3 = 768;break; case 0x40:value3 = 1024;break; case 0x50:value3 = 1280;break; case 0x60:value3 = 1536;break; case 0x70:value3 = 1792;break; case 0x80:value3 = 2048;break; case 0x90:value3 = 2304;break; case 0xa0:value3 = 2560;break; case 0xb0:value3 = 2816;break; case 0xc0:value3 = 3072;break; case 0xd0:value3 = 3328;break; case 0xe0:value3 = 3584;break; case 0xf0:value3 = 3840;break; default: error = ERROR; /* error - unknown conversion result */ } *Value = value1+value2+value3; /* total value for conversion */ } return error; /* no errors detected */ }
int das08::AOut(int DAChannel, int DAValue){ // This function performs a digital to analog conversion // routine. The DAChannel must be either 0 or 1 and the // digital value must be in the range 0-4095. int error; int low, high, DACLOW, DACHIGH; error = NO_ERROR; switch(DAChannel){ case 0:DACLOW = DAC0LOW;DACHIGH = DAC0HIGH;break; case 1:DACLOW = DAC1LOW;DACHIGH = DAC1HIGH;break; default:error = ERROR;break; } /* The following table converts the digital value into three hex values encompassing two 8-bit registers. The layout of the registers follow: low - DA7 high x
DA6 x
DA5 x
DA4 x
DA3 DA2 DA1 DA11 DA10 DA9
if(DAValue = 256) && (DAValue = 512) && (DAValue = 768) && (DAValue = 1024) && (DAValue = 1280) && low = DAValue - 1280; high = 0x05; if((DAValue >= 1536) && low = DAValue - 1536; high = 0x06; if((DAValue >= 1792) && low = DAValue - 1792; high = 0x07; if((DAValue >= 2048) && low = DAValue - 2048; high = 0x08; if((DAValue >= 2304) && low = DAValue - 2304; high = 0x09; if((DAValue >= 2560) && low = DAValue - 2560; high = 0x0a; if((DAValue >= 2816) && low = DAValue - 2816; high = 0x0b; if((DAValue >= 3072) && low = DAValue - 3072; high = 0x0c; if((DAValue >= 3328) && low = DAValue - 3328; high = 0x0d; if((DAValue >= 3584) && low = DAValue - 3584; high = 0x0e; if((DAValue >= 3840) && low = DAValue - 3840; high = 0x0f;
(DAValue AIn( query(QUERY, "Enter Channel Number (0-7): ", 0), &value); printf("The value is [%d]\n", value); } else if(choice == 10){ A->AOut( query(QUERY, "Enter Channel Number (0-1): ", 0), query(QUERY, "Enter Value (0- 4095): ", 0)); } else if(choice == 11){ } else { printf("ERROR: Choice not recognized\n"); } } while(choice != 11); A->disconnect(); delete A; }
int
query(int type, char *text, int def){ char work[20]; int value;
if(type == QUERY){ printf("%s [%d]: ", text, def); scanf("%s", work); printf("\n", work); if(strlen(work) == 0){ return def; } else { return atoi(work); } } else if(type == CHOOSE_PORT){ printf("Which port (1=A, 2=B, 3=C, 4=CH, 5=CL, 6=AUX): "); scanf("%d", &value); if(value == 1) return PORTA; if(value == 2) return PORTB; if(value == 3) return PORTC; if(value == 4) return PORTCL; if(value == 5) return PORTCH; if(value == 6) return PORTAUX; return ERROR; } else if(type == CHOOSE_COUNTER){ printf("Which counter (1, 2, 3): "); scanf("%d", &value); if((value >= 1) || (value =20
A>=20 Part E A 40 A < 40
Tmin
15.5 9
rectangle
Com-
3 0.125
circle Tmin < 0.18 Tmin > 0.18
rectangle C > 28 C < 28
odd triangle isosceles triangle
page 499
17.12 TUTORIAL - LABVIEW BASED IMAQ VISION 1. Locate the appropriate hardware and software for the laboratory. This includes a video camera with an appropriate lens attached. A BNC cable to connect to the computer. A computer with the National Instruments IMAQ PCI-1408 vision card and IMAQ software installed. 2. We will start by verifying that the vision system is working properly. To do this run the “IMAQ Configuration Utility”. You should see a screen that shows the computer and PCI-1408 card. Click on the ‘+’ to the left of the card and you should see four input channels appear. The first of these is ‘channel 0’, click on it. Next, select “Aquire”, “Grab”, a window should appear that shows a video feed. Adjust/focus the lens until a clear image appears. Note that the lens attached is a TV lens. For small distances (less than 2-3 feet) the lens will be very sensitive to focus, when a longer focus is used it will be much less sensitive. Explore the software settings for the camera. Feel free to change values, but record the original value so that it may be changed back. When you feel comfortable that the video images are being captured properly, continue to the next step. 3. Run Labview, and open a “New vi”. Construct the vi below to capture an image and display it on the screen.
Panel
Diagram
test
IMAQ
snap
(From left to right) First create a string, and enter ‘test’ or something else. Next create the ‘IMAQ’ icon using “IMAQ Vision”, “Management”, “IMAQ”. This will create a generic place to store images. At this point the image size, etc is not important. Now that we have a place to store the image, we can grab images from the camera with the ‘snap’ icon found at “Image Aquisition”, “Snap”. Finally we can display the images using the last icon found at “IMAQ
page 500
Vision”, “Display (basics)”, “IMAQ WindDraw”. Connect these together and run the vi. You should see an image from the camera. Notice that these icons are doing a lot that is not on the screen. The vision add-on to Labview does not fully follow the philosophy of graphical programming. Things like the display window are not shown in the panel where they should be. These ‘cheats’ are necessary because of the huge amount of data required for vision tasks. Take some time to explore the other vision tools, and try modifying the vision program. 4. Close the vi and do not save changes to any other vi (this could save some settings permanantly). Next, use “Open vi” and open “examples”, “vision”, “barcodedemo.vi”. Run the vi. An image of a barcode should appear. Use the mouse to put a rectangle over the bar code. Then accept the Region of Interest “ROI”. After this the program will use images saved on disk to test the routine. The codes should match the displayed images. Stop the vi and look at the diagram to see the general operation - it is set up to use a sequence. Notice that the first frame in the sequence pulls an image from a file, and displays it on the screen. The next couple of frames deal with getting the region of interest. The fourth sequence (3 of 0 to 4) captures images and decodes the barcodes. The last sequence is used to release the vision memory, etc. Notice that the images are being supplied by a function called “simu GRAB”, replace this with the normal snap routine and run the program (put a vi in front of the camera). You should now see the images, but they are not decoded properly. Notice that the barcode icon has an integer digit input of ‘3’, you will need to change this value to get the barcodes to decode properly. 5. Close the vi (don’t save any changes). Open the example vi “caliperdemo.vi”, and run the vi. This vi can be used to check the presence of objects. Draw lines across the image. Each point where the line goes from light/dark or dark/light an edge will be detected. If the line is accepted you will see it appear on the list, you will want to change the number of edges. You can have more than one test line. When done run the test and see how it behaves. Look at the diagram for the vi and modify it to use the camera (as you did for the barcode reader).
17.13 LABORATORY - VISION SYSTEMS FOR INSPECTION Purpose: A vision system will be explored and implemented in the laboratory setting. Overview: The vision system is based on Labview. A dedicate PC will be used in the cell to process the vision commands. Using labview the PC can then be connected to the Soft PLC controller. Pre-Lab: 1. Review labview programming using tutorials found at the national instruments site (www.natinst.com). In-Lab:
page 501
1. Complete the Labview vision tutorial. 2. Modify the appropriate test program to read bar codes, and save them to a file 3. Modify the appropriate test program to read a dimension of arbitrary parts and write the dimension to a serial port. Submit: 1. Printouts of the modified test programs.
page 502
18. INTEGRATION ISSUES
18.1 CORPORATE STRUCTURES • First consider the major functions within a company, - Production - Materials - Process Planning - Design - Customer Orders / Service - Marketing - Accounting - Management • All of these functions generate and use common information which must be communicated between departments.
• Since computers handle information, we must be aware of what we get, and what we produce.
18.2 CORPORATE COMMUNICATIONS • Previous paper based systems provided support for data transfer between departments, and provided a good basis for the introduction of computers
• ASIDE: Computers can make a good system better, but they will always make a bad system worse. This is because a system which is not well defined and poorly understood cannot be programmed, or optimized.
• Characteristics of paper based manufacturing systems,
page 503
- Multiple copies of same information. - Revising information is hard when multiple copies exist. - Delays for the transfer of paper. - Easy to lose paper. - Paper is not interactive. - Paper requires bulky storage. • Computers overcome and reduce the problems above, but introduce some technological challenges, - Creating programs to support corporate functions. - Software to support interdepartmental communication and data sharing. - Hardware to support the software.
S u p plier D ata
O rd er
P rodu ction O rder P urchase O rder R eq
O rder
O rder R eq
Incom ing C o m m un ication
M an ag e R aw M aterial an d E n erg y 4
S ched ule
O rd er S tatu s
K now H ow
D ata
M eth o d s
S h ip p in g C o st
R e qm ts
Q A R esu lt
In v en to ry
P ack O ut S c he du le
A ssum e Q u ality 6
C orporate R& D
O rde r R eq u est
A ccep ted O rd er R e serv atio n
M anage P rod uct C o sts 9
W aiv ers
QA R esults
STDS
P erfo rm an ce & C o sts
C o st O B J
M anage P rodu ction 3
A pp ro v als
M a terial an d E n ergy Inv en to ry
M a terial an d E n erg y R eq d
P a rts R M & E n erg y Inc om ing
S ales F orecast
S ch edu le P ro ductio n 2 C ap acity
M ark etin g P lan t F u n ctio n al E n tities and S ales
A nnual S ales
P ro cess O rd ers 1
P ro d uc tio n C o st
Transit C o m pan y
M ark eting and S ales
R eq m ts
C u sto m er
M anag e P ro du ct S h ippin g 8
T ran sp o rt O rder
M an age P rodu ct In vento ry 7
Inventory B alance
L o n g Te rm M aterial an d E n erg y R eq u irem en ts
M anage P ro cu rem en t 5
P ay m en t R elea se
A ccoun ting
M FG R M & E n erg y C o sts
Invoice and S h ipp ing D ocum en ts
E x tern al E n tities
P urchasing
S u pp lier P e rfo rm an ce
In vo ic e
S up plier / Ven do r
C redit L im it and O ther P o licy
A cco untin g
R elease To S h ip
C onfirm Availability
R elease Invoice C onfirm S hip
M arketin g an d S ales
Invoice
C u sto m er
page 504
• This figure below shows various departments, and the information flow [source - ???
page 505
• Requirements for interfacing corporate management and staff functional entities to the fac-
FA C TO RY L E V E L 0.0
M anpow er R equirem ents K now H ow Vendor C ontracts
RES
E xternal E ntities
PURCH
RD&E
M KTG and SALES
Policies
CORP MGMT
H um an
M anufactuing policies
ACCT
R equirem ents
tory [source - find]
• Assumed functional hierarchy computer system structure for a large manufacturing com-
page 506
Plant Production Scheduling and Operational Management
Level3
Supervisor’s Console
Inter-area Coordination (Shop coordination)
Level2
Supervisor’s Console
Work Cell (Direct Numerical Control)
Operator’s Console
Work Station (Computerized numerical Control)
Level 1 Dedicated Programmable Logic Controllers
PROCESS
Communications with other areas
Operational and Production Supervision
Level4
Communications with other supervisory systems
Plant Management Information
Communications with other control systems
Management Data Presentation
Sales Orders
plex [source - find]
[source - find]
raw material, energy and spare parts orders
PURCH
External Entities
Status of Production orders
FACTORY LEVEL 0.0
Requests for information, plant tests
RD&E
MKTG and SALES
operational performance Policies
Manpower performance data and reqmts
RES
Human
Corporate Performance reporting
CORP MGMT
Cost reporting
ACCT
page 507
• Report interfacing to corporate management and staff functional entities from the factory
page 508
• The Shop Floor Production Model (SFPM): [ source - find]
Level
4
Section/
Sub-Activity
Responsibility
Supervise shop
Supervising and coordinating
floor production process
Area
the production and supporting the jobs and obtaining and allocating resources to the jobs.
3
Cell
Coordinate shop
Sequencing and supervising
floor production
the jobs at the shop floor produc-
process
tion process
Command shop 2
Station
floor production process Execute shop floor
1
Equipment
production process
Directing and coordinating the shop floor production process Executing the job of shop floor production according to commands
The ISO Reference Model for Factory Automation adds a couple of layers [ source - find]
Level/ Hierarchy 6/ Enterprise
Area of Con-
Responsibility
Basic Functions
Managing the
Achieving the
Corporate management
trol
corporation
enterprise’s mission
Finance
and managing the
Marketing and sales
corporation
Research and Development
page 509
Level/ Hierarchy 5/ Facility or
Area of Con-
Responsibility
Basic Functions
Planning Pro-
Implementing
Product design and production
trol
duction
plant
the enterprise functions and planning and scheduling production
engineering Production management (upper level) Resource management (upper level) Procurement (upper level) Maintenance management (upper level)
4/ Section or area
Allocating and
Coordinating
Production management (lower
supervising materi-
production and
als and resources
obtaining and allocat-
Procurement (lower level)
ing resources to jobs
Resource management (lower
level)
level) Maintenance management (lower level) Shipping Waste material treatment 3 / Cell
Coordinating
Sequencing and
multiple machines
supervising shop
and operations
floor jobs and super-
Shop floor production (cell level)
vising various supporting services 2 / Station
commanding
Directing and
machine sequences
coordinating the
and motion
activity of the shop floor equipment
Shop floor production (station level)
page 510
Level/ Hierarchy 1 / Equipment
Area of Con-
Responsibility
Basic Functions
Activating
Taking action on
Shop floor production (equip-
trol
sequences and
commands to the
motion
shop floor equipment
ment level)
page 511
• A LAN (Computer Network) Hierarchy for Shop Floor Control [source - find] E n te rp rise L A N
L ev e l 6 : E n terp rise
L ev e l 5 : F ac ility o r P lan t
F ac to ry B ac k b o n e L A N
S ec tio n C o n tro lle r A
S e ctio n C o n tro lle r B
S ec tio n C o n tro ller C
sim ila r to A L ev e l 4 : S ec tio n o r A re a
C ell C o n tro ller A
L ev e l 3 : C e ll
L ev e l 2 : S tatio n
sim ila r to A
S ec tio n A L A N
C e ll A L A N
D e v ic e C o n tro ller A
C ell C o n tro lle r B
C ell B L A N
D e v ic e C o n tro ller B
D e v ice C o n tro lle r A
D e v ice D e v ic e D ev ice
D ev ice D e v ice D e v ic e
D e v ice C o n tro ller B
L ev e l 1 : E q u ip m en t D ev ic e D ev ice D e v ice
D e v ic e D ev ic e D ev ice
page 512
• Typical Architecture for Manufacturing Components [ update]
Item
Equipment
Workstation
Cell
EXAM-
Lathe, Mill, T-10
Robot tended
Variable Mission
PLES
Bridgeport Series I
Machine Center, Car-
System, Several Inte-
IBM 7545 Robot
trac Material Handling
grated workstations
Hardware
System Mark Century
Controller Hardware
2000, Accuramatic
Allen-Bradley PLC-5, IBM-PC, etc.
Windows NT, SUN workstation, etc.
9000, Custom-singleboard system.
Type Controller
Single-board processors, Machine tool
PLC, PC, Minicomputer
controller, Servo-Con-
PC, Microcomputer, Super-MiniComputer
troller, etc Language Application
Assembler, Part
C, LISP, FOR-
programming, Robot
Pascal and other
TRAN, and other high
programming, etc.
sequential languages
level languages
Memory/
8k-128k RAM
Size Require-
plus custom ROM,
ments
EPROM, etc.
Response
C, Ladder logic,
32M RAM, >1M Hard Drive
128M RAM, >1Gigabyte Hard drive
< 10-3 sec
< 1 sec
< 20 sec
1-1 connect
1-many
1-many
1-[1,8] Machine
1-[1-15] worksta-
Time Machines/ Interconnects
tools, 1-[1-50] Material handling
tions
page 513
• Functional Breakdown of Control Architecture
Planning
Equipment
Workstation
Cell
Tool selection, parame-
•Resource allocation
Batching, Workload
ter specification, tool path
jobs
refinement, GMT code, tool assignment to slots, job setup
balancing between worksta•Batch splitting and
equipment load balancing
planning Planning
tions, Requirements planning Task allocation to workstations
Milliseconds - Minutes
Minutes - Hours/Days
Hours - Days/weeks
•Operation sequencing
•Sequence equipment
•Assignment of due
Horizon Scheduling
at individual equipment
level subsystems •Deadlock detection
dates to individual workstations
and avoidance •Gantt chart or E.S.
•Look ahead ES/simulation based scheduling
based scheduling •Buffer management
•Optimization based tech •Batch sequencing
Control
•Interface to workstation controller •Physical control (motion control at NC and
•Monitor equipment states and execute part and
of workstations, Interface
information flow actions
with MPS, generation of
based on states
reports, etc.
robot pick and place level) •Execution of control programs (APT, AML, etc.)
Organizational control
•Synchronize actions between equipment (eg. robot & machine while loading/unloading parts) • Ladder logic execution
• In all of these models we must consider the value of the information being passed. At the low level control stages, information that is more than a few seconds old may be completely
page 514
worthless, while the same information at the higher level may be valuable for quality tracking months later.
• We can draw part of a simple flow chart that illustrates a simple CIM system. The elements shown include a PLC, NC machine, and stand alone sensors. These are all integrated by a single computer running cell control software.
Operation plans
Cell status and quality reports
Cell Controller (IBM PC)
NC Programs
CNC Controller
NC Status
Actuators, Structure, Sensors
Quality Measurements
CNC Controller
Actuators, Sensors
Gauges and Meters
18.3 COMPUTER CONTROLLED BATCH PROCESSES • The nature of Batch processes, - Batch processes deal with discrete quantities of raw materials or products. - batch processes allow the tracking of these discrete quantities of materials or products - batch processes allow more than one type of product to be processed simultaneously, as
page 515
long as the products are separated by the equipment layout. - Batch processes entail movement of discrete product from processing area to processing area - Batch processes have recipes (or processing instructions) associated with each load of raw material to be processed into product. - Batch processes have more complex logic associated with processing than is found in continuous processes - Batch processes often include normal steps that can fail, and thus also include special steps to be taken in the event of a failure. • The nature of steps in a batch process, - Each step can be simple or complex in nature, consisting of one or more operations - Generally, once a step is started it must be completed to be successful. - It is not uncommon to require some operator approval before leaving one step and starting the next. - There is frequently provision for non-normal exits to be taken because of operator intervention, equipment failure or the detection of hazardous conditions. - Depending on the recipe for the product being processed, a step may be bypassed for some products. - The processing operations for each step are generally under recipe control, but may be modified by operator override action. • A typical process step
Operator or Recipe Bypass Command
Operator or Recipe Hold at Completion Command
Operator Abort Command
Yes Previous Step
No Perform Step Bypass Step Operation
Hold at step completion Yes
Fault Detected or Operator Abort Fault Exit to pre-defined step
No Next Step
page 516
18.4 PRACTICE PROBLEMS 1. List 5 industries that are well suited to integration, and 5 that are not. Indicate why you think so.
2. In an automated factory there as many as six levels of control. Discuss the equipment available in the lab and how this relates to the 6 level model of factor floor control. ans.
The lab equipment (right now) only satisfies the first couple of levels. You can
3. Information drives an automated factory from the initial entry of geometry in CAD, to the final production of parts with CAM. Discuss how data networks support this and the impact of open network standards.
4.
18.5 LABORATORY - WORKCELL INTEGRATION
Purpose: All of the components explored in the laboratories of previous weeks will be integrated into a final working cell. Overview:
Pre-Lab:
page 517
To be determined. In-Lab: 1. To be determined. Submit (individually): 1. To be determined.
page 518
19. MATERIAL HANDLING • Basic purpose is to provide automatic transfer of workparts between automated machines, and interface with individual work stations.
19.1 INTRODUCTION • Basic layouts for material handling include, - lines - stations arranged along a fixed part transfer path. - batch - stations are grouped by function and batches of raw materials/WIP are brought in batches - job shop - individual parts are carried through one or more stages by one worker - job site - equipment is brought to the work • These transfer systems can also be categorized by their timing approach, - synchronous - the entire line moves parts with a fixed period cycle. This is well suited to mass production of similar products. - asynchronous - parts are moved as completed or needed. Often buffers are required, but this is more tolerant of problems than synchronous systems. - continuous - the product flows by without stopping • Basic Requirements,
• Random, independent movement of palletized workparts between workstations in the FMS - pallets can flow from any station to any other - parts are mounted in pallet fixtures - pallets can move independently to avoid interference • Temporary storage or banking of workparts - queues allow parts to wait for machines, thus increasing efficiency • Convenient access for loading and unloading workparts - easy to do manual load/unload. - automatic loading/unloading of parts at workstations - can load/unload from either side of system • Compatible with computer control • Provision for future expansion
page 519
- modular extensions to system are desirable • Adherence to all applicable industrial codes - safety, noise, etc. • Access to machine tools - allow unobstructed floor level access to each workstation • Operation in shop environment - must be reliable when exposed to metal chips, cutting fluids, oil, dirt, etc. • Common type of Material handling systems - power roller conveyors
- power and free overhead conveyors
- shuttle conveyors - floor “towline” systems
page 520
- robots (in a limited sense) - indexing (geneva mechanism) - walking beam
19.2 VIBRATORY FEEDERS • When small parts are hard to orient we can dump them in a vibratory feeder.
• The vibrations cause parts to ‘hop’ forward.
• Various cutouts, tracks, etc are added to sort parts.
page 521
19.3 PRACTICE QUESTIONS 1. What are pallets used for? (ans. to acts as holders for work that is being transported)
2. List possible methods for guiding an AGV. (ans. guide wire, vision, painted lines, chain)
19.4 LABORATORY - MATERIAL HANDLING SYSTEM • For this lab the class will be divided into two halves. One group will do part A, the other group will do part B. Both groupswill have to work together for a successful lab. • System Objective: When done the system should be able to pass a shuttle in a continuous loop.
19.4.1 System Assembly and Simple Controls Purpose: The SoftPLC and devicenet will be used to control the material handling system Lock and go stations. Overview: The material handling system is designed in a modular format. Each of the track sections can be disassembled and reassembled in other configurations. In total there are, 4 turnstations 6 straight track sections (2 have stands for suspending overhead gear) 2 90 degree track sections 1 conveyor system for a straight track section 12 shuttles The material handling system will be outfitted with the devicenet based controls system to move the shuttles around the system. This system will be added to in later labs. The shuttles are actuated using solenoid valves for an air supply. By actuating the “lock and go” stations the cart can be stopped, or ejected.
page 522
Pre-Lab: Examine the system components and determine (as a group) how the system will work. Implement ladder logic to control the system. In-Lab: 1. Connect the track sections. 2. Connect solenoid valves to the “lock an go” stations - except on the turnstations. Add sensors to detect the presence of a shuttle 3. Wire the solenoid valves to the softPLC and write the ladder logic required to control the stations. Submit: 1. All design work.
page 523
19.5 AN EXAMPLE OF AN FMS CELL
19.5.1 Overview • A workcell has been constructed using one light industrial robot, and one NC milling machine. Some automated fixtures are also used. • All of the devices in the workcell are controlled from a single Sun computer. This is an engineering workstation with UNIX. Thus, it is capable of multitasking (running more than one program at once). • Software drivers, interfaces, and applications have been developed, to aid in teaching and demonstration. • The following pages will describe the interfacing in the workcell, as an example of the connection between process control computers and a plant floor computer. A project in development will be discussed for networking Plant Floor (and higher) computers.
page 524
FMS Cell Connection Diagram Plant Floor Control & Up (Network Based Level)
Ethernet
Ethernet
Sun Computer (“Sunbane”)
Sun Computer (“RA”)
RS 232 Interface Level
RS 232
RS 232
RS 232 IBM PC Compatible (Running CAM/CAM Software)
Process Controllers CRS Robot Controller
Dyna Controller
Microbot Controller
Sensors and Actuator Level rocesses
Conveyor Belt
CRS Plus Robot
Pneumatic Vice
DYNA NC Milling Machine
Microbot Teach Mover
page 525
19.5.2 Workcell Specifications • Workcell Layout
NC Milling NC Milling Machine Machine Controller
Conveyor Robot
gripper
Pneumatic Vice Pneumatic Vice Controller
Robot Controller
Sun 3/60 Computer
• Devices: 1 Sun Computer 2. CRS-Plus robot • A five axis, articulated robot arm • Communicates over an RS232 serial data line • Interprets a language called RAPL • Has 16 Digital I/O lines • Uses a pneumatically controlled gripper • The robot controller is 8088 based 3. DYNA-Mite Milling Machine • A 3-axis 2.5D milling machine • Uses a proprietary NC code • Can be run locally, or remotely (over RS232 serial communication lines) • Programs may be executed as they are entered, or when they are completely ordered • Can handle objects of dimensions 6” by 5” by 4”
page 526
• Can machine plexiglass, wax, aluminum, steel (at low feed rates) 4. Pneumatic Vice • Has a maximum opening of 4 inches • Has a maximum travel of 1 inches • Controlled by a pneumatic solenoid • Pneumatic solenoid controlled from CRS-Plus robot controller 5. Conveyor • A former undergraduate student project • Activated electronically by the CRS-Plus robot controller 6. Fixtures (for making customized keytags) • These are highly specific to the task being performed • Parts Feeder - Provides a structured environment so that the robot may easily pick up the parts. • Robot Gripper - Designed to provide a reasonable reach into the vice (and parts feeder), and to firmly grasp the workpiece. • Vice Fixture - Designed to hold the workpiece at a level fixed height, and has a location for drill through of the keytag. This part does not effect the travel of the vice.
19.5.3 Operation of The Cell
page 527
• Developed/Proprietary software in the workcell User Interface Routines on Sun
User Interface (written with the Sunview Window Interface Library)
Device Specific Routines on Sun
Robot Vice Conveyor DynaMill Control Control Control Control Subroutines Subroutines Subroutines Subroutines
Serial Interface Routines on Sun
Controllers and proprietary Operating Systems
Hardware
Serial Communication Subroutines
CRS-Plus Robot Controller
CRS-Plus Robot
Pneumatic Vice
Conveyor Belt
DynaMill Controller
Programming Module
Software Written
Hardware Purchased or Built
DynaMill Milling Machine
High Level User Interface ( or application program) Low Level Device Drives and Communication Routines Hardware and Controllers Supplied by Manufacturers (except Conveyor)
page 528
2.1.4 - Example of Robot and Vice Software Driver Use void demo() { static double a1, a2, a3, a4, a5;
Set up Robot
crs_init(); crs_speed(40.0); crs_open(); crs_close();
Set speed to 40% of Maximum Open the Gripper Close the Gripper
conv_on(); crs_xy_r_move(-5.0, -5.0, 0.0); crs_xy_status(&a1, &a2, &a3, &a4, &a5); conv_off(); crs_xy_a_move(a1+3.0, a2+2.0, a3); crs_depart(-2.0); crs_depart(2.0);
Turn on Conveyor Move Robot with relative Cartesian Coordinates Return Cartesian Position of End Effector Turn off Conveyor
crs_home(); crs_r_move(0.0, 10.0, 0.0, 0.0, 0.0); crs_speed(100.0)
Move Robot to absolute Cartesian Position
vice_closed(); crs_a_move(-90.0, 0.0,0.0,0.0,0.0); vice_open();
Move robot gripper 2” forward Move robot gripper 2” backward
}
Move robot to home position Move robot in relative joint coordinates Close the Vice Move the Robot in Absolute Joint Coordinates Open the Vice
page 529
• NC code Example (for the Dyna Milling Machine)
000 START INS 01 001 TD = 0.125 002 FRXY = 10 003 FRZ = 4 004 SETUP > zcxyu 005 GOY -.625 006 GOZ -.125 007 GRa -180 008 ZERO AT 009 X .634 010 Y .5 011 GOr .125 012 a 90 013 GRa -30 014 > REF COODS 015 ZERO AT 016 X 1.50 017 Y 0 018 GOr .125 019 a 60 020 GRa -60 021 > REF COODS 022 ZERO AT 023 X 1.5 024 Y -0.3 025 GOr .125 026 a 0 027 GRa -90 028 GRX -1.3 029 END
Start Program in inches Set Tool Diameter Set Feed Rates Set Absolute Zero Position Move to Start Position A
B 2.00”
B
30°
Y
C
0.50”
C
Z X
D 0.50”
A E F 0.20”R
D
E F End Program
page 530
• An Example of the Dyna Mill Software Drivers
void demo() { char ret[100]; /* Initialize Dyna Mill and check for failure */ if(dyna_init() == NO_ERROR){ /* Send NC Program to Dyna Mill */ dyna_load(“/usr/people/cim/nc.code/test1.nc”); /* Download program from NC Mill */ dyna_download(“/usr/people/cim/nc.code/test”); /* Send program to mill 1 step at a time */ dyna_step(“/usr/people/cim/nc.code/test2.nc”); } /* Deinitialize mill */ dyna_kill(); }
page 531
• A User interface for Workcell Control
Robot Control Subwindow
Vice and Conveyor Controls Dyna Mill Control Subwindow
Key Tag Programs (Also uses Dyna Mill)
Programming Master Control
page 532
• Actual Communication with devices, via a report window
page 533
• Workcell Programming window
• Advantages: • UNIX Based system allows easy control of cell in modes which are both parallel and/or concurrent • A blend of high level computers with low level devices allows for a very modular system, with a variety of computing resources. • Synchronization of processes is very simple. • Allows rapid reconfiguration of the workcell. • This workcell will perform all of the basic CAD/CAM/CIM functions. • The hierarchical design of software tools has simplified the development of new applications. • Disadvantages:
page 534
• Many Equipment manufacturers have not considered this type of control (they prefer stand alone modes), and thus their machines lack self calibration features, and software is made to be user interactive, and batch, but is not very friendly for software applications. • Requires technical people to operate the equipments.
19.6 THE NEED FOR CONCURRENT PROCESSING • An individual computer is not powerful enough to control an entire factory. And, a single program would be too complex. Therefore, there is a need for many computers and programs which interact. • The example below involves two programs. The first program will control the robot, and the second will cut key tags with the NC machine. • While the keytags are being cut, the robot program will move pegs around in the cell. This requires that the control software be very complex, or that two programs be used. • if two programs are used, then some communication is required for sequencing tasks in the work cell. • Concurrent tasks in the workcell use message passing between programs,
page 535
Program #1
Program #2 Start
Start
Call for New Part Is Dyna Mill Waiting for Part ?
messages passed through file #1
Yes
Wait for Part Loaded Move to Milling Position
Load Part
No
Mill out Keytag Move to Unload Position
Is Dyna Mill Done with Part ?
No
Call for Unloading Keytag Yes
Unload Part
messages passed through file #2
Wait for Part Unloaded
Is Another Name Left ?
Swap a Peg
Yes
No Stop
• Strategies for Concurrent processing, involve how the processes are split apart, and how they communicate, - Have a number of processes which communicate directly to one another (point to point). This is synchronous and well suited to real-time control. - Use a buffered message passing system. This allows asynchronous communication between processes running at different speeds, which do not do real-time control. - Remote Procedure Calls allows one program to run other programs remotely. This is suited to well defined problems, but every program must have knowledge of the other computers in the network.
page 536
19.7 PRACTICE PROBLEMS
1. What is concurrent (parallel) processing and why is it important for workcell control? (ans. to allow equipment to do other tasks while one machine is processing)
2. What is meant by the term “Device Driver”? (ans. a piece of hardware that allows a connections to a specific piece of hardware)
page 537
20. PETRI NETS
20.1 INTRODUCTION Petri nets are useful tools for modelling systems with control flow. In particular they aid in modelling systems with concurrency, and parallelism. A set of routines have been developed at UWO to serve as the basis for a manufacturing simulation. The routines will support a number of various Petri net functions. The basic operation of the Petri net may be simulated. As well the EOR transitions will also be modelled. An attempt has been made to add ‘colors’ to the tokens, but at the present there is insufficient information (i.e., no references) to verify the implementation.
The routines have been written in a user friendly way to allow simple application interface. Places and Transitions are specified with textual names. A brief theory of petri nets follows.
• These are like state diagrams, except multiple states can be active at the same time.
• Other techniques, such as GRAFCET, are based on Petri nets.
20.2 A BRIEF OUTLINE OF PETRI NET THEORY There are four basic elements in a petri net; places, transitions, arcs, and tokens. If we are to think in terms of a factory, tokens are equivalent to work parts. Arcs are the paths the work will follow through the factory. Places are buffers where parts are stored temporarily, and transitions are equivalent to machines where the parts are used to make new parts.
page 538
Token
stock from inventory
stock from supplier
Place
Arc
Transition
stock from cutter
feeder
hopper
Bolt Maker
Nut Maker Petri Net Model
Bolt Hopper
Nut Hopper
Screwing Machine Finished Part
The basic operation is that tokens are introduced to the network, and then transitions are fired in different orders, and thus tokens are created and destroyed at the transitions. The example below follows the petri net for a few cycles. The first figure shows the Petri Net with the initial markings.
page 539
this transition was fired
this transition was fired
page 540
this transition was fired
The reader should note that there are a few interesting properties found in Petri nets.
• Transitions are fired when all of their inputs are satisfied, and the user specifies that transition. • Most analysis of petri nets uses random firings of the transitions to obtain statistical performance.
Other basic references to the petri net theory are available in Peterson [1981] and Reisig [1985].
20.3 MORE REVIEW • Ideal for parallel control problems
page 541
Token - Indicates place active (control)
Place - Indicates part of a system state (as before). If there is a token here, the place is valid, or active.
Transition - This will wait until all inputs have a token. Those tokens are destroyed and new tokens are put into all the outputs
e.g. An example of basic operation
The Petri Net (with no tokens)
page 542
Initial State : The tokens are added below, based upon the system
Step 1 : One of the states gives up a token (this is arbitrary and depends on the state)
transition condition fires
Step 2 : Another state gives up a token (again arbitrary) In this case the transition can fire because both input places now have tokens, we are only waiting for the condition to occur.
page 543
Step 3: Here the conditions of the transition are met. The two input tokens are consumed and a new token is created for the output place.
Step 4: We see the condition for the transition met.
This continues on indefinitely.........
• Basic logic functions are shown below,
page 544
and exclusive or
regulator
or
action
loop/repeat
if/wait (state transition) synchronize state machines (only 1 input/output on transitions)
• We can model various logic functions with Petri nets,
page 545
And - Both inputs must be present to fire
Recirculator - keeps only one action at a time Or - one or the other input will start the process If - this state can chose to send the token on either arc Parallel - both processes will run in parallel at the same time
• Reachability allows us to determine if a state (set of places) is possible given an initial condition.
• Boundedness determines whether the number of states will be controlled, or grow/shrink.
• Deadlock and liveliness - will the controller find itself unable to continue.
page 546
• The procedure for producing ladder logic and other programs from the Petri Nets, is identical to producing Ladder Logic for SFC diagrams.
page 547
e.g. Petri Net for a single cup coffee maker money added
start cleaning cleaning done cleaning off
start water heater drop cup
start grinder
temp. sensor
3 sec delay stop grinder
heater off
cup removed filter coffee 10 sec delay pour coffee
Try: 1. Add a coffee strength selection to the Petri Net. 2. Draw the petri net above using a Parallel Process Flowchart 3. Develop some ladder logic for the petri net diagram
page 548
• Petri nets have been used for the modeling, control and validation of the control model [Teng and Black, 1988]
20.4 USING THE SUBROUTINES
20.4.1 Basic Petri Net Simulation The subroutines are applied in a methodical manner. Before the user can integrate the subroutines into their program, they must draw out the petri net, and label all places and transitions. The example given above is illustrated below.
p3
p1
t1
p2
t4
t2
p5
t3 p4
After these labels are determined, they are defined using the petri net subroutines. The arcs in the petri net are also defined in the program. There are defined with respect to the transitions. That is to say that an arc is an input to, or output from a transition. After the petri net structure has been defined, tokens may be placed in the places of the net. The tokens are as given in the previous example.
page 549
p3
p1
t1
p2
t4
t2
p5
t3 p4
The transitions are then selectively fired in the net, by function calls in the program. This program also has calls to functions which print the petri net structure after each transition. The code is show below for the example above.
#include #include #include #include “global.h” #include “petri.h”
int test1() /* * BASIC TEST NET (Peterson book, 1981, pg. 19) */ { static int error; static struct petri_net net; static int p1, p2, p3, p4, p5; static int t1, t2, t3, t4; error = petri_init(&net); p1 = petri_place(&net, “p1”); p2 = petri_place(&net, “p2”); p3 = petri_place(&net, “p3”); p4 = petri_place(&net, “p4”); p5 = petri_place(&net, “p5”); t1 t2 t3 t4
= = = =
petri_transition(&net, petri_transition(&net, petri_transition(&net, petri_transition(&net,
“t1”); “t2”); “t3”); “t4”);
petri_input(&net, p1, t1, 1); petri_input(&net, p2, t2, 1); petri_input(&net, p3, t2, 1);
page 550
petri_input(&net, petri_input(&net, petri_input(&net, petri_input(&net, petri_output(&net, petri_output(&net, petri_output(&net, petri_output(&net, petri_output(&net, petri_output(&net, petri_output(&net, petri_output(&net,
p4, p4, p4, p5, p2, p3, p4, p4, p2, p5, p3, p4,
t2, t3, t3, t4, t1, t1, t1, t1, t2, t3, t4, t4,
1); 1); 1); 1); 1); 1); 1); 1); 1); 1); 1); 1);
petri_add_tokens(&net, p1, 1); petri_add_tokens(&net, p4, 2); petri_add_tokens(&net, p5, 1); petri_print(&net); petri_event(&net, t4); petri_print(&net); petri_event(&net, t1); petri_print(&net); petri_event(&net, t3); petri_print(&net); return error; }
As can be seen this method of implementation is very simple. The user is able to define a number of nets, and refer to transitions and places by name.
20.4.2 Transitions With Inhibiting Inputs In some cases we want to prevent a transition from firing. To do this, the idea of inhibiting inputs has been proposed. If a transition has an inhibiting input from a place, that has any tokens in it, then the transition cannot fire. Otherwise the transition may fire normally. A sample net has been devised for this case, it is seen below.
page 551
p1
p2 p3
t1
p4
t2
Inhibiting input
p5
p6
t3
t4
The program below shows that the inhibiting input is simply defined when the arc is defined.
int test2() /* * INHIBITED */ { static static static static
TEST NET (Peterson book, 1981, pg. 196)
int error; struct petri_net net; int p1, p2, p3, p4, p5, p6; int t1, t2, t3, t4;
error = petri_init(&net); p1 = petri_place(&net, “p1”); p2 = petri_place(&net, “p2”); p3 = petri_place(&net, “p3”); p4 = petri_place(&net, “p4”); p5 = petri_place(&net, “p5”); p6 = petri_place(&net, “p6”); t1 t2 t3 t4
= = = =
petri_transition(&net, petri_transition(&net, petri_transition(&net, petri_transition(&net,
petri_input(&net, petri_input(&net, petri_input(&net, petri_input(&net, petri_input(&net, petri_input(&net, petri_input(&net,
p1, p2, p3, p5, p3, p4, p6,
t1, t2, t2, t3, t4, t4, t4,
“t1”); “t2”); “t3”); “t4”);
1); 1); 1); 1); INHIBIT); 1); 1);
page 552
petri_output(&net, petri_output(&net, petri_output(&net, petri_output(&net, petri_output(&net, petri_output(&net,
p1, p3, p2, p4, p5, p6,
t1, t1, t2, t3, t3, t4,
1); 1); 1); 1); 1); 1);
petri_add_tokens(&net, petri_add_tokens(&net, petri_add_tokens(&net, petri_add_tokens(&net,
p1, p2, p5, p6,
1); 1); 1); 1);
petri_print(&net); petri_event(&net, t1); petri_print(&net); petri_event(&net, t3); petri_print(&net); petri_event(&net, t4); petri_print(&net); petri_event(&net, t2); petri_print(&net); petri_event(&net, t4); petri_print(&net); return error; }
20.4.3 An Exclusive OR Transition: The inhibitory inputs are complimentary to the exclusive or function. Thus another research proposed an Exclusive or transition which will fire when one (and only one) input is from a place with tokens. An example of a problem using this, a ring shift register was modelled. This net is modelled as shown below.
page 553
p7
t1
t2
t3
p1
p3
p5
t4
t5
t6
p2 p8
EOR transition
p6
p4 p10
p9
t7
In this example the EOR transition is marked with a plus in a circle (at ‘t7’). When run, a token will appear in p1, p3, and p5 in a repeating cycle. The program to set this up is seen below.
int test3() /* * EOR TEST NET (Peterson book, 1981, discussed pg. 190) * This is for a single bit shifter */ { static int error; static struct petri_net net; static int p1, p2, p3, p4, p5, p6, p7, p8, p9, p10; static int t1, t2, t3, t4, t5, t6, t7; error = petri_init(&net); p1 = petri_place(&net, “p1”); p2 = petri_place(&net, “p2”); p3 = petri_place(&net, “p3”); p4 = petri_place(&net, “p4”); p5 = petri_place(&net, “p5”); p6 = petri_place(&net, “p6”); p7 = petri_place(&net, “p7”); p8 = petri_place(&net, “p8”); p9 = petri_place(&net, “p9”);
page 554
p10 = petri_place(&net, “p10”); t1 t2 t3 t4 t5 t6 t7
= = = = = = =
petri_transition(&net, petri_transition(&net, petri_transition(&net, petri_transition(&net, petri_transition(&net, petri_transition(&net, petri_transition(&net,
petri_input(&net, petri_input(&net, petri_input(&net, petri_input(&net, petri_input(&net, petri_input(&net, petri_input(&net, petri_input(&net, petri_input(&net, petri_input(&net, petri_input(&net, petri_input(&net, petri_output(&net, petri_output(&net, petri_output(&net, petri_output(&net, petri_output(&net, petri_output(&net, petri_output(&net, petri_output(&net, petri_output(&net, petri_output(&net,
“t1”); “t2”); “t3”); “t4”); “t5”); “t6”); “t7”);
p6, t1, 1); p7, t1, 1); p2, t2, 1); p7, t2, 1); p4, t3, 1); p7, t3, 1); p1, t4, 1); p3, t5, 1); p5, t6, 1); p8, t7, 1); p9, t7, 1); p10, t7, 1); p1, t1, 1); p3, t2, 1); p5, t3, 1); p2, t4, 1); p8, t4, 1); p4, t5, 1); p9, t5, 1); p6, t6, 1); p10, t6, 1); p7, t7, 1);
petri_type_transition(&net, t7, EOR); petri_add_tokens(&net, p1, 1); petri_print(&net); petri_event(&net, t4); petri_print(&net); petri_event(&net, t7); petri_print(&net); petri_event(&net, t2); petri_print(&net); petri_event(&net, t5); petri_print(&net); petri_event(&net, t7); petri_print(&net); petri_event(&net, t3); petri_print(&net); petri_event(&net, t6); petri_print(&net); petri_event(&net, t7); petri_print(&net); return error; }
page 555
20.4.4 Colored Tokens This section should be considered incorrect. The theory has not been found, although the approach should adhere to the concept. The concept is that each token may now have a color, and a second bit of private information. If a transition is specified to be colored, it will only fire if tokens of the specified color are available at the inputs. The subroutines will then require that the user supply a new set of instance information so that new tokens may be issued.
The net used has tokens of mixed colors in it, an is seen below. p3
p1
p2
t1
t2
The code is shown below. The reader should note that a second subroutine is used. This is done because there is a bit of code which would be repeated for each update of tokens at the transition.
int test4() /* * COLOR TEST NET (Assumed for now) * Two consumers of different colors and one input. The instances of tokens * are kept track of. */
page 556
{ static static static static static static
int error, i; struct petri_net net; int p1, p2, p3; int t1, t2; int color1 = 1, color2 = 2; int instance[20], instance_pnt;
error = petri_init(&net); p1 = petri_place(&net, “p1”); p2 = petri_place(&net, “p2”); p3 = petri_place(&net, “p3”); t1 = petri_transition(&net, “t1”); t2 = petri_transition(&net, “t2”); petri_input(&net, petri_input(&net, petri_input(&net, petri_input(&net,
p1, p3, p2, p3,
t1, t1, t2, t2,
1); 1); 1); 1);
petri_output(&net, p1, t1, 1); petri_output(&net, p2, t2, 1); petri_type_transition(&net, t1, COLORED); petri_type_transition(&net, t2, COLORED); for(i = 0; i < 20; i++) instance[i] = i; instance_pnt = 0; petri_add_color_token(&net, instance_pnt++; petri_add_color_token(&net, instance_pnt++; petri_add_color_token(&net, instance_pnt++; petri_add_color_token(&net, instance_pnt++; petri_print(&net); sub4(&net, t2, color1, petri_print(&net); sub4(&net, t1, color1, petri_print(&net); sub4(&net, t1, color1, petri_print(&net); sub4(&net, t2, color2,
p1, color1, instance[instance_pnt]); p2, color2, instance[instance_pnt]); p3, color1, instance[instance_pnt]); p3, color2, instance[instance_pnt]);
instance, &instance_pnt); instance, &instance_pnt); instance, &instance_pnt); instance, &instance_pnt);
petri_print(&net); return error; }
int sub4(net, transition, color, instance, instance_pnt) struct petri_net *net; int transition, color, *instance, *instance_pnt;
page 557
{ static int error, i, list[20], n, outputs; error = ERROR; if(petri_in_event(net, transition, color) == NO_ERROR){ if(petri_get_consumed(net, transition, &color, list, &n, &outputs) == NO_ERROR){ for(i = 0; i