Fuel pressure hose replacement
141 97 242KB
English Pages [5]
Recommend Papers


File loading please wait...
Citation preview
TroubleCodes.net- engine & OBD2 Trouble Codes and Technical info ...
1 of 5
http://www.troublecodes.net/articles/fuelhose/
Articles / SAFETY / TOOL STORE!! / Keep BAT Alive! / Search / Help / Guestbook / About Us / Contact Us Forums Saturday, September 09, 2006
Navigation
Links & Technical
Get an AlldataDIY Repair Info Subscription
Trouble Codes Special Thanks To: AC Kits.com / Auto Clinics
Fuel pressure hose replacement CAUTION: Before starting on any fuel service repair, ALWAYS release the fuel pressure from the system and disconnect the battery. Check your service manual for the correct procedure for releasing the fuel pressure on your vehicle and be sure to have any code information to reset your radio or alarm. NOTE: The following was added by the mechanic members of BAT Auto Technical; When working with gasoline in your garage, maintain adequate ventilation and MAKE SURE that any appliances will remain OFF from the time you start the job until the last vapors have been dissipated. This goes for water heaters, clothes dryers, and anything else that can ignite the vapors. Gasoline vapors are heavier than air and can travel a long way along the floor, and can be drawn by air currents to pilot lights. Having all pilot lights at least 18 inches above the floor will reduce, but not eliminate the danger. Also, never use gasoline as a parts or floor cleaner.
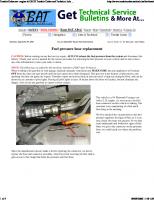
The vehicle is a 94 Plymouth Voyager van with a 3.3L engine. As you can see, the fuel hose connector on this vehicle is leaking. The customer was complaining of a fuel smell first thing in the morning. We first checked the vacuum hose to the fuel pressure regulator for signs of fuel, as it is an easy check, but none was present. So we then went underneath and looked for signs of fuel. Once we got to the connector on the pressure hose, we could easily see where the problem was.
Since the manufacturer doesn't make a kit for repairing the connector, we had to replace the hose and connector assembly, which involved lowering the fuel tank to gain access to the clamp that holds the pressure side fuel hose.
09/09/2006 11:40 AM
TroubleCodes.net- engine & OBD2 Trouble Codes and Technical info ...
2 of 5
http://www.troublecodes.net/articles/fuelhose/
To lower the tank, it is necessary to remove the tank strap bolts and using a floor jack with a board to protect the tank, lower the tank down a bit. We used jack stands to keep the tank from dropping too far, should we have a problem with the floor jack. In this picture, you can see the tank straps hanging down. The tank straps are what normally supports the fuel tank.
On the top of the tank is where the fuel hoses connect to the fuel pump that is mounted into the fuel tank.
We then loosened the fuel pressure hose clamp that secures the hose to the pump pipes.
09/09/2006 11:40 AM
TroubleCodes.net- engine & OBD2 Trouble Codes and Technical info ...
3 of 5
http://www.troublecodes.net/articles/fuelhose/
Once the clamp is loosened, the hose can be removed from the lines to the fuel pump. Before you disconnect the hose, you did remember to release the fuel pressure, RIGHT?
Now to disconnecting the quick connect fitting. Remove the gas tank cap to release fuel tank pressure. Perform fuel system pressure release procedure. Clean fitting to prevent contamination of the system when the system is opened. Wrap hoses with shop towels to contain any fuel spray and catch spilled fuel. Push in on the black plastic ring on the end of the fitting and pull the quick connector from the fuel tube. If more force is needed an open end wrench may be used to push the plastic ring into the nipple.
09/09/2006 11:40 AM
TroubleCodes.net- engine & OBD2 Trouble Codes and Technical info ...
4 of 5
http://www.troublecodes.net/articles/fuelhose/
Now we have the fuel pressure hose loose, make sure that the steel line that the fuel connector attaches to is clean and not damaged.
Now it is time to go back together with everything. Make sure that everything is clean and in good shape before assembly, otherwise you may be doing the job over again.
As you can see, we have the new fuel hose re-connected, the clamp back on the end of the hose and are ready to reconnect the quick connector. But first, we raised the tank back into position and started the tank strap bolts into the places.
With the tank back in place, we connect the quick connector to the steel line and tighten the tank strap bolts back up.
09/09/2006 11:40 AM
TroubleCodes.net- engine & OBD2 Trouble Codes and Technical info ...
5 of 5
http://www.troublecodes.net/articles/fuelhose/
While it isn't absolutely necessary, it is good practice to replace the fuel filter when ever you do any repair to the fuel system. After everything is re-installed, we turn the key to ON and listen for the pump to engage. Once the pump has run and shut off, we turn the key off and back on several times to make sure that the pump runs several times and check for any leaks. Once we have confirmed that there are no leaks, we start and run the vehicle and recheck for leaks. If there are no leaks, we call the customer and let them know the leak is repaired. Oh yeah, and collect our fee, of course.
We cannot stress enough the need for appropriate safety measures. Eye protection, neoprene gloves, jack stands and a fire extinguisher are just a few things that are absolutely necessary. Any time you do any repair to the fuel system, make sure that there are no open flames anywhere and use extreme caution when fuel vapors are present. We hope this article is an interesting and helpful article. Your feedback is GREATLY appreciated!! Please email your comments to: Contact Us Images used with permission © 2002 ALLDATA LLC. All rights reserved.
96 & newer vehicles are OBD2 systems and REQUIRE A SCANNER, unless otherwise stated. Warning: Please check for manufacturer specific codes and confirm the trouble code descriptions with an appropriate manual. Disclaimer: We cannot guarantee the accuracy of all information. Please confirm the information with an appropriate manual We try and make them as accurate as we can, but sometimes we all make mistakes.
Banner ads/Advertising | Logo Store | Disclaimer Bruce's Laptops | Technical Index | Help ©Copyright 2001-2005 batauto.com, BAT Auto Technical. All Rights Reserved. May not be reproduced without express written consent .
09/09/2006 11:40 AM